
As with many other things, software development is not fun until we do it together with other people. Unfortunately, most software developers are not introduced to Git in a healthy setting. Either they are experiencing Git for the setting in a classroom where the professor has understood that Git is important and that someone should be teaching it to the students, but it is simply a footnote in a much larger curriculum. Or they are introduced to workflows and collaboration in Git in some organization that are more concerned with doing things according to the described process than in a meaningful way. This chapter will hopefully get you back on track and enable you to select a Git workflow and work efficiently with colleagues.
In this chapter, we will first cover the foundations of working with a remote repository. So far, we have only concerned ourselves with local repositories. Fear not, if you have grasped branches, remotes will be a small extension of these concepts. After that, we will compare the most common workflows and discuss pros and cons of each.
Working with Remotes
Git is said to be a distributed version control system, and Git implements this distribution through the concept of remotes. Commonly, we work with a single remote in our repository, and by default, it has the name origin. Most development on software projects start with a clone of an existing project. This instantiates a local copy of the original repository on your computer and saves a reference to the original repository as the remote origin.
In client/server-based version control systems, all commands and actions go through the server. This means that we can do things like lock files, so only one user at a time can modify it. In Git, it is not so. We work asynchronously and then at the user’s leisure synchronize our work. Most commonly, this is done through a common repository manager such as GitHub.
Most of the tasks in collaboration flow around how we manage branches, but other than that, we work with clone, fetch, push, and pull. With these four commands, 98% of your day-to-day collaboration work will be covered.
Collaboration typically takes place on a managed server or cloud solution such as GitHub, GitLab, or Bitbucket. For the purpose of creating self-contained exercises, we are not using a repository manager. We are modeling the workflows using local repositories. The last exercise in this chapter should you choose to complete it requires an account on GitHub and will show off a repository manager.
Cloning
There are two scenarios for starting work on a project. First, it can be a new project. We covered that scenario a long time ago, using git init. Second and perhaps more common, we are going to contribute to an existing code base, open source or proprietary. When starting on an existing code base, the first thing that we do is to clone the repository in order to get a local instance on our machine. We do this with the command git clone <url> <path>, for example, git clone https://github.com/randomsort/practical-git/ git-exercises. This will initialize a local repository on disk, download the entire repository from the remote, check out the default branch into the workspace, and create a pointer to the remote repository named origin. The default branch in most cases is the master branch. If we omit the path parameter, Git will use the repository name instead. In the preceding example, it would be in a folder called practical-git if we omit the path.
In this exercise, we will clone a public repository from GitHub and look at what we get on our disk. This exercise can be done from anywhere, so is not dependent on the exercise source bundled with this book.
First, we clone the repository https://github.com/randomsort/practical-git-students.
This exercise showed you how you could clone a repository and see the origin.
Synchronizing with Remote
Now that our local repository is established, we are set up to do some work. The common workflow in Git is to do some work locally and then synchronize that work with the remote. Delivering our work to the remote is called pushing. When there is work available on the remote that we do not have locally, we can get that work using pull or fetch. There are a few types of differences that can occur between a local remote. They can either be about objects or references. For the purpose of this chapter, commits are the only type of objects we concern ourselves with. When we synchronize objects, it is always an additive operation. We always deliver more objects or download more objects. We can never delete or modify objects either locally or remotely. This makes object operations safe, as we never lose an object, bar garbage collection. Secondly, we can need to synchronize references, that is, branches and tags. They can either disagree on what they point to or whether they should exist at all.
These divergences are reconciled using branching methods and the methods for interacting with the remote: push, fetch, and pull. Pull is a shorthand for a fetch and a merge. Push is the least interesting of the commands. We send the references and objects that we have to the remote – and if the remote is unable to do a fast-forward merge on the references, then it will reject the change.
Fetch: To get objects and references from remote
Merge: To get the changes from the remote onto our local master branch

Git repository managed centrally, but cloned locally. Alice and Bob can work asynchronously and either coordinate work at the origin or between each other

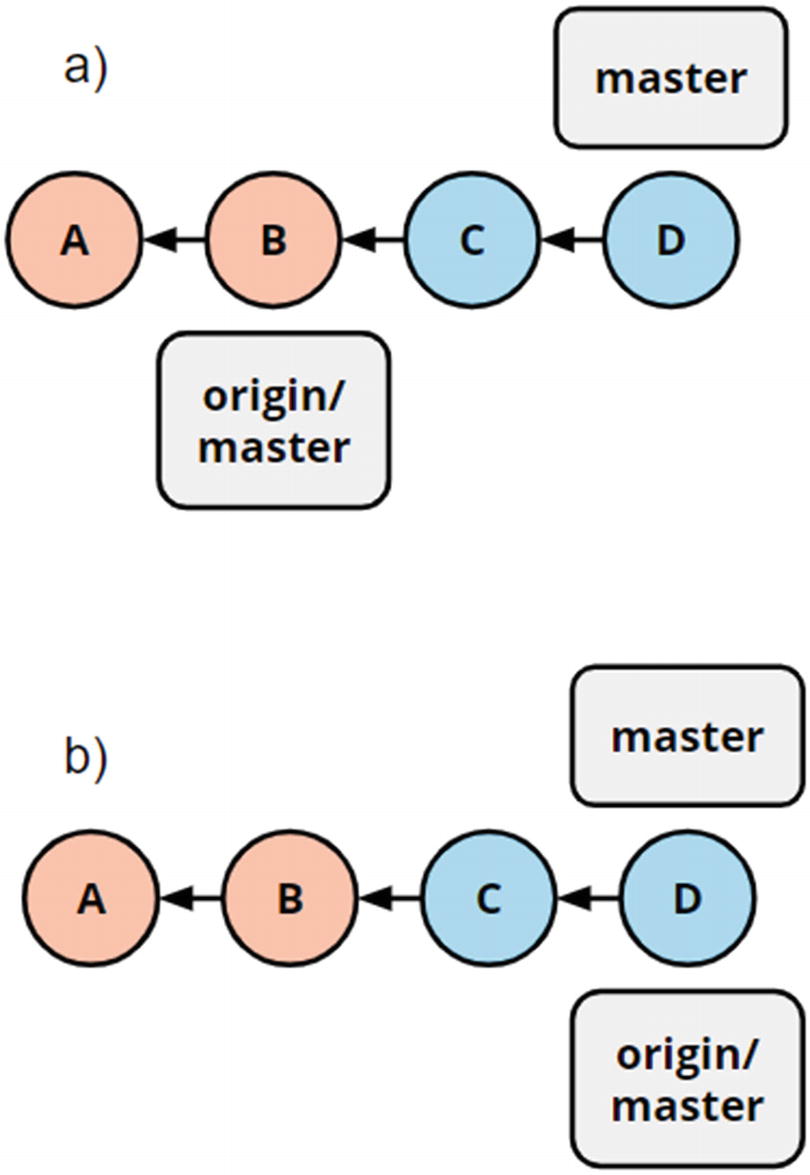
(a) Repository before fetching. (b) Repository after fetching. (c) Repository after merging
(a) Scenario prepush. (b) Scenario after push. Note that before the push, C and D are not available on the remote

(a) Before we push, this is our world view; (b) as there has been done work on master on the remote (commit E), push will be rejected. After fetch, this is how it looks (c). We reconcile the differences with a merge, and the result can be pushed which leads to (d) status after push
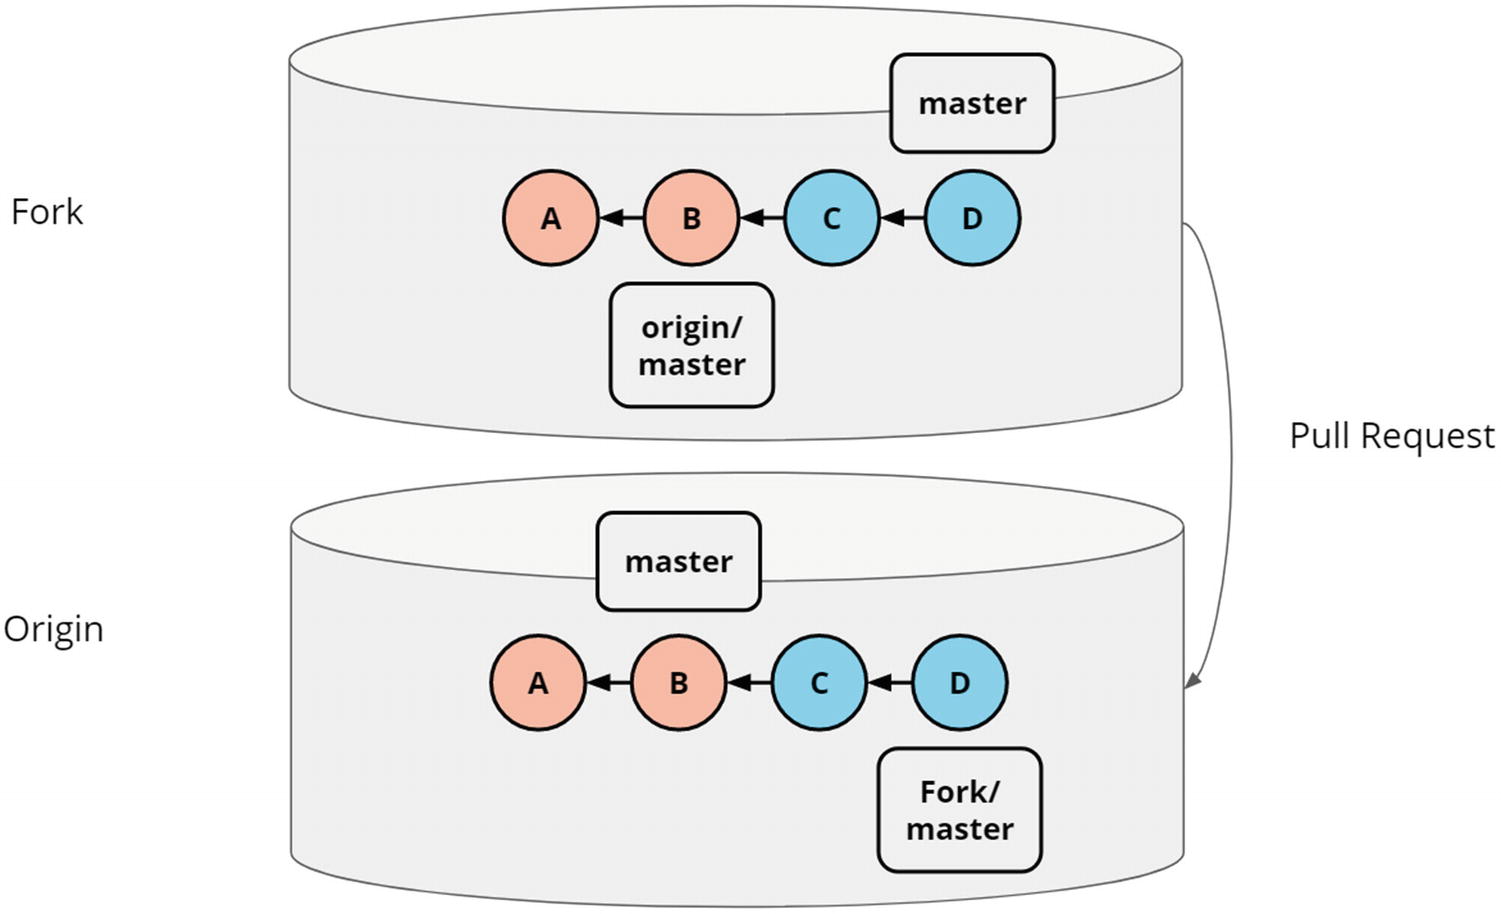
A pull request from a fork to the original repository. Commonly, the owner of the fork has no access rights to the original repository

Fork button in the repository
Forking the repository to your account
Commit in your repository – click Pull request
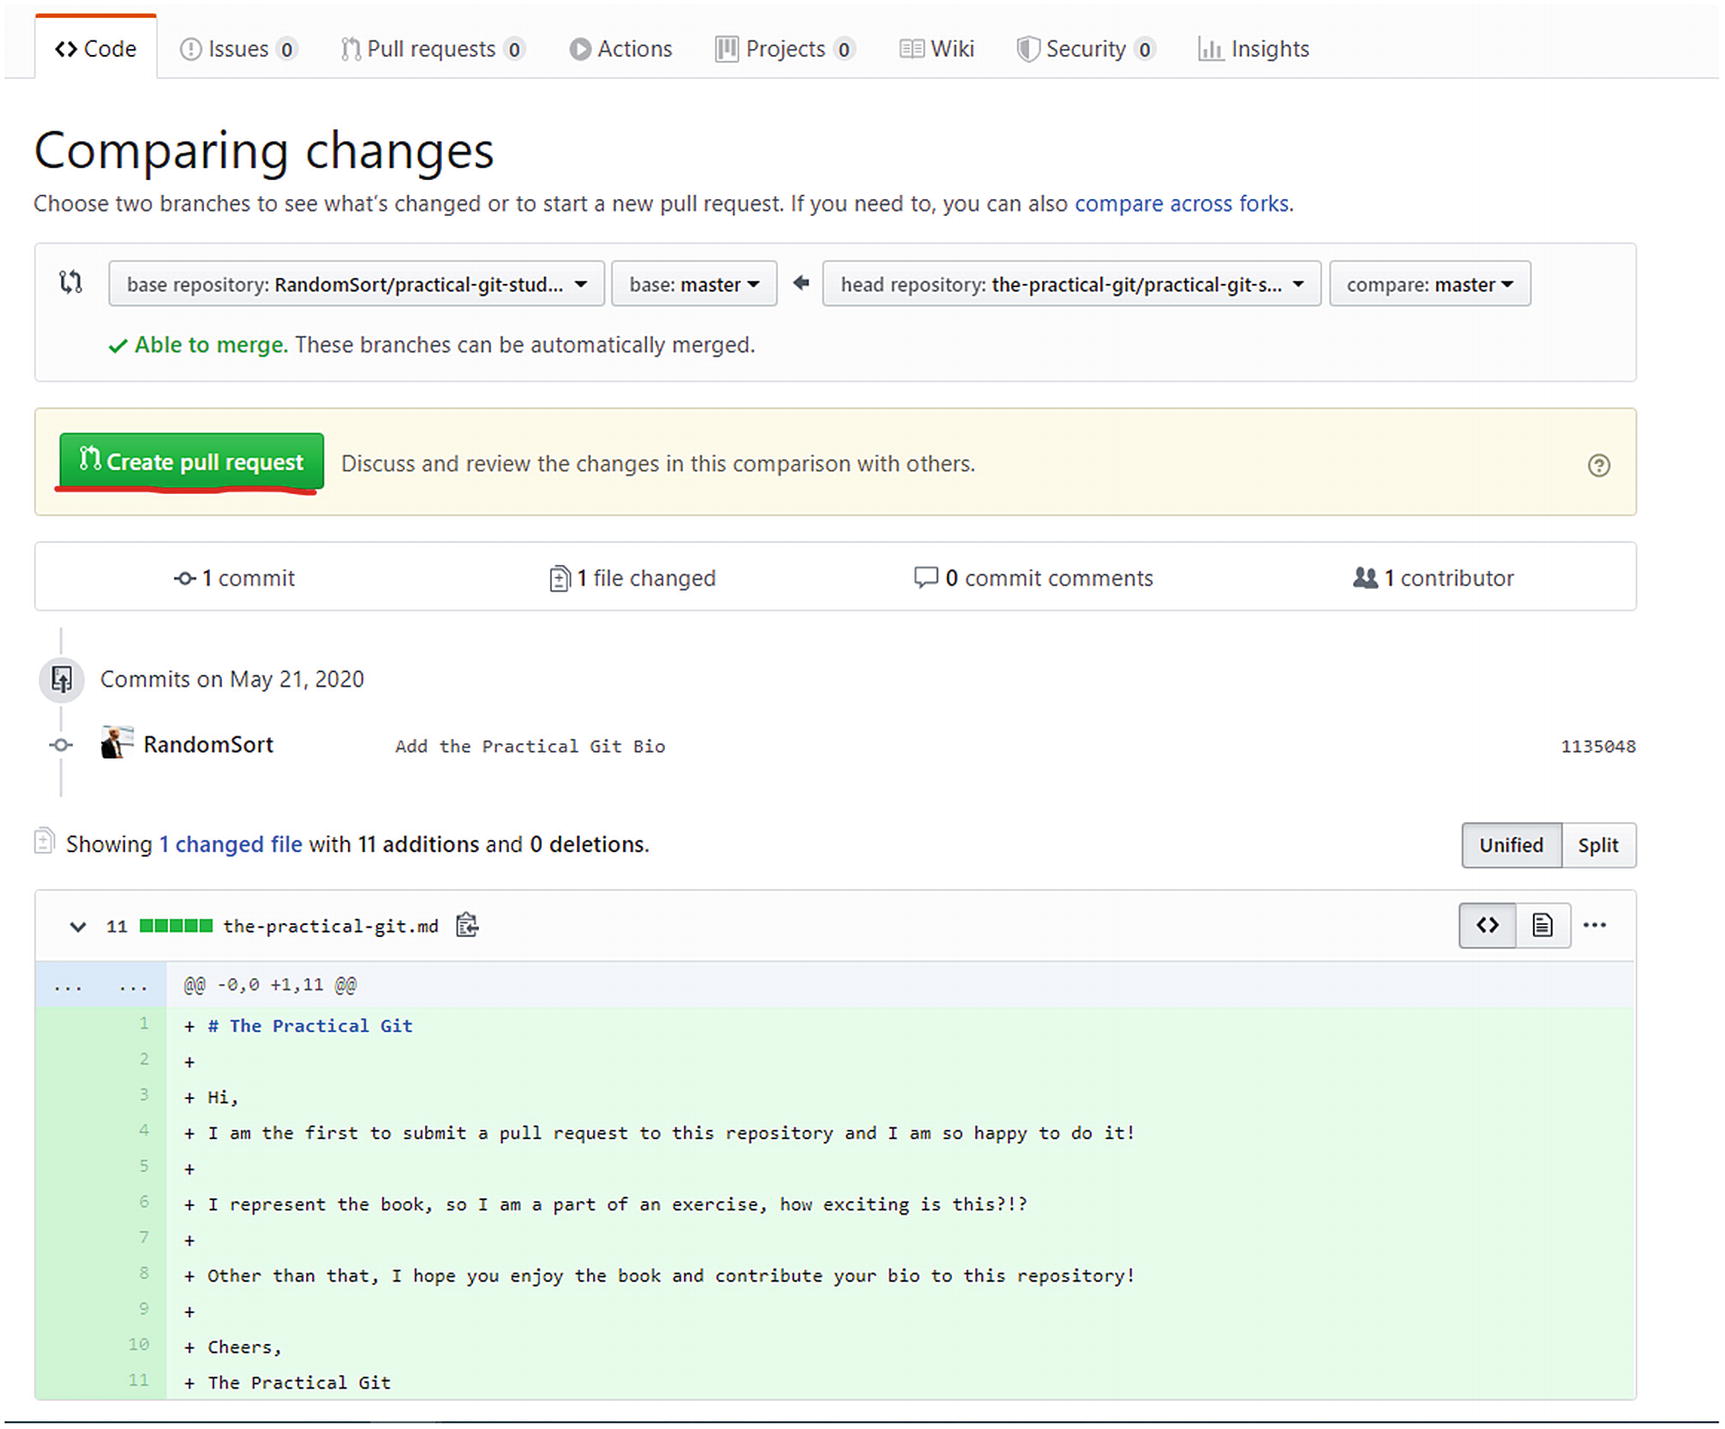
Seeing the changeset. Create pull request
Open a pull request

Pull requests tab

Interact with pull request contributor
When we push and get our changes rejected, we go through a fetch/merge loop and will then be able to deliver our changes.
We can see the origin/ namespace as our cache of how the remote repository looks. This is not automatically synchronized by Git, so we need to do the fetch to update our cache. Thus, when we run Git status, the output is based on our cache, rather than what is on the remote, and this might yield to unexpected results.
We will cover how this plays out in the next exercise based on the simplified workflow. Now that we have investigated the moving parts of working with a remote, we can see the different ways of working and how we can work within them.
Simplified Workflow
You might have come across the term simplified workflow, master based or centralized workflow. This workflow is known by many names and is default workflow unless you configured your repository manager differently. The defining characteristic of this workflow is that all collaboration happens directly on the master. This means that while you may have local branches to isolate your work, when you are done, you push to master. This workflow is how I work with my toy projects, note repositories, and similar things. The good thing is there is little overhead and almost no process. This makes it an efficient workflow that is easy to understand, that is, if we stay on the happy path. The bad thing is that we can have race conditions with our colleagues, and we have no workflow tools that help keep the quality of the source on our master branch high.
There are basically two scenarios that we need to cover in a master-based workflow. First, there is the happy scenario where no work has been done in master while we have been working locally. This case is boring, as this works, and becomes a fast-forward merge on the remote. This scenario can be seen in Figure 5-3.
Clone or fetch from origin.
Do work locally and commit.
Push, and be rejected from remote.
Fetch newest changes and merge them into your local master branch.
Push master to origin, as it is now a fast-forward merge.
It is entirely possible that this can happen repeatedly thus locking out developers from delivering their changes. This either means that the repository spans too many architectural boundaries or that the workflow you are using is not scaling with your organization. In any case, this is unlikely to happen for normal usage, so if you end up here, step back and reflect on repository architecture.
The preceding workflow can be seen in Figure 5-4. First is the scenario where local changes will be rejected, then the reconciliation, and the fast-forward merge on the remote.
In the following, we will do an exercise that simulates interacting with a remote repository on the master branch. As this is a more complex exercise than the previous exercises, I am going to run through the master-workflow kata in this exercise. The kata is available in the git-kata repository.
As we have seen in this exercise, nothing tremendously exciting is happening, and it is simple to reconcile the race condition in this simple scenario. If you encounter many merge conflicts, this is a sign that you should investigate a different way of working.
The master-based workflow is not bad for simple projects, and the low amount of overhead and process is attractive for many. If you are just starting out, this is a good workflow to get your bearings. If you continuously pay attention to whether the lack of process is hurting your productivity, you should be good.
Fork-Based Workflows
Fork-based workflows are commonly used in open source software, where the trust model is a bit different than inside an organization. While open source means that everyone can contribute, it does not mean that all changes will get into the projects. The fork-based workflow helps enable this way of working.
In fork-based workflows, we have multiple remote repositories. One of which is the original and contains the ultimate truth of the project. Let us say that I want to contribute to a major open source project such as Kubernetes. I can’t simply clone the repository and push back any changes I would like. First, there is the issue of the quality of my delivery, what if I am horribly incompetent and my work should be kept out? Second, there is also the vision of the product. If there are no clear vision and guidelines to what features the project is interested in supporting, it will become an unmaintainable and unusable mess over time. Thus, even if my work is good, the project might not be interested in integrating it. And lastly, the two previous points were even assuming that my intentions were benign. If we do not have guard rails or some sort of access control, all open source projects would be instantly compromised by bad third parties. There have been situations where evil actors have injected vulnerabilities in high-profile open source projects, thus compromising all those that depended on that code.
The solution to this is that we create a so-called fork of the original project, on our own namespace. This gives us full access to our fork. We can then make our changes and submit those back to the original project using a mechanic commonly called pull requests. This can be seen in Figure 5-5.
It is called pull requests because you make a second remote available and request the maintainers to pull your changes into their repository.
This exercise is a bit different in that it will require a GitHub account, and it will be based more on screenshots than on command-line interface.
If, however, you complete this exercise, you will have contributed to a public repository on GitHub.
This exercise assumes that you have a GitHub account and that you are logged in.
First, we are going to locate the repository that we are going to contribute to and create a fork of that.
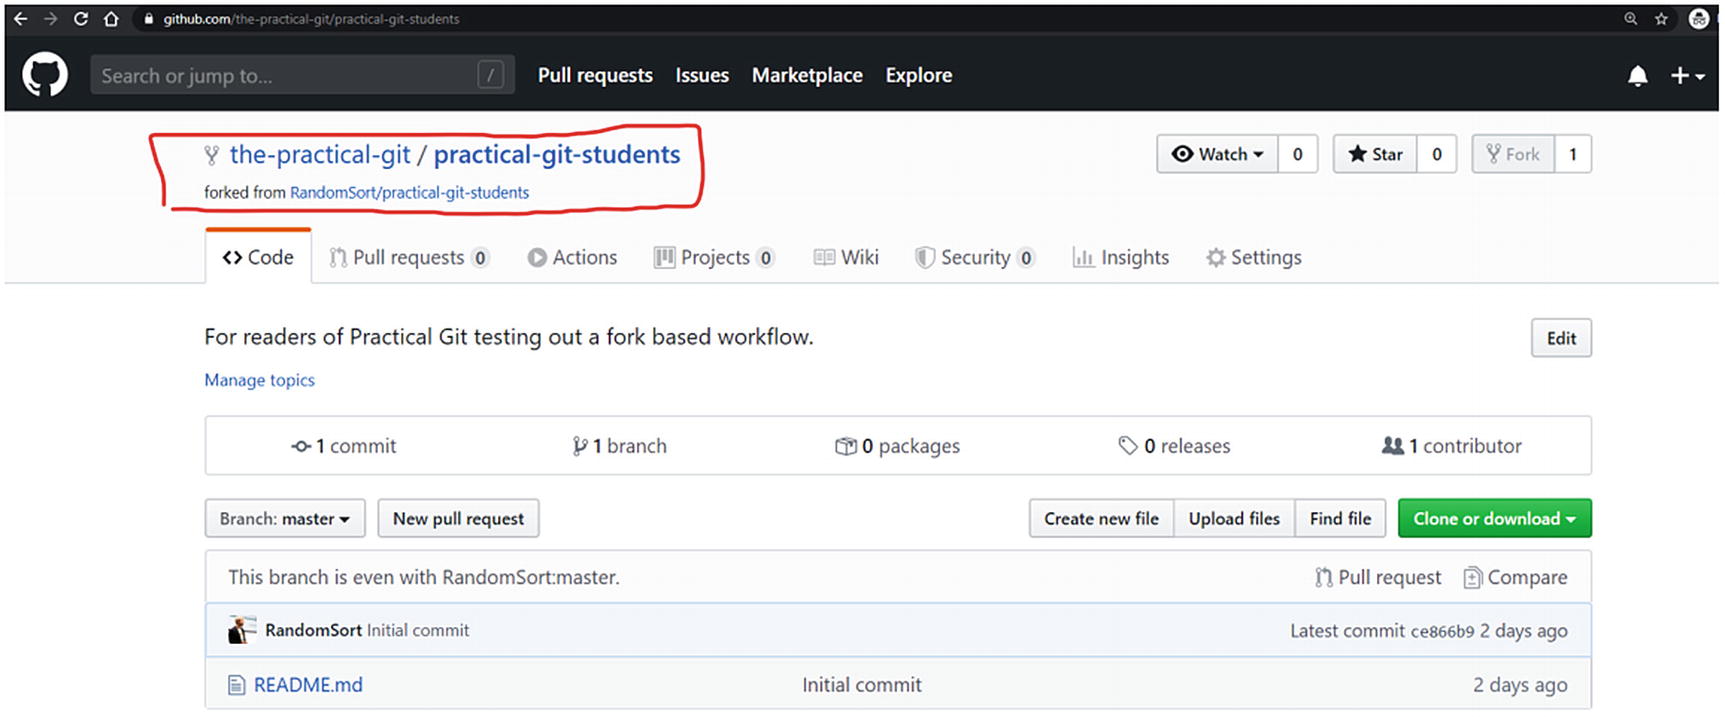
To do so, open https://github.com/randomsort/practical-git-students in your browser and locate the fork button as seen in Figure 5-6.
Clicking the fork button will fork the repository to your own account and take you to this page in Figure 5-7, where it will be your own username rather than mine showing up.
We can note that it is explicit from where we have forked the repository.
Now that we have our own fork, or working copy, we can clone this link, either through the clone button or the command line.
Note that if you are following along with the exercise, you should choose your own name or username as the filename, and you should use your own username for authenticating for GitHub. Depending on how your local Git installation is configured you may be prompted for credentials, or it might just work.
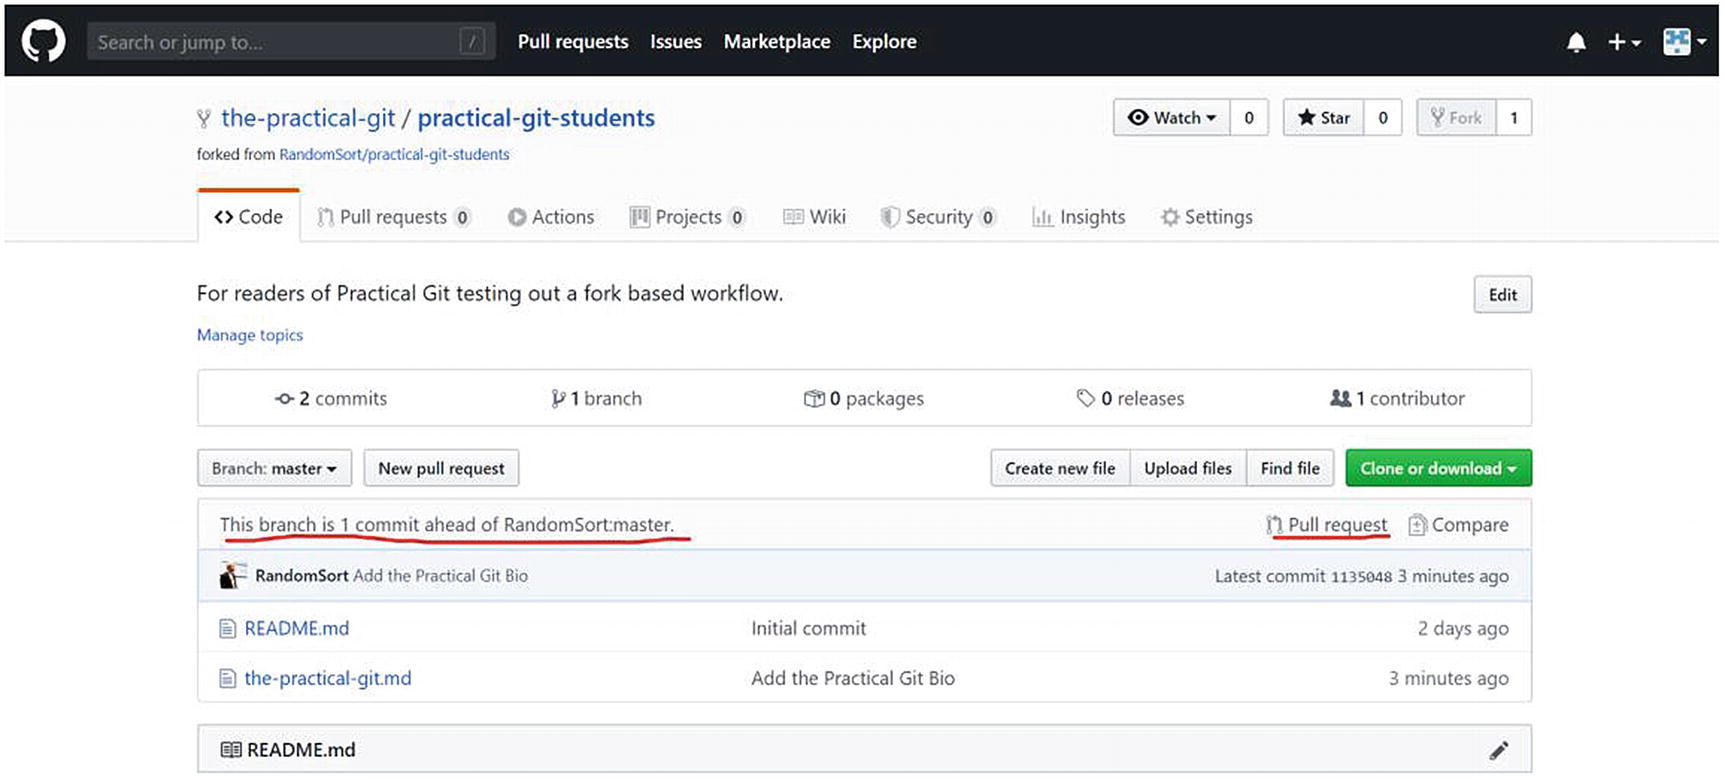
Now, we can go back to our fork and see that the changes we made showed up in the GitHub interface. For me, I go to https://github.com/the-practical-git/practical-git-students, but you will have to substitute with your own username.
We can see in Figure 5-8 that we now have a commit that is not present in the original repository. This is what we would like to contribute back! So we click the Pull request link to the right.
This takes us to Figure 5-9 where we can see the changeset and what branches we are using. In this case, we will contribute back to the master branch in the original repository, what is on our master branch in our fork. So we click the Create pull request button.
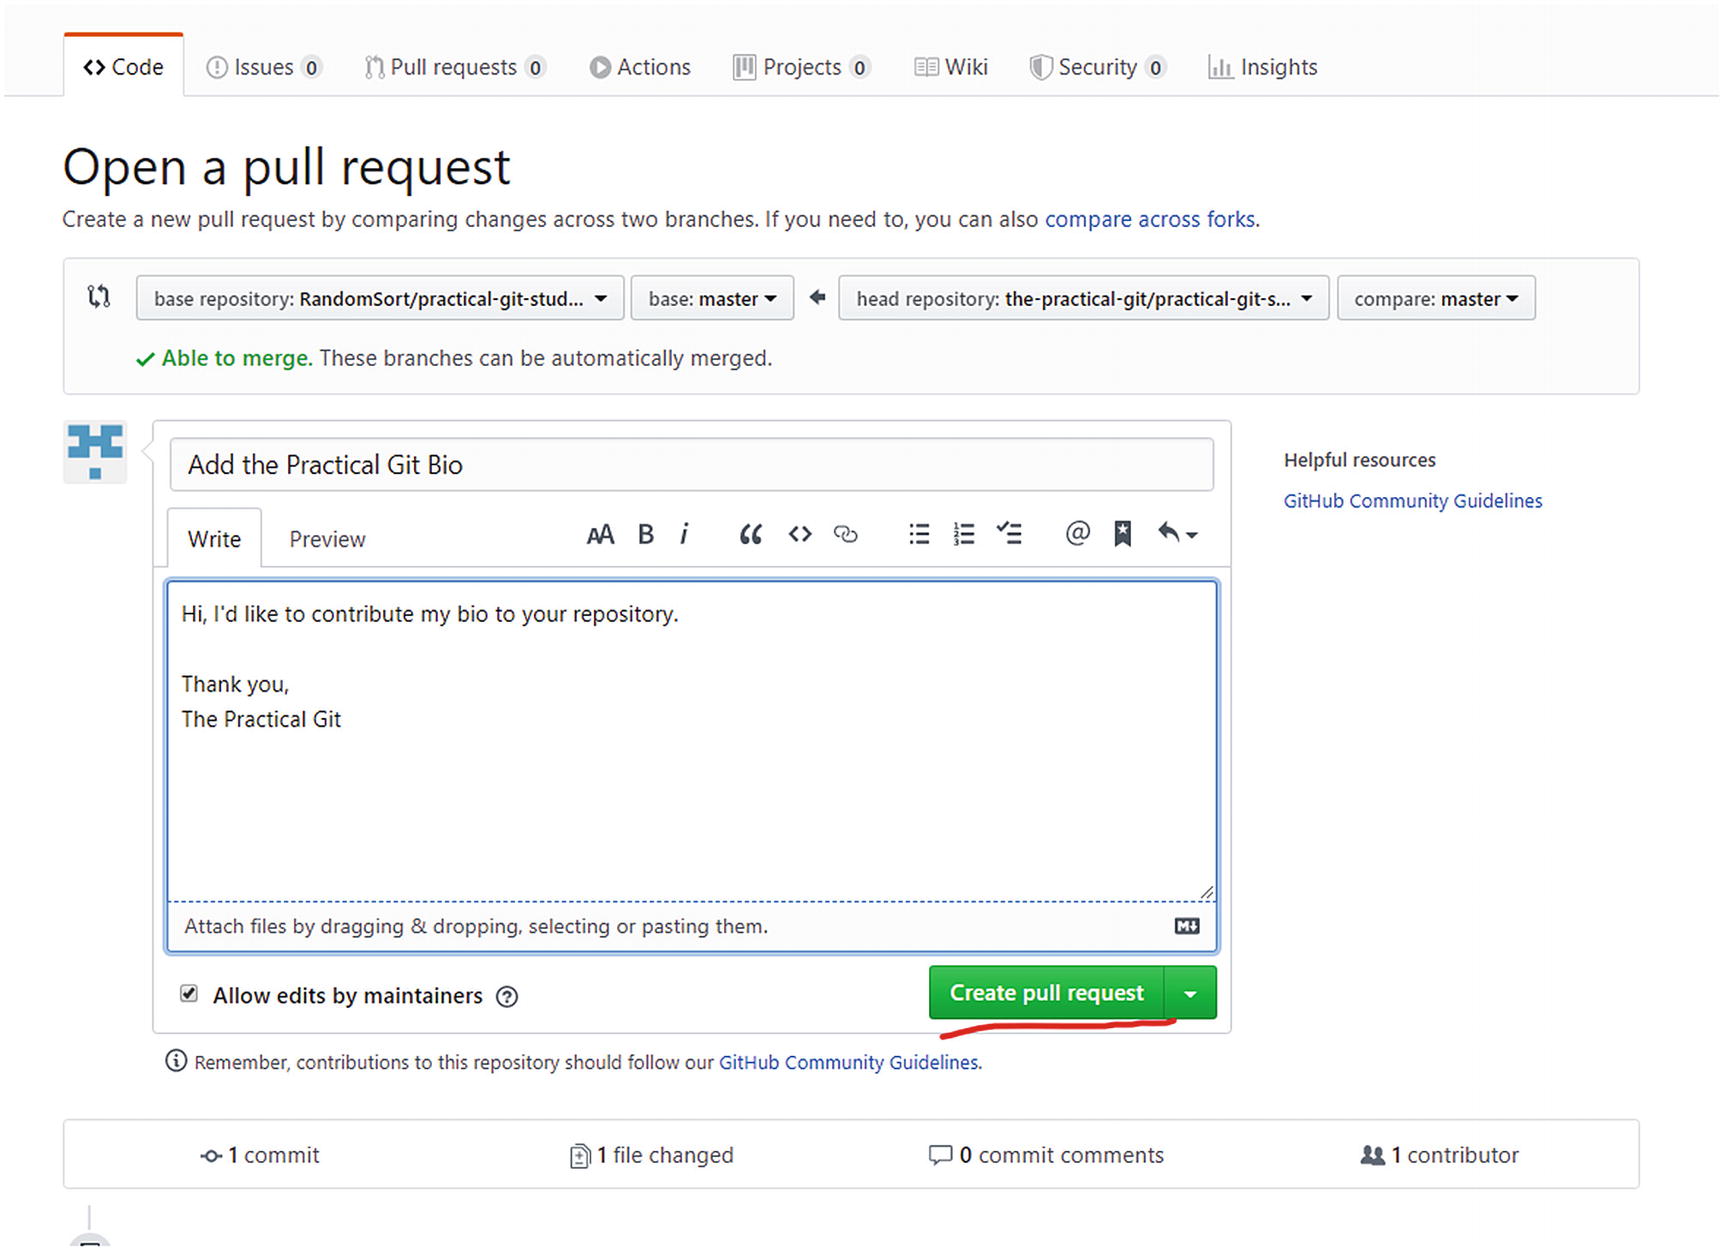
This takes us to Figure 5-10 where we can add a bit more information to the pull request. Commonly, we will describe the changeset, or the reason for the change. This is our communication toward the maintainers of the repository. In this case, our changeset is trivial, so we only add a brief description before clicking Create pull request.
In many scenarios, there will be a bit back and forth between the contributors and the maintainers to make sure that the pull request adheres to their coding guidelines, has the documentation and tests they need, and so on. In this case, I will accept your pull request, if you keep the language clean and kind, and do not cover political or religious issue. I would love for you to say Hi, though!
Now that you have created the pull request, your work is done, unless there are any requests by the maintainers for reworks. From the maintainer side, we can now go and find the pull request in the Pull requests tab, as seen in Figure 5-11.
We click the pull request to see what is being contributed, and here we can comment and interact with the contributor (Figure 5-12).
As the maintainer, I can click the Merge pull request and accept your changes. If you have been following along with this exercise, I am looking forward to merging in your commits!
Note that while this exercise was performed in GitHub, all the big repository managers support fork-based workflows.
This has been an exercise into fork-based workflows, commonly used in open source setups. I know some open source projects who have their source in Git have different email-based systems, but that is so arcane and not used a lot that we will not go into details on that. In the next section, we will present the more commonly used workflow inside of organizations.
Pull Request–Based Workflows
While we could argue that the fork-based workflow described earlier is also based on pull requests, the workflow we go through in this section is commonly known as pull request–based workflow. It is a simpler version of the fork-based workflow, starting from the fact that inside an organization we have a different trust model. Everyone is allowed to contribute directly to the repository, even though not everyone necessarily has access rights to merge to the master branch.
Clone or fetch the repository.
Create a feature branch.
Do work locally and commit to your feature branch.
Push your feature branch to the remote.
Go to the remotes web interface and create a pull request from your feature branch to your master branch.
Those that have access rights merge or request changes.
The pull request–based workflow is simple, understandable, and does not have a lot of overhead. However, pull requests lend themselves to a few antipatterns that we will cover here. First, depending on your way of working, pull requests might be a manual gate, requiring reviews and manual approval. This can lead to handoffs and delayed feedback loops; this reduces productivity and morale and leads to lower-quality software.
Second, pull requests tend to be created late in the development process, when we are ready to deliver. To great effect, they can be created at the start of the process as a work in progress branch. This will create traceability and add the ability for early feedback on work, and collaboration, which increases productivity.
Third , when many pull requests target the same master branch, this can also lead to issues in synchronizing and maintaining the pull request, while those that are in front in the queue get processed. This can also lead to broken builds on the master due to tests being run on another state that ends up being merged.
Again, if this is something that you encounter, you have outgrown this way of working, or your repository architecture.
Git Flow
I have had a long inner discussion on whether to cover the Git Flow or not. It is a workflow that I have seen many organizations adapt, and none succeed with. It is described by nvie in his blog post at https://nvie.com/posts/a-successful-git-branching-model/ as “a successful git branching model.” While I am certain that some organizations have had good fortune with this workflow, but Git, the tools that surround it, and our ways of working have outgrown it. Thus, Git Flow is, for most uses, an antipattern. The problems that we try to solve by introducing the abstractions and the “develop” branch often end up with doing the exact opposite. We end up with long merge queues, complex workflows, and integration hell in multiple directions. So, I do really recommend against it.
The scenario I can imagine where Git Flow is useful is if you have a completely dysfunctional way of working and you need a temporary transition flow in order to get to a sane place. This can help with the organizational resistance, tooling, and upskilling as required.
Git Katas
To support this chapter’s learning goals, I recommend that you go through your master-workflow kata of the previous exercise. After that, if you have not already covered the exercise doing a pull request on GitHub, I suggest you backtrack to that and make the pull request now. I look forward to saying Hi and hearing from you!
Summary
In this chapter, we covered a few basic Git workflows and showed how you can collaborate using Git. Hopefully, you now feel more confident that you can be a valuable contributor in a software organization. It is important to me that you take charge of your workflow and do not let the workflow dictate how you work, but rather let the way you work dictate your workflow. If there is a mismatch between the desired way of working and the implemented Git workflow, you will live in pain and frustration.
Is my workflow introducing manual gates or handoffs?
Is my workflow making it easy to deliver changes?
Do I feel confident in our workflow?
Does the workflow introduce unnecessary bureaucracy?
What are the common mistakes that our developers make? Can we do something to minimize either the impact or frequency of these?
If we keep asking these questions and accept that our workflow is not a dead static thing, but rather something that lives and evolves together with our software, we will end up in a good place.