
![]()
SECURING SSH with PAM
There’s little argument that SSH (and in particular the OpenSSH implementation) is the remote access method of choice for Unix-type machines connected to the Internet and to local networks. At times, however, it’s just not convenient to have your SSH key readily available and present on the device that you’re logging in from. If you’ve ever had to type an SSH key in manually, in order to copy it from one device to another, you know it’s a little like trying to push water up a hill. It’s not recommended.
This is where two-step (or two-factor) authentication comes in. Coupled with the already excellent security that SSH provides and a pluggable module compatible with most Linux flavors, courtesy of search giant Google, the superiorly secure Google Authenticator can mean that even if you’re not using SSH keys, your logins are much safer. I’m referring to mitigating brute-force attacks on your passwords and the like.
In this chapter, you learn how to harden your SSH server configuration by adding TCP wrappers (so that only IP addresses or domain names that you trust can log in). You’ll finish off by enabling the Google authenticator library to add two-step (or two-factor) authentication. Google Authenticator supports a number of devices including iPhone, iPod Touch, iPad, and BlackBerry. As Google’s own smartphone brand is Android, and other versions are ports of the Android version, this chapter focuses on that device. Other than the package installation on your smartphone, however, the rest of the information should apply. To install the package for a device other than Android, simply select your device from this web page and follow the instructions: https://support.google.com/accounts/answer/1066447?hl=en.
A Note About Standards
If you’re new to the technicalities of how the standards on the Internet work then a quick mention of RFCs is probably needed. RFCs are “Request For Comments,” which the Internet Engineering Task Force (IETF) publishes along with the Internet Society (ISoc). Think of each RFC as a specification of each standard put together by those who know best for discussion or adoption by the Internet communities to whom they relate. I mention RFCs because the Google Authenticator utility available on Linux is based on Initiative for Open Authentication (OATH) standards (http://www.openauthentication.org), not to be confused with the popular OAuth (http://oauth.net). Furthermore, don’t think of the Google Authenticator Android App as being the same thing as the Linux project of the same name. They are quite separate entities (more on the Android incarnation is here: https://github.com/google/google-authenticator-android).
Google Authenticator supports two RFCs: The HMAC-Based One-Time Password (HOTP) algorithm, which is specified in RFC 4226 (https://tools.ietf.org/html/rfc4226) and the Time-Based One-Time Password (TOTP) algorithm, which is specified in RFC 6238 (https://tools.ietf.org/html/rfc6238). Both documents are worth a quick skim through. It’s a good learning experience even if you’re just picking up new terminology.
That’s enough theory, let’s focus on getting your SSH server secured more robustly by running Google Authenticator (https://github.com/google/google-authenticator).
Configuring Your SSH Server
A quick summary of the key changes that you should be making to your /etc/ssh/sshd_config file. You can, as ever, go further than just applying these changes, but they are a good starting point in most cases. What follows are my personal preferences and what I would consider a minimum.
You have to modify a few lines in your config file. Begin by identifying the following lines in your config file and then alter them to reflect the following settings or add them if they’re not present.
- Change your SSH server port so that automated attacks don’t fill your logs with quite as much noise like this:
Port 2222 - Avoid the weaker version 1 protocol by only allowing clients running the second version to connect with this line:
Protocol 2 - Ensure that only less-privileged users can connect initially over SSH like this:
PermitRootLogin No - Ensure that only usernames that you explicitly allow are allowed to log in. I leave this setting at the top of the config file to immediately point out that it’s enabled when troubleshooting a problem. That way, I see it as soon as I open the file.
AllowUsers chrisbinnie sysadmin- I haven’t tried the following more advanced syntax, but (carefully, without closing your existing SSH session) you might want to test these examples too. Here the user neymar can only connect from the IP address 10.10.10.10; user lionel can connect from any machine; and the user luis must connect from machines with a hostname under the chrisbinnie.tld domain name, such as barca.chrisbinnie.tld:
AllowUsers [email protected] lionel luis@*.chrisbinnie.tld - Lots of users might be more manageable with a group (I won’t include it in this config however), which could be achieved like this:
AllowGroup sysops
- I haven’t tried the following more advanced syntax, but (carefully, without closing your existing SSH session) you might want to test these examples too. Here the user neymar can only connect from the IP address 10.10.10.10; user lionel can connect from any machine; and the user luis must connect from machines with a hostname under the chrisbinnie.tld domain name, such as barca.chrisbinnie.tld:
- Next, verify that the following setting is disabled. When establishing a remote connection, you tend to trust the client that you’re connecting from more than the server that you’re connecting to and therefore don’t accept X11 communications unless they’re specifically needed.
X11Forwarding no - It’s unlikely to be disabled, but check this config setting just in case:
UsePAM yes - Now quickly check that this option is also enabled:
ChallengeResponseAuthentication yes - And finally, although not strictly security related and more of a throwback, don’t wait for hideously long DNS timeouts during a connection by using this setting:
UseDNS no
Now it’s time to face your daemons and restart your SSH service, using the following command (on newer systems that run systemd):
# systemctl restart sshd.service
At this stage it’s not a bad idea to try to log in from different IP addresses and as different users so that you have confidence in your newly configured security before potentially making it more complex with two-step authentication. If you’re seriously unsure of any of the above (or can’t get it working), then you may want to move over to a development machine. Or at the very least, go to a machine that you can physically log in to via a terminal or one that has a virtual console available, such as a virtual machine or cloud instance. In other words, you might need an out-of-band login prompt of some description that doesn’t rely on your SSH server.
Wrapping Your Connections
Next, you’ll wrap up your SSH connections by making sure that only specific domain names or IP addresses (or ranges of IP addresses) can connect.
This is very simple but a word of caution is in order. Don’t close your existing SSH connection until you’ve tested that your new config has worked. You can do this by spawning a new SSH session. You might be locked out otherwise; believe me when I say that it’s easy to do, even for old-timers. I prefer to use TCP wrappers for tasks such as these because the likelihood of typing errors is greatly reduced. At the end of this section you can see an IPtables example if you prefer to go that route. Open the file /etc/hosts.allow and add something along these lines:
sshd: .chrisbinnie.tld
sshd: 123.123.123.0/24
I’ve separated the lines for the purposes of demonstrating the differences in the syntax. On the top line, notice the important preceding dot before the domain name chrisbinnie.tld. Here any machine with a hostname that falls under that domain name will be allowed to connect, similar to the config used directly as an example in the more advanced SSH config. Similarly, on the second line, any of the 254 IP addresses within the 123.123.123.0 range will also be given access. I tend to prefer raw IP addresses in this file as a rule because DNS entries can be spoofed. IP addresses are much trickier.
The excellent TCP wrappers hosts.allow file is too clever for words and you can also include slightly odd-looking settings such as this:
sshd: 10.10.
Here the many IP addresses that begin with 10.10. are allowed access. This leaves access relatively open, so be sure to use a setting like this with caution.
Don’t just think that TCP wrappers apply to your SSH server only, of course; look at the following example, which includes a netmask for all services that support TCP wrappers (further details can be found at http://www.admin-magazine.com/Articles/Secure-Your-Server-with-TCP-Wrappers):
ALL: 10.10.0.0/255.255.254.0
In order to make these changes live, you need to edit the file /etc/hosts.deny. Remember not to close your existing SSH session until you’re happy that you can log in successfully again! Add this line to the deny file:
sshd: ALL
Equally you might of course opt to secure your SSH server using IPtables too. I will leave you to look up which option suits your needs but this shown below works for me.
# iptables -A INPUT -i eth0 -p tcp -s 123.123.123.0/24 --dport 2222 -m state --state NEW,ESTABLISHED -j ACCEPT
# iptables -A OUTPUT -o eth0 -p tcp --sport 2222 -m state --state ESTABLISHED -j ACCEPT
Getting Started with Two-Step Authentication
Now that you can ensure that only select users are allowed to log in over SSH, and from very specific IP addresses or machines, it’s time to get your hands dirty with two-step authentication. Using the excellent pluggable authentication modules provided by PAM, Google Authenticator supports the following features, according to its GitHub page (https://github.com/google/google-authenticator/wiki):
- Per-user secret and status file stored in the user’s home directory
- Support for 30-second TOTP codes
- Support for emergency scratch codes
- Protection against replay attacks
- Key provisioning via display of a QRCode
- Manual key entry of RFC 3548 (http://tools.ietf.org/html/rfc3548) base32 key strings
I love the mention of “scratch codes.” These can be used during a break-glass-in-an-emergency style scenario so that you’re never locked out completely (in theory). Let’s have a look at some of the terminology and one feature in particular before getting lost in setting it up.
I mentioned the TOTP (time-orientated) codes earlier. Consider what would happen if a code which you had generated was wrong because of a difference in client and server time settings. The server simply wouldn’t trust the code and all hell would break loose as you were locked out.
There’s some leeway given for time skew, but there’s also a clever option for helping to mitigate expected issues. You might not have your client device connected to an NTP (Network Time Protocol) server, for example, or you could be connecting remotely from a location where network latency plays a part in the opening handshake. Rather than lower the security integrity of the authentication mechanism, the pluggable module listens intently as the user fails repeatedly to authenticate successfully. The user is obviously going to be frustrated entering what they think are valid codes. After three attempts, when the option is enabled, the PAM module takes time for time skew and measures the device’s misjudged attempts in order to compensate. It then lets the user connect if appropriate. Clever, huh?
Near the end of the smartphone package installation process, you will be asked questions relating to the time settings. Thankfully the queries are relatively detailed so I will leave you to choose the best options for your circumstances.
Installing the Required Packages
If you want to install the required packages via a package manager, then try this on Debian derivatives (I’m on “Jessie”):
# apt-get install libpam-google-authenticator
Figure 6-1 shows the installation process in a little more detail.
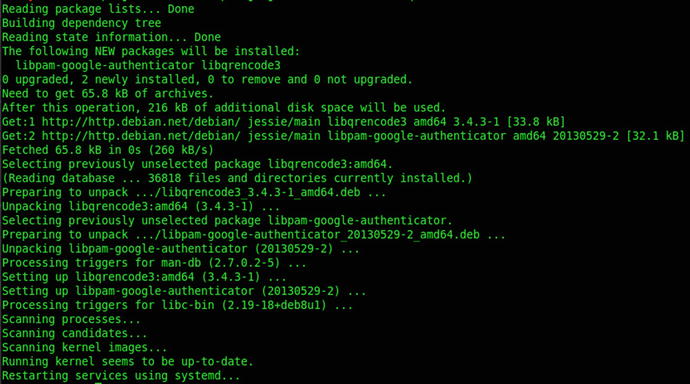
Figure 6-1. Detailed installation information of the PAM module
If you’re so inclined, you can also download the source from GitHub at https://github.com/google/google-authenticator/ and then change (cd) to the directory where you’ve saved and unpacked the download. Then use these commands:
# ./bootstrap.sh
# ./configure
# make; make install
It’s probably safer to be the “root” user (at least for the make install command) to run these commands. Next, you need to add the following line to the bottom of the PAM config file. On Debian and Red Hat, that file can most likely be found at /etc/pam.d/sshd.
auth required pam_google_authenticator.so
You probably want to add a comment above that line in keeping with the neatness of the file in general. As a result, it looks more like this:
# Google Authenticator for PAM – add a comment to the following line to disable it and then restart sshd
auth required pam_google_authenticator.so
Next, restart SSH. On newer versions of Linux running systemd such as Debian “Jessie,” you can use the following:
# systemctl restart sshd.service
After that you’re all set to try your new security implementation. Another reminder that you shouldn’t log out of any SSH sessions you have in use!
Installing Google Authenticator On Android
Before jumping ahead, you need to search the Google Play App Store for “google authenticator” or simply “authenticator” and then install the relevant app on your Android phone (the required instructions for installing Google Authenticator on other devices is here: https://support.google.com/accounts/answer/1066447?hl=en).
Back to your SSH server. If your system supports the libqrencode library (it’s called libqrencode3 in Debian Jessie’s repositories and can be checked with apt-get install libqrencode3), then you should be shown a QRCode on your console. Your Android Phone app is primed to scan a QRCode to save you typing in a code manually if you desire (you may need another small barcode-reading app installed, but the operating system should tell you if this is so).
If your system doesn’t support QRCodes, it’s just a case of typing an alphanumeric code into your smartphone’s app, which is a little tedious but thankfully nothing too taxing.
Once the code is entered you should see a single code changing every few seconds (the timer is the blue circle on the right), as shown in Figure 6-2. (In case you’re wondering, I tend to obfuscate as many things relating to security as I can, hence the odd names under the codes in Figure 6-2 and not “My Bank Account’s secret code.”)

Figure 6-2. On this display, two servers are updating their codes every few seconds
Back to your SSH server. Logged in as an allowed SSH user (one of those select usernames that can log in under “AllowUsers” in your SSH config), you now run the following command:
# google-authenticator
As shown in Figure 6-3, you don’t need X Windows or any fancy desktop manager software to display your QRCode at installation time.
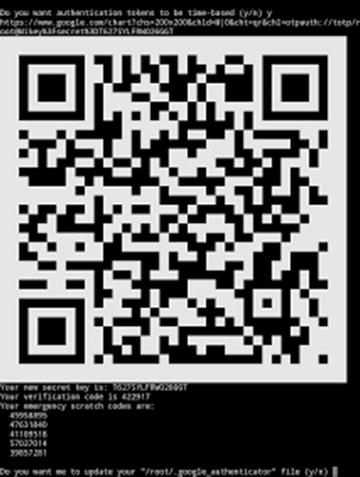
Figure 6-3. What you see having run the command google-authenticator as the user that you want to log in over SSH with
After the QRCode, you will also be presented with the secret key and emergency scratch codes. The secret key comprises of the characters hidden in the QRCode, so simply type that into your Android device if you’re not scanning the QRCode.
Note also that you have just disabled SSH access for the “root” user, so there should never be any good reason to run the google-authenticator command as the superuser. Instead make sure that you become another user (run a command such as su - chrisbinnie) so that you don’t log out of your working SSH session until you’re happy with testing and then run the command. The result is that you’ll have a miniscule file written to your home directory containing your user’s token.
Testing SSH Access
Remember: You still want to keep any existing SSH sessions open while you test your access so that you’re not locked out. By connecting over SSH, you should now see something like the following prompts:
# cb@chrisbox:~$ ssh -p 2222 -l chrisbinnie prodserver1.chrisbinnie.tld
Password:
Verification code:
The Verification code: prompt is a new addition to your normal login process over SSH. If all is going well, you should only be able to get access with your password and a time-limited code. If that’s the case, then try getting the code wrong so that you’re used to the errors that are generated.
Summary
You now have solid SSH server security in place to help keep the wolves at bay. You’ve changed the port number most likely to be hit by automated attacks and additionally locked down three key aspects of anyone logging in over SSH. You’ve limited the usernames that can be used to enter a password at the SSH login prompt. And, that’s of course based on the premise that the users has been shown the prompt in the first place because they have connected via one of the few IP addresses (or hostnames) that are permitted to open up a session on the SSH port. Finally, if those two criteria are met then a uniquely generated, time limited, access code is required to gain any access to the system. All in, that’s a pretty robust front door with chunky locks and bolts to keep it firmly closed to anyone who comes knocking without credentials.
The only other addition that immediately springs to mind to further bolster the network-facing aspect of an SSH server (without using SSH keys) is the addition of a technique called port knocking (http://www.admin-magazine.com/Archive/2014/23/Port-Knocking). You might be surprised to learn that you can make your SSH port entirely invisible to port scans and the Internet at large. The only way to remove its invisibility cloak is to knock on other TCP or UDP ports, in a pre-configured sequence, and then as if by magic, port 2222 will appear like an apparition and allow your clients to connect.
With your newly found knowledge, I hope that you can rest assured that your SSH server is fully locked down and remote access over SSH to your boxes should only be possible by you or those who you permit. One thing to note, however, is to keep an eye on your emergency scratch codes, just in case. Not all servers can be logged into from a physical console these days.