5. Security
_______________________________
In This Chapter
Layered Security
Role Groups
Assigning Role Group Membership
Removing User(s) From Role Groups
Management Roles
Audit in Security and Compliance Center
_______________________________
Layered Security
Ingrained in the coding of the Security and Compliance Center are layers of security that are used to prevent unauthorized access to various areas of this Office 365 workload like mailbox data, Data Loss Prevention (DLP) configuration and more. The ecosystem of security consists of multiple layers that enable a complex setup with administrators given access to all, some or none of this Office 365 interface. Typically the security layers concern is more on the administration side of the Security and Compliance Center, however, some conditions can also be applied to user access as well.
Role Groups are a special type of Security Group that contains Security Groups, other Role Groups and users which are also known as Role Group members. Group members can be added and removed to fit the needs of an organization. Management Roles are assigned to the groups. Management Role Scopes are also assigned to control what rights a Role Group member can exercise within Exchange.
Management Roles are groups of responsibilities that are grouped logically to help an administrator perform a certain task. These roles are assigned to Role Groups as part of this arrangement.
Auditing is the process of keeping track of changes. In the case of the Security and Compliance Center we have auditing for Admin changes via PowerShell or EAC as well as auditing for mailbox access. Auditing can be monitored and reports generated for compliance and security requirements for an organization. Admin Audit logging and mailbox auditing is on by default as of the writing of this book, however additional auditing can be configured. Check your region privacy settings before enabling any additional auditing features.
In this chapter we will cover these topics in-depth and as they relate to PowerShell.
Role Groups
Like any of the other workloads in Office 365, there are Role Groups and Management Roles that control access to various features and functions. Roles Groups are vehicles to be used to assign certain permissions to users in your organization.
PowerShell
Let’s take a look at how we can reveal and work with these Role Groups in the SCC PowerShell.
Get-Command *RoleGroup*
We see we have a series of cmdlets that can be used to work with the Role Groups as well as the members of those same groups:

|
Add-RoleGroupMember |
Remove-RoleGroup |
|
Get-RoleGroup |
Remove-RoleGroupMember |
|
Get-RoleGroupMember |
Set-RoleGroup |
|
New-RoleGroup |
Update-RoleGroupMember |
First, let’s review what Role Groups are available. We can use the second cmdlet in the list above ‘Get-RoleGroup’ to show what Role Groups are available (partial list provided below):
There are twenty four different Role Groups with many roles assigned to them, which is eight more than when this book was originally published. These roles will help you decide how to split responsibilities. Each Role Group has a set of Assigned Roles that determine what that group can do. These Assigned Roles are known as Management Roles. These roles can also be reviewed in PowerShell in detail to see what they allow a Role Group member to do.
Let’s take a sample Role Group to see what we can find out about the Role Groups:
Get-RoleGroup Reviewer | Fl

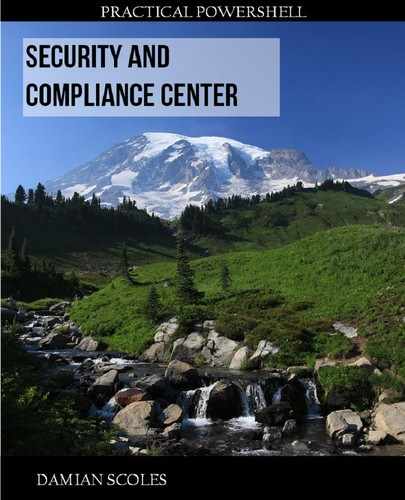
In red we have the Management Role that is assigned to the group and in blue is a detailed description of purpose of the Role Group. To see what all Role Groups are capable of, we can get the name and description like so:
Get-RoleGroup | Fl DisplayName,Description


Notice that there are gaps in the information available. In order to get a better understanding of these roles, we need to go to Microsoft’s documentation Online. Easiest way to find this is with a search query with your favorite search engine:
Search Terms: MailFlow Administrator

We click on the search result above and are provided with a description of the Mail Flow Administrator:
- The user may log in to the Security and Compliance Center directly at https://protection.office.com.
- The user will only have read-only permission to the mail flow dashboard.
- The user won’t have access to the Office 365 admin portal.
Additionally, more Role Group descriptions can be found here:
Security Reviewer
“Members have read-only access to a number of security features of Identity Protection Center, Privileged Identity Management, Monitor Office 365 Service Health, and Office 365 Security & Compliance Center. Membership in this role group is synchronized across services and managed centrally. This role group is not manageable through the administrator portals. Members of this role group may include cross-service administrators, as well as external partner groups and Microsoft Support. By default, this group may not be assigned any roles. However, it will be a member of the Security Reader role groups and will inherit the capabilities of that role group. “
Security Administrator
“Membership in this role group is synchronized across services and managed centrally. This role group is not manageable through the administrator portals. Members of this role group may include cross-service administrators, as well as external partner groups and Microsoft Support. By default, this group may not be assigned any roles. However, it will be a member of the Security Administrators role groups and will inherit the capabilities of that role group. All of the read-only permissions of the Security reader role, plus a number of additional administrative permissions for the same services: Azure Information Protection, Identity Protection Center, Privileged Identity Management, Monitor Office 365 Service Health, and Office 365 Security & Compliance Center. “
Management Roles per Role Groups
In order to get a list of the Management Roles in each Role Group, we need to tinker a bit with PowerShell to get a list that visually makes sense. The limitation to overcome is that the amount of Management Roles can be large for some of the Role Groups, which leads to incomplete listings like this:

We’ll have to use a loop and some special formatting in order to get a good display. Using the code below, we can do this:
$Output = Get-RoleGroup
Foreach ($Line in $Output) {
$Name = $Line.Name
Write-Host “$Name” -ForegroundColor Cyan
Write-host “---------------------------” -ForegroundColor Cyan
$Roles = $Line.RoleAssignments
Foreach ($Role in $Roles) {
Write-host “ $Role” -ForegroundColor White
}
}
The output from the above script looks something like this (truncated):

... and so on until all Role Assignments are listed additionally for Tenant Admins, HelpDesk Admins, Security Reader, eDiscovery Manager, Service Assurance User and Mail Flow Administrator.
Assigning Role Group Membership
Now that we’ve covered the Role Groups and what they are responsible for, we can cover how to add and remove users from these groups. First, adding a member to a group. In the set of cmdlets for managing Role Groups, there is a cmdlet called ‘Add-RoleGroupMember’ that is used to add users that exist in Azure AD to the various Role Groups present in the SCC.
PowerShell
Some practical examples are provided below. First example shows the user ‘Colleen’ being added to the Mail Flow Administrators group:
Add-RoleGroupMember -Identity MailFlowAdministrator -Member Colleen
In this next example, we are adding a user Ed Wright (alias is ‘EWright’) to the Reviewer Role Group:
Add-RoleGroupMember -Identity Reviewer -Member EWright
Now that we’ve seen how users can be added to groups, let’s do a deeper dive into the effects on a user who now has access to the SCC. We will see the PowerShell cmdlets they are allowed to use as well as how the SCC GUI itself changes from Role Group to Role Group.
Mail Flow Administrator Role
A Mail Flow Administrator has only one assigned role in the SCC and that is ‘View-Only Recipients’:

The Security and Compliance Center looks like this when the Mail Flow Administrator role is assigned:

If we specifically look at Mail Flow in the menu, we see that we only have the dashboard revealed:

Clicking on the dashboard under Mail Flow also reveals that some features and functions have been removed for this role:

PowerShell as a Mail Flow Administrator
If an account only has the above role and then logs into the Security and Compliance Center via PowerShell, a limited set of PowerShell cmdlets for the Security and Compliance center are made available. These can be revealed with a little bit of PowerShell. In the below code, the section - where {$_.Source -Like ‘tmp*’} - will reveal only SCC cmdlets:
Get-Command | Where {$_.Source -Like ‘tmp*’}

Notice that the cmdlets are, like the role is configured, Read Only cmdlets. This means that this role is allowed to check in on some functions, specifically around Device Compliance. We are provided with ten cmdlets with this Role Group.
Reviewer Role
A reviewer in the Security and Compliance Center is also a limited role. This role has only one role assigned to it leaving it with limited responsibilities as well:

PowerShell as a Reviewer
After logging in as a user with this new role, we can also review what PowerShell cmdlets are available:
Get-Command | Where {$_.Source -Like ‘tmp*’}

Again, it’s a smaller role and the amount of PowerShell cmdlets that are available is small - ten in total.
The Security and Compliance Center web console is again altered for this role. Search and Investigation replaces Reports from the previous view:

The real focus of this role is in the Search and Investigation part of the Security and Compliance Center:

Records Management
Records Management also has one role assigned to it in the SCC and that is ‘Record Management’:
“Allow viewing and editing configuration and reports for the Record Management feature”.

Very little in the way of interaction or options are now provided to the user with this role.

We can see that the Get-DataRetentionReport has potential from a PowerShell perspective:

In addition to the restricted cmdlets available for the Records Management role, we also see the restrictions when we log into the Security and Compliance Center as a user with the Records Management role:

Security Administrator
This role entails a lot more responsibility and thus quite a few more PowerShell cmdlets. This role has access to around 100 cmdlets in the Security and Compliance Center:

Also, unlike the few roles we’ve examined so far, this Management Role has access to PowerShell cmdlets with more than just Get cmdlets. We see Import, New, Remove, Search, Set, Start, Stop and Test verbs available. We also see that this role has quite a few Role Assignments to it:
(Get-RoleGroup SecurityAdministrator).RoleAssignments

This role could also include some cross-service administrators. As we can see above, it has access to roles relevant to Information Barriers, Audit Logs, Device Management, and some view-only roles like DLP, Alerts, etc.
Organization Management
This Role Group has even more responsibility than the previous role with up to 278 PowerShell cmdlets available. Below is a very small portion from the list:

This role has full access to the tenant as well as what is in the Security and Compliance Center. The interface used at https://protection.office.com is not restricted either. This user with this role would bear great responsibility and be tasked with a higher level of access in an Office 365 tenant. In terms of least permissions, very few users should have this role assigned. We can also see there are even more Roles assigned than the Security Administrator role group:

Supervisory Review
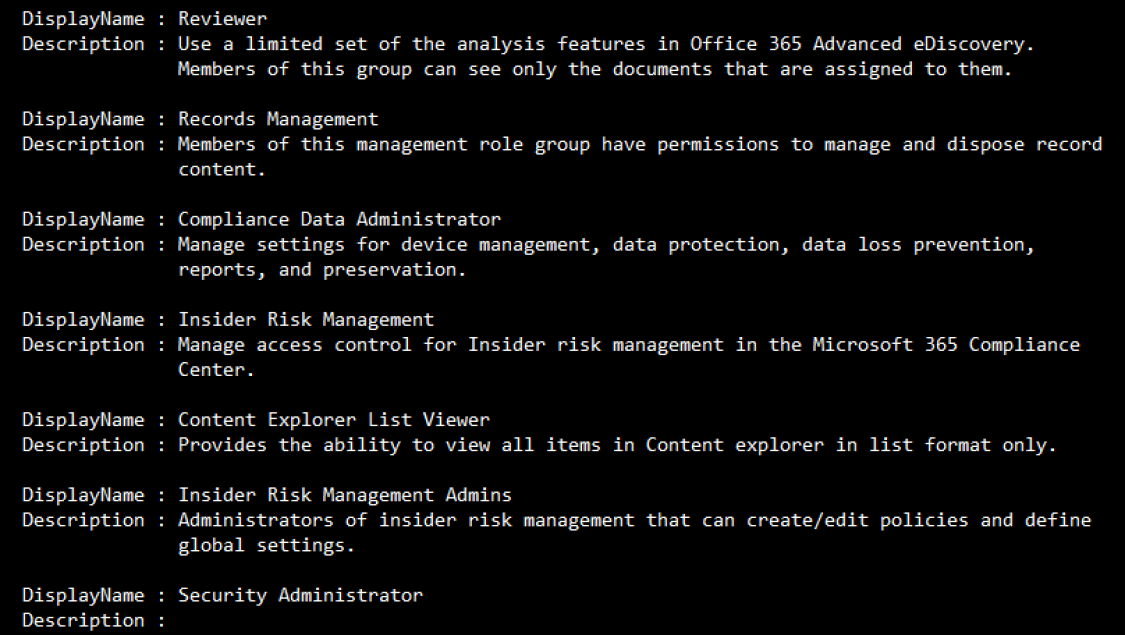
The Supervisory Review Role is a relatively new role that allows the holder to review emails from users that are under Supervision. The role grants these users access to Supervisory mailboxes for users they are assigned to monitor. Emails being monitored can be viewed in the SCC by the user with this role or via an exposed mailbox (see Chapter 8 Supervision for more information). As we can see below, we have a limited set of cmdlets that are exposed to this Role and they contain the Supervisory noun in them:
Compliance Administrator
The Compliance Administrator has nearly as many PowerShell cmdlets as does the Organization Management role. The total number of cmdlets is 222 in the Security and Compliance Center. These cmdlets are exposed because the Compliance Administrator has quite a few assigned roles:

The Compliance Administrator has quite a few View-Only assigned roles in the Security and Compliance Center. From the list of assigned roles and the plethora of PowerShell cmdlets available we can assume this is also a higher profile role in the SCC. This role has access to Information Barrier info, View-Only on DLP Compliance, Recipients Audit Logs, Records, Alerts and Device Management.
If an organization already has a Compliance Administrator then this would obviously match well. These individuals will need to have access to compliance cases, review Records and be able to pull various bits of information from the SCC.
Security Reader
The Security Reader group is also a cross workload security group, so members might be pulled from other sources. This role is a limited role in the Security and Compliance Center. There are five assigned roles which are all a variety of View-Only for items in the SCC:

As such, it also has a limited set of 22 PowerShell cmdlets to use:

The above cmdlets, while restrictive, do cover the wide variety of components - Device Compliance, Exact Data Match (EDM), Information Barriers, and some DLP.
eDiscovery Manager/Administrator
The eDiscovery Manager role is an interesting security option in the Security and Compliance Center. The role is actually one of two roles - eDiscovery Manager and the eDiscovery Administrator - and we see this in the GUI and in PowerShell for the SCC:

In PowerShell, we see there are special cmdlets to handle the eDiscovery Administrator:

We need these cmdlets because the eDiscovery Administrator is NOT listed in the list of all Role Groups:

Of the two, the Administrator Role has greater responsibilities. How do we know this? They both have the same assigned roles according to the GUI of the SCC:

However, on the same screen we see the vital difference between the two roles. The eDiscovery Administrator’s permissions apply to all users, whereas the eDiscovery Manager has to be granted access:

The eDiscovery Manager role has access to 68 PowerShell cmdlets as does the eDiscovery Administrator. As such, the Administrator role only really needs to be applied to a person who needs access to all cases in the SCC and should be treated like a Global Admin with a limited or small number of people having access. From a discovery perspective, the Admin rights would enable the assigned user rights to see all of the cases that were listed in the SCC and gather details for reporting purposes. The Administrator role should also be more protected as it has greater rights and insights than the Manager Role.
Service Assurance User
The Service Assurance User role is probably one of, if the most restrictive role present that can be assigned to a user in the SCC. This role does have one assigned role, which we can see below
The ‘Service Assurance View’ role only has access to one cmdlet - ‘Get-User’. Outside of PowerShell, this role has this description:
“Access the Service Assurance section in the Security & Compliance Center. Members of this role group can use this section to review documents related to security, privacy, and compliance in Office 365 to perform risk and assurance reviews for their own organization.”
The primary interface for this use is logging into the Security and Compliance Center and click on Software Assurance:

Compliance Data Administrator
Compliance Data Administrators are focused on settings for data protection, reports, device management and DLP. It has 17 assigned roles to it with half of them View-Only:

With the amount of assigned roles, it isn’t surprising the Compliance Data Administrator has access to 210 PowerShell cmdlets. The cmdlets comprise of File Plan Management, Supervisor, Compliance, Device Compliance, Alerting and DLP Sensitive Information Types. With the wide range of responsibilities, this role should also be restrictive in its membership.
Security Operator
A Security Operator is a role design for reviewing Audit Logs, Information Barrier Settings, DLP Compliance Management, Device Management, and Alert Logs. This role group has the following assigned roles:

These associated roles have a combined total of 57 cmdlets available to them with about half of the cmdlets of the ‘Get’ variety. The reset of the cmdlets allow for work with Alerts, Logs, Compliance Searches, Information Barrier review and more.
Data Investigator
A Data Investigator can perform searches in Exchange Online (mailboxes), SharePoint sites and in OneDrive accounts. The role group has nine assigned roles which are as follows:

With these assigned roles, a limited set of PowerShell cmdlets are available for use. Note the RMS Decrypt role which allows the decryption of protected email messages which is another role that should be protected. The cmdlets are concentrated on a set of Compliance Search cmdlets (Get, New, Remove, Set and more):

Global Reader
For the last role group, we will look at Global Reader. The Global Reader role is entirely oriented to View-Only roles. The roles cover Alerts, Auditing, Record Management, Retention, Device Management, DLP and Information Barriers.

It is interesting to note that even with a lot of View-Only roles, this role group has access to 62 PowerShell cmdlets. A few non View-Only cmdlets are provided as well, like Remove-OrganizationSegment, Set-OrganizationSegment, and Set-DLPEdmSchema.
** Note ** It should be noted that any of these built-in role groups cannot be modified in terms of assigned roles. If you try, you will receive an error like this:

Insider Risk Roles
Insider risk is one of the new features that have been added to the Security and Compliance Center and follows in the same vein as Data Loss Prevention (DLP) with the intent to reduce risk from internal sources. Insider Risk management is designed to detect and even take action on any malicious activity. Microsoft lists these as sample activities monitored:
Leaks of sensitive data and data spillage
Confidentiality violations
Intellectual property (IP) theft
Fraud
Insider trading
Regulatory compliance violations
With these roles, a user in your environment would be able to manage this new functionality.
The new Roles listed in the Security and Compliance Center are, as of this book edition (note the assigned roles and available PowerShell cmdlets as shown below per role):
InsiderRiskManagement

Add-ComplianceCaseMember
Execute-AzureAdLabelSync
Get-ComplianceCase
Get-ComplianceCaseMember
Get-ComplianceCaseStatistics
Get-ComplianceSecurityFilter
Get-DlpCompliancePolicy
Get-DlpSensitiveInformationType
Get-InsiderRiskPolicy
Get-Label
Get-RoleGroup
Get-RoleGroupMember
New-ComplianceCase
New-InsiderRiskPolicy
Remove-ComplianceCase
Remove-ComplianceCaseMember
Remove-InsiderRiskPolicy
Set-ComplianceCase
Set-InsiderRiskPolicy
Update-ComplianceCaseMember
InsiderRiskManagementAdmins
Add-ComplianceCaseMember
Execute-AzureAdLabelSync
Get-ComplianceCase
Get-ComplianceCaseMember
Get-ComplianceCaseStatistics
Get-ComplianceSecurityFilter
Get-DlpCompliancePolicy
Get-DlpSensitiveInformationType
Get-InsiderRiskPolicy
Get-Label
Get-RoleGroup
Get-RoleGroupMember
New-ComplianceCase
New-InsiderRiskPolicy
Remove-ComplianceCase
Remove-ComplianceCaseMember
Remove-InsiderRiskPolicy
Set-ComplianceCase
Set-InsiderRiskPolicy
Update-ComplianceCaseMember
InsiderRiskManagementAnalysts
Add-ComplianceCaseMember
Get-ComplianceCase
Get-ComplianceCaseMember
Get-ComplianceCaseStatistics
Get-ComplianceSecurityFilter
Get-InsiderRiskPolicy
Get-RoleGroup
Get-RoleGroupMember
New-ComplianceCase
Remove-ComplianceCase
Remove-ComplianceCaseMember
Set-ComplianceCase
Update-ComplianceCaseMember
InsiderRiskManagementInvestigators
Add-ComplianceCaseMember
Get-ComplianceCase
Get-ComplianceCaseMember
Get-ComplianceCaseStatistics
Get-ComplianceSecurityFilter
Get-InsiderRiskPolicy
Get-RoleGroup
Get-RoleGroupMember
New-ComplianceCase
Remove-ComplianceCase
Remove-ComplianceCaseMember
Set-ComplianceCase
Update-ComplianceCaseMember
From the above we can see that the InsiderRiskManagement role has the most responsibilities whereas the Admins, Analysts and Investigators are more focused on certain aspects of this larger role. Note the names are oddly displayed above and the key is to focus on the name of the assigned role before the dash (-) and this is true of other roles previously covered.
Quarantine Administrator
New to the Security and Compliance Center is the Quarantine Administrator which is a role whose holder would manage and control quarantined messages. One possible use case would be Help Desk staff that can handle additional responsibility as managing the Quarantine could potentially impact end users if their email gets stuck in Quarantine.
If we review the roles and PowerShell cmdlets available to the role, we do see that it is a narrowly designed / focused role in the SCC:
Delete-QuarantineMessage
Export-QuarantineMessage
Get-QuarantineMessage
Get-QuarantineMessageHeader
Preview-QuarantineMessage
Release-QuarantineMessage
We also see that a user with only this role assigned in the SCC has a very limited view:

IRM Contributors
According to Microsoft, this role is not a user-based role. It is used only for background services. Be aware that you can assign a user to the group, but that user will not be able to do anything.
Content Explorer List Viewer and Content Explorer Content Viewer
The combination of these two Role Groups enables an account to view the Content Explorer content that exists in the Compliance Center for your tenant. The base address for this is as follows:
https://compliance.microsoft.com/dataclassification?viewid=contentexplorer
If a user is assigned only these role groups, then the Content Explorer will look like this:

The account will not have access to remote PowerShell as no roles will be recognized:

If an account is a Global Administrator and it does not have these groups, you will see this error message instead:

It appears that these roles need to be combined with a basic set of roles in order to access the Content Viewer. Even a higher level account with a Global Administrator role will need additional permissions.
Removing User(s) From Role Groups
Removing a user from a Role Group is an easy task to perform. If we remember back when we listed all of the cmdlets for working with Role Groups, there was a cmdlet called ‘Remove-RoleGroupMember’. Before removing a user from the Role Group we can also verify that they are still in the Role Group:
Get-RoleGroupMember -Identity mailflowadministrator

Now that we confirmed the user is in the group, we can move forward with removing the user from the intended Role Group.
Remove-RoleGroupMember -Identity mailflowadministrator -Member Colleen

After removing permissions, it would be advisable for the affected user to log out of the Security and Compliance Center, close any open PowerShell sessions and exit PowerShell completely. Doing so will eliminate any potential access errors when in PowerShell or the GUI interface for the Security and Compliance Center.
If we hadn’t confirmed the user first, we would have seen an error like this:

What about multiple users or Role Groups?
We have a user that is in multiple groups. This same user has been reassigned and no longer needs these rights in the Security and Compliance Center. How can we remove them? We can use a combination of the script we used before to identity all members in all groups with the above Remove-RoleGroupMember cmdlet. First issue will be to identify the user and then once identified as a group member, remove that member.
One User in Multiple Groups
For this scripting example we’ll run through some typical errors and problems that can often occur when drafting your own script. Remember that your script will likely have issues upon drafting, so knowing how to troubleshoot can come in handy.
First Code iteration:
$UserToRemove = “Ed Wright”
$RoleGroupNames = (Get-RoleGroup).Name
Foreach ($RoleGroupName in $RoleGroupNames) {
Write-Host “Examining Role Group - “ -ForegroundColor White -NoNewline
Write-host “$RoleGroupName .....” -ForegroundColor Yellow
$RoleGroupMembers = (Get-RoleGroupMember -Identity $RoleGroupName).Name
Foreach ($RoleGroupMember in $RoleGroupMemebers) {
If ($RoleGroupMember -eq $UserToRemove) {
# Remove-RoleGroupMember -Identity $RoleGroupName -Member $UserToRemove -Confirm:$False
Write-Host “Testing - FOUND - in the $RoleGroupName Role Group!” -ForegroundColor White
}
}
}
Problem One - Script not matching the user to remove.
First troubleshooting mechanism we can place in the script is a pair of lines that displayed the Role Group being examined:
Write-Host “Examining Role Group - “ -ForegroundColor White -NoNewline
Write-host “$RoleGroupName .....” -ForegroundColor Yellow
Result:

Now we can see that each group is listed correctly. Secondly, we can add a code section to remove the user. However, some lines are commented out we need to validate that the script was finding the correct members. We can add some ‘Write-Host’ lines to display results to again validate the script was working:
# Remove-RoleGroupMember -Identity $RoleGroupName -Member $UserToRemove
Write-Host “Testing - FOUND - in the $RoleGroupName Role Group!” -ForegroundColor White
Running the script again, however no members were matching: (essentially a repeat of the first run):

The third section added was to list each member of the group, to make sure that we were pulling members. This was done because no users were showing a match even though we knew the name was correct.
$RoleGroupMembers = (Get-RoleGroupMember -Identity $RoleGroupName).Name
$RoleGroupMembers
As we can see below, the script does identify all users in a Role Group. However is it not matching our one user:

Then, adding the $RoleGroupMember variable on a separate line after “Foreach ($RoleGroupMember in $RoleGroupMemebers) {“ in order to see if the individual members would be listed. We can remove the $RoleGroupMembers variable to keep the results clean. Running the script again, we are left with no results:

This means that there is an issue with the code between those two variables. Examining one line we see there is a tyop (!) and once this was corrected, we are able to identify which groups the user is in.
Tyop (!)

Easy error to fix:
Foreach ($RoleGroupMember in $RoleGroupMembers) {
Once corrected, we can remove extra variables and here is the final code:
$UserToRemove = “Ed Wright”
$RoleGroupNames = (Get-RoleGroup).Name
Foreach ($RoleGroupName in $RoleGroupNames) {
Write-Host “Examining Role Group - “ -ForegroundColor White -NoNewline
Write-host “$RoleGroupName .....” -ForegroundColor Yellow
$RoleGroupMembers = (Get-RoleGroupMember -Identity $RoleGroupName).Name
Foreach ($RoleGroupMember in $RoleGroupMembers) {
IF ($RoleGroupMember -eq $UserToRemove) {
# Remove-RoleGroupMember -Identity $RoleGroupName -Member $UserToRemove -Confirm:$False
Write-Host “Testing - “ -ForegroundColor White -NoNewline
Write-Host “FOUND - “ -ForegroundColor Green -NoNewline
Write-Host “in the $RoleGroupName Role Group!” -ForegroundColor White
}
}
}
Results:

Now that the code is correct, we can uncomment the removal line:
# Remove-RoleGroupMember -Identity $RoleGroupName -Member $UserToRemove -Confirm:$False
Becomes:
Remove-RoleGroupMember -Identity $RoleGroupName -Member $UserToRemove -Confirm:$False
Error Correction:
If we want to put some error checking in we can add a Try {} Catch set of code around the removal. This would be good in case you do not have the correct rights to add / remove users from Role Groups because it would provide a visual to the effect that the user was not removed:
Try {
Remove-RoleGroupMember -Identity $RoleGroupName -Member $UserToRemove -Confirm:$False -ErrorAction STOP
} Catch {
Write-host “The User $UserToRemove was not removed from the Role Group - $RoleGroupName. Please review this change” -ForegroundColor Red
}
If there was an error, you would see an error like this:
Validation
The easiest way to validate membership is to run the previous script we used to get all users in each group. With the removal of ‘Ed’ we see the groups are cleaner now:

Removing multiple users from one group
In this example we have one group that needs to be cleaned up so we need a script that will remove a set of users from the Role Group. For this scenario we have a list of users that need to be removed from one of the Role Groups. The names are stored in a CSV file.
Known Items
Role Group - Reviewer
List of users - UsersToRemove.CSV
PowerShell
$CSV = Import-CSV UsersToRemove.CSV
$RoleGroupName = ‘Reviewer’
Foreach ($Line in $CSV) {
$Name = $Line.Name
Remove-RoleGroupMember -Identity $RoleGroupName -Member $Name -Confirm:$False
}
Once complete, the script will not provide any feedback because we have ‘-Confirm:$False’. If we would like to confirm each removal, we would remove this. A re-run of the script would then prompt us for each user’s removal from the Reviewers Role Group.
Management Roles
Permissions for managing the Security and Compliance Center are broken down into a concept called Management Roles. Each of these roles can be assigned to a user in order to allow that person to configure those portions of the SCC. Role Groups are security groups within the SCC to which the Management Roles are assigned to so that a member of this Role Group has the rights granted to it. Role Groups in SCC vary from a View-Only Recipients all the way up to Organization Management. Let’s explore these Management Roles and then Role Groups in order to get a better idea of how security is layered in the SCC.
PowerShell
Let’s explore what cmdlets are available for Management Role management in PowerShell:
Get-Command *ManagementRole*
This only provides us with this one cmdlet:
Get-ManagementRole
We are restricted because RBAC security customization in Office 365 in general is very limited. We have to work within the framework provided by Microsoft’s hosted services. A quick review of these Management Roles can be found here:

Get-ManagementRole
With the same cmdlet we can also get a brief description of each role:

Typically we would be able to dig into the Management Roles and PowerShell cmdlets to see what it takes to run particular cmdlets. However, at the time of the writing of this book, this functionality is broken:

Audit in Security and Compliance Center
It seems like a lifetime ago, but there was once a time when there wasn’t an express need to audit the system administrator. They were the trusted IT support people who handled the thankless job of maintaining the servers in corporate datacenters. With the advent of multiple compliance-based standards, the auditing of the actions of an administrator have become important. Microsoft recognized this in Exchange 2010 with the advent of Admin Audit Logging and has continued this forward by enabling this logging capability in Office 365.
Admin Audit Logging is in a way self-explanatory. Basically the actions of an Administrator in Office 365 are being tracked in a way that can be audited and searched for possible misdeeds. This includes unauthorized access or even a bad configuration. The log can be dumped for examination by a third party, examined in the Security and Compliance Center or even just simply displayed to the screen.
PowerShell
What PowerShell cmdlets are available for this part of the Security and Compliance Center’s security mechanisms? Well, let’s find out:
Get-Command *AdminAudit*
This provides a short list of cmdlets:

Let’s start off with reviewing what the Admin Audit Log is configured for:
Get-AdminAuditLogConfig

Notice that the log age limit is 90 days, plenty of time to generate reports from and get history from as well. Two other parameters are important - AdminAuditLogCmdlets and AdminAuditLogParameters which refer to all cmdlets and all parameters. The parameter ‘AdminAuditLogExcludedCmdlets’ is also blank which means no cmdlets are being blocked from the log either. The default level of logging (‘Log Level’) is set to ‘Verbose’ in Office 365, which is a marked contrast to Exchange Server (where it originated) which the ‘Log Level’ is ‘None’. The Verbose LogLevel setting also adds two additional bits of information:
ModifiedProperties (old and new)
ModifiedObjectResolvedName properties
What has changed with the Admin Audit Log over the past versions is the addition of the UnifiedAuditLog parameters. These two parameters link Exchange On-Premises and Exchange Online. Only one can be configured. The UnifiedAuditLogIngestionEnabled parameter can be set to True or False. The default is False, which only audits and allows searches of Exchange On-Premises servers. If the setting is configured for True, the Admin Audit Logs for Office 365 are recorded in Office 365 and searches will be allowed after the fact. Other configurable parameters for the Admin Audit Log are:
AdminAuditLogCmdlets
AdminAuditLogParameters
AdminAuditLogExcludedCmdlets
The auditable cmdlets and parameters can be fine-tuned if that is desired, but to get a true sense of what an admin is doing the default configuration is the way to go. The third parameter ‘AdminAuditLogExcludedCmdlets’ allows for exclusions from the entirety of what is defined in the first two cmdlets. For example, if all cmdlets are chosen ‘*’ to be audited, one could exclude certain cmdlets that may not be important like running Get-MessageTrackingLog or any Get cmdlets as well. This would allow for a more fine-tuned set of Admin Audit Logs.
Lastly, the amount of time included in the logs can also be adjusted from the default of 90 days. If the value is set for 0, all the logs are purged. Setting a number less than the default will truncate what is available in the Admin Audit Log as well.
Get-Help Search-AdminAuditLog -Full
Get-Help New-AdminAuditLogSearch -Full
Searching the Admin Audit Log
You will notice that there are two cmdlets for handling searches of the Admin Audit Log:
New-AdminAuditLogSearch
Search-AdminAuditLog
So which of these cmdlets are we supposed to use for searching the logs? Let’s review some examples from these two cmdlets to compare the two:
New-AdminAuditLogSearch

Search-AdminAuditLog

Reviewing the two cmdlets, the help reveals a small difference between the two cmdlets. The first one, New-AdminAuditLogSearch cmdlet examples both include the ‘StatusMailRecipients’ parameter and the parameter is required for the cmdlet. Thus the only way to get the results is via an email. This email is generated and delivered within a period of 15 minutes. If the results need to be displayed on the screen, then the cmdlet to use is Search-AdminAuditLog. An example of this would be:
Search-AdminAuditLog -Cmdlets Set-InformationBarrierPolicy -StartDate 6/1/19 -EndDate 7/28/19
Which, in a sample tenant, would produce results like this:

New-AdminAuditLogSearch
As of the writing this book, this cmdlet is experiencing issues and has been reported as buggy:

Normally after the cmdlet is run, the results will be emailed to the Administrator’s mailbox. The cmdlet does have some limitations:
‘After the New-AdminAuditLogSearch cmdlet is run, the report is delivered to the mailboxes you specify within 15 minutes. The log is included as an XML attachment on the report email message. The maximum size of the log that can be generated is 10 megabytes (MB).’
https://technet.microsoft.com/en-us/library/ff459243(v=exchg.160).aspx
This is behavior that Exchange Online and On-premises display when the cmdlet is run.