6. Data Loss Prevention
_______________________________
In This Chapter
Introduction
Custom Sensitive Information Types
Fingerprints
Keyword Dictionaries
Exact Data Match (EDM)
DLP Compliance
Other DLP Cmdlets
_______________________________
Introduction
Data Loss Prevention (DLP) is a concept of preventing vital information from leaving an organization. This information could be leaked by email, sharing and more. An organization that depends on Office 365 for many services can leverage DLP to help maintain control of how their data is shared or not shared. We can create rules for OneDrive, SharePoint, Exchange and more and the rules can be applied to one or more workloads as needed. While DLP is just one of the many tools available to tenants, it is also a fairly complex tool.
What we also find is that while most tasks can be performed in PowerShell, there are some tasks that still cannot be performed in it. For this chapter we will concentrate on what we can do, what each part of the process requires, any limitations as well as any advantages to using PowerShell for DLP.
The PowerShell cmdlets for DLP in the Security and Compliance Center are considerably complex due to the layers that are involved. From Sensitive Information Types, to Rules to Policies and more.
Important components for DLP:
Sensitive Information Type - A pattern that can be matched to content is a document or object in Office 365 - examples include Credit Card Information, Social Security Numbers and Personally Identifiable Information (PII).
DLP Policy - Used to select what content is affected (which workload - like Exchange or Teams...).
DLP Rule - Combines the DLP Policy with a set of conditions and or Sensitive Information Type to help control content in a tenant.
For this chapter we will first start with the Sensitive Information Types - custom, fingerprint, etc. and then proceed to using these to build out DLP Policies and then DLP Rules.
Sensitive Information Types
Sensitive Information Types are specific sets of criteria to be used by DLP in the SCC that tells DLP what to look for in content. We’ll need to identify what we are looking for before we can construct any sort of policies and rules. Do we need to look for particular documents (fixed format) or do we need to construct a set of keywords or an entire dictionary of keywords with which to help tag documents in Office 365. We then need to know what workload and what level of protection or action that will be taken.
For this part of the chapter we will look at the various Sensitive Information Types that we can create for our DLP Policies and Rules. We have quite a bit of PowerShell to look forward to, time to dive right in.
PowerShell
Like any other workload or feature in the SCC, there are a few PowerShell cmdlets that are available to use. Let’s see what we have:
Get-Command *Sensitive*
This provides us with these cmdlets:
Get-DlpSensitiveInformationType
Get-DlpSensitiveInformationTypeRulePackage
New-DlpSensitiveInformationType
New-DlpSensitiveInformationTypeRulePackage
Remove-DlpSensitiveInformationType
Remove-DlpSensitiveInformationTypeRulePackage
Set-DlpSensitiveInformationType
Set-DlpSensitiveInformationTypeRulePackage
Now that we have a series of cmdlets to use to work with Sensitive Information Types in the SCC, let’s explore what we have by default and then see what it takes to create these for ourselves.
Get-DlpSensitiveInformationType
In a new tenant, we find that there are numerous pre-created Sensitive Information Types in our tenant. All of these were published by Microsoft. A total of 100 Sensitive Information Types are included. Here is a small sample:

If there are any others that are defined and we need to document just those, we need to filter out the Microsoft ones. We can do so by looking at all DLP Sensitive Information Types and filter for any that do not have Microsoft Corporation as its publisher:
Get-DlpSensitiveInformationType | where {$_.Publisher -ne ‘Microsoft Corporation’}

For statistics or tracking purposes, we can also get counts of both of these items (differences highlighted):
$CreatedCount = (Get-DlpSensitiveInformationType | Where {$_.Publisher -ne ‘Microsoft Corporation’} ).Count
$MicrosoftCount = (Get-DlpSensitiveInformationType | Where {$_.Publisher -eq ‘Microsoft Corporation’} ).Count
If we reveal the values of the variables, we will see we only have a few created ones:

Let’s go further and check percentages. Why? Because we can with PowerShell:
$TotalCount = (Get-DlpSensitiveInformationType).Count
$PercentCreated = ($CreatedCount/$TotalCount)*100
$PercentMicrosoft = ($MicrosoftCount/$TotalCount)*100
Write-Host “Created Types are $PercentCreated % of the total, while $PercentMicrosoft % are from Microsoft.”
These code lines produce this output for the percentages of DLP Sensitive Information Type percentages:
Well, those results need to be cleaned up. Why don’t we use some rounding in the Math function of PowerShell to do this for us? Percentages are usually set to 2 decimal places for most applications and we can do that here as well. Here is a set of Math functions that round our numbers to the decimal places we desire:
[Math]::Round($VariableToRound,2)
Or
[Math]::Round(<Formula used>,2)
In our case we would do this as we are calculating something and want to keep the number of lines of code down:
$PercentCreated = [Math]::Round(($CreatedCount/$TotalCount)*100,2)
$PercentMicrosoft = [Math]::Round(($MicrosoftCount/$TotalCount)*100,2)
Write-Host “Created Types are $PercentCreated % of the total, while $PercentMicrosoft % are from Microsoft.”
Now that we’ve done that, we can see a better looking percentage output:

What if we needed to create a new Sensitive Information Type for our tenant and apply this to content? We have two options for this. We can either use the Security and Compliance Center’s new feature of adding Sensitive Info Types or we can use PowerShell:

For the most control and options, using PowerShell is the best option. It requires some additional planning and understanding of all the options in order to properly create them.
Custom Sensitive Information Types
In addition to creating Sensitive Information Types, we can also create Rules Packages that are not based on a particular fingerprint, but on a set of conditions that need to match in order for a DLP rule to trigger. These Rules Packages are also known as Custom Sensitive Information Types. Like Sensitive Information Types, these were once created in Exchange Online, however, they are now only created in the SCC via PowerShell or the GUI. Creating a customer XML for the Custom Sensitive Information type is a bit complex. Microsoft has a very detailed article on creating a customer XML here:
The author of this book also has a custom script for creating a working XML. The script is rudimentary but usable for production XML files. If we dig deeper into Sensitive Information types, we find that there is a concept of a Rules Packages which is how these Sensitive Information Types are stored. We can, in fact, extract these Rules Packages with PowerShell into XML files. Why would we want to do that? We can use these XML files for documentation or verification of what we have set in the service.
Powershell:
Get-Help *DlpSensitiveInformationTypeRulePackage
This provides us with a short list of cmdlets:
Get-DlpSensitiveInformationTypeRulePackage
New-DlpSensitiveInformationTypeRulePackage
Remove-DlpSensitiveInformationTypeRulePackage
Set-DlpSensitiveInformationTypeRulePackage
We can even see Rules Packages for already created Sensitive Information types:
Get-DlpSensitiveInformationType | Where {$_.Publisher -ne ‘Microsoft Corporation’} | Fl

** NOTE ** Get Help for New-DlpSensitiveInformationTypeRulePackage is incorrect of the writing of the book:

However, if we simply replace the bad cmdlet specified ‘New-ClassificationRuleCollection’ with New-DlpSensitiveInformationTypeRulePackage, the rest of the example is technically correct. Unfortunately there are inconsistencies present in Get-Help versus what should be present. Usually it’s just because a cmdlet is new and so the Synopsis, Description and Examples may be lacking. Eventually these should be populated correctly. With the above example, if you were to go to the Microsoft Docs version of the Help file, the example is correct:

From here we can now use the information above to export the XML files which make up the custom sensitive information types. It is also possible you may have these XML files stored somewhere, but if you do we can export them using guidance from this article:
First we can start off with our list of sensitive information types:
Id Name Publisher Type
-- ---- --------- ----
1fc4e0c3-62cd-4886-8a58-ec8bbb793eec test Damian Scoles Fingerprint
aef38428-a35d-489a-8568-bc1440643ab1 Community Bank Account Number Damian Scoles Entity
791b1558-a0aa-49e4-bc31-e03b24d43e73 ConfidentialInformation Damian Scoles Entity
Using one of the ID’s above as an example, we can then store the entire item in a variable like so:
$RuleCollections = Get-DlpSensitiveInformationTypeRulePackage aef38428-a35d-489a-8568-bc1440643ab1
The we can take the $RuleCollection variable and use it to extract the XML values like so:
$DLPRulePackIDs = (Get-DlpSensitiveInformationType | where {$_.Publisher -ne ‘Microsoft Corporation’}).RulePackID
Foreach ($DLPRulePackID in $DLPRulePackIDs) {
$Path = (Get-Item -Path “.” -Verbose).FullName
$File = ‘DlpSensitiveInformationTypeRulePackage-’+$DLPRulePackID+’.xml’
$Destination = $Path+””+$File
$RulesPackage = Get-DlpSensitiveInformationTypeRulePackage $DLPRulePackID
Set-Content -Path $Destination -Encoding Byte -Value $RulesPackage.SerializedClassificationRuleCollection
$Line = “Rules Collection for - $Identity --> $Path” | Out-file $Destination -Append
}
If we look over the XML file it produced, we see this:

Now we know how to expose the current Custom Sensitive Information Types / existing Rules Packages, we can create our own Custom Sensitive Information Types. First we need to create our own XML file. For creating our own we have two choices, we can use the Microsoft site which has a guide to creating XML files based off a template, or we can use PowerShell to do so. A XML creation script, written by the author of this book, is still available in the TechNet Gallery here:
https://gallery.technet.microsoft.com/Custom-DLP-XML-Generation-43846c75
This script can help assemble a XML file based on your criteria. First, a run through and then a code explanation:

The script above is almost 200 lines in length, so we will not go line by line. However, first, the output from the script matches standard XML formatting:

Hardest part about assembly a file like this is that there are quotes everywhere in the XML file. This requires a bit of gymnastics with PowerShell code. Luckily there are a few sections of the XML code that are the same between each XML file and we can pre-code those sections. The method of adding quotes is to use an escape character (`) in front of the quotes. This allows PowerShell to interpret the double quotes as we want them and not the closing of a string.
One of the first items we need to create are random GUIDs. GUIDs are unique ID’s used to identify the DLP rule. We need three GUIDs and can generate these like so:
$Guid = New-Guid
$Guid2 = New-Guid
$Guid3 = New-Guid
In the below section, assuming we have populated the $Directory and $Filename variables, we can then add these lines to the top of the file:
Add-Content $Directory””$Filename “<?xml version=`”1.0`” encoding=`”UTF-8`”?>”
Add-Content $directory””$Filename “ <RulePackage xmlns=`”http://schemas.microsoft.com/office/2011/mce`”>”
Add-Content $Directory””$Filename “<RulePack id=`”$guid`”>”
Add-Content $directory””$Filename “<Version revision=`”0`” build=`”0`” minor=`”0`” major=`”1`”/>”
Add-Content $Directory””$Filename “<Publisher id=`”$guid2`”/>”
We can then add localizations if we need something other than the default ‘en-us’:
# Placeholder for future code to accept other languages
# $Language = read-host “Choose which language for the XML file. Default is ‘en-us’.”
$Language = “en-us”
Add-Content $Directory””$Filename “ <Details defaultLangCode=`”$Language`”>”
Add-Content $Directory””$Filename “ <LocalizedDetails langcode=`”$Language`”>”
Here we can specify the publisher of the XML file:
$Publisher = read-host “Enter a Publisher Name (i.e. Ben Smith from That Company)”
Add-Content $Directory””$Filename “<PublisherName>$publisher</PublisherName>”
Next we need to provide a name for the DLP rule, which will be inserted into the XML:
$Name = read-host “Enter a name for the DLP rule (i.e. SSN Rule)”
Add-Content $Directory””$Filename “<Name>$name</Name>”
After the name, we should provide a description that will make it easier to determine what the rule is for:
$Description = read-host “Enter a description for the DLP rule”
Add-Content $Directory””$Filename “<Description>$Description</Description>”
After entering the publisher, name and descriptions, we can close this section off for the XML file:
Add-Content $Directory””$Filename “</LocalizedDetails>”
Add-Content $Directory””$Filename “</Details>”
Add-Content $Directory””$Filename “</RulePack>”
Add-Content $Directory””$Filename “ <Rules>”
Some default values included in XML files for sensitive information types include a proximity and confidence level. We can choose to keep these levels or to modify them. For this we ask questions and then set variables ($Proximity and $Confidence) to the level requested.
# Set custom proximity and confidence levels
$Answer = read-host “Do you want to modify the default proximity level of 300? (y or n)”
If ($Answer -eq “y”) {
$Proximity = read-host “Enter a proximity value for the rules (300 is the default)”
} Else {
$Proximity = “300”
}
$Answer2 = read-host “Do you want to modify the default confidence value of 85?”
If ($Answer2 -eq “y”) {
$Confidence = read-host “Enter a recommended confidence value for the rules (85 is the default)”
} Else {
$Confidence = “85”
}
Add-Content $Directory””$Filename “ <Entity id=`”$Guid3`”recommendedConfidence=`”$confidence`” patternsProximity=`”$Proximity`”>”
Next we need to enter RegEx to use for the DLP rule and we can specify one or more of these expression when building out our rule. First we ask for a number of Regex rules we need:
$RegexNum = read-host “Enter the number of Regex expressions to be used for this rule (i.e. 1)”
Initialize an array for storing lines for Regex to be inserted into the XML file:
$RegExID2 = @()
Counter to keep track of progress:
$Counter = 1
Now we start a Do...While loop that will allow us to loop while the $Counter variable is less than the number of Regex rules to be create ($RegexNum):
Do {
$RegExID = Read-Host “Enter an ID or short name for the RegEx criteria (i.e. FormattedSSN)”
$Answer3 = read-host “Change the confidence value for this rule (85 is the default)”
If ($Answer3 -eq “y”) {
$Confidence2 = read-host “Enter the confidence value for the rules (85 is the default)”
} Else {
$Confidence2 = “85”
}
Add-Content $Directory””$Filename “ <Pattern confidenceLevel=`”$Confidence2`”>”
Add-Content $Directory””$Filename “<IdMatch idRef=`”$RegExID`”/>”
Add-Content $Directory””$Filename “</Pattern>”
$RegExID2 += $RegExID
$Counter++
}
While ($Counter -le $RegexNum)
Now we close off the ‘Entity’ Section:
Add-Content $directory””$filename “</Entity>”
Next we can query for each actual Regex expression to be used:
Foreach ($Line in $RegexID2) {
$Regex = Read-Host “Enter the Regex to be used for this rule”
Add-Content $Directory””$Filename “<Regex id=`”$line`”>$Regex</Regex>”
}
Next we close off all of the open sections of the XML file:
Add-Content $Directory””$Filename “ <LocalizedStrings>”
Add-Content $Directory””$Filename “ <Resource idRef=`”$guid3`”>”
Add-Content $Directory””$Filename “<Name langcode=`”$language`” default=`”true`”>$Name</Name>”
Add-Content $Directory””$Filename “<Description langcode=`”$language`” default=`”true`”>$Description</Description>”
Add-Content $Directory””$Filename “</Resource>”
Add-Content $Directory””$Filename “</LocalizedStrings>”
Add-Content $Directory””$Filename “</Rules>”
Add-Content $Directory””$Filename “</RulePackage>”
$FullDirectory = $Directory+””+$Filename
$FullDirectoryxml = $Directory+””+$Filenamexml
Next we convert our txt file, where all of the above lines have gone to produce and convert it to the end product, a XML file:
# Convert TXT file to an UTF8 formatted file.
$File_Content = Get-Content $Fulldirectory;
$File_Content
[System.IO.File]::WriteAllLines($FullDirectoryxml, $File_Content);
Now that we have a XML file, either via the script or one we created via a manual method. Let’s take this file and create a Custom Sensitive Information Type. Assume our file is called NewRegexDLP.xml we can run these PowerShell lines like this to import it:
$File = ‘\FS01ITDLP NewRegexDLP.xml’
New-DlpSensitiveInformationTypeRulePackage -FileData ([Byte[]]$(Get-Content -Path $File -Encoding Byte -ReadCount 0))

Once our new Sensitive Information Type is imported, we can verify it exists:
Get-DlpSensitiveInformationTypeRulePackage -Identity TestRegEx | fl

Fingerprints
In the Security and Compliance Center, a Fingerprint refers to a standard document (Invoice or HR Form) that has been converted into a Sensitive Information Type. This Sensitive Information Type can then be used with DLP policies to block potential data leaks with a particular document. For example we could use this feature with HR forms and employee records and create a DLP policy that blocks the document from being emailed or shared externally.
Now what happens with Fingerprints is a document is processed and word patterns are stored in the Fingerprint. When a document matching these word patterns are found, then the DLP action is taken. The pattern is stored in XML file to be used in the SCC. The full document is not stored in the server, but a hash of the document is.
One thing to keep in mind is that there is a supported list of documents for the Fingerprinting process. Microsoft’s list can be found here:
PowerShell
Now that we know what Fingerprints are and what documents are supported, we can explore what PowerShell cmdlets are available and what we can do with them. First, Fingerprint cmdlets?
Get-Command *fingerprint*
This gives us two PowerShell cmdlets:
Migrate-DlpFingerprint
New-DlpFingerprint
Notice we do not have PowerShell cmdlets with the following verbs - Get, Remove and Set. Let’s start with the New-DlpFingerprint cmdlet and see what we can do:

Reviewing the Get-Help as well, there are very few options to choose from. The main ones that should be used are FileData and Description. Most other options are default/built-in ones for most PowerShell cmdlets. Let’s run through some scenarios when creating these Fingerprints.
Example 1
Imagine we have a set of documents for the HR department that need to be protected because they will contain Personally Identifiable Information (PII). For a test case, we will use an Employee Data Sheet that is in Word format; Word documents are supported for Fingerprints in the SCC. Here is what the sample document looks like:

The document is stored on the HR file share at \FS01HREmployeeEmployeeDatasheet.docx. Following the example, we can store the document, using Get-Content, in a variable.
$DatasheetContent = Get-Content ‘\FS01HREmployeeEmployeeDatasheet.docx’ -Encoding Byte
$Fingerprint = New-DLPFingerprint -FileData $DatasheetContent -Description ‘EmployeeDatasheet’
Now that we have a Fingerprint ready, we need to take it and create a new Sensitive Information Type:
New-DlpSensitiveInformationType -Name “Employee Datasheet” -Fingerprints $Fingerprint -Description “Employee Datasheet”
With a Sensitive Information type we can now apply this to documents that exist in our ecosystem.
Example 2
HR has some confidential forms that are to be used internally by the company. They’ve provided IT with three forms that need to be blocked from being emailed to anyone external to the organization. First, place a copy of the document on file share so that it can be imported for creating the DLP Policy. Any form or document to be ‘fingerprinted’ should be blank so that no information interferes with the evaluation.
For PowerShell cmdlets, start with Get-Content (used to store the file in a variable) and then use New-FingerPrint to create the Fingerprint based off the content from the Get-Content variable. Follow this by creating a new Data Classification to be used by Transport Rules later. There are three forms to be protected:
- EmployeePII-Form.docx
- Employee-Review-2016.docx
- Termination-RequestForm.docx
Next, store the document content in a variable in preparation for Transport Rules to use the content. Let’s walk through the process of taking these documents and creating Transport Rules to handle them. First import each individual document into a separate variable to be used by New-Fingerprint:
$HRDoc1 = Get-Content “C:DocumentsHREmployeePII-Form.docx” -Encoding Byte
$HRDoc2 = Get-Content “C:DocumentsHREmployee-Review-2016.docx” -Encoding Byte
$HRDoc3 = Get-Content “C:DocumentsHRTermination-RequestForm.docx” -Encoding Byte
Notice that the documents are encoded as a ‘byte’ type document. According to the help file on the ‘Get-Help’ cmdlet, there are a few data types that can be used:
ASCII, BigEndianUnicode, Byte, String, Unicode, UTF7, UTF8 and Unknown.
In choosing a Word document (which is a binary file) we need to choose ‘byte’ for the encoding to properly ingest the hash from the file. The ‘Get-Content’ cmdlet does have other parameters, but for the purposes of fingerprinting itself, no others are required. Simply put in a location of the file and what encoding to use for the document for fingerprinting and store that in a variable.
Create a Fingerprint based off the document stored in each variable:
$HRDoc1_Fingerprint = New-DLPFingerprint -FileData $HRDoc1 -Description “Employee PII Form”
$HRDoc2_Fingerprint = New-DLPFingerprint -FileData $HRDoc2 -Description “Employee Review 2016”
$HRDoc3_Fingerprint = New-DLPFingerprint -FileData $HRDoc3 -Description “Termination Request Form”
** No cmdlet can query Fingerprints that were created, to see the Fingerprints raw data, you can simply ‘dump’ the variable contents to the PowerShell window:
$HRDoc1_Fingerprint | Fl

The New-Fingerprint cmdlet has even less options than the Get-Content cmdlet and examples from the cmdlet use only the two parameters chosen above – FileData and Description. FileData references the document stored in the variable. Now that the Fingerprint has been created, it can be used by the New-DlpSensitiveInformationType cmdlet to create a data classification for a Transport Rule:
New-DlpSensitiveInformationType -Name “HR Confidential Form 1” -Fingerprints $HRDoc1_Fingerprint -Description “Message contains confidential employee information.”
New-DlpSensitiveInformationType -Name “HR Confidential Form 2” -Fingerprints $HRDoc2_Fingerprint
-Description “Message contains confidential employee information.”
New-DlpSensitiveInformationType -Name “HR Confidential Form 3” -Fingerprints $HRDoc3_Fingerprint -Description “Message contains confidential employee information.”
The New-DLPSensitiveInformationType cmdlet can be used to create individual classifications or it can group multiple Fingerprints together into one classification as the parameter used for this is ‘Fingerprints’ not ‘Fingerprint’. Make sure to separate multiple Fingerprints with a comma.
** Note ** Document Fingerprints can also be added to existing data classifications using the Set-DataClassification cmdlet and the -Fingerprints parameter:
New-DlpSensitiveInformationType -Name “HR Confidential Form 3” -Fingerprints $HRDoc3_Fingerprint
To verify the Fingerprints were successful in being converted to an SCC Rules Package run the following(results below):
Get-DlpSensitiveInformationTypeRulePackage

Keyword Dictionaries
A Keyword Dictionary is a grouping of words that can be used for DLP purposes. These Dictionaries can contain up to 100,000 keywords and are typically groups by topic, like health care related keywords, profanity or some other grouping.
Powershell
Get-Command *KeywordDictionary
We now have a list of four PowerShell cmdlets related to Keyword Dictionaries in the SCC:
Get-DlpKeywordDictionary
New-DlpKeywordDictionary
Remove-DlpKeywordDictionary
Set-DlpKeywordDictionary
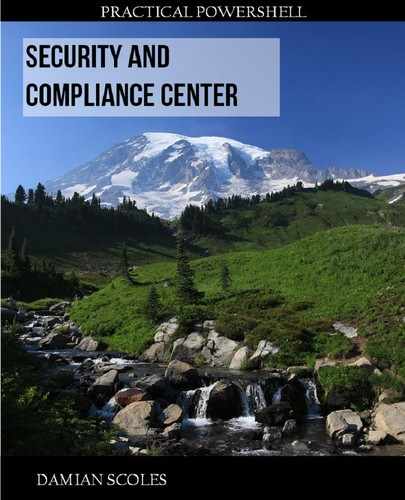
By default we have no DLP Keyword Dictionaries and we can confirm that by running the Get-DLPKeywordDictionary on a new tenant. So if we wish to work with these, we need to start by creating a new one with the New-DLPKeywordDictionary cmdlet. Here are two examples from the cmdlet:
From the above examples we see that there are a couple of steps to creating the DLP Keyword Dictionary. First, we need a list of words and store those in a variable. Once we have that list stored, they need to be converted to a format that can be interpreted by the SCC. The converter is this code section ‘[system.Text.Encoding]::UTF8.GetBytes’ as we need to convert the list into the Binary UTF8 format according to the FileData option for New-DLPKeywordDictionary help:

Example 1
For the first example, we are provided a list of keywords we wish to build a small dictionary of. A dictionary of words will be far easier than say individual rules for words, but also provides a common set for detection and sense of relevance.
$PIIKeywords = ‘First Name’,’Last Name’,’State’,’street address’,’city’,’county’,’zip code’,’Phone numbers’,’Fax numbers’,’email address’,’Social Security numbers’,’Account number’,’License number’,’License Plate’,’Serial number’
$EncodedKeywords = [system.Text.Encoding]::UTF8.GetBytes($PIIKeywords)
New-DlpKeywordDictionary -Name ‘PII’ -Description ‘PII Terms’ -FileData $EncodedKeywords

Example 2
For this example we have been provided a list of medical terms to be used for a new DLP rule for a medical firm. The list of words is stored in a txt file on one of their file servers - \MFS01DLPWordList.txt. We will need to ingest this word list to create a Keyword Dictionary in the SCC. The WordList.txt file looks like this:

Then we take the file and store it in a variable with an Encoding type of ‘Byte’ using this one liner:
$FileData = Get-Content Wordlist.txt -Encoding Byte -ReadCount 0
Then we take the encoded word list and create a new DLP Keyword Dictionary:
New-DlpKeywordDictionary -Name ‘Medical Terms’ -Description ‘Medical Lexicon’ -FileData $FileData

Remove a DLP Keyword Dictionary
Removing an existing DLP Keyword Dictionary is as simple as knowing the name and using a one-liner like this:
Remove-DlpKeywordDictionary <Name>
From Example 2:
Remove-DlpKeywordDictionary ‘Medical Terms’
Modifying an existing DLP Keyword List
For this scenario, imagine we have a terms list that is published for a particular field. This list is usually static, but every few years changes are made either with the addition of new terms or the retirement of old words. Sometimes both additions and removals are made to terms in the list. If we have a DLP Keyword Dictionary based on this we can take that Dictionary and swap out the old list. Once we receive the new list, we can follow a similar process as we did to create the initial Dictionary:
$FileData = Get-Content Wordlist.txt -Encoding Byte -ReadCount 0
Set-DlpKeywordDictionary -Name ‘Medical Terms’ -FileData $FileData
Now, if we want, we can also change the description at the same time, possibly noting the date of the change for future reference:
Set-DlpKeywordDictionary -Name ‘Medical Terms’ -Description ‘Medical Lexicon - 2019-08-03’
Additionally we could add values to an existing dictionary like so:
$Original = (Get-DlpKeywordDictionary -Name ‘Technical Docs’).KeywordDictionary.split(‘,’).Trim()
$Original += ‘Robotics’,’Perfect Invention’
$NewKeywords = $Original -Join ‘, ‘
$Data = [system.Text.Encoding]::UTF8.GetBytes($NewKeywords)
Set-DlpKeywordDictionary -Identity “Technical Docs” -FileData $Data

** Note ** ‘.Trim() will remove any spaces are the front of a line for cleanup purposes. Results of the above code lines are produced like so:
Exact Data Match (EDM)
While this book was being written, it was noticed that a set of four Exact Data Match EDM related PowerShell cmdlets appeared in the Security and Compliance Center. These same cmdlets would appear and disappear in an irregular basis. As of now, the cmdlets are still available, but the feature EDM is in Preview. This was confirmed by Microsoft Docs pages as well:
Create custom sensitive information types with Exact Data Match based classification (Preview)
https://docs.microsoft.com/en-us/office365/securitycompliance/create-custom-sensitive-info-type-edm
For this section of the book, we will briefly explore this function via PowerShell. However, anything written at the publication of this edition may change by the time your begin to use it in your tenant. Make sure to refer to any current documentation and PowerShell Get-Help for these cmdlets.
Requirements
Permissions:
You must be a global admin, compliance administrator, or Exchange Online administrator to perform the tasks described in this article. To learn more about DLP Permissions, see Permissions.
Licensing:
- Office 365 E5
- Microsoft 365 E5
- Microsoft 365 Information Protection and Compliance
- Office 365 Advanced Compliance
PowerShell
Get-Command *DLPEdm*
This provides us with these cmdlets:
Get-DlpEdmSchema
New-DlpEdmSchema
Remove-DlpEdmSchema
Set-DlpEdmSchema
First, it should be noted that there are not EDM Schemas pre-built at the time of Preview and running ‘Get-DlpEdmSchema’ will return a blank result. According to Microsoft’s work flow for EDM, we need to first create an EDM-based classification.
Sample EDM
Using a sample EDM Schema provided by Microsoft (https://docs.microsoft.com/en-us/exchange/security-and-compliance/mail-flow-rules/inspect-message-attachments#supported-file-types-for-mail-flow-rule-content-inspection), we will produce one that we can use for Employee Records for a company. The Text file would look something this (XML Style format):
<EdmSchema xmlns=”http://schemas.microsoft.com/office/2018/edm”>
<DataStore name=”EmployeeRecords” description=”Schema for patient records” version=”1”>
<Field name=”EmployeeID” unique=”true” searchable=”true” />
<Field name=”FirstName” unique=”false” searchable=”false” />
<Field name=”LastName” unique=”false” searchable=”false” />
<Field name=”SSN” unique=”true” searchable=”true” />
<Field name=”Phone” unique=”false” searchable=”true” />
<Field name=”DOB” unique=”false” searchable=”true” />
<Field name=”Gender” unique=”false” searchable=”false” />
<Field name=”Address” unique=”false” searchable=”false” />
</DataStore>
</EdmSchema>
Once we have our Text files saved and ready we can go ahead and import this into Office 365. Connect to the PowerShell interface for the Security and Compliance Center (see Ch 3). We can then import the Text file and convert it into an EDM Schema like so:
$EmployeeRecordsSchema = Get-Content .EmployeeRecordSchemal.xml -Encoding Byte -ReadCount 0
New-DlpEdmSchema -FileData $EmployeeRecordsSchema -Confirm:$true

However, according to the documentation, we can choose “Fields”, plural, for this option:

So apparently, this isn’t true. For our test we will assume that the SSN field is unique. After the file value has been modified, we can re-run the cmdlets, accept the import and now we have an EDM Schema available for us:

The EDM Schema can be pretty large, as referenced by these Microsoft Specs:
Up to 10 million rows of sensitive data
Up to 32 columns (fields) per data source
Would we be able to display all of that data or would PowerShell be limited to what is available?
After we import the EDM Schema data, we can now display the results of the import here:
Get-DlpEdmSchema | Fl
What is interesting (see the red box on the previous page) is that the entire schema file we created and imported is listed here:

** Notes **
Field names in the EDM Schema cannot have spaces in the field names or else an error like this occurs:

If we exceed 32 fields in the EDM Schema, we receive errors like these:

Once we have an EDM Schema in place we need to build an XML file that can be used for as a Sensitive Information Type:
<RulePackage xmlns=”http://schemas.microsoft.com/office/2018/edm”>
<RulePack id=”fd098e03-1796-41a5-8ab6-198c93c62b11”>
<Version build=”0” major=”2” minor=”0” revision=”0” />
<Publisher id=”fc553734-8306-44b4-9ad5-c388ad970528” />
<Details defaultLangCode=”en-us”>
<LocalizedDetails langcode=”en-us”>
<PublisherName>PII DLP</PublisherName>
<Name>Employee EDM Rulepack</Name>
<Description>This rule package contains the PII sensitive information types for employee data.</Description>
</LocalizedDetails>
</Details>
</RulePack>
<Rules>
<ExactMatch id = “F2CC861E-3FE9-4A58-82DF-4BD259EAB371” patternsProximity = “300” dataStore =”EmployeeRecords” recommendedConfidence = “65” >
<Pattern confidenceLevel=”65”>
<idMatch matches = “SSN” classification = “U.S. Social Security Number (SSN)” />
</Pattern>
<Pattern confidenceLevel=”75”>
<idMatch matches = “SSN” classification = “U.S. Social Security Number (SSN)” />
<Any minMatches =”3” maxMatches =”100”>
<match matches=”EmployeeID” />
<match matches=”FirstName”/>
<match matches=”LastName”/>
<match matches=”SSN”/>
<match matches=”Phone”/>
<match matches=”DOB”/>
<match matches=”Gender”/>
<match matches=”Address” />
</Any>
</Pattern>
</ExactMatch>
<LocalizedStrings>
<Resource idRef=”F2CC861E-3FE9-4A58-82DF-4BD259EAB371”>
<Name default=”true” langcode=”en-us”>Patient SSN Exact Match.</Name>
<Description default=”true” langcode=”en-us”>EDM Sensitive type for detecting employee SSN.</Description>
</Resource>
</LocalizedStrings>
</Rules>
</RulePackage>
In the above XML, we’ve provided details needed to identify the purpose of the XML file. Careful planning should be done in order to get the correct fields. With our XML we can now create a Sensitive Information Type:
$EmployeeRulepack=Get-Content .EmployeeRulePack.xml -Encoding Byte -ReadCount 0
New-DlpSensitiveInformationTypeRulePackage -FileData $EmployeeRulePack
Now, in order to complete the EDM Schema import process for the Security and Compliance Center, we need to follow some additional steps.
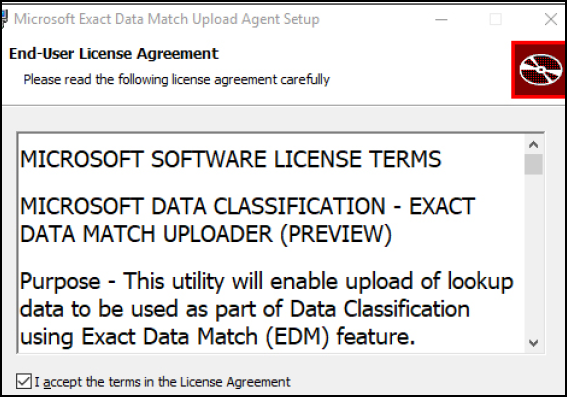
Download EDM Upload Agent: https://go.microsoft.com/fwlink/?linkid=2088639

Next we need to install it on the computer that will be used to upload the EDM data:

Authorize EDM- runeEdmUploadAgent.exe /Authorize
Create Hash for the Employee records file:
EdmUploadAgent.exe /CreateHash /DataStoreName EmployeeRecords /DataFile \FS01DLPEdmDataEmployeeRecords.csv /HashLocation \FS01DLPEdmHash
A hash file of our EDM Schema will need to be created and uploaded. When we up load the hash file we will need to specify:
Datastore Name: Provide a relevant name for the information to be stored
DataFile: CSV file with sensitive information in it
HashLocation: Location for sensitive information file’s hash to be stored
We can use these values like so:
EdmUploadAgent.exe /CreateHash /DataStoreName EmployeeRecord /DataFile \FS01sccEDMEmployeeRecords.csv /HashLocation \FS01sccEDMEmployeeRecords
If this works, you should receive a successful message:
Otherwise a failure message should appear:

This error could occur due to an error in one of the data files, or if the name of the Schema is wrong. If we check our DLP EDM Schemas in the SCC, we will see if we have the name incorrect:

EdmUploadAgent.exe /UploadHash /DataStoreName Employeerecords /HashFile FS01sccEDMEmployeeRecords.EdmHash
The above cmdlet should also return a ‘Completed Successfully’. As a final step, we can verify the datastore:
EdmUploadAgent.exe /GetDataStore

We also need to install the EDM Upload Agent, as seen on the following pages:


DLP Compliance
In the previous pages of this chapter we walked though how to create various Sensitive Information Types: Fingerprints and Keyword Dictionaries to Custom XML files and Exact Data Match objects. Now we need to explore what we can do with these. Using additional scenarios, help files and code samples we will explore how to configure our DLP Compliance Policies and Rules. Keep in mind the hierarchy of objects we need n order to create DLP Compliance Policies and then we create the DLP Compliance Rules. DLP Compliance Rules reference the Policies.
First step, is creating a new DLP Compliance Policy. A DLP Compliance Policy is used to determine which workloads in Office 365 will be affected. We can choose from Exchange, SharePoint, OneDrive and Teams locations as our target workloads for the policy.
PowerShell
In order to create a new DLP Compliance Policy we need the ‘New-DLPCompliancePolicy’ cmdlet in order to do so. The help for the New-DLPCompliancePolicy command provides us with two examples:

Let’s take some of our previous scenarios and complete them by using a Sensitive Information Type and create some DLP Compliance Policies:
Custom Sensitive Information Type (XML Based)
For this example, we’ll take the Custom Sensitive Information Type and apply it against OneDrive locations:
New-DLPCompliancePolicy -Name ‘RegEx Document Query’ -OneDriveLocation All
** In the next section we’ll create DLP Compliance Rules with these Policies.
Fingerprints
For our previous Fingerprint examples, the documents are all stored in SharePoint. We want to be able to control how these documents are access and shared. First, we need a DLP Compliance Policy for the Fingerprints:
New-DLPCompliancePolicy -Name ‘Employee Datasheet’ -SharePointLocation All
New-DLPCompliancePolicy -Name ‘HR Confidential Form 1’ -SharePointLocation All
New-DLPCompliancePolicy -Name ‘HR Confidential Form 2’ -SharePointLocation All
New-DLPCompliancePolicy -Name ‘HR Confidential Form 3’ -SharePointLocation All
** In the next section we’ll create DLP Compliance Rules with these Policies.
Keyword Dictionary
In this example, we have two Keyword Dictionaries that cover Technical Documents and PII. For these, we will want to cover any location we can (Exchange, SharePoint, OneDrive and Teams):
New-DLPCompliancePolicy -Name ‘Technical Document Policy’ -SharePointLocation All -ExchangeLocation All -OneDriveLocation All -TeamsLocation All
New-DLPCompliancePolicy -Name ‘PII’ -SharePointLocation All -ExchangeLocation All -OneDriveLocation All -TeamsLocation All
** In the next section we’ll create DLP Compliance Rules with these Policies.
Exact Data Match (EDM)
For this example we need to set up a DLP policy for Exchange:
New-DLPCompliancePolicy -Name ‘Employee Records’ -ExchangeLocation All
** In the next section we’ll create DLP Compliance Rules with these Policies.
New-DLPComplianceRule
After we have a DLP Compliance Policy, we need to create a DLP Compliance Rule as well. A DLP Compliance Rule is associated with a specify DLP Compliance Policy. No other settings are required. Typically a DLP Compliance Rule will be configured with other options such as Sensitive Information Types, Notifications, as well as determining access to the content affected.

Before we begin to build our new DLP Compliance Rules, let’s explore some of the available options that we can use to build them:
Name: Name of the DLP Compliance Rule
Policy: Which DLP Compliance Policy is referenced by the Rule
AccessScope: We have three options for this parameter - InOrganization - applied to internal content only, NotInOrganization - applied to content accessible externally or None - Condition isn’t used
BlockAccess: $True - only the owner, author, and site owner have access | $False - Allows access (default)
Comment: Allows us to provide a description for others to read
ContentContainsSensitiveInformation: Adds Sensitive Information Type(s) as a condition
ContentPropertyContainsWords: Condition that matches property values to content
Disabled: Allows us to disable a rule if we need to for testing or to decommission a DLP Compliance rule
GenerateAlert: Email notification sent to one or more email addresses
GenerateIncidentReport: Email notification sent to one or more email addresses
IncidentReportContent: Specifies content for incident report, can choose all or partial details
NotifyAllowOverride: Override allows when this condition met - FalsePositive | WithoutJustification | WithJustification
NotifyEmailCustomText: Add custom text to the notification up to 5000 characters
NotifyPolicyTipCustomText: Custom text shown to user (up to 250 characters) when conditions met
NotifyUser: Who to notify when conditions met (email address(es))
ReportSeverityLevel: None | Low | Medium | High
RuleErrorAction: If an error is encountered, what action to take - Ignore | RetryThenBlock | Block
Even with all of those options, it should be noted that there are quite a few options that are for Microsoft Internal use only: (not all inclusive)

Below are examples for creating various DLP Compliance rules, using different Sensitive Information Types:
Custom Sensitive Information Type
New-DLPComplianceRule -Name ‘Regex Document Rule’ -Policy ‘Regex Document Query’ -AccessScope InOrganization -ContentContainsSensitiveInformation ‘TestRegEx’
For this one a block is put in place for external users.
Fingerprint
New-DLPComplianceRule -Name ‘Employee Data Sheet Fingerprint Rule’ -Policy ‘Employee Datasheet’ -ContentContainsSensitiveInformation “Employee Datasheet” -AccessScope InOrganization -ReportSeverityLevel Medium
New-DLPComplianceRule -Name ‘HR Fingerprint Rule 1’ -Policy ‘HR Confidential Form 1’ -ContentContainsSensitiveInformation “HR Confidential Form 1” -AccessScope InOrganization -ReportSeverityLevel High
New-DLPComplianceRule -Name ‘HR Fingerprint Rule 2’ -Policy ‘HR Confidential Form 2’ -ContentContainsSensitiveInformation “HR Confidential Form 2” -AccessScope InOrganization -ReportSeverityLevel High
New-DLPComplianceRule -Name ‘HR Fingerprint Rule 3’ -Policy ‘HR Confidential Form 3’ -ContentContainsSensitiveInformation “HR Confidential Form 3” -AccessScope InOrganization -ReportSeverityLevel High
For the above Rules we added the block for external users as well as setting a Report Severity Level to High for three of the four and to Medium for the Employee Datasheet.
Keyword Dictionary
New-DLPComplianceRule -Name ‘Technical Doc DLP Rule’ -Policy ‘Technical Document Policy’ -GenerateIncidentReport ‘[email protected]’ -IncidentReportContent All
New-DLPComplianceRule -Name ‘PII DLP Rule’ -Policy ‘PII’-GenerateIncidentReport ‘[email protected]’ -IncidentReportContent All
For this rule set, we added notifications and a complete Incident report to be sent (all details).
Exact Data Match (EDM)
New-DLPComplianceRule -Name -Policy ‘Employee Records’ -RuleErrorAction RetryThenBlock
For this DLP Rule we are attempting to troubleshoot some issues so we have put the Rule to try again. If it does not work, then block access to the protected content.
Other DLP Cmdlets
Get-DlpDetectionsReport
“Use the Get-DlpDetectionsReport cmdlet to list a summary of Data Loss Prevention (DLP) rule matches for SharePoint Online and OneDrive for Business in your cloud-based organization.”
Get-DlpSiDetectionsReport
“Use the Get-DlpSiDetectionsReport cmdlet to view information about data loss prevention (DLP) sensitive information type detections in the Security & Compliance Center.”