
As you learned in Chapter 2, you can build a Spring Cloud Function and deploy it to multiple environments. You can use various manual methods such as Azure-Function:Deploy, Gcloud CLI, AWS CLI, Kubectl, and Knative CLI. These manual approaches are not sustainable in an enterprise with many different teams, a lot of programmers, and a lot of code. It will be a management nightmare if every team member uses their own method to build and deploy code. Also, as you can see, this process is repeatable. Since it is a repeatable process, there is a chance to leverage automation.
This chapter explores ways to automate the deployment process. It leverages some popular approaches for automating your deploys. It explores GitHub Actions for deploying Lambda, Google Cloud Functions, and Azure Functions and you will integrate with ArgoCD to push to a Kubernetes/Knative environment. While you can use GitHub Actions alone for all environments, that would require custom scripting to push to Kubernetes. ArgoCD has built-in hooks to deploy to Kubernetes, which is the preferred way. More information on GitHub Actions can be found at https://github.com/features/actions, and information on ArgoCD can be found at https://argoproj.github.io/cd/.
Let’s dig a bit deeper into GitHub Actions and ArgoCD.
3.1 GitHub Actions

A screenshot of the banup-kubeforce window. Tab action is selected. It describes all workflows. It contains runs from all workflows, events, statuses, brands, and actors.
Creating a new GitHub Actions workflow

A screenshot of the banup-kubeforce window. Tab actions is selected which displays a message to choose a workflow.
Workflow marketplace to choose your workflow setup

A screenshot of a banup-kubeforce window. Tab code is selected. Code is present on the left side of the window. The right side of the window contains feature actions under the tab marketplace. The featured actions are upload a build artifact and set up Java J D K.
Workflow page to create custom workflows
Workflow for Payroll Function to be Deployed on AWS Lambda

A screenshot of workflow code elaboration. It contains name, on-push, jobs, runs-on ubuntu-latest, steps, uses, and run along with its details.
Work flow code elaboration

A screenshot of chapter 3 S C F plus Lambda. Build-deploy is selected under jobs. Build-deploy window contains set up job, run action, run a w s-actions, build with Maven, run Sam package and deploy, post run a w s, etc.
A successful execution of the workflow
3.2 ArgoCD
Declarative means configuration is guaranteed by a set of facts instead of by a set of instructions.
Declarative GitOps allows the programmer or the ones who created the application to control the configuration of the environment in which the environment will run. This means the programmer does not have to rely on different teams, such as infrastructure or DevOps teams, to manage the pieces of the application. The programmers are in control, and this is a good thing.
ArgoCD set up is mostly programmatic and relies on the underlying Kubernetes configmaps. This is, as you can see, is different from other tools like Jenkins.
Here is how I set up the ArgoCD environment.
A Kubernetes cluster
Kubectl CLI configured to access your cluster
ArgoCD CLI installation instructions can be found at https://argo-cd.readthedocs.io/en/stable/cli_installation/
Step 1: Create a namespace for ArgoCD.

A screenshot of creating an Argo C D namespace. The screenshot reads, dollar sign Kubectl create namespace Argo c d namespace forward slash Argo c d created.
Create an ArgoCD namespace

A screenshot describes the status of an Argo C D installation run logs. It includes name, status, restarts, etc.
View the status of an ArgoCD installation
Now you can see that the ArgoCD services are up and running. Notice that an external IP has not been associated with service/argocd-server.

A screenshot of the external I P of Argo c d-server run logs. It contains name, type, cluster-I P, external-I P, port, and age.
Take note of the external IP of argocd-server
You will see an external IP associated with argocd-server. This will allow you to connect to the argocd-server.
Before you start to use ArgoCD, you need to change the “admin” user password. You can use Kubectl to read the secret associated with the “admin” user.

A screenshot of getting the password of admin user. The screenshot depicts a code.
Get the password of the "admin" user
The output of this command is the password for the “admin” user.
You can now log in using the web browser. Then navigate to the 20.119.112.240 URL to change the password.

A screenshot of logging in to Argo C D run logs. If it gets a warning error, the command is a certificate signed by an unknown authority. Run logs contain details and the admin logged in successfully.
Log in to ArgoCD

A screenshot of deploying an application in Argo C D U I. It depicts Payroll-h 2 which contains project, labels, status, repository, path, destination, etc. The status is healthy and synced.
ArgoCD UI showing an app deployed
Now that you have learned about GitHub Actions and ArgoCD, you can move on to deploying your application and automating the CI/CD process.
3.3 Building a Simple Example with Spring Cloud Function
You will use the same example from Chapter 2, but instead of using the EmployeeConsumer interface, this example uses EmployeeSupplier. In order to do that, you need a prepopulated database. You’ll then query the database using a supplier function. You can find the code at https://github.com/banup-kubeforce/payroll-h2.
Here are the required changes.
Schema.sql
Data.sql

A screenshot of the spring boot project structure. In a project structure, the s r c folder is selected. It contains a resources folder. Resources folder includes data. s q l, and schema. s q l folders along with other folders.
Spring Boot project structure with data.sql and schema.sql
Application.properties
Also add spring.jpa.defer-datasource-initialization=true to ensure that the data gets populated on startup.
No other code changes are required. It is important to note that the changes you made only affect the configuration file.
3.4 Setting Up a CI/CD Pipeline to Deploy to a Target Platform
As discussed in the introduction of this chapter, you’ll use two tools for the CI/CD process. GitHub Actions can be used as a tool for both CI (Continuous Integration) and CD (Continuous Deployment), while ArgoCD is a CD tool.
ArgoCD was designed for Kubernetes, so you can leverage this tool exclusively for Knative/Kubernetes deployment. You’ll use GitHub Actions for serverless environments such as Lambda.
Figure 3-13 shows the flow when deploying to serverless environments like AWS Lambda, Google Cloud Functions, and Azure Functions.
- 1)
Create code and push/commit code to GitHub.
- 2)
GitHub Actions senses the event trigger of the commit and starts the build and deploy process to the serverless environments defined in the actions script.

A flow diagram of deploying to serverless functions. The code created is pushed to GitHub through Git flows repo name and branch name. Event-triggered from GitHub results in GitHub actions and deploys to spring cloud function.
Deploying to serverless functions environments
Figure 3-13 shows the flow when deploying Spring Cloud Function to a Kubernetes environment with Knative configured.
- 1)
Create code and push/commit code to GitHub.
- 2)
GitHub Actions senses the event trigger of the commit and starts the build process and deploys the created container image into Docker Hub.
- 3)
ArgoCD polls for changes in GitHub and triggers a “sync.” It then retrieves the container image from Docker hub and deploys to Knative on Kubernetes. See Figure 3-14.

A flow diagram describes deploying to a Knative-kubernetes environment. Commit code through Git is pushed to GitHub. Event-triggered GitHub actions are pushed to docker and synced and pulled to Argo. It deploys the spring cloud function on kubernetes.
Deploying to a Knative-Kubernetes environment
3.5 Deploying to the Target Platform
This section looks at the process of deploying the Spring Cloud Function to the target environments such as AWS Lambda, Google Cloud Functions, Azure Functions, and Knative on Kubernetes.
3.5.1 Deploying to AWS Lambda
Deploying to AWS Lambda requires using a SAM (Serverless Application Model) based GitHub Actions script. This section explains how to use SAM and GitHub Actions. There is no additional coding required.
AWS account
AWS Lambda Function subscription
S3 bucket to store the code build
AWS CLI (optional) to verify deployments through the CLI
Code from GitHub at https://github.com/banup-kubeforce/payroll-aws-h2

A flow diagram describes deploying spring cloud function with GitHub actions. Commit code through Git is pushed to GitHub. Event-triggered GitHub actions deploy spring cloud function on lambda.
Deploying Spring Cloud Function with GitHub Actions on AWS Lambda
Step 1: Spring Cloud Function code in GitHub.
Push the code to GitHub. You can bring down code from GitHub at https://github.com/banup-kubeforce/payroll-aws-h2. This code can be modified to your specs and deployed to the repository of your choice.
Step 2: Implement GitHub Actions with AWS SAM. AWS SAM (Serverless Application Model) is a framework for building serverless applications. More information can be found at https://aws.amazon.com/serverless/sam/.
AWS has a sample SAM-based actions script that is available in the GitHub marketplace that you can leverage. This script will execute the SAM commands.
Workflow for Payroll Function to be Deployed on AWS Lambda

A screenshot of the ban up-Kubeforce window. The settings tab is selected. It displays action secrets and environmental secrets with its details.
Actions secrets for credentials and configuration

A screenshot of the banup-kubeforce window. The build deploy button is selected. It displays a new window on build deploy which includes set up job, build with Maven, run Sam package, etc.
A successful execution of GitHub Actions on AWS Lambda

A screenshot of A W S Lambda window. The function is selected. It displayed the function name.
Function created after execution of GitHub Actions

A screenshot of the Lambda function window. It depicts function overview with its description.
Testing if the function was successful. See the JSON response
In Figure 3-19, you can see that the test was successful and see a JSON result of what is in the database.
3.6 Deploying to GCP Cloud Functions
Deploying to GCP Cloud Functions using GitHub Actions is a bit intrusive, as you have to add a MANIFEST.MF file to the resources folder. See the code in GitHub.
A GitHub repository with the code. The code at https://github.com/banup-kubeforce/payroll-gcp-h2.git can be leveraged
Google accountSubscribe to Google Cloud Functions
Gcloud CLI is optional if you are just using the GitHub Actions dashboard

A flow diagram describes G C P and GitHub actions flow. Commit code through Git is pushed to GitHub. Event-triggered GitHub actions deploy spring cloud function in google cloud function.
GCP and GitHub Actions flow
Step 1: Spring Cloud Function code in GitHub. Push your code to GitHub. If you have cloned the https://github.com/banup-kubeforce/payroll-gcp-h2.git then you have everything that you need to push the code to your repository.
Step 2: Set up Cloud Functions actions.
Use deploy-cloud-functions runner
Use gcloud-cli
Workflow for Payroll Function to be Deployed on GCP Cloud Functions
Note that you will have to store your GCP_CREDENTIALS in the GitHub Secrets dashboard.
As in the previous example with AWS Lambda, note that the steps to check out, set up, and build Maven are the same. For the authentication and deployment, you use the Google Cloud CLI. The Set up Cloud SDK task will download and set up the Google CLI. You can use the same command line script that you used when you deployed from a laptop in Chapter 2.

A screenshot of the banup-kubeforce window. The build deploy button is selected. A new window on build deployment is displayed, it includes set up job, build with Maven, run Sam package, etc.
GitHub Actions gets triggered by a code commit
Once the actions successfully complete the job, you can go to the Google Cloud Functions dashboard and test the function. Again, you execute a simple GET against the EmployeeSupplier function.
Step 4: Test the function.

A screenshot of the unauthenticated set for payroll-g c p- h 2 which is allowed. It includes a link to 1st gen payroll along with other details.
Allow unauthenticated set for Payroll-gcp-h2

A screenshot of the google cloud window. It displays cloud functions. In payroll-g c p-h 2, a function is selected. It configures triggering events and displays the test command.
Successful output of the Spring Cloud Function test in GCP Cloud Functions
3.7 Deploying to Azure Functions
Spring Cloud Function on Azure Functions require a bit of tweaking, as you learned in Chapter 2. This is because the configuration is not externalized, as with AWS Lambda or GCP Cloud Functions. This does not mean that you cannot deploy easily. You have to understand how Azure Function code interprets Spring Cloud Function code and execute. See Chapter 2 for discussions around this issue; make sure that you execute and test locally before pushing to the Azure cloud.

A flow diagram describes flow of spring cloud function deployment on azure. Commit code through Git is pushed to GitHub. Event-triggered GitHub actions and deploy spring cloud function in Azure functions.
Flow of Spring Cloud Function deployment on Azure
Workflow for Payroll Function to be Deployed on Azure Functions

A screenshot of the summary window. The build and deploy button is selected which displays build deployment window which includes set up job, build with Maven, run Sam package, etc.
Successful deployment of Payroll Spring Cloud Function using GitHub Actions

A screenshot of the azure functions dashboard. Functions selected under payroll-kubeforce includes name, trigger and status with its details.
Azure Functions dashboard showing the function employeeSupplier has been deployed

A screenshot of the employee supplier dashboard. The tab overview is selected. The get function under overview is selected which displays essentials along with other details such as function app, status, etc.
Click the Get Function URL on the employeeSupplier dashboard

A screenshot of the employee supplier dashboard. The tab overview is selected. It displays the Get function U r l along with the default function key and ok tab.
Get the URL of the function
The URL of the function is https://payroll-kubeforce.azurewebsites.net/api/employeeSupplier. Use this URL for testing.
Step 4: Testing. You will use an external testing tool to see if the deployed functions work. The tool you use here is Postman.

A screenshot of the window of testing of the payroll-Kubeforce azure website. The tab body is selected. It displays options raw, binary, and Graph Q L along with other details.
Successful test result with Postman
This completes the deployment of Spring Cloud Function on Azure Functions using GitHub Actions.
3.8 Deploying to Knative on Kubernetes
The CI/CD for deploying Spring Cloud Function on Knative are similar for every Kubernetes. The only change is the cluster name. This section uses ArgoCD (http://argoproj.github.io) for CD even though you can achieve the same result with GitHub Actions. I found GitHub Actions a bit code-intensive. I wanted to separate the CD process and have a good visual tool that shows the deployment. ArgoCD provides a good visual interface.
To have a common repository for all the cloud environments, you’ll use Docker hub in this example. Docker hub provides a good interface for managing images and it is popular with developers. If you use ECR, GCR, or ACR, you’ll experience vendor lock-in.
Get the code from GitHub. You can use https://github.com/banup-kubeforce/payroll-h2.git or push your custom code
A Dockerhub account
A Dockerfile to push to Dockerhub
Actions code in your GitHub project
Access to a Kubernetes Cluster with Knative configured
ArgoCD up and running
An app in ArgoCD that is configured to poll the GitHub project

A flow diagram describes deployment flow for spring cloud function with Github actions and Argo C D. Commit code through Git pushes it to GitHub. Event-triggered Github actions push to docker and pull and sync to Argo. It deploys spring cloud function in kubernetes.
Deployment flow for Spring Cloud Function with GitHub Actions and ArgoCD
Once you have the prerequisites set up, you can begin configuring an automated CI/CD pipeline. For this example implementation, you’ll use the code from GitHub at https://github.com/banup-kubeforce/payroll-h2.git.
Step 1: Spring Cloud Function code in GitHub. Push your code to GitHub. You can use the code for payroll-h2 in GitHub.
Workflow for Payroll Function Image to be Pushed to Docker Hub
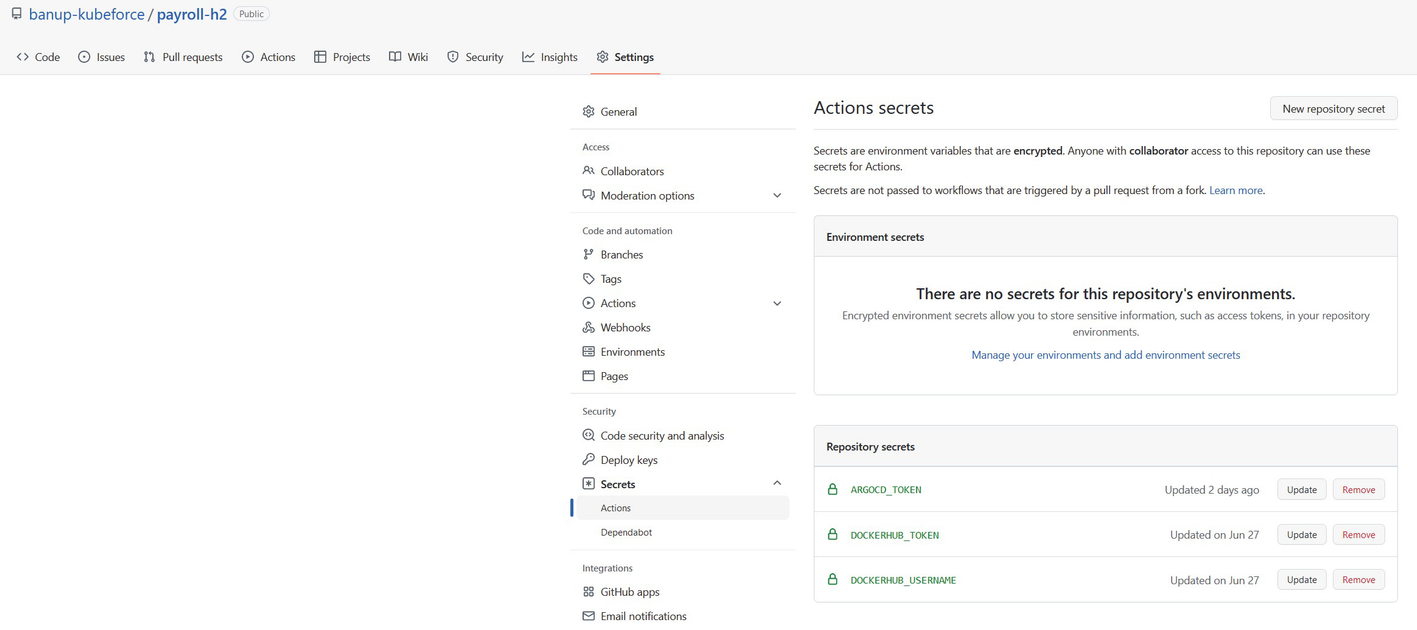
A screenshot of the payroll-Kubeforce window. In settings, action is selected. It displays environment and repository secrets and their details.
GitHub Secrets store for configurations and credentials
Step 3: Execute GitHub Actions to build and push the Docker image.

A screenshot of the banup-kubeforce window. The docker button is selected. under docker the following is displayed setup job, set up Q E M U, build with Maven, run the Sam package, etc.
Successful run of GitHub Actions
Step 4: Configure ArgoCD.
ArgoCD Script to Create a Project and Point to the payroll-h2 Repo

A screenshot of the application window. It depicts the Payroll-h 2 which includes project, labels, status, repository, path, destination, etc. The status is healthy and synced.
Application payroll-h2 deployed on ArgoCD
Step 5: Sync the project in Argo CD.

A screenshot of the repository window. It depicts type, name, repository, and connection status.
Connect payroll-h2 to the repo using HTTPS

A screenshot of payroll-h 2 window. It depicts the project, labels, status, repository, target, path, destination, and name. The status is healthy and synced.
The SYNC button on payroll-h2 app in ArgoCD

A screenshot of deploying the application window. Select synced button. Payroll-h 2 is displayed. It includes app health, current synchronize status, and last synchronize result.
Successful run of the sync showing the deployment flow

A screenshot of Kubernetes services dashboard. It displays payroll c l s t r of services and ingresses. Services and ingresses are selected and the status all are ok.
Successful deployment of Spring Cloud Function (payroll-h2) on Azure
Step 7: Testing. The best way to get the URL to test is to connect to the cluster via the command line and get the URL, as explained in Chapter 2.

A screenshot of service list run logs. It contains name, U R L, latest, age, conditions, ready, and reason.
URL for testing payroll-h2

A screenshot of the Get window. params selected. It contains query parameters of key, value, description, and bulk edit. The body includes a code with other tabs such as pretty, raw, preview, etc.
Successful execution of test against payroll-h2 deployed on AKS Knative
This completes the successful deployment using GitHub Actions and ArgoCD.
3.9 Summary
In this chapter, you learned how to set up some CI/CD tools to create an automated deployment for your Spring Cloud Function.
You learned how to trigger the deployment of functions on Lambda, Google Cloud Functions, and Azure Functions.
You also learned that you can combine the build of Docker images stored in Docker hub and ArgoCD to deploy the image to any Kubernetes cluster that is running Knative.
If you want to achieve “write-once deploy-anywhere,” you have to look at using Kubernetes and Knative. Spring Cloud Function is really a portable function.