© Banu Parasuraman 2023
B. ParasuramanPractical Spring Cloud Functionhttps://doi.org/10.1007/978-1-4842-8913-6_4

4. Building Event-Driven Data Pipelines with Spring Cloud Function

Banu Parasuraman1  
(1)
Frisco, TX, USA
 

Spring Cloud Function plays a critical role in the hybrid cloud or on-premises/private cloud space. Building events/data pipelines that span across the local datacenter and the cloud increases complexity due to the firewall boundaries. Data pipelines play an important role when you want to acquire, move, or transform data as it comes (streaming) or when it’s offline (batch).

So, what are event data pipelines?

4.1 Data Event Pipelines

Let’s look at an example. Say you are driving a car and suddenly you collide with a vehicle. After a few minutes, you get a call from OnStar asking you if you are alright as you were in a collision. How did OnStar know that you were in a collision? All this happens in a flash. Sensors in your vehicle are triggered by the collision event and begin sending data as streams into the OnStar system. The OnStar system processes the data from numerous other systems and triggers a response in the form of an OnStar operator calling you. The event that triggered the data processing along with the output is the event data pipeline. Figure 4-1 illustrates this process.

An illustration depicts the OnStar event-driven data pipeline implementation for vehicles. The vehicle sends data to nearby Cell tower, Cell tower relays data to OnStar datacenter. OnStar datacenter routes information to the call center. Through this emergency services such as police, medical response team and towing company are activated.

Figure 4-1

An example event-driven data pipeline implementation for vehicles using OnStar

All data regarding the incident is collated, processed, analyzed, and sent to various target systems, both internal and external to OnStar. This is an example of event data pipeline.

A data pipeline is a set of processes that takes raw data from disparate sources, and then filters, transforms, and moves the data to target stores, where it can be analyzed and presented in a visually compelling way.

The data can be in the form of streams or batches. Streaming is usually associated with real-time to near real-time data movement and batches are usually scheduled and non-real-time. Figure 4-2 illustrates this.

An illustration depicts the data pipeline as a set of processes that ingests the structured or unstructured data and retrieves and transforms the data through data lakes or data warehouses which is further analyzed through A I or M L processes.

Figure 4-2

Data pipeline process

The data can also be unstructured or structured. Unstructured data can be from a multitude of resources, including Internet-based platforms such as Twitter, to an automotive device emanating data.

Structured data usually originates from within the company’s applications. This data needs to be combined at a landing zone of object stores. These object stores can be on-premises or in the cloud. Once the data is ingested into the object stores, it is then retrieved and transformed, usually through an ETL process in other datastores such as data lakes or data warehouses. This data is then further analyzed using BI tools such as Power BI and Tableau or further processed with the AI/ML processes.

This whole process—from data ingestion to consumption—is called the data pipeline.

Let’s dive a bit deeper into the various sub-processes outlined in the data pipeline process.

4.1.1 Acquire Data

Acquiring data is the first step in the data pipeline process. Here, business owners and data architects decide on what data to use to fulfil the requirements for a specific use case.

For example, in the case of a collision event detection for OnStar, the data needs to be acquired from sensors. This sensor data then needs to be combined with data from internal and external partners, like finance, towing partners, rental partners, and so on.

Table 4-1 shows the data, the type of data, and the sources for a vehicle event-driven pipeline.
Table 4-1

Data Identification

Data

Type of Data

Data Source

Sensor

Unstructured (JSON, CSV)

Sensors

Rental info

Relational (RDBMS)

External rental agency

User info

Relational (RDBMS)

OnStar registration

Vehicle info

Relational (RDBMS)

Vehicle data systems

Towing info

Relational (RDBMS)

External towing company

4.1.2 Store/Ingest Data

The data from various sources is acquired and stored as raw data into the store of choice. The method of ingestion can be stream-based or batch-based.

For example, in the case of OnStar, sensor data is streamed at regular intervals or is event-based. Other data, such as rental info, can either be batch based or on-demand query driven. The raw datastore can be an S3 object store hosted in the cloud or on-premises.

4.1.3 Transform Data

The data that is stored raw in the object store is then processed. The process may include converting or transforming unstructured data into structured data and storing it in an RDBMS database.

For example, in OnStar, partner data and internal data will be combined and transformed into a common data model. The sensor data will also be transformed into an RDBMS format.

4.1.4 Load Data

Once the data is transformed, it is then loaded into a single or multiple databases with a common schema. This schema is based on a predefined data model specific to the use case. The target datastore can be a data lake or another RDBMS store. Here again, it depends on the type of analysis that needs to be done.

For example, if this an OLTP type of analysis, the data needs to be processed and sent to requesting systems quickly. This would require an RDBMS store. Data that needs to be available for reporting and research can be stored in a data lake.

4.1.5 Analyze Data

During this sub-process, the data that is stored in a data lake or RDBMs will be analyzed using tools such as Tableau, Power BI, or a dedicated web page for reporting.

In the case of OnStar, data that is stored in the data lake will be analyzed using Tableau or Power BI, while the data that needs immediate attention will be analyzed by a custom dashboard or reporting interface on the web.

Spring Cloud Function plays an integral role in the whole process, especially when combined with tools such as Spring Cloud Data Flow, AWS Glue, Azure Data Factory, Google’s data flow, and so on. You will dive deep into these tools in this chapter.

4.2 Spring Cloud Function and Spring Cloud Data Flow and Spring Cloud Streams

Spring Cloud Data Flow (SCDF) is a Spring.io-based product that supports the creation and deployment of a data pipeline. It supports batch and event-driven data, which makes it versatile. SCDF pipelines can be built programmatically or wired up through a GUI. It is heavily based on the Spring Framework and Java, which makes it very popular among Spring developers.

Figure 4-3 shows a sample dashboard of SCDF with a simple data pipeline that has a source, a processor, and a sink. You can drag-and-drop from the available components to build the pipeline. You can also build your custom source, processors, and sinks and deploy them for use within your enterprise.

A screenshot of a S C D F. It shows the stream vehicle data pipelines definition, status and applications.

Figure 4-3

A sample graphical representation of a data pipeline in SCDF

As you can see from the dashboard, you can build stream-based or batch-based (task) data pipelines and manage these through a single dashboard.

SCDF, unlike other the data pipeline tools available in the cloud, can be deployed in a Kubernetes, Docker, or Cloud Foundry environment, making it a portable tool for data pipeline development and deployment.

4.2.1 Spring Cloud Function and SCDF

Spring Cloud Function and SCDF are perfectly matched, as they are built out of the same framework, Spring. You can deploy Spring Cloud Function as a source, processor, sink, or as a trigger for the pipeline. Since the data pipelines are usually invoked sporadically for processing data, you can optimize utilization of resources and costs with a Spring Cloud Function.

Let’s look at a sample implementation of Spring Cloud Function with SCDF.

In this example, you will build a simple data pipeline using RabbitMQ as a source, do a simple transformation, and store the messages in a log. You will publish sample vehicle information into a RabbitMQ topic called VehicleInfo and do a simple transformation, then store it in a log file.

RabbitMQ ➤ Transform ➤ Log

Prerequisites:

Additional prerequisites for each environment can be found at https://dataflow.spring.io/docs/installation

Step 1: Installing Spring Cloud Data Flow.
For this example, I used an existing cluster that I created in Chapter 2 and ran the following helm command to install the SCDF, which results in the output shown in Figure 4-4.
$helm install scdf bitnami/spring-cloud-dataflow -n scdf-system --set server.service.type=LoadBalancer --set server.service.loadBalancerIP=${ingress} --set server.ingress.enabled=true --set server.ingress.server.host=scdf.${ingress}.xip.io

A screenshot depicts the helm command to install the S C D F. It consists of name, last deployed, namespace, status, test suite, notes, chart name, chart version and app version.

Figure 4-4

Successful execution of a helm chart for SCDF

Once the command runs successfully, as shown in Figure 4-4, you can check the status by running kubectl get pods. You can also get the external IP with the kubectl get svc commands, as shown in Figures 4-5 and 4-6.
$kubectl get pods -n scdf-system

A screenshot depicts the command to get external I P of the S C D F. The command used is dollar kubect 1 get pods-n s c d f-system.

Figure 4-5

Get the external IP of the SCDF

A screenshot depicts the command to get the status of the S C D F. The command used is dollar kubect 1 get s v c-n s c d f-system.

Figure 4-6

Get the status of SCDF

$kubectl get svc -n scdf-system

You can now access SCDF using the external IP. For example, http://20.241.228.184:8080/dashboard

The next step is to add applications. Spring provides a standard set of templates that you can use to build your pipeline.

Step 2: Add Applications to your SCDF Instance

Use the Add Application(s) button to create some starter apps that you can use to create a data pipeline; see Figures 4-7 and 4-8.

A screenshot depicts the S C D F add application view to create a data pipeline.

Figure 4-7

Add application view in SCDF

A screenshot depicts the options to add applications and docker-based or rabbit M Q kafka-based.

Figure 4-8

Pick the starters of your choice. If SDCF is deployed in Kubernetes, pick Docker based starters

Figure 4-8 shows you the options to add applications that are custom built through the Registering One or More Applications option. You import the application coordinates from an HTTP URI or use a properties file. There is also an option to import some prebuilt starters from Spring. Furthermore, you can choose starters that are Maven- or Docker-based or RabbitMQ- or Kafka-based. RabbitMQ and Kafka are used as backbone messaging systems for internal SCDF components and not for external use. When deploying to a Kubernetes cluster, you have to choose a Docker-based starter. When deploying locally in a Docker environment, you can choose between Maven and Docker-based starters.

Figure 4-9 shows prebuilt templates with the Docker images URI. SCDF is running on a Kubernetes environment, so the prebuilt images have a Docker URI.

A screenshot depicts the S C D F running on a Kubernetes environment and prebuilt templates installed in S C D F.

Figure 4-9

Prebuilt templates are installed in SCDF

These prebuilt templates come in three categories—source, processor, and sink. They allow you to wire up a data pipeline without the need for coding. If you want a custom component, you can follow the examples in https://dataflow.spring.io/docs/stream-developer-guides/.

The next step is to create a stream using the starter templates you loaded.

Step 3: Create a Stream

The Streams dashboard allows you to wire up a data pipeline. Click the Create Streams button to start the process, as shown in Figure 4-10.

A screenshot depicts the streams button to create a stream in the streams dashboard.

Figure 4-10

The Streams dashboard

Then perform the following steps:
  1. 1.

    Pick the source.

     
This example uses a RabbitMQ as the source, so pick Rabbit from the available options, as shown in Figure 4-11.

A screenshot depicts the create stream and picking the available option from the source.

Figure 4-11

Create a source

  1. 2.

    Pick a processor.

     
Pick the Transform component from the list, as shown in Figure 4-12.

A screenshot depicts a selection and creation of a processor for the transform component.

Figure 4-12

Create a processor

  1. 3.

    Pick a sink.

     
Pick the Log component from the list, as shown in Figure 4-13.

A screenshot depicts a selection and creation of a sink for the log component.

Figure 4-13

Create a sink

Now you wire them by dragging from the output of the first component to the input of the second component, as depicted in Figure 4-14.

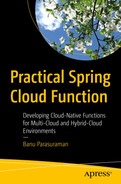
A screenshot depicts wiring the data pipeline by dragging the output of the first component to the input of the second component.

Figure 4-14

Wiring the data pipeline

The next step is to configure the pipeline.
  1. 4.

    Configure RabbitMQ.

     
You have to point the Rabbit source to your RabbitMQ instance. There are three categories in the form to populate. Open and fill in the appropriate fields. I used username, password, port, host, and queue, as shown in Figure 4-15.

Two screenshot depicts the configured Rabbit M Q and the properties of the Rabbit. It consists of a username, password, port and host.

Figure 4-15

Set the properties for rabbit

Click Update once you’re done with the configuration.
  1. 5.

    Configure the transform.

     
In this example, you simply transform the incoming string to uppercase. Note that you have to use SpEL (Spring Expression Language). More information on SpEL Is available at https://docs.spring.io/spring-framework/docs/3.0.x/reference/expressions.html. See Figure 4-16.

A screenshot depicts the properties for transform. It consists of general and spel. function and update and cancel buttons.

Figure 4-16

Set the transform properties

  1. 6.

    Configure the sink.

     
In this case, you just use a simple log. No configuration is required. See Figure 4-17.

A screenshot depicts setting properties for log. It represents general, log along with cancel and update buttons.

Figure 4-17

Setting properties for the log

  1. 7.

    Wire up the data pipeline.

     
Once you wire up, you will get a data pipeline. This will also show a Stream DSL (Domain Specific Language) expression that you can save and reuse using a SCDF shell or dashboard, as shown in Figure 4-18.
rabbit --password=pa55word --port=5672 --host=20.40.208.246 --username=banup --queues=VehicleInfo | transform --expression='new String(payload).toUpperCase()' |log

A screenshot depicts the wiring up of the data pipeline. It represents stream D S L expression on create stream dashboard.

Figure 4-18

Wire up the data pipeline

The pipeline can be triggered by an external Spring Cloud Function on Lambda or using Google Cloud Functions, and so on. See Figure 4-19.
  1. 8.

    Deploy the stream


A screenshot depicts the successful deployment of a data pipeline by an external Spring Cloud Function.

Figure 4-19

Successful deployment of a data pipeline

Step 4: Create a function to publish data to RabbitMQ

Here, you create a Spring Cloud Function to publish the data to start the data-pipeline process.

The components that you will create are as follows:
  • SenderConfig

  • QueueSender

  • SenderFunction

Prerequisites:
  • A POM with the necessary dependencies for RabbitMQ and Spring Cloud Functions, as shown in Listing 4-1.

    <dependencies>
        <dependency>
            <groupId>org.springframework.boot</groupId>
            <artifactId>spring-boot-starter-data-jpa</artifactId>
        </dependency>
        <dependency>
            <groupId>org.springframework.boot</groupId>
            <artifactId>spring-boot-starter-web</artifactId>
        </dependency>
        <dependency>
            <groupId>org.springframework.boot</groupId>
            <artifactId>spring-boot-starter-amqp</artifactId>
        </dependency>
        <dependency>
            <groupId>org.springframework.cloud</groupId>
            <artifactId>spring-cloud-function-web</artifactId>
        </dependency>
        <dependency>
            <groupId>org.springframework.boot</groupId>
            <artifactId>spring-boot-starter-test</artifactId>
            <scope>test</scope>
        </dependency>
    </dependencies>
    <dependencyManagement>
        <dependencies>
            <dependency>
                <groupId>org.springframework.cloud</groupId>
                <artifactId>spring-cloud-dependencies</artifactId>
                <version>${spring-cloud.version}</version>
                <type>pom</type>
                <scope>import</scope>
            </dependency>
    </dependencyManagement>
Listing 4-1

pom.xml with RabbitMQ Dependencies

Add the RabbitMQ server and configuration references to the application.properties file, as in Listing 4-2.
spring.cloud.function.definition=senderFunction
spring.rabbitmq.host=20.40.208.246
spring.rabbitmq.port=5672
spring.rabbitmq.username=banup
spring.rabbitmq.password=pa55word
queue.name=VehicleInfo
Listing 4-2

application.properties

     1.     Create the SenderConfig Component

This is a simple setter for the queue name. You can expand this to include other RabbitMQ configurations. This is the entity definition (see Listing 4-3).
package com.kubeforce.scdffunctiontigger;
import org.springframework.amqp.core.Queue;
import org.springframework.beans.factory.annotation.Value;
import org.springframework.context.annotation.Bean;
import org.springframework.context.annotation.Configuration;
@Configuration
public class SenderConfig {
    @Value("${queue.name}")
    private String message;
    @Bean
    public Queue queue() {
        return new Queue(message, true);
    }
}
Listing 4-3

application.properties

     2.     Create the QueueSender Component

You use a RabbitTemplate from the springframework amqp library to define the connection to the RabbitMQ instance (see Listing 4-4).
package com.kubeforce.scdftrigger;
import org.springframework.amqp.core.Queue;
import org.springframework.amqp.rabbit.core.RabbitTemplate;
import org.springframework.beans.factory.annotation.Autowired;
import org.springframework.stereotype.Component;
@Component
public class QueueSender {
    @Autowired
    private RabbitTemplate rabbitTemplate;
    @Autowired
    private Queue queue;
    public void send(String order) {
        rabbitTemplate.convertAndSend(this.queue.getName(), order);
    }
}
Listing 4-4

QueueSender.java

     3.     Wrap the Sender in Spring Cloud Function framework

This example uses the queueSender to send the data (see Listing 4-5).
package com.kubeforce.scdftrigger;
import org.springframework.beans.factory.annotation.Autowired;
import java.util.function.Function;
public class SenderFunction implements Function<String,String> {
    @Autowired
    private QueueSender queueSender;
    @Override
    public String apply(String s) {
        queueSender.send("Vehicle:SUV,Make:Ford,Model:Edge,Year:2021");
        return "ok. done";
    }
}
Listing 4-5

SenderFunction.java

Step 5: Test the function using Postman

Use the GET function on Postman and provide the URL to the senderFunction.

A screenshot depicts the G E T function on Postman with the U R L.

You should get the result shown in this image.

Check the RabbitMQ queue for any messages.

A screenshot depicts the Rabbit M Q Queue for any messages. It represents Exchange, Routing key, Redelivered, Properties, and Payload under the Queries tab with a message the server reported 0 messages remaining.

Now you have a function that can post messages to a RabbitMQ topic. The SCDF data pipeline will be listening to the queue and will start processing.

You can also look at the logs associated with each of the components to monitor the status of the data pipeline, as shown in Figure 4-20.

A screenshot depicts the details of the vehicle data pipeline. It shows the logs associated with each of the components to monitor.

Figure 4-20

Details of the VehicleDataPipeline stream

You have seen how to create a data pipeline in SCDF that monitors a topic in RabbitMQ. You created a Spring Cloud Function that posts messages into the RabbitMQ topic. Spring Cloud Function can also be deployed as a source in SCDF; more information on how to develop code for SCDF is available on the SCDF site.

4.3 Spring Cloud Function and AWS Glue

AWS Glue works very similarly to Spring Cloud Data Flow in that you can wire up a data pipeline that has a source, processor, and sink. More information can be found at https://us-east-2.console.aws.amazon.com/gluestudio/home?region=us-east-2#/.

Spring Cloud Function can participate in the data pipeline process as a trigger, or simply by integrating with one of the components in the data pipeline.

For example, if you have AWS Kinesis as a source and you need to get data from a vehicle, you can have Spring Cloud Function stream the data that it gets into AWS Kinesis.

In the example in this section, you will be publishing data into AWS Kinesis and then kick off an AWS Glue job manually.

The flow will be:

Spring Cloud Function ➤ Kinesis ➤ AWS Glue Job ➤ S3

The prerequisites are:

It is assumed that you have some knowledge of AWS Glue, as we do not delve into the details of this product. The focus is on creating the Spring Cloud Function.

4.3.1 Step 1: Set Up Kinesis

You can get to Kinesis at https://us-east-1.console.aws.amazon.com/kinesis/home?region=us-east-1#/home.

Once you subscribe to Kinesis, you can begin creating the data stream. Make sure you select on-demand (see Figure 4-21), as this will save you some money.

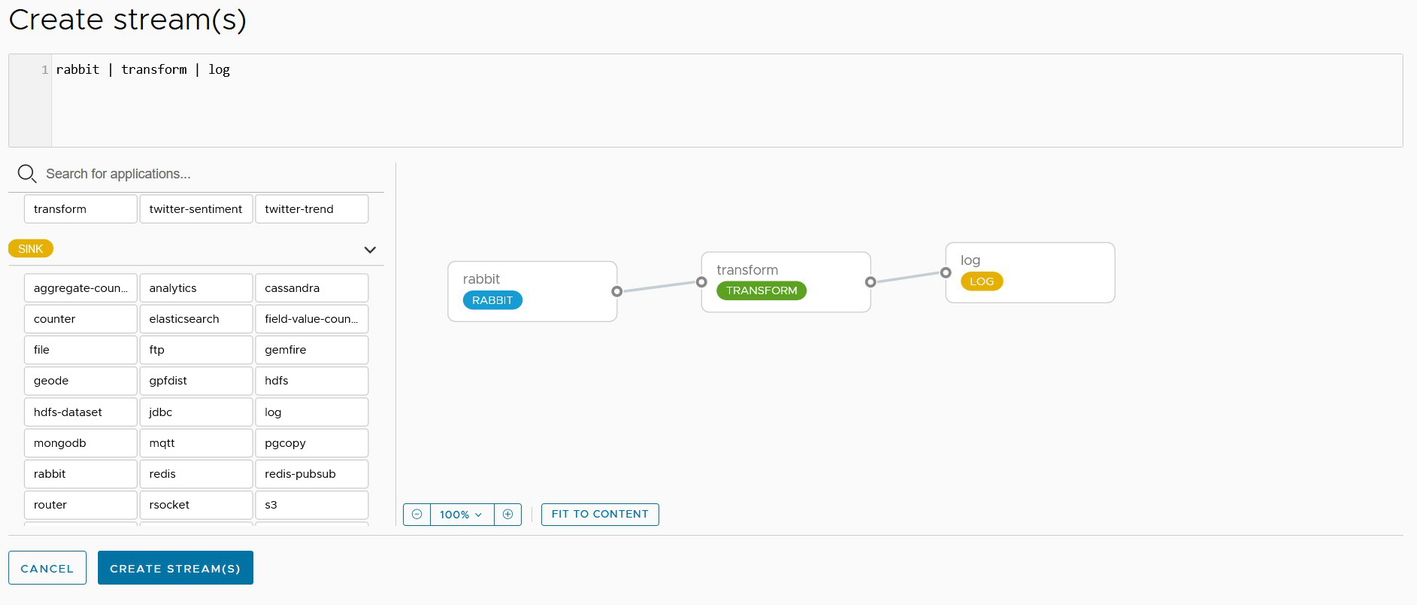
A screenshot depicts the setup for Kinesis to create a data stream for a vehicle. It shows the data stream configuration, data stream capacity and data stream settings.

Figure 4-21

Create a vehicledatastream in AWS Kinesis

A screenshot depicts the active vehicle data stream under the monitoring tab.

Figure 4-22

vehicledatastream is active

You can now connect and publish to the stream using your Spring Cloud Function.

4.3.2 Step 2: Set Up AWS Glue

You can access the AWS Glue Studio at https://us-east-1.console.aws.amazon.com/gluestudio/home?region=us-east-1#/.

Once you have the subscription, you can begin creating a glue job.

Go to the AWS Glue Studio to start the creation of the glue job, as shown in Figure 4-23.

A screenshot depicts the creation of a job on A W S glue studio.

Figure 4-23

AWS Glue Studio, Create a Job

Create a job called vehicledatapipeline. Use Amazon Kinesis as the source and Amazon S3 as the target. Ensure that you set the proper configurations for each of these components.

The job shown in Figure 4-24 will read Amazon Kinesis shards and post the data into Amazon S3.

A screenshot depicts the Configuration of amazon kinesis as the source and amazon S 3 integration for each component.

Figure 4-24

Configure Kinesis and S3 integration

Now you have a job in AWS Glue that you can trigger manually or via a function.

4.3.3 Step 3: Create a Function to Load Data into Kinesis

1: Set the application properties. Make sure that you provide the stream name. AWS information has to be set, as shown in Listing 4-6.
spring.cloud.function.definition=producerFunction
#use your aws credentials here
aws.access_key =
aws.secret_key =
aws.region = us-east-2
#use your stream name that you have created
aws.stream_name = vehicledatastream
Listing 4-6

application.properties

2: Add the kinesis dependencies. Make sure to add the necessary libraries. The latest version of producer has some bugs, so I used the working version, as shown in Listing 4-7.
<dependency>
    <groupId>com.amazonaws</groupId>
    <artifactId>amazon-kinesis-client</artifactId>
    <version>1.14.1</version>
</dependency>
<dependency>
    <groupId>com.amazonaws</groupId>
    <artifactId>amazon-kinesis-producer</artifactId>
    <version>0.13.1</version>
</dependency>
<dependency>
    <groupId>com.amazonaws</groupId>
    <artifactId>amazon-kinesis-client</artifactId>
    <version>1.14.1</version>
</dependency>
Listing 4-7

pom.xml dependecies

3: Create the model. This is a simple model for tracking a vehicle’s detail. See Listing 4-8.
public class TrackDetail {
    private String vehicleId;
    private String driverId;
    private String driverName;
    public String getVehicleId() {
        return vehicleId;
    }
    public void setVehicleId(String vehicleId) {
        this.vehicleId = vehicleId;
    }
    public String getDriverId() {
        return driverId;
    }
    public void setDriverId(String driverId) {
        this.driverId = driverId;
    }
    public String getDriverName() {
        return driverName;
    }
    public void setDriverName(String driverName) {
        this.driverName = driverName;
    }
}
Listing 4-8

TrackDetail.java

4: Create the Kinesis producer. This interface is nice to have; see Listing 4-9.
public interface ProducerService {
    public void putDataIntoKinesis(String payload) throws Exception;
    public void stop();
}
Listing 4-9

ProducerService.java

5: Create the producer implementation. The implementation provided in Listing 4-10 sets the method for posting to Kinesis.
import com.amazonaws.auth.AWSStaticCredentialsProvider;
import com.amazonaws.auth.BasicAWSCredentials;
import com.amazonaws.services.kinesis.producer.*;
import com.google.common.util.concurrent.FutureCallback;
import com.google.common.util.concurrent.Futures;
import com.google.common.util.concurrent.ListenableFuture;
import org.slf4j.Logger;
import org.slf4j.LoggerFactory;
import org.springframework.beans.factory.annotation.Value;
import org.springframework.stereotype.Service;
import java.io.UnsupportedEncodingException;
import java.nio.ByteBuffer;
import java.util.concurrent.ExecutorService;
import java.util.concurrent.Executors;
import java.util.concurrent.atomic.AtomicLong;
@Service
public class ProducerServiceImpl implements ProducerService {
    private static final Logger LOG = LoggerFactory.getLogger(ProducerServiceImpl.class);
    @Value(value = "${aws.stream_name}")
    private String streamName;
    @Value(value = "${aws.region}")
    private String awsRegion;
    @Value(value = "${aws.access_key}")
    private String awsAccessKey;
    @Value(value = "${aws.secret_key}")
    private String awsSecretKey;
    private KinesisProducer kinesisProducer = null;
    // The number of records that have finished (either successfully put, or failed)
    final AtomicLong completed = new AtomicLong(0);
    private static final String TIMESTAMP_AS_PARTITION_KEY =
            Long.toString(System.currentTimeMillis());
    public ProducerServiceImpl() {
        this.kinesisProducer = getKinesisProducer();
    }
    private KinesisProducer getKinesisProducer() {
        if (kinesisProducer == null) {
            BasicAWSCredentials awsCreds = new BasicAWSCredentials("AKIAZKRBTXXLPA3V2RW5", "kUqeO3bJyHEGziM09ru83/yU5vulbYagqHXmM4zG");
            KinesisProducerConfiguration config = new KinesisProducerConfiguration();
            config.setRegion("us-east-2");
            config.setCredentialsProvider(new AWSStaticCredentialsProvider(awsCreds));
            config.setMaxConnections(1);
            config.setRequestTimeout(6000); // 6 seconds
            config.setRecordMaxBufferedTime(5000); // 5 seconds
            kinesisProducer = new KinesisProducer(config);
        }
        return kinesisProducer;
    }
    @Override
    public void putDataIntoKinesis(String payload) throws Exception {
        FutureCallback<UserRecordResult> myCallback = new FutureCallback<UserRecordResult>() {
            @Override
            public void onFailure(Throwable t) {
                // If we see any failures, we will log them.
                int attempts = ((UserRecordFailedException) t).getResult().getAttempts().size() - 1;
                if (t instanceof UserRecordFailedException) {
                    Attempt last =
                            ((UserRecordFailedException) t).getResult().getAttempts().get(attempts);
                    if (attempts > 1) {
                        Attempt previous = ((UserRecordFailedException) t).getResult().getAttempts()
                                .get(attempts - 1);
                       LOG.error(String.format(
                                "Failed to put record - %s : %s. Previous failure - %s : %s",
                                last.getErrorCode(), last.getErrorMessage(),
                                previous.getErrorCode(), previous.getErrorMessage()));
                    } else {
                        LOG.error(String.format("Failed to put record - %s : %s.",
                               last.getErrorCode(), last.getErrorMessage()));
                    }
                }
                LOG.error("Exception during put", t);
            }
            @Override
            public void onSuccess(UserRecordResult result) {
                long totalTime = result.getAttempts().stream()
                        .mapToLong(a -> a.getDelay() + a.getDuration()).sum();
                LOG.info("Data writing success. Total time taken to write data = {}", totalTime);
                completed.getAndIncrement();
            }
        };
        final ExecutorService callbackThreadPool = Executors.newCachedThreadPool();
        ByteBuffer data = null;
        try {
            data = ByteBuffer.wrap(payload.getBytes("UTF-8"));
        } catch (UnsupportedEncodingException e) {
            e.printStackTrace();
        }
        // wait until unfinished records are processed
        while (kinesisProducer.getOutstandingRecordsCount() > 1e4) {
            Thread.sleep(1);
        }
        // write data to Kinesis stream
        ListenableFuture<UserRecordResult> f =
                kinesisProducer.addUserRecord(streamName, TIMESTAMP_AS_PARTITION_KEY, data);
        Futures.addCallback(f, myCallback, callbackThreadPool);
    }
    @Override
    public void stop() {
        if (kinesisProducer != null) {
            kinesisProducer.flushSync();
            kinesisProducer.destroy();
        }
    }
}
Listing 4-10

ProducerServiceImpl.java

6: Create the producer function. This is the critical function that will be exposed to post data into Kinesis; see Listing 4-11.
import com.fasterxml.jackson.core.JsonProcessingException;
import com.fasterxml.jackson.databind.ObjectMapper;
import org.springframework.beans.factory.annotation.Autowired;
import java.util.function.Function;
public class ProducerFunction implements Function<TrackDetail,String> {
    @Autowired
    private ProducerService producerService;
    @Override
    public String apply(TrackDetail trackDetail) {
        ObjectMapper mapper = new ObjectMapper();
        String data = "";
        try {
            data = mapper.writeValueAsString(trackDetail);
            producerService.putDataIntoKinesis(data);
        } catch (JsonProcessingException e) {
            e.printStackTrace();
        } catch (Exception e) {
            e.printStackTrace();
        }
        return "Saved data into Kinesis successfully!";
    }
}
Listing 4-11

ProducerFunction.java

7: Run the function; see Figure 4-25.

A screenshot depicts the successful run of the function.

Figure 4-25

Successful run of the function

8: Test with Postman. Run a POST-based test against ProducerFunction to publish data into Kinesis.

Add text that introduces and gives context to Figure 4-26.

A screenshot depicts the post-based test against the producer function. It includes the tabs params, authorization, headers, body, pre-request script, tests, and settings with a button to send.

Figure 4-26

Postman test

You will get a message that the data is saved.

9: Check Kinesis for data. This information can be found on the Kinesis dashboard under Monitoring, as shown in Figure 4-27.

A screenshot depicts the data metrics found on the kinesis dashboard.

Figure 4-27

Kinesis dashboard showing the data metrics

10: Run Glue manually. From the Glue Studio, start the process by clicking Run, as shown in Figure 4-24.

The job starts to run, as shown in Figure 4-28. Check the s3 bucket for any data.

A screenshot depicts the glue job run from the glue studio.

Figure 4-28

The Glue job run

In this section, you learned how to create a Spring Cloud Function that can post data into AWS Kinesis that is part of the data pipeline. You learned that you can publish data into Kinesis and trigger the AWS Glue pipeline manually, but I also encourage you to explore other ways you can implement Spring Cloud Function for AWS Glue, such as creating and deploying triggers. More information on how to create AWS Glue triggers in Spring is available at https://docs.aws.amazon.com/sdk-for-java/latest/developer-guide/examples-glue.html.

4.4 Spring Cloud Function and Google Cloud Dataflow

Google Cloud Dataflow is very similar to Spring Cloud Data Flow, in that it allows you to wire up a data pipeline with a source, processor, and sink. The Dataflow product is easier to develop with. You can read about Dataflow and its capabilities at https://cloud.google.com/dataflow.

For the example in this section, you will create a dataflow that includes cloud pub/sub:

Spring Cloud Function ➤Dataflow {Cloud Pub/Sub ➤ Cloud Storage}

Prerequisites:

Step 1: Create and configure a cloud pub/sub instance.

Before coming to this step, ensure that you are subscribed to cloud pub/sub. Also ensure that you have proper subscriptions to the APIs.

Navigate to Cloud Pub/Sub console in your subscription to create a topic. See Figure 4-29.

A screenshot depicts the creation and configuration of cloud pub or sub-instance in google cloud.

Figure 4-29

Cloud Pub/Sub with a topic

Step 2: Create and configure a bucket in cloud storage. Create a cloud storage instance and bucket. I created a bucket called vehiclebucket1 to store the file coming from cloud pub/sub; see Figure 4-30.

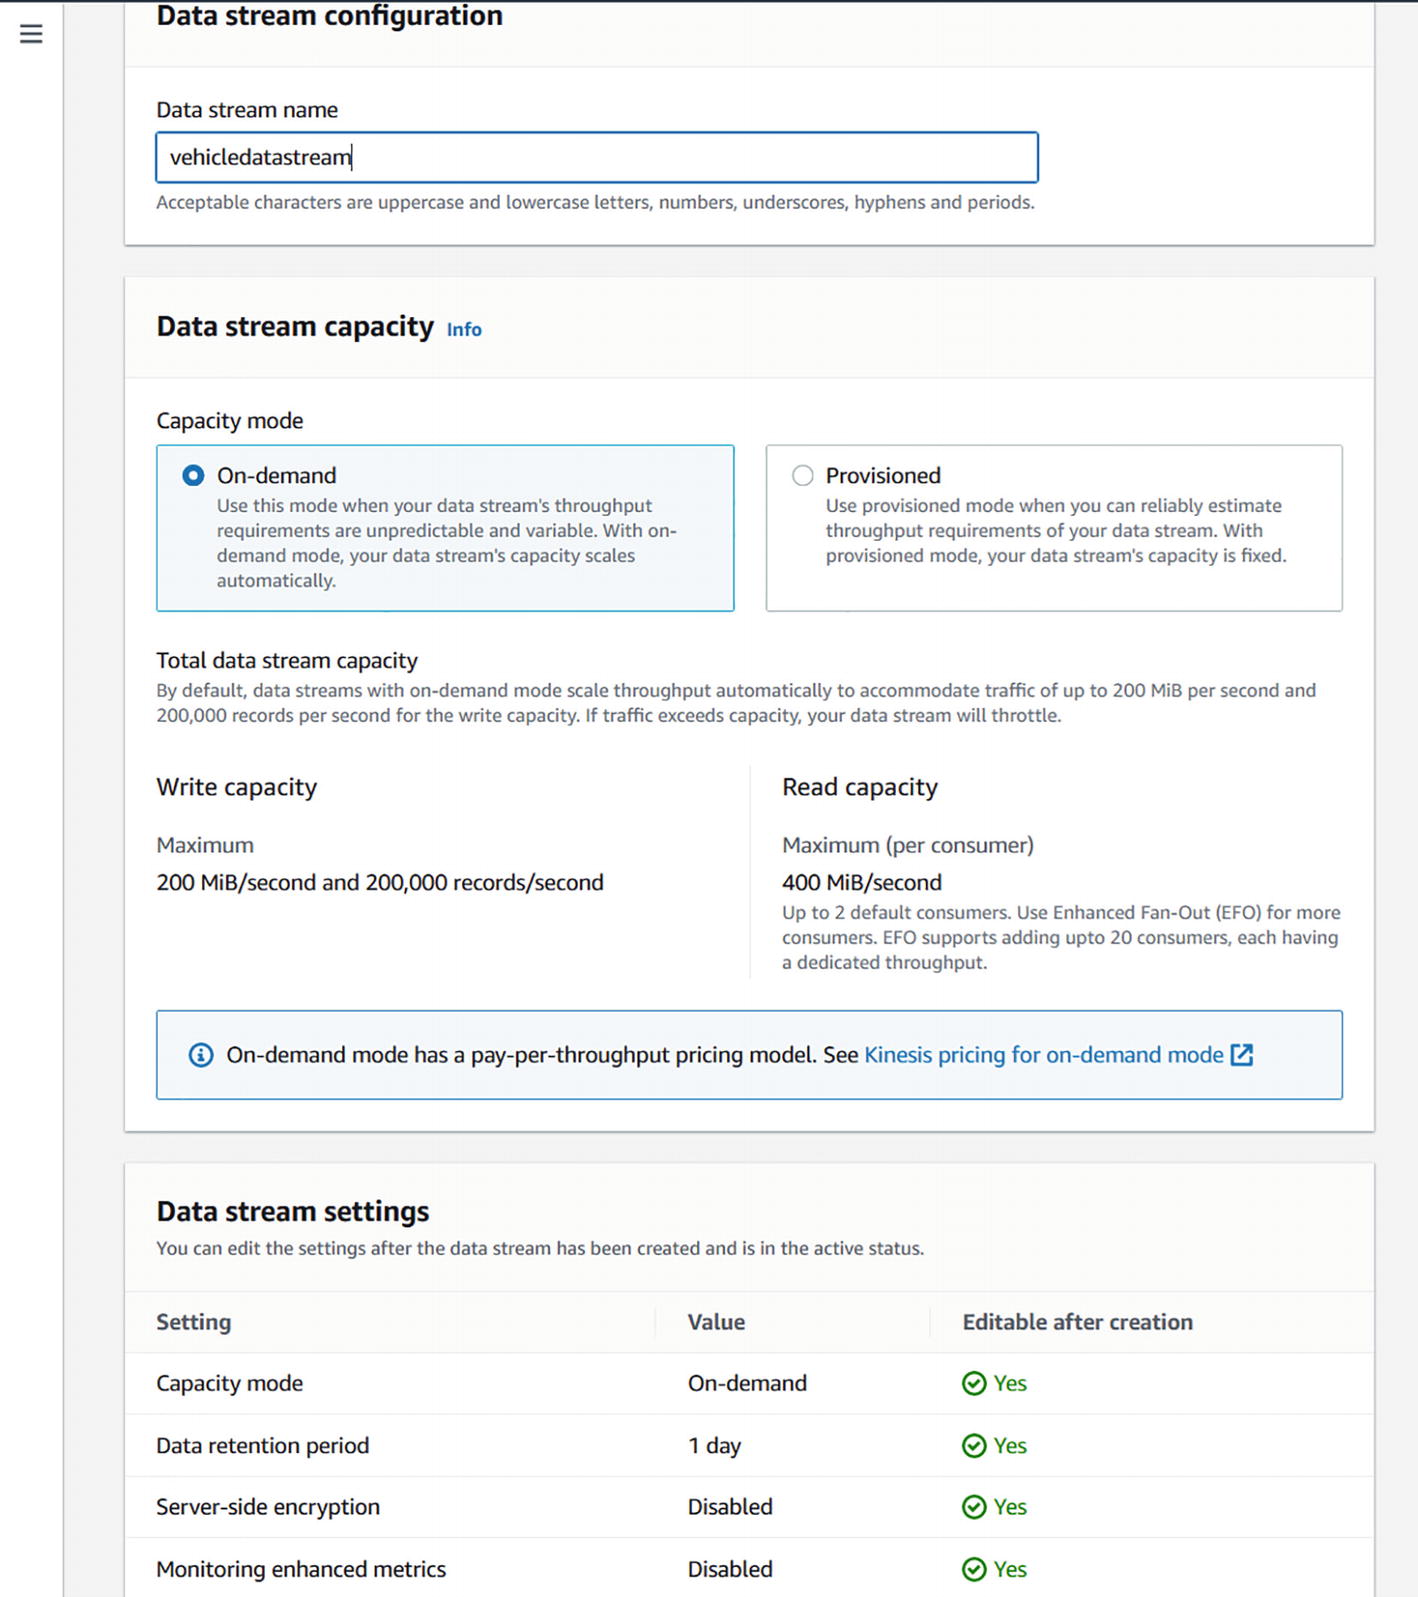
A screenshot depicts the google cloud storage with vehicle bucket 1. It includes the tabs create and refresh with a list of names under buckets.

Figure 4-30

Google Cloud Storage with vehiclebucket1

Now you are ready to build the Dataflow data pipeline.

Step 3: Create a data pipeline. Navigate to the Dataflow dashboard and create a pipeline. I created a pipeline using a prebuilt template.

1: Pick the template

This example uses the Pub/Sub to Text Files on Cloud Storage template, as shown in Figure 4-31.

A screenshot of a data flow option in google cloud. It shows the template used to create the data pipeline in the drop-down and the filter option shows many data flow template formats.

Figure 4-31

Create a data pipeline from the template

2: Set the parameters for pub/sub and cloud storage.

You will be able to pick the topic that you created in Step 1 and the bucket in Step 2. See Figure 4-32.

A screenshot depicts the data flow parameter setup. It shows the option to create a pipeline template, data flow template, regional endpoint, input pub per subtopic, output file name prefix and temporary file location.

Figure 4-32

Complete the parameters set up for Dataflow

3: Verify the creation of the data pipeline.

You can see from Figure 4-33 that a data pipeline has been created.

A screenshot depicts the successful creation of vehicle data pipeline and its pipeline summary.

Figure 4-33

Successful creation of vehicledatapipeline

An associated job will also be created, as shown in Figure 4-34.

A screenshot depicts the created job from the template in google cloud.

Figure 4-34

An associated job is created

You can find a graphical representation of the job by drilling further into the URL of the job, as shown in Figure 4-35.

A screenshot depicts the graphical representation of the job. It consists of read pub-sub event, a 5-meter window and write files.

Figure 4-35

Execution of the pipeline

A screenshot depicts the vehicle bucket details. It consists of vehicle bucket 1, location, storage class, public access and protection, under the objects tab, it shows the vehicle info.

Figure 4-36

The bucket shows the posted document

Step 4: Create the Spring Cloud Function.

In this Spring Cloud Function, you create the following classes:
  • MessageEntity class to formulate the message

  • TrackDetail class as the entity class

  • PubSubPublisher class that subscribes to the topic and publishes data

  • ProducerFunction class to implement the Spring Cloud Function

Prerequisites:
  • Maven dependencies

You need to add spring-cloud-gcp-starter-pubsub and spring-integration-core in addition to spring-cloud-function-web; see Listing 4-12.
<dependencies>
        <dependency>
            <groupId>org.springframework.boot</groupId>
            <artifactId>spring-boot-starter-web</artifactId>
        </dependency>
        <dependency>
            <groupId>org.springframework.cloud</groupId>
            <artifactId>spring-cloud-function-web</artifactId>
        </dependency>
        <!-- [START pubsub_spring_boot_starter] -->
        <!-- [START pubsub_spring_integration] -->
        <dependency>
            <groupId>com.google.cloud</groupId>
            <artifactId>spring-cloud-gcp-starter-pubsub</artifactId>
            <version>3.3.0</version>
        </dependency>
        <!-- [END pubsub_spring_boot_starter] -->
        <dependency>
            <groupId>org.springframework.integration</groupId>
            <artifactId>spring-integration-core</artifactId>
        </dependency>
        <!-- [END pubsub_spring_integration] -->
        <dependency>
        <dependency>
            <groupId>org.springframework.boot</groupId>
            <artifactId>spring-boot-starter-test</artifactId>
            <scope>test</scope>
        </dependency>
    </dependencies>
Listing 4-12

Maven Dependencies

The Application.properties file is shown in Listing 4-13.
spring.cloud.function.definition=producerFunction
spring.cloud.gcp.project-id=springcf-348721
spring.cloud.gcp.credentials.location=file:C://Users//banua//Downloads//application_default_credentials.json
pubsub.topic=projects/springcf-348721/topics/vehicletopic
Listing 4-13

application.properties

1: Create the MessageEntity class.

Store the message with a timestamp, as shown in Listing 4-14.
package com.kubeforce.googlepubsub;
import java.time.LocalDateTime;
public class MessageEntity {
    private final LocalDateTime timestamp;
    private final String message;
    public MessageEntity(LocalDateTime timestamp, String message) {
        this.timestamp = timestamp;
        this.message = message;
    }
    public LocalDateTime getTimestamp() {
        return timestamp;
    }
    public String getMessage() {
        return message;
    }
}
Listing 4-14

MessageEntity.java

2: Create the TrackDetail class.

The TrackDetail class will have three fields—vehicleId, driverId, and driverName; see Listing 4-15.
package com.kubeforce.googlepubsub;
public class TrackDetail {
    private String vehicleId;
    private String driverId;
    private String driverName;
    public String getVehicleId() {
        return vehicleId;
    }
    public void setVehicleId(String vehicleId) {
        this.vehicleId = vehicleId;
    }
    public String getDriverId() {
        return driverId;
    }
    public void setDriverId(String driverId) {
        this.driverId = driverId;
    }
    public String getDriverName() {
        return driverName;
    }
    public void setDriverName(String driverName) {
        this.driverName = driverName;
    }
Listing 4-15

TrackDetail.java

3: Create the PubSubPublisher.

The PubSubPublisher will use the topic defined in application.properties to send messages; see Listing 4-16.
package com.kubeforce.googlepubsub;
import com.google.cloud.spring.pubsub.core.PubSubTemplate;
import org.springframework.beans.factory.annotation.Value;
import org.springframework.stereotype.Component;
@Component
public class PubSubPublisher {
    private final String topic;
    private final PubSubTemplate pubSubTemplate;
    public PubSubPublisher(
            @Value(“${pubsub.topic}”) String topic,
            PubSubTemplate pubSubTemplate) {
        this.topic = topic;
        this.pubSubTemplate = pubSubTemplate;
    }
    public void publish(String payload) {
        pubSubTemplate.publish(topic, payload);
    }
}
Listing 4-16

PubSubPublisher.java

4: Create the Spring Cloud Function.

The ProducerFunction will use the topic defined in application.properties to send messages. See Listing 4-17.
package com.kubeforce.googlepubsub;
import com.fasterxml.jackson.core.JsonProcessingException;
import com.fasterxml.jackson.databind.ObjectMapper;
import org.springframework.beans.factory.annotation.Autowired;
import java.time.LocalDateTime;
import java.util.function.Function;
public class ProducerFunction implements Function<TrackDetail,String> {
    @Autowired
    private PubSubPublisher publisher;
    @Override
    public String apply(TrackDetail trackDetail) {
        ObjectMapper mapper = new ObjectMapper();
        String data = “”;
        try {
            data = mapper.writeValueAsString(trackDetail);
            MessageEntity entity = new MessageEntity(LocalDateTime.now(), data);
            publisher.publish(data);
        } catch (JsonProcessingException e) {
            e.printStackTrace();
        } catch (Exception e) {
            e.printStackTrace();
        }
        return "Saved data into Kinesis successfully!";
    }
}
Listing 4-17

ProducerFunction.java

5: Run the application and test if a message is published to Cloud Pub/Sub.

Go to the Pub/Sub console in your Google Cloud console and verify that the message has been posted; see Figure 4-37.

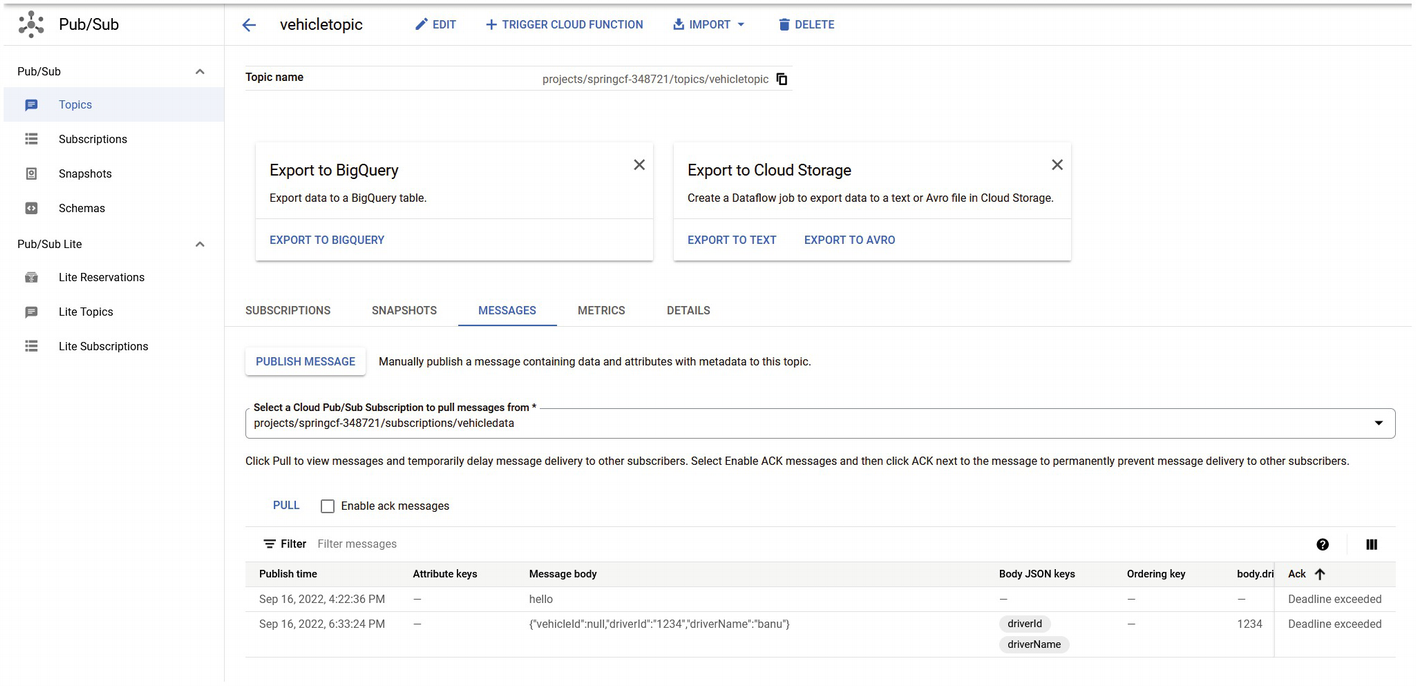
A screenshot depicts the message posted in the pub per sub console in google cloud.

Figure 4-37

The message has been posted in Cloud Pub/Sub

6: Verify is the message has been loaded into Cloud Storage.

Navigate to the Cloud Storage console in your Google Cloud to verify that the message has been loaded; see Figure 4-38.

A screenshot depicts the cloud storage console to verify that the message has been loaded into the storage. It shows the bucket details of vehicle bucket one.

Figure 4-38

The message is loaded into Cloud Storage

In this section, you learned how to use Spring Cloud Function to trigger a Google Cloud Dataflow-based data pipeline.

4.5 Summary

This chapter explained how to create dataflow and data pipelines, whether on-premises using SCDF or in the cloud. For the cloud, you can use SCDF or cloud-native tools.

Spring Cloud Function is versatile and can be used in the context of data pipelines as a trigger or as part of the flow.

With AWS Glue and Google Data Flow, you saw that you can use Spring Cloud Function as a trigger for the flows. This requires some additional coding by adding some relevant libraries and invoking the flow.

Upcoming chapters discuss other use cases of Spring Cloud Function.

..................Content has been hidden....................

You can't read the all page of ebook, please click here login for view all page.
Reset
18.116.40.53