Now that you have the basics down, it’s time to learn about
branches. Branches allow you to segregate different
lines of development. They’re integral how Git works, so having a good
conceptual understanding of what they are is crucial to becoming
proficient with Git.
Version control systems of yesterday had poor support for branches
and even worse support for merging those branches back together.
Git changes this. In fact, one of the most compelling features of
Git is its ability to easily handle creating branches and
gracefully merge them back together.
Branches track changes to multiple versions of a
project. For example, you might be finishing up version 1.0 and
already starting on new features for version 1.1. Using branches,
you can keep the code from version 1.0 isolated so new features
from 1.1 don’t accidentally slip into the version that is getting
ready to release.
You give branches names, making it easier track them based on
their name, rather than some commit ID.
master is the name of the default branch
that Git uses. All your commits so far in this book have been
in that branch. You can create as many branches as you want.
Branches in Git are relatively simplistic—they’re simply a text
file inside the repository that marks the latest commit in the
branch. Treating branches as pointers makes operations with
branches painless and fast.
There are several different ways to approach using branches. One
approach is the topic branch. You can use
this style of branch to work on a specific feature, fix a bug, or
deal with any other “topic.” Once it’s complete, then you merge
the finished changes back into your master
branch.
Another common type of branch is the release
branch, the type of branch mentioned earlier. You create release
branches as you approach a release in your project.
They’re useful when you or other members on your team are working
on multiple versions of your project.
You can create a branch called release_v1.0 for
the 1.0 version to isolate that release
from features that aren’t supposed to ship until version 1.1. Work
on version 1.1 continues like normal in the
master branch, and any changes from the
final work on version 1.0 get merged back into
master.
You can use tags to mark milestones in your project, such as
releases. Tags are similar to branches, except they are read-only.
Once you create a tag, you can’t change it. Well, that’s almost true, but for
now consider them completely unchangeable.
Branches and tags are not shared by default. Like commits, you’re
given the ability to decide which branches and tags to share with
other developers and when.
Branches in Git are pointers to a specific commit in your
repository’s history. Since each commit knows about its parent (or
parents), Git can reconstruct what’s in a branch by looking at the
latest commit in that branch and walking the history backward to
find all the ancestors. This simplified approach to branches
makes them quick to create, rename, merge, and even delete.
You occasionally have to merge changes between branches to keep
from duplicating the same work in different branches. Git makes
this easy by tracking which commits have been merged between
branches for you. Many modern VCS do not do this at all or do it
poorly.
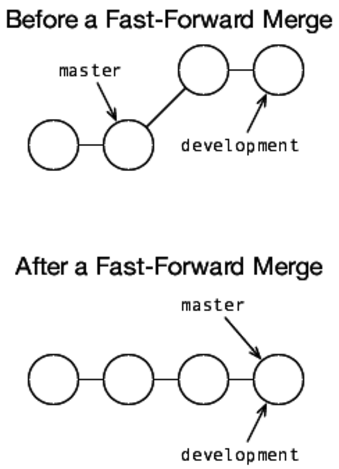
Git can employ several different merge strategies
to merge branches together. The first is the
fast-forward merge. Fast-forwards are
performed when two conditions are met: when the branch you are merging
in is being merged back into the branch it was created from and when
the original branch hasn’t had any new commits since the branch was
created. For an example, check out Figure 3, Before and after a fast-forward merge.
Fast-forward merges do not actually create anything new in the
repository. They “fast-forward” the branch pointer to
the new location.
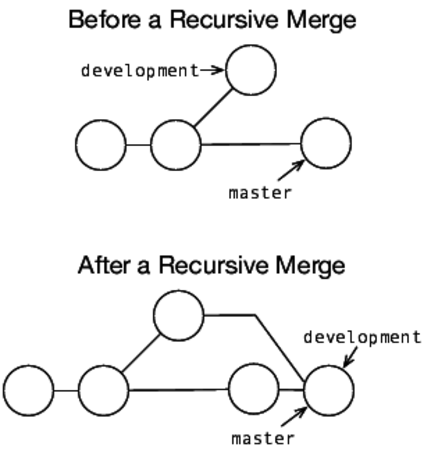
Recursive merges are used by default when both
the branches have commits that are not in the other branch. Git
creates a merge commit that has two parent
commits—the latest commit in each branch (see Figure 4, Before and after a recursive merge).
Another way to get information from one branch into another is
through rebasing the branch. Rebasing is a powerful tool in Git
that’s often misunderstood, which is understandable—there’s no
corollary in traditional VCS. It’s best explained with an example
workflow.
Consider the following example.
Rebasing Changes
You start your morning by pulling in all the changes from the
company’s shared repository and then start working. During the
morning, your co-worker pushes some commits upstream. When
you try to push the commits you’ve made, you get an error. You
now have two options. You can fetch the changes and do the following:
-
Merge them into your local branch, creating a merge
commit.
-
Rebase your local branch on top of the remote branch.
Rebasing takes the commits you made this morning and then replays
them, one by one, starting on the other branch. You can do this to
keep the appearance of a continuous stream of development instead
of having a bunch of merge commits scattered throughout your
repository’s history.
Now, let’s see what’s covered in this part:
-
Before you can use branches, you must create them. You will
learn how to do that in Task 13, Creating and Switching Branches.
-
Keeping track of your branches requires that you be able to
see what branches you have. Task 14, Viewing Branches covers the commands you
need to know in order to see the branches you have in your
repository.
-
Having multiple branches to separate work on your project
into different areas is useful only if you can merge the
changes all back together. You learn this in Task 15, Merging Commits Between Branches.
-
No coverage of merging is complete without talking about
rebasing. Rebasing is often misunderstood and feared, so
Task 16, Rewriting History by Rebasing gets you comfortable
with the mechanics of rebasing.
-
Branches often outlive their intended use. Once you no
longer need a branch, you can then delete it using the methods
described in Task 17, Deleting Branches.
-
Finally, you need to be able to mark milestones in your
branches. We cover that in Task 18, Tagging Milestones.
At first glance, it might seem odd that branches—generally
considered an advanced topic in most version control systems—are
covered before discussing how to collaborate with a team. There is
a reason for this. Remotes in Git are read-only branches. Once
you know how to work with a branch, you know how to interact with a
remote repository minus a couple of extra commands we’ll cover when
we get there.