Presentation Essentials Toolkit
To support your development as a presenter, we wanted to provide you with this at-a-glance toolkit, which includes:
• The Dos and Don’ts of Presenting
• Presentation Structure Guidelines
• Presentation Development Worksheet
• Postpresentation Evaluation—Speedback Coaching on the Spot
• High-Impact Storytelling Worksheet
• Top Resources for Smart Presenters
THE DOS AND DON’TS OF PRESENTING
Dos
• Be appropriately energetic and engaging.
• Use an attention-grabbing opener.
• Step from behind the podium.
• Use audience-appropriate language.
• Use appealing visuals and easy-to-read fonts.
• Know the essence of your Big Idea.
• Use physical movement to emphasize your message.
• Be authentic.
• Use catchphrases and one-liners to make your message memorable.
• Close your presentation with an unforgettable call to action.
• Think on the fly.
• Mention you’re available after your presentation for a meet and greet.
• Make powerful pauses.
Don’ts
• Be repetitive, boring, or monotone.
• Stumble on your words or ask if the mic is working.
• Lean on or hide behind the podium.
• Swear.
• Use bad graphics or too much text in your visuals.
• Read directly from your notes.
• Wring your hands, touch your hair or face, or tuck your hands behind your head.
• Be fake.
• Ramble on with too much information.
• Say “thank you” and close your presentation.
• Make up statistics or figures on the fly.
• Sell from the stage or be a know-it-all
• Say “um” or “ah,” or “uh” repeatedly.
PRESENTATION STRUCTURE GUIDELINES
In Chapter 2, we shared guidelines for creating an effective presentation. This at-a-glance list provides that framework for you with just the basics to help you with your next presentation:
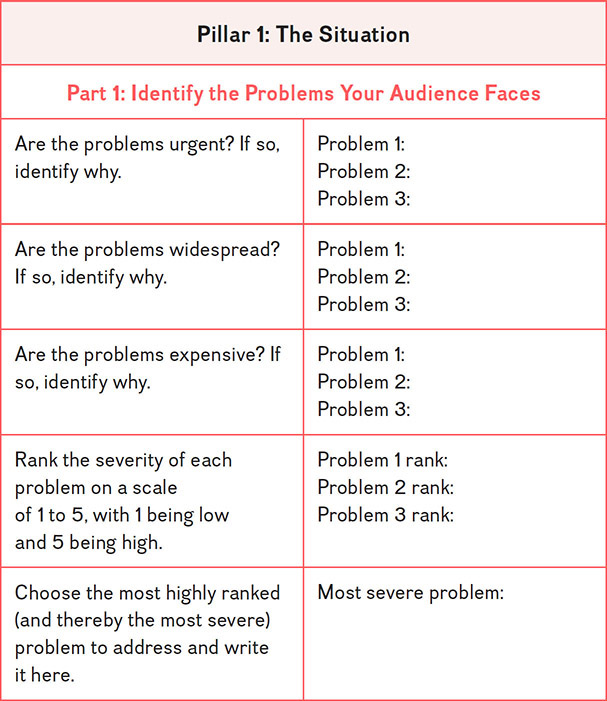
Pillar 1: The Situation
The presenter defines the problem being addressed, creates a Big Idea Statement to motivate the audience to take action after the presentation, and identifies what’s at stake if the audience fails to take action.
• Part 1: Identify the problems your audience faces.
![]() Are the problems urgent, widespread, or expensive?
Are the problems urgent, widespread, or expensive?
![]() Rank the severity of each problem.
Rank the severity of each problem.
![]() Choose the most severe problem to address.
Choose the most severe problem to address.
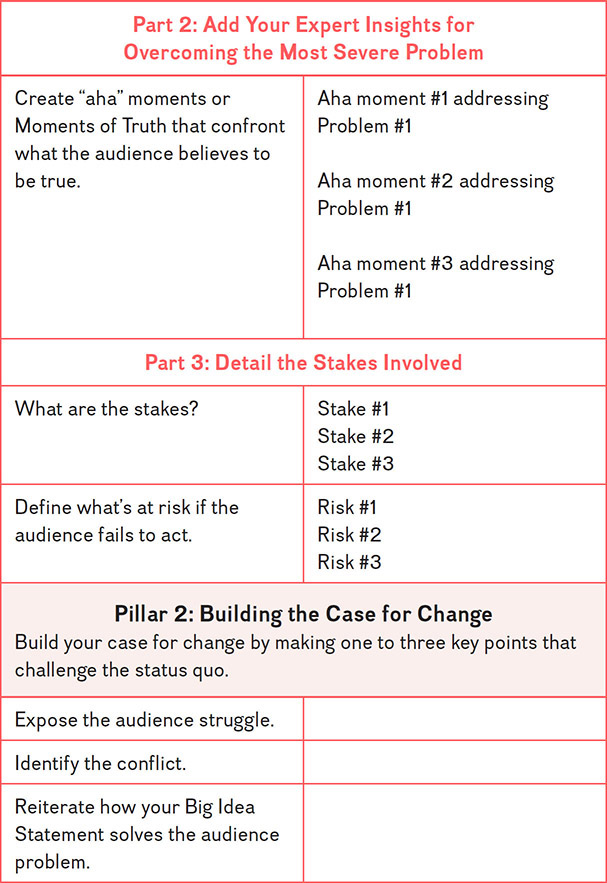
• Part 2: Add your expert insights for overcoming the problem.
![]() Create “aha” moments or Moments of Truth that confront what the audience believes to be true.
Create “aha” moments or Moments of Truth that confront what the audience believes to be true.
• Part 3: Detail the stakes involved.
![]() Define what’s at risk if the audience fails to act.
Define what’s at risk if the audience fails to act.
Pillar 2: Building the Case for Change
This is where the presenter builds the case for change by making one to three key points that challenge the status quo.
• Expose the audience struggle.
• Identify the conflict.
• Reiterate how your Big Idea Statement solves the audience problems.
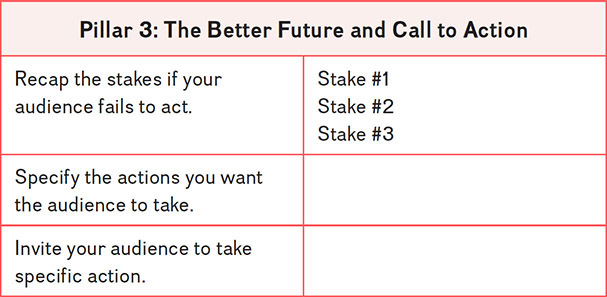
Pillar 3: The Better Future and Call to Action
This is where the presenter defines a better future and appeals for a call to action.
• Recap the stakes if your audience fails to act.
• Specify the actions you want the audience to take.
• Invite your audience to take specific action.
PRESENTATION DEVELOPMENT WORKSHEET
Use this helpful worksheet when planning your presentation. Fill in the blanks appropriate to your content.
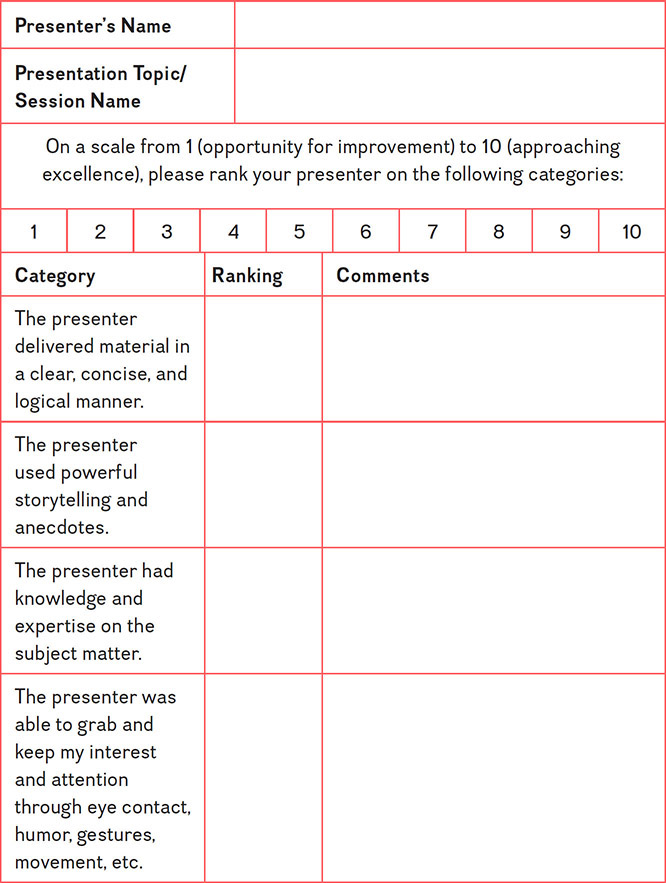
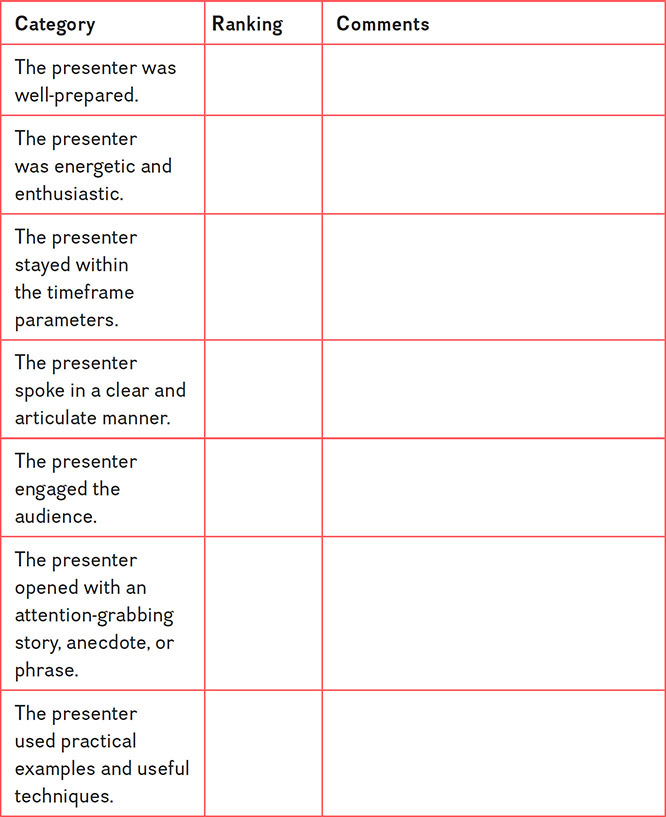
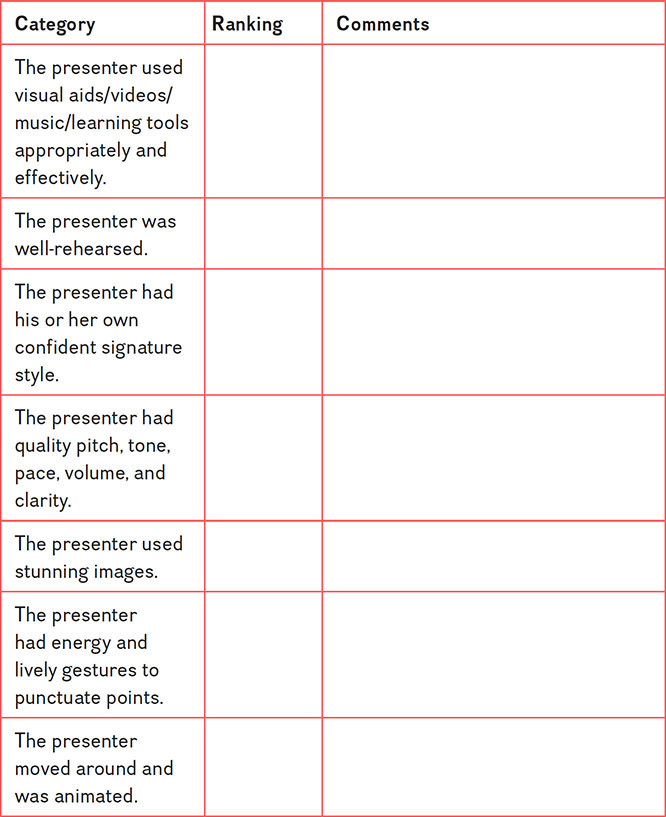
POSTPRESENTATION EVALUATION—SPEEDBACK COACHING ON THE SPOT
Every reputable presentation should have a mechanism for audience feedback that’s fast and accurate. We like to call this “speedback coaching.” How else will you know if you’re hitting the mark with your audience unless you receive feedback? Or how will you know if you’re improving, for that matter? With this in mind, we’ve provided a sample evaluation form you can use or adapt to measure your presentations.
How to Use the Postpresentation Evaluation
If you’re evaluating your own presentation, we recommend taking a video with a smartphone or camera of yourself presenting. Try to keep your trial run short, about three minutes or so. Play the video and use the evaluation to critique yourself, making notes on where you can improve and where you already shine. Remember, in areas where you feel strong, focus on how you can amplify them and let those strengths work for you.
When to Use the Postpresentation Evaluation
Presenters often distribute evaluations to receive feedback from their audiences because an evaluation is a great tool for continuous growth. It’s not a way to embarrass presenters or make them feel inadequate; on the contrary, presenters should seek out feedback in order to refine their craft. We encourage you to adapt the evaluation in this section to share with your audience after your presentations.
How to Use the Postpresentation Evaluation in a Group
When you’re learning how to present and you’re trying to up your game, it’s great to have reliable feedback and an audience you know. Many organizations have groups where you can practice presenting, and this evaluation can be perfect for those types of settings.
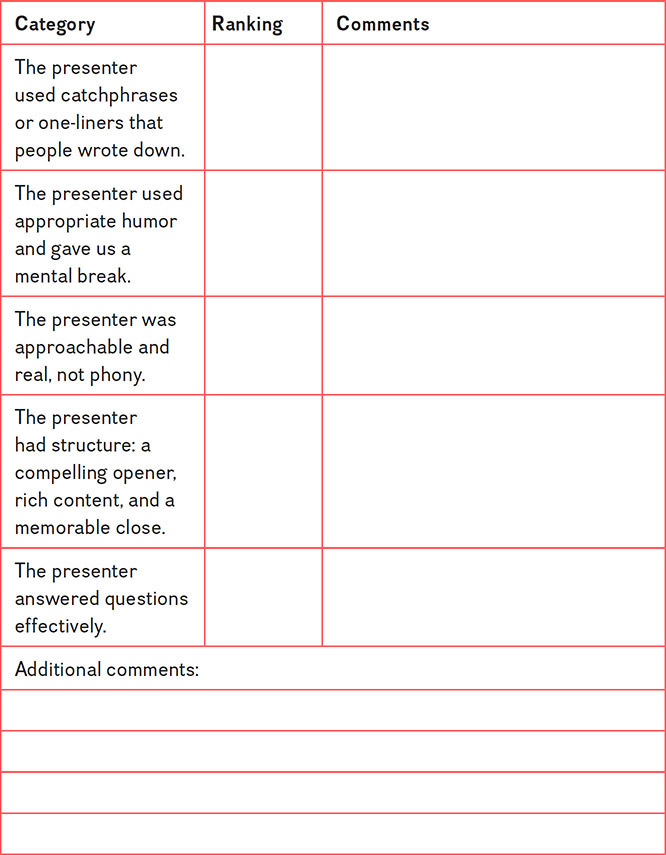
Make copies of the following evaluation, giving a copy to every audience member for each presenter. (Reminder: This is a time to be honest and helpful. Insults or negative comments are not allowed and can be deflating for everyone involved. Leave your comments in the spirit of providing helpful feedback.)
Give everyone three minutes to present their speech or specialized presentation. Assign a timekeeper in the audience and tell everyone they should be focused on the presenter during their time and should not be writing as they speak. There should be time set aside after each presenter for everyone to record their thoughts.
It’s also a great idea to remind everyone that the entire evaluation does not have to be completed. Instead, focus on areas that will be of the most help to the presenter. If she or he spoke too softly, that’s a great note to make. If they soared with confidence or told a heartfelt story that grabbed everyone’s attention, make note of that as well.
The feedback a presenter receives from these evaluations can provide an enormous growth opportunity. Each presenter can study the comments and make notes on things that resonated with the audience or things that may have been confusing. And, remember, when you’re the one completing this sheet on someone’s presentation, be supportive, helpful, specific, kind, and empathetic.
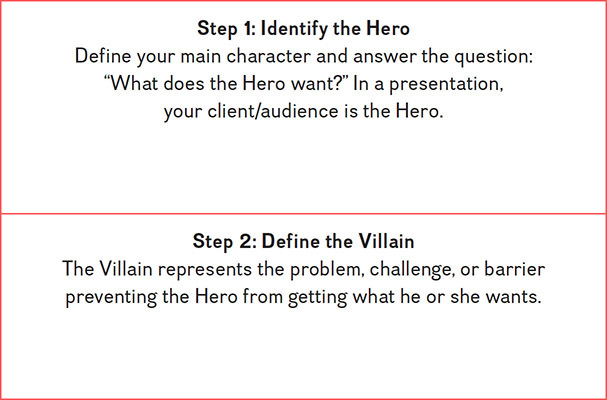
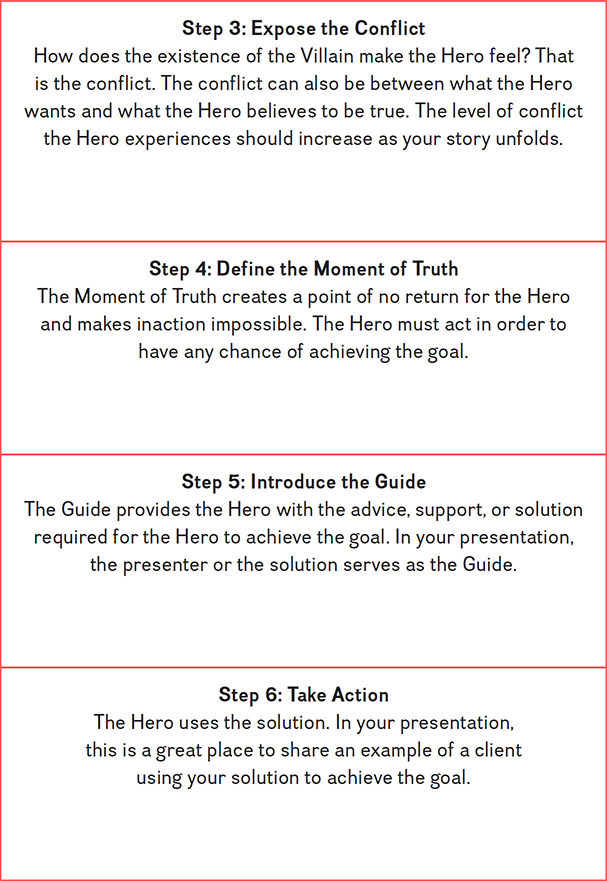
HIGH-IMPACT STORYTELLING WORKSHEET
Every story contains three characters: the Hero, the Villain, and the Guide. We created this High-Impact Storytelling Worksheet so you can easily craft and create stories (with these three characters in mind) to captivate your audience and make your message memorable. By using story structure, you:
• Eliminate irrelevant information
• Obliterate confusion
• Engage your audience
• Inspire action
TOP RESOURCES FOR SMART PRESENTERS
This list of resources vital to presenters has and continues to evolve. During the course of our careers, we’ve found the following resources essential to sharpening and growing our presentation skills:
• Toastmasters International, the world-renowned nonprofit, has been teaching public speaking and leadership skills since 1924.
• Podcasts such as Toastmasters, The Speaker Lab, The Public Speaker’s Quick and Dirty Tips for Improving Your Communication Skills, and many more.
• TED Talks and the TED Audio Collective (bonus here is you will learn about presenting and can watch other presenters’ signature styles).
• The Association for Talent Development is the world’s largest association for training professionals.
• The National Speakers Association is a leading resource for those who pursue a career as a professional speaker.
• YouTube.
• The Ethos3 blog, The Accidental Communicator, Speaking About Presenting, and any of the articles on quick and dirty tips when you do a Google search on “public speaking.”