
![]()
Unit Testing and Integration Testing
It is very likely you have already written unit tests for your projects and thus are familiar with the concepts, frameworks, and steps involved in writing unit tests. This chapter therefore mainly deals with how to apply those skills to the effective writing of unit tests for your Web API. As you will see, unit testing is where you start, not where you finish.
As you know, industry is undergoing immense change at the moment. On one hand, Service Oriented Architecture (SOA) has resulted in big enterprise applications being broken into multiple independent or semi-independent services. On the other hand, recent trends in adoption of REST have led the API of those services to move from heavy, ceremony-rich SOAP toward lightweight HTTP APIs. That is, everyday more and more APIs are being built or are migrating to pure HTTP APIs, commonly referred to as RESTful (although not every HTTP API is actually RESTful, as you have already seen). Another side of the story is that the DevOps movement and adoption of automated deployment not only encourages automated integration tests but mandates it for its success. Many companies deploy new software into their production daily or even multiple times a day.
What does this mean for us? First of all, it means that while we will carry on writing unit tests for our API projects, we also need to cover our APIs with automated integration tests.
On the other hand, testing an HTTP endpoint poses new challenges. In SOAP, you could reduce the call to a remote procedure call (RPC), so that your test consisted of ensuring that the right output was returned for your inputs—although you still had to cover various aspects of SOAP headers. However, the behavior of an HTTP API is much richer. For example, an HTTP API implements content negotiation, which allows multiple formats to be returned per a client’s request and preference. So not just the data but also the format needs to be tested when the data cross the wire. Other aspects include HTTP caching behavior, which can be complex to test.
This chapter looks at a few key concepts of testing and then moves to applying them in ASP.NET Web API.
Unit Testing in ASP.NET Web API
In unit testing, you test a unit of code. A unit of code usually maps to a method in a class. If you follow the single responsibility principle (the S in SOLID), your classes will have a single reason to change. So testing them will be easy, and you will have only a few tests per class.
In ASP.NET Web API, the main classes you will be writing are controllers and models. We focus on these classes first, and then move to handlers and filters.
Testing Frameworks
You could call the last few years the boom years of testing frameworks. Initially there was only NUnit,but gradually more and more frameworks came out. These include BDD frameworks, such as SpecFlow and SubSpec (we look at these in the section of this chapter called “Integration Testing and BDD”). At the end of the day, all of these frameworks help you define Arrange-Act-Assert within your unit tests and execute your tests interactively within Visual Studio as well as in your continuous integration environment.
![]() Note Test-driven development (TDD) is a programming practice where writing code starts with writing tests first. These tests are initially broken (red). Then by implementing the functionality, you get the pass (green). At the end, you refactor the code while making sure the tests remain green.
Note Test-driven development (TDD) is a programming practice where writing code starts with writing tests first. These tests are initially broken (red). Then by implementing the functionality, you get the pass (green). At the end, you refactor the code while making sure the tests remain green.
Regardless of whether you practice TDD or write your tests after writing your implementation, unit testing is part and parcel of all but the most trivial projects. Given this, mastering unit testing techniques is essential for your project—as well as for your career.
As you saw in Chapter 5, xUnit is the testing framework of choice for this book. xUnit is a modern unit testing framework that has extended testing concepts and has been ported to .NET by Brad Wilson, one of the authors of ASP.NET Web API. For mocking dependencies, we use Moq library. You can add xUnit and Moq to your project using NuGet.
PM> Install-Package xUnit
PM> Install-Package Moq
PM> Install-Package xUnit.Extensions
For data-driven tests, you will need xUnit extensions as the last command.
Sample Application
In Chapter 5 you learned how to build a full-blown application. For the purpose of our tests, we use a small application to demonstrate unit testing in ASP.NET Web API. The source code is included with the samples for the rest of the book.
In this sample application we simulate a small pizza shop API, where a member of staff can take orders from customers over the phone. Also, orders can be updated or removed (canceled). We use the single-page application (SPA) approach using Knockout.js, which makes calls to our Web API for order’s CRUD (Create-Read-Update-Delete) operations.
![]() Note Single-page application (SPA) is a term referring to browser-based applications where the main page is loaded once and then the flow of the application is handled fully in the client side using JavaScript. (In conventional web applications pages are loaded by posting the state back to the server, which causes the whole page to be reloaded.) By providing a more natural and seamless experience for the user, it replicates some of the benefits of desktop applications while maintaining the power and interoperability of the Web.
Note Single-page application (SPA) is a term referring to browser-based applications where the main page is loaded once and then the flow of the application is handled fully in the client side using JavaScript. (In conventional web applications pages are loaded by posting the state back to the server, which causes the whole page to be reloaded.) By providing a more natural and seamless experience for the user, it replicates some of the benefits of desktop applications while maintaining the power and interoperability of the Web.
For the UI theme, we use the home page theme of ASP.NET Web API samples available in the ASP.NET MVC 4 template (see Figure 15-1).

Figure 15-1. Our sample pizza shop application with a single-page application user interface. Orders are created and edited on the left side, and the list of existing orders are displayed on the right side of the page
Orders are stored in an in-memory repository. Our controller implements CRUD operations for orders, and these operations are called within our single-page application. New orders can be created by entering the name of the customer in the box and setting the number of each pizza in the order by clicking the plus (+) or minus (−) sign (see Figure 15-2). To delete an order, click the x sign, and to edit, click on the order number. The order Id is a random integer assigned on the server side.
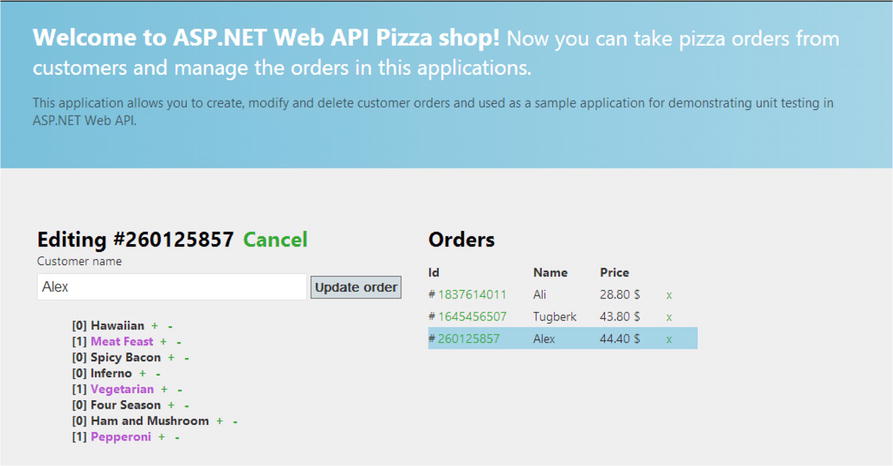
Figure 15-2. Sample pizza shop user interface displayed while editing an item
Our controller is a simple CRUD controller. It has a dependency on IOrderService (see Listing 15-1).
Listing 15-1. OrderController Implementing CRUD API
namespace PizzaApi.Api.Controllers
{
    public class OrderController : ApiController
    {
        private readonly IOrderService _orderService;

        public OrderController(IOrderService orderService)
        {
            _orderService = orderService;
        }

        public HttpResponseMessage Post(HttpRequestMessage request, Order order)
        {
            if (!order.Items.Any())
                return request.CreateErrorResponse(HttpStatusCode.BadRequest, "Order has no
                    items");

            if(_orderService.Exists(order.Id))
                return request.CreateErrorResponse(HttpStatusCode.BadRequest, "Order already
                    exists");

            _orderService.Save(order);
            var response = request.CreateResponse(HttpStatusCode.Created);
            response.Headers.Location = new Uri(Url.Link(null, new {id = order.Id}));
            return response;
        }

        public HttpResponseMessage Get(HttpRequestMessage request, int id)
        {
            if (!_orderService.Exists(id))
                return request.CreateErrorResponse(HttpStatusCode.NotFound, "Order does not
                    exist");

            return request.CreateResponse(HttpStatusCode.OK, _orderService.Get(id));
        }

        public IEnumerable<Order> Get()
        {
            return _orderService.GetAll();
        }

        public HttpResponseMessage Delete(HttpRequestMessage request, int id)
        {
            if (!_orderService.Exists(id))
                return request.CreateErrorResponse(HttpStatusCode.NotFound, "Order does not
                    exist");

            _orderService.Delete(id);
            return request.CreateResponse(HttpStatusCode.OK);
        }

        public HttpResponseMessage Put(HttpRequestMessage request, Order order)
        {
            if (!_orderService.Exists(order.Id))
                return request.CreateErrorResponse(HttpStatusCode.NotFound, "Order does not
                    exist");

            _orderService.Update(order);
            return request.CreateResponse(HttpStatusCode.OK);
        }
    }
}
![]() Note As you have probably noticed, we pass the request as an input parameter to some of the actions. This is not necessary considering the current HttpRequestMessage is accessible using the Request property of the controller. However, by defining an input parameter of the type HttpRequestMessage, ASP.NET Web API automatically passes the request to action when calling it. This helps to make the action stateless and easier to test.
Note As you have probably noticed, we pass the request as an input parameter to some of the actions. This is not necessary considering the current HttpRequestMessage is accessible using the Request property of the controller. However, by defining an input parameter of the type HttpRequestMessage, ASP.NET Web API automatically passes the request to action when calling it. This helps to make the action stateless and easier to test.
IOrderService is implemented in InMemoryOrderService class, which in turn has a dependency on IPricingService. For the sake of simplicity, InMemoryOrderService holds an in-memory repository (instead of a persistent one) for storing orders. IPricingService is implemented in SimplePricingService, which calculates the price of the order and adds the VAT (value-added tax), wherever it is applicable.
We use this simple application to demonstrate unit testing and integration testing in ASP.NET Web API. This application has a client-side code component requiring testing that is outside the scope of this book.
Testing Controllers
Since controllers are the mainstay of ASP.NET Web API, it is essential to test your controllers. In order to grasp controller unit testing, you need to ensure you understand the responsibility of the controller.
The controller in ASP.NET Web API is responsible for verifying the request (the last layer in the pipeline to have this responsibility), calling the business layer to complete the operation, and presenting the response. It is considered a best practice to keep the controllers free from any business logic. Most of the business logic of your application is to be implemented in your business classes or domain models—if, that is, you follow domain-driven design (DDD) guidelines.
![]() Note Domain-Driven Design is an approach to software design that involves modeling the business and dividing the domain into bounded contexts (see Domain-Driven Design by Eric Evans [Addison-Wesley, 2003]). “Bounded context” refers to a part of your domain that defines a ubiquitous vocabulary according to the models of your business in that context. For example, if your domain is pizza takeaway and delivery, “delivery” can be a bounded context containing these models: Driver, Address, DeliveryPackage, Bill, Vehicle, and so on. It probably does not contain Customer, Topping, or Pizza, as they belong to the “order taking” bounded context.
Note Domain-Driven Design is an approach to software design that involves modeling the business and dividing the domain into bounded contexts (see Domain-Driven Design by Eric Evans [Addison-Wesley, 2003]). “Bounded context” refers to a part of your domain that defines a ubiquitous vocabulary according to the models of your business in that context. For example, if your domain is pizza takeaway and delivery, “delivery” can be a bounded context containing these models: Driver, Address, DeliveryPackage, Bill, Vehicle, and so on. It probably does not contain Customer, Topping, or Pizza, as they belong to the “order taking” bounded context.
Let’s look at this action:
public IEnumerable<Order> Get()
{
     return _orderService.GetAll();
}
This action, which returns all orders from the in-memory repository, has nothing Web API–specific in it. It could as easily belong to a repository or a service. On the other hand, the action uses controller context (see Listing 15-2).
Listing 15-2. Post Action in OrderController
public HttpResponseMessage Post(HttpRequestMessage request, Order order)
{
    if (!order.Items.Any())
        return request.CreateErrorResponse(HttpStatusCode.BadRequest, "Order has no items");

    _orderService.Save(order);
    var response = request.CreateResponse(HttpStatusCode.Created);
    response.Headers.Location = new Uri(Url.Link(null, new { id = order.Id }));
    return response;
}
This action uses Url, which is an instance of UrlHelper sitting on the base class ApiController. In this case, it cannot be treated as a simple method call since it relies on the controller context. Let’s look at these tests separately.
Testing Actions Not Dependent on the Controller Context
In these tests, we test the action as we would any other method. Let’s look at the action again:
public IEnumerable<Order> Get()
{
     return _orderService.GetAll();
}
You can see there is very little to test. Some might argue there is not a lot of value to test this method. At the end of the day, you need to make a judgment on the level of the testing required, but in order to test all you need do is make sure _orderService is called and returns GetAll as a result. Let’s create a mock object and pass it to the constructor to supply the dependency (see Listing 15-3).
Listing 15-3. Testing GetAll()
[Fact]
public void GetAll_should_return_all_from_OrderService()
{
    // arrange
    var orders = new Order[0];
    var mockOrderService = new Mock<IOrderService>();
    mockOrderService.Setup(x => x.GetAll())
                .Returns(orders);
    var orderController = new OrderController(mockOrderService.Object);

    // act
    var result = orderController.Get();

    // assert
    Assert.Equal(orders, result);
}
![]() Note You might have heard about the difference between mock and stub and the associated community discussion. Here we use a stub to return values to help test our code. We do not “verify” the mock at the end of the test (to ensure expectations are called) nor do we add checks for the inputs. On the other hand, for mocks (also known as strict mocks), we verify right input is passed to them from the system under test.
Note You might have heard about the difference between mock and stub and the associated community discussion. Here we use a stub to return values to help test our code. We do not “verify” the mock at the end of the test (to ensure expectations are called) nor do we add checks for the inputs. On the other hand, for mocks (also known as strict mocks), we verify right input is passed to them from the system under test.
The difference here is black-box testing and white-box testing; in the first, we test the system as more or less a black-box (assuming little about its implementation), while in the second we test implementation. It is generally believed that using mocks leads to “brittle tests”—that is, the test breaks when you change the implementation even while maintaining the same behavior. This was one of the drivers behind the behavior-driven development (BDD) movement, which we look at later in the chapter. Brittle tests also make refactoring harder. Refactoring is one of the tenets of test-driven development (TDD): red-green-refactor. See Martin Fowler’s article on the subject (http://martinfowler.com/articles/mocksArentStubs.html) for more information.
Testing Actions with Limited Dependency on the Context
Now let’s look at the Get action, where the order Id is passed. You start by writing the test and then improve it step by step. In this case, the item is returned if it exists; otherwise HTTP status 404 (Not Found) is returned:
public HttpResponseMessage Get(HttpRequestMessage request, int id)
{
    if (!_orderService.Exists(id))
        return request.CreateErrorResponse(HttpStatusCode.NotFound, "Order does not exist");

    return request.CreateResponse(HttpStatusCode.OK,  _orderService.Get(id));
}
Testing this action involves two tests: one where order exists, and one where it does not. So let’s write the first test (shown in Listing 15-4).
Listing 15-4. Testing Getting an Existing Order Without Preparing the Request Context (Causes Exception)
[Fact]
public void Get_should_return_OK_if_order_exists()
{
    // arrange
    const int OrderId = 123;
    var order = new Order()
                    {
                        Id = OrderId
                    };
    var mockOrderService = new Mock<IOrderService>();
    mockOrderService.Setup(x => x.Exists(It.IsAny<int>()))
                .Returns(true);

    mockOrderService.Setup(x => x.Get(It.IsAny<int>()))
        .Returns(order);
    var orderController = new OrderController(mockOrderService.Object);

    // act
    var result = orderController.Get(new HttpRequestMessage(),  OrderId);

    // assert
    Assert.Equal(HttpStatusCode.OK, result.StatusCode);
}
This test looks all well and good, but when it is run, we get an error:
System.InvalidOperationException
The request does not have an associated configuration object or the provided configuration was null.
   at System.Net.Http.HttpRequestMessageExtensions.CreateResponse(HttpRequestMessage request,
HttpStatusCode statusCode, T value, HttpConfiguration configuration)
   at System.Net.Http.HttpRequestMessageExtensions.CreateResponse(HttpRequestMessage request,
HttpStatusCode statusCode, T value)
   at PizzaApi.Api.Controllers.OrderController.Get(HttpRequestMessage request, Int32 id) in OrderController.cs: line 37
   at PizzaApi.Api.Tests.OrderControllerTests.Get_should_return_OK_if_exists() in OrderControllerTests.cs: line 54
The test complains about the configuration object being null, but since HttpConfiguration was not used at all, where does it need to use the configuration? Remember from previous chapters that HttpRequestMessage contains a property bag, named Properties, that contains context-related properties of the request. This design has the benefit of not relying on the HttpContext.Current, but you need to supply the configuration when you create the request. So let’s rewrite the test (see Listing 15-5).
Listing 15-5. Testing Getting an Existing Order with Setting the Request Property
[Fact]
public void Get_should_return_OK_if_order_exists()
{
    // arrange
    const int OrderId = 123;
    var order = new Order()
                    {
                        Id = OrderId
                    };

    var mockOrderService = new Mock<IOrderService>();
    mockOrderService.Setup(x => x.Exists(It.IsAny<int>()))
                .Returns(true);

    mockOrderService.Setup(x => x.Get(It.IsAny<int>()))
        .Returns(order);
    var orderController = new OrderController(mockOrderService.Object);
    var request = new HttpRequestMessage();
    request.Properties[HttpPropertyKeys.HttpConfigurationKey] = new HttpConfiguration();

    // act
    var result = orderController.Get(request,  OrderId);

    // assert
    Assert.Equal(HttpStatusCode.OK, result.StatusCode);
}
Now the test passes without an exception. So now you can write a test for the case where an Id does not exist (see Listing 15-6).
Listing 15-6. Testing Getting a Nonexisting Order
[Fact]
public void Get_should_return_NotFound_if_order_DoesNotExistS()
{
    // arrange
    const int OrderId = 123;
    var mockOrderService = new Mock<IOrderService>();
    mockOrderService.Setup(x => x.Exists(It.IsAny<int>()))
                .Returns(false);

    var orderController = new OrderController(mockOrderService.Object);
    var request = new HttpRequestMessage();
    request.Properties[HttpPropertyKeys.HttpConfigurationKey] = new HttpConfiguration();

    // act
    var result = orderController.Get(request, OrderId);

    // assert
    Assert.Equal(HttpStatusCode.NotFound, result.StatusCode);
}
Now let’s look at the Delete action (see Listing 15-7). This action can be tested in a similar way, since it does not access controller context. Delete first checks to see whether the item exists. If it does, Delete deletes it and returns HTTP status 200 (OK); otherwise HTTP status 404 (Not Found) is returned.
Listing 15-7. Implementing Delete in OrderController
public HttpResponseMessage Delete(HttpRequestMessage request, int id)
{
    if (!_orderService.Exists(id))
        return request.CreateErrorResponse(HttpStatusCode.NotFound, "Order does not exist");

    _orderService.Delete(id);
    return Request.CreateResponse(HttpStatusCode.OK);
}
Writing tests for the PUT and DELETE methods is very similar to writing them for GET, and so there is no need to go into the matter here.
Testing Actions Dependent on Controller Context
Now let’s look at the POST action. This method
- Checks to make sure an order contains order items. If the order is invalid, the action returns a “Bad Request” error.
- Checks to make sure an Id does not exist. If it does, a “Bad Request” error is returned.
- Saves the order.
- Creates a response with Created (201) HTTP status and creates an address for the new order in the Location header.
Step 3 is implemented by the IServiceOrder—since it is stubbed, it does not need to be tested, and hence three tests are needed for this method. The first two tests are easy to implement and very similar to previous tests. So let’s look at testing the fourth step.
This is where things get interesting. Let us just create a test similar to those already done (see Listing 15-8).
Listing 15-8. Testing HTTP Status Code for a Valid Order Without Preparing Controller Context
[Fact]
public void Post_should_return_Created_if_order_good()
{
    // arrange
    const int OrderId = 123;
    var order = new Order(new OrderItem[]
                                {
                                    new OrderItem()
                                        {
                                            Name = "Name",
                                            Quantity = 1
                                        }
                                })
    {
        Id = OrderId
    };
    var mockOrderService = new Mock<IOrderService>();
    mockOrderService.Setup(x => x.Exists(It.IsAny<int>()))
                .Returns(false);

    var orderController = new OrderController(mockOrderService.Object);
    var request = new HttpRequestMessage();
    request.Properties[HttpPropertyKeys.HttpConfigurationKey] = new HttpConfiguration();

    // act
    var result = orderController.Post(request, order);

    // assert
    Assert.Equal(HttpStatusCode.Created, result.StatusCode);
}
Running this test results in a null exception:
System.ArgumentNullException
Value cannot be null.
Parameter name: request
at System.Web.Http.ApiController.get_Url()
As you see, the problem is that the Url property of the controller is null since it has not been set up. It is time to set up the controller context, as our implementation depends upon it. For the Url property to work, the controller context must be set. The code in Listing 15-9 does exactly that.
Listing 15-9. Testing HTTP Status Code for a Valid Order Without Preparing Controller Context
[Fact]
public void Post_should_return_Created_if_order_good()
{
    // arrange
    const int OrderId = 123;
    var order = new Order(new OrderItem[]
                                {
                                    new OrderItem()
                                        {
                                            Name = "Name",
                                            Quantity = 1
                                        }
                                })
    {
        Id = OrderId
    };
    var mockOrderService = new Mock<IOrderService>();
    mockOrderService.Setup(x => x.Exists(It.IsAny<int>()))
                .Returns(false);

    var orderController = new OrderController(mockOrderService.Object);
    var request = new HttpRequestMessage(HttpMethod.Post, "http://localhost:2345/api/Order/");
    var config = new HttpConfiguration();
    request.Properties[HttpPropertyKeys.HttpConfigurationKey] = config;
    orderController.Request = request;
    orderController.Configuration = config;
    config.Routes.MapHttpRoute("DefaultApi", "api/{controller}/{id}", _
        new {id = RouteParameter.Optional});
    var route = config.Routes["DefaultApi"];
    var httpRouteData = new HttpRouteData(route, new HttpRouteValueDictionary( _
        new {controller = "Order" }));
    orderController.Request.Properties[HttpPropertyKeys.HttpRouteDataKey] = httpRouteData;

    // act
    var result = orderController.Post(request, order);

    // assert
    Assert.Equal(HttpStatusCode.Created, result.StatusCode);
}
The code in Listing 15-9 works but is verbose, and setting up the context in each test, as we have done, will reduce readability. So to make the code more readable, let’s devise a helper that can be used to create and set up the controller and its context. The ControllerContextSetup class has been created—you can find it in the book’s samples—and it exposes a Fluent API for context setup. The test in Listing 15-10 uses the ControllerContextSetup class.
Listing 15-10. Using the Data Builder’s Fluent API to Set Up the Controller Context
[Fact]
public void Post_should_return_Created_if_order_good_fluentApi()
{
    // arrange
    const int OrderId = 123;
    var order = new Order(new OrderItem[]
                                {
                                    new OrderItem()
                                        {
                                            Name = "Name",
                                            Quantity = 1
                                        }
                                })
    {
        Id = OrderId
    };
    var mockOrderService = new Mock<IOrderService>();
    mockOrderService.Setup(x => x.Exists(It.IsAny<int>()))
                .Returns(false);

    var orderController = ControllerContextSetup
        .Of(() => new OrderController(mockOrderService.Object))
        .WithDefaultConfig()
        .WithDefaultRoute()
        .Requesting("http://localhost:2345/api/Order/")
        .WithRouteData(new {controller="Order"})
        .Build<OrderController>();

    // act
    var result = orderController.Post(orderController.Request, order);

    // assert
    Assert.Equal(HttpStatusCode.Created, result.StatusCode);
}
Great! You now have 100 percent coverage of the controller. Is there anything missing? Let’s look at the test in Listing 15-10: does it cover all functionality of the SUT—that is, the system under test (the Post action here)? Not really. You have not yet checked the content or the location header.
![]() Tip Be objective with the tests you write—do not write tests just to increase your test coverage. Test coverage is the percentage of your code that runs as part of one or more tests. When TDD started to get popular, test coverage became really important, and development teams set themselves to achieve higher and higher coverage. This led to more tests, but the quality and reliability of the code did not necessarily increase, as quality of the code has more to do with assertions than mere coverage. It became evident that test coverage was a poor indicator of code quality. Nowadays it is believed that you should not write a test to cover trivial code paths (getters and setters). Achieving 80 to 90 percent is a good coverage.
Tip Be objective with the tests you write—do not write tests just to increase your test coverage. Test coverage is the percentage of your code that runs as part of one or more tests. When TDD started to get popular, test coverage became really important, and development teams set themselves to achieve higher and higher coverage. This led to more tests, but the quality and reliability of the code did not necessarily increase, as quality of the code has more to do with assertions than mere coverage. It became evident that test coverage was a poor indicator of code quality. Nowadays it is believed that you should not write a test to cover trivial code paths (getters and setters). Achieving 80 to 90 percent is a good coverage.
So more assertions are needed. However,it is generally accepted that every test needs to check only one piece of functionality. In effect, this means that you can have similar tests with only the assertions being different. This is also not ideal, but you will see later how to use SubSpec to overcome this problem. For now let’s add more assertions to the test. After defining URL as a constant and adding more assertions, the code looks like Listing 15-11.
Listing 15-11. Adding more assertions
[Fact]
public void Post_should_return_Created_if_order_good_fluentApi()
{
    // arrange
    const string url = "http://localhost:2345/api/Order/";
    const int OrderId = 123;
    var order = new Order(new OrderItem[]
                                {
                                    new OrderItem()
                                        {
                                            Name = "Name",
                                            Quantity = 1
                                        }
                                })
    {
        Id = OrderId
    };
    var mockOrderService = new Mock<IOrderService>();
    mockOrderService.Setup(x => x.Exists(It.IsAny<int>()))
                .Returns(false);

    var orderController = ControllerContextSetup
        .Of(() => new OrderController(mockOrderService.Object))
        .WithDefaultConfig()
        .WithDefaultRoute()
        .Requesting(url)
        .WithRouteData(new {controller="Order"})
        .Build<OrderController>();

    // act
    var result = orderController.Post(orderController.Request, order);

    // assert
    Assert.Equal(HttpStatusCode.Created, result.StatusCode);
    Assert.NotNull(result.Headers.Location);
    Assert.Equal(result.Headers.Location, new Uri(new Uri(url), order.Id.ToString()));
}
SubSpec helps to define each assertion by means of a separate test (this is examined later in the chapter).
Testing Routes
Routing in ASP.NET Web API is based on the IHttpRoute—a parallel to the IRoute in the ASP.NET MVC world.
public interface IHttpRoute
{
    string RouteTemplate { get; }
    IDictionary<string, object> Defaults { get; }
    IDictionary<string, object> Constraints { get; }
    IDictionary<string, object> DataTokens { get; }
    HttpMessageHandler Handler { get; }
    IHttpRouteData GetRouteData(string virtualPathRoot, HttpRequestMessage request);
    IHttpVirtualPathData GetVirtualPath(HttpRequestMessage request, IDictionary<string, object>
        values);
}
Testing routes in ASP.NET Web API is not very different from testing routes in ASP.NET MVC. So if you are familiar with testing routes in MVC, you should find them fairly straightforward.
Routing is a two-way concept: first comes the ability to break down the URL to its components and parameters, and second is being able to pass parameters and reconstruct links. These two concepts are modeled in the GetRouteData and GetVirtualPath methods. You need to test these two concepts separately. Remember that you want to test just the routes and not the Web API routing framework.
Currently there is only one route—the DefaultApi route. To make things a bit more interesting, let us add another route—for OrderItems. Then add a new controller, OrderItemController, its purpose being to return items of an order, and add the route shown in Listing 15-12.
Listing 15-12. Setting Up the Next Level of Routes
config.Routes.MapHttpRoute(
    name: "OrderItems",
    routeTemplate: "api/Order/{id}/{controller}/{name}",
    defaults: new { name = RouteParameter.Optional }
    );
Now let’s test the two routes.
Testing GetRouteData and GetVirtualPath
As we said, GetRouteData matches URL to a route and extracts its parameters. To test it, create an instance of HttpConfiguration, and pass it to static Register method of WebApiConfig class (see Listing 15-13).
Listing 15-13. Data-Driven Cases for Testing Routing
[Theory]
[InlineData("http://localhost:12345/foo/route", "GET", false, null, null)]
[InlineData("http://localhost:12345/api/order/", "GET", true, "order", null)]
[InlineData("http://localhost:12345/api/order/123", "GET", true, "order", "123")]
public void DefaultRoute_Returns_Correct_RouteData(
    string url, string method, bool shouldfound, string controller, string id)
{
    // arrange
    var config = new HttpConfiguration();
    WebApiConfig.Register(config);
    var request = new HttpRequestMessage(new HttpMethod(method), url);

    // act
    var routeData = config.Routes.GetRouteData(request);

    // assert
    Assert.Equal(shouldfound, routeData!=null);
    if (shouldfound)
    {
        Assert.Equal(controller, routeData.Values["controller"]);
        Assert.Equal(id == null ? (object) RouteParameter.Optional : (object)id, routeData.Values["id"]);
    }
}
To test the routing in Listing 15-13, call the Register method to initialize the configuration. Instead of using the Fact attribute, use the Theory attribute along with InlineData to create a data-driven test. Each InlineData attribute defines one test, and parameters defined in each InlineData attribute are passed to the test method. As Figure 15-3 shows, each InlineData case appears as a separate test. You can also add a parameter for the route name to ensure that the URL is mapped to the correct route name.
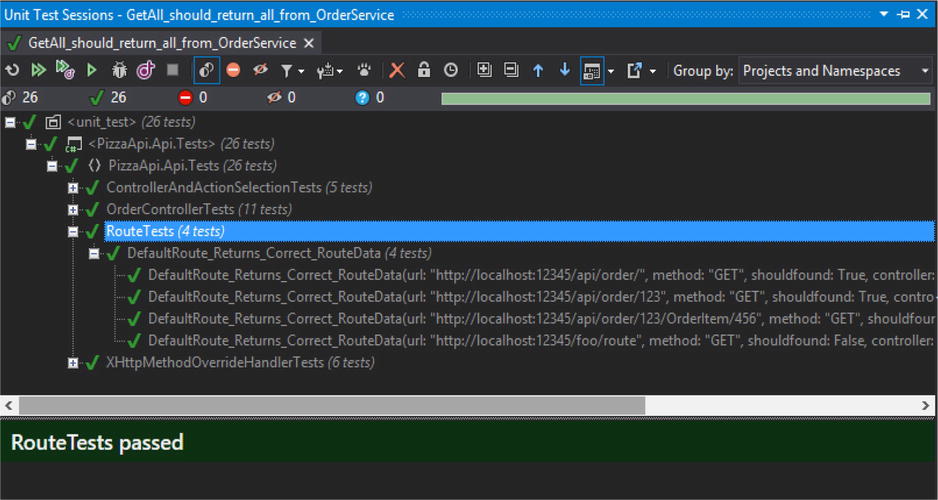
Figure 15-3. Data-driven tests in Resharper unit testing window
Now let’s add a test for the OrderItems route:
[InlineData("http://localhost:12345/api/order/123/OrderItem/456",  _
"GET", true, "OrderItem", "123")]
This will ensure that the second added route works. Testing GetVirtualPath is also very similar, the difference being that the parameters are passed and the resultant path checked on the other side. Testing GetVirtualPath does not have a lot of value, and some exclude it from their coverage.
Testing Controller and Action Selection
Testing routes is very important, especially when you have many routes and the likelihood of route collision is high. But even checking that the correct route is selected and the correct route data are extracted does not ensure that the correct controller and action are selected. But not to worry! It is possible to test that, too.
As you learned in previous chapters, the controller selector (an implementation of IHttpControllerSelector) and the action selector (an implementation of IHttpActionSelector) are used by the framework to find the appropriate controller and action. It is not very difficult to run the same process in your tests so as to ensure correct selection of the controller and action—especially if you have replaced default services with your own. This test complements your routing tests, and so in a sense it is an integration test rather than a unit test. Either way, it is very important. You can write the tests in two ways:
- Relying on the routing result to be correct—hence, an integration test
- Providing your own route data to decouple the test from routing
The second option looks purer and more decoupled, but as it requires more setup, it can lead to less readable tests. We prefer the first option, since we prefer simplicity and readability and believe controller/action selection is an integration test anyway. We employ data-driven tests using the Theory attribute in Listing 15-14.
Listing 15-14. Data-Driven Cases for Checking Controller and Action Selection
[Theory]
[InlineData("http://localhost:12345/api/order/123", "GET", typeof(OrderController), "Get")]
[InlineData("http://localhost:12345/api/order", "POST", typeof(OrderController), "Post")]
[InlineData("http://localhost:12345/api/order/123", "PUT", typeof(OrderController), "Put")]
[InlineData("http://localhost:12345/api/order", "GET", typeof(OrderController), "Get")]
[InlineData("http://localhost:12345/api/order/123/OrderItem", "GET", typeof(OrderItemController), "GetItems")]
public void Ensure_Correct_Controller_and_Action_Selected(
    string url,
    string method,
    Type controllerType,
    string actionName)
{
    // arrange
    var config = new HttpConfiguration();
    WebApiConfig.Register(config);
    var actionSelector = config.Services.GetActionSelector();
    var controllerSelector = config.Services.GetHttpControllerSelector();
    var request = new HttpRequestMessage(new HttpMethod(method), url);
    var routeData = config.Routes.GetRouteData(request);
    request.Properties[HttpPropertyKeys.HttpRouteDataKey] = routeData;
    request.Properties[HttpPropertyKeys.HttpConfigurationKey] = config;

    // act
    var controllerDescriptor = controllerSelector.SelectController(request);
    var context = new HttpControllerContext(config, routeData, request)
                        {
                            ControllerDescriptor = controllerDescriptor
                        };
    var actionDescriptor = actionSelector.SelectAction(context);

    // assert
    Assert.Equal(controllerType, controllerDescriptor.ControllerType);
    Assert.Equal(actionName, actionDescriptor.ActionName);
}
Testing Delegating Handlers (Message Handlers)
Delegating handlers are the backbone of the HTTP pipeline in ASP.NET Web API. As you saw in Chapter 10, they are very powerful elements of the pipeline and can be used for cross-cutting concerns such as security, tracing, and logging. Also, they are very useful if a special feature that applies globally to a request needs implementing. Delegating handlers can also be used on a particular route, but to keep things simple, let’s test a global delegating handler. For the test’s purposes, let’s use the MethodOverrideHandler class (explored in Chapter 10).
Testing delegating handlers is straightforward, as there is mainly one method to be tested: SendAsync. One caveat is that the SendAsync method is protected; hence we cannot call it directly. However, the .NET Framework provides the HttpMessageInvoker class, which can be used to invoke the method. This is very useful, since the alternative would be calling the method through Reflection—this is possible, but it demands a bit more work.
![]() Tip At times you may want to test a method without making it public. One solution is to declare the method internal but expose the method to the test project using the InternalVisibleTo attribute in the AssemblyInfo file of the project where the class is located. The ASP.NET Web API code base itself uses this technique in a number of places.
Tip At times you may want to test a method without making it public. One solution is to declare the method internal but expose the method to the test project using the InternalVisibleTo attribute in the AssemblyInfo file of the project where the class is located. The ASP.NET Web API code base itself uses this technique in a number of places.
Delegating handlers are intermediary pipes in the HTTP pipeline. Hence they rely on their InnerHandler for the main processing of the request. Hence, too, you need to ensure that you populate the InnerHandler property. In this test a dummy inner handler class has been created to receive the request to verify whether the HTTP method was changed in the process. Note that data-driven tests are used again, since one test code can be written to run against various conditions. To improve readability, you could also implement this test as three different tests (see Listing 15-15).
Listing 15-15. Testing the XHttpMethodOverrideHandler DelegatingHandler
public class XHttpMethodOverrideHandlerTests
{
    [Theory]
    [InlineData("POST", "PUT", "PUT")]
    [InlineData("POST", "DELETE", "DELETE")]
    [InlineData("POST", "GET", "POST")]
    [InlineData("POST", "", "POST")]
    [InlineData("POST", "HEAD", "HEAD")]
    [InlineData("GET", "PUT", "GET")]
    public void XHttpMethodOverrideHandler_Should_Change_Method_correctly(
        string method, string xHttpMethodValue, string expectedMethod)
    {
        // arrange
        var innerHandler = new DummyInnerHandler();
        var handler = (HttpMessageHandler) new XHttpMethodOverrideHandler()
                            {
                                InnerHandler = innerHandler
                            };
        var request = new HttpRequestMessage(new HttpMethod(method),
            "http://localhost:12345/foo/bar");

        request.Headers.Add(XHttpMethodOverrideHandler.XOVERRIDEHEADER, xHttpMethodValue);
        var invoker = new HttpMessageInvoker(handler);

        // act
        var result = invoker.SendAsync(request, new CancellationToken());

        // assert
        Assert.Equal(expectedMethod, innerHandlder.Request.Method.Method);
    }

    class DummyInnerHandler : HttpMessageHandler
    {
        private HttpRequestMessage _request;

        public HttpRequestMessage Request
        {
            get { return _request; }
        }

        protected override Task<HttpResponseMessage> SendAsync(HttpRequestMessage request,
            CancellationToken cancellationToken)
        {
            _request = request;
            return null;
        }
    }
}
Testing Filters
As Chapter 11 discussed filters, let’s use one of its sample filters to test ValidateModelStateAttribute, which is responsible for returning BadRequest status if the ModelState is invalid (see Listing 15-16).
Listing 15-16. ValidateModelStateAttribute Filter
[AttributeUsage(
    AttributeTargets.Class | AttributeTargets.Method,
    AllowMultiple = false, Inherited = true)]
public class ValidateModelStateAttribute : ActionFilterAttribute {

    public override void OnActionExecuting(
        HttpActionContext actionContext) {

        if (!actionContext.ModelState.IsValid) {

            actionContext.Response =
                actionContext.Request.CreateErrorResponse(
                    HttpStatusCode.BadRequest,
                    actionContext.ModelState);
        }
    }
}
In this case the filter overrides only OnActionExecuting. Hence only this method is tested. All that we have to do is to create an instance of HttpActionContext with an invalid ModelState and then verify the response’s status (see Listing 15-17).
Listing 15-17. Testing ValidateModelStateAttribute Filter
[Fact]
public void Should_Return_BadRequest_If_ModelState_Invalid()
{
    // arrange
    var filter = new ValidateModelStateAttribute();
    var context = new HttpActionContext(
        new HttpControllerContext(new HttpConfiguration(),
            new HttpRouteData(new HttpRoute("SomePattern")),
            new HttpRequestMessage()),
            new ReflectedHttpActionDescriptor());
    context.ModelState.AddModelError("foo", "some error");

    // act
    filter.OnActionExecuting(context);

    // assert
    Assert.NotNull(context.Response);
    Assert.Equal(HttpStatusCode.BadRequest, context.Response.StatusCode);
}
Here the context was not set up with any data since our controller did not use them, so we have passed only the defaults. In other filters you might have to populate the context with the appropriate data—configuration, routes, routes data, request properties, and the like—as you saw earlier in this chapter.
Integration Testing
You have now written unit tests and achieved a high coverage on your code with high-value unit tests. Is anything else needed?
The answer is yes: integration tests are needed. An integration test ensures that your code works not just on its own but in the framework it is going to run on. In other words, it prepares your code to meet codes that you do not own.
An example of integration testing is making sure the object returned by your controller is sent back in a format consumable by your clients. Another example is making sure your authentication message handler kicks in correctly, as the ordering of your message handlers could interfere with its functionality. Yet another is verifying that a request is handled by the controller and action it is meant to.
Before going into details of writing effective integration tests, let’s review a few related subjects to better understand integration testing practices.
Integration Testing and Automation
Automated testing is one of the tenets of modern software development. If you need to deploy software multiple times a day, you cannot have exhaustive regression testing to make sure that, with all the changes since the previous release, everything still works. Instead you run automated tests to get assurance that all is well and that new software can be deployed.
Unit tests are very easy to automate and are normally part of the continuous integration cycle. Integration tests require a bit more setup since they will run in an environment. Automating the process of deployment can help in limiting the number of failing tests due to environmental issues.
When it comes to writing and automating tests, you need to keep the slanted pyramid shown in Figure 15-4 in mind. A system must have many unit tests, some integration tests, and very few UI tests. Also, the pyramid shows that most UI tests and a lot of integration tests can be defined by nontechnical stakeholders of the project—usually using BDD style tests.
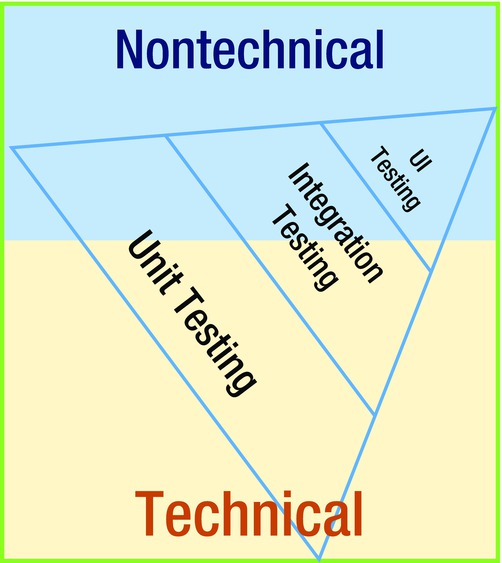
Figure 15-4. A healthy testing pyramid. It shows the correct proportion of UI, integration, and unit testing. It also shows what proportion of each test category can be understood by nontechnical members of the team
![]() Note User interface (UI) tests assess whether an application returns the right kinds of UI output for user actions. UI tests, often run using UI automation tools such as Selenium and Watin, have become very popular in the last few years. However, their effectiveness and cost have recently been questioned, since as soon as they get fairly complex, they become very hard to maintain. Another issue is a phenomenon known as “flickering tests”—that is, tests that should pass but occasionally fail for no code-related reason (they normally fail due to timing out). This reduces the reliability of the results and renders tests unuseful and unreliable.
Note User interface (UI) tests assess whether an application returns the right kinds of UI output for user actions. UI tests, often run using UI automation tools such as Selenium and Watin, have become very popular in the last few years. However, their effectiveness and cost have recently been questioned, since as soon as they get fairly complex, they become very hard to maintain. Another issue is a phenomenon known as “flickering tests”—that is, tests that should pass but occasionally fail for no code-related reason (they normally fail due to timing out). This reduces the reliability of the results and renders tests unuseful and unreliable.
The cost of writing, maintaining, and running these tests increases from unit tests to UI tests. As with unit tests, be objective with your integration tests, and choose the right granularity for writing tests.
Integration Testing and BDD
Behavior-driven development (BDD) is a testing paradigm that focuses on behavior instead of testing implementation. This methodology was developed to address the shortcomings of TDD. Nowadays it can be used alongside TDD.
One of the problems experienced in TDD was that as the tests grew more complex, refactoring the code sometimes led to breaking the tests. In other words, the red-green-refactor cycle would turn into a continuous loop: the refactor would lead to red, fixes would cause red to go green, and then any more refactoring reinforced the next round of the loop. This discouraged developers from refactoring—thus defeating the main objective of TDD. BDD solves this problem by focusing on behavior, which is independent of implementation.
Another problem was that unit tests tested implementation of the code, but there was no tangible relationship with the end business goal. While unit tests were meaningful for developers, nontechnical stakeholders of the project got no assurance from the unit-test coverage. In this sense, BDD is an “outside-in” process (it brings outsiders into the process) in that it tackles the problem by letting nontechnical stakeholders define the specification that is later wired to the code by the developers. This is an “executable specification,” where BDD scenarios are written in a human-readable specification by stakeholders. The beauty of such tests is that they will break if the requirement changes.
The language of BDD specification is a domain-specific language (DSL) called Gherkin, which is very close to natural language. Each test is composed of a Given-When-Then scenario, similar to Arrange-Act-Assert of unit testing.
BDD-style tests can be used both for unit testing and integration testing. In fact BDD-style tests are more suitable for integration tests than traditional unit tests. BDD tools will thus be used for writing our integration tests.
SpecFlow
SpecFlow,a Visual Studio plug-in and library, implements Gherkin language and links its wiring to unit-testing frameworks. SpecFlow—not itself a testing framework—works with all popular unit-testing frameworks, including NUnit and xUnit.
In SpecFlow you start with the features of your system. Then stakeholders start to define one or more acceptance tests as scenario. Each scenario is composed of one or more Given statements, one When statement, and one or more Then statements. These are defined in a feature file (see Figure 15-5), and multiple statements are separated using And.
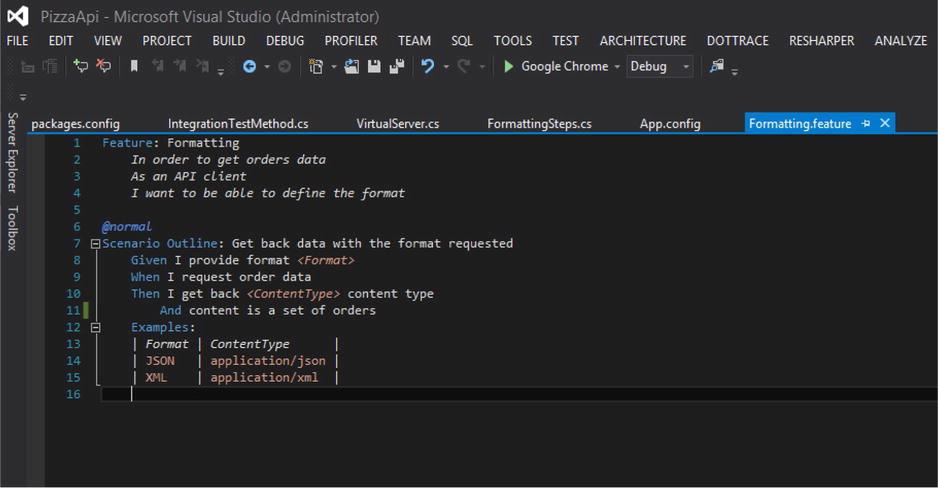
Figure 15-5. Authoring a feature file in Visual Studio using SpecFlow
Each Given/When/Then is mapped to a step. A step is the code implementation of the statement. These steps are methods in a class, methods that have Given, When and Then attributes defined against them. These attributes accept a string parameter that is the text of the statement. Let’s look at SpecFlow in more detail and use it to write our integration tests.
SubSpec
SubSpec,an add-on to the xUnit framework, enables more readable BDD-style unit/integration tests. It defines Context, Do, and one or more Observation instances (analogous to Given, When, and Then) and helps define multiple assertions inside the test while making each one a separate test.
Since SubSpec tests use string extension methods, you can use strings (instead of comments) to define the requirement. Unlike typical xUnit tests, which are defined by [Fact] or [Theory] attributes, it uses a [Specification] attribute.
In order to use SubSpec, add it to your project using NuGet:
PM> Install-Package SubSpec
In order to demonstrate how to write unit/integration tests in SubSpec, let’s rewrite GetAll_should_return_all_from_OrderService in SubSpec (see Listing 15-18).
Listing 15-18. Writing Multiple Assertions in SubSpec
[Specification]
public void GetAll_should_return_all_from_OrderService_Subspec()
{

    var orders = default(Order[]);
    var mockOrderService = default(Mock<IOrderService>);
    var orderController = default(OrderController);
    var result = default(IEnumerable<Order>);

    "Given order service contains no orders"
        .Context(() =>
                        {
                            orders = new Order[0];
                            mockOrderService = new Mock<IOrderService>();
                            orderController = new OrderController(mockOrderService.Object);
                            mockOrderService.Setup(x => x.GetAll())
                                            .Returns(orders);
                        });

    "When I ask for all orders from orderController"
        .Do(() =>
                {
                    result = orderController.Get();
                });
    "Then it must not be null"
        .Observation(() =>
                            {
                                Assert.NotNull(result);
                            });
    "And it should contain no order"
        .Observation(() =>
                            {
                                Assert.Empty(result);
                            });
}
Tests of this style differ from tests with SpecFlow in that these tests are suited for writing (and reading) only by the developers. They are thus better suited for unit tests than integration tests.
Integration Testing in ASP.NET Web API
Now let us look into implementing integration tests for the Pizza API. There are two levels at which integration tests for an ASP.NET Web API application can be written: self-hosting and HttpServer. At the self-hosting level you would spin up an actual self-hosted server listening at a port and use HttpClientto connect to the server. In the HttpServer approach you come in at a level below the hosting, where HttpServer is invoked regardless of your hosting strategy. Our tests will be written so that you can toggle between them, but HttpServeris preferred since it is faster and does not require permission to listen on a port. Another problem is that some unit-testing tools run tests in parallel. Hence there could be a port collision between tests running concurrently unless you randomize the port number. There could be some benefit (not a huge one) in running your tests in a self-hosting solution since it is a more end-to-end process and might surface some configuration problems.
Let’s use SpecFlow to write our integration tests. SpecFlow (like other testing frameworks) allows both normal and data-driven tests. Normal tests are created by a Scenario statement, and data-driven tests are created using Scenario Outline.
In order to use SpecFlow, use these steps to add it to the project:
- Download SpecFlow Visual Studio plug-in from specflow.org.
- Install the plug-in, and restart Visual Studio. Now you should see new item templates added to your Visual Studio.
- Add SpecFlow library to the project by typing Install-Package SpecFlow in the NuGet Package Manager Console.
- A testing framework still needs to be added. By default SpecFlow uses NUnit, but it’s better to use xUnit with SpecFlow. So to use xUnit, type Install-Package SpecFlow.xUnit in the NuGet Package Manager Console.
- Your environment is ready. From the “Add New Item” dialog, choose “SpecFlow Feature File” (see Figure 15-6).
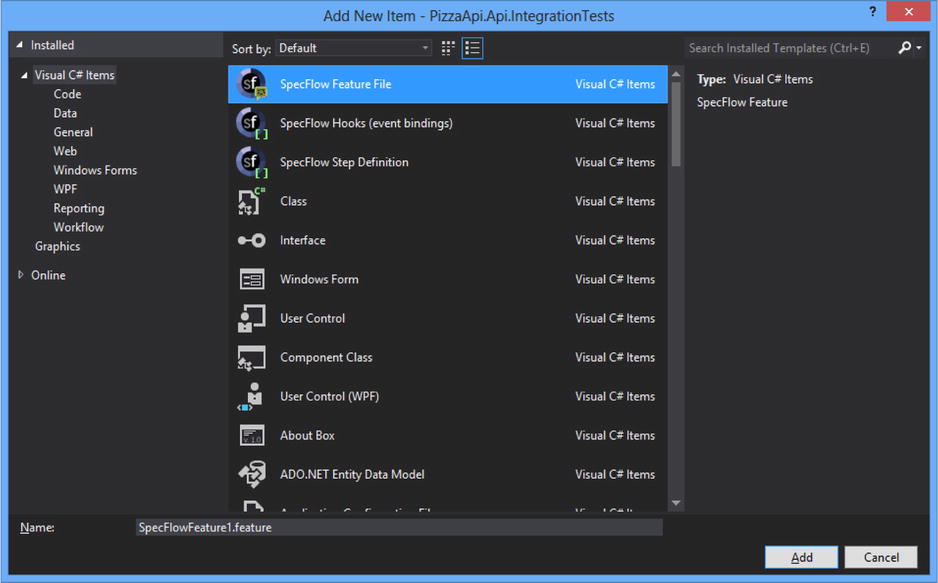
Figure 15-6. Adding a SpecFlow feature file
Now you are ready to write your first scenario.
Integration Testing for Content Negotiation
We all rely on the framework to implement content negotiation and to return the correct format if it is requested by the client. Given that, we could be adding, removing, or replacing MediaTypeFormatters. Also, we could define ViewModel types that some formatters might have a problem serializing or deserializing. All in all, the importance of integration testing cannot be overemphasized.
OK, let’s start with the first SpecFlow feature by adding the Formatting.feature file with the content shown in Listing 15-19.
Listing 15-19. Feature File Using Gherkin Syntax
Feature: Formatting
               In order to get orders data
               As an API client
               I want to be able to define the format

@normal
Scenario Outline: Get back data with the format requested
               Given I provide format <Format>
               When I request for all orders
               Then I get back <ContentType> content type
                              And content is a set of orders
               Examples:
               | Format | ContentType      |
               | JSON   | application/json |
               | XML    | application/xml  |
As you can see from the use of Scenario Outline, this is a data-driven test. In a Scenario Outline the data are defined in the Examples section using a table. Each row defines one test, with data of the row as the parameters passed to the test.
Now steps to map each statement to the code need to be created. An easy way to do this is to right-click on the feature file and select “Generate Step Definitions”. A step is just a method in a class which has a [Binding] attribute. A [Binding] attribute tells SpecFlow to look for step definition methods.
Steps can be reused from one scenario to another if the statement is the same. So although the Gherkin syntax is very close to free text, be consistent in terms of the statement text. Keep them the same if they refer to the same action or condition.
Let’s implement the steps. Listing 15-20 shows the step definitions. Note that parameters defined in statements using angle brackets—for example <Format>—are defined as regular expression statements.
Listing 15-20. Code for Steps Related to the Feature File in Listing 15-19
[Binding]
public class FormattingSteps
{

    private const string Url = "http://localhost:12345/api/Order";
    private string _format = null;
    private HttpResponseMessage _response;

    [Given(@"I provide format (.+)")]
    public void GivenIProvideFormat(string format)
    {
        _format = format;
    }

    [When(@"When I request for all orders")]
    public void WhenIRequestOrderData()
    {
        var request = new HttpRequestMessage(HttpMethod.Get, Url);
        var server = new VirtualServer(WebApiConfig.Register,
            Convert.ToBoolean(ConfigurationManager.AppSettings["UseSelfHosting"]));
        request.Headers.Accept.Clear();
        request.Headers.Accept.Add( new MediaTypeWithQualityHeaderValue(
            _format == "JSON" ? "application/json" : "application/xml"));
        _response = server.Send(request);
    }

    [Then(@"I get back (.+) content type")]
    public void ThenIGetBackContentType(string contentType)
    {
        Assert.Equal(contentType, _response.Content.Headers.ContentType.MediaType);
    }

    [Then(@"content is a set of orders")]
    public void ThenContentIsASetOfOrders()
    {
        var content = _response.Content.ReadAsAsync<IEnumerable<Order>>().Result;
    }
}
Also note that we have defined the flag to use self-hosting or not as an appSettings key in the app.config file. You can flip the value to true or false depending on which one you prefer.
![]() Note There are several alternative ways to achieve this result in SpecFlow. One approach is to define two tags. @SelfHosted and @HttpServer, for the scenario and run the tests with the tag you prefer. Or you could run the tests twice, each time targeting one tag. However, implementing this requirement using tags and automating it using SpecRunner is outside the scope of this book.
Note There are several alternative ways to achieve this result in SpecFlow. One approach is to define two tags. @SelfHosted and @HttpServer, for the scenario and run the tests with the tag you prefer. Or you could run the tests twice, each time targeting one tag. However, implementing this requirement using tags and automating it using SpecRunner is outside the scope of this book.
The code in Listing 15-20 uses a class called VirtualServer (see Listing 15-21), which abstracts whether to use self-hosting or HttpServer.
Listing 15-21. Code for a VirtualServer class That Executes a Request Using a Self-Hosted or HttpServer
public class VirtualServer
{
    private readonly bool _useSelfHosting;
    private readonly Action<HttpConfiguration> _setupConfiguration;

    public VirtualServer(Action<HttpConfiguration> setupConfiguration, bool useSelfHosting = false)
    {
        _setupConfiguration = setupConfiguration;
        _useSelfHosting = useSelfHosting;
    }

    public HttpResponseMessage Send(HttpRequestMessage request)
    {
        return _useSelfHosting ? SendSelfHosted(request) : SendHttpServer(request);
    }

    private HttpResponseMessage SendHttpServer(HttpRequestMessage request)
    {
        var config = new HttpConfiguration();
        _setupConfiguration(config);
        var server = new HttpServer(config);
        var invoker = new HttpMessageInvoker(server);
        return invoker.SendAsync(request, new CancellationToken())
            .Result;
    }

    private HttpResponseMessage SendSelfHosted(HttpRequestMessage request)
    {
        var config = new HttpSelfHostConfiguration(new Uri("http://localhost :" +
            request.RequestUri.Port));
        _setupConfiguration(config);
        using (var host = new HttpSelfHostServer(config))
        {
            host.OpenAsync().Wait();
            var client = new HttpClient();
            var response = client.SendAsync(request).Result;
            host.CloseAsync().Wait();
            return response;
        }
    }
}
Once this is done, you can run or debug your integration tests by right-clicking the feature file and choosing the run/debug scenario. The tests also can be triggered using test-running tools (such as Resharper), and you may choose to run them there.
Our tests’ current implementation works, but use of local member variables will prevent reuse of our steps. The next section introduces a technique to remove all member variables.
Integration Testing for Placing the Order
Now an integration test for placing the order would be great to have. Here we use Scenario instead of Scenario Outline. Also, this time we use the ScenarioContext.Current object rather than member variables for keeping the context. Using ScenarioContext is the preferred approach. In BDD terms, ScenarioContext is the “world”—that is, the context in which a test is running.
So let’s add the PlaceOrder.featurefile and write the feature and a scenario (see Listing 15-22).
Listing 15-22. PlaceOrders Feature File
Feature: PlaceOrders
               In order to inform kitchen of the customer orders
               As a pizza shop operator
               I want to be able to place customer orders

@normal
Scenario: Placing order
               Given I have an order for a mixture of pizzas
                              And it is for a particular customer
               When I place the order
                              And retrieve the order
               Then system must have priced the order
                              And system must have saved the order
                              And saved order must contain same pizzas
                              And saved order must have the name of the customer
Here we make sure that the order is saved and, when retrieved, contains the same data. We also check that the price is calculated. To do this, we need to make some changes in the VirtualServer class so that it keeps its state between requests (see Listing 15-23).
Listing 15-23. Updated VirtualServer
public class VirtualServer : IDisposable
{
    private readonly bool _useSelfHosting;
    private readonly Action<HttpConfiguration> _setupConfiguration;
    private Func<HttpRequestMessage, Task<HttpResponseMessage>> _invoker;
    private HttpSelfHostServer _server;

    public VirtualServer(Action<HttpConfiguration> setupConfiguration, bool useSelfHosting = false)
    {
        _setupConfiguration = setupConfiguration;
        _useSelfHosting = useSelfHosting;
        if (useSelfHosting)
        {
            var config = new HttpSelfHostConfiguration(new Uri(ConfigurationManager.
                AppSettings["BaseUrl"]));
            _setupConfiguration(config);
            _server = new HttpSelfHostServer(config);
            _server.OpenAsync().Wait();
            var client = new HttpClient();
            _invoker = client.SendAsync;
        }
        else
        {
            var config = new HttpConfiguration();
            _setupConfiguration(config);
            var server = new HttpServer(config);
            _invoker = (req) =>
                            {
                                return new HttpMessageInvoker(server).SendAsync(req,
                                    new CancellationToken());
                            };
        }
    }

    public HttpResponseMessage Send(HttpRequestMessage request)
    {
        return _useSelfHosting ? SendSelfHosted(request) : SendHttpServer(request);
    }

    private HttpResponseMessage SendHttpServer(HttpRequestMessage request)
    {

        return _invoker(request)
            .Result;
    }

    private HttpResponseMessage SendSelfHosted(HttpRequestMessage request)
    {
        return _invoker(request)
                .Result;
    }

    public void Dispose()
    {
        if (_server != null)
        {
            _server.CloseAsync().Wait();
            _server.Dispose();
            _server = null;
        }
    }
}
Now we are ready to create our steps. But to make sure the server is created and destroyed at the right time, we need to use two SpecFlow hooks: BeforeScenario and AfterScenario. As the names imply, these hooks run, respectively, before and after the scenario steps (see Listing 15-24).
Listing 15-24. Steps for the PlaceOrder Feature
[Binding]
public class PlaceOrdersSteps
{

    [BeforeScenario]
    public void CreateVirtualServer()
    {
            var server = new VirtualServer(WebApiConfig.Register,
            Convert.ToBoolean(ConfigurationManager.AppSettings["UseSelfHosting"]));
            ScenarioContext.Current[TestContextKeys.VirtualServer] = server;
    }

    [AfterScenario]
    public void DisposeVirtualServer()
    {
        var server = ScenarioContext.Current.Get<VirtualServer>(TestContextKeys.VirtualServer);
        if (server != null)
        {
            server.Dispose();
        }

    }

    [Given(@"I have an order for a mixture of pizzas")]
    public void GivenIHaveAnOrderForAMixtureOfPizzas()
    {
        var order = new Order();
        order.Items = new[]
                            {
                                new OrderItem()
                                    {
                                        Name = "Hawaiian",
                                        Quantity = 2
                                    },
                                    new OrderItem()
                                        {
                                            Name = "Meat Feast",
                                            Quantity = 1
                                        }
                            };
        ScenarioContext.Current[TestContextKeys.NewOrder] = order;
    }

    [Given(@"it is for a particular customer")]
    public void GivenItIsForAParticularCustomer()
    {
        const string CustomerName = "SomeCustomer";
        var order = ScenarioContext.Current.Get<Order>(TestContextKeys.NewOrder);
        ScenarioContext.Current[TestContextKeys.CustomerName] = CustomerName;
        order.CustomerName = CustomerName;
    }

    [When(@"I place the order")]
    public void WhenIPlaceTheOrder()
    {
        var request = new HttpRequestMessage(HttpMethod.Post,  _
               ConfigurationManager.AppSettings["BaseUrl"]
            + "api/Order");
        var server  = ScenarioContext.Current.Get<VirtualServer>(TestContextKeys.VirtualServer);
        var newOrder = ScenarioContext.Current.Get<Order>(TestContextKeys.NewOrder);
        request.Content = new ObjectContent<Order>(newOrder, new JsonMediaTypeFormatter());
        ScenarioContext.Current[TestContextKeys.Request] = request;
        var response = server.Send(request);
        ScenarioContext.Current[TestContextKeys.Response] = response;
        ScenarioContext.Current[TestContextKeys.OrderUrl] = response.Headers.Location;

    }

    [When(@"retrieve the order")]
    public void WhenRetrieveTheOrder()
    {
        var server = ScenarioContext.Current.Get<VirtualServer>(TestContextKeys.VirtualServer);
        var request = new HttpRequestMessage(HttpMethod.Get,
            ScenarioContext.Current.Get<Uri>(TestContextKeys.OrderUrl));
        var response = server.Send(request);
        var retrievedOrder = response.Content.ReadAsAsync<Order>().Result;
        ScenarioContext.Current[TestContextKeys.RetrievedOrder] = retrievedOrder;
    }

    [Then(@"system must have priced the order")]
    public void ThenSystemMustHavePricedTheOrder()
    {
        var retrievedOrder = ScenarioContext.Current.Get<Order>(TestContextKeys.RetrievedOrder);
        Assert.True(retrievedOrder.TotalPrice > 0);
    }

    [Then(@"system must have saved the order")]
    public void ThenSystemMustHaveSavedTheOrder()
    {
        var retrievedOrder = ScenarioContext.Current.Get<Order>(TestContextKeys.RetrievedOrder);
        Assert.True(retrievedOrder.Id != 0);
    }

    [Then(@"saved order must contain same pizzas")]
    public void ThenSavedOrderMustContainSamePizzas()
    {
        var retrievedOrder = ScenarioContext.Current.Get<Order>(TestContextKeys.RetrievedOrder);
        var newOrder = ScenarioContext.Current.Get<Order>(TestContextKeys.NewOrder);
        Assert.Equal(newOrder.Items.Count(), retrievedOrder.Items.Count());
        Assert.Equal(newOrder.Items.First().Name, retrievedOrder.Items.First().Name);
        Assert.Equal(newOrder.Items.First().Quantity, retrievedOrder.Items.First().Quantity);
    }

    [Then(@"saved order must have the name of the customer")]
    public void ThenSavedOrderMustHaveTheNameOfTheCustomer()
    {
        var retrievedOrder = ScenarioContext.Current.Get<Order>(TestContextKeys.RetrievedOrder);
        var customerName = ScenarioContext.Current.Get<string>(TestContextKeys.CustomerName);
        Assert.Equal(customerName, retrievedOrder.CustomerName);
    }
}
OK, now our scenario is ready to run. Note that the use of ScenarioContext to avoid member variables will help to share steps, since the step relies on no context other than ScenarioContext.Current.
Creating other integration tests for other features of the system is more or less the same. As noted earlier, some common steps can be reused, such as the “retrieve the order” step which uses the order URL to retrieve the order from the server.
Summary
This chapter has shown how easy it is to test your ASP.NET Web API application. A sample project was created and used for testing. xUnit is a powerful unit-testing framework that can be used for writing normal unit tests as well as data-driven tests. Testing controllers can be tricky if the action relies on the controller context, but we built a class that helps prepare the context for the test.
Other elements of your API are equally testable, including filters, message handlers, and routing. It is also possible to test the controller and action.
Integration testing is an important part of your test suite. All tests need to be automated and run regularly so that failures occur in your development and integration environment, not in the live environment. BDD-style tests are ideal for writing unit tests, especially because they bridge the gap between requirements and code. SpecFlow is the tool of choice for writing BDD-style tests.