The final section of this book covers ASP.NET Core, the latest version of the web development framework that uses C# and .NET Core. This chapter introduces ASP.NET Core and some of the changes from the previous version of the web development framework, ASP.NET.
After covering the basics of the MVC pattern as implemented in ASP.NET Core, you will start to build two applications that will work together. The first application, an ASP.NET Core RESTful service, will be completed in Chapter 30. The second is an ASP.NET Core web application using the Model-View-Controller pattern and will be completed in Chapter 31. The AutoLot.Dal and AutoLot.Models projects that you finished in Chapter 23 will serve as the data access layer for both applications.
A Quick Look Back
Microsoft released ASP.NET MVC in 2007 to great success. The framework is based on the Model-View-Controller pattern and provided an answer to developers who were frustrated by WebForms, which was essentially a leaky abstraction over HTTP. WebForms was created to help client-server developers move to the Web, and it was pretty successful in that respect. However, as developers became more accustomed to web development, many wanted more control over the rendered output, elimination of view state, and adherence to a proven web application design pattern. With those goals in mind, ASP.NET MVC was created.
Introducing the MVC Pattern
The Model-View-Controller (MVC) pattern has been around since the 1970s, originally created as a pattern for use in Smalltalk. The pattern has made a resurgence recently, with implementations in many different and varied languages, including Java (Spring Framework), Ruby (Ruby on Rails), and .NET (ASP.NET MVC).
The Model
The model is the data of your application. The data is typically represented by plain old CLR objects (POCOs). View models are composed of one or more models and shaped specifically for the consumer of the data. One way to think about models and view models is to relate them to database tables and database views.
Academically, models should be extremely clean and not contain validation or any other business rules. Pragmatically, whether or not models contain validation logic or other business rules depends entirely on the language and frameworks used, as well as specific application needs. For example, EF Core contains many data annotations that double as a mechanism for shaping the database tables and a means for validation in ASP.NET Core web applications. In this book (and in my professional work), the examples focus on reducing duplication of code, which places data annotations and validations where they make the most sense.
The View
The view is the user interface of the application. Views accept commands and render the results of those commands to the user. The view should be as lightweight as possible and not actually process any of the work but hand off all work to the controller.
The Controller
The controller is the brains of the application. Controllers take commands/requests from the user (via the view) or client (through API calls) through action methods and handle them appropriately. The results of the operation are then returned to the user or client. Controllers should be lightweight and leverage other components or services to handle the details of the requests. This promotes separation of concerns and increases testability and maintainability.
ASP.NET Core and the MVC Pattern
ASP.NET Core is capable of creating many types of web applications and services. Two of the options are web applications using the MVC pattern and RESTful services. If you have worked with ASP.NET “classic,” these are analogous to ASP.NET MVC and ASP.NET Web API, respectively. The MVC web application and API application types share the “model” and the “controller” portion of the pattern, while MVC web applications also implement the “view” to complete the MVC pattern.
ASP.NET Core and .NET Core
Just as Entity Framework Core is a complete rewrite of Entity Framework 6, ASP.NET Core is a rewrite of the popular ASP.NET Framework. Rewriting ASP.NET was no small task, but it’s necessary in order to remove the dependency on System.Web. Removing this dependency enabled ASP.NET applications to run on operating systems other than Windows and other web servers besides Internet Information Services (IIS), including self-hosted. This opened the door for ASP.NET Core applications to use a cross-platform, lightweight, fast, and open source web server called Kestrel. Kestrel presents a uniform development experience across all platforms.
Kestrel was originally based on LibUV, but since ASP.NET Core 2.1, it is now based on managed sockets.
Like EF Core, ASP.NET Core is being developed on GitHub as a completely open source project (https://github.com/aspnet). It is also designed as a modular system of NuGet packages. Developers only install the features that are needed for a particular application, minimizing the application footprint, reducing the overhead, and decreasing security risks. Additional improvements include a simplified startup, built-in dependency injection, a cleaner configuration system, and pluggable middleware.
One Framework, Many Uses
There are lots of changes and improvements in ASP.NET Core, as you will see throughout the rest of the chapters in this section. Besides the cross-platform capabilities, another significant change is the unification of the web application frameworks. ASP.NET Core encompasses ASP.NET MVC, ASP.NET Web API, and Razor Pages into a single development framework. Developing web applications and services with the full .NET Framework presents several choices, including WebForms, MVC, Web API, Windows Communication Foundation (WCF), and WebMatrix. They all had their positives and negatives; some were closely related, and others were quite different. All of the choices available meant developers had to know each of them in order to select the proper one for the task at hand or just select one and hope for the best.
With ASP.NET Core, you can build applications that use Razor Pages, the Model-View-Controller pattern, RESTful services, and SPA applications using JavaScript frameworks like Angular and React. While the UI rendering varies with choices between MVC, Razor Pages, and the JavaScript frameworks, the underlying development framework is the same across all choices. Two prior choices that have not been carried forward into ASP.NET Core are WebForms and WCF.
With all of the separate frameworks brought under the same roof, the former names of ASP.NET MVC and ASP.NET Web API have been officially retired. In this book, I still refer to ASP.NET Core web applications using the Model-View-Controller pattern as MVC and to ASP.NET RESTful services as Web API for simplicity.
ASP.NET Core Features from MVC/Web API
Convention over configuration
Controllers and actions
Model binding
Model validation
Routing
Filters
Layouts and Razor Views
These are covered in the next sections, except for layouts and Razor views, which are covered in Chapter 31.
Convention over Configuration
ASP.NET MVC and ASP.NET Web API reduced the amount of configuration necessary by introducing certain conventions. When followed, these conventions reduce the amount of manual (or templated) configuration, but also require the developers to know the conventions in order to take advantage of them. Two of the main conventions include naming conventions and directory structure.
Naming Conventions
There are multiple naming conventions in ASP.NET Core, both for MVC and API applications. For example, controllers are typically named with the Controller suffix (e.g., HomeController) in addition to deriving from Controller (or ControllerBase). When accessed through routing, the Controller suffix is dropped. When looking for a controller’s views, the controller name minus the suffix is the starting search location. This convention of dropping the suffix is repeated through ASP.NET Core. There will be many examples covered in the following chapters.
Another naming convention is used in view location and selection. By default, an action method (in an MVC application) will render the view of the same name as the method. Editor and display templates are named after the class that they render in the view. These defaults can be changed if your application requires it. All of these will be further explored when the AutoLot.Mvc application is built .
Directory Structure
There are several folder conventions that you must understand to successfully build ASP.NET Core web applications and services.
The Controllers Folder
By convention, the Controllers folder is where the ASP.NET Core MVC and API implementations (and the routing engine) expect that the controllers for your application are placed.
The Views Folder
The Views folder is where the views for the application are stored. Each controller gets its own folder under the main Views folder named after the controller name (minus the Controller suffix). The action methods will render views in their controller’s folder by default. For example, the Views/Home folder holds all the views for the HomeController controller class.
The Shared Folder
A special folder under Views is named Shared. This folder is accessible to all controllers and their action methods. After searching the folder named for the controller, if the view can’t be found, then the Shared folder is searched for the view.
The wwwroot Folder (New in ASP. NET Core)
An improvement over ASP.NET MVC is the creation of a special folder named wwwroot for ASP.NET Core web applications. In ASP.NET MVC, the JavaScript files, images, CSS, and other client-side content were intermingled with all the other folders. In ASP.NET Core, the client side is all contained under the wwwroot folder. This separation of compiled files from client-side files significantly cleans up the project structure when working with ASP.NET Core.
Controllers and Actions
Just like ASP.NET MVC and ASP.NET Web API, controllers and action methods are the workhorses of an ASP.NET Core MVC or API application .
The Controller Class
As mentioned already, ASP.NET Core unified ASP.NET MVC5 and ASP.NET Web API. This unification also combines the Controller, ApiController, and AsyncController base classes from MVC5 and Web API 2.2 into one new class, Controller, which has a base class of its own named ControllerBase. ASP.NET Core web application controllers inherit from the Controller class, while ASP.NET Core service controllers inherit from the ControllerBase class (covered next).
Some of the Helper Methods Provided by the Controller Class
Helper Method | Meaning in Life |
|---|---|
ViewDataTempDataViewBag | Provide data to the view through the ViewDataDictionary, TempDataDictionary, and dynamic ViewBag transport. |
View | Returns a ViewResult (derived from ActionResult) as the HTTP response. Defaults to a view of the same name as the action method, with the option of specifying a specific view. All options allow specifying a view model that is strongly typed and sent to the View. Views are covered in Chapter 31. |
PartialView | Returns a PartialViewResult to the response pipeline. Partial views are covered in Chapter 31. |
ViewComponent | Returns a ViewComponentResult to the response pipeline. ViewComponents are covered in Chapter 31. |
Json | Returns a JsonResult containing an object serialized as JSON as the response. |
OnActionExecuting | Executes before an action method executes. |
OnActionExecutionAsync | Async version of OnActionExecuting. |
OnActionExecuted | Executes after an action method executes. |
The ControllerBase Class
Some of the Helper Methods Provided by the ControllerBase Class
Helper Method | Meaning in Life |
|---|---|
HttpContext | Returns the HttpContext for the currently executing action. |
Request | Returns the HttpRequest for the currently executing action. |
Response | Returns the HttpResponse for the currently executing action. |
RouteData | Returns the RouteData for the currently executing action (routing is covered later in this chapter). |
ModelState | Returns the state of the model in regard to model binding and validation (both covered later in this chapter). |
Url | Returns an instance of the IUrlHelper, providing access to building URLs for ASP.NET Core MVC applications and services. |
User | Returns the ClaimsPrincipal user. |
Content | Returns a ContentResult to the response. Overloads allow for adding a content type and encoding definition. |
File | Returns a FileContentResult to the response. |
Redirect | A series of methods that redirect the user to another URL by returning a RedirectResult. |
LocalRedirect | A series of methods that redirect the user to another URL only if the URL is local. More secure than the generic Redirect methods. |
RedirectToActionRedirectToPageRedirectToRoute | A series of methods that redirect to another action method, Razor Page, or named route. Routing is covered later in this chapter. |
TryUpdateModel | Explicit model binding (covered later in this chapter). |
TryValidateModel | Explicit model validation (covered later in this chapter). |
Some of the HTTP Status Code Helper Methods Provided by the ControllerBase Class
Helper Method | HTTP Status Code Action Result | Status Code |
|---|---|---|
NoContent | NoContentResult | 204 |
Ok | OkResult | 200 |
NotFound | NotFoundResult | 404 |
BadRequest | BadRequestResult | 400 |
CreatedCreatedAtActionCreatedAtRoute | CreatedResultCreatedAtActionResultCreateAtRouteResult | 201 |
AcceptedAcceptedAtActionAcceptedAtRoute | AcceptedResultAcceptedAtActionResultAcceptedAtRouteResult | 202 |
Actions
Actions are methods on a controller that return an IActionResult (or Task<IActionResult> for async operations) or a class that implements IActionResult, such as ActionResult or ViewResult. Actions will be covered more in the following chapters.
Model Binding
Model binding is the process where ASP.NET Core uses the name-value pairs submitted in an HTTP Post call to assign values to models. To bind to a reference type, the name-value pairs come from the form values or the request body, the reference types must have a public default constructor, and the properties to be bound must be public and writable. When assigning values, implicit type conversions (such as setting a string property value using an int) are used where applicable. If type conversion doesn’t succeed, that property is flagged in error. Before discussing binding in greater detail, it’s important to understand the ModelState dictionary and its role in the binding (and validation) process.
The ModelState Dictionary
The ModelState dictionary contains an entry for every property being bound and an entry for the model itself. If an error occurs during model binding, the binding engine adds the errors to the dictionary entry for the property and sets ModelState.IsValid = false. If all matched properties are successfully assigned, the binding engine sets ModelState.IsValid = true.
Model validation, which also sets the ModelState dictionary entries, happens after model binding. Both implicit and explicit model binding automatically call validation for the model. Validation is covered in the next section.
Adding Custom Errors to the ModelState Dictionary
Implicit Model Binding
Form values from an HTTP Post method (including JavaScript AJAX posts)
Request body (for API controllers)
Route values provided through ASP.NET Core routing (for simple types)
Query string values (for simple types)
Uploaded files (for IFormFile types)
Explicit Model Binding
The Bind Attribute
The Bind attribute in HTTP Post methods allows you to limit the properties that participate in model binding or set a prefix for the name in the name-value pairs. Limiting the properties that can be bound helps reduce the threat of over-posting attacks. If a Bind attribute is placed on a reference parameter, the fields listed in the Include list are the only fields that will be assigned through model binding. If the Bind attribute is not used, all fields are bindable.
Controlling Model Binding Sources in ASP.NET Core
Controlling Model Binding Sources
Attribute | Meaning in Life |
|---|---|
BindingRequired | A model state error will be added if binding cannot occur instead of just setting the property to its default value. |
BindNever | Tells the model binder to never bind to this parameter. |
FromHeaderFromQueryFromRouteFromForm | Used to specify the exact binding source to apply (header, query string, route parameters, or form values). |
FromServices | Binds the type using dependency injection (covered later in this chapter). |
FromBody | Binds data from the request body. The formatter is selected based on the content of the request (e.g., JSON, XML, etc.). There can be at most one parameter decorated with the FromBody attribute. |
ModelBinder | Used to override the default model binder (for custom model binding). |
Model Validation
Model validation occurs immediately after model binding (both explicit and implicit). While model binding adds errors to the ModelState data dictionary due to conversion issues, validation adds errors to the ModelState data dictionary based on business rules. Examples of business rules include required fields, strings that have a maximum allowed length, or dates being within a certain allowed range.
Some of the Built-in Validation Attributes
Attribute | Meaning in Life |
|---|---|
CreditCard | Performs a Luhn-10 check on the credit card number |
Compare | Validates the two properties in a model match |
EmailAddress | Validates the property has a valid email format |
Phone | Validates the property has a valid phone number format |
Range | Validates the property falls within a specified range |
RegularExpression | Validates the property matches a specified regular expression |
Required | Validates the property has a value |
StringLength | Validates the property doesn’t exceed a maximum length |
Url | Validates the property has a valid URL format |
Remote | Validates input on the client by calling an action method on the server |
Custom validation attributes can also be developed but are not covered in this book.
Routing
Routing is how ASP.NET Core matches HTTP requests to controllers and actions (the executable endpoints) in your application, instead of the old Web Forms process of matching URLs to the project file structure. It also provides a mechanism for creating URLs from within the app based on those endpoints. An endpoint in an MVC- or Web API-style app consists of a controller, action (MVC only), HTTP verb, and optional values (called route values).
Routes also apply to Razor pages, SignalR, gRPC services, and more. This book covers MVC- and Web API-style controllers.
ASP.NET Core uses routing middleware to match URLs of incoming requests and to generate URLs sent out in responses. The middleware is registered in the Startup class, and endpoints are added in the Startup class or through route attributes, both covered later in this chapter.
URL Patterns and Route Tokens
Reserved Route Tokens for MVC and API Applications
Token | Meaning in Life |
|---|---|
Area | Defines the MVC area for the route |
Controller | Defines the controller (minus the controller suffix) |
Action | Defines the action name in MVC applications |
In addition to the reserved tokens , routes can contain custom tokens that are mapped (model bound) to action method parameters.
Routing and ASP.NET Core RESTful Services
When defining routes for ASP.NET services, an action method is not specified. Instead, once the controller is located, the action method to execute is based on the HTTP verb of the request and HTTP verb assignments to action methods. More on this shortly.
Conventional Routing
When a URL is requested, it is checked against the route table. If there is a match, the code located at that application endpoint is executed. An example URL that would be serviced by this route is Car/Delete/5. This invokes the Delete() action method on the CarController, passing 5 to the id parameter.
The defaults specify how to fill in the blanks for URLs that don’t contain all of the defined components. In the previous code, if nothing was specified in the URL (such as http://localhost:5001), then the routing engine would call the Index() action method of the HomeController class, without an id parameter. The defaults are progressive, meaning that they can be excluded from right to left. However, route parts can’t be skipped. Entering a URL like http://localhost:60466/Delete/5 will fail the {controller}/{action}/{id} pattern.
The routing engine will attempt to find the first route based on the controller, action, custom tokens, and HTTP verb. If the routing engine can’t determine the best route, it will throw an AmbiguousMatchException.
Notice that the route template doesn’t contain a protocol or hostname. The routing engine automatically prepends the correct information when creating routes and uses the HTTP verb, path, and parameters to determine the correct application endpoint. For example, if your site is running on https://www.skimedic.com, the protocol (HTTPS) and hostname (www.skimedic.com) is automatically prepended to the route when created (e.g., https://www.skimedic.com/Car/Delete/5). For an incoming request, the routing engine uses the Car/Delete/5 portion of the URL.
Named Routes
Route names can be used as a shorthand to generate URLs from within the application. In the preceding conventional round, the endpoint is assigned the name default.
Attribute Routing
In attribute routing , routes are defined using C# attributes on controllers and their action methods. This can lead to more precise routing, but can also increase the amount of configuration, since every controller and action needs to have routing information specified.
Conventional and attribute routing can be used together. If the default controller route was set up on UseEndpoints() (as in the conventional routing example), the preceding controller would be located by the route table.
The built-in tokens are distinguished with square brackets ([]) in attribute routing instead of the curly braces ({}) used in conventional routing. Custom tokens still use curly braces.
Named Routes
Routing and HTTP Verbs
You might have noticed that neither of the route template definition methods defines an HTTP verb. This is because the routing engine (in MVC- and API-style applications) uses the route template and the HTTP verb in combination to select the proper application endpoint.
HTTP Verbs in Web Application (MVC) Routing
If an action method isn’t decorated with an HTTP verb attribute, it defaults to a get method. However, in MVC web applications, unmarked action methods can also respond to post requests. For this reason, it’s considered a best practice to mark all action methods explicitly with the correct verb attribute.
API Service Routing
If an action method doesn’t have an HTTP verb attribute, it is treated as the application endpoint for get requests. If the route request is matched but there isn’t an action method with the correct verb attribute, the server will return a 404 (not found).
ASP.NET Web API allowed you to omit the HTTP verb for a method if the name started with Get, Put, Delete, or Post. This convention is generally considered a bad idea and has been removed in ASP.NET Core. If an action method does not have an HTTP verb specified, it will be called using an HTTP Get.
Redirecting Using Routing
Another advantage of routing is that you no longer have to hard-code URLs for other pages in your site. The routing entries are used to match incoming requests as well as build URLs. When building URLs, the scheme, host, and port are added based on the values of the current request.
Filters
Filters Available in ASP.NET Core
Filter | Meaning in Life |
|---|---|
Authorization filters | Run first and determine if the user is authorized for the current request. |
Resource filters | Run immediately after the authorization filter and can run after the rest of the pipeline has completed. Run before model binding . |
Action filters | Run immediately before an action is executed and/or immediately after an action is executed. Can alter values passed into an action and the result returned from an action. |
Exception filters | Used to apply global policies to unhandled exceptions that occur before writing to the response body. |
Result filters | Run code immediately after the successful execution of action results. Useful for logic that surrounds view or formatter execution. |
Authorization Filters
Authorization filters work with the ASP.NET Core Identity system to prevent access to controllers or actions that the user doesn’t have permission to use. It’s not recommended to build custom authorization filters since the built-in AuthorizeAttribute and AllowAnonymousAttribute usually provide enough coverage when using ASP.NET Core Identity.
Resource Filters
The before code executes after authorization filters and prior to any other filters, and the after code executes after all other filters. This enables resource filters to short-circuit the entire response pipeline. A common user for resource filters is for caching. If the response is in the cache, the filter can skip the rest of the pipeline.
Action Filters
The before code executes immediately before the execution of the action method, and the after code executes immediately after the execution of the action method. Action filters can short-circuit the action method and any filters that are wrapped by the action filter (order of execution and wrapping are covered shortly).
Exception Filters
Exception filters implement cross-cutting error handling in an application. They don’t have before or after events, but they handle any unhandled exceptions in controller creation, model binding, action filters, or action methods.
Result Filters
Result filters wrap the execution of the IActionResult for an action method. A common scenario is to add header information into the HTTP response message using a result filter.
What’s New in ASP.NET Core
Built-in dependency injection.
Cloud-ready, environment-based configuration system.
Lightweight, high-performance, and modular HTTP request pipeline.
The entire framework is based on fine-grained NuGet packages.
Integration of modern client-side frameworks and development workflows.
Introduction of tag helpers.
Introduction of view components.
Vast improvements in performance.
Built-in Dependency Injection
Dependency injection (DI) is a mechanism to support loose coupling between objects. Instead of directly creating dependent objects or passing specific implementations into classes and/or methods, parameters are defined as interfaces. That way, any implementation of the interface can be passed into the classes or methods and classes, dramatically increasing the flexibility of the application.
Lifetime Options for Services
Lifetime Option | Functionality Provided |
|---|---|
Transient | Created each time they are needed. |
Scoped | Created once for each request. Recommended for Entity Framework DbContext objects. |
Singleton | Created once on first request and then reused for the lifetime of the object. This is the recommended approach versus implementing your class as a Singleton. |
Entries in the DI container can be injected into class constructors and methods and into Razor views.
If you want to use a different dependency injection container, ASP.NET Core was designed with that flexibility in mind. Consult the docs to learn how to plug in a different container: https://docs.microsoft.com/en-us/aspnet/core/fundamentals/dependency-injection.
Environmental Awareness
The IWebHostEnvironment Properties
Property | Functionality Provided |
|---|---|
ApplicationName | Gets or sets the name of the application. Defaults to the name of the entry assembly. |
ContentRootPath | Gets or sets the absolute path to the directory that contains the application content files. |
ContentRootFileProvider | Gets or sets an IFileProvider pointing to the ContentRootPath. |
EnvironmentName | Gets or sets the name of the environment. Sets to the value of the ASPNETCORE_ENVIRONMENT environment variable. |
WebRootFileProvider | Gets or sets an IFileProvider pointing at the WebRootPath. |
WebRootPath | Gets or sets the absolute path to the directory that contains the web-servable application content files. |
In addition to accessing the relevant file paths, IWebHostEnvironment is used to determine the runtime environment.
Determining the Runtime Environment
ASP.NET Core automatically reads the value of the environment variable named ASPNETCORE_ENVIRONMENT to set the runtime environment. If the ASPNETCORE_ENVIRONMENT variable is not set, ASP.NET Core sets the value to Production. The value set is accessible through the EnvironmentName property on the IWebHostEnvironment.
While developing ASP.NET Core applications, this variable is typically set using a settings file or the command line. Downstream environments (staging, production, etc.) typically use standard operating system environment variables.
The HostEnvironmentEnvExtensions Methods
Method | Functionality Provided |
|---|---|
IsProduction | Returns true if the environment variable is set to Production (case insensitive) |
IsStaging | Returns true if the environment variable is set to Staging (case insensitive) |
IsDevelopment | Returns true if the environment variable is set to Development (case insensitive) |
IsEnvironment | Returns true if the environment variable matches the string passed into the method (case insensitive) |
Determining which configuration files to load
Setting debugging, error, and logging options
Loading environment-specific JavaScript and CSS files
You will see each of these in action while building the AutoLot.Api and AutoLot.Mvc applications in the next two chapters.
Application Configuration
Previous versions of ASP.NET used the web.config file to configure services and applications, and developers accessed the configuration settings through the System.Configuration class. Of course, all configuration settings for the site, not just application-specific settings, were dumped into the web.config file making it a (potentially) complicated mess.
The template also creates an appsettings.Development.json file. The configuration system works in conjunction with the runtime environment awareness to load additional configuration files based on the runtime environment. This is accomplished by instructing the configuration system to load a file named appsettings.{environmentname}.json after the appSettings.json file. When running under Development, the appsettings.Development.json file is loaded after the initial settings file. If the environment is Staging, the appsettings.Staging.json file is loaded. It is important to note that when more than one file is loaded, any settings that appear in both files are overwritten by the last file loaded; they are not additive.
All configuration values are accessible through an instance of IConfiguration, available through the ASP.NET Core dependency injection system.
Retrieving Settings
Additional configuration features will be utilized throughout the rest of this book.
Deploying ASP.NET Core Applications
On a Windows server (including Azure) using IIS
On a Windows server (including Azure app services) outside of IIS
On a Linux server using Apache or NGINX
On Windows or Linux in a Docker container
This flexibility allows organizations to decide the deployment platform that makes the most sense for the organization, including popular container-based deployment models (such as using Docker), as opposed to being locked into Windows servers.
Lightweight and Modular HTTP Request Pipeline
Following along with the principles of .NET Core, you must opt in for everything in ASP.NET Core. By default, nothing is loaded into an application. This enables applications to be as lightweight as possible, improving performance and minimizing the surface area and potential risk.
Create and Configure the Solution
Now that you have a background in some of the major concepts in ASP.NET Core, it’s time to start building the ASP.NET Core applications. The ASP.NET Core projects can be created using either Visual Studio or the command line. Both options will be covered in the next two sections.
Using Visual Studio
Visual Studio has the advantage of a GUI to step you through the process of creating a solution and projects, adding NuGet packages, and creating references between projects.
Create the Solution and Projects

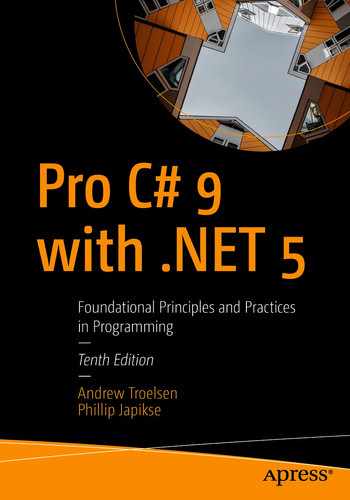
Creating the AutoLot.Api project and AutoLot solution
Selecting the ASP.NET Core Web API template
Next, add another ASP.NET Core web application to the solution. Select the ASP.NET Core Web App (Model-View-Controller) template. Make sure that .NET Core and ASP.NET Core 5.0 are selected in the top select boxes; leave the Advanced check boxes at their default values.
Add in AutoLot.Models and AutoLot.Dal
The solution requires the completed data access layer from Chapter 23. You can either copy the files into the current solution directory or leave them in place. Either way, you need to right-click your solution name in Solution Explorer, select Add ➤ Existing Project, and navigate to the AutoLot.Models.csproj file and select it. Repeat for the AutoLot.Dal project.
While the order that the projects are added to the solution doesn’t technically matter, Visual Studio will preserve the references between AutoLot.Models and AutoLot.Dal if the models project is added first.
Add the Project References
Add the following project references by right-clicking the project name in Solution Explorer and selecting Add ➤ Project Reference for each project.
AutoLot.Models
AutoLot.Dal
AutoLot.Services
AutoLot.Models
AutoLot.Dal
Add the NuGet Packages
Additional NuGet packages are needed to complete the applications.
AutoMapper
System.Text.Json
Swashbuckle.AspNetCore.Annotations
Swashbuckle.AspNetCore.Swagger
Swashbuckle.AspNetCore.SwaggerGen
Swashbuckle.AspNetCore.SwaggerUI
Microsoft.VisualStudio.Web.CodeGeneration.Design
Microsoft.EntityFrameworkCore.SqlServer
With the ASP.NET Core 5.0 API templates, Swashbuckle.AspNetCore is already referenced. The Swashbuckle packages listed add capabilities beyond the basic implementation.
AutoMapper
System.Text.Json
LigerShark.WebOptimizer.Core
Microsoft.Web.LibraryManager.Build
Microsoft.VisualStudio.Web.CodeGeneration.Design
Microsoft.EntityFrameworkCore.SqlServer
Microsoft.Extensions.Hosting.Abstractions
Microsoft.Extensions.Options
Serilog.AspNetCore
Serilog.Enrichers.Environment
Serilog.Settings.Configuration
Serlog.Sinks.Console
Serilog.Sinks.File
Serilog.Sinks.MSSqlServer
System.Text.Json
Using the Command Line
As shown earlier in this book, .NET Core projects and solutions can be created using the command line. Open a prompt and navigate to the directory where you want the solution located.
The commands listed use the Windows directory separator. If you are using a non-Windows operating system, adjust the separator characters as needed.
That completes the setup using the command line. It is much more efficient provided you don’t need the Visual Studio GUI to help you.
Running ASP.NET Core Applications
From Visual Studio, using IIS Express
From Visual Studio, using Kestrel
From a command prompt with the .NET CLI, using Kestrel
From Visual Studio Code, using Kestrel, from the Run menu
From Visual Studio Code’s Terminal window using the .NET CLI and Kestrel
Configuring the Launch Settings
Using Visual Studio
The iisSettings section defines the settings of running the application using IIS Express as the web server. The most important settings to note are applicationUrl, which defines the port, and the environmentVariables block, which defines the runtime environment. This setting supersedes any machine environment setting when running in debug mode. The second profile (AutoLot.Mvc or AutoLot.Api, depending on which project you are using) defines the settings when running the application using Kestrel as the web server. The profile defines the applicationUrl and ports, plus the environment.

The available Visual Studio debugging profiles
When running your application from Visual Studio, edit-and-continue is no longer supported.
Using the Command Line or Visual Studio Code Terminal Window
To end the process, press Ctrl+C.
Changing Code While Debugging
This update to the command runs a file watcher along with launching your application. When changes are detected in any project (or referenced project) files, the app will automatically stop and then restart. New in ASP.NET Core 5, any connected browser windows will reload as well. It’s not exactly edit-and-continue, but it’s a good solution for development.
Using Visual Studio Code (VS Code)
To run the projects from Visual Studio Code, open the folder where the solution is located. When you press F5 (or click Run), VS Code will prompt you to select the project to run (AutoLot.Api or AutoLot.Mvc) and then create a run configuration and place it in a file named launch.json. VS Code also uses the launchsettings.json file for port configuration.
Changing Code While Debugging
When running from VS Code, code can be changed, but it won’t be reflected in the running app. To have changes reflected in the running app, run the dotnet watch run command from the terminal.
Debugging ASP.NET Core Applications
When running your application from Visual Studio or Visual Studio Code, debugging works as expected. When running from the command line, you have to attach to the running process before you can debug your application. Doing this in Visual Studio and Visual Studio Code is easy.
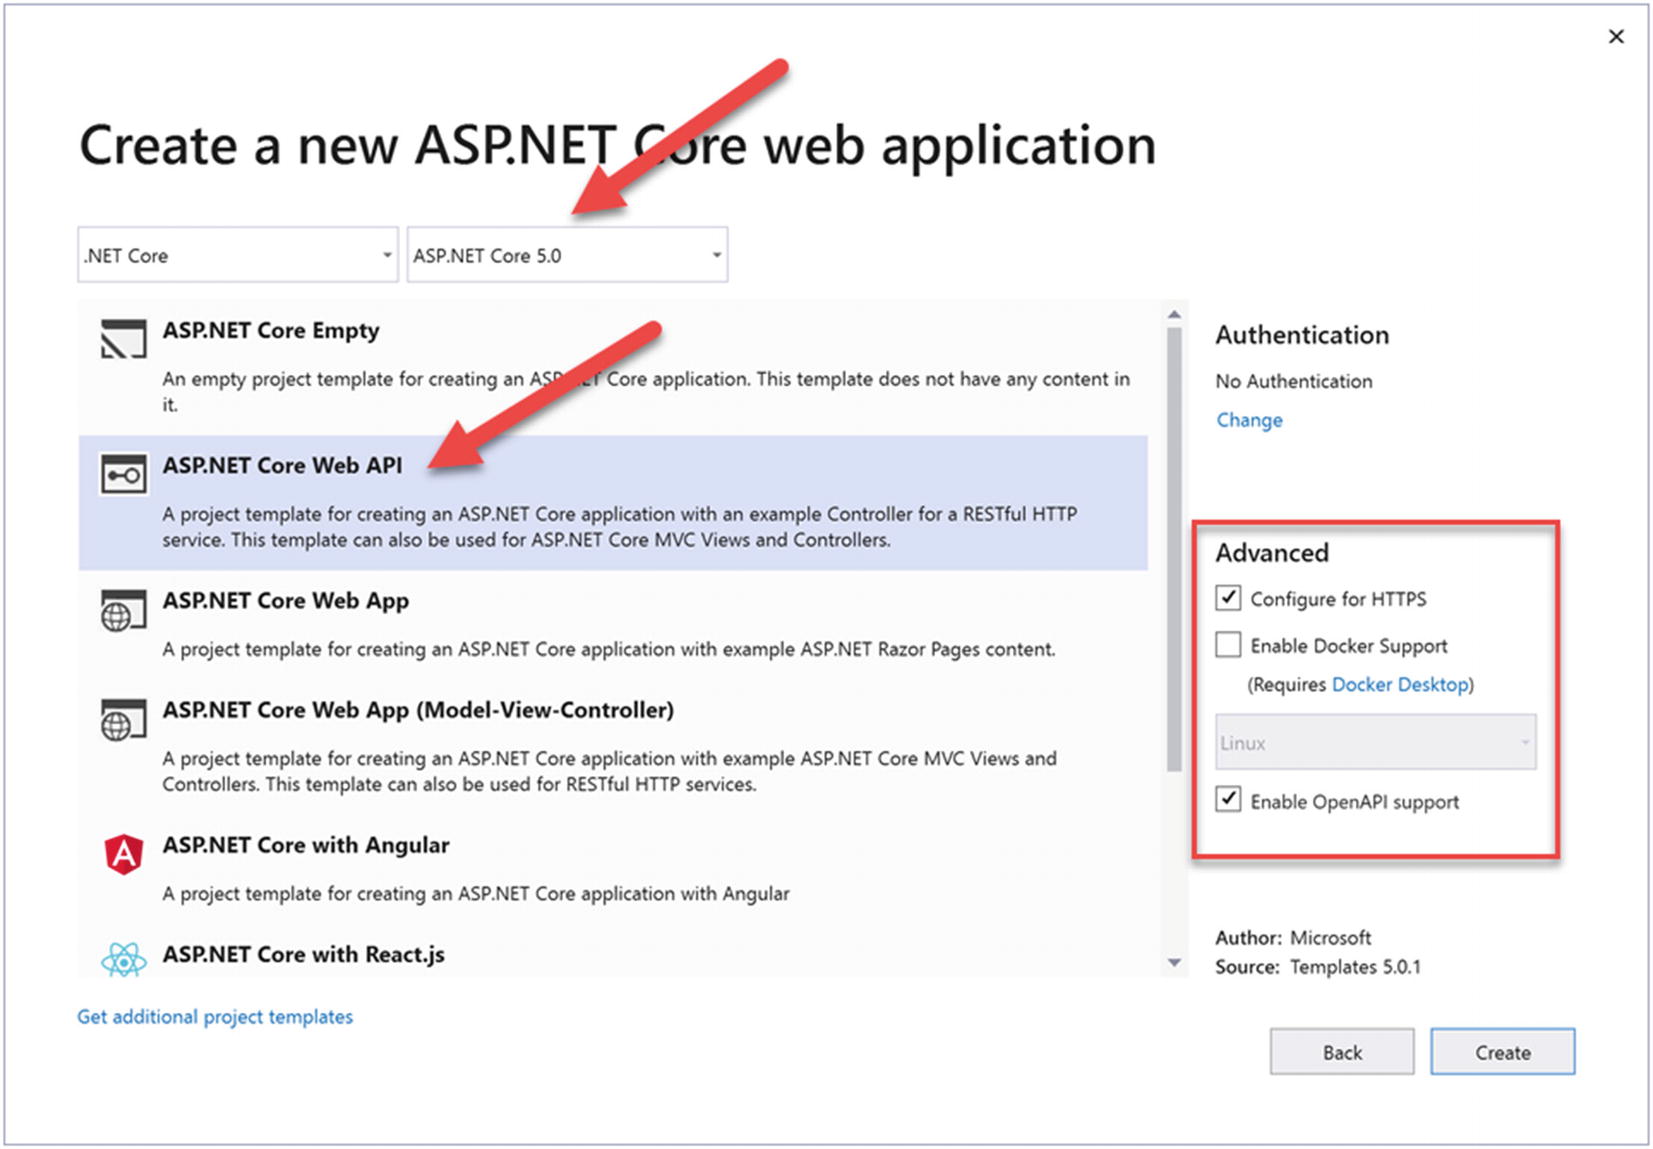
Attaching with Visual Studio

Attaching to the running applications for debugging in Visual Studio
Once attached to the running process, you can set breakpoints in Visual Studio, and debugging works as expected. You can’t edit and continue; you will have to detach from the process for changes to be reflected in your running app.
Attaching with Visual Studio Code
Attaching to the running applications for debugging in Visual Studio Code
When you click the Run button, you will be prompted to select which process to attach. Select your application. And you can now set breakpoints as expected.
The advantage of using Visual Studio Code is that once it is attached (and using dotnet watch run) you can update your code while running (without having to detach) and your changes will be reflected in your app.
Update the AutoLot.Api Ports
Create and Configure the WebHost
Unlike classic ASP.NET MVC or ASP.NET Web API applications, ASP.NET Core applications are simple .NET Core Console applications that create and configure a WebHost. The creation of the WebHost and the subsequent configuration is what sets the application up to listen (and respond) to HTTP requests. The WebHost is created in the Main() method of the Program.cs file. The WebHost is then configured for your application in the Startup.cs file.
The Program.cs File
The CreateDefaultBuilder() method compacts the most typical application setup into one method call. It configures the app (using environment variables and appsettings JSON files), it configures the default logging provider, and it sets up the dependency injection container. This setup is provided by the ASP.NET Core templates for API- and MVC-style applications.
The next method (ConfigureWebHostDefaults()) is also a meta-method that adds support for Kestrel, IIS, and additional configuration. The final step is to set the application-specific configuration class, which in this example (and by convention) is named Startup. The final step is to use the Run() method to activate the web host.
In addition to the WebHost , the preceding code also creates the IConfiguration instance and adds it into the dependency injection container.
The Startup.cs File
The Startup class configures how the application will handle HTTP requests and responses, configures any needed services, and adds services to the dependency injection container. The class name can be anything, as long as it matches the UseStartup<T>() line in the configuration of the CreateHostBuilder() method, but the convention is to name the class Startup.
Available Services for Startup
Available Services in Startup
Service | Functionality Provided |
|---|---|
IApplicationBuilder | Defines a class that provides the mechanisms to configure an application’s request pipeline. |
IWebHostEnvironment | Provides information about the web hosting environment an application is running in. |
ILoggerFactory | Used to configure the logging system and create instances of loggers from the registered logging providers. |
IServiceCollection | Specifies the contract for a collection of service descriptors. This is part of the dependency injection framework. |
IConfiguration | An instance of the application configuration, created in the Main method of the Program class. |
The constructor takes an instance of IConfiguration and optional instance of IWebHostEnvironment/IHostEnvironment. The ConfigureServices() method runs before the Configure() method takes an instance of IServiceCollection. The Configure() method must take an instance of IApplicationBuilder but can also take instances of IWebHostEnvironment/IHostEnvironment, ILoggerFactory, and any interfaces added to the dependency injection container in ConfigureServices(). Each of the components is discussed in the next sections.
The Constructor
The constructor takes an instance of the IConfiguration interface that was created by the Host.CreateDefaultBuilder method in the Program.cs file and assigns it to the Configuration property for use elsewhere in the class. The constructor can also take an instance of the IWebHostEnvironment and/or the ILoggerFactory, although these are not added in the default template.
The ConfigureServices Method
The ConfigureServices() method is used to configure any services needed by the application and insert them into the dependency injection container. This includes the services needed to support MVC applications and API services.
AutoLot.Api
The first line gets the connection string from the settings file (more on this later). The next line adds a pool of ApplicationDbContext instances into the DI container. Much like a connection pool, the pool of ApplicationDbContexts can improve performance by having pre-initialized instances waiting to be used. When a context is needed, it gets loaded from the pool. When it is done being used, it is cleaned up of any remnants of the use and is returned to the pool.
Add the Connection String to the App Settings
This keeps the real connection string out of source control and enables replacement of the token (ITSASECRET) during the deployment process.
AutoLot.Mvc
The MVC web application will use both the data access layer and the API to interact with the data to demonstrate both mechanisms.
Add the Connection String to the App Settings
The Configure Method
The Configure() method is used to set up the application to respond to HTTP requests. This method executes after the ConfigureServices() method, which means anything added to the DI container can also be injected into the Configure() method.
There are differences in how API- and MVC-styled apps are configured to handle the HTTP pipeline requests and response.
AutoLot.Api
The default template checks the environment, and if it’s set to development, the UseDeveloperExceptionPage() middleware is added to the processing pipeline. This provides debugging information, information that you probably don’t want exposed in production.
AutoLot.Mvc
The method also checks for the environment and, if set to development, adds in the DeveloperExceptionPage middleware. If the environment is anything but development, the generic ExceptionHandler middleware is added to the pipeline as well as HTTP Strict Transport Security Protocol (HSTS).
Back in the main execution path, like its API counterpart, a call to app.UseHttpsRedirection() is added. The next step is adding support for static files with app.UseStaticFiles(). Support for static files is opt-in as a security measure. If your app doesn’t need them (like APIs), then don’t add support, and they can’t be a security risk. The routing, authorization, and end point middleware are added.
Logging
A powerful feature of ASP.NET Core is the extensibility of the pipeline as a whole and logging in particular. The default logger can be swapped out with another logging framework as long as the new framework can integrate with the logging pattern. Serilog is one framework that integrates with ASP.NET Core. The next sections cover creating a logging infrastructure based on Serilog and configuring the ASP.NET Core applications to use the new logging code.
The IAppLogging Interface
If values are passed into the method call, the values passed in are used instead of the values from the attributes.
The AppLogging Class
Logging Configuration
Serilog uses sinks to write to different logging targets. The targets we will use for logging in the ASP.NET Core apps are a text file, the database, and the console. The text file and database sinks require configuration, an output template for the text file sink, and a list of fields for the database sink.
With everything in place, it’s time to swap out default logger for Serilog.
App Settings Updates
The Logging section of all the app settings files (appsettings.json, appsettings.development.json, and appsettings.production) for the AutoLot.Api and AutoLot.Dal projects must be updated with new logging information as well as adding the application name.
Program.cs Updates
Startup.cs Updates
Controller Updates
Test-Drive the Logging Framework
With Serilog in place, it’s time to test the logging for the applications. If you are using Visual Studio, set the AutoLot.Mvc application as the startup application (right-click in Solution Explorer, select Set as Startup Project, and then click the green run arrow, or press F5). If you are using Visual Studio Code, open the terminal window (Ctrl+`), navigate to the AutoLot.Mvc directory, and enter dotnet run.
With Visual Studio, the browser will automatically launch to the Home/Index view (you’ll see “Welcome/Learn about building apps with ASP.NET Core”). If you are using Visual Studio Code, you will need to open a browser and navigate to https://localhost:5001. Once the browser has loaded, you can close it since the logging call was made when the home page was loaded. Closing the browser using VS will stop debugging. To stop debugging with VS Code, press Ctrl+C in the terminal window.

Initial Swagger page for AutoLot.Api
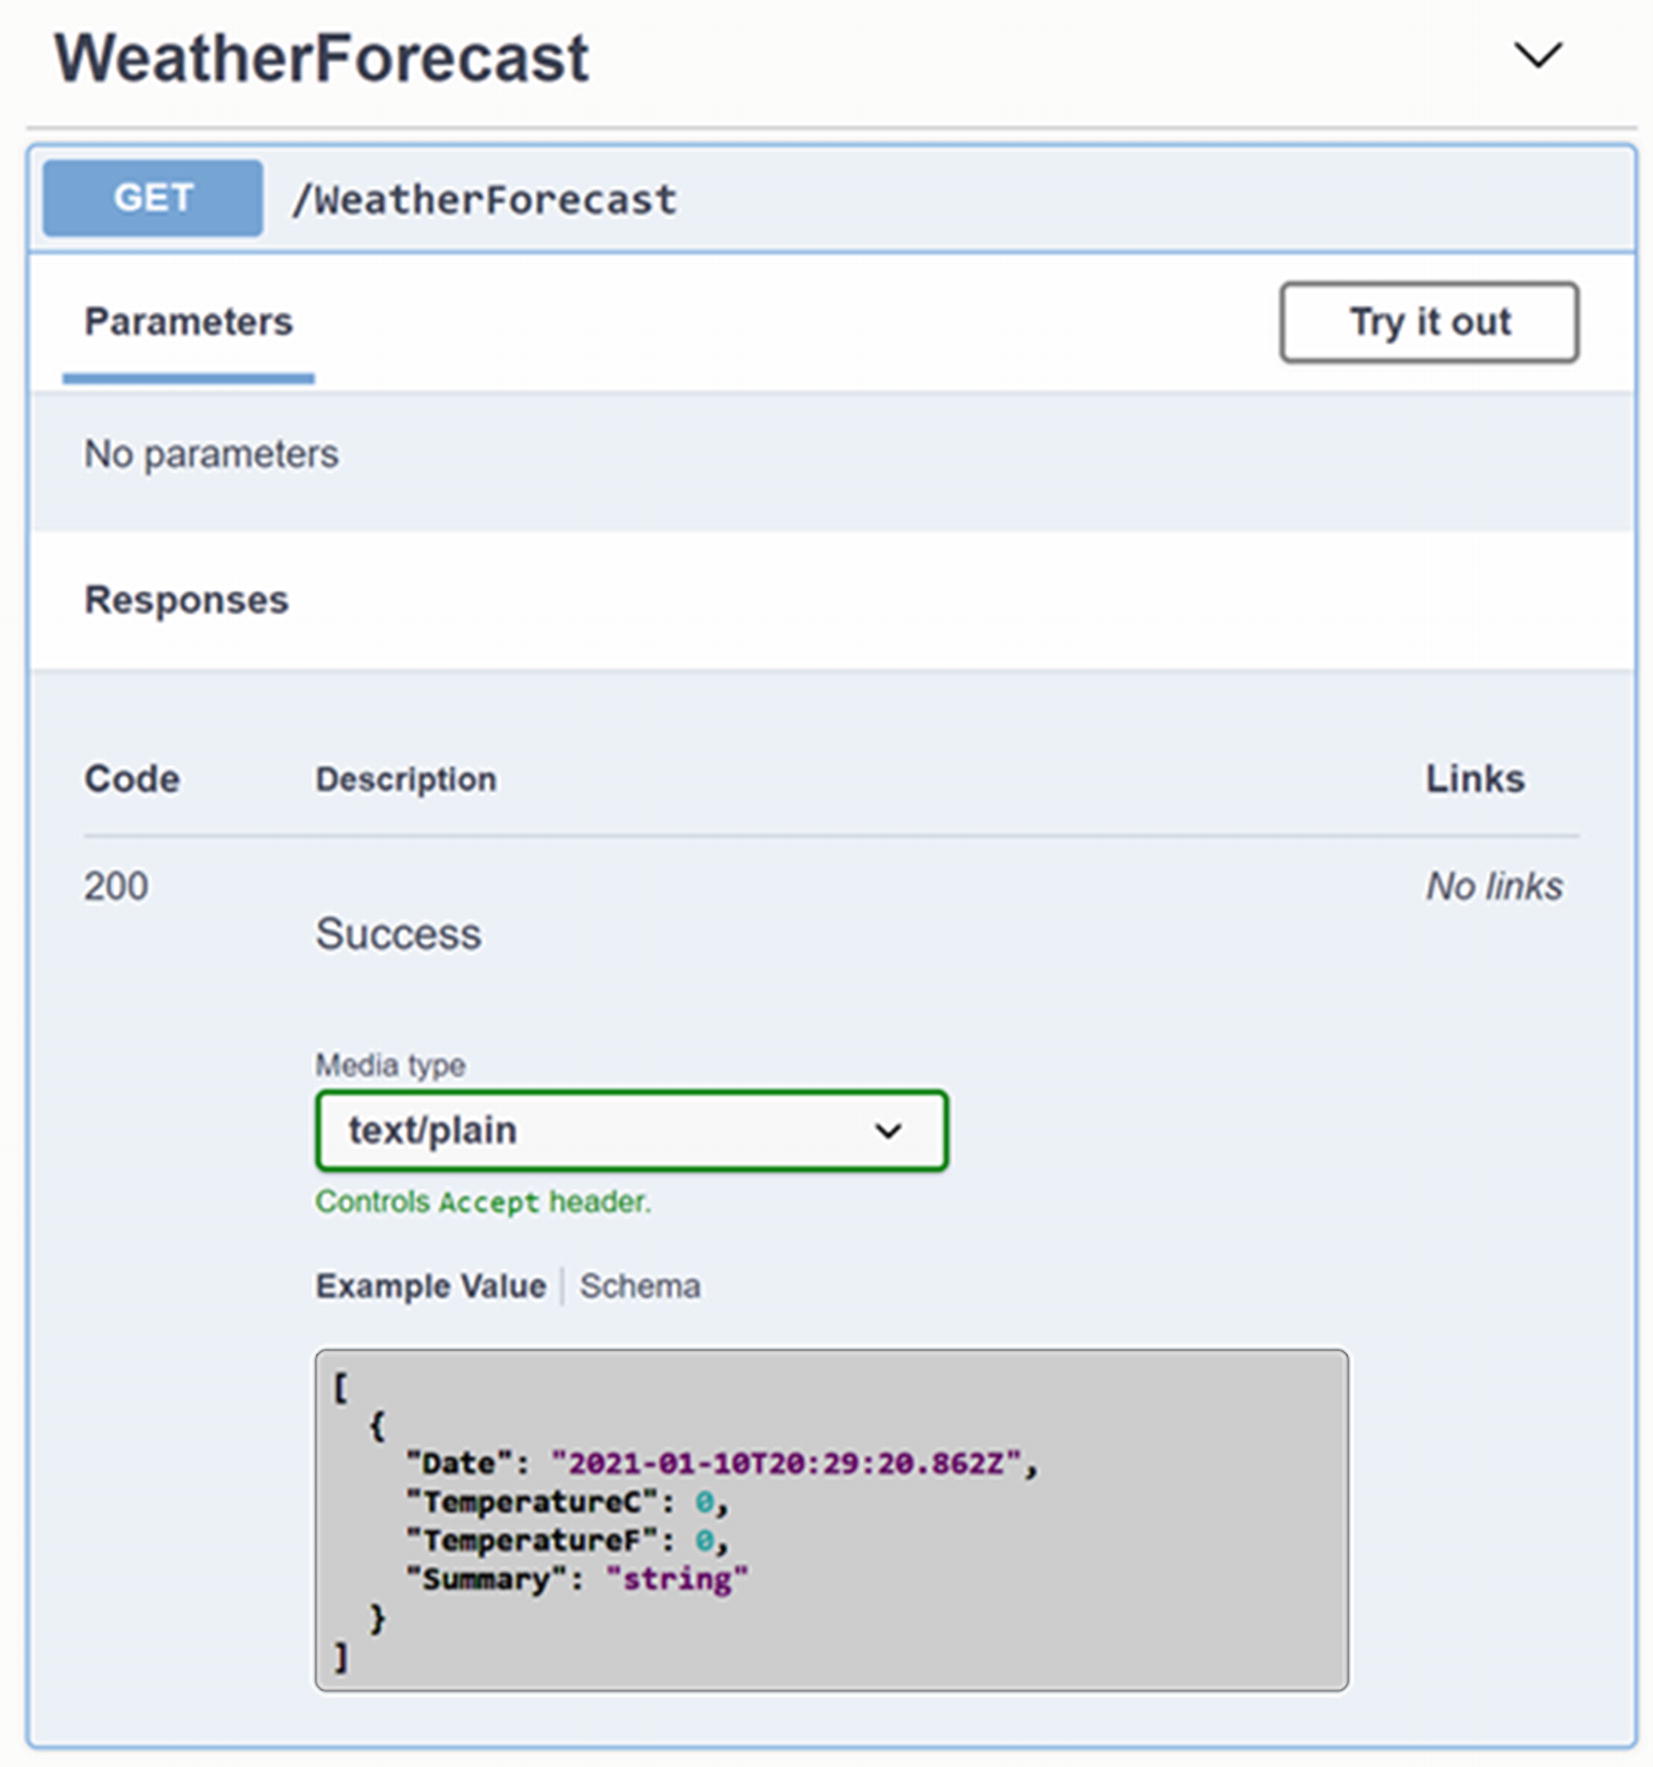
Details for the Get method of the WeatherForecast controller

Executing the details for the Get method of the WeatherForecast controller
New in ASP.NET Core 5, Swagger is enabled by default in the API template. Swagger will be examined in detail in the next chapter.
Summary
This chapter introduced ASP.NET Core and is the first of a set of chapters covering ASP.NET Core. This chapter began with a brief look back at the history of ASP.NET and then looked at the features from classic ASP.NET MVC and ASP.NET Web API that also exist in ASP.NET Core.
The next sections examined the new features in ASP.NET Core and how they work. Then after learning about the different ways to run and debug ASP.NET Core applications, you set up the solution with the two ASP.NET Core projects, a common library for application services, and the AutoLot data access layer (from Chapter 23). Finally, you replaced the default ASP.NET Core logger with Serilog in both projects.
In the next chapter, you will finish the AutoLot.Api application.