
C H A P T E R 5
Using the Geolocation API
Let’s say you want to create a web application that offers discounts and special deals on running shoes in stores that your application’s users are within walking (or running) distance away from. Using the Geolocation API, you can request users to share their location and, if they agree, you can provide them with instructions on how to get to a nearby store to pick up a new pair of shoes at a discounted rate.
Another example of the use of Geolocation could be an application that tracks how far you have run (or walked). You can picture using an application in a browser on a mobile phone that you turn on when you start a run. While you’re on the move, the application tracks how far you have run. The coordinates for the run can even be overlaid on a map, perhaps even with an elevation profile. If you’re running a race against other competitors, the application might even show your opponents’ locations.
Other Geolocation application ideas could be turn-by-turn GPS-style navigation, social networking applications that allow you to see exactly where your friends are, so you can pick the coffee shop you want to visit, and many more unusual applications.
In this chapter, we’ll explore what you can do with Geolocation—an exciting API that allows users to share their location with web applications so that they can enjoy location-aware services. First, we'll take a look at the source of Geolocation location information―the latitude, longitude and other attributes―and where they can come from (GPS, Wi-Fi, cellular triangulation, and so on). Then, we'll discuss the privacy concerns around using Geolocation data and how browsers work with this data.
After that, we’ll dive into a practical discussion about the two different position request functions (methods) within the Geolocation API: the one-shot position request and repeated position updates, and we'll show you how and when to use them. Next, we'll show you how to build a practical Geolocation application using the same API, and we'll finish up with a discussion about a few additional use cases and tips.
About Location Information
Using the Geolocation API is fairly straightforward. You request a position and, if the user agrees, the browser returns location information. The position is provided to the browser by the underlying device (for example, a laptop or a mobile phone) on which the Geolocation–enabled browser is running. The location information is provided as a set of latitude and longitude coordinates along with additional metadata. Armed with this location information, you can then build a compelling, location-aware application.
Latitude and Longitude Coordinates
The location information consists primarily of a pair of latitude and longitude coordinates like the ones shown in the following example, which shows the coordinates for beautiful Tahoe City, located on the shore of Lake Tahoe, America’s most beautiful mountain lake:
In the preceding example, the latitude (the numerical value indicating distance north or south of the equator is 39.17222) and the longitude (the numerical value indicating distance east or west of Greenwich, England) is -120.13778.
Latitude and longitude coordinates can be expressed in different ways:
- Decimal format (for example, 39.17222)
- Degree Minute Second (DMS) format (for example, 39° 10′ 20′)
![]() Note When you use the Geolocation API, coordinates are always returned in the decimal format.
Note When you use the Geolocation API, coordinates are always returned in the decimal format.
In addition to latitude and longitude coordinates, Geolocation always provides the accuracy of the location coordinates. Additional metadata may also be provided, depending on the device that your browser is running on. These include altitude, altitudeAccuracy, heading, and speed. If this additional metadata is not available it will be returned as a null value.
Where Does Location Information Come From?
The Geolocation API does not specify which underlying technology a device has to use to locate the application's user. Instead, it simply exposes an API for retrieving location information. What is exposed, however, is the level of accuracy with which the location was pinpointed. There is no guarantee that the device's actual location returns an accurate location.
Location, Location
A device can use any of the following sources:
- IP address
- Coordinate triangulation
- Global Positioning System (GPS)
- Wi-Fi with MAC addresses from RFID, Wi-Fi, and Bluetooth
- GSM or CDMA cell phone IDs
- User defined
Many devices use a combination of one or more sources to ensure an even higher accuracy. Each of these methods has its own pros and cons, as explained in the next sections.
IP Address Geolocation Data
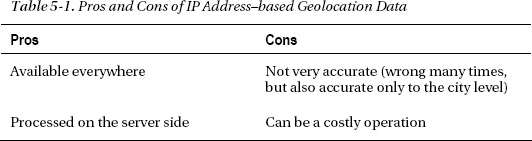
In the past, IP address–based geolocation was the only way to get a possible location, but the returned locations often proved unreliable. IP address–based geolocation works by automatically looking up a user’s IP address and then retrieving the registrant's physical address. Therefore, if you have an ISP that provides you with an IP address, your location is often resolved to the physical address of your service provider that could be miles away. Table 5-1 shows the pros and cons of IP address–based geolocation data.
Many websites advertise based on IP address locations. You can see this in action when you travel to another country and suddenly see advertisements for local services (based on the IP address of the country or region you are visiting).
GPS Geolocation Data
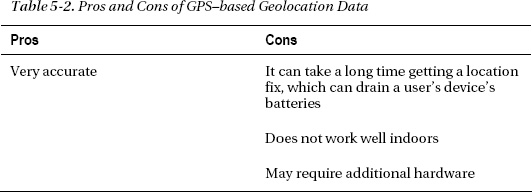
As long as you can see the sky, GPS can provide very accurate location results. A GPS fix is acquired by acquiring the signal from multiple GPS satellites that fly around the earth. However, it can take awhile to get a fix, which does not lend itself particularly well for applications that must start up rapidly.
Because it can take a long time to get a GPS location fix, you might want to query for the user’s location asynchronously. To show your application’s users that a fix is being acquired, you can add a status bar. Table 5-2 shows the pros and cons of GPS–based geolocation data.
Wi-Fi Geolocation Data
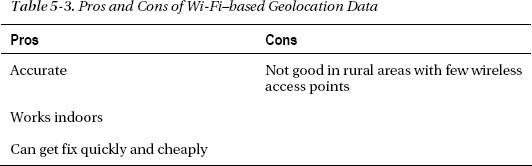
Wi-Fi–based geolocation information is acquired by triangulating the location based on the user's distance from a number of known Wi-Fi access points, mostly in urban areas. Unlike GPS, Wi-Fi is very accurate indoors as well as in urban areas. Table 5-3 shows the pros and cons of Wi-Fi–based geolocation data.
Cell Phone Geolocation Data
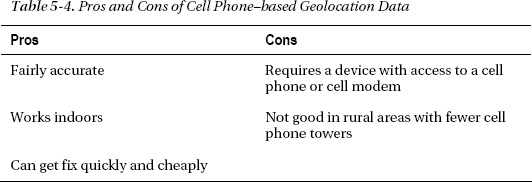
Cell phone–based geolocation information is acquired by triangulating the location based on the user's distance from a number of cell phone towers. This method provides a general location result that is fairly accurate. This method is often used in combination with Wi-Fi– and GPS–based geolocation information. Table 5-4 shows the pros and cons of cell phone–based geolocation data.
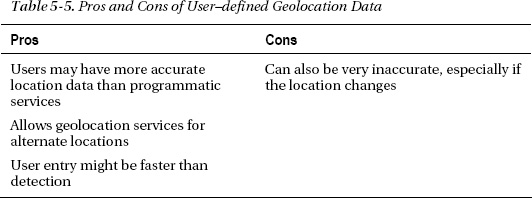
User–Defined Geolocation Data
Instead of programmatically figuring out where the user is, you can also allow users to define their location themselves. An application may allow users to enter their address, ZIP code, or some other details; your application can then use that information to provide location-aware services. Table 5-5 shows the pros and cons of user–defined geolocation data.
Browser Support for Geolocation
Geolocation was one of the first HTML5 features to be fully embraced and implemented, and it is available in all the major browsers now. For a complete overview of the current browser support, including mobile support, refer to http://caniuse.com and search for Geolocation.
If you have to support older browsers, it’s always a good idea to first see whether Geolocation is supported before you use the API. The section “Checking for Browser Support” later in this chapter will show you how you can programmatically check for browser support.
Privacy
The Geolocationspecification mandates that a mechanism is provided to protect the user's privacy. Furthermore, location information should not be made available unless the application’s users grant their express permission.
This makes sense and addresses the “big brother” concerns users often raise about Geolocation applications. However, as you can see from some of the possible use cases for HTML 5 Geolocation applications, there is usually an incentive for the user to share this information. For example, users might be OK with sharing their location if this could let them know about a rare 50% discount on a pair of running shoes that are ready to be picked up in a store located just a few blocks away from where they happen to be drinking coffee. Let’s take a closer look at the browser and device privacy architecture shown in Figure 5-1.
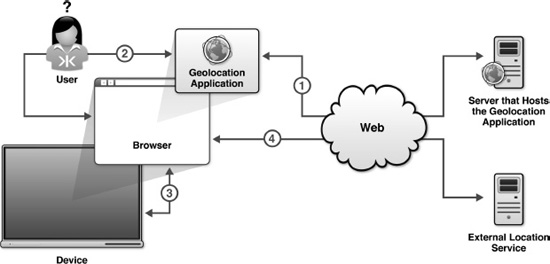
Figure 5-1. Geolocation browser and device privacy architecture
The following steps are shown in the diagram:
- A user navigates to a location-aware application in the browser.
- The application web page loads and requests coordinates from the browser by making a Geolocation function call. The browser intercepts this and requests user permission. Let's assume, in this case, that the permission is granted.
- The browser retrieves coordinate information from the device it is running on. For example, a combination of IP address, Wi-Fi, and possibly GPS coordinates. This is an internal function of the browser.
- The browser sends these coordinates to a trusted external location service, which returns location coordinates that can now be sent back to the host of the Geolocation application.
![]() Important The application does not have direct access to the device; it can only query the browser to access the device on its behalf.
Important The application does not have direct access to the device; it can only query the browser to access the device on its behalf.
Triggering the Privacy Protection Mechanism
When you access a web page that uses the Geolocation API, the privacy protection mechanism should kick in. Figure 5-2 shows what this looks like in Firefox.
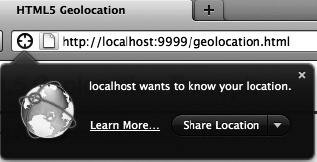
Figure 5-2. The notification bar is triggered in Firefox when the Geolocation API is used.
The mechanism is triggered when the Geolocation code is executed. Simply adding Geolocation code that is not called anywhere (for example, in an onload method) does not do anything. If, however, the Geolocation code is executed, for example, in a call to navigator.geolocation.getCurrentPosition (explained in more detail later on), the user is prompted to share their location with the application. Figure 5-3 shows what happens on Safari, running on an iPhone.

Figure 5-3. The notification dialog box is triggered in Safari when the Geolocation API is used.
Apart from providing the necessary mechanism to request permission to share your location, some implementations (Firefox, for example) also allow you to remember the permission granted to the site for the next time you enter. This is similar to how you can remember passwords for certain sites in your browser.
![]() Note if you've given permission to always give your location to a site in Firefox and later change your mind, you can easily revoke that permission by going back to the site and selecting Page Info from the Tools menu. Then change the setting for Share Location on the Permissions tab.
Note if you've given permission to always give your location to a site in Firefox and later change your mind, you can easily revoke that permission by going back to the site and selecting Page Info from the Tools menu. Then change the setting for Share Location on the Permissions tab.
Dealing with Location Information
Location data is sensitive information, so when you receive it, you must be careful about handling, storing, and retransmitting the data. Unless users give permission to store data, you should always dispose of the data after the task for which it was required is complete.
Therefore, if you retransmit the location data, it is recommended that you first encrypt the data. Regarding the collection of geolocation data, your application should prominently show the following:
- That you are collecting location data
- Why you are collecting location data
- How long the location data is kept
- How you are securing the data
- How and with whom the location data is shared (if it is)
- How users can check and update their location data
Using the Geolocation API
In this section, we’ll explore the use of the Geolocation API in more detail. For the sake of illustration, we’ve created a simple browser page—geolocation.html. Remember that you can download all the code from the book's page on apress.com or on the companion website http://prohtml5.com.
Checking for Browser Support
Before you call the Geolocation API functions, you will want to make sure that there is support in the browser for what you’re about to do. This way, you can provide some alternate text, prompting the users of your application to dump their dinosaur-like browsers or install a plugin such as Gears, which augments the existing browser functionality. Listing 5-1 shows one way you can use to test for browser support.
Listing 5-1. Checking for Browser Support
function loadDemo() {

  if(navigator.geolocation) {

    document.getElementById("support").innerHTML = "Geolocation supported.";


} else {

     document.getElementById("support").innerHTML = "Geolocation is not supported in

                                        your browser.";

    }

}
In this example, you test for browser support in the loadDemo function, which might be called when the application’s page is loaded. A call to navigator.geolocation (you can also use Modernizr) will return the Geolocation object if it exists, or trigger the failure case if it does not. In this case, the page is updated to reflect whether there is browser support or not by updating a previously defined support element on the page with a suitable message.
Position Requests
There are two types of position requests:
- One-shot position request
- Repeated position updates
One-Shot Position Requests
In many applications, it will be acceptable to retrieve the user’s location only once, or only by request. For example, if someone is looking for the nearest movie theater showing today’s popular movie in the next hour, the simplest form of the Geolocation API shown in Listing 5-2 can be used.
Listing 5-2. One-Shot Position Request
void getCurrentPosition(in PositionCallback successCallback,

                 in optional PositionErrorCallback errorCallback,

                 in optional PositionOptions options);
Let’s take a look at this core function call in more detail.
First, this is a function that is available on the navigator.geolocation object, so you will need to have already retrieved this object in your script. As noted previously, make sure that you have a good fallback handler if your browser does not support Geolocation.
The function takes one required parameter, and two optional ones.
- The
successCallbackfunction parameter tells the browser which function you want called when the location data is made available. This is important because operations such as fetching location data may take a long time to complete. No user wants the browser to be locked up while the location is retrieved, and no developer wants his program to pause indefinitely—especially because fetching the location data will often be waiting on a user to grant permission. The successCallback is where you will receive the actual location information and act on it. - However, as in most programming scenarios, it is good to plan for failure cases. It is quite possible that the request for location information may not complete for reasons beyond your control, and for those cases you will want to provide an
errorCallbackfunction that can present the user with an explanation, or perhaps make an attempt to try again. While optional, it is recommended that you provide one. - Finally, an
optionsobject can be provided to the Geolocation service to fine-tune the way it gathers data. This is an optional parameter that we will examine later.
Let’s say that you’ve created a JavaScript function on our page named updateLocation() in which you update the contents of the page with the new location data. Similarly, you’ve created a handleLocationError() function to handle the error cases. We’ll examine the details of those functions next, but that means that your core request to access the user’s position would look something like this:
navigator.geolocation.getCurrentPosition(updateLocation, handleLocationError);
The updateLocation() Function
So, what happens in our updateLocation() call? It’s actually quite simple. As soon as the browser has access to the location information, it will call updateLocation() with a single parameter: a position object. The position will contain coordinates—as the attribute coords—and a timestamp for when the location data was gathered. While you may or may not need the timestamp, the coords attribute contains the crucial values for the location.
The coordinates always have multiple attributes on them, but it is up to the browser and the hardware of the user’s device whether they will have meaningful values. The following are the first three attributes:
latitudelongitudeaccuracy
These attributes are guaranteed to have values and are fairly self-explanatory. latitude and longitude will contain the Geolocation service’s best determined value of the user’s location specified in decimal degrees. accuracy will contain a value in meters that specifies how close the latitude and longitude values are to the actual location, with a 95% confidence level. It can therefore be used to display a proximity radius around the location to give people a visual clue about the accuracy. Due to the nature of Geolocation implementations, approximation will be common and coarse. Make sure to check the accuracy of the returned values before you present them with any certainty. Recommending a user to visit a “nearby” shoe store that is actually hours away could have unintended consequences.
The other attributes of the coordinates are not guaranteed to be supported, but they will return a null value if they are not available (for example, if you’re on a desktop computer, you’re unlikely to have access to this information):
altitude—the height of the user’s location, in metersaltitudeAccuracy—once again in meters, ornullif no altitude is providedheading—direction of travel, in degrees relative to true northspeed—ground speed in meters per second
Unless you are sure that your users have devices with access to such information, it is recommended that you not rely on them as critical to your application. While global positioning devices are likely to provide this level of detail, simple network triangulation will not.
Now let’s take a look at a code implementation of our updateLocation() function that performs some trivial updates with the coordinates (see Listing 5-3).
Listing 5-3. Example of Using the updateLocation() Function
function updateLocation(position) {

  var latitude = position.coords.latitude;

  var longitude = position.coords.longitude;

  var accuracy = position.coords.accuracy;

  var timestamp = position.timestamp;


  document.getElementById("latitude").innerHTML = latitude;

  document.getElementById("longitude").innerHTML = longitude;
  document.getElementById(“accuracy”).innerHTML = accuracy

  document.getElementById("timestamp").innerHTML = timestamp;

}
In this example, the updateLocation() callback is used to update the text in different elements of our page; we put the value of the longitude attribute in the longitude element, the latitude attribute in the latitude element, and accuracy and timestamp in their corresponding fields.
The handleLocationError() Function
Handling errors is very important for a Geolocation application because there are many moving parts and therefore many possibilities for the location calculation services to go awry. Fortunately, the API defines error codes for all the cases you will need to handle, and it sets them on the error object passed to your error handler as the code attribute. Let’s look at them in turn:
PERMISSION_DENIED(error code 1)—The user chose not to let the browser have access to the location information.POSITION_UNAVAILABLE(error code 2)—The technique used to determine the user’s location was attempted, but failed.TIMEOUT(error code 3)—A timeout value was set as an option, and the attempt to determine the location exceeded that limit.
In these cases, you will probably want to let the user know that something went wrong. You may want to retry getting the values in the case of an unavailable or timed-out request.
Listing 5-4 shows an example of an error handler in action.
Listing 5-4. Using an Error Handler
    function handleLocationError(error) {

        switch(error.code){

        case 0:

          updateStatus("There was an error while retrieving your location: " +

                                       error.message);

        break;

        case 1:

        updateStatus("The user prevented this page from retrieving a location.");

        break;

        case 2:

        updateStatus("The browser was unable to determine your location: " +

                                     error.message);

        break;

        case 3:

        updateStatus("The browser timed out before retrieving the location.");

        break;

        }

    }
The error codes are accessed from the code attribute of the provided error object, while the message attribute will give access to a more detailed description of what went wrong. In all cases, we call our own routine to update the status of the page with the necessary info.
Optional Geolocation Request Attributes
With both the normal and error cases handled, you should turn your attention to the three optional attributes that you can pass to the Geolocation service in order to fine-tune how it gathers its data. Note that these three attributes can be passed using shorthand object notation, making it trivial to add them to your Geolocation request calls.
enableHighAccuracy—This is a hint to the browser that, if available, you would like the Geolocation service to use a higher accuracy-detection mode. This defaults to false, but when turned on, it may not cause any difference, or it may cause the machine to take more time or power to determine location. Use with caution. Note Curiously, the high accuracy setting is only a toggle switch:
 trueorfalse. The API was not created to allow the accuracy to be set to various values or a numeric range. Perhaps this will be addressed in future versions of the specification.timeout—This optional value, provided in milliseconds, tells the browser the maximum amount of time it is allowed to calculate the current location. If the calculation does not complete in this amount of time, the error handler is called instead. This value defaults to Infinity, or no limit.maximumAge—This value indicates how old a location value can be before the browser must attempt to recalculate. Again, it is a value in milliseconds. This value defaults to zero, meaning that the browser must attempt to recalculate a value immediately. Note You might be wondering what the difference is between the timeoutandmaximumAgeoptions. Although similarly named, they do have distinct uses. Thetimeoutvalue deals with the duration needed to calculate the location value, whilemaximumAgerefers to the frequency of the location calculation. If any single calculation takes longer than thetimeoutvalue, an error is triggered. However, if the browser does not have an up-to-date location value that is younger thanmaximumAge, it must refetch another value. Special values apply here: setting themaximumAgeto “0” requires the value to always be re-fetched, while setting it toInfinitymeans it should never be refetched.
The Geolocation API does not allow you to tell the browser how often to recalculate the position. This is left entirely up to the browser implementation. All we can do is tell the browser what the maximumAge is of the value it returns. The actual frequency is a detail we cannot control.
Let’s update our location request to include an optional parameter using shorthand notation, as shown in the following example:
navigator.geolocation.getCurrentPosition(updateLocation,handleLocationError,

                                         {timeout:10000});
This new call ensures that any request for location that takes longer than 10 seconds (10,000 milliseconds) should trigger an error, in which case the handleLocationError function will be called with the TIMEOUT error code. We can combine the Geolocation calls that we discussed so far and display the relevant data on a page as shown in Figure 5-4.
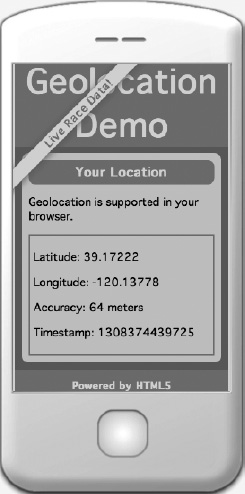
Figure 5-4. Geolocation data displayed on a mobile device
Repeated Position Updates
Sometimes you have to make repeated position requests. Thankfully, the designers of the Geolocation API made it trivial to switch from an application that requests a user location one time to one that requests the location at regular intervals. In fact, it’s largely as trivial as switching the request call, as shown in the following examples:
- One-shot update:
navigator.geolocation.getCurrentPosition(updateLocation,

handleLocationError); - Repeated updates:
navigator.geolocation.watchPosition(updateLocation, handleLocationError);
This simple change will cause the Geolocation service to call your updateLocation handler repeatedly as the user’s location changes, rather than one time. It acts as though your program is watching the location and will let you know whenever the location changes.
Why would you want to do this?
Consider a web page that gives turn-by-turn directions as the viewer moves around town. Or a page that constantly updates to show you the nearest gas station as you drive down the highway. Or even a page that records and sends your location so that you can retrace your steps. All these services become easy to build once the location updates flow into your application right as they are changing.
Turning off the updates is also simple. Should your application no longer need to receive regular updates about the user’s location, you need merely make a call to the clearWatch() function, as shown in the following example:
navigator.geolocation.clearWatch(watchId);
This function will inform the Geolocation service that you no longer want to receive updates on a user’s location. But what is the watchID and where did it come from? It is actually the return value from the watchPosition() call. It identifies the unique monitor request in order to allow us to cancel it later. So, if your application ever needs to stop receiving location updates, you would write some code, as shown in Listing 5-5.
Listing 5-5. Using watchPostion
var watchId = navigator.geolocation.watchPosition(updateLocation,

                                                  handleLocationError);

// do something fun with the location updates!


// OK, now we are ready to stop receiving location updates

navigator.geolocation.clearWatch(watchId);
Building an Application with Geolocation
So far, we’ve mainly focused on single-shot location requests. Let’s see how powerful the Geolocation API can really be by using its multirequest feature to build a small but useful application: a web page with a distance tracker.
If you’ve ever wanted a quick way to determine how far you’ve traveled in a certain amount of time, you would normally use a dedicated device such as a GPS navigation system or a pedometer. Using the power of the Geolocation service, you can create a web page that tracks how far you have traveled from where the page was originally loaded. Although less useful on a desktop computer, this page is ideal for the millions of web-enabled phones that ship with Geolocation support today. Simply point your smartphone browser to this example page, grant the page permission to access your location, and every few seconds it will update with the distance you just traveled and add it to a running total (see Figure 5-5).
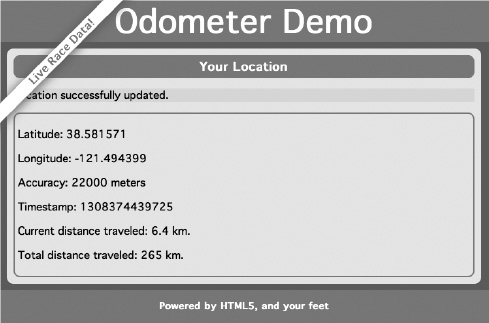
Figure 5-5. Our Geolocation example application in action
This sample works by using the watchPosition() capability we discussed in the last section. Every time a new position is sent to us, we will compare it to the last known position and calculate the distance traveled. This is accomplished using a well-known calculation known as the Haversine formula, which allows us to calculate distance between two longitude and latitude positions on a sphere. Listing 5-6 displays what the Haversine formula tells us.

If you're hoping to learn how the Haversine formula works, you’ll be sorely disappointed. Instead, we’ll present you a JavaScript implementation of the formula, which allows anyone to use it to calculate the distance between two positions (see Listing 5-7).
Listing 5-7. A JavaScript Haversine Implementation
    Number.prototype.toRadians = function() {

      return this * Math.PI / 180;

    }


    function distance(latitude1, longitude1, latitude2, longitude2) {

      // R is the radius of the earth in kilometers

      var R = 6371;


      var deltaLatitude = (latitude2-latitude1).toRadians();

      var deltaLongitude = (longitude2-longitude1).toRadians();

      latitude1 = latitude1.toRadians(), latitude2 = latitude2.toRadians();


      var a = Math.sin(deltaLatitude/2) *

              Math.sin(deltaLatitude/2) +

              Math.cos(latitude1) *

              Math.cos(latitude2) *

              Math.sin(deltaLongitude/2) *

              Math.sin(deltaLongitude/2);

      var c = 2 * Math.atan2(Math.sqrt(a),

                             Math.sqrt(1-a));

      var d = R * c;

      return d;

    }
If you want to know why or how this formula works, consult a teenager’s math textbook. For our purposes, we have written a conversion from degrees to radians, and we provided a distance() function to calculate the distance between two latitude and longitude position values.
If we check the user’s position and calculate the distance traveled at frequent and regular intervals, it gives a reasonable approximation of distance traveled over time. This assumes that the user is moving in a straight direction during each interval, but we’ll make that assumption for the sake of our example.
Writing the HTML Display
Let’s start with the HTML display. We kept it quite simple for this exercise because the real interest is in the script driving the data. We display a page with the pertinent Geolocation data. In addition, we’ll put a few status text indicators in place so that the user can see the summary of distance traveled (see Listing 5-8).
Listing 5-8. Code for the Distance Tracker HTML Page
<!DOCTYPE html>

<html>


<head>

  <meta charset="utf-8" >

  <title>Geolocation</title>

  <link rel="stylesheet" href="geo-html5.css" >

</head>


<body onload="loadDemo()">


  <header>

    <h1>Odometer Demo</h1>

    <h4>Live Race Data!</h4>

  </header>


  <div id="container">


  <section>

    <article>

      <header>

        <h1>Your Location</h1>

      </header>


        <p class="info" id="status">Geolocation is not supported in your browser.</p>


      <div class="geostatus">

        <p id="latitude">Latitude: </p>

        <p id="longitude">Longitude: </p>

        <p id="accuracy">Accuracy: </p>

        <p id="timestamp">Timestamp: </p>

        <p id="currDist">Current distance traveled: </p>

        <p id="totalDist">Total distance traveled: </p>

      </div>


    </article>

  </section>


  <footer>

    <h2>Powered by HTML5, and your feet!</h2>

  </footer>


  </div>
.

.

.

 </body>

</html>
These values are all defaulted for now and are populated once data starts flowing into the application.
Processing the Geolocation Data
Our first JavaScript code section should look familiar. We’ve set a handler—loadDemo()—that will execute as soon as the page completes loading. This script will detect if Geolocation is supported in the browser and use a status update functions to change the status message at the top of the page to indicate what it finds. It will then request a watch of the user’s position, as shown in Listing 5-9.
Listing 5-9. Adding the loadDemo() and Status Update Functions
    var totalDistance = 0.0;

    var lastLat;

   var lastLong;


    function updateErrorStatus(message) {

      document.getElementById("status").style.background = "papayaWhip";

      document.getElementById("status").innerHTML = "<strong>Error</strong>: " + message;

    }


    function updateStatus(message) {

      document.getElementById("status").style.background = "paleGreen";

      document.getElementById("status").innerHTML = message;

    }


    function loadDemo() {

      if(navigator.geolocation) {

        document.getElementById("status").innerHTML = "HTML5 Geolocation is supported in your browser.";

        navigator.geolocation.watchPosition(updateLocation, handleLocationError,

                                                {timeout:20000});

      }

    }
Note that we are setting a maximumAge option on our position watch: {maximumAge:20000}. This will tell the location service that we don’t want any cached location values that are greater than 20 seconds (or 20,000 milliseconds) old. Setting this option will keep our page updating at regular intervals, but feel free to adjust this number and experiment with larger and smaller cache sizes.
For error handling, we’ll use the same routine we identified earlier, as it is generic enough to work for our distance tracker. In it we’ll check the error code of any error we receive and update the status message on the page accordingly as shown in Listing 5-10.
Listing 5-10. Adding the Error Handling Code
    function handleLocationError(error) {

      switch(error.code)

      {

      case 0:

        updateErrorStatus("There was an error while retrieving your location. Additional

details: " +

                                               error.message);

        break;

      case 1:

        updateErrorStatus("The user opted not to share his or her location.");

        break;

      case 2:

        updateErrorStatus("The browser was unable to determine your location. Additional

details: " +

                                                error.message);

        break;

      case 3:

        updateErrorStatus("The browser timed out before retrieving the location.");

        break;

      }

    }
The bulk of our work will be done in our updateLocation() function. Here we will update the page with our most recent values and calculate the distance traveled, as shown in Listing 5-11.
Listing 5-11. Adding the updateLocation() Function
    function updateLocation(position) {

      var latitude = position.coords.latitude;

      var longitude = position.coords.longitude;

      var accuracy = position.coords.accuracy;

      var timestamp = position.timestamp;


      document.getElementById("latitude").innerHTML = "Latitude: " + latitude;

      document.getElementById("longitude").innerHTML = "Longitude: " +  longitude;

      document.getElementById("accuracy").innerHTML = "Accuracy: " + accuracy + " meters";

      document.getElementById("timestamp").innerHTML = "Timestamp: " + timestamp;
As you might expect, the first thing we will do when we receive an updated set of position coordinates is to record all the information. We gather the latitude, longitude, accuracy, and timestamp, and then update the table values with the new data.
You might not choose to display a timestamp in your own application. The timestamp number used here is in a form primarily useful to computers, which won’t be meaningful to an end user. Feel free to replace it with a more user-friendly time indicator or remove it altogether.
The accuracy value is given to us in meters and might at first seem unnecessary. However, any data depends on its accuracy. Even if you don’t present the user with the accuracy values, you should take them into account in your own code. Presenting inaccurate values could give the user a skewed idea of his or her location. Therefore, we will throw out any position updates with an unreasonably low accuracy, as shown in Listing 5-12.
Listing 5-12. Ignoring Inaccurate Accuracy Updates
      // sanity test... don't calculate distance if accuracy

      // value too large

      if (accuracy >= 30000) {

        updateStatus("Need more accurate values to calculate distance.");

        return;

      }
The Easiest Way to Travel
Finally, we will calculate the distance traveled, assuming that we have already received at least one accurate position value before. We will update the totals of travel distance and display them for the user, and we will store the current values for future comparison. To keep our interface a little less cluttered, it is a good idea to round or truncate the calculated values, as shown in Listing 5-13.
Listing 5-13. Adding the Distance Calculation Code
      // calculate distance

      if ((lastLat != null) && (lastLong != null)) {

        var currentDistance = distance(latitude, longitude, lastLat, lastLong);

        document.getElementById("currDist").innerHTML =

                 "Current distance traveled: " + currentDistance.toFixed(2) + " km";

        totalDistance += currentDistance;

        document.getElementById("totalDist").innerHTML =

                 "Total distance traveled: " + currentDistance.toFixed(2) + " km";

        updateStatus("Location successfully updated.");


      }

      lastLat = latitude;

      lastLong = longitude;


    }
That’s it. In fewer than 200 lines of HTML and script, we’ve created a sample application that monitors the viewer’s position over time and demonstrated nearly the entire Geolocation API, complete with error handling. Although this example is inherently less interesting when viewed on a desktop computer, try it out on your favorite geolocation–enabled phone or device and see how mobile you truly are during the course of a day.
The Final Code
The full code sample is shown in Listing 5-14.
Listing 5-14. Complete Distance Tracker Code
<!DOCTYPE html>

<html>


<head>

  <meta charset="utf-8" >

  <title>Geolocation</title>

  <link rel="stylesheet" href="geo-html5.css" >

</head>


<body onload="loadDemo()">


  <header>

    <h1>Odometer Demo</h1>

    <h4>Live Race Data!</h4>

  </header>


  <div id="container">


  <section>

    <article>

      <header>

        <h1>Your Location</h1>

      </header>


        <p class="info" id="status">Geolocation is not supported in your browser.</p>


      <div class="geostatus">

        <p id="latitude">Latitude: </p>

        <p id="longitude">Longitude: </p>

        <p id="accuracy">Accuracy: </p>

        <p id="timestamp">Timestamp: </p>

        <p id="currDist">Current distance traveled: </p>

        <p id="totalDist">Total distance traveled: </p>

      </div>


    </article>

  </section>


  <footer>

    <h2>Powered by HTML5, and your feet!</h2>

  </footer>


  </div>


  <script>
    var totalDistance = 0.0;

    var lastLat;

    var lastLong;


    Number.prototype.toRadians = function() {

      return this * Math.PI / 180;

    }


    function distance(latitude1, longitude1, latitude2, longitude2) {

      // R is the radius of the earth in kilometers

      var R = 6371;


      var deltaLatitude = (latitude2-latitude1).toRadians();

      var deltaLongitude = (longitude2-longitude1).toRadians();

      latitude1 = latitude1.toRadians(), latitude2 = latitude2.toRadians();


      var a = Math.sin(deltaLatitude/2) *

              Math.sin(deltaLatitude/2) +

              Math.cos(latitude1) *

              Math.cos(latitude2) *

              Math.sin(deltaLongitude/2) *

              Math.sin(deltaLongitude/2);


      var c = 2 * Math.atan2(Math.sqrt(a),

                             Math.sqrt(1-a));

      var d = R * c;

      return d;

    }


    function updateErrorStatus(message) {

      document.getElementById("status").style.background = "papayaWhip";

      document.getElementById("status").innerHTML = "<strong>Error</strong>: " + message;

    }


    function updateStatus(message) {

      document.getElementById("status").style.background = "paleGreen";

      document.getElementById("status").innerHTML = message;

    }


    function loadDemo() {


    if(navigator.geolocation) {

        document.getElementById("status").innerHTML = "HTML5 Geolocation is supported in your

        browser.";

        navigator.geolocation.watchPosition(updateLocation, handleLocationError,

                                                {timeout:10000});

      }

        }


    function updateLocation(position) {

      var latitude = position.coords.latitude;

      var longitude = position.coords.longitude;
      var accuracy = position.coords.accuracy;

      var timestamp = position.timestamp;


      document.getElementById("latitude").innerHTML = "Latitude: " + latitude;

      document.getElementById("longitude").innerHTML = "Longitude: " +  longitude;

      document.getElementById("accuracy").innerHTML = "Accuracy: " + accuracy + " meters";

      document.getElementById("timestamp").innerHTML = "Timestamp: " + timestamp;


      // sanity test... don't calculate distance if accuracy

      // value too large

      if (accuracy >= 30000) {

        updateStatus("Need more accurate values to calculate distance.");

        return;

      }


      // calculate distance

      if ((lastLat != null) && (lastLong != null)) {

        var currentDistance = distance(latitude, longitude, lastLat, lastLong);


        document.getElementById("currDist").innerHTML =

                 "Current distance traveled: " + currentDistance.toFixed(2) + " km";


        totalDistance += currentDistance;

        document.getElementById("totalDist").innerHTML =

                 "Total distance traveled: " + currentDistance.toFixed(2) + " km";

        updateStatus("Location successfully updated.");


      }


      lastLat = latitude;

      lastLong = longitude;


    }


    function handleLocationError(error) {

      switch(error.code)

      {

      case 0:

        updateErrorStatus("There was an error while retrieving your location. Additional

        details: " + error.message);

        break;

      case 1:

        updateErrorStatus("The user opted not to share his or her location.");

        break;

      case 2:

        updateErrorStatus("The browser was unable to determine your location. Additional

        details: " + error.message);

        break;

      case 3:

        updateErrorStatus("The browser timed out before retrieving the location.");

        break;

      }
    }


  </script>


</body>


</html>
Practical Extras
Sometimes there are techniques that don’t fit into our regular examples, but which nonetheless apply to many types of HTML5 applications. We present to you some short, common, and practical extras here.
What’s My Status?
You might have already noticed that a large portion of the Geolocation API pertains to timing values. This should not be too surprising. Techniques for determining location—cell phone triangulation, GPS, IP lookup, and so on—can take a notoriously long time to complete, if they complete at all. Fortunately, the API gives a developer plenty of information to create a reasonable status bar for the user.
If a developer sets the optional timeout value on a position lookup, she is requesting that the geolocation service notify her with an error if the lookup takes longer than the timeout value. The side effect of this is that it is entirely reasonable to show the user a status message in the user interface while the request is underway. The start of the status begins when the request is made, and the end of the status should correspond to the timeout value, whether or not it ends in success or failure.
In Listing 5-15, we’ll kick off a JavaScript interval timer to regularly update the status display with a new progress indicator value.
Listing 5-15. Adding a Status Bar
    function updateStatus(message) {

        document.getElementById("status").innerHTML = message;

    }


    function endRequest() {

      updateStatus("Done.");

    }


    function updateLocation(position) {

      endRequest();

      // handle the position data

    }


    function handleLocationError(error) {

      endRequest();


      // handle any errors

    }


    navigator.geolocation.getCurrentPosition(updateLocation,

                                             handleLocationError,
                                             {timeout:10000});

                                             // 10 second timeout value


updateStatus(“Requesting Geolocation data…”);
Let’s break that example down a little. As before, we’ve got a function to update our status value on the page, as shown in the following example.
function updateStatus(message) {

  document.getElementById("status").innerHTML = message;

}
Our status here will be a simple text display, although this approach applies equally well for more compelling graphical status displays (see Listing 5-16).
Listing 5-16. Showing the Status
navigator.geolocation.getCurrentPosition(updateLocation,

                                         handleLocationError,

                                         {timeout:10000});

                                         // 10 second timeout value


updateStatus(“Requesting location data…”);
Once again, we use the Geolocation API to get the user’s current position, but with a set timeout of ten seconds. Once ten seconds have elapsed, we should either have a success or failure due to the timeout option.
We immediately update the status text display to indicate that a position request is in progress. Then, once the request completes or ten seconds elapses—whichever comes first—you use the callback method to reset the status text, as shown in Listing 5-17.
Listing 5-17. Resetting the Status Text
    function endRequest() {

      updateStatus("Done.");

    }


    function updateLocation(position) {

      endRequest();

      // handle the position data

    }
A simple extra, but easy to extend.
This technique works well for one-shot position lookups because it is easy for the developer to determine when a position lookup request starts. The request starts as soon as the developer calls getCurrentPosition(), of course. However, in the case of a repeated position lookup via watchPosition(), the developer is not in control of when each individual position request begins.
Furthermore, the timeout does not begin until the user grants permission for the geolocation service to access position data. For this reason, it is impractical to implement a precise status display because the page is not informed during the instant when the user grants permission.
Show Me on a Google Map
One very common request for geolocation data is to show a user’s position on a map, such as the popular Google Maps service. In fact, this is so popular that Google itself built support for Geolocation into its user interface. Simply press the Show My Location button (see Figure 5-6); Google Maps will use the Geolocation API (if it is available) to determine and display your location on the map.
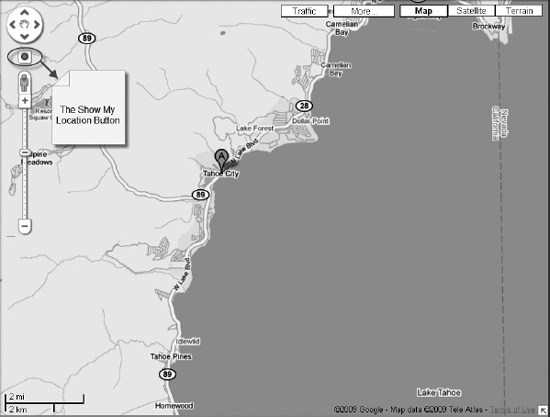
Figure 5-6. Google Map’s Show My Location button
However, it is also possible to do this yourself. Although the Google Map API is beyond the scope of this book, it has (not coincidentally) been designed to take decimal latitude and longitude locations. Therefore, you can easily pass the results of your position lookup to the Google Map API, as shown in Listing 5-18. You can read more on this subject in Beginning Google Maps Applications, Second Edition (Apress, 2010).
Listing 5-18. Passing a Position to the Google Map API
//Include the Google maps library

<script src="http://maps.google.com/maps/api/js?sensor=false"></script>


// Create a Google Map… see Google API for more detail

var map = new google.maps.Map(document.getElementById("map"));


function updateLocation(position) {

  //pass the position to the Google Map and center it

  map.setCenter(new google.maps.LatLng(

                               parseFloat(position.coords.latitude),

                               parseFloat(position.coords.longitude));

navigator.geolocation.getCurrentPosition(updateLocation,

                                         handleLocationError);
Summary
This chapter discussed Geolocation. You learned the Geolocation location information—latitude, longitude, and other attributes—and where they can come from. You also learned about the privacy concerns that accompany Geolocation and you’ve seen how the Geolocation API can be used to create compelling, location–aware web applications.
In the next chapter, we’ll demonstrate how HTML5 lets you communicate between tabs and windows as well as between pages and servers with different domains.