
C H A P T E R 6
Using the Communication APIs
In this chapter, we'll explore what you can do with two of the important building blocks for real-time, cross-origin communication: Cross Document Messaging and XMLHttpRequest Level 2 and we'll show you how they can be used to create compelling applications. Both of these building blocks add new communication options to HTML5 applications and allow applications served from different domains to safely communicate with each other.
First, we'll discuss the postMessage API and the origin security concept—two key elements of HTML5 communication—and then we'll show you how the postMessage API can be used to communicate between iframes, tabs, and windows.
Next, we'll discuss XMLHttpRequest Level 2—an improved version of XMLHttpRequest. We'll show you in which areas XMLHttpRequest has been improved. Specifically, we'll show you how you can use XMLHttpRequest to make cross-origin requests and how to use the new progress events.
Cross Document Messaging
Until recently, communications between frames, tabs, and windows in a running browser was entirely restricted due to security concerns. For instance, while it might be handy for certain sites to share information from inside the browser, it would also open up the possibility for malicious attacks. If browsers granted the ability to programmatically access the content loaded into other frames and tabs, sites would be able to steal whatever information they could get from another site's content using scripting. Wisely, the browser vendors restricted this access; attempting to retrieve or modify content loaded from another source raises a security exception and prevents the operation.
However, there are some legitimate cases for content from different sites to be able to communicate inside the browser. The classic example is the "mashup", a combination of different applications such as mapping, chat, and news from different sites, all combined together to form a new meta-application. In these cases, a well-coordinated set of applications would be served by direct communication channels inside the browser itself.
To meet this need, the browser vendors and standards bodies agreed to introduce a new feature: Cross Document Messaging. Cross Document Messaging enables secure cross-origin communication across iframes, tabs, and windows. It defines the postMessage API as a standard way to send messages. As shown in the following example, it is very simple to send a message with the postMessage API.
chatFrame.contentWindow.postMessage('Hello, world', 'http://www.example.com/'),
To receive messages, you just have to add an event handler to your page. When a message arrives, you can check its origin and decide whether or not to do something with the message. Listing 6-1 shows an event listener that passes the message to a messageHandler function.
Listing 6-1. An Event Listener for Message Events
window.addEventListener(“message”, messageHandler, true);

function messageHandler(e) {

    switch(e.origin) {

      case “friend.example.com”:

      // process message

      processMessage(e.data);

      break;

    default:

      // message origin not recognized

      // ignoring message

  }

}
A message event is a DOM event with data and origin properties. The data property is the actual message that the sender passed along and the origin property is the sender's origin. Using the origin property, it is easy for the receiving side to ignore messages from untrusted sources; the origin can simply be checked against a list of allowed origins.
As shown in Figure 6-1, the postMessage API provides a way to communicate between a chat widget iframe hosted at http://chat.example.net and an HTML page that contains the chat widget iframe hosted at http://portal.example.com (two different origins).
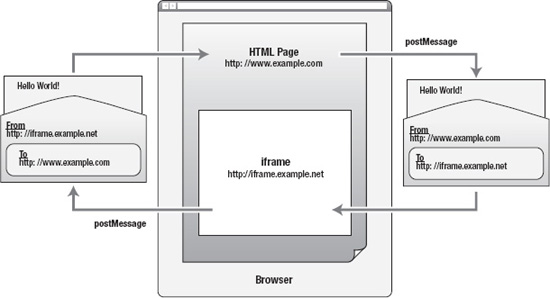
Figure 6-1. postMessage communication between an iframe and a main HTML page
In this example, the chat widget is contained in an iframe from another origin, so it does not have direct access to the parent window. When the chat widget receives a chat message, it can use postMessage to send a message to the main page so that the page can alert the user of the chat widget that a new message has been received. Similarly, the page can send messages about the user's status to the chat widget. Both the page and the widget can listen for messages from each other by adding the respective origins to a whitelist of allowed origins.
Figure 6-2 shows a real-life example of using the postMessage API in action. It is an HTML5 Slide viewer application called DZSlides, built by Firefox engineer and HTML5 evangelist Paul Rouget (http://paulrouget.com/dzslides). In this application, the presentation and its container communicate using the postMessage API.
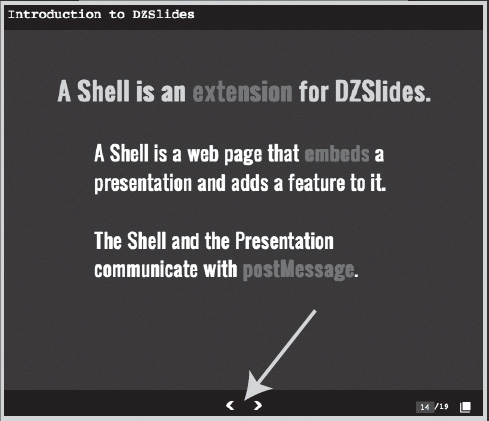
Figure 6-2. Real-life use of postMessage API in DZSlides application
Before the introduction of postMessage, communicating between iframes could sometimes be accomplished by direct scripting. A script running in one page would attempt to manipulate another document. This might not be allowed due to security restrictions. Instead of direct programmatic access, postMessage provides asynchronous message passing between JavaScript contexts. As shown in Figure 6-3, without postMessage, cross origin communication would result in security errors, enforced by browsers to prevent cross-site scripting attacks.
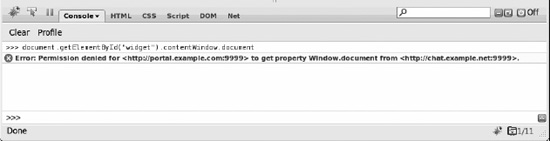
Figure 6-3. Cross-site scripting error in earlier version of Firefox and Firebug
The postMessage API can be used for communicating between documents with the same origin, but it is particularly useful when communication might otherwise be disallowed by the same-domain policy, which is enforced by browsers. However, there are reasons to use postMessage for messaging between same-origin documents as well because it provides a consistent, easy-to-use API. The postMessage API is used whenever there is communication between JavaScript contexts, such as with HTML5 Web Workers.
Understanding Origin Security
HTML5 clarifies and refines domain security by introducing the concept of an origin. An origin is a subset of an address used for modeling trust relationships on the Web. Origins are made up of a scheme, a host, and a port. For example, a page at https://www.example.com has a different origin than one at http://www.example.com because the scheme differs (https vs. http). The path is not considered in the origin value, so a page at http://www.example.com/index.html has the same origin as a page at http://www.example.com/page2.html because only the paths differ.
HTML5 defines the serialization of origins. In string form, origins can be referred to in APIs and protocols. This is essential for cross-origin HTTP requests using XMLHttpRequest, as well as for WebSockets.
Cross-origin communication identifies the sender by origin. This allows the receiver to ignore messages from origins it does not trust or does not expect to receive messages from. Furthermore, applications must opt-in to receiving messages by adding an event listener for message events. Because of this, there is no risk of messages interfering with an unsuspecting application.
Security rules for postMessage ensure that messages cannot be delivered to pages with unexpected—and possibly undesired—origins. When sending a message, the sender specifies the receiver's origin. If the window on which the sender is calling postMessage does not have that specific origin (for instance, if the user has navigated to another site) the browser will not transmit that message.
Likewise, when receiving a message, the sender's origin is included as part of the message. The message's origin is provided by the browser and cannot be spoofed. This allows the receiver to decide which messages to process and which to ignore. You can keep a white list and process only messages from documents with trusted origins.
Be careful with External input
Browser Support for Cross Document Messaging
All major browsers, including Internet Explorer 8 and later, support the postMessage API. It is always a good idea to first test if HTML5 Cross Document Messaging is supported, before you use it. The section “Checking for Browser Support” later in this chapter will show you how you can programmatically check for browser support.s
Using the postMessage API
In this section, we'll explore the use of the HTML5 postMessage API in more detail.
Checking for Browser Support
Before you call postMessage, it is a good idea to check if the browser supports it. The following example shows one way to check for postMessage support::
if (typeof window.postMessage === “undefined”) {

    // postMessage not supported in this browser

}
Sending Messages
To send messages, invoke postMessage on the target window object, as shown in the following example:
window.postMessage(“Hello, world”, “portal.example.com”);
The first argument contains the data to send, and the second argument contains the intended target. To send messages to iframes, you can invoke postMessage on the iframe's contentWindow, as shown in the following example:
document.getElementsByTagName(“iframe”)[0].contentWindow.postMessage(“Hello, world”,

“chat.example.net”);
Listening for Message Events
A script receives messages by listening for events on the window object, as shown in Listing 6-2. In the event listener function, the receiving application can decide to accept or ignore the message.
Listing 6-2. Listening for Message Events and Comparing Origins Against a Whitelist
var originWhiteList = [“portal.example.com”, “games.example.com”, “www.example.com”];


function checkWhiteList(origin) {

    for (var i=0; i<originWhiteList.length; i++) {

        if (origin === originWhiteList[i]) {

          return true;

        }

    }

    return false;

}


function messageHandler(e) {

    if(checkWhiteList(e.origin)) {

        processMessage(e.data);

    } else {

        // ignore messages from unrecognized origins

    }

}

window.addEventListener(“message”, messageHandler, true);
![]() Note The MessageEvent interface defined by HTML5 is also part of HTML5 WebSockets and HTML5 Web Workers. The communication features of HTML5 have consistent APIs for receiving messages. Other communication APIs, such as the EventSource API and Web Workers, also use MessageEvent to deliver messages.
Note The MessageEvent interface defined by HTML5 is also part of HTML5 WebSockets and HTML5 Web Workers. The communication features of HTML5 have consistent APIs for receiving messages. Other communication APIs, such as the EventSource API and Web Workers, also use MessageEvent to deliver messages.
Building an Application Using the postMessage API
Let's say that you wanted to build the aforementioned portal application with its cross-origin chat widget. You can use Cross Document Messaging to communicate between the portal page and the chat widget, as shown in Figure 6-4.
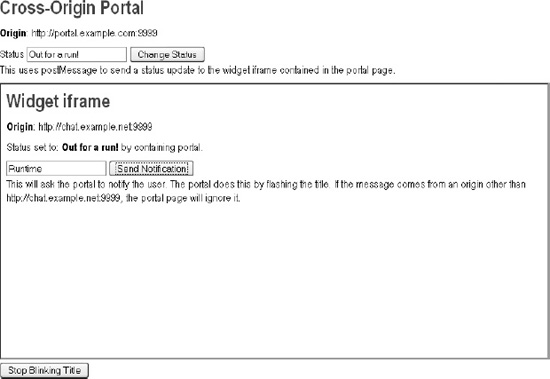
Figure 6-4. Portal page with cross-origin chat widget iframe
In this example, we show how a portal might embed widgets from third parties in iframes. Our example shows a single widget from chat.example.net. The portal page and widget then communicate using postMessage. In this case, the iframe represents a chat widget that wants to notify the user by blinking the title text. This is a common UI technique found in applications that receive events in the background. However, because the widget is isolated in an iframe served from a different origin than the parent page, changing the title would be a security violation. Instead, the widget uses postMessage to request that the parent page perform the notification on its behalf.
The example portal also sends messages to the iframe to inform the widget that the user has changed his or her status. Using postMessage in this way allows a portal such as this to coordinate with widgets across the combined application. Of course, because the target origin is checked when the message is sent, and the event origin is checked when it is received, there is no chance that data leaks out accidentally or is spoofed.
![]() Note In this example application, the chat widget is not connected to a live chat system, and notifications are driven by the application's users clicking Send Notification. A working chat application could use Web Sockets, as described in Chapter 7.
Note In this example application, the chat widget is not connected to a live chat system, and notifications are driven by the application's users clicking Send Notification. A working chat application could use Web Sockets, as described in Chapter 7.
For the sake of illustration, we created a few simple HTML pages: postMessagePortal.html and postMessageWidget.html. The following steps highlight the important parts of building the portal page and the chat widget page. The sample code for the following examples is located in the code/communication folder.
Building the Portal Page
First, add the chat widget iframe hosted at the different origin::
<iframe id="widget" src="http://chat.example.net:9999/postMessageWidget.html"></iframe>
Next, add an event listener messageHandler to listen for message events coming from the chat widget. As shown in the following example code, the widget will ask the portal to notify the user, which can be done by flashing the title. To make sure the message comes from the chat widget, the message's origin is verified; if it does not come from http://chat.example.net:9999, the portal page simply ignores it.
var trustedOrigin = "http://chat.example.net:9999";


function messageHandler(e) {

    if (e.origin == trustedOrigin) {

        notify(e.data);

    } else {

        // ignore messages from other origins

    }

}
Next, add a function to communicate with the chat widget. It uses postMessage to send a status update to the widget iframe contained in the portal page. In a live chat application, it could be used to communicate the user's status (available, away, and so on).
function sendString(s) {

    document.getElementById("widget").contentWindow.postMessage(s, targetOrigin);

}
Building the Chat Widget Page
First, add an event listener messageHandler to listen for message events coming from the portal page. As shown in the following example code, the chat widget listens for incoming status-change messages. To make sure the message comes from the portal page, the message's origin is verified; if it does not come from http://portal.example.com:9999, the widget simply ignores it.:
var trustedOrigin = "http://portal.example.com:9999";

function messageHandler(e) {

    if (e.origin === trustedOrigin {

        document.getElementById("status").textContent = e.data;

    } else {

        // ignore messages from other origins

    }
}
Next, add a function to communicate with the portal page. The widget will ask the portal to notify the user on its behalf and uses postMessage to send a message to the portal page when a new chat message is received, as shown in the following example:
function sendString(s) {

    window.top.postMessage(s, trustedOrigin);

}
The Final Code
Listing 6-3 shows the complete code for the Portal page postMessagePortal.html.
Listing 6-3. Contents of postMessagePortal.html
<!DOCTYPE html>

<title>Portal [http://portal.example.com:9999]</title>

<link rel="stylesheet" href="styles.css">

<style>

    iframe {

        height: 400px;

        width: 800px;

    }

</style>

<link rel="icon" href="http://apress.com/favicon.ico">

<script>


var defaultTitle = "Portal [http://portal.example.com:9999]";

var notificationTimer = null;


var trustedOrigin = "http://chat.example.net:9999";


function messageHandler(e) {

    if (e.origin == trustedOrigin) {

        notify(e.data);

    } else {

        // ignore messages from other origins

    }

}


function sendString(s) {

    document.getElementById("widget").contentWindow.postMessage(s, trustedOrigin);

}


function notify(message) {

    stopBlinking();

    blinkTitle(message, defaultTitle);

}
function stopBlinking() {
if (notificationTimer !== null) {
clearTimeout(notificationTimer);
}
document.title = defaultTitle;
}
function blinkTitle(m1, m2) {
document.title = m1;
notificationTimer = setTimeout(blinkTitle, 1000, m2, m1)
}
function sendStatus() {
var statusText = document.getElementById("statusText").value;
sendString(statusText);
}
function loadDemo() {
document.getElementById("sendButton").addEventListener("click", sendStatus, true);
document.getElementById("stopButton").addEventListener("click", stopBlinking, true);
sendStatus();
}
window.addEventListener("load", loadDemo, true);
window.addEventListener("message", messageHandler, true);
</script>
<h1>Cross-Origin Portal</h1>
<p><b>Origin</b>: http://portal.example.com:9999</p>
Status <input type="text" id="statusText" value="Online">
<button id="sendButton">Change Status</button>
<p>
This uses postMessage to send a status update to the widget iframe contained in the portal
page.
</p>
<iframe id="widget" src="http://chat.example.net:9999/postMessageWidget.html"></iframe>
<p>
<button id="stopButton">Stop Blinking Title</button>
</p>
Listing 6-4 shows the code for the portal page postMessageWidget.html.
Listing 6-4. Contents of postMessageWidget.html
<!DOCTYPE html>

<title>widget</title>

<link rel="stylesheet" href="styles.css">

<script>


var trustedOrigin = "http://portal.example.com:9999";
function messageHandler(e) {
if (e.origin === "http://portal.example.com:9999") {
document.getElementById("status").textContent = e.data;
} else {
// ignore messages from other origins
}
}
function sendString(s) {
window.top.postMessage(s, trustedOrigin);
}
function loadDemo() {
document.getElementById("actionButton").addEventListener("click",
function() {
var messageText = document.getElementById("messageText").value;
sendString(messageText);
}, true);
}
window.addEventListener("load", loadDemo, true);
window.addEventListener("message", messageHandler, true);
</script>
<h1>Widget iframe</h1>
<p><b>Origin</b>: http://chat.example.net:9999</p>
<p>Status set to: <strong id="status"></strong> by containing portal.<p>
<div>
<input type="text" id="messageText" value="Widget notification.">
<button id="actionButton">Send Notification</button>
</div>
<p>
This will ask the portal to notify the user. The portal does this by flashing the title. If
the message comes from an origin other than http://chat.example.net:9999, the portal page will
ignore it.
</p>
The Application in Action
To see this example in action, there are two prerequisites: the pages have to be served up by a web server and the pages have to be served up from two different domains. If you have access to multiple web servers (for example, two Apache HTTP servers) on separate domains, you can host the example files on those servers and run the demo. Another way to accomplish this on your local machine is to use Python SimpleHTTPServer, as shown in the following steps.
- Update the path to the Windows hosts file (
C:Windowssystem32driversetchosts) and the Linux version (/etc/hosts) by adding two entries pointing to your localhost (IP address 127.0.0.1), as shown in the following example:127.0.0.1 chat.example.net
127.0.0.1 portal.example.com Note You must restart your browser after modifying the host file to ensure that the DNS entries take effect.
 - Install Python 2, which includes the lightweight SimpleHTTPServer web server.
- Navigate to the directory that contains the two example files
(postMessageParent.html and postMessageWidget.html). - Start Python as follows:
python -m SimpleHTTPServer 9999 - Open a browser and navigate to
http://portal.example.com:9999/postMessagePortal.html. You should now see the page shown in Figure 6-4.
XMLHttpRequest Level 2
XMLHttpRequest is the API that made Ajax possible. There are many books about XMLHttpRequest and Ajax. You can read more about XMLHttpRequest programming in John Resig's Pro JavaScript Techniques, (Apress, 2006).
XMLHttpRequest Level 2—the new version of XMLHttpRequest—has been significantly enhanced. In this chapter, we will be covering the improvements introduced in XMLHttpRequest Level 2. These improvements are centered on the following areas:
- Cross-origin XMLHttpRequests
- Progress events
- Binary Data
Cross-Origin XMLHttpRequest
In the past, XMLHttpRequest was limited to same-origin communication. XMLHttpRequest Level 2 allows for cross-origin XMLHttpRequests using Cross Origin Resource Sharing (CORS), which uses the origin concept discussed in the earlier Cross Document Messaging section.
Cross-origin HTTP requests have an Origin header. This header provides the server with the request's origin. This header is protected by the browser and cannot be changed from application code. In essence, it is the network equivalent of the origin property found on message events used in Cross Document Messaging. The origin header differs from the older referer [sic] header in that the referer is a complete URL including the path. Because the path may contain sensitive information, the referer is sometimes not sent by browsers attempting to protect user privacy. However, the browser will always send the required Origin headers when necessary.
Using cross-origin XMLHttpRequest, you can build web applications that use services hosted on different origins. For example, if you wanted to host a web application that used static content from one origin and Ajax services from another, you could use cross-origin XMLHttpRequest to communicate between the two. Without cross-origin XMLHttpRequest, you would be limited to same-origin communication. This would constrain your deployment options. For example, you might have to deploy the web application on a single domain or set up a subdomain.
As shown in Figure 6-5, cross-origin XMLHttpRequest allows you to aggregate content from different origins on the client side. Additionally, you can access secured content with the user's credentials if the target server allows it, providing users with direct access to personalized data. Server-side aggregation, on the other hand, forces all content to be funneled through a single server-side infrastructure, which can create a bottleneck.
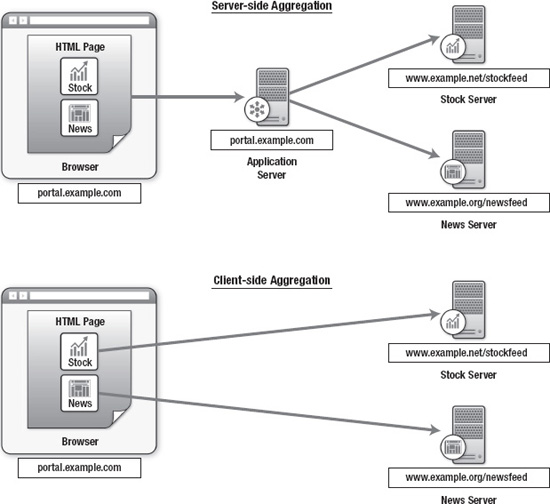
Figure 6-5. Difference between client-side and server-side aggregation
The CORS specification dictates that, for sensitive actions—for example, a request with credentials, or a request other than GET or POST—an OPTIONS preflight request must be sent to the server by the browser to see whether the action is supported and allowed. This means that successful communication may require a CORS-capable server. Listings 6-5 and 6-6 show the HTTP headers involved in a cross-origin exchange between a page hosted on www.example.com and a service hosted on www.example.net.
Listing 6-5. Example Request Headers
POST /main HTTP/1.1

Host: www.example.net
User-Agent: Mozilla/5.0 (X11; U; Linux x86_64; en-US; rv:1.9.1.3) Gecko/20090910 Ubuntu/9.04 (jaunty) Shiretoko/3.5.3
Accept: text/html,application/xhtml+xml,application/xml;q=0.9,*/*;q=0.8
Accept-Language: en-us,en;q=0.5
Accept-Encoding: gzip,deflate
Accept-Charset: ISO-8859-1,utf-8;q=0.7,*;q=0.7
Keep-Alive: 300
Connection: keep-alive
Referer: http://www.example.com/
Origin: http://www.example.com
Pragma: no-cache
Cache-Control: no-cache
Content-Length: 0
Listing 6-6. Example Response Headers
HTTP/1.1 201 Created

Transfer-Encoding: chunked

Server: Kaazing Gateway

Date: Mon, 02 Nov 2009 06:55:08 GMT

Content-Type: text/plain

Access-Control-Allow-Origin: http://www.example.com

Access-Control-Allow-Credentials: true
Progress Events
One of the most important API improvements in XMLHttpRequest has been the changes related to progressive responses. In the previous version of XMLHttpRequest, there was only a single readystatechange event. On top of that, it was inconsistently implemented across browsers. For example, readyState 3 (progress) never fires in Internet Explorer. Furthermore, the readyState change event lacked a way to communicate upload progress. Implementing an upload progress bar was not a trivial task and involved server-side participation.
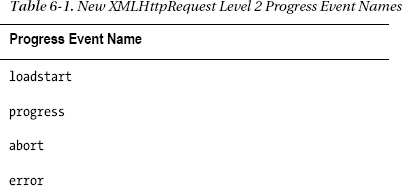
XMLHttpRequest Level 2 introduces progress events with meaningful names. Table 6-2 shows the new progress event names. You can listen for each of these events by setting a callback function for the event handler attribute. For example, when the loadstart event fires, the callback for the onloadstart property is called.

The old readyState property and readystatechange events will be retained for backward compatibility.
“Seemingly Arbitrary” Times
Browser Support for HTML5 XMLHttpRequest Level 2
HTML5 XMLHttpRequest is already supported in many browsers at the time of this writing. Due to the varying levels of support, it is a good idea to first test if HTML5 XMLHttpRequest is supported, before you use these elements. The section “Checking for Browser Support” later in this chapter will show you how you can programmatically check for browser support.
Using the XMLHttpRequest API
In this section, we'll explore the use of the XMLHttpRequest in more detail. For the sake of illustration, we've created a simple HTML page—crossOriginUpload.html. The sample code for the following examples is located in the code/communication folder.
Checking for Browser Support
Before you try to use XMLHttpRequest Level 2 functionality—such as cross-origin support—it is a good idea to check if it is supported. You can do this by checking whether the new withCredentials property is available on an XMLHttpRequest object as shown in Listing 6-7.
Listing 6-7. Checking if Cross-Origin Support Is Available in XMLHttpRequest
var xhr = new XMLHttpRequest()

if (typeof xhr.withCredentials === undefined) {

    document.getElementById("support").innerHTML =

        "Your browser <strong>does not</strong> support cross-origin XMLHttpRequest";

} else {

    document.getElementById("support").innerHTML =

        "Your browser <strong>does</strong>support cross-origin XMLHttpRequest";

}
Making Cross-Origin Requests
To make a cross-origin XMLHttpRequest, you must first create a new XMLHttpRequest object, as shown in the following example.:
var crossOriginRequest = new XMLHttpRequest()
Next, make the cross-origin XMLHttpRequest by specifying an address on a different origin as shown in the following example.
crossOriginRequest.open("GET", "http://www.example.net/stockfeed", true);
Make sure, you listen for errors. There are many reasons why this request might not succeed. For example, network failure, access denied, and lack of CORS support on the target server.
WHY NOT JSONP?
Using Progress Events
Instead of numerical states representing different stages of the request and response, XMLHttpRequest Level 2 provides named progress events. You can listen for each of these events by setting a callback function for the event handler attribute.
Listing 6-8 shows how callback functions are used to handle progress events. Progress events have fields for the total amount of data to transfer, the amount that has already transferred, and a Boolean value indicating whether the total is known (it may not be in the case of streaming HTTP). XMLHttpRequest.upload dispatches events with the same fields.
Listing 6-8. Using the onprogress Event
crossOriginRequest.onprogress = function(e) {

    var total = e.total;

    var loaded = e.loaded;


    if (e.lengthComputable) {

        // do something with the progress information

    }

}

crossOriginRequest.upload.onprogress = function(e) {

    var total = e.total;
var loaded = e.loaded;
if (e.lengthComputable) {
// do something with the progress information
}
}
Binary Data
Browsers that support new binary APIs such as Typed Array (which is necessary for WebGL and programmable audio) may be able to send binary data with XMLHttpRequest. The XMLHttpRequest Level 2 specification includes support for calling the send() method with Blob and ArrayBuffer (aka Typed Array) objects (see Listing 6-9).
Listing 6-9.Sending a Typed Array of Bytes
var a = new Uint8Array([8,6,7,5,3,0,9]);

var xhr = new XMLHttpRequest();

xhr.open("POST", "/data/", true)

console.log(a)

xhr.send(a.buffer);
This makes an HTTP POST request with a binary content body. The content length is 7, and the body contains the bytes 8,6,7,5,3,0,9.
XMLHttpRequest Level 2 also exposes binary response data. Setting the responseType attribute to “text,” “document,” “arraybuffer,” or “blob” controls the type of object returned by the response property. To see the raw bytes contained by the HTTP response body, set the responseType to “arraybuffer” or “blob.”
In the next chapter, we'll see how WebSocket can be used to send and receive binary data using the same types.
Building an Application Using XMLHttpRequest
In this example, we'll look at uploading race geolocation coordinates to a web server hosted on a different origin. We use the new progress events to monitor the status of the HTTP request including the upload percentage. Figure 6-6 shows the application in action.
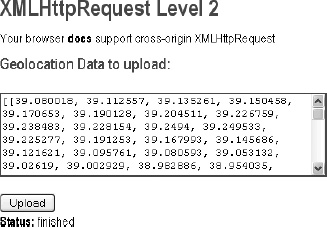
Figure 6-6. A Web Application That Uploads Geolocation Data
For the sake of illustration, we've created the HTML file crossOrignUpload.html. The following steps highlight the important parts of building the cross-origin upload page shown in Figure 6-5. The sample code for the following examples is located in the code/communication folder.
First, create a new XMLHttpRequest object, as shown in the following example.
var xhr = new XMLHttpRequest();
Next, do check if cross-origin XMLHttpRequest is supported in the browser, as shown in the following example.
if (typeof xhr.withCredentials === undefined) {

  document.getElementById("support").innerHTML =

           "Your browser <strong>doesnot</strong> support cross-origin XMLHttpRequest";

} else {

    document.getElementById("support").innerHTML =

             "Your browser <strong>does</strong> support cross-origin XMLHttpRequest";

}
Next, set callback functions to handle the progress events and calculate the uploaded and downloaded ratios.
xhr.upload.onprogress = function(e) {

  var ratio = e.loaded / e.total;

  setProgress(ratio + "% uploaded");

}


xhr.onprogress = function(e) {

  var ratio = e.loaded / e.total;

  setProgress(ratio + "% downloaded");

}


xhr.onload = function(e) {

  setProgress("finished");

}
xhr.onerror = function(e) {
setProgress("error");
}
Finally, open the request and send the string containing the encoded geolocation data. This will be a cross-origin request because the target location is a URL with a different origin than the page.
var targetLocation = "http://geodata.example.net:9999/upload";
xhr.open("POST", targetLocation, true);
geoDataString = dataElement.textContent;
xhr.send(geoDataString);
The Final Code
Listing 6-10 shows the complete application code—the contents of the crossOriginUpload.html file.
Listing 6-10. Contents of crossOriginUpload.html
<!DOCTYPE html>
<title>Upload Geolocation Data</title>
<link rel="stylesheet" href="styles.css">
<link rel="icon" href="http://apress.com/favicon.ico">
<script>
function loadDemo() {
var dataElement = document.getElementById("geodata");
dataElement.textContent = JSON.stringify(geoData).replace(",", ", ", "g");
var xhr = new XMLHttpRequest()
if (typeof xhr.withCredentials === undefined) {
document.getElementById("support").innerHTML =
"Your browser <strong>does not</strong> support cross-origin XMLHttpRequest";
} else {
document.getElementById("support").innerHTML =
"Your browser <strong>does</strong> support cross-origin XMLHttpRequest";
}
var targetLocation = "http://geodata.example.net:9999/upload";
function setProgress(s) {
document.getElementById("progress").innerHTML = s;
}
document.getElementById("sendButton").addEventListener("click",
function() {
xhr.upload.onprogress = function(e) {
var ratio = e.loaded / e.total;
setProgress(ratio + "% uploaded");
} xhr.onprogress = function(e) {
var ratio = e.loaded / e.total;
setProgress(ratio + "% downloaded");
}
xhr.onload = function(e) {
setProgress("finished");
}
xhr.onerror = function(e) {

  setProgress("error");

}
xhr.open("POST", targetLocation, true);
geoDataString = dataElement.textContent;
xhr.send(geoDataString);
}, true);
}
window.addEventListener("load", loadDemo, true);
</script>
<h1>XMLHttpRequest Level 2</h1>
<p id="support"></p>
<h4>Geolocation Data to upload:</h4>
<textarea id="geodata">
</textarea>
</div>
<button id="sendButton">Upload</button>
<script>
geoData = [[39.080018000000003, 39.112557000000002, 39.135261, 39.150458, 39.170653000000001, 39.190128000000001, 39.204510999999997, 39.226759000000001, 39.238483000000002, 39.228154000000004, 39.249400000000001, 39.249533, 39.225276999999998, 39.191253000000003, 39.167993000000003, 39.145685999999998, 39.121620999999998, 39.095761000000003, 39.080593, 39.053131999999998, 39.02619, 39.002929000000002, 38.982886000000001, 38.954034999999998, 38.944926000000002, 38.919960000000003, 38.925261999999996, 38.934922999999998, 38.949373000000001, 38.950133999999998, 38.952649000000001, 38.969692000000002, 38.988512999999998, 39.010652, 39.033088999999997, 39.053493000000003, 39.072752999999999], [-120.15724399999999, -120.15818299999999, -120.15600400000001, -120.14564599999999, -120.141285, -120.10889900000001, -120.09528500000002, -120.077596, -120.045428, -120.0119, -119.98897100000002, -119.95124099999998, -119.93270099999998, -119.927131, -119.92685999999999, -119.92636200000001, -119.92844600000001, -119.911036, -119.942834, -119.94413000000002, -119.94555200000001, -119.95411000000001, -119.941327, -119.94605900000001, -119.97527599999999, -119.99445, -120.028998, -120.066335, -120.07867300000001, -120.089985, -120.112227, -120.09790700000001, -120.10881000000001, -120.116692, -120.117847, -120.11727899999998, -120.14398199999999]];</script>
<p>
<b>Status: </b> <span id="progress">ready</span>
</p>
The Application in Action
To see this example in action, there are two prerequisites: the pages have to be served up from different domains, and the target page has to be served up by a web server that understands CORS headers. A CORS-compliant Python script that can handle incoming cross-origin XMLHttpRequests is included in the example code for this chapter. You can run the demo on your local machine by performing the following steps:
- Update your hosts file (
C:Windowssystem32driversetchostson Windows or/etc/hosts on Unix/Linux)by adding two entries pointing to your localhost (IP address127.0.0.1) as shown in the following example:127.0.0.1 geodata.example.net
127.0.0.1 portal.example.com Note You must restart your browser after modifying the host file to ensure the DNS entries take effect. - Install Python 2, which includes the lightweight
SimpleHTTPServerweb server, if you did not do so for the previous example. - Navigate to the directory that contains the example file (
crossOrignUpload.html) and the Python CORS server script (CORSServer.py). - Start Python in this directory as follows:
python CORSServer.py 9999 - Open a browser and navigate to
http://portal.example.com:9999/crossOriginUpload.html. You should now see the page shown in Figure 6-6.
Practical Extras
Sometimes there are techniques that don't fit into our regular examples, but that nonetheless apply to many types of HTML5 applications. We present to you some short, but common, practical extras here.
Structured Data
Early versions of postMessage only supported strings. Later revisions allowed other types of data including JavaScript objects, canvas imageData, and files. Support for different object types will vary by browser as the specification develops.
In some browsers, the limitations on JavaScript objects that can be sent with postMessage are the same as those for JSON data. In particular, data structures with cycles may not be allowed. An example of this is a list containing itself.
Framebusting
Framebusting is a technique for ensuring that your content is not loaded in an iframe. An application can detect that its window is not the outermost window (window.top) and subsequently break out of its containing frame, as shown in the following example.:
if (window !== window.top) {

    window.top.location = location;

}
Browsers supporting the X-Frame-Options HTTP header will also prevent malicious framing for resources that set that header to DENY or SAMEORIGIN. However, there may be certain partner pages that you want to selectively allow to frame your content. One solution is to use postMessage to handshake between cooperating iframes and containing pages, as shown in the Listing 6-11.
Listing 6-11. Using postMessage in an iframe to Handshake with a Trusted Partner Page
var framebustTimer;

var timeout = 3000; // 3 second framebust timeout


if (window !== window.top) {

    framebustTimer = setTimeout(

        function() {

             window.top.location = location;

        }, timeout);

}


window.addEventListener(“message”, function(e) {

    switch(e.origin) {

        case trustedFramer:

            clearTimeout(framebustTimer);

            break;

    }

), true);
Summary
In this chapter, you have seen how HTML5 Cross Document Messaging and XMLHttpRequest Level 2 can be used to create compelling applications that can securely communicate cross-origin.
First, we discussed postMessage and the origin security concept—two key elements of HTML5 communication—and then we showed you how the postMessage API can be used to communicate between iframes, tabs, and windows.
Next, we discussed XMLHttpRequest Level 2—an improved version of XMLHttpRequest. We showed you in which areas XMLHttpRequest has been improved; most importantly in the readystatechange events area. We then showed you how you can use XMLHttpRequest to make cross-origin requests and how to use the new progress events.
Finally, we wrapped up the chapter with a few practical examples. In the next chapter, we'll demonstrate how HTML5 WebSockets enables you to stream real-time data to an application with incredible simplicity and minimal overhead.