CHAPTER 7
OpenSolaris and Virtualization
If you can see it and it's there it's real; if you can't see it and it's there it's transparent; if you can see it and it's not there it's virtual.
—Jeff Savit, Sun system engineer
Virtualization is a very broad and somewhat overused term that now encompasses a great number of different technologies. The basic ideas and implementations date back to the early days of mainframe computers in the 1960s when such systems were large, expensive, and scarce resources. In order to efficiently use these systems for multiple simultaneous computational tasks, techniques were developed to provide separate execution environments for individual workloads, including support for different operating systems. These execution environments provided performance and security boundaries through both hardware and software containment methods. To do this in software, indirect abstractions were created for access to system resources such as CPUs, memory, disks, and network interfaces. These abstractions are called virtual resources, which is where the term virtualization originates.
Note Hardware partitioning techniques used on mainframe class systems are often referred to as forms of virtualization, but such partitioning does not always use virtualized system components. Such techniques are forms of the more general concept of workload containment. Hardware partitioning allocates real server resources to each operating system and generally requires specialized server hardware.
Unfortunately, computers have become much smaller, faster, and cheaper! Unfortunately, because this led to the practice of giving nearly every application its own hardware system, some large organizations now have thousands of individual hardware servers that use enormous amounts of space and electrical power and that require complex and expensive environmental cooling. Many of these servers are extremely overpowered for the applications they host; average utilization rates for most servers today are around 5 percent or even lower. And in many data centers today, more than half of the power consumption goes to cooling and infrastructure, not to computational power.
Fortunately, computers continue to grow smaller yet more powerful, and modern servers are capable of handling dozens or hundreds of simultaneous application workloads. That's where virtualization reappears, and there are now numerous community-developed and commercially developed virtualization solutions for nearly every operating system and processor family, including OpenSolaris on AMD, Intel, and SPARC. Virtualization technologies are a critical component of the new "Cloud Computing" products offered by Google, Amazon, Sun Microsystems, and others. These products provide computational, network, and storage services as utilities, much like the electric and water distribution companies.
A single operating system's primary tasks are to efficiently schedule user application work on available CPU and memory hardware and to efficiently handle and route interrupts for data I/O from disks, network interfaces, and other devices. Server virtualization techniques allow operating systems and their applications to share the underlying hardware in a way that gives each OS the impression that it is still running directly on the server hardware when in fact it is sharing it with other OS/application environments. Deploying applications in this manner allows IT architects and system administrators to do the following:
- Increase hardware utilization rates
- Reduce the total server hardware required to host multiple applications
- Provide greater flexibility for resource allocation among application environments
- Reduce electrical power, cooling, and physical space requirements in data centers
- Easily create test and development environments
- Preserve legacy OS environments
- Reduce system management costs
One important way to categorize virtualization techniques is according to the number of operating system kernels involved. Some techniques support multiple different guest operating system kernels running simultaneously on a hardware server, under the control of a program called a hypervisor or virtual machine monitor. Each guest OS and its applications can have the appearance of being an independent server.
Note Although you normally think of a "server" as a hardware system, all it really provides is a name for the host environment, an IP address for network access, and a restricted space in which to execute the OS and its assigned applications. This can be accomplished with hardware or, using virtualization, with software.
There are several kinds of virtualization to consider:
- Hardware emulation: Permits operating systems developed for one processor architecture to run on a different processor architecture.
- Full or native OS virtualization: Allows unmodified OS guests to run under a hypervisor.
- Paravirtualization: Guest operating systems run under a hypervisor and are modified to use virtualization APIs to assist performance.
- OS virtualization (sometimes called lightweight virtualization or containers): Presents to an application environment the appearance of running in a dedicated server and OS but without duplicating the entire kernel environment; in this case, your system's OS plays the role of the hypervisor.
- Application virtualization: Provides application portability across different operating systems and processor architectures; the Java Virtual Machine is the best-known example.
- Resource virtualization: I/O and network hardware can be separately virtualized to emulate other hardware or to partition such hardware into multiple virtual devices that can be dedicated to individual VMs or containers (see the Crossbow technology discussed at http://opensolaris.org/os/project/crossbow/ for an example).
Table 7-1 summarizes just a few of the various virtualization technologies that are available.
Table 7-1. Some Available Virtualization Technologies
| Technology | Type | Description | URL |
| User Mode Linux (UML) | Paravirtualization | Runs Linux VMs within Linux host | http://user-mode-linux.sourceforge.net/ |
| KVM | Full and paravirtualization | In-kernel hypervisor for Linux; provides three execution modes: kernel, user, and guest | http://kvm.qumranet.com/kvmwiki |
| Xen | Full and paravirtualization | Multiplatform hypervisor | http://xen.org/ and http://xensource.com |
| QEMU | Hardware emulation | Multiplatform processor emulator | http://bellard.org/qemu/ |
| VirtualBox | Full | Desktop virtualization of OS guests | http://www.virtualbox.org/ |
| VMware Server | Full | Fast server hypervisor | http://www.vmware.com/ |
| V-Server | OS virtualization | Runs multiple Linux containers | http://linux-vserver.org |
| Zones | OS virtualization | Solaris and OpenSolaris containers | http://www.sun.com/software/solaris/containers/ and http://opensolaris.org/os/community/zones/ |
| Parallels | Full | Desktop virtualization for Mac, Windows, and other OSs | http://www.parallels.com/ |
| xVM Server | Full and paravirtualization | Xen-based hypervisor | http://www.sun.com/xvm |
| xVM Hypervisor | Full and paravirtualization | Xen-based hypervisor | http://opensolaris.org/os/community/xen/ |
| LDoms | Paravirtualization | Hypervisor for UltraSPARC Sun4v processors | http://www.sun.com/ldoms |
| Microsoft Hyper-V | Paravirtualization | Hypervisor for Windows Server 2008 | http://www.microsoft.com/virtualization |
Note Most current paravirtualization implementations on the x86 architecture now require processors that support Intel VT or AMD-V features, such as the Core 2 Duo or Opteron.
OpenSolaris can operate as a guest operating system, as we discussed in Chapter 3; platforms for this mode of operation include the following:
- VMware Workstation, Server, and ESX and VMware Fusion
- Xen 3 and Citrix XenServer
- Sun xVM Server and OpenSolaris xVM Hypervisor
- Parallels Workstation and Server
- Sun VirtualBox
- Microsoft Hyper-V and Virtual Server 2008
But OpenSolaris can be a host for a variety of virtual environments as well, and the criteria for choosing which type of virtualization solution you need depends on your performance requirements, the number and kind of guest operating systems you need to host, and the overall infrastructure of real and virtual systems you need to manage.
Figures 7-1 through 7-3 will help you visualize the differences among the virtualization technologies we've just outlined and how they are implemented with OpenSolaris.
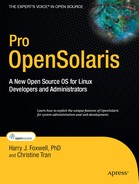
Figure 7-1 shows how a Type 1 hypervisor, installed "natively" or on "bare metal," provides virtualization services to guest virtual machines. It generally uses a small, privileged kernel called the control domain or Domain 0 that communicates with the hypervisor and manages the creation and resource allocations of guests. Generally used for server virtualization, it provides good performance especially when using paravirtualization and processor features such as Intel-VT or AMD-V.
Some discussions of Type 1 hypervisors classify them further into two types. Thin hypervisors, like the Xen kernel, contain only the minimum needed for booting and creating guest VMs; the remaining functionality, such as device drivers, is provided by a more traditional operating system kernel in the control domain. Thick hypervisor kernels, such as that used by VMware ESX, provide boot support, VM management tools, device drivers, and resource management.
Note that when using hypervisor-based virtualization each guest VM must be a fully installed, configured, and possibly licensed OS kernel, such as Windows, Linux, Solaris, or OpenSolaris. Sun's commercial xVM Server is an example of this virtualization architecture, as is the xVM Hypervisor implementation in OpenSolaris, both based on the work of the Xen community. You can see the details of this project at http://opensolaris.org/os/community/xen/.
Figure 7-2 shows a Type 2, or hosted, hypervisor, which is essentially just another application running in your OS. It still provides a control interface for creating and managing guest VMs, along with device virtualization services that link with the host OS's device drivers. Because of this extra level of indirection, performance of the guest VMs can suffer, but this architecture provides a convenient method for adding guest OS support to workstations or laptops. VirtualBox, VMware Workstation, and Parallels are examples of this type; VirtualBox is available for OpenSolaris, so it can serve as both a host for OpenSolaris and as a platform for hosting other operating systems on OpenSolaris. Note again that each guest is a fully installed OS kernel.
OS virtualization, shown in Figure 7-3, does not implement guests as full OS kernels and does not use a hypervisor. Rather, it provides performance, resource, and security boundaries around application process environments generally known as containers. Containers have the appearance of a full kernel but they more directly use the kernel resources and device drivers of the host OS. Because of this, they can be very fast and efficient; however, this approach limits the kinds of virtual guests that can be supported since guests are in a sense just subsets of the host OS environment. Solaris 10 and OpenSolaris have built-in support for container virtualization.
Let's start by exploring OpenSolaris containers, since we'll be using them in the next chapter to host web applications.
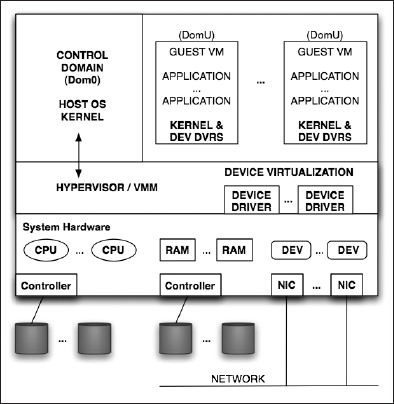
Figure 7-1. The Type 1 hypervisor architecture

Figure 7-2. The Type 2 hypervisor architecture
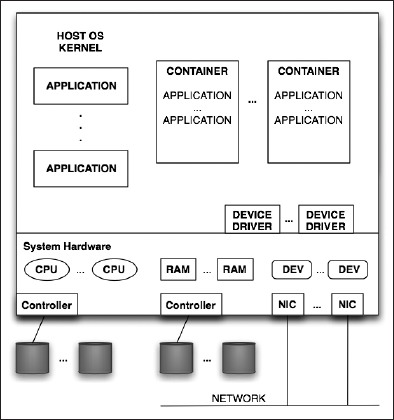
Figure 7-3. The OS virtualization, or container architecture
Zones and Containers
In this section, we'll present more detail on what zones and containers are, how to create and manage them, and what they can and can't do.
But before we start, let's clear up a vocabulary problem. Much of the documentation and articles about OS virtualization in Solaris 10 and OpenSolaris refer to both containers and zones, and many writers often use these two terms interchangeably. Even some of the Sun documentation is ambiguous about the definitions. Zone is a term specific to Solaris 10 and to OpenSolaris, and it refers to the bounded, virtualized OS environment created using the zonecfg program, defined by an XML file in the /etc/zones directory, managed with the zoneadm program, and monitored by SMF's zone service. Container is a more general term that is also used in other contexts such as Java Servlet Containers and in earlier versions of Solaris when referring to resource management features. A container in Solaris 10 or in OpenSolaris is a zone whose performance and scale are controlled using the OS's resource management facilities for allocating CPUs, execution threads, memory, and I/O. Briefly, an OpenSolaris container is a resource-managed zone. To add to the confusion, nearly all of the tools used to create and manage containers, and their documentation, use the term zone. In the remainder of this chapter, we'll use zone until we start discussing how to allocate resources for these virtualized OS environments.
A zone is not a virtual machine. With this form of OpenSolaris virtualization, there is only one OS kernel running; it's called the global zone. Virtualized OS environments created within the global zone are called nonglobal or local zones. They provide a restricted environment in which to deploy applications. In fact, that's the recommended way to host applications on Solaris 10 and OpenSolaris servers. Applications that are designed to run on Solaris 10 and on OpenSolaris will in general run in a local zone with the exception of programs and services that require privileged access to hardware or kernel services, such as firewalls or NFS servers. Installing applications in local zones is almost identical to installing them in the global zone, although you must create the zone with the writable directories expected by the application.
To end users, applications, developers, and administrators, the view from inside a local zone looks as if they are running on a full implementation of OpenSolaris, with some notable exceptions that we'll see shortly. A local zone has the equivalent of a host name, an IP address, and nearly all the system files an administrator would expect to see. Each local zone has its own root file system that can be configured to include read-only access to global zone file systems or writable file systems dedicated to that zone. A local zone has its own root administrator who can "reboot" the zone. Startup of a zone looks and acts similar to a boot process, including startup of local zone services by SMF and by rc scripts. But because a zone is not a full virtual machine kernel and is essentially just a collection of restricted processes and files, "rebooting" a local zone equates to shutting down those processes in an orderly manner and then restarting them, and that can happen very quickly; local zones can be "rebooted" in just a few seconds! Also, because zones are not full OS kernels, they are "lightweight" and have little additional impact on the global zone beyond the applications running in them. The theoretical maximum number of local zones on a single OpenSolaris instance is more than 8000, although you would certainly never attempt to configure that many. But modern x86 and SPARC servers can comfortably handle dozens or even hundreds of zones depending on the size of the system and the kind of applications being run within the zones.
Because a local zone is simply a bounded area within the global OpenSolaris OS, it can run only those applications compiled for that OS (there are a few exceptions such as Linux branded zones that we'll discuss later). So, unlike VMware or other hypervisor-based virtualization, you can't run Windows, Linux, or other virtualized OS kernels within a zone. Nevertheless, you can still do a lot of interesting things with this type of virtualization.
Figure 7-4 shows a sample scenario of an OpenSolaris server hosting three local zones.
Figure 7-4. Example configuration of OpenSolaris zones
In this scenario, OpenSolaris is installed on a server providing web services for healthprovider.com. Three separate zones are configured for patients, doctors, and public health information. Each zone has its own authentication/login services and its own host name and IP address. Each can run different authentication services, net services, and application versions, and they can communicate only with each other using standard TCP/IP protocols.
Tip Zones on the same system communicate using TCP/IP, but intra-zone networking runs at memory bus speed, not Ethernet controller/wire speed. This means that you have very high bandwidth with low latency for network applications that can run in difference zones on the same server, such as an application server communicating with a database.
Users of one zone cannot see the processes of the other zones; they can only observe processes in their own zone. Only the global zone administrator can observe all local zone processes. As you will see later, you can also subdivide and allocate available memory, CPU, and other global resources among the local zones. This helps you ensure that one local zone's processes do not impact the performance of another local zone or of the entire system.
Creating a Zone
There are several key programs you will need to use zones:
zonecfg: Creates zones and defines their characteristicszoneadm: Manages zones after their creationzlogin: Logs in to a zone for zone administratorszonename: Displays the name of the current zone
The zonecfg and zoneadm programs have many subcommands; we'll illustrate those most commonly used in the following examples. First, let's create a sample local zone and then examine what it looks like from within the zone and from the global zone. We'll use the command-line method to illustrate this process. Several GUIs, such as Webmin, could also be used, but they call the zone commands, so it's useful to examine these first. Also, you can write shell scripts containing these zone commands to make zone management easier. In fact, many such scripts have been posted on the OpenSolaris.org web site (for example, http://opensolaris.org/os/project/zonemgr/files/zonemgr-1.8.txt).
In Figure 7-5, we've become the root administrator and created a zone named myfirstzone using the zonecfg command.
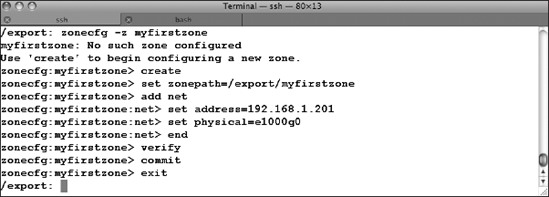
Figure 7-5. Defining a zone using zonecfg
Notice the syntax: zonecfg -z myfirstzone attempts to reference that zone name, but it's not defined yet, so zonecfg tells you to create it. Like a normal OS, a zone needs a root file system. In this example, we've specified a path for its directory, /export/myfirstzone. For now, ensure that /export has sufficient disk space for the zone's files, about 300MB. We've also specified an IP address for the zone along with the name of the physical network device we want the zone to use. Some systems will have multiple network interface cards (NICs), and their names might differ from the device name in this example (use the /usr/sbin/ifconfig -a command to display your system's NICs and addresses). The remaining zonecfg subcommands end the configuration subcommands, verify the syntax of the parameter definitions, commit the configuration to disk, and then exit the zonecfg program.
All that has happened at this point is that zone myfirstzone has been defined. Its configuration file, as are those of all local zones you will define on your system, is an XML file in the /etc/zones directory. Let's examine the contents of that directory and the myfirstzone.xml file (Figure 7-6).
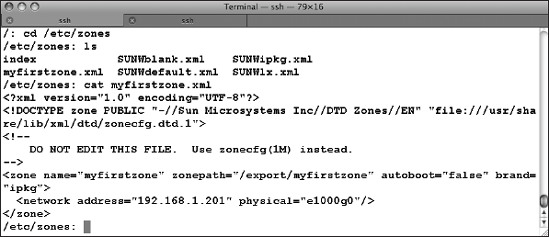
Figure 7-6. The zone configuration files directory, /etc/zones
The directory has several default definition files (SUNWblank.xml and SUNWdefault.xml, for example) that you can copy and use as templates when you create new zones; you can preconfigure devices, IP addresses, zone paths, and other parameters in your template file using the syntax zonecfg -z zonename -f zonetemplatefile. The XML Document Type Definition (DTD) file is referenced in the first two lines of each zone file.
Note Heed the "DO NOT EDIT THIS FILE" warnings in this and other OpenSolaris configuration files; use the recommended program! If you introduce errors by directly editing such files (as many UNIX/Linux admins are inclined to do), unpredictable erroneous behaviors can occur.
The myfirstzone.xml file that was created by zonecfg contains the parameter definitions shown in Table 7-2.
Table 7-2. Configuration Parameters in File /etc/zones/myfirstzone.xml
| Parameter | Description |
name="myfirstzone" |
The name of the zone, not the zone's host name, although many users make them the same. |
zonepath="/export/myfirstzone" |
The directory of the zone's root file system. |
autoboot="false" |
Set this to true if you want the zone to boot when the global zone boots. |
brand="ipkg" |
There are several "brands" of zones: native, ipkg, lx (Linux), s8 (Solaris 8 on SPARC), and s9 (Solaris 9 on SPARC). |
address="192.168.1.201" |
The zone's IP address. Currently must be set as a static address. |
physical="e1000g0" |
The physical NIC used by the zone; can be dedicated or shared. |
You can use the zoneadm program to list the zones that are available on your system (Figure 7-7). The -cv flag shows a listing of all configured zones in verbose mode.

Figure 7-7. Listing the zones on your system
Zones can have several states, as listed in Table 7-3. Notice in Figure 7-7 that the global zone's state is running (of course!) and that myfirstzone is only configured.
Table 7-3. Possible Zone States
| State | Description |
configured |
The zone has been defined; it has a configuration file in /etc/zones. |
installed |
The zone's root file system (zonepath) has been copied and the zone registered with the global zone. |
incomplete |
The zone is in the process of being installed or uninstalled and its files are being copied or deleted. |
ready |
The zone is properly configured and installed, but no zone processes are running (the zone has not been "booted"). |
running |
The zone has successfully "booted" and its processes are running. |
shutting down |
The zone is in the process of being halted. |
down |
The zone is not running and is stuck possibly because the failure of one of its applications to properly shut down. |
The next step is to install your zone (Figure 7-8). Depending on the speed of your system, this process will take several minutes; this example took less than two minutes. Take special note of the output: a ZFS file system was created for the zone; we will take advantage of that later. Note also that necessary packages were downloaded from the OpenSolaris release repository.
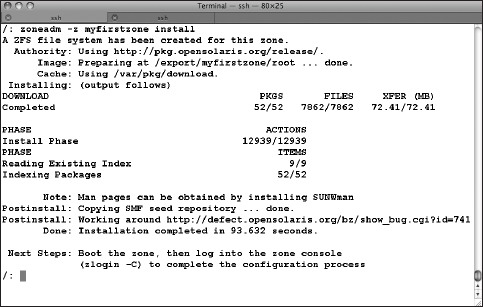
Figure 7-8. Installing a zone
Following the directions given by zoneadm when it's finished installing your zone, you're ready to boot the zone:
# zoneadm -z myfirstzone boot
Then log into the zone console using the password you assigned earlier:
# zlogin -C myfirstzone
The first time you log in to a zone console after its creation and first boot, you will see a series of instructions similar to those for installing a full OpenSolaris operating system. You will be asked to select a terminal type to use; select xterm, VT100, or whatever type you prefer depending on what terminal program you are running (the default terminal type setting when you open a terminal session in OpenSolaris is VT100).
Note Your keyboard's function keys will almost certainly not work during this final configuration process; the installation terminal will emulate those keys with ESC-#, where # is the number of your function key (so ESC-2 emulates the F2 key).
The zone configuration process will next ask you to assign a host name, which could be the same as the zone name but that's not required. Next you'll be asked whether you want to enable Kerberos, what name service you want to use (NIS, DNS, LDAP, none), what time zone you want to use (which can be different from that of the global zone!), and finally the root password for the zone. After all of this you can log in to your zone.
Global and Local Zone Environments
At this point, it's important for you to understand the difference between the global zone administrator environment and that for a local zone, especially if you are simultaneously logged in as root on both types of zones.
Caution It's a good idea to set your shell prompt in your login profile for both global and local zone work to include the zone name to help you recall which zone you're working in. Executing the reboot command in a local zone will simply reboot that zone in a few seconds. Mistakenly executing reboot in the global zone will reboot the entire system and terminate any user processes running in local zones.
For the bash shell in each zone, the following will set your prompt to include both the zone name and your current working directory:
export 'PS1=$(zonename):${PWD}:'
System administrators are familiar with several tools to monitor the state of their system and the processes running on it; Linux users will often use the top command. OpenSolaris 2008.11 includes top (Figure 7-9).
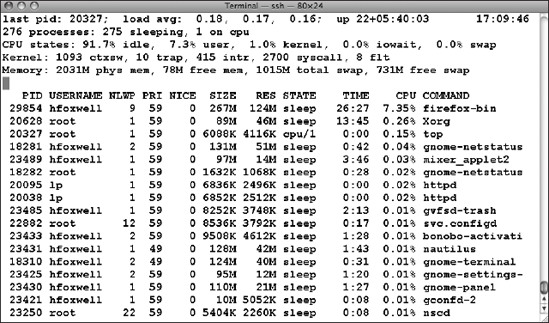
Figure 7-9. Running top on OpenSolaris
However, the top program for OpenSolaris has not yet been modified to work in a local zone or to identify local zone-related processes when called from the global zone. Instead, use the prstat command, which has been enhanced with two extra flags, -z and -Z. The prstat command alone will report data on all processes regardless of which zone they run in, sorted by descending CPU usage. That's somewhat useful for the global zone administrator, but prstat -Z, run from the global zone, will report additional data on local zones (Figure 7-10).
Tip You will notice several services, such as sendmail, are configured by default to start in local zones. You should disable unnecessary services using the svcadm command from within the local zone.
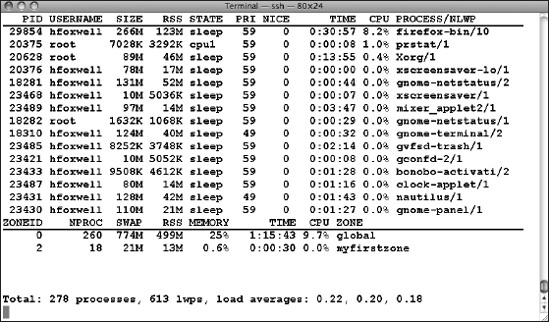
Figure 7-10. prstat running in the global zone
Local zone administrators can run ps or prstat, but they will only get details on processes running in their own zone; they cannot see any process information for other zones or the global zone. The global zone administrator can view process details for specific zones using the -z flag with ps or with prstat, giving the desired zone name. For example, the command prstat -z myfirstzone displays process data for the myfirstzone zone (Figure 7-11).
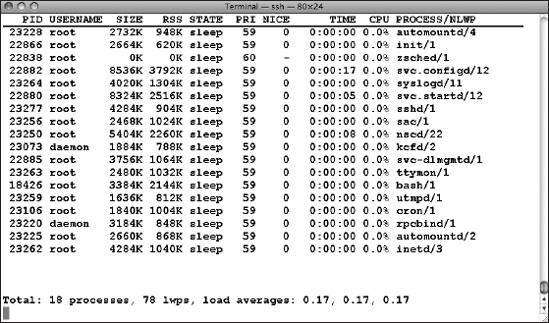
Figure 7-11. prstat -z myfirstzone running in the global zone
The global zone administrator can monitor local zone activity using a variety of tools; some of these are familiar programs that have been modified to understand zones. Table 7-4 describes these tools.
Table 7-4. Tools for Monitoring Local Zone Resources from the Global Zone*
| Command | Description |
ps -eZ |
Lists every running process in all local zones and global zone |
ps -ez zonename |
Lists every running process in the specified zone name |
prstat -Z |
Monitors all process activity in all zones |
prstat -z zonename |
Monitors all process activity in the specified zone name |
pgrep -z zonename pname |
Finds the pid (the process ID) of process pname in the specified zone name |
ptree -z zonename pid |
Lists the process tree for pid in the specified zone name |
zlogin zonename vmstat|iostat|mpstat |
Runs vmstat|iostat|mpstat in the specified zone name and displays the output on the global zone |
| *Other commonly used option flags can still be used with these programs. | |
Caution Interpreting statistics such as CPU utilization, I/O data, and memory usage for processes running in local zones can be a bit difficult. Traditional tools such as vmstat and iostat were not originally designed for virtualized environments. Fortunately, the OpenSolaris developer community is starting to contribute solutions to this problem; for example, the zonestat tool for developing a better understanding of resource consumption and resource controls of zones and their workloads. Read about this project at http://opensolaris.org/os/project/zonestat/.
Cloning a Zone
Before we go further, let's create another zone. Here's where ZFS again helps us; it takes a snapshot of the source zone's root file system and uses it for the new zone, saving the time of creating and copying the zone files. The source zone must be halted before it can be cloned, however. Figure 7-12 shows the sequence of commands needed to clone myfirstzone. First the source zone is halted; then zoneconfig exports the myfirstzone configuration into a temporary work file. You must then edit that file to specify a new zone path and IP address for the new zone (since two zones can't share the same zone path or IP address). You then use zonecfg to configure the new zone using the modified file, and finally you use zoneadm to create the clone. When it's all finished, zoneadm list -cv confirms that the new zone is ready to go; use the same initial boot procedure you did for myfirstzone.
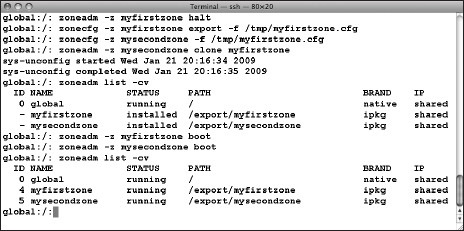
Figure 7-12. Cloning a zone
Managing Zones
If all this seems like a lot of command line work, you can again rely on OpenSolaris community software for help; zone management scripts are available such as the zonemgr tool at http://opensolaris.org/os/project/zonemgr/. Or, you can use the browser-based Webmin tool discussed in Chapter 5; it has a basic Zone Management GUI that lets you create and configure zones on your system from anywhere on your network (Figure 7-13).
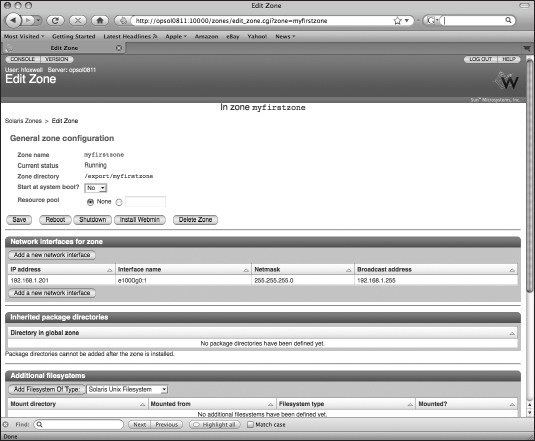
Figure 7-13. The Webmin zone management GUI
Using the Zone
Okay, you've got zones! Now what? Recall that a local zone is very much like a server implemented in software: it has a host name and an IP address, and you can communicate with it using standard TCP/IP programs and protocols just as you do with traditional hardware servers. From the point of view of end users, application developers, and system administrators, working in a local zone is similar to working in an independent OS environment running on a hardware server, but with some very important restrictions. From inside a local zone, you can't "see out" into the global zone or see anything belonging to other local zones, even if you are the local zone root user. Also, you don't have direct access to system hardware; only the global zone administrator can configure hardware resources such as file system disks and network interfaces. And in general, user applications that are designed to run on Solaris and OpenSolaris in the global zone will run fine in a properly configured local zone. However, some programs or services that need privileged access to hardware or to kernel services, such as NFS servers (disks) or NTP servers (system clock), can be run from only the global zone.
Note There are numerous detailed answers about how OpenSolaris zones work (and their limitations) in the Zones and Containers FAQ at http://opensolaris.org/os/community/zones/faq.
One of the most common use cases for local zone deployment is for hosting web servers. In general, applications such as Apache are not resource intensive, and you can therefore host a large number of web servers on a single hardware server running OpenSolaris using zones virtualization. Because each zone has its own IP stack, address, and port list, web servers running in local zones look the same to the outside world as those running on separate hardware servers. Moreover, you can configure your system to restrict access to your web content by placing the content files in a zone writable only by global zone users while mounting the content directories in read-only mode for access by the web server. In this way, you can prevent defacement of your web site content even if the web server software is compromised (see "Eliminating Web Page Hijacking" at http://www.sun.com/software/solaris/howtoguides/s10securityhowto.jsp for details). You can of course run multiple web servers on your system, each in their own protected local zone. You could also use Apache's Virtual Hosts to do this, but confining each web server to a local zone allows you to better allocate system resources to it, and if a local zone is compromised, the other zones are still protected.
Installing the web server software in a local zone uses the command-line interface to the Image Packaging System described in previous chapters. Using the Package Manager GUI from your global zone desktop, you search for and find that the necessary package for the Apache 2 web server is called SUNWapch22. Then, from a terminal command line in the local zone, install Apache using this command: pfexec pkg install SUNWapch22. IPS will install Apache; you then enable it with SMF using svcadm enable apache22, and you're ready to access web content by pointing your browser to the host name or IP address of the local zone.
Tip On OpenSolaris, Apache's httpd.conf configuration file resides in the /etc/apache2/2.2 directory; the default index.html and web content files reside in the /var/apache2/2.2/htdocs directory.
In the next chapter, you'll learn more about deploying the OpenSolaris web stack in zones.
Managing Zone Resources
One of the concerns about hosting multiple virtual environments on a single server is competition among the environments for resources. This is true for hypervisor-based virtualization (Xen, VMware, Microsoft Hyper-V) as well as for OS virtualization models such as OpenSolaris zones. Virtualization models must not only provide security boundaries for their environments but must also provide configurable resource allocation for them.
Operating systems can allocate resources to applications using different process scheduling algorithms (rules) depending on how you want processes to be prioritized. OpenSolaris can use any of the following scheduling classes:
RT, the real-time class, for predictable latency environmentsTS, the time-sharing class, for guaranteeing all threads some CPU timeIA, the interactive class, which prioritizes active window processesFX, the fixed-priority class, for scheduled batch processesFSS, the fair-share class, which allocates CPU time according to assigned shares
By default, the OpenSolaris global zone uses the TS and IA classes. You can change the default on your server to be the FSS class so that you can later reserve a specified proportion of CPU resources to each local zone. To enable the FSS scheduling class, use the dispadmin program:
# dispadmin -d FSS
This sets the default scheduler class listed in the /etc/dispadm.conf file to FSS; you must reboot your global zone for this change to take effect. After you have made this change, you need to decide how to allocate shares to each local zone.
Tip It's best to test your zone configuration first under the default TS class and observe how it performs; OpenSolaris is already pretty good at allocating resources to processes and to local zones. If you later observe the need to give more resources to a local zone (for example, one running a database), you can enable FSS and adjust that zone's relative resource allocation.
Shares are an arbitrary number that can be divided into whatever proportions you want to assign to each local zone. You can assign 40 shares to local zone myfirstzone and 10 shares to mysecondzone, and these zones will get 80 percent and 20 percent, respectively, of available CPU time from the process scheduler. Or you can assign four shares and one share to each and get the same result. The proportion of the total shares assigned is used; the total number of shares is irrelevant.
To assign shares to each of your local zones, use the zoneadm command as follows:
# zonecfg -z myfirstzone

zonecfg: myfirstzone> add rctl

zonecfg: myfirstzone:rctl> set name=zone.cpu-shares

zonecfg: myfirstzone:rctl> add value (priv=privileged, limit=40, action=none)

zonecfg: myfirstzone:rctl> end

zonecfg: myfirstzone> exit

#

# zonecfg -z mysecondzone

zonecfg: mysecondzone> add rctl

zonecfg: mysecondzone:rctl> set name=zone.cpu-shares

zonecfg: mysecondzone:rctl> add value (priv=privileged, limit=10, action=deny)

zonecfg: mysecondzone:rctl> end

zonecfg: mysecondzone> exit

#
This sequence sets the relative shares for each of these local zones. The action parameter specifies what is to be done if the zone requests more resources than have been allocated; deny indicates that no additional resources are to be allocated even if available. In this way, an application environment running in a local zone can be limited.
In some cases, it's advisable to also limit hardware resources used by local zones, either for performance purposes or for software licensing requirements. On a multicore or multi-CPU system, you can confine a local zone to run on a restricted number of CPUs. To do this, you need create a resource pool consisting of a set of CPUs (a processor set, or pset) and then assign the zone to use that pool.
First, enable resource pools using the pooladm command:
# pooladm -e
Assuming you have multiple CPUs available on your system, you create a processor set of some number of CPUs using the poolcfg command, for example:
# poolcfg -c 'create pset myfirstzone-pset (uint pset.min=1;uint pset.max=4)'

# poolcfg -c 'create pool myfirstzone-pool'

# poolcfg -c 'associate pool myfirstzone-pool (pset myfirstzone-pset)'

# pooladm -c
This sequence of commands creates a processor set named myfirstzone-pset with a minimum of one CPU and a maximum of four CPUs, creates a resource pool named myfirstzone-pool linked to the processor set, and then activates the new configuration and updates the /etc/pooladm.conf configuration file. Lastly, you need to tell the zone to use your newly created resource pool:
# zonecfg -z myfirstzone

zonecfg:myfirstzone> set pool=myfirstzone-pool

zonecfg:myfirstzone> verify

zonecfg:myfirstzone> commit

zonecfg:myfirstzone> exit
You now have your local zone bound to a maximum of four CPUs on your system; it cannot use more than you have allocated.
Note Depending on the processor family you are using, OpenSolaris will recognize hardware threads or cores as individual CPUs. A quad-core Intel Xeon processor will present as 4 CPUs; an 8-core CMT SPARC processor will present as 64 CPUs.
Remember, the term container is used when you constrain and control a zone's resources. So, in the previous discussion, it's now more appropriate to call myfirstzone and mysecondzone OpenSolaris containers. In addition to shares and pool CPUs we just discussed, there are additional system resources that you can allocate to local zones, as shown in Table 7-5. See the man page for resource_controls for additional details.
The reason for using such configurable zone resource controls is to contain applications running in local zones so that they do not interfere with other zones. A runaway process in one local zone can consume global system resources needed by the other local zones. Limiting a local zone's resources can prevent problems such as memory leaks or network based denial-of-service attacks from spreading outside the zone. You can find more details on zone/container resource allocation at http://www.solarisinternals.com/wiki/index.php/Zones_Resource_Controls and http://opensolaris.org/os/community/zones/faq/#rm.
Table 7-5. Configurable Zone Resources
More OpenSolaris Virtualization
OS virtualization in the form of OpenSolaris zones is just one method of virtualized environment containment. Although zones are very efficient and easy to create, they are limited in the type of application environments they can provide. Table 7-6 shows other OpenSolaris virtualization projects and features.
Table 7-6. OpenSolaris Virtualization Technologies
| Technology | Description | URL |
| VirtualBox | An open source Type 2 virtualization application. Runs on OpenSolaris on Intel and on AMD systems and supports a variety of guest operating systems including Solaris, Linux distributions, OpenSolaris, and Windows. | http://www.virtualbox.org/ |
| xVM | A Type 1 hypervisor based on the work of the Xen community; will be productized by Sun as xVM Server, a virtualization appliance and available as an OpenSolaris community project. | http://www.sun.com/software/products/xvmserver/index.xml and http://opensolaris.org/os/community/xen/ |
| BrandZ | Also called Solaris Containers for Linux Applications; allows Linux binary applications to run in a Solaris 10 for x86 zone; does not require a full Linux kernel, so it is not a full Linux VM. | http://wikis.sun.com/display/chosug/Installing+a+Linux+Zone and http://www.sun.com/software/solaris/scla.jsp |
| LDoms Logical Domains | Chip-based virtualization for Sun's UltraSPARC CMT/CMP processors. SPARC support for OpenSolaris will start to appear in the 2009.06 release. | http://www.sun.com/servers/coolthreads/ldoms/index.jsp and http://opensolaris.org/os/community/ldoms/ |
VirtualBox
If you want to use OpenSolaris as a base OS for running guest operating systems, VirtualBox is a good candidate. Since it was acquired in 2008 by Sun Microsystems, it's been offered both in a commercially supported Enterprise Subscription edition and as a GPL-licensed OpenSource Edition; no cost binary copies are downloadable at http://dlc.sun.com/virtualbox/vboxdownload.html, along with a platform-independent Software Development Kit (SDK) of APIs and command-line tools that let you create scripts and services to manage VMs. VirtualBox supports dozens of different operating systems, although not all features work for some VMs; a list of OSs and their support/bug status is at http://www.virtualbox.org/wiki/Guest_OSes.
Download a copy of VirtualBox for your system, but carefully note whether your system's processor is 32-bit or 64-bit, because 64-bit guest VMs will not work on 32-bit OpenSolaris systems. You can check your processor's instruction set and type using the isainfo and psrinfo commands, as shown in the example output in Figure 7-14.
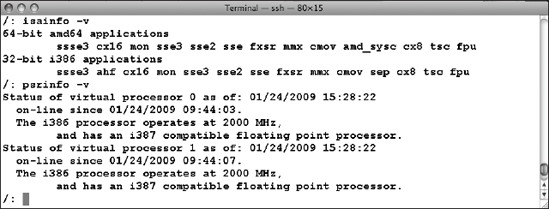
Figure 7-14. Checking your processor capabilities using isainfo and psrinfo
The VirtualBox executable and support files for OpenSolaris download is a gzipped tar file that you unzip and unarchive into any directory of your choice. Note that this is an application not installed using IPS. After installing VirtualBox, download the .iso image of your preferred guest OS (or obtain a CD/DVD). When you start up VirtualBox (located in /usr/bin/VirtualBox), you can choose to add new guests as in Figure 7-15, selecting the name, OS type, and version.
After selecting the OS type and version, specify the memory and file sizes you need for your VM. Select the CD/DVD-ROM item from the GUI, and mount either the physical CD or the .iso boot file for your VM, as in Figure 7-16.
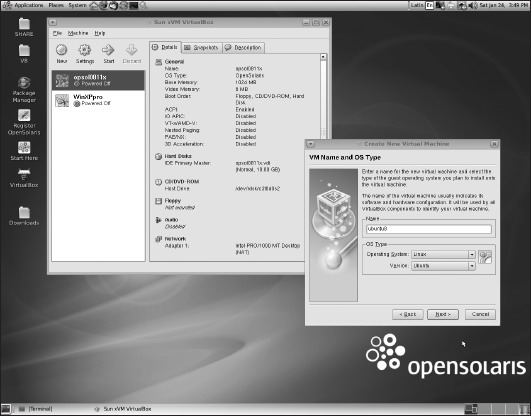
Figure 7-15. Installing a new guest VM in VirtualBox
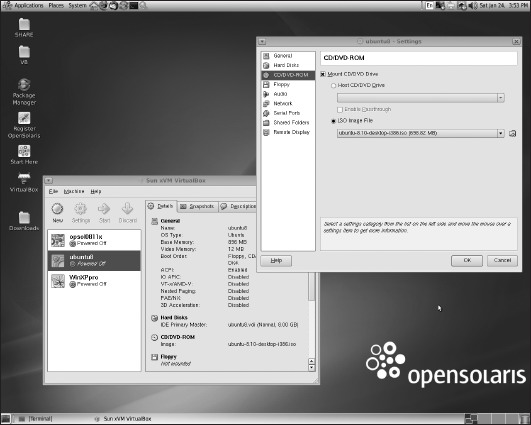
Figure 7-16. Select and mount your guest VM's CD, DVD, or .iso file.
At this point, you need to follow the installation instructions for your guest VM. After your guest(s) are installed, VirtualBox lets you start and stop them, take VM snapshots, and run guest-specific applications. By default, VirtualBox configures the guest's network interfaces using NAT so you will be able to connect to your local network from within the guests. VirtualBox also supports "not attached" mode (no network) and "host interface" mode (direct access to your host system's NIC).
Figure 7-17 shows two example guest VMs running on OpenSolaris, Windows XP Professional, and Ubuntu 8.

Figure 7-17. Running Windows XP and Ubuntu 8 guest VMs on OpenSolaris using VirtualBox
The xVM Hypervisor
The xVM hypervisor, based on OpenSolaris and Xen 3.1.4, is a Type 1 ("bare-metal") hypervisor that supports guest operating systems on Intel and AMD servers. This hypervisor has been enhanced with patches from Xen and from Sun for additional security, hardware support, stability, and DTrace probes. Sun is productizing this technology as an appliance called xVM Server, which will support Linux, Solaris, and Windows as full or paravirtualized guest VMs including support for hardware assisted virtualization. The xVM Server appliance product includes a browser-based user interface (BUI) for creating and managing guest VMs; the underlying OS and hypervisor will not be directly accessible. See http://www.sun.com/software/products/xvmserver/index.xml for the productized version that will include hardware and software support subscriptions, and see http://www.sun.com/software/products/xvmserver/faqs.xml for a comprehensive FAQ list about the product.
But there's a full community developed base for the OpenSolaris xVM hypervisor at http://opensolaris.org/os/community/xen/. It implements OpenSolaris as the privileged control domain, or Dom0, as the first VM booted by the hypervisor. You log into Dom0 to administer your virtualization environment. Commands issued from within Dom0 are used to create and manage guest operating system VMs known as user domains, or DomUs, which can be Linux, Windows, or UNIX kernels. Figure 7-18 shows the general layout of the OpenSolaris xVM environment.
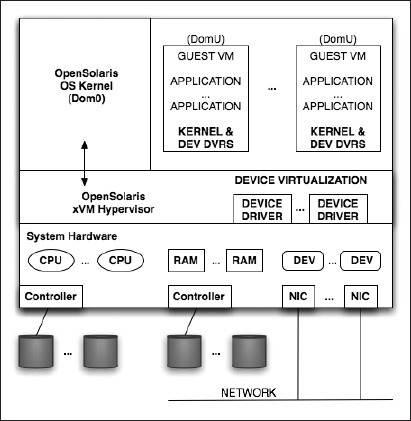
Figure 7-18. The OpenSolaris xVM hypervisor
Currently, installing and configuring the OpenSolaris xVM hypervisor is a somewhat tedious manual process; future releases of OpenSolaris are expected to include community-developed xVM Hypervisor setup and management tools similar to those planned for Sun's xVM Server product.
Installing the OpenSolaris 2008.11 xVM Hypervisor
Using the Package Manager, install the xVM virtualization files and drivers shown in Figure 7-19.
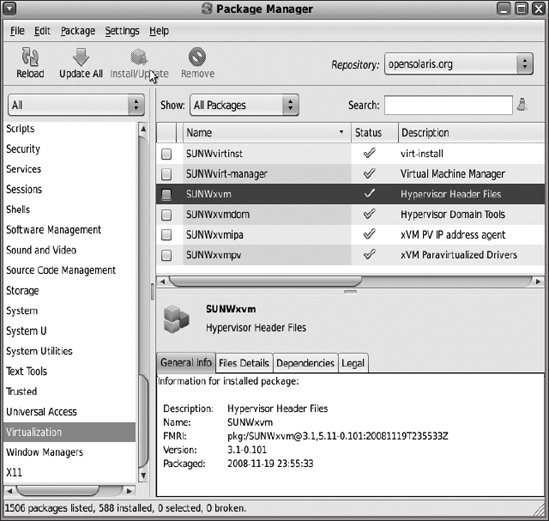
Figure 7-19. Installing OpenSolaris xVM components using the Package Manager GUI
Create a symbolic link from /rpool/boot/grub/menu.lst to /boot/grub/menu.lst:
# ln -s /rpool/boot/grub/menu.lst /boot/grub/menu.lst
then add the following to the end of the menu.lst file:
title OpenSolaris 2008.11 xVM

bootfs rpool/ROOT/opensolaris

kernel$ /boot/$ISADIR/xen.gz

module$ /platform/i86xpv/kernel/$ISADIR/unix /platform/i86xpv/kernel/$ISADIR/unix

-B $ZFS-BOOTFS

module$ /platform/i86pc/$ISADIR/boot_archive
Reboot your system, choosing the OpenSolaris 2008.11 xVM GRUB menu option. Log in again, and use the SMF svcadm command to enable the xVM services, as listed in Table 7-7.
Table 7-7. SMF svcadm Commands to Enable xVM services
| Command | Meaning |
svcadm enable store |
Creates a database to store domain configuration data |
svcadm enable xend |
Daemon used by xVM admin tools to control hypervisor |
svcadm enable console |
Enables access to guest domain (DomU) consoles |
svcadm enable domains |
Starts/stops guest domain on boot/shutdown of Dom0 |
svcadm enable virtd |
Daemon used by DomU guests to communicate with hypervisor |
Verify that these services are running using the svcs command (Figure 7-20).
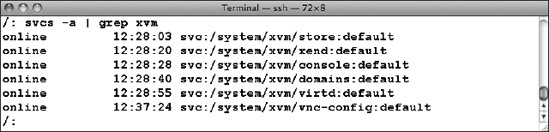
Figure 7-20. Verifying the OpenSolaris xVM services
At this point, it becomes a bit easier, because you can now use the virt-manager GUI tool to create and manage guest VMs. This tool lets you monitor existing remote and local DomU VMs, including Dom0, and steps you through the process of creating new DomUs (Figures 7-21 and 7-22).
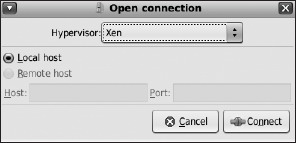
Figure 7-21. Starting the virt-manager GUI
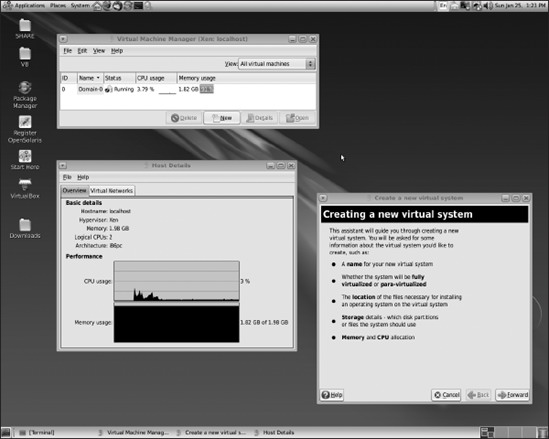
Figure 7-22. The virt-manager GUI for creating and monitoring VMs
The next series of figures outline the process for using virt-manager to add a new guest VM to the OpenSolaris Dom0.
In Figure 7-23, you select a name for your VM. Note that this name is used by the hypervisor to identify individual VMs; it is not necessarily the host name assigned to the VM, although you can use the same name if you want.
In Figure 7-24, you select a virtualization method. Currently, OpenSolaris is supported only as a paravirtualized guest.

Figure 7-23. Naming your virtual system
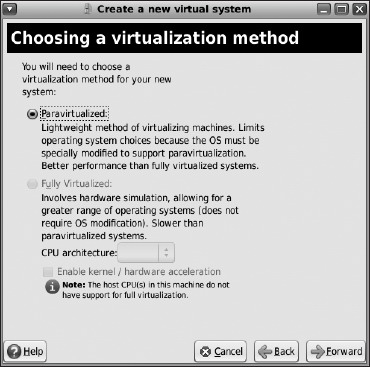
Figure 7-24. Choosing a virtualization method
Figure 7-25 shows how to indicate the location of your installation media. This location can be a locally mounted boot image or DVD (mounted in Dom0), or it can be a URL pointing to a boot image or to a kickstart file.
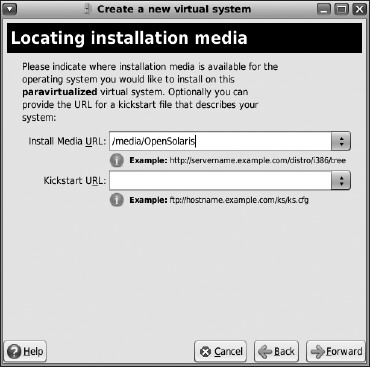
Figure 7-25. Locating the install media
You can choose to use either an existing disk partition or a disk image file as shown in Figure 7-26. You need to specify the size of the file you need for your VM's OS and applications. Note that it's a good idea while you are just experimenting to save space and don't allocate the entire virtual disk; later, when you have a better idea of your VM storage needs, you can preallocate needed space.
The next step shown in Figure 7-27 selects the network method and host NIC you want your VM to use. If you have more than one VM and more than one NIC on your system, it may be useful to spread VM network traffic over multiple NICs.
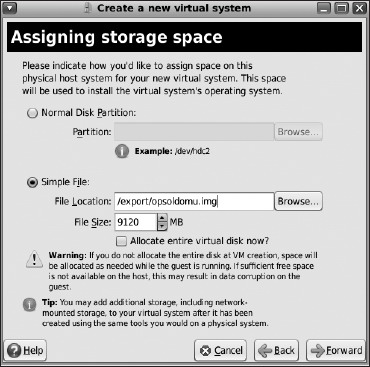
Figure 7-26. Assigning storage space
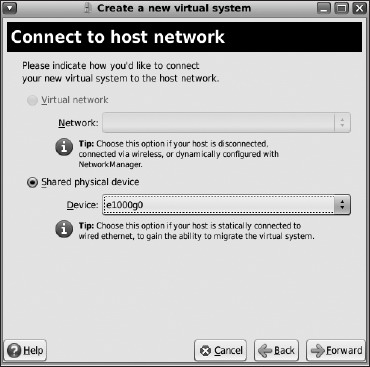
Figure 7-27. Selecting your VM's network device
In Figure 7-28 you allocate memory to your VM. Be sure to leave sufficient memory for your host domain (Dom0). If your host system has multiple CPUs (or cores), you can allocate multiple virtual CPUs for better multithread performance of your VM.
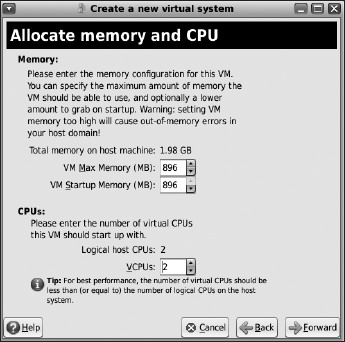
Figure 7-28. Allocating memory and CPU
You are now ready to install and start your DomU VM (Figure 7-29); virt-manager then allows you to start, stop, and monitor DomU VMs (Figure 7-30).
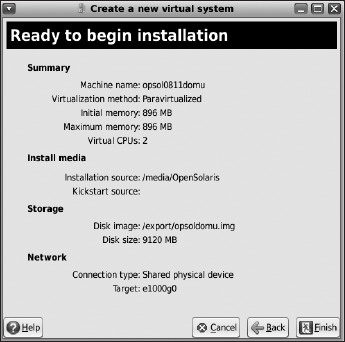
Figure 7-29. Ready to begin DomU VM installation
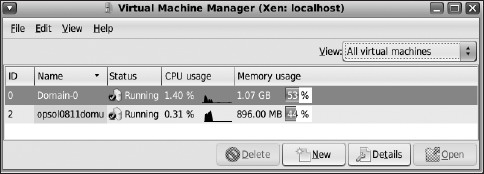
Figure 7-30. Monitoring the new DomU with virt-manager
At this point (Figure 7-29), you are ready to install the guest VM. The installation steps for the guest OS are the same as we discussed earlier, configuring the OS, host name, network address, user, and root accounts in the usual manner. The virt-manager tool then lets you start, stop, and monitor your newly installed VM.
BrandZ
Users of Solaris 10 and OpenSolaris often ask whether there's anything else besides Solaris environments that can be run in zones. Recalling that zones are not full virtual machine kernels and that they are really named and highly restricted containment areas for applications that merely look like VMs, it would appear at first that the answer is no. But it turns out that not all application environments need a full kernel to support them. They need system libraries and APIs that in theory can be provided by a different kernel than the application was compiled for. This is the basic idea behind branded zones, which allow non-native operating environments to run within an OpenSolaris zone. When an application in such a zone makes a system call, the call is intercepted and redirected to a user module from the foreign operating system. This avoids the requirement of a full VM environment to run the application.
Branded zones are now implemented in both the x86 and SPARC versions of Solaris 10. You can create a Linux, or lx, zone on x86 systems running Solaris 10 or OpenSolaris that lets you run many Linux binaries within that kind of zone. This can be useful for running applications compiled for Linux that have not yet been ported to run on OpenSolaris.
Note A Linux branded zone is not a full Linux kernel, so it cannot support Linux kernel modules, and it cannot create and use Linux-specific file systems or device drivers. This feature should be considered interesting but still experimental. Nevertheless, several useful Linux binaries have been successfully run on OpenSolaris lx zones, such as Maple and MATLAB. A list of runnable binaries that have been shown to work is here: http://opensolaris.org/os/community/brandz/applications/.
Another kind of branded zone, which we'll mention only briefly, is for Sun's UltraSPARC Sun4v processors. This allows Solaris 8 and Solaris 9 applications to run in a Solaris 10 zone and is called the Solaris 8 (or 9) Migration Assistant. Because the new UltraSPARC Sun4v processors run only Solaris 10, users of Solaris 8 and Solaris 9 could not upgrade their hardware to the new processor. So, Sun created a nominally temporary solution using branded zones, with the intent of helping users finish their migration to Solaris 10. But let's get back to Linux zones.
The OpenSolaris implementation of lx zones is still somewhat limited. It currently only supports the CentOS 3 Linux distribution in 32-bit mode; a copy of the required installation instructions and CentOS image is available on the OpenSolaris web site at http://wikis.sun.com/display/chosug/Installing+a+Linux+Zone. Creating an lx zone is similar to creating a native zone:
# pfexec zonecfg -z lzone1

lzone1: No such zone configured

Use 'create' to begin configuring a new zone.

zonecfg:lzone1> create -t SUNWlx

zonecfg:lzone1> set zonepath=/export/lzone1

zonecfg:lzone1> add net

zonecfg:lzone1:net> set address=192.168.1.205/24

zonecfg:lzone1:net> set physical=e1000g0

zonecfg:lzone1:net> end

zonecfg:lzone1> verify

zonecfg:lzone1> commit

zonecfg:lzone1> exit

#
Then download and install the CentOS image:
# cd /var/tmp

# wget http://dlc.sun.com/osol/brandz/downloads/centos_fs_image.tar.bz2

# pfexec zoneadm -z lzone1 install -d /var/tmp/centos_fs_image.tar.bz2
Boot the zone, and log in:
# pfexec zoneadm -z lzone1 boot

# pfexec zlogin lzone1
The results of this process are shown in Figure 7-31. You are now in a Linux zone, and you can load and run almost any user application that runs on CentOS 3.
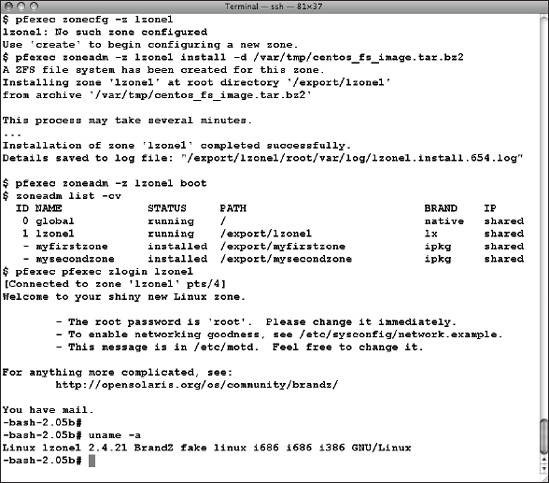
Figure 7-31. Installing a Linux (lx) zone on OpenSolaris
One long-missing application from Solaris 10 and OpenSolaris for Intel/AMD is Adobe's PDF reader, acroread. A blog on Adobe's web site reported in March 2008 that the reader will be available for Solaris and OpenSolaris some time in 2009. It is available for Linux, however, and if you don't like running OpenSolaris's evince PDF reader, you can download acroread for Linux and run it in an lx-branded zone. Like any other zone, you access it with TCP/IP communication tools. In the previous example, you can log in to the zone (using its IP address, or using its host name if you've added it to your global hosts file) using ssh and X11 forwarding, as shown in Figure 7-32. Note that upon login to lzone1, we verified that we were in a Linux environment (using uname -a) and then ran the Linux version of acroread to view a local PDF file (opensolaris_datasheet.pdf). You can run other applications in this manner, including of course any of the X11 applications (such as xcalc in the example) on the installed version of Linux. Also note (in the smaller terminal window) that the global zone has access to the local zone's file system and that the global zone administrator could copy files into any local zone directory. This is not advisable, however, and a better practice is to create a sharable global zone file system that can be mounted by the local zone.
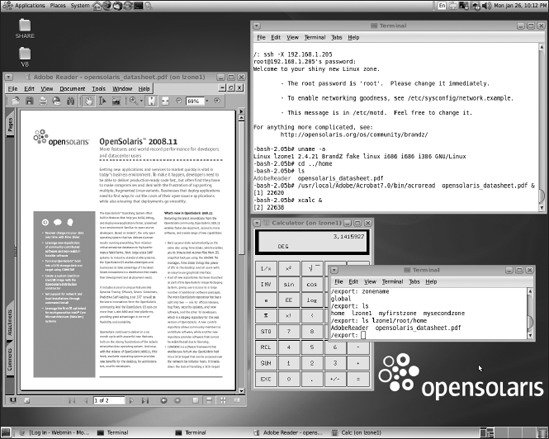
Figure 7-32. Running the Linux versions of acroread and xcalc in an lx-branded zone and displaying on the global zone desktop using X11 forwarding
LDoms
With the coming release of OpenSolaris 2009.06 you will begin to see support for OpenSolaris on SPARC processors. This will be a significant development when there is full support for the UltraSPARC Sun4v processor family. These processors have multiple CPU cores with multiple independently executable threads per core. For example, the Ultra-SPARC T2 processor chip (http://www.sun.com/processors/UltraSPARC-T2/) has 8 cores with 8 threads per core; Solaris 10 now and OpenSolaris in future releases see the equivalent of 64 CPUs when running on these chips. Sun has created a virtualization technology for these "CoolThreads" processors called LDoms (for logical domains). In brief, this includes a SPARC-based hypervisor, not unlike the Xen architecture, that allows Solaris or OpenSolaris VMs to be created on groups of processor threads.
There is already an active LDom developer community at http://opensolaris.org/os/community/ldoms/ that is studying and contributing to the open source LDoms code base for Solaris 10 (Figure 7-33). Watch this site for more news about LDoms support in OpenSolaris.
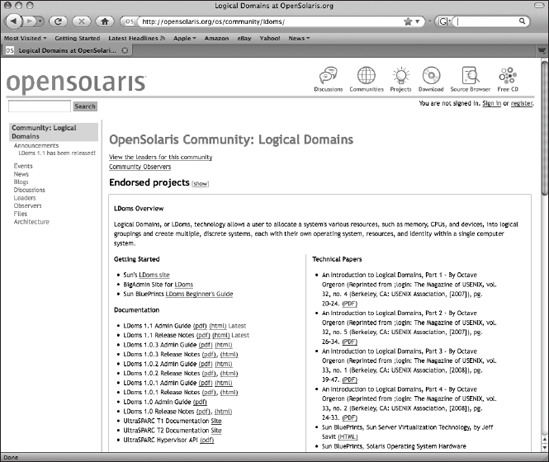
Figure 7-33. The OpenSolaris LDoms community web site
Summary
OpenSolaris provides a number of choices for virtualized environments, including zones, branded zones (Linux), desktop OS virtualization (VirtualBox), and server virtualization (xVM Hypervisor), with more to look forward to in future releases (LDoms for SPARC). Your choice depends on the number and type of virtual environments you need and on the number of such environments your system can support. OpenSolaris containers are lightweight and efficient but are somewhat limited in the variety of application/OS combinations they can support. If you need to run more than one type of kernel, a hypervisor approach is more appropriate.
We've now completed our introduction and review of OpenSolaris's special features. In Chapter 8, we'll put them all together for some practical web development examples.