CHAPTER 8
A Development Environment on OpenSolaris
Developer, n: an organism that turns coffee into software.
—Author Unknown
Not terribly long ago, if a developer had wanted to load a development environment on her laptop, she could count on spending half a day building the operating system and another half a day getting and loading her tools, compilers, scripting languages, and database. If she were a casual tinkerer or a beginner, add another day for figuring out where all the knobs are and reading the manuals. By the time she's ready to get down to business, her flash of inspiration may well have smoldered down to embers, or worse, the idea of having to go through with the build is so wearying that our budding developer chucks it all in disgust.
Tools that are accessible get used most often—in fact, that's the first rule of the wood shop. OpenSolaris has made itself extremely accessible to the developer, whether you are developing in C, developing in Java, or building web infrastructures and database applications. You can have a full-featured developer's "wood shop" in about 90 minutes.
Note It helps to provide a little perspective: we remember loading Solaris (the progenitor of OpenSolaris); b-splitting device drivers and schlepping them onto the hard drive via thumb drives; and downloading gcc and updated versions of Perl, ssh, and gtk+. All of that and more was done manually over a very long weekend. With OpenSolaris, there are fewer war stories.
Introducing the Web Stack and AMP
Web development used to mean many things, from graphics design and layout to the actual coding of the engine behind the web page. The end result is a construct that follows this pattern: a browsable, interactive front end; a database back end to store the input; and a programming-logic middle to manage the data. For example, you might issue a database query for audio files that match a certain characteristic, sort them, generate a web page for them to appear on, and stream them in a certain format.
Regardless of the web application and other technology factors, anything that does something useful via a browser loosely follows this design pattern. In fact, web commerce in its heyday was described as using a three-tier architecture, and most web development was geared toward developing an e-commerce site. This design pattern is now more familiarly known as the web stack.
The web stack comprises three parts: the web server front end, the programming-logic middle, and the database back end. The tools dominating each niche are Apache, Perl, PHP (or any other popular scripting language), and MySQL. Thus, it's called AMP—or LAMP if the operating system underneath it all is Linux. The web stack has undergone hybridization as it is being used; AMP is no longer strictly limited to its eponymous part. That is, PostgreSQL can stand in for MySQL, and Ruby can stand in for PHP; you may even have seen references to the LAMR stack.
Getting the AMP Stack
On your OpenSolaris desktop, open the Package Manager (IPS) GUI. The plain-vanilla AMP stack is called, not so surprisingly, amp. Your other choice is the amp-dev stack. Select the box next to the amp-dev package, and click the Install/Update icon; or, select Package ![]() Install/Update from the drop-down menu, as shown in Figure 8-1.
Install/Update from the drop-down menu, as shown in Figure 8-1.
You will be asked to confirm this action, as shown in Figure 8-2.

Figure 8-1. Selecting the amp-dev package for installation

Figure 8-2. Confirming installation of the amp-dev package
Taking a Tour of the Command-Line Package Manager
For the inveterate command-line user, the command behind the IPS GUI is pkg. Here's an example of searching for a package from a remote image repository:
# pkg search -r amp
INDEX      ACTION    VALUE PACKAGE

description set       AMP   description set       AMP

pkg:/[email protected]

description set       AMP   pkg:/[email protected]

description set       AMP   pkg:/[email protected]
pkg:/[email protected] is an example of a Fault Management Resource Identifier (FMRI), which you encountered in Chapter 5. Incidentally, FMRI is also used to identify hardware components in the Fault Management Architecture, part of OpenSolaris. pkg is the scheme. What follows up to the @ sign is the name of the package and then the component version, build number (which matches the output of uname -r), and branch number. The last of these is the timestamp. You will see multiple, and seemingly identical, returns from pkg search; in fact, these are all different packages with their FMRIs abridged. For the full FMRI, run this:
# pkg info -r amp-dev
                Name: amp-dev

             Summary: AMP Development cluster

            Category: Development/Integrated Development Environments

               State: Installed

           Authority: opensolaris.org

             Version: 0.5.11

       Build Release: 5.11

              Branch: 0.101

      Packaging Date: Wed Dec 10 00:46:05 2008

                Size: 0.00 B

                FMRI: pkg:/[email protected],5.11-0.101.20081210T004605Z
The package version returned is always the most recent package. You should not have to interpret what these numbers really mean, because the FMRI uniquely identifies the package for the purposes of repair and update. You can also search the IPS repository at http://pkg.opensolaris.org.
You may be curious as to what the difference is between the two packages amp and amp-dev. They are both metapackages, or package clusters. This means they contain only other packages. Installing a metapackage installs the packages on which they depend. You can leverage this knowledge and look at their dependencies to see which other packages constitute amp and amp-dev. Here are the amp-dev contents:
# pkg contents -m amp-dev
depend [email protected] type=require

depend [email protected] type=require

depend fmri=netbeans type=require

depend [email protected] type=require

depend [email protected] type=require

depend [email protected] type=require

depend [email protected] type=require

depend [email protected]. type=require

depend [email protected] type=require

depend [email protected] type=require

depend [email protected] type=require

depend [email protected] type=require

depend [email protected]. type=require

depend [email protected] type=require

depend [email protected] type=require

depend [email protected] type=require

depend [email protected] type=require

depend [email protected] type=require

depend [email protected]. type=require

depend [email protected] type=require

depend [email protected]. type=require

depend [email protected] type=require
Running the same command for the amp package shows that it has only the basic Apache, MySQL, and PHP packages, with a few Apache plug-ins. amp-dev provides all of this, as well as Tomcat, NetBeans, the Squid proxy, CVS, Mercurial version control, and much more.
The CLI command equal to the action you've taken with the Package Manager GUI is as follows:
# pkg install amp-dev
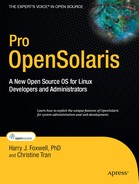
Next, you need to initialize your web stack for your workspace. You are logged in as the RBAC profile Primary Administrator, and you have assigned root as a role. You must modify some root-owned files' attributes to enable you to work with them. The RBAC profiles and authorization tokens for these new services also have to be added. The initialization also adds items under the Developer Tools ![]() Web Stack Admin menu drop-down. You can see this in Figure 8-3.
Web Stack Admin menu drop-down. You can see this in Figure 8-3.
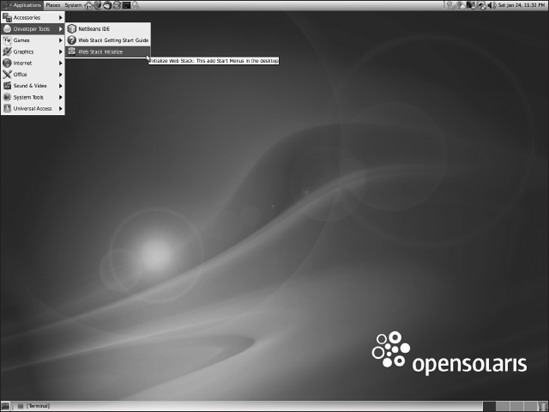
Figure 8-3. Initializing the web stack
You will see the web stack initialization in a terminal window, as shown in Figure 8-4. Figure 8-5 shows the new menu after initialization.
Note ZFS implements extended ACL, sometimes called NFSv4-style ACL but more precisely described as ACL based on the Posix-draft specification. getfacl(1) does not work; you need ls –v to view extended ACL. Be careful, and check your path. If you take the default login environment without making any modifications, most likely /usr/gnu/bin will be ahead of /usr/bin and you are using GNU ls. The GNU ls –v switch does something entirely different from the Solaris ls –v switch, which is located in /usr/bin.
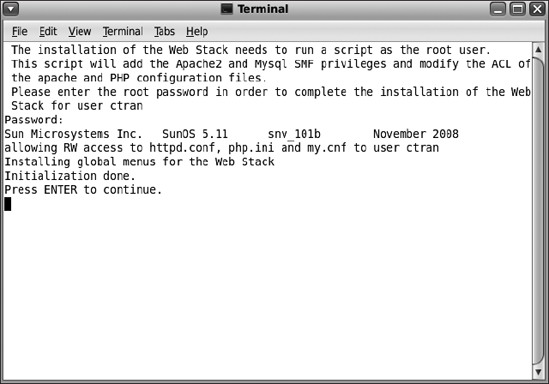
Figure 8-4. Script initializing web stack
You can see the difference in the following example:
ctran@ender:/etc/apache2/2.2$ cd /etc/apache2/2.2

ctran@ender:/etc/apache2/2.2$ ls -v httpd.conf
httpd.conf
ctran@ender:/etc/apache2/2.2$ which ls
/usr/gnu/bin/ls
ctran@ender:/etc/apache2/2.2$ /usr/bin/ls -v httpd.conf
-rw-r--r--+ 1-root   bin    13335 Jan 25 00:05 httpd.conf

     0:user:ctran:write_data:allow <-- user ctran allowed to write to file

     1:owner@:execute:deny

     2:owner@:read_data/write_data/append_data/append_data/write_xattr/write_attributes

         /write_acl/write_owner:allow

    3:group@:write_data/append_data/execute:deny

    4:group@:read_data:allow

    5:everyone@:write_data/append_data/write_xattr/execute/write_attributes

        /write_acl/write_owner:deny

    6:everyone@:read_data/read_xattr/read_xattr/read_attributes/read_acl/synchronize

        :allow
Figure 8-5. New menus after web stack initialization
Note You are installing a development environment, which is quite different from a production environment in aspects of security, manageability, customization, and so on. Typically, production-environment Apache runs as the UNIX user webadmin or webservd group, and MySQL runs as the UNIX user mysql. It has not been good practice to run these services as root for a long time. You will need to develop your own method for deploying your newly minted web application onto a production server. For a production server, we do not advise you to use chmod httpd.conf to give a number of users rights to modify it, as our example here showed.
At this point, you can start up your Apache and MySQL servers by selecting from the drop-down menu. Alternatively, you can issue the following commands:
# svcadm enable apache22

# svcadm enable mysql
Even though the full FMRI is svc:/network/http:apache22 and svc:/application/database/mysql:version_50, SMF operates on the first unique match principle, so apache22 and mysql are OK (however, http is not, because there is an instance of http:squid).
You can view the process ID (PID) and contract ID (CTID) of these services by running this:
# svcs -pv apache22
STATE    NSTATE      STIME    CTID    FMRI

online   -            1:03:06     153 svc:/network/http:apache22

          1:03:06   4463 httpd

          1:03:07   4476 httpd

          1:03:08   4477 httpd

          1:03:08   4478 httpd

          1:03:08   4479 httpd

          1:03:08   4480 httpd

          1:03:08   4481 httpd
# svcs -pv mysql
STATE     NSTATE    STIME  CTID FMRI

online    -          1:03:06  154

 svc:/application/database/mysql:version_50

                1:03:06     4472 mysqld
At this point, you have a vanilla AMP environment on which you can begin building your web app. Beginners and tinkerers can choose to create and load a very simple AMP example, built with PHP, jMaki, and MySQL, under the Sample App menu.
Making a Case for Containers
Before you open the valves and steam full-speed ahead with the AMP stack you've just loaded, perhaps you want to build your application inside an OpenSolaris container. You can refer to Chapter 7 for discussions on zones and virtualization. Here are the reasons why you should consider running your application inside a zone:
- Fault and resource isolation: Zones are designed to be logically isolated from other zones, and software faults in one zone have no impact on any other zone. If you impose zone resource control, you also limit the impact of a resource-hogging application on other applications. You can also allocate separate storage space to each zone and not worry about which application is overusing its allotment.
- Security isolation: Zones are execution environments bounded by a reduced set of privileges. A process executing in a zone cannot escalate its privileges to access data in any other zone. For example, say a security vulnerability is discovered in an application. If the application is run in the global zone, the exploit will affect the entire system. If the application is run in a nonglobal zone, any effect from the exploit is limited to the nonglobal zone only.
Caution There are cases when a zone is delegated an entire physical device such as tape, disk, or CD-ROM drive, as opposed to giving the zone limited access to an LOFS file system. This will present opportunities for faults incurred by the device to affect the entire platform. In general, we don't recommend this practice. We prefer delegating file systems instead of raw devices. If you've ever wondered what the zone configuration directive add options [rw,nodevices] is for, the mount option nodevices stops the zone from opening any device node present on the mount.
- Delegation: You can delegate the administrative and management function of an application running in a zone to a set of administrators with superuser privileges in the zone but not the entire system.
- Scalability: While you're building your application on a desktop or laptop platform, you may not yet be thinking of the day when your brainchild becomes a breakaway success and it's no longer feasible to run everything on a single platform. If you compartmentalize your web stack and build within a container, you will be able to horizontally scale your application. Anywhere you are able to deploy a zone, you will be able to run your application. Recently, a federated database model, sometimes referred to as data sharding, has been employed with some success. The idea behind data sharding is to separate, or "shard," the data into many parallel databases, called silos. Each connection will be directed to the silo containing the data it needs, instead of to a single database server or a number of replicated database servers containing all data. A zone is a very good solution for this architecture without incurring an additional hardware cost.
- Portability: Zones can be quickly built and torn down without much administrative overhead. If you take steps to ensure your web stack can run within a zone, your application will run anywhere you can export or rebuild the zone. NAS and SAN storage have been used creatively to provision zones and applications on the fly. For example, build a zone on a NAS or SAN that is accessible by multiple hosts. The zone can be detached from one host and attached to another, and within minutes the application can be provisioned on a different host. For the same reason, zones make efficient test and staging environments to pilot new applications or test code changes.
Building Applications for a Container Environment
We said that zones are virtual OS instances with a reduced set of privileges. For this reason, some actions possible in the global zone will not be permitted in a nonglobal zone. Let's examine how this works to come to a better understanding about why things behave the way they do in a zone.
Introducing Zones and Discrete Privileges
The OpenSolaris access control model differs from traditional Solaris (up to SunOS 5.9) in that Solaris used the UID to determine who has the privilege to do what. Processes running with UID 0 have unlimited privileges to the system. Processes running with UID not equal to 0 have privileges to their own files and directories, as well as files and directories accessible by their GIDs. This was the reason why the SUID bit was so dangerous. OpenSolaris breaks the omnipotent root powers down to 74 discrete privileges, enforceable by the kernel at runtime. Formally, this is referred to as process rights management. Note the word process. The privileges are enforced not at the user level but at the process level. We'll talk more about this in the "Installing Tomcat in a Container" section.
You can read the privileges(5) man page for the description of all the available privileges. Take, for example, the privilege PRIV_FILE_DAC_READ. A process running with this privilege is able to read directories and files it doesn't own; more precisely, a user running a process with PRIV_FILE_DAC_READ can read files that user doesn't own. Enforcement on reading files is no longer "Is UID == 0?" Rather, it is "Does the process have the correct privilege?"
You can view all available privileges with this:
# ppriv -l
To view privileges in a zone, log in to the zone, and run this:
# ppriv -l zone
To view the description of a privilege, such as proc_clock_highres, run this:
# ppriv -lv proc_clock_highres
proc_clock_highres

        Allows a process to use high resolution timers.
Note the difference between the number of privileges between the global zone and the nonglobal zone. Privileges for nonglobal zones—more precisely, privileges for processes running in a nonglobal zone—are restricted to maintain isolation between zones as well as to prevent an action in a zone from having a system-wide impact. An upper limit is set for these privileges to prevent zones from escalating their own privileges.
You will read about DTrace in the next chapter, but for now, notice that no DTrace privileges appear in the zone list of privileges. By default, you cannot use DTrace in a zone; however, you can change this provided you add a couple of privileges. They are PRIV_DTRACE_PROC and PRIV_DTRACE_USER. Add the following to the zone using zonecfg, and reboot the zone:
# zonecfg -z myzone set limitpriv=default,dtrace_proc,dtrace_user
It's not just a matter of picking out privileges to grant to a zone, cafeteria-style. There are privileges that a zone will never be able to assert, such as PRIV_DTRACE_KERNEL. A zone that can read kernel-level data would violate every principle of containment and isolation.
Qualifying Your Application for Zones
So, what does all this mean for the web app you're building? There are things that your application should take care not to do. At one time, there was a dependable list of privileges not available in a nonglobal zone, such as PRIV_NET_RAWACCESS, which allows a zone to directly access the network layer. That limitation went away when a zone of ip-type "exclusive" was integrated. At one time it was not possible for a zone to assert PRIV_SYS_TIME to change the system clock; now it's a usage example in the OpenSolaris documentation. With future versions of OpenSolaris, even more restrictions may be lifted, with caveats. Although there is no hard rule about this, here are a couple of things to keep in mind:
- Unless your zone is of ip-type "exclusive," you cannot access the raw network device, plumb interfaces, modify routing tables, use
snoop, or modify attributes of/dev/ip. - Zones can't access
/dev/kmemor load or unload kernel modules. - Zones can't modify processor sets, create device special files, or manipulate platform configuration.
- A global zone and a nonglobal zone on the same system may not be the NFS client of the same NFS server.
This is a swiftly moving area, and the thing to keep in mind is this: will the action of my application have an unexpected and deleterious effect on another nonglobal zone or the system? When in doubt, be conservative.
A tool called srcheck can help you determine whether what you want to run in a zone will work. It scans the source code for API calls that are not permitted in a zone. This tool is somewhat dated, and given how quickly things can change on OpenSolaris, use it with caution.
You can get the Solaris Ready Test Suite 1.2 here:
https://cds.sun.com/is-bin/INTERSHOP.enfinity/WFS/CDS-CDS_Developer-Site![]()
/en_US/-/USD/ViewProductDetail-Start?ProductRef=srcheck1.2-G-F@CDS-CDS_Developer
You will find a guide for srcheck and examples at http://developers.sun.com/solaris/articles/zone_app_qualif.html.
Installing Tomcat in a Container
Create and install a zone. Refer to Chapter 7 for how to do this. Remember that OpenSolaris implements ZFS for the root file system, so create a ZFS file system for the zone first:
# zfs create rpool/zones

# zonecfg -z web

...

# zoneadm -z web install
A ZFS file system has been created for this zone.

  Authority: Using http://pkg.opensolaris.org/release/.

      Image: Preparing at /zones/web/root ... done.

      Cache: Using /var/pkg/download.

 Installing: (output follows)

DOWNLOAD                                   PKGS      FILES     XFER (MB)

SUNWipkg                                   7/52  2406/7862 10.87/72.41 Installed

Completed                                 52/52  7862/7862   72.41/72.41

PHASE                                       ACTIONS

Install Phase                           12939/12939

PHASE                                         ITEMS

Reading Existing Index                          9/9

Indexing Packages                             52/52
Note If you're familiar with zones on Solaris 10, you may notice that the zone brand is not type native and that the zone installation actually pulls packages from http://pkg.opensolaris.org instead of copying them locally. ipkg-branded zones are independent of the global zone, and packages you've pulled for the global zone will not be installed in ipkg-branded zones. This is why, if you've already installed amp-dev into your global zone, it will not be automatically installed in any nonglobal zone you create.
For identification purposes, we're installing Tomcat into a zone called web. Log in, and install the IPS package SUNWtcat. You may have to tweak the network configuration inside the zone; for example, modify /etc/nsswitch.conf and /etc/resolv.conf to add name service for your network. Needless to say, the network connection inside your zone must be a working one so you can access the OpenSolaris package repository.
# zlogin web

root@web:~# pkg info -r SUNWtcat
          Name: SUNWtcat

        Summary: Tomcat Servlet/JSP Container

       Category: Web Services/Application and Web Servers

          State: Not installed

      Authority: opensolaris.org

        Version: 5.5.27

  Build Release: 5.11

         Branch: 0.101

 Packaging Date: Wed Nov 19 23:03:01 2008

           Size: 24.56 MB

           FMRI: pkg: /[email protected],5.11-0.101:20081119T230301Z
root@web:~# pkg install SUNWtcat
Refreshing Catalog 1/1 opensolaris.org

DOWNLOAD                                 PKGS      FILES    XFER (MB)

SUNWtcat                                  0/1   900/2382   7.55/10.72

Completed                                 1/1  2382/2382   10.72/10.72
Tomcat 5.5.27 runs on J2SE 5.0 or newer. If you just want to run Tomcat, you need only the JRE. If you plan on developing with Java, you'll want to install the entire JDK. A search of the package repository turns up only SUNWj6rt, so we'll install that along with SUNWtcat.
There exists a reserved UID:GID, webservd:webservd, traditionally used to run Apache. You can run Tomcat under this UID. If you are concerned about the separation of administrative functions in case you want to run another instance of Apache, create another user to run Tomcat. We like to keep a tidy passwd file, so we use the existing account webservd and change the home directory to /var/apache. Then we need to set some Tomcat environment variables.
root@web:~# usermod -d /var/apache -s /usr/bin/bash webservd
root@web:/var/apache# cat .bash_profile
# .bash_profile

if [ -f ~/.bashrc ]; then

   source ~/.bashrc

fi
root@web:/var/apache# cat .bashrc
PS1='$PWD:'

CATALINA_HOME=/usr/apache/tomcat

CATALINA_BASE=/var/apache/tomcat

JAVA_HOME=/usr/jdk/jdk1.6.0_10

export CATALINA_HOME CATALINA_BASE JAVA_HOME

PATH=$PATH:$JAVA_HOME/bin:$CATALINA_HOME/bin
If you have worked with Tomcat in a single directory hierarchy such as /opt/apache/tomcat, you will find that the Tomcat version distributed by Sun follows the Filesystem Hierarchy Standard (which can be found at http://www.pathname.com/fhs/). SUNWtcat splits the bin and conf directories under /usr/apache/tomcat/bin and /var/apache/tomcat/conf.
Note Shells and UNIX flavors are funny things. Sometimes a big headache can be relieved (or be brought on) by a subtle distinction. The UNIX user webservd account is marked as *LK* in /etc/shadow. If you want this user to be able to run cron jobs, change *LK* to NP. .bash_profile is sourced for login shells, while .bashrc is sourced for nonlogin shells. You need .bashrc because Tomcat will be started from a nonlogin shell by SMF, not a login shell. This will apply only if you are using bash; if you're using another shell, know how that shell sources profiles and sets environment variables.
You may want to enable SSL for Tomcat. This process is similar to how it's done on other UNIX platforms. If you have elected to use a directory such as /var/apache or /usr/apache as the home for the user webservd, you need to modify the directory to enable webservd and put a .keystore file there.
root@web:~# chmod -R A+user:webservd:add_file/write_data/execute:allow /var/apache

root@web:~# $JAVA_HOME/bin/keytool -genkey -alias tomcat -keyalg RSA
Enter keystore password:  changeit

Re-enter new password: changeit

What is your first and last name?

  [Unknown]:  Christine Tran

What is the name of your organizational unit?

  [Unknown]:  Sandwich Ninja

What is the name of your organization?

  [Unknown]:  Apress Books

What is the name of your City or Locality?

  [Unknown]:  Washington

What is the name of your State or Province?

  [Unknown]:  DC

What is the two-letter country code for this unit?

  [Unknown]: US

Is CN=Christine Tran, OU=Sandwich Ninja, O=Apress Books, L=Washington,

ST=DC, C=US correct?

  [no]:  yes

Enter key password for <tomcat>

    (RETURN if same as keystore password):  [RETURN]
Modify /var/apache/tomcat/conf/server.xml to uncomment the SLL connector port. You can add an ACL for webservd to be able to modify server.xml if you are editing files as webservd. You can comment out the non-SSL connector on port 8080 if you want.
root@web:~# vi /var/apache/tomcat/conf/server.xml
<!-- Define a SSL HTTP/1.1 Connector on port 8443 -->

<Connector port="8443" maxHttpHeaderSize="8192"

           maxThreads="150" minSpareThreads="25" maxSpareThreads="75"

           enableLookups="false" disableUploadTimeout="true"

           acceptCount="100" scheme="https" secure="true"

           clientAuth="false" sslProtocol="TLS" />
If you want to start Tomcat as user webservd, you need to do this:
# usermod -K defaultpriv=basic,net_privaddr webservd
Referring to the discussion on privileges (in the "Introducing Zones and Discrete Privileges" section), you are assigning an additional privilege to user webservd, named net_privaddr. You can see this change in /etc/user_attr. To get a description of the privilege netprivaddr, run:
# ppriv -lv net_privaddr
net_privaddr

        Allows a process to bind to a privileged port number. The privilege port

numbers are 1-1023 (the traditional UNIX privileged ports) as well as those

ports marked as "udp/tcp_extra_priv_ports" with the exception of the ports

reserved for use by NFS.
Although we have configured Tomcat to listen on 8080 and 8443 for non-SSL and SSL connections, respectively, it's a good idea to give this privilege to webservd in case you decide to add other web server instances or user different ports later. It will save head scratching should you decide to fire up an instance of Apache 2 on port 80.
Note Although we add or take away privileges from the user, they are enforced on the process. This is a subtle but important distinction. The user does not have privileges; the processes the user starts inherit their privileges from their privilege profile. You can also add or take away privileges from a process itself, but this method is only good for that process and for the duration of that process.
At the time of this writing, SUNWtcat does not come with an SMF manifest. You can find a basic Tomcat manifest, tomcat5.xml, along with all the source code on this book's page on the Apress web site (http://www.apress.com). A few things from that file deserve more attention.
Typically, HTTP services put their manifests in /var/svc/manifest/network, and their service names are under the network functional category. For example:
# svcs -a|grep http
disabled     Jan_19  svc:/network/http:squid

online       Jan_25  svc:/network/http:apache22
The Apress manifest puts the service into /var/svc/manifest/site, and the name of the service will be svc:/site/http:tomcat5. This is done with this line in the file:
name='site/http'
We do this to prevent the possible collision of the manifest with future manifests for Tomcat 5, should the OpenSolaris community decide to bundle one with the next version of the SUNWtcat package.
The start method includes a block to add the net_privaddr privilege, but not the stop method. That's because when Tomcat shuts down, it does not need to bind to a privileged port. SMF starts Tomcat as the user webservd; but with privileges explicitly assigned, you can run as root if you want. Still, if the sight of a slew of httpd processes running as root gives you heart palpitations before remembering that it's all done with discrete privileges now, run as webservd to be consistent with current practices. The following code snippet shows the start and stop methods for Tomcat 5:
<exec_method

    type='method'

    name='start'

    exec='/opt/apache/tomcat/bin/startup.sh'

    timeout_seconds='60' >

    <method_context>

    <method_credential user='webservd' privileges='basic,net_privaddr'/>

    </method_context>

</exec_method>
Every time a spawned httpd process exits, SIGCHILD is sent to the parent process. SMF interprets any external signal sent to a service as an error and restarts the service. Likewise, if a process core dumps, SMF will restart the service. The following snippet tells SMF to ignore these conditions and not to restart Tomcat:
<property_group name='startd' type='framework'>

<propval name='ignore_error' type='astring'

    value='core,signal' />

</property_group>
Before importing your SMF manifest, you should start Tomcat manually to ensure that it works on its own before sending it off to SMF. Start it as the user webservd, and also remember that webservd will need permission to write into /var/apache to create and write logs. You can do this with ZFS ACL. If you've gone through the key-generating step, you've done this already.
root@web# su - webservd
Sun Microsystems Inc. SunOS 5.11 snv_101b November 2008
webservd@web$ /usr/apache/tomcat/bin/startup.sh
Using CATALINA_BASE:   /var/apache/tomcat

Using CATALINA_HOME:   /usr/apache/tomcat

Using CATALINA_TMPDIR: /var/apache/tomcat/temp

Using JRE_HOME:        /usr/jdk/jdk1.6.0_10
There should be a process listening on port 8080:
webservd@web$ netstat -an|grep 8080
*.8080 *.* 0 0 49152 0 LISTEN
Now, from another computer (which could even be the global zone), open a browser and point to http://web:8080. You should be greeted with the Apache Tomcat/5.5.27 welcome page. Success!
Get the tomcat5.xml file from this book's home page on the Apress web site. Put it in the /var/svc/manifest/site directory, and import it. Before working with this manifest, remember to manually shut down the Tomcat process you just started. You will have to do the following as root, in the zone web:
root@web# svccfg import tomcat5.xml
Now you have an imported service in the disabled state:
root@web# svcs -v tomcat5
STATE     NSTATE   STIME   CTID  FMRI

disabled  -        15:43:15     - svc:/site/http:tomcat5
Enable the service, and the -pv switch shows the contract ID as well as the process ID of any process running within the service. Here, the PID 12301 is the Java process running under the Tomcat service:
root@web# svcadm enable tomcat5

root@web# svcs -pv tomcat5
STATE      NSTATE     STIME  CTID   FMRI

online     -          15:43:29  475 svc:/site/http:tomcat5

           15:43:29 12301 java
Installing MySQL
MySQL installs in /usr/mysql and /var/mysql. You'll find sample config files and my.cnf in /etc/mysql. The user and group mysql:mysql have already been created and own the data directory in /var/mysql. It installs with an SMF manifest and method. This must come as a refreshing breath of fresh air to DBAs turned reluctant systems administrators who have had to install MySQL, make the data directories, modify config files, add users, and grant privileges—and that's before any real database administration!
Still, there are a few things to be done. The default my.cnf is copied from my-small-cnf.cnf. You'll need to change this if your database is large and your system memory allows for more than 64MB.
Common and accepted practice suggests that you have created the data, administration, binary log, and backup directory. Some directories are implicit. For example, the data directory for this installation is /var/mysql/5.0/data, but the variable datadir is not set in my.cnf. We make it a habit to spell out everything, even when unnecessary. The variables serve as comments in the config file and save us time in hunting down the location of our directories. Add the following lines to my.cnf, under the MySQL server block:
# The MySQL server

[mysqld]

...

basedir=/usr/mysql/5.0 # Where MySQL is installed

datadir=/var/mysql/5.0/data # data directory were user mysql has write access

log-error=/var/mysql/5.0/data/errors/mysql5.0.err # MySQL error

log-bin=/var/mysql/5.0/data/dbbinlog/mysql-bin # MySQL binary log

log=/var/mysql/5.0/data/querylog $ MySQL query log
You need to create the errors and dbbinlog directories. The query log is optional. Use caution when you turn query logging on; it's not recommended for a production environment. Logs grow without bounds unless you explicitly tell MySQL to stop logging queries. If you forget to turn this off on an active database server, you can run out of disk space and into trouble very quickly.
Note Runtime options to mysqld invoked at start time override the variables set in my.cnf. For example, had you set pid-file=/var/tmp/foo.pid, it would not have taken effect, because the MySQL method invokes mysqld with --pid-file=${PIDFILE}, where ${PIDFILE} happens to be /var/mysql/5.0/data/$hostname.pid.
Enable MySQL. The SMF manifest starts mysqld as the user and group mysql:mysql. Check that the database is functioning and answering queries:
root@ender:# svcadm enable mysql

root@ender: # su - mysql

mysql@ender$ /usr/mysql/bin/mysqladmin status
Uptime: 1154 Threads: 1  Questions: 2  Slow queries: 0  Opens:

12  Flush tables:1  Open tables: 3  Queries per second avg: 0.002
Set a password for mysqld. Here we are setting the password for the user root at localhost:
root@ender:# /usr/mysql/bin/mysqladmin -u root password 'mysql'
Alternatively, you can run this:
root@ender:# /usr/mysql/bin/mysql_secure_installation
[Output has been truncated for brevity.]
To log into MySQL to secure it, you'll need the current password for the root user. If you've just installed MySQL and you haven't set the root password yet, the password will be blank, so you should just press Enter here:
Enter current password for root (enter for none): mysql
Setting the root password ensures that nobody can act as the MySQL root user without the proper authorization.
You already have a root password set, so you can safely answer with an n.
Change the root password? [Y/n] n

Remove anonymous users? [Y/n] Y

Disallow root login remotely? [Y/n] Y

Remove test database and access to it? [Y/n] Y

Reload privilege tables now? [Y/n] Y

Cleaning up...
All done! If you've completed all the previous steps, your MySQL installation should now be secure.
To see the current user list for MySQL, run this:
mysql@ender$ /usr/mysql/bin/mysql -u root -p
Enter password: mysql

Welcome to the MySQL monitor. Commands end with; or g.

Your MySQL connection id is 19

Server version: 5.0.67-log Source distribution

mysql> select User,Host,Password from mysql.user;

+------+-----------+-------------------------------------------+

| User | Host      | Password                                  |

+------+-----------+-------------------------------------------+

| root | localhost | *E74858DB86EBA20BC33D0AECAE8A8108C56B17FA |

+------+-----------+-------------------------------------------+

1 row in set (0.00 sec)

mysql> exit;
In the previous example, you are UNIX user mysql, connecting to the database as user root. The -p prompts you for a password. Checking the user list, you can see that the only user allowed access to the database is user root at localhost. You can commence adding users and adding tables to the database, either by using SQL or by using the Java Database Connector (JDBC) driver Connector/J. The Connector/J driver sits between a Java application and MySQL database and provides the API for the application to manipulate the database.
Taking a Quick Tour of NetBeans IDE
The NetBeans integrated development environment (IDE) installs as part of the amp-dev package. Open it by selecting Applications ![]() Developer Tools
Developer Tools ![]() NetBeans IDE. You can see the start screen of NetBeans in Figure 8-6.
NetBeans IDE. You can see the start screen of NetBeans in Figure 8-6.

Figure 8-6. NetBeans IDE start screen
Clicking the Quick Start Tutorial link launches a Firefox browser with http://www.netbeans.org/kb/docs/java/quickstart.html loaded. The Projects tab on the left should be empty. To start a new project, select File ![]() New Project. You'll see a dialog box like the one shown in Figure 8-7.
New Project. You'll see a dialog box like the one shown in Figure 8-7.
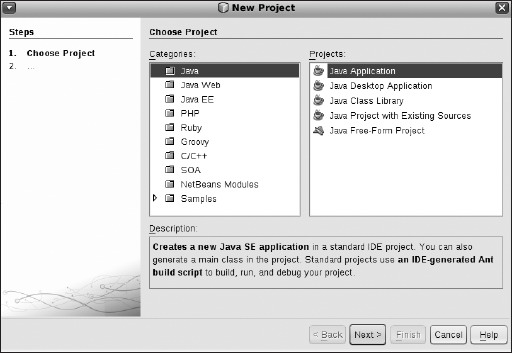
Figure 8-7. NetBeans New Project dialog box
Assuming you want to test-drive NetBeans with a new Java project, choose Java under Categories and then Java Application under Projects. Click Next. You'll be asked for the name of your project and where you want it stored. Our example is everybody's favorite programming primer, HelloWorld. Enter the project name. The default location to store your projects is in your home directory, under the NetBeansProjects directory, which will be created for you, as shown in Figure 8-8. Click Finish.
A new Java application template will be created for you. Change the following:
//TODO code application logic here
to this:
System.out.println("Hello World!");
Figure 8-9 shows you the code body from your HelloWorld project.

Figure 8-8. NetBeans new Java project screen
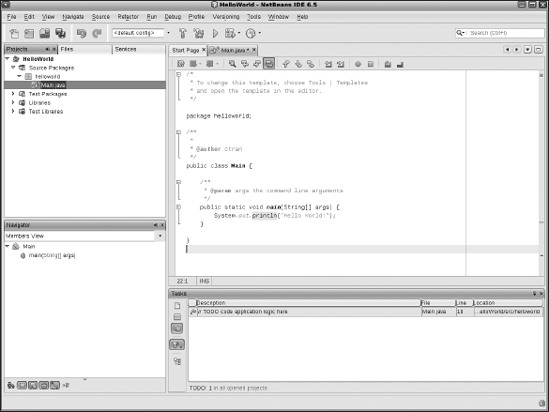
Figure 8-9. New Java application template and code
On the Files tab, which was previously empty, you will find the directory hierarchy of your code source. To build your application, click the Run button (the hammer icon) on the toolbar at the top. You can also build from the Run menu. You can see the build progress in the window below the code. When your build finishes successfully, you will also see a small line of text at the bottom left of your window saying "Finished building HelloWorld (jar)."
Click the Run button on the toolbar, or choose Run from the Run drop-down menu. Your code runs in the output window shown at the bottom of Figure 8-10.

Figure 8-10. Building and running your Java application
You can find extensive documentation for NetBeans at http://www.netbeans.org/kb/index.html.
Using Subversion
Subversion is a version manager; it manages the recording, storing, cataloging, and retrieving of different versions of a file. If you are a developer, version control is essential to managing source code, scripts, and whatever else a developer needs to build. It enables many developers to access and modify one file, and it manages the storing of that file so all the modifications to the files are tracked and committed.
amp-dev includes the SUNWsvn package, which is Subversion 1.4.3. You need to set up Subversion first, before NetBeans can integrate with it. Specifically, you need to set up the repository, import your working files, and manage the access method.
Creating the Repository and Managing Files
To set up the repository, run this:
root@ender:# mkdir /opt/svn

root@ender:# svnadmin create --fs-type fsfs /opt/svn/repo
FSFS is a file system implementation from the folks who created Subversion. It is the alternative to storing your information in the BerkeleyDB database format. We use FSFS for small to medium-size projects. To read about the pros and cons of FSFS, see http://svn.collab.net/repos/svn/trunk/notes/fsfs.
You need to create the Subversion group and add any users who would need access to the repository to that group:
root@ender:# groupadd -g 99 svngrp
vi the /etc/group file, and add your user to the group. Or make the group the default group for the user.
Modify the ACL to allow group svngrp access to /opt/svn:
root@ender:# /usr/bin/chmod -R


A+group:svngrp:add_file/write_data/add_subdirectory/append_data:allow /opt/svn
You probably have some files that you'd like to put under Subversion control. For our example, we'll use files under the directory /var/tmp/project:
root@ender:# ls -l /var/tmp/project
total 3

-rw-r--r-- 1 root root 0 2009-01-30 23:32 bread.jar

-rw-r--r-- 1 root root 0 2009-01-30 23:32 ham.jar

-rw-r--r-- 1 root root 0 2009-01-30 23:32 lettuce.jar

-rw-r--r-- 1 root root 0 2009-01-30 23:32 mayo.jar

-rw-r--r-- 1 root root 0 2009-01-30 23:32 tomato.jar
Import your files into the repository. In this example, we are importing the files from /var/tmp/project into a folder called hamsandwich:
root@ender:# svn import /var/tmp/project file:///opt/svn/repo/hamsandwich


-m "First import of Ham Sandwich project"
Adding        /var/tmp/project/lettuce.jar

Adding        /var/tmp/project/ham.jar

Adding        /var/tmp/project/mayo.jar

Adding        /var/tmp/project/bread.jar

Adding        /var/tmp/project/tomato.jar


Committed revision 1.
Show what's in the repository:
root@ender:# svn list file:///opt/svn/repo
hamsandwich/
root@ender:# svn list file:///opt/svn/repo/hamsandwich
bread.jar

ham.jar

lettuce.jar

mayo.jar

tomato.jar
checkout means make your own workspace a copy of what's currently in the repository. Note that we're doing this now as a non-root user. checkout makes a directory in our current directory called hamsandwich, mirroring what's in the repository:
ctran@ender:$ svn checkout file:///opt/svn/repo/hamsandwich
A    hamsandwich/ham.jar

A    hamsandwich/lettuce.jar

A    hamsandwich/mayo.jar

A    hamsandwich/bread.jar

A    hamsandwich/tomato.jar

Checked out revision 1.
ctran@ender:$ ls ~/hamsandwich
bread.jar lettuce.jar ham.jar mayo.jar tomato.jar
Start working in your workspace. Using svn delete and svn add signals Subversion that you want these files deleted and added from the repository itself, when you commit the changes:
ctran@ender:~/hamsandwich$ svn delete mayo.jar
D mayo.jar
ctran@ender:~/hamsandwich$ vi pesto.jar
Modify and save your pesto.jar.
ctran@ender:~/hamsandwich$ svn add pesto.jar

A     pesto.jar
This is the same as an svn move. We'll use ham.jar and prosciutto.jar as an example:
ctran@ender:~/hamsandwich$ svn move ham.jar prosciutto.jar
A      prosciutto.jar

D      ham.jar
ctran@ender:~/hamsandwich$ svn status
D    ham.jar

D    mayo.jar

A +  prosciutto.jar

A    pesto.jar
The plus sign in the status output indicates that the item isn't merely scheduled for addition but scheduled for addition "with history."
You can show the difference between the working and base copies using svn diff:
ctran@ender:~/hamsandwich$ svn diff
Index: pesto.jar
svn update checks your current workspace against the latest revision in the repository. If other people have committed new changes to the repository since you checked out your files, you will be notified that a conflict has occurred. This is so that you do not overwrite other people's recent changes by committing your changes wholesale. In this example, there are no conflicts. Subversion is telling you that you are at revision 1, like the repository:
ctran@ender:~/hamsandwich$ svn update
At revision 1.
Committing your changes updates the repository and imprints a +1 revision number:
ctran@ender:~/hamsandwich$ svn commit -m "Italian style"
Deleting       ham.jar

Deleting       mayo.jar

Adding         prosciutto.jar

Adding         pesto.jar

Transmitting file data .

Committed revision 2.
If you get this message, check that the user who is doing the svn commit has access permission to the repository:
svn: Commit failed (details follow):

svn: Can't create directory '/opt/svn/repo/db/transactions/1-1.txn':

Permission denied
Using the Manage Access Control Method
We will now show how to set up a Subversion server that provides access to the repository over TCP/IP. This is the svn:// scheme. You can also tunnel svn under ssh, which is the svn+ssh:// scheme for better security, if you have an environment where you need to enable developers' laptops to connect to the Subversion server from the Internet, for example.
Simple svn Remote Access
Starting the Subversion server is very simple:
root@ender:# svnserve -d -r /opt/svn/repo
The -d switch tells svnserve to run as a daemon, and the -r switch specifies the full path to the repository. svnserve runs on port 3690. You can see this by running pfiles on the process svnserve; look at the sockets it has opened and the port number in the following code snippet:
root@ender:~# pfiles `pgrep svnserve`
3283:  svnserve -d -r /opt/svn/repo

  Current rlimit: 256 file descriptors

   0: S_IFCHR mode:0666 dev:291,0 ino:6815752 uid:0 gid:3 rdev:13,2

      O_RDONLY|O_LARGEFILE

      /devices/pseudo/mm@0:null

   1: S_IFCHR mode:0666 dev:291,0 ino:6815752 uid:0 gid:3 rdev:13,2

      O_WRONLY|O_CREAT|O_TRUNC|O_LARGEFILE

      /devices/pseudo/mm@0:null

   2: S_IFCHR mode:0666 dev:291,0 ino:6815752 uid:0 gid:3 rdev:13,2

      O_WRONLY|O_CREAT|O_TRUNC|O_LARGEFILE

      /devices/pseudo/mm@0:null

   3: S_IFSOCK mode:0666 dev:300,0 ino:55708 uid:0 gid:0 size:0

      O_RDWR

        SOCK_STREAM

        SO_REUSEADDR,SO_SNDBUF(49152),SO_RCVBUF(49152)

        sockname: AF_INET6 :: port: 3690
To set Subversion for simple svn client remote access, modify the file /opt/svn/repo/conf/svnserve.conf.
Anonymous users get no access, and authenticated users get read/write access (read is implicit when you grant write). This is further refined to who can write to which directory in the file /opt/svn/repo/conf/authz:
anon-access = none

auth-access = write
Uncomment the following two lines:
password-db = passwd

authz-db = authz
Modify the file /opt/svn/repo/conf/passwd. This is where you set up users to access the repository:
[users]

ctran = toasted

trainee = grilled
Keep in mind that this user and password roster pertains to Subversion only. This is not the UNIX user ctran or user trainee in the /etc/passwd file. In fact, there is no such UNIX user trainee on the system.
Modify the file /opt/svn/repo/conf/authz. This is where you set up fine-grained privileges of who can read and write to which directory under the repository. This is called path-based authorization, and you can opt to skip this step if your development group is small or if you trust all authorized users to know what they are doing and not commit changes where they ought not.
[groups]

dev1 = ctran

intern = trainee

[/]

@dev1 = rw

* = r
In the previous code snippet, the [groups] code block says to create two groups, dev1 and intern, and assign users to each group. In the next block, the directory location [/] (the root of the repository, not the root directory of the system) is readable and writable by group dev1; everybody else gets read-only access. As projects grow, you can grant read and write permissions to other groups, such as other directories, for example:
[/hamsandwich/experimental]

@intern = rw
This is all you need for simple svn access. From another host, you can check out a workspace, make modifications, and publish your changes. In the following example, UNIX user root from host dojo is checking out a workspace as Subversion user trainee. root is prompted for a password, which is grilled, which was what we set for user trainee in /opt/svn/repo/conf/passwd.
root@dojo:#svn --username trainee checkout svn://ender/hamsandwich
Authentication realm: <svn://ender:3690> 1c392b9b-7528-4ab7-f512-fb19ff8457c0

Password for 'trainee': grilled

A    hamsandwich/lettuce.jar

A    hamsandwich/pesto.jar

A    hamsandwich/prosciutto.jar

A    hamsandwich/bread.jar

A    hamsandwich/tomato.jar

Checked out revision 2.
The previous actions will allow you to access your Subversion repository remotely, as long as you are working in a private and safe network environment. If you are working remotely, you will need to set up your Subversion server to use svn+ssh.
Note Make sure the firewall protecting your Subversion server allows ssh access.
More Secure svn+ssh Access
The simple svn access depends on an svnserve server listening for connections from the svn client and authenticating using a user and password file defined in svnserve.conf. The svn+ssh scheme does not use svnserve at all; authentication is done by ssh. A remote user accesses the repository with her own UNIX credential, over the SSH connection. What is actually happening is that the user is spawning her own svnserve process, more precisely, svnserve -t for tunnel mode. This process is created and terminated for every invocation of svn+ssh:// Access control is via the permission on the repository. It is as if a user on the Subversion server is reading files locally.
To minimize having to create 20 different UNIX users on the Subversion server, you can create a single svn user and use that as a shared account for all remote users. You may wonder whether this will make it seem like every commit to the repository looks like it comes from user svn. The answer is, yes, it will, but there's a trick around that. Read on.
First, create the svn user on the Subversion server, which is host ender in our case:
root@ender:# useradd -u 102 -g 99 -m -d /export/home/svn -s


/usr/bin/bash -c "Subversion User" svn
From a remote server, access the repository. In our example, we are logged in on host dojo as UNIX user mysql. We use user mysql to avoid any confusion about SSH and root privileges:
root@dojo:# su - mysql

mysql@dojo$ id
uid=300(mysql) gid=300(mysql)
mysql@dojo$ svn list svn+ssh://svn@ender/opt/svn/repo/hamsandwich
Password: <password for svn on ender>

bread.jar

lettuce.jar

pesto.jar

prosciutto.jar

tomato.jar
You should note a few things about the previous command. The UNIX user mysql on host dojo is accessing the repository on host ender as user svn. Nothing special needs to be done on host ender, except to make sure that svn has a valid password and has read access to the repository on /opt/svn. All that user mysql needs is the svn password. Pay attention to the two slashes (//) and svn@ender, because frequent mistakes are forgetting the two forward slashes and forgetting to put in the user@host notation. You access the repository with the absolute path, not the relative path starting from the repository.
Every time you invoke svn+ssh://, you will be prompted for a password. Actually, every time the svn client makes a connection to the sunserve daemon, there is an authentication challenge. You don't notice this, because the client caches the password for you. With ssh, there is no caching going on.
To get around this problem, set up public/private keys for user svn to be automatically authenticated.
Note The following section is a short detour into the murky waters of SSH key generation. There are many vendor implementations of SSH on the market, each of them slightly different. There are SSHv1, SSHv2, RSA1, RSA, DSA keys. Putting them together in the right combination could possibly cause a normal person to tear his hair out. We'll describe the method to generate keys between two Solaris servers. If you are using a non-SUN platform for your svn remote client, read that vendor's SSH documentation carefully, and make sure you understand it before embarking.
Generating the Public/Private Key Pair
Our remote client is dojo. Our Subversion server is ender. We need to generate keys for user ctran@dojo, keep the private key in ~ctran/.ssh/id_dsa, and give the public key ~ctran/.ssh/ id_dsa.pub to svn@ender. Here's how we do that.
Generate the private and public key pair, and put them into the files id_dsa and id_dsa.pub in your home's .ssh directory:
ctran@dojo$ cd ~/.ssh

ctran@dojo$ ssh-keygen -t dsa
Generating public/private dsa key pair.

Enter file in which to save the key (/export/home/ctran/.ssh/id_dsa): [RETURN]

Enter passphrase (empty for no passphrase): <do not leave empty>

Enter same passphrase again: <do not leave empty>

Your identification has been saved in /export/home/ctran/.ssh/id_dsa.

Your public key has been saved in /export/home/ctran/.ssh/id_dsa.pub.

The key fingerprint is:

0a:52:de:ed:77:d3:3d:3a:fd:a7:b9:90:a2:3c:e2:bc ctran@dojo
You may have read elsewhere that in order to have a challenge-free login, you should use an empty passphrase. That's because you will be prompted for your passphrase (not your login password) when you initiate an SSH connection. An empty passphrase is an invitation for trouble. Go the extra step and do it right. We will show you another trick to overcome the passphrase challenge.
Keep the private key safe. Copy the public key to svn's .ssh directory on ender.
ctran@dojo$ scp id_dsa.pub svn@ender:/export/home/svn/.ssh/authorized_keys
Password: <password for svn on ender>
Now, try to ssh from dojo to ender and log in as user svn:
ctran@dojo$ ssh -l svn ender
Enter passphrase for key '/export/home/ctran/.ssh/id_dsa': <enter passphrase>

Last login: Sun Feb 1 00:42:27 2009 from dojo

svn@ender:~$
You are prompted for the passphrase you entered when you made the keys. Note that the passphrase is not the same thing as your UNIX password. To bypass this step, start a shell with ssh-agent, and use ssh-add to add the key to ssh-agent. You will be prompted for a passphrase only once.
ctran@dojo$ ssh-agent sh -c 'ssh-add < /dev/null && /usr/bin/bash'
Enter passphrase for /export/home/ctran/.ssh/id_dsa: <enter passphrase>

Identity added: /export/home/ctran/.ssh/id_dsa (/export/home/ctran/.ssh/id_dsa)

bash-3.00$
From the bash shell, from now on everything is smooth sailing. Notice you get no challenge of any kind:
bash-3.00$ ssh -l svn ender
Last login: Sun Feb 1 00:44:01 2009 from dojo

svn@ender:~$
Log out of ender. Try it with svn+ssh:
bash-3.00$ svn checkout svn+ssh://svn@ender/opt/svn/repo/hamsandwich
A    hamsandwich/lettuce.jar

A    hamsandwich/pesto.jar

A    hamsandwich/prosciutto.jar

A    hamsandwich/bread.jar

A    hamsandwich/tomato.jar

Checked out revision 2.
Modifying files, updating from the repository, and publishing and committing changes at this point are the same as with the simple svn remote client, except that you are tunneled under the safety of SSH.
But wait, did we not say there was a trick so not every commit looks like it came from user svn? Yes. And you implement that trick by making one more change to svn's .ssh/authorized_keys file. Right now, the content of that file looks like this:
ssh-dss [very long key] ctran@dojo.
Modify this line to look like this:
command="/usr/bin/svnserve -t --tunnel-user=ctran" ssh-dss


[very long key] ctran@dojo
The command directive tells ssh to run what's in the double quotes, instead of defaulting to svnserve -t. The --tunnel-user switch tells svnserve to take action as the named user, instead of user svn. Do not be mistaken—you are not connecting with the daemon svnserve. You are actually launching your own svnserve in tunnel mode. So, svn's .ssh/authorized_keys file could look like this:
command="/usr/bin/svnserve -t --tunnel-user=ctran" ssh-dss


[ctran's public key] ctran@dojo

command="/usr/bin/svnserve -t --tunnel-user=hfoxwell" ssh-dss


[hfoxwell's public key] harry@opsol01
Of course, user hfoxwell and everyone else who wants to use this method must generate their own public/private key pair, and the authorized_keys file has to include a line to identify the user and their public key.
Caution You've modified the authorized_keys files for user svn to start svnserve every time ssh authenticates you. This will impair your ability to ssh into host ender as user svn normally. You won't be able to launch a shell; instead, you'll be greeted with something like this:
bash-3.00$ ssh -l svn ender
( success ( 1 2 ( ANONYMOUS EXTERNAL ) ( edit-pipeline svndiff1 absent-entries ) ) )
You are seeing the output from svnserve. In fact, you would see the same text if you open your browser to http://ender:3690 if the svnserve daemon were running and accepting connections on 3690. So, don't ssh -l svn to do any shell work.
Note When working with SSH, it helps to have logging turned on. sshd logging is not on by default. You need to modify your /etc/syslog.conf to add this line:
auth.info ifdef(`LOGHOST', /var/log/authlog, @loghost)
Be careful editing this file. Tabs and whitespace matter:
auth.info<tab><tab><tab>ifdef(`LOGHOST', /var/log/authlog, @loghost)
Restart syslog:
root@ender:# svcadm restart system-log
sshd logs to /var/log/authlog. You might need the package SUNWspnego to resolve the problem you will see in /var/log/authlog. Basically, sshd is complaining that it's missing a GSS-API library, as you see from the following snippet from authlog:
Jan 31 21:45:41 ender sshd[4158]: [ID 800047 auth.info] Accepted publickey for

ctran from 192.168.0.5 port 33011 ssh2

Jan 31 22:05:23 ender sshd[4239]: [ID 685508 auth.info] libgss dlopen(/usr/lib/

gss/mech_spnego.so.1): ld.so.1: sshd: fatal: /usr/lib/gss/mech_spnego.so.1: ope

n failed: No such file or directory
You will find a Subversion SMF manifest, subversion.xml, along with all the source code on this book's page on the Apress web site. Put the manifest in /var/svc/manifest/site, import it, and start it. The following code block shows how to import the Subversion manifest, enable Subversion (make Subversion run as a daemon), and check the Subversion process ID and contract ID:
root@ender:# pwd

/var/svc/manifest/site

root@ender:# ls
subversion.xml tomcat5.xml
root@ender:# svccfg import subversion.xml

root@ender:# svcs subversion
STATE      STIME     FMRI

disabled   17:25:34  svc:/site/subversion:default
root@ender:# svcadm enable subversion

root@ender:# svcs -pv subversion
STATE    NSTATE  STIME   CTID   FMRI

online   -       17:25:42   218 svc:/site/subversion:default

    17:25:42    4475 svnserve
This was by no means a comprehensive or advanced treatment of Subversion, which a rich and flexible tool that allows complex manipulation of the code base. You can find an excellent comprehensive guide, written by the Subversion developers and community, at http://svnbook.red-bean.com/.
Integrating NetBeans with Other Products
The following sections cover how to integrate NetBeans with Tomcat and Subversion.
Integrating with Tomcat
You may find it convenient to integrate your Tomcat server into the NetBeans IDE. This allows you to add Java application projects directly to Tomcat after debugging and running the project, in addition to stopping, starting, and debugging your Tomcat server from NetBeans.
In the example given in this chapter, you've configured Tomcat in a container. If you've followed the steps to start NetBeans on your desktop or laptop, your IDE is loaded in the global zone. As of this writing, there is no way to integrate NetBeans with a remote instance of Tomcat, running on a different server, even if that server is a nonglobal zone sharing the disk space with NetBeans. The reason for this is that the integration allows you to start and stop Tomcat from NetBeans; NetBeans runs in the global zone and will have no view into the process space of any other zone. Even if NetBeans can access the zone's /var/apache/tomcat and /usr/apache/tomcat directories, there's no way NetBeans can launch a process that belongs to the web zone itself. So, for the examples to follow, you will need to repeat the steps to start Tomcat in the global zone. That is, you'll need to modify the user profile for the user webserved and make sure that user has access permission to /var/apache and the right privilege. Then you'll need to modify server.xml, generate keys for SSL connection, and import the Tomcat manifest. You'll be working with the NetBeans IDE and Tomcat server running in the global zone.
Start the NetBeans IDE. On the left column, select the Services tab. Right-click the Server icon, and select Add Server from the drop-down menu. Choose the Tomcat 5.5 server, add a descriptive name, and click Next, as shown in Figure 8-11.
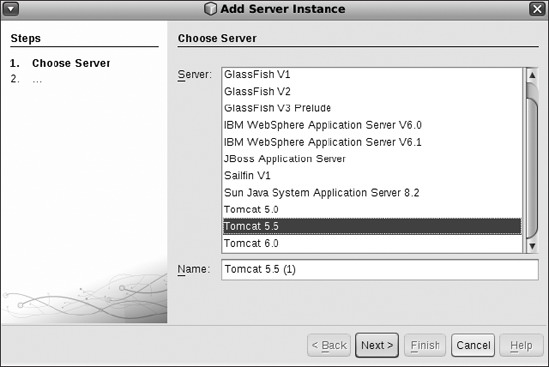
Figure 8-11. Adding a Tomcat server instance in NetBeans
Recall that the SUNWtcat package splits the bin and conf directories between /usr/apache/tomcat and /var/apache/tomcat. CATALINA_HOME is /usr/apache/tomcat, but NetBeans expects to be able to write into the conf directory as well. You need to make a symbolic link, linking the conf directory under CATALINA_HOME. You've already made everything under /var/apache/tomcat writable by webserved when you set up Tomcat:
root@ender:# ln -s /var/apache/tomcat/conf /usr/apache/tomcat/conf
Specify /usr/apache/tomcat as CATALINA_HOME. For CATALINA_BASE, any directory writable by NetBeans will do; we keep ours in our home directory. Select the box Create User If It Does Not Exist, as shown in Figure 8-12. Then click Finish. After this, you will see a Tomcat 5 instance on the left side of the IDE screen, under Server.

Figure 8-12. Specifying Tomcat directory locations
Integrating with Subversion
So, you've worked very hard to create a working Subversion repository, accessible with two schemas, svn:// and svn+ssh://. You are tired from schlepping files back and forth. You'd rather check out and commit your code from within your IDE. The good news is you can do that, and it's a simple process. The bad news is that because of bug 6192335 (at the time of this writing), a file critical to the public/private key exchange for GUI tools is missing.
Note You can view, and file, bugs against OpenSolaris at http://defect.opensolaris.org. Developers of OpenSolaris consider the OpenSolaris code base distinct from its predecessor, Solaris 10. Bugs against Solaris 10 can be viewed and filed at http://bugs.opensolaris.org. This bug is actually filed against the Solaris 10 code. It hasn't made it to the OpenSolaris defect tracker yet. You can see bug 6192335 at http://bugs.opensolaris.org/bugdatabase/view_bug.do?bug_id=6192335.
For secure remote access from the IDE, you'll have to set up Subversion to run over HTTPS, which will not be covered in this chapter. For simple svn access, you can specify this from the IDE.
In the NetBeans main window, select Versioning ![]() Subversion
Subversion ![]() Checkout. Remember that the
Checkout. Remember that the svn:// schema relies on the svnserve daemon running, and authentication is done with users and passwords specified in the files in /opt/svn/repo/conf. Figure 8-13 shows a checkout from the repository on host ender.
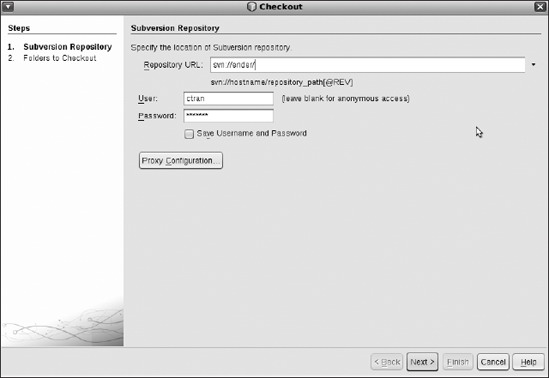
Figure 8-13. Specifying the location of the Subversion repository and logging in
You'll get a screen prompting you for the repository folder. Click the Browse button, and select hamsandwich. Figure 8-14 shows this. Click OK to return to the previous screen.
Choose the local folder where you want to put your new directory. In this example, hamsandwich will be created under the NetBeansProjects directory. Check the box Scan for NetBeans Project After Checkout, as shown in Figure 8-15, and then click Finish.
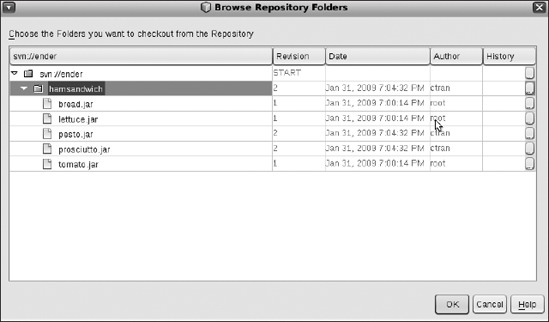
Figure 8-14. Selecting the directory to check out

Figure 8-15. Specifying the local directory and checking out
You will get a box asking whether you want to create a new project from the code you have just checked out, as shown in Figure 8-16. Click Create Project.
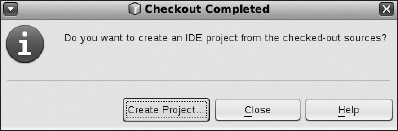
Figure 8-16. Creating a new project from code you've checked out
You'll come to a New Project dialog box, as shown in Figure 8-17. Select Java and Java Project with Existing Sources. Click Next.

Figure 8-17. Choosing Java Project with Existing Sources
Select the location of your project; in our case, it's hamsandwich. Recall that you checked out hamsandwich under your home directory's NetBeansProjects directory (see Figure 8-18). Click OK.
NetBeans will create a new project for you, called hamsandwich. You will find it on the Projects tab. Now you can start working with your local copy of hamsandwich files inside NetBeans. You can see your new project and its files on the left side of Figure 8-19.
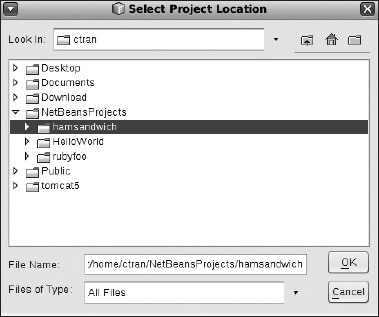
Figure 8-18. Selecting the location of files for your new project

Figure 8-19. Selecting the location of files for your new project
You can go through similar steps to import local projects in NetBeans to the Subversion repository. Keep in mind that svn add makes changes to the local copy, and svn import makes changes to the repository. Import requires you to add a text memo. In Figure 8-20 we're importing our HelloWorld project, which I wrote in my introduction to NetBeans. Click Next.
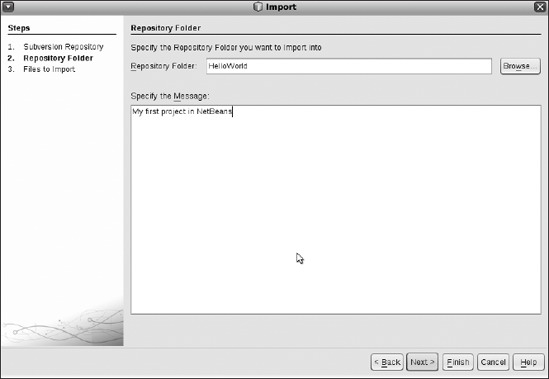
Figure 8-20. Importing a new project into Subversion
On the next screen, shown in Figure 8-21, you are asked to confirm that you want to import (or commit) these files to the repository and how they will be created, meaning as directory or text. Click Finish.
When you have modified your local copy of the files, you can select Versioning ![]() Subversion
Subversion ![]() Update, before you choose to commit. Note that you need to have the files underneath the project highlighted, before NetBeans will give you a menu choice of Update.
Update, before you choose to commit. Note that you need to have the files underneath the project highlighted, before NetBeans will give you a menu choice of Update.
Under the Window menu, you can select Output ![]() Version Output to view the text output of your actions, as shown on the bottom of Figure 8-22.
Version Output to view the text output of your actions, as shown on the bottom of Figure 8-22.

Figure 8-21. Verifying the files you want to import
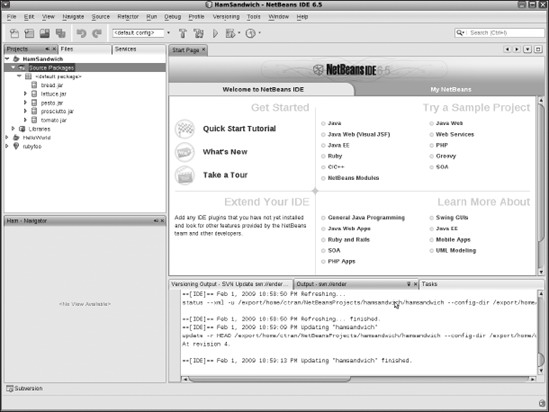
Figure 8-22. Text in the output window
Putting It All Together with IPS
IPS is the OpenSolaris packaging system. You connect to an IPS server (the default is http://pkg.opensolaris.org) to install packages, check for updates, and get the latest version. IPS resolves dependencies on other packages and fetches them for you. You've built a web app, and it's a success. Now it's time for you to package it into IPS and make it available for other developers.
Note The process of getting a package into the OpenSolaris repository is governed by the OpenSolaris advocacy group. The following example demonstrates how to generate such a package and publish it into your own local package server. But in order to make a package available from http://pkg.opensolaris.org, you need to check with the advocacy group. You can run your own IPS repository and make your package available there.
First, you need to make your own local repository. You have an IPS server loaded on OpenSolaris, and you just need to specify the port number and the location of the repository and fire up the service. Here's the SMF service for the IPS server:
root@ender:# svcs pkg/server
STATE     STIME   FMRI

disabled  Jan_31  svc:/application/pkg/server:default
Use svccfg to interact directly with the SMF repository. We know, it's confusing. There's the SMF repository that holds all the SMF manifests, the Subversion repository that holds your versioned code, and now the IPS repository that holds packages. Repository is a word overloaded with meanings, so you need to pay attention to the context.
root@ender:# svccfg -s pkg/server
svc:/application/pkg/server> listpg

pkg             application

fs              dependency

autofs          dependency

ntp             dependency

network         dependency

startd          framework

general         framework

start           method

stop            method
tm_common_name template

svc:/application/pkg/server> listprop pkg

svc:/application/pkg/server> setprop pkg/port = astring: "8000"

svc:/application/pkg/server> setprop pkg/inst_root = astring: /var/tmp/localrepo"

svc:/application/pkg/server> listprop pkg/*

pkg/content_root    astring /usr/share/lib/pkg

pkg/log_access      astring none

pkg/log_errors      astring stderr

pkg/mirror          boolean false

pkg/proxy_base      astring

pkg/readonly        boolean false

pkg/socket_timeout  count  60

pkg/threads         count  10

pkg/port            astring 8000

pkg/inst_root       astring /var/tmp/localrepo

svc:/application/pkg/server> exit
In the previous code snippet, listpg lists the property group, and the setprop commands set the port to 8000 and the location of the IPS repository to /var/tmp/localrepo.
Commit your changes, and start the IPS package server, as shown here:
root@ender:# svcadm refresh pkg/server

root@ender:# svcadm enable pkg/server

root@ender:# svcs -pv pkg/server
STATE    NSTATE     STIME   CTID   FMRI

online   -          11:50:11   213 svc:/application/pkg/server:default

         11:50:11  3855 pkg.depotd
Start a package:
ctran@ender:~/NetBeansProjects$ pkgsend -s http://localhost:8000 open ham_pkg@1
export PKG_TRANS_ID=1233598199_pkg%3A%2Fham_pkg%401%2C5.11%3A20090202T180959Z
ctran@ender:~/NetBeansProjects$ pkgsend -s http://localhost:8000


add dir mode=0555 owner=root group=bin path=hamsandwich
pkgsend: No transaction ID specified in $PKG_TRANS_ID
You are getting the pkgsend error because the pkgsend open command gets back a variable, $PKG_TRANSACTION_ID. You need to include this ID with the rest of the add dir and add file commands to tell the repository that you mean to add it to a package you've just opened, identified by the publication transaction ID $PKG_TRANSACTION_ID. The way to do this is with the built-in shell command eval. Note the backticks.
ctran@ender:~/NetBeansProjects$ eval `pkgsend -s http://localhost:8000


open ham_pkg@1`
Now, add files. Note that the path value is relative to your current path:
ctran@ender:~/NetBeansProjects$ pkgsend -s http://localhost:8000


add dir mode=0555 owner=root group=bin path=hamsandwich

ctran@ender:~/NetBeansProjects$ pkgsend -s http://localhost:8000


add file hamsandwich/bread.jar mode=0555 owner=root group=bin


 path=hamsandwich/bread.jar

ctran@ender:~/NetBeansProjects$ pkgsend -s http://localhost:8000


add file hamsandwich/lettuce.jar mode=0555 owner=root group=bin


path=hamsandwich/lettuce.jar

ctran@ender:~/NetBeansProjects$ pkgsend -s http://localhost:8000


add file hamsandwich/pesto.jar mode=0555 owner=root group=bin


path=hamsandwich/pesto.jar

ctran@ender:~/NetBeansProjects$ pkgsend -s http://localhost:8000


add file hamsandwich/prosciutto.jar mode=0555 owner=root group=bin


path=hamsandwich/prosciutto.jar

ctran@ender:~/NetBeansProjects$ pkgsend -s http://localhost:8000


add file hamsandwich/tomato.jar mode=0555 owner=root group=bin


path=hamsandwich/tomato.jar
Add a description and close the package:
ctran@ender:~/NetBeansProjects/hamsandwich$ pkgsend -s http://localhost:8000


add set name=description value="Hamsandwich Example"

ctran@ender:~/NetBeansProjects/hamsandwich$ pkgsend -s http://localhost:8000 close
PUBLISHED

pkg:/ham_pkg@1,5.11:20090202T182929Z
You can see the packages you've published to your local repository by opening your browser to http://localhost:8000, as shown in Figure 8-23.
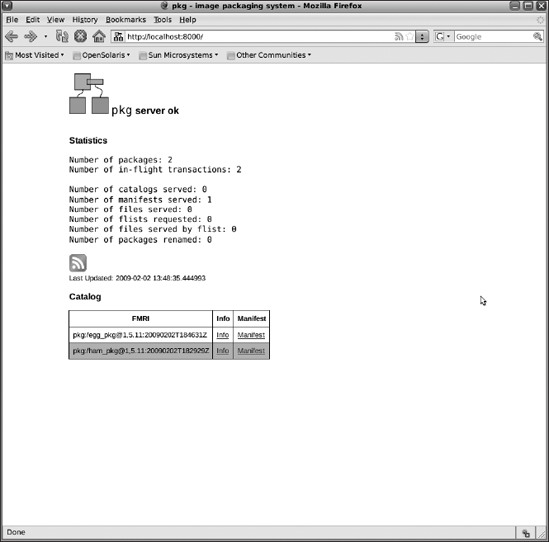
Figure 8-23. Viewing the IPS packages you've just published
But now you've made a mistake, and you want to modify or delete one of the packages you've recently published to your local IPS server. Unfortunately, there are no tools to do that as yet. If you want, you can muck around in the repository, /var/tmp/localrepo as we've specified it. You'll have to edit the catalog and index files, plus everything else that's been written there. This area is not well documented, so play here with caution. The tools to better manage your package are coming soon in a future release of OpenSolaris, or so we're told. Watch the IPS development space at http://opensolaris.org/os/project/pkg.
Summary
You've been on a brief tour of the web stack on OpenSolaris. Besides some minor quirks, we hope you've found it easy to install, configure, and use. The toolset is only one part of the story. The underlying platform can also contribute to the success and failure of a project. The tools can be good, but if the platform is unstable, hard to manage, hard to upgrade, and hard to patch, the project will not last long on that platform because of hostility from the people who will have to use and manage it.
OpenSolaris comes with the Fault Management Architecture. On particular hardware, FMA has the ability to detect CPU and memory error and may be able to remove them from service without taking down the entire platform. SMF monitors and manages your application as a service, which obviates the need to run a process checker. Basic Auditing and Reporting Tools (BART) is a simple but effective file integrity checker, which you can script around to detect changes in file content and attributes. IPFilter is an integrated firewall with simple, readable rules in ipf.conf. Pluggable Authentication Module (PAM), Basic Security Module (PAM), and Role-Based Access Control (RBAC) are three more toolsets that authenticate, audit, and enforce privileges for users. Containers and resource control enforce security and resource consumption per application, if you run them in a container. As you'll read in the next chapter, DTrace allows you to find performance bottlenecks and diagnose problems in real time in a production environment, without risking safety or adding more load. OpenSolaris offers binary compatibility and source code compatibility. This means if your application sticks to using the published, documented OpenSolaris API, your code is guaranteed to run on all future releases of OpenSolaris; and if your application compiles and runs on x86 or AMD, it'll compile and run SPARC, and vice versa. This gives you a choice of hardware platform and OpenSolaris release on which to deploy your application.
These are just the tips of the iceberg, but perhaps it's enough for you to consider not just developing on OpenSolaris but making it your production environment as well.