CHAPTER 4
A Familiar User and Developer Environment and More
It's like déjà vu all over again.
—Yogi Berra, U.S. baseball player, coach, and manager
At Home with GNOME
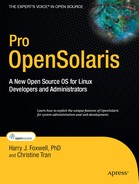
Long before Sun Microsystems even thought about OpenSolaris, it recognized the benefits of community-developed desktop environments such as KDE and GNOME, especially since many Sun engineers contributed extensively to these systems. GNOME was selected as the default Solaris desktop, replacing the Common Desktop Environment (CDE) originally developed by the corporate consortium comprising IBM, Digital Equipment Corporation (DEC), Novell, and Sun. GNOME is now standard on most UNIX and Linux systems, and GNOME 2.24 is the current default desktop for OpenSolaris (Figure 4-1).
Since we're assuming you're already generally familiar with how GNOME menus, icons, and windows work, we'll focus on the application components included with OpenSolaris's desktop environment.
The first thing you'll notice when you log in if your system's network interface is active is an alert that your network interface has been configured by nwamd, the Network Auto-Magic Daemon. Such network autoconfiguration is standard behavior on most laptops and workstations, and it connects you using your predefined or DHCP-assigned IP address. Although this is very convenient, you can manually set up your network interfaces by selecting System ![]() Administration
Administration ![]() Network and then selecting the Manual item from the page that appears.
Network and then selecting the Manual item from the page that appears.
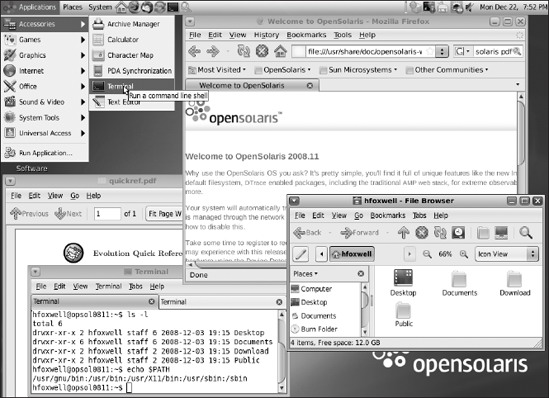
Figure 4-1. The OpenSolaris GNOME desktop
Under the Applications menu, you will see a list of programs typically distributed with systems such as Ubuntu Linux:
- Calculator
- Terminal
- Games
- Image Manipulation Software
- Evolution Mail/Calendar
- Firefox Web Browser
- Pidgin Instant Messenger
- Thunderbird Email Client
- Evince PDA Viewer
- Rhythmbox Music Player
- System Monitoring Tools
- Accessibility Aids
You'll note that some programs, such as OpenOffice, are missing. Recall that you installed OpenSolaris from a CD that has limited capacity and that you'll want to download additional programs from the network repositories discussed in Chapter 3. You'll learn more about that in a moment. This approach—distributing the operating system on a CD-sized file rather than on a multigigabyte DVD—reduces the size of the downloaded .iso file needed to get started with OpenSolaris and also allows you to download and customize your installation with only the software you need.
The System ![]() Preferences menu lists the functionality you will use to customize your system and desktop behaviors such as screen resolution, GNOME themes, laptop power management, and many other settings (Figure 4-2). Again, there's nothing unusual here since these are the same kinds of working environment personalizations you find in Linux distributions; in fact, many of them are simply ports of open source configuration tools to OpenSolaris.
Preferences menu lists the functionality you will use to customize your system and desktop behaviors such as screen resolution, GNOME themes, laptop power management, and many other settings (Figure 4-2). Again, there's nothing unusual here since these are the same kinds of working environment personalizations you find in Linux distributions; in fact, many of them are simply ports of open source configuration tools to OpenSolaris.
Figure 4-2. The OpenSolaris System ![]() Preferences menu
Preferences menu
The System ![]() Administration menu is where you'll see some familiar system configuration tasks along with some that are unique to OpenSolaris, as shown in Table 4-1.
Administration menu is where you'll see some familiar system configuration tasks along with some that are unique to OpenSolaris, as shown in Table 4-1.
Table 4-1. OpenSolaris System Administration Menu
| Menu Item | Description |
| Keyring Manager | The GNOME keyring manager used to store security credentials such as names and passwords |
| Network | Configures and activates network interfaces, host names, and DNS information, manually or using nwamd |
| Package Manager | GUI for the Image Packaging System (IPS); installs and updates application and system software; also includes Boot Environment Management |
| Print Manager | Manages local and network printers and queues, OpenSolaris version |
| Register OpenSolaris | Registers your installation with OpenSolaris.org for news and updates |
| Services | GUI for the Service Management Facility (SMF); starts and stops system and network services |
| Shared Folders | Specifies NFS shared directories |
| Solaris LP Print Manager | Selects naming service for local and network printers; adds, modifies, removes printers; Solaris version |
| Time and Date | Sets your system time zone, time, and date manually or using a specified NTP server |
| Time Slider Setup | ZFS-based automatic data backup service similar to Apple OS X Time Machine |
| Update Manager | IPS notification service for application updates |
| Users and Groups | Adds, deletes, and manages user and group accounts, profiles, and RBAC roles |
The CLI, for the GUI-averse
Linux users who've tried Solaris have criticized it for a number of annoyances, in particular for the lack of a modern and familiar default shell for users and for root, as well as for the differences in functionality between the older System V utilities and the newer GNU utilities. Solaris has actually included a directory of GNU programs for several releases, but you had to know its location and alter your PATH environment variable to use it. OpenSolaris addresses these complaints.
The default shell for root and users is now /usr/bin/bash; the old System V Bourne Shell, /usr/bin, is now implemented with KSH93. Developers often have very strong preferences for UNIX or Linux shells, and we won't argue the advantages and differences among all the choices here. OpenSolaris uses bash because of its ubiquity among Linux developers and its advantages over older shell implementations such as command-line editing, shell history, and file name completion. If you prefer other shells, such as the C Shell (/usr/bin/csh) or the Korn Shell (/usr/bin/ksh), they are also included. You can change your default shell using the System ![]() Administration
Administration ![]() Users and Groups menu.
Users and Groups menu.
Your default path starts with the /usr/gnu/bin directory, which contains links to the GNU versions of the typical UNIX tools (Figure 4-3). Many of the programs in the /bin directory have also been replaced with their GNU or community-developed equivalents, including the venerable /bin/vi, which is now a link to the vim editor. GNU emacs can be easily added using the Package Manager GUI from the Text Tools group. The OpenSolaris terminal shell also enables cursor-driven command-line history and editing, and file name completion by default, a capability that Linux has had forever and that Solaris probably should have included by default long ago.

Figure 4-3. The /usr/gnu/bin directory
As you explore OpenSolaris, you'll find many of the common UNIX/Linux utilities and find that they work in the expected manner. However, some programs are unique to OpenSolaris because of their Solaris heritage, and some familiar programs behave differently because of their interaction with special features such as ZFS or zones. We'll explain the differences for ZFS in Chapter 6 and for virtualization in Chapter 7. Table 4-2 shows some of the OpenSolaris-specific programs and their approximate Linux equivalents.
Table 4-2. OpenSolaris Administrator Tools
| Tool | Program/Command Line | Linux Distribution Equivalents |
| Examine Network Packets | /usr/sbin/snoop |
etherfind or tcpdump |
| Manage Boot Images | /usr/sbin/beadm |
(Varies) Startup Manager, GNOME Grub Conf |
| Manage RBAC Roles | /usr/bin/roles, /usr/sbin/roleadd, /usr/sbin/rolemod |
sudo |
| Manage Service Daemons | /usr/bin/svcs, /usr/sbin/svcadm, /usr/sbin/svccfg |
/etc/rc*, /etc/init.d |
| Manage ZFS Pools | /usr/sbin/zpool, /usr/sbin/zfs |
(None) |
| Modify Process Privs | /usr/bin/ppriv |
sudo |
| Reset System Identity | /usr/sbin/sys-unconfig |
(Varies) sysconfig |
| Show Processor Info | /usr/bin/isainfo -v, /usr/sbin/ psrinfo -v |
(Varies) dmesg |
| Show System Hardware | /usr/sbin/prtconf -v |
(Varies) dmesg |
| Trace System Calls | /usr/bin/truss, /usr/sbin/dtrace |
ltrace, strace, SystemTap |
| Manage IPS and SysV Software Packages | /usr/bin/pkg, /usr/sbin/pkgadd, /usr/bin/pkginfo |
(Varies) rpm, yum, apt-get |
To su, or Not to sudo?
Since you were summarily rejected from logging in as root after your initial OpenSolaris installation and you had to log in using the apparently unprivileged user you first configured, we assume the next thing you want to know is how to get to the root account, how to execute privileged programs, and how to reconfigure your system as generations of UNIX administrators before you have done for decades. As with all UNIX/Linux systems, simply execute the su command, and enter the root password you specified at installation; then you can happily roam around your system at will. But there is another way.
Because the root ID has traditionally been so powerful, it's been the target of hackers and system abusers and the enabler of catastrophic user errors. Modern systems now restrict the privileges of root and administrator accounts, assigning limited privilege sets to specific users (including root), granting only what's needed to perform each task. This restricted permission approach is called role-based access control (RBAC). Special programs also permit execution of privileged tasks by nonadministrator users. The most common such program is the venerable sudo, ported years ago to Linux; it's also delivered with the OpenSolaris CD, and it works as expected, allowing you or designated users to run root-privileged programs and to log their actions.
Although OpenSolaris includes sudo, it also includes RBAC software for defining users' roles. The first non-root user you defined when installing OpenSolaris has the Primary Administrator role, similar to the administrator accounts on Apple's OS X and on Microsoft Windows. The rough equivalent to sudo on OpenSolaris is the pfexec program; commands run by the Primary Administrator using pfexec run with root privileges without requiring you to enter the root password. These privileges are defined (and therefore controlled) by this user's entry in the /etc/user_attr file and its associated role and privileges in the /etc/security/exec_attr file; you alter the administrator and other users' privileges using the /usr/sbin/usermod command or the user administration GUI.
Boot and Reboot
OK, you've installed and explored your first OpenSolaris, downloaded and modified software, reconfigured system parameters, and deleted unwanted files; now that you've familiarized yourself with your new environment, you're ready to go back and start all over and set up the system the way you really want it. Here's where ZFS comes to your rescue. Because OpenSolaris installs and boots from a ZFS file system, you get all the advantages that file system provides, including file system snapshots. We'll have much more to say about ZFS in Chapter 6, but for now look at what the capability of taking unlimited root file system snapshots buys you. At any point after your initial installation, you can take a ZFS snapshot of the root file system, make any additions and changes you want, and easily revert to your earlier snapshot if you're unhappy with your changes. OpenSolaris makes this process extraordinarily easy by providing a tool to manage these snapshots: beadm.
The beadm program lets you quickly create a named snapshot of your existing boot environment and files. For example, the following command:
# beadm create MyNewBoot
creates a ZFS snapshot of the currently active root file system and adds an appropriate entry in the GRUB boot file located at /rpool/boot/grub/menu.lst (Figure 4-4). Note that your current boot image remains the default; beadm has simply added a new image named MyNewBoot to your GRUB boot menu.
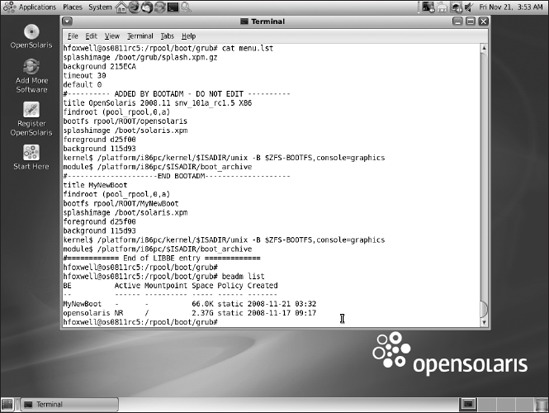
Figure 4-4. The new GRUB menu.lst file created by beadm
You can activate any of the images in the menu.lst file using beadm or the File ![]() Boot Environment Manager selection from the Package Manager GUI discussed earlier (Figure 4-5).
Boot Environment Manager selection from the Package Manager GUI discussed earlier (Figure 4-5).
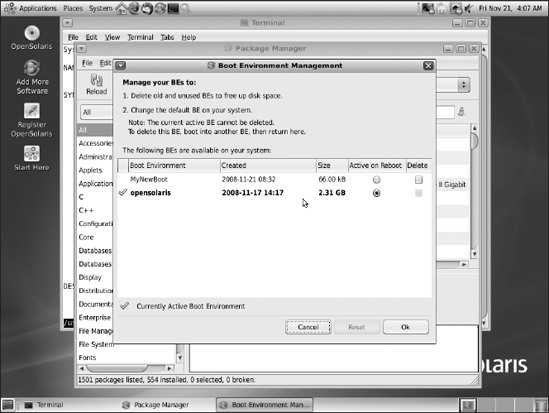
Figure 4-5. The Boot Environment Management GUI
Updating Your Kernel Build
As you work with OpenSolaris, you may want to update your OS kernel image to the most recent development builds that are posted to the online repository every two weeks. You don't have to worry about a painful upgrade process, however. From the Primary Administrator account, enter the following:
pfexec pkg image-update
The IPS will update your package database and then begin the process of updating your OpenSolaris build image. This process will take several minutes as IPS downloads and replaces packages and builds a new boot environment. When it's finished, it alerts you that your new build image is ready (Figure 4-6).

Figure 4-6. The OpenSolaris image-update process
IPS has not simply updated your system kernel. First it took a ZFS snapshot of your current system, and then it performed the update of all the kernel and related application files. Next it created a new boot image, appended the new image's configuration details to your GRUB menu.lst file, and set that image as your default boot environment (Figure 4-7). It also gave you a URL for the most recent OpenSolaris Release Notes document.
Now all you need to do is reboot, and you will see the new boot option in your GRUB menu (Figure 4-8). Of course, you can alter this by editing the menu.lst file directly or by using the Boot Environment Management GUI discussed earlier.
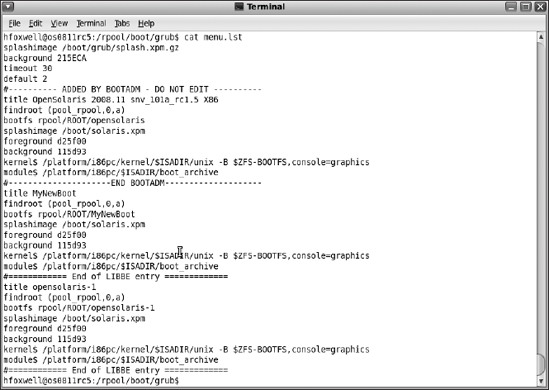
Figure 4-7. The updated GRUB menu.lst file for the new kernel image
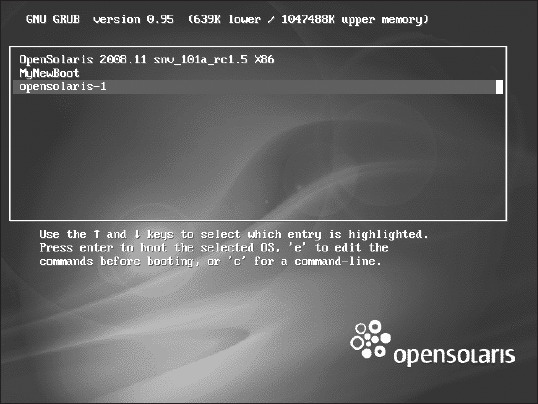
Figure 4-8. The updated GRUB boot menu listing your new kernel image
Other Administrative Tasks
In this book we've assumed you're familiar with many of the typical tasks required to set up a laptop, workstation, or server and get it ready for use. There are a few common tasks, however, that are worth reviewing here in their OpenSolaris versions.
Adding New Users
The first user you configured upon installing OpenSolaris by default is the privileged Primary Administrator for your system. To create additional users and configure their profiles and privileges, select the System ![]() Administration
Administration ![]() Users and Groups menu (Figure 4-9). Add each user's "real" name, enter the user (login) name, and set their password.
Users and Groups menu (Figure 4-9). Add each user's "real" name, enter the user (login) name, and set their password.
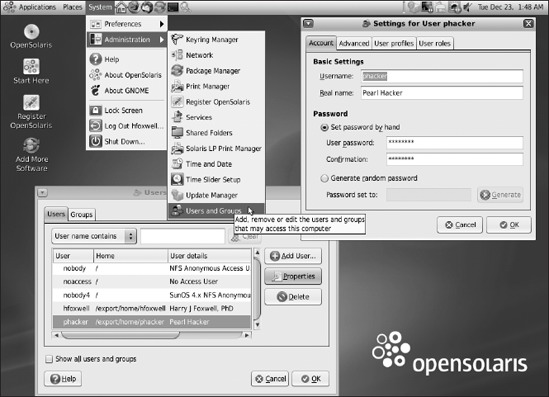
Figure 4-9. Adding a new user
You can then select and modify the user's properties, such as their group memberships, shell, and home directory (Figure 4-10); their permissions to execute administrative tasks (Figure 4-11); and the administrative roles they may become to perform special tasks such as taking ZFS snapshots (Figure 4-12).
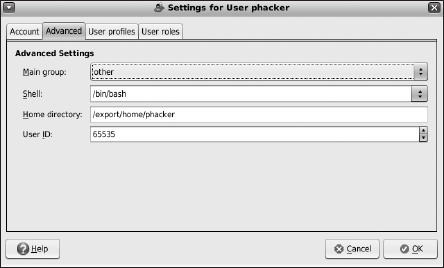
Figure 4-10. Advanced user settings
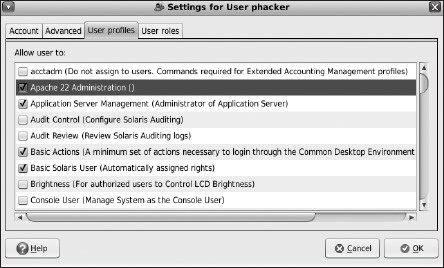
Figure 4-11. Setting a user's permission profile

Figure 4-12. Assigning a user's roles
Printing
There is an active OpenSolaris community at http://opensolaris.org/os/community/printing/ devoted to developing and enhancing the user interface for managing printers and to adding support for a wide variety of printers. One goal is to autodetect printer hardware when it is attached and to allow the system administrator to customize the printer configuration. Although this goal has been only partially met, it does cover many common brands of printers. Figure 4-13 shows the setup windows for one such brand, Lexmark. The printer's USB cable was attached, and for this model OpenSolaris auto-matically detected it and selected an appropriate driver. The Print Manager lets you select and test the brand, model, and driver for more than 50 manufacturers and hundreds of models.
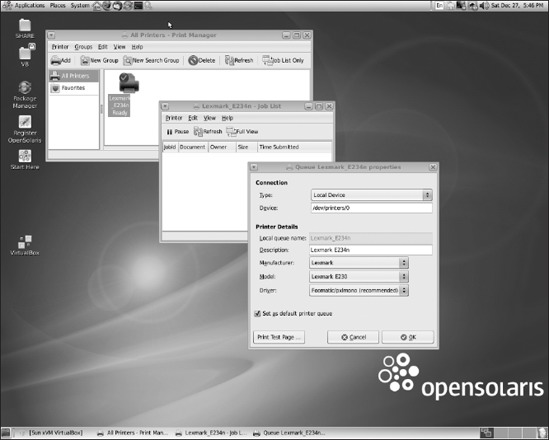
Figure 4-13. Configuring a printer
Summary
You've installed OpenSolaris, explored some of its similarities to familiar Linux environments as well as its differences, learned how to add software packages to it, and learned how to keep your OS and applications up to date using the Image Packaging System. Now you're ready to start using OpenSolaris and its special features to host your web applications and other software.