
You're fresh off exploring Spring and OSGi as stand-alone technologies. Now it's time for you to experience what both have to offer in tandem. This chapter will focus on the different layers at which a Java application designed around Spring can benefit from integrating OSGi, as well as what additional steps or software you need to make use of in order to obtain the desired results.
I wouldn't expect you to take a leap of faith and combine Spring and OSGi just because "you can," so I'll start by elaborating on the high-level benefits of doing so.
OSGi is about the packaging, versioning, and dynamic loading of Java applications, while Spring is about pursuing a pragmatic approach to developing Java applications using POJOs and IoC. So OSGi and Spring address orthogonal[11] concerns, as a set of mutually perpendicular axes meeting at right angles. OSGi's strengths (outlined in Chapter 1) can be greatly enhanced by leveraging the Spring Framework, gaining from the following techniques:
OSGi's core services can make use of Spring's dependency injection approach, making the development of OSGi-bound classes simpler and more amenable to testing, traits that are highly desirable in enterprise applications.
OSGi can leverage Spring's ample foundation for delivering enterprise-grade applications, granting it faster ramp-up times for creating RDBMS and web-bound applications.
Similarly, Spring's already popular approach has much to gain from adopting some of OSGi's features, yielding the following benefits:
Spring's overall dependency injection technique can be performed more intelligently with the help of OSGi's dynamic-loading capabilities.
Class libraries used in Spring applications can be shared more easily, with a lesser threat of class conflicts and an overall reduced memory footprint due to OSGi's awareness of other bundles (JARs) running in the system.
Spring applications can be designed to support class versioning, thanks to OSGi's capabilities in this area.
Spring beans can be registered as OSGi services, making them readily available to other bundles (JARs) running in the system.
As you can see from some of these benefits, the integration process of Spring and OSGi entails modifying the way you design Java classes themselves, the way you package Java applications, and, of course, the way in which you actually deploy this latter type of project.
The next section explores the different layers at which you will need to incorporate new approaches in order to make Spring and OSGi click together.
Due to how Spring and OSGi use techniques that are orthogonal to one another, you need to make a coordinated effort in various areas that is best understood by using layers. The following sections address such layers, including the necessary tools and resources needed to integrate Spring and OSGi.
The application design layer of integration refers to the classes that make up an application, which go on to form the building blocks for each platform: services for OSGi and beans for Spring.
As you learned in Chapter 1, OSGi's architecture is based primarily on the use of services, which can be accessed, searched, or registered against a central OSGi repository in order to achieve the many dynamic behaviors offered by the platform.
The way in which these services are made use of—accessed, searched, and registered—is done using a sequence of procedural calls, requiring explicit and extensive use of OSGi APIs to achieve such steps; if you don't recall the process, refer back to Listing 1-16, which contains an OSGi service registration sequence.
Similarly, the composition of services, which can range from a custom-made HelloWorld service to an HttpService, is also based on the same kind of procedural sequence for defining such things as the dependencies a service might rely on.
So what if, instead of using sequences of procedural calls to create and perform actions against OSGi services, Spring's IoC/DI technique were used? It turns out that by going down this path, OSGi services not only become simpler to access, register, and perform queries on, but also can be easier to create and test, given they will be IoC enabled, fulfilling their dependencies and further avoiding the need to make use of specific APIs.
Turning our attention to Spring's bean-centric approach, while the use of such a design has brought the framework to the mainstream in the Enterprise Java market, there are also a few lessons that can be learned from something like OSGi.
For the most part, every bean and application library that makes up a Spring application is declared on the standard Java CLASSPATH to load Java classes, a process that can lead to unresolved class dependencies and class conflicts. Add to this that beans in different JAR files are unaware of each other's presence, and you have two clear areas in which OSGi can offer its dynamic-loading capabilities, as well as its service registry for localizing cross-JAR beans.
Additionally, other areas like versioning, which come integrated with OSGi, can also bring more functionality into Spring's already powerful IoC/DI approach, making OSGi an even more compelling partner.
Of course, in order for Spring beans to accommodate all these OSGi features, they would need to morph into a type of OSGi service, thus being capable of supporting versioning, dynamic loading, and all the other features available through OSGi's framework.
In this case, all these gaps in both platforms—OSGi services morphing into Spring beans and vice versa—are filled through the use of additional artifacts like additional descriptors and classes. These are then brought together using a special glue called the Spring Dynamic Modules for OSGi, or Spring-DM.
This last initiative, spearheaded by the people behind the Spring Framework, is core to integrating both Spring and OSGi, for it is this subproject that makes sense out of those special OSGi extensions inside the context of the Spring Framework, and similarly, makes Spring extensions click inside an OSGi environment.
For the moment, I will leave the details of Spring-DM to the Hello World example presented in this chapter and the remainder of the book to concentrate on another level of integration between Spring and OSGi: application packaging.
As you learned in Chapter 2, Spring applications make use of two widely known Java packaging formats, Java Archives (JARs), for packaging bean classes and other supporting class files, and Web Archives (WARs), which serve to deploy full-blown application units inside Java EE application servers/containers. WARs contain JARs, XML descriptors, and GUI web templates like JSPs.
Similarly, in Chapter 1 you explored how OSGi, in order to achieve its intended purpose, requires a special packaging format. This format, though similar in nature to a JAR, requires an accompanying MANIFEST.MF file with special OSGi headers.
The rift in this layer occurs due to these differing approaches used in both platforms. For starters, the packaging formats used by Java application servers—which are typically used to deploy Spring applications—occur in sandboxes, with JAR files contained in WARs operating in a sandbox isolated from communicating with any other WARs or external JARs used elsewhere.
Of course, these sandboxes are in place by design to avoid any potential conflicts or class clashes, but in OSGi sandboxes have no place, for they only thwart the intended purpose behind the platform, which is to dynamically share resources across a system; a bundle managed through an OSGi framework effectively polices resources, instead of relying on a sandbox approach.
Similarly, OSGi's core packaging unit, the bundle, fulfills the duties of both standard JAR files and of a deployable unit like a WAR. This is due to OSGi environments operating on the premise that a packaging unit is always deployable no matter what it contains—class files, libraries, descriptors—so long as it also contains the appropriate OSGi manifest.
Given these more general-purpose packaging characteristics, bundles are the preferred packaging format when integrating Spring and OSGi. The consequence though of using bundles as the packaging format under these circumstances is the need to always include special OSGi headers in a JAR's MANIFEST.MF file, declaring a bundle's reliance on external packages, what it can offer other running bundles in the system, and specifying the many other OSGi behaviors described in Chapter 1.
For Spring application development, this can add some overhead, since each bundle—JAR or WAR—used in an application needs to incorporate this additional manifest, a process that applies equally to classes developed for the application and any staple libraries used by the application itself, such as an XML parser, JPA implementation, or some other variation.
While nothing much can done to avoid this burden for bundles pertaining to an application's domain model, the people behind Spring have put together a repository of bundles that are typically used as libraries in Spring applications, therefore reducing the need for end users to OSGi'fy standard staple JAR libraries.[12] You will make use of this last repository along with the Spring-DM framework in the Hello World application presented in this chapter. But first, let's take a look at the last layer of integration influencing the combination of Spring and OSGi.
The application servers or containers on which Spring applications are deployed are designed around a formal set of specifications defined by numerous Java EE expert groups, many of which are currently not in complete sync with OSGi's approach.
So at this level of integration between Spring and OSGi there are various workable scenarios that depend upon the application server/container you make use of, so let's explore such possibilities.
Scenario 1: Application Server Running WARs Embedded with OSGi
This is the most straightforward manner in which you can deploy Spring and OSGi applications, because it doesn't require changing the underlying infrastructure used to deploy Java EE applications. Under these circumstances though, while you could effectively use even a J2EE application server, circa 1999, and still make use of Spring and OSGi, this scenario is also one in which the benefits are less palpable. Let's see why.
You're already aware that standard application servers/containers rely on the notion of deploying WARs, as outlined earlier. However, this packaging format operates in a type of sandbox similar to how non-OSGi JARs do. Figure 3-1 illustrates just how application servers behave upon deploying WAR files.
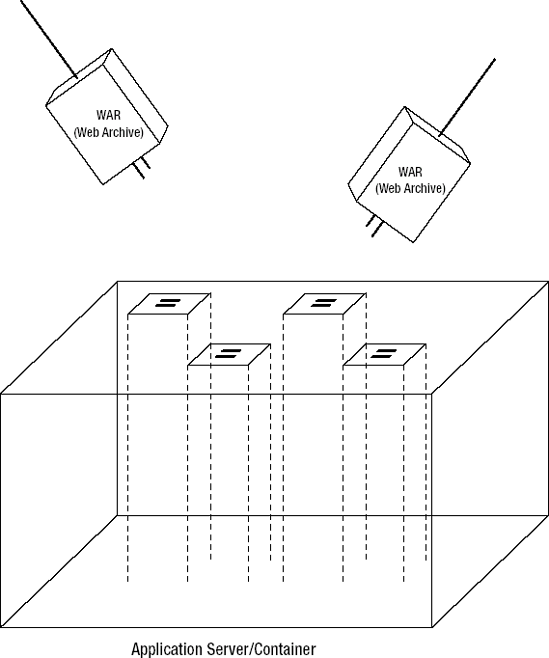
Notice how each WAR is isolated from the others. What the application server is doing is generating different class loaders for each WAR, effectively granting each WAR its own CLASSPATH sandbox on which to operate, a process that is dictated by Java EE specs.
At this level, and given OSGi's small footprint, it's viable to embed an OSGi environment inside a WAR and let it manage that one particular class loader or sandbox, in this manner granting all the potential Spring class files and Spring libraries packaged as bundles the benefits OSGi has to offer.
However, don't lose sight of the fact that while you may have one WAR file reaping the benefits of OSGi, the benefits are still confined to one sandbox, with any other application running on the same application server/container also needing to embed OSGi in its underlying WAR package.
All this again is by design, since application servers/containers have to support different class loaders for each deployed WAR, which begs the question, isn't there a way to have one unique classpath managed by OSGi and have all deployed WARs managed by that one instance? Well, the answer is yes, but there is a twist as to how an application server/container needs to behave with respect to class loading, which takes us to the next scenario.
Scenario 2: Application Server Running Inside an OSGi Environment with Other Bundles
You might not have realized it, but you've already used an application server running as an OSGi bundle in the example presented in Chapter 1. Back in that example, you made use of the Jetty web server to expose OSGi's HttpService. On that occasion, however, it was a stripped-down version containing solely OSGi's HttpService. What I am referring to in this scenario is a full-fledged application server/container based on these principles.
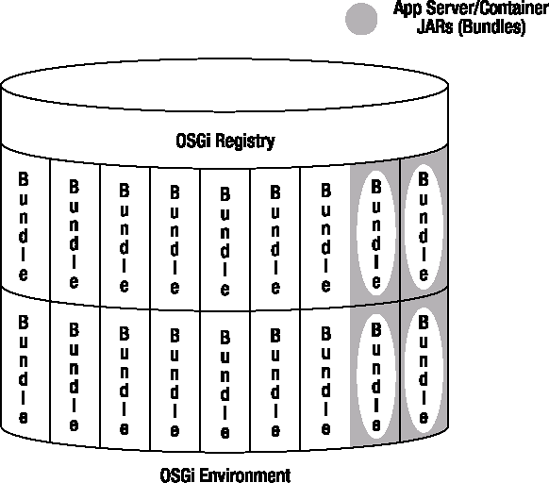
Application servers/containers operating under such principles—which from here on I will refer to as OSGi'fied application servers—behave in a totally different manner from those under Scenario 1, since there is absolutely no notion of classpath loaders, and we have one and only one global class space administered by OSGi.
Of course, this effectively supersedes the notion of using WAR files and the whole process of how classes and libraries contained in these latter packages are loaded into a JVM. This is on account of both the application server and the applications deployed on it relying exclusively on packages made up as OSGi bundles. Figure 3-2 depicts how this setup looks.
As you can conclude from this figure, using OSGi and Spring in such fashion entails employing an OSGi'fied application server to support and expose an application's logic; it's no doubt a step forward from Scenario 1, since there is one global class space administered by OSGi, but nevertheless represents a trade-off of another nature.
Currently, only a handful of application servers are said to be OSGi'fied, which is to say they have all their underlying JARs equipped with the corresponding OSGi manifests. But herein lies a bit of confusion, since even an OSGi'fied application server can still run without OSGi, or inclusively there are non-OSGi'fied servers running OSGi in their backplane.
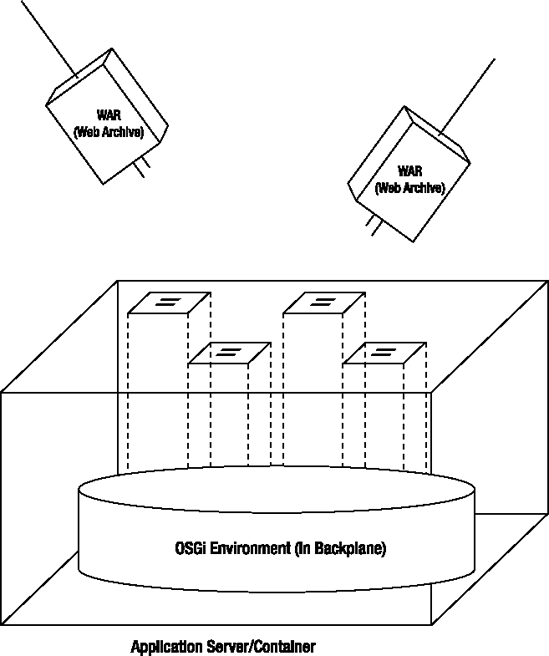
Figure 3-2 depicts an application server with its main entry point being an OSGi environment, in which all requests are handled by an OSGi-administered application server; in this case, we have an OSGi'fied server communicating with other OSGi application bundles.
However, having an application server's JAR files contain an OSGi manifest doesn't necessarily mean OSGi is required. Recall that a manifest simply contains instructions, and a JAR is equally usable without OSGi. This means that all the composing application server JAR files can be bootstrapped outside OSGi, in essence having a standard Java EE application just like in Scenario 1.
The confusion in these circumstances further arises from Java EE application servers that use OSGi in their backplane, yet don't support the deployment of OSGi application bundles. In these cases, in order to use OSGi you would still need to go down Scenario 1, embedding Spring/OSGi inside a WAR, since an OSGi backplane is simply used internally. See Figure 3-3, which illustrates how this scenario plays out, and read the sidebar "OSGi'fied Application Server/Container and OSGi Backplanes," which contains a more extensive explanation on the subject.
To many the thought of using an OSGi'fied application server/container on top of an OSGi environment might seem a bit radical. After all, what are you supposed to do with all those standard WAR files you already have?
For those willing to accept a partial conversion of WAR files to OSGi bundles, Spring-DM offers support, effectively delegating a standard WAR file provisioned with an OSGi manifest—which could include servlets, JSPs, and other Java web application artifacts—to run inside an OSGi'fied application server, an architecture that you will explore firsthand in the Hello World application presented in this chapter.
But let's assume you are not the middle-ground type, and you want your WARs deployable as they currently stand but still want the capacity to potentially deploy OSGi bundles in the same environment. Isn't there an application server/container capable of supporting both? Yes, there is as a matter of fact, and Scenario 3 covers this last option for integrating Spring and OSGi in relation to application servers.
Scenario 3: Application Server Running Native OSGi Bundle and WARs
Supporting the deployment of both native OSGi bundles and WAR files is a hybrid type of application server/container, as illustrated in Figure 3-4.
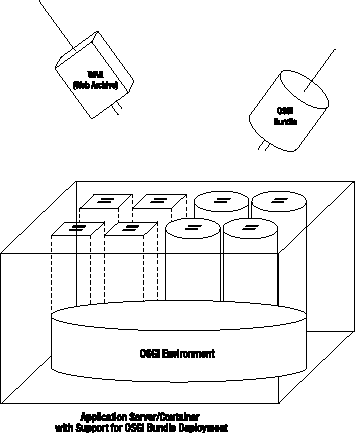
In this image you can appreciate how the best of Scenario 1 and Scenario 2 are brought to fruition, with support for deploying standard WAR files used in Java EE applications, as well as the OSGi bundle packaging format.
As this is a relatively new paradigm for Java EE application servers, there is only one application server in the market that currently supports this scenario: the SpringSource dm Server.
The SpringSource dm Server is an application server capable of deploying standard Java EE web applications, built on the foundations of Apache Tomcat and Eclipse OSGi Equinox. (Eclipse OSGi Equinox is another OSGi implementation based on the same standard as the Apache Felix OSGi environment used in Chapter 1.) The platform also makes special provisions when it comes to dealing with class loaders and the way OSGi bundles are deployed, not to mention making use of a custom kernel to deal with cross-functional issues, like persistence to RDBMS, needed to deploy OSGi applications in enterprise settings.
While it's still early to tell with certainty whether vendors of other Java EE application servers such as IBM and Oracle/BEA will support this hybrid model of OSGi/WAR deployment in future versions of their products, the approach brings clear value to those wanting to obtain the greatest benefit from using Spring/OSGi technology, while still leaving room for standard Java EE web application deployment.
Chapter 5 will take a look at some special aspects of using the SpringSource dm Server, including its architecture and deployment style, but next it's time to get into the thick of things and create your first application using Spring and OSGi.
The Hello World application you are about to start creating will take you through the most basic steps in combining Spring and OSGi technology, such as logically partitioning an application into OSGi bundles and creating the corresponding OSGi manifests, to more advanced topics like deploying an application into an OSGi'fied application server/container and making it accessible through the Web. Figure 3-5 illustrates the bundles that will make up the application and the relationship between each one.
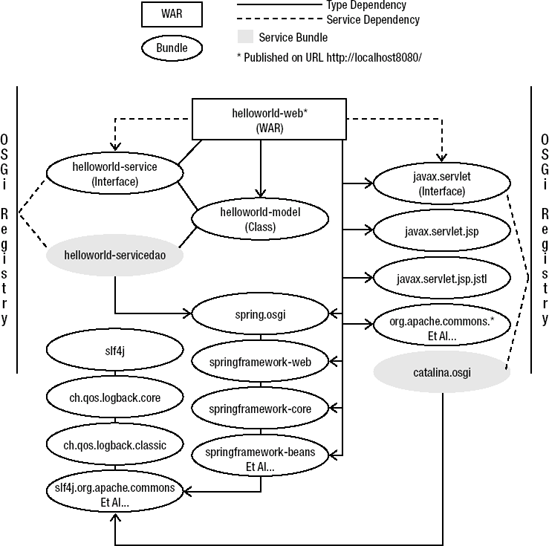
Even though Figure 3-5 illustrates various bundles, don't let the number startle you. Many of the bundles in the application correspond to prepackaged bundles, such as those belonging to Apache Tomcat, SLF4J's logging facilities, and the Spring Framework itself. You will create only four of the bundles illustrated in Figure 3-5 in the upcoming sections.
Table 3-1 lists the software you will need to download and install prior to embarking on your first Spring-OSGi project.
Table 3-1. Spring-OSGi Hello World Prerequisites and Downloads
Software | Function | Download Site |
|---|---|---|
Java SE 5 or higher | Java's runtime environment |
|
Java Ant 1.6 or higher | Popular Java build project, used for easing the compilation and creation of OSGi bundles |
|
Eclipse Equinox | OSGi 4.0 reference implementation developed by the Eclipse foundation | http://download.eclipse.org/equinox/drops/ S-3.5M1-200808071402/download.php?dropFile=org. eclipse.osgi_3.5.0.v20080804-1730.jar |
Spring Dynamic Modules for OSGi 1.2 (Spring-DM) | Spring's central OSGi integration subproject |
|
An OSGi'fied version of the Apache Tomcat application server/container | http://s3browse.com/getObject/maven.springframework. org/osgi/org/springframework/osgi/catalina.osgi/ 5.5.23-SNAPSHOT/catalina.osgi-5.5.23-20080425. 154256-4.jar | |
Jasper 5.5.23 (OSGi'fied) | An OSGi'fied version of the Jasper 2 JSP Engine—a companion for Apache Tomcat's application server/container for compiling JSPs | http://s3browse.com/getObject/maven.springframework. org/osgi/org/springframework/osgi/jasper.osgi/ 5.5.23-SNAPSHOT/jasper.osgi-5.5.23-20080305. 122359-4.jar |
Tomcat OSGi Service Bootstrapper | Program that allows an OSGi'fied Apache Tomcat application server to be published as an OSGi service | http://s3browse.com/getObject/maven.springframework. org/osgi/org/springframework/osgi/catalina.start. osgi/1.0-SNAPSHOT/catalina.start.osgi-1.0- 20080425.161832-4.jar |
It's very likely you may have some of this software already installed on your workstation. If so, just ensure that you have the suggested versions, as minor version variations may hold you back in getting through the outlined steps.
Additionally, since some of this software was already used in the OSGi and Spring Hello World applications presented in Chapters 1 and 2, installation instructions for those packages will not be presented here, so please refer to the cited chapters for detailed installation instructions.
To complete the download list, Table 3-2 contains the OSGi'fied bundle dependencies needed in this Hello World project, all of which can be downloaded from the SpringSource Enterprise Bundle Repository.
Table 3-2. OSGi'fied Bundles Used in the Hello World application—From the SpringSource Enterprise Bundle Repository
OSGi Bundle | Download URL[a] |
|---|---|
| [a] | |
Logging | |
LOGback Core | http://www.springsource.com/repository/app/bundle/version/ detail?name=com.springsource.ch.qos.logback.core&version=0.9.9 |
LOGback Classic | http://www.springsource.com/repository/app/bundle/version/ detail?name=com.springsource.ch.qos.logback.classic&version=0.9.9 |
SLF4J API | http://www.springsource.com/repository/app/bundle/version/ detail?name=com.springsource.slf4j.api&version=1.5.0 |
Jakarta Commons Logging over SLF4J | http://www.springsource.com/repository/app/bundle/version/ detail?name=com.springsource.slf4j.org.apache.commons.logging&versio n=1.5.0 |
Log4J Logging over SLF4J | http://www.springsource.com/repository/app/bundle/version/ detail?name=com.springsource.slf4j.org.apache.log4j&version=1.5.0 |
Apache Tomcat | |
Java Expression Language API | http://www.springsource.com/repository/app/bundle/version/ detail?name=com.springsource.javax.el&version=1.0.0 |
Java JSP API | http://www.springsource.com/repository/app/bundle/version/ detail?name=com.springsource.javax.servlet.jsp&version=2.1.0 |
Java Servlet API | http://www.springsource.com/repository/app/bundle/version/ detail?name=com.springsource.javax.servlet&version=2.5.0 |
Apache Standard Tag Libraries | http://www.springsource.com/repository/app/bundle/version/ detail?name=com.springsource.org.apache.taglibs.standard&version=1.1.2 |
Java JSP Standard Tag Library | http://www.springsource.com/repository/app/bundle/version/ detail?name=com.springsource.javax.servlet.jsp.jstl&version=1.1.2 |
Apache Commons Expression Language | http://www.springsource.com/repository/app/bundle/version/ detail?name=com.springsource.org.apache.commons.el&version=1.0.0 |
Spring | |
Spring Core | http://www.springsource.com/repository/app/bundle/version/ detail?name=org.springframework.core&version=2.5.4.A |
Spring Beans | http://www.springsource.com/repository/app/bundle/version/ detail?name=org.springframework.beans&version=2.5.4.A |
Spring Context | http://www.springsource.com/repository/app/bundle/version/ detail?name=org.springframework.context&version=2.5.4.A |
Spring Context Support | http://www.springsource.com/repository/app/bundle/version/ detail?name=org.springframework.context.support&version=2.5.4.A |
Spring AOP | http://www.springsource.com/repository/app/bundle/version/ detail?name=org.springframework.aop&version=2.5.4.A |
AOP Alliance | http://www.springsource.com/repository/app/bundle/version/ detail?name=com.springsource.org.aopalliance&version=1.0.0 |
Java Common Annotations | http://www.springsource.com/repository/app/bundle/version/ detail?name=com.springsource.javax.annotation&version=1.0.0 |
Spring Web Servlet | http://www.springsource.com/repository/app/bundle/version/ detail?name=org.springframework.web.servlet&version=2.5.4.A |
Spring Web | http://www.springsource.com/repository/app/bundle/version/ detail?name=org.springframework.web&version=2.5.4.A |
CGLIB Code Generation Library | http://www.springsource.com/repository/app/bundle/version/ detail?name=com.springsource.net.sf.cglib&version=2.1.3 |
Apache Commons Collections | http://www.springsource.com/repository/app/bundle/version/detail? name=com.springsource.org.apache.commons.collections&version=3.2.0 |
Backport Util Concurrent | http://www.springsource.com/repository/app/bundle/version/ detail?name=com.springsource.edu.emory.mathcs.backport&version=3.0.0 |
[a] See the book's source code download, which contains these bundles, on the Apress web site in the Book Extras section at | |
Installing Spring Dynamic Modules for OSGi
The process for installing Spring Dynamic Modules for OSGi, or Spring-DM, consists of just one step: unzipping the downloaded file into a directory of your choice. Since you will only be using the various libraries contained in this file, there is nothing more to do with respect to using Spring-DM right now; when the need arises I will indicate where to copy files from this download.
Installing Eclipse Equinox
The process for installing Eclipse Equinox is very straightforward, given it's a self-contained JAR file. In the directory where you downloaded Eclipse Equinox's JAR file, invoke the following command: java -jar org.eclipse.osgi_3.5.0.v20080804-1730.jar -console
This last step will start an OSGi shell session, similar to Apache Felix's shell session illustrated in Chapter 1. The commands available in Eclipse Equinox's shell are strikingly similar to Apache Felix's shell, since they're both OSGi environments. You can enter help to obtain a detailed list of commands or press Ctrl+C to exit the shell session.
Additionally, starting this shell will also generate a directory named configuration under the working directory of Eclipse Equinox's JAR file. This directory serves various purposes: to contain Eclipse Equinox's main configuration file, to contain its log files, and to maintain Eclipse Equinox's application bundle states. If you move to the configuration directory at this juncture, you will see the org.eclipse.osgi directory and a log file.
The org.eclipse.osgi directory is very important in the sense that it's here that Eclipse Equinox keeps track of bundles between sessions. No matter how many times you start or stop an Eclipse Equinox shell, it will always perform a search in this directory to replicate the last session's actions. The org.eclipse.osgi directory functions like the profile concept used in Apache Felix, in which a directory is used to maintain copies of installed bundles and their states.
The log file appearing at this initial stage contains an error message. The reason for this error message is because Eclipse Equinox is designed to work in tandem with Eclipse's flagship platform, and therefore it attempts to bootstrap other JAR files in the process. In order to avoid this error message, you will need to create an Eclipse Equinox configuration file.
Eclipse Equinox's main configuration file is a simple text file that needs to be placed under the configuration directory by the name config.ini. For the moment, add the line eclipse.ignoreApp=true inside this file to avoid Eclipse Equinox from attempting to start Eclipse's flagship platform at startup.
If you restart an Eclipse Equinox shell session with this configuration file, you will note that no more log files are generated at startup. Next, you will install Apache Tomcat aided by this same Eclipse Equinox configuration file.
Installing Apache Tomcat (OSGi'fied)
The process for installing Apache Tomcat (OSGi'fied) consists of colocating its OSGi'fied JAR and required bundle dependencies alongside Eclipse Equinox, the latter of which will serve as the underlying OSGi environment. In order to simplify the startup sequence of an OSGi'fied Apache Tomcat, the first thing you will need to do is modify Eclipse Equinox's configuration file to bring up Apache Tomcat without needing to go into an OSGi shell.
Inside Eclipse Equinox's configuration directory, reedit the config.ini file to automatically load Apache Tomcat upon startup. Listing 3-1 contains a snapshot of how the config.ini file should look to initiate Apache Tomcat at startup.
Example 3-1. Eclipse Equinox config.ini Bootstrapping OSGi'fied Apache Tomcat App Server
osgi.bundles=logging/com.springsource.ch.qos.logback.core-0.9.9.jar@start,
logging/com.springsource.ch.qos.logback.classic-0.9.9.jar,
logging/com.springsource.slf4j.api-1.5.0.jar@start,
logging/com.springsource.slf4j.org.apache.commons.logging-1.5.0.jar@start,
logging/com.springsource.slf4j.org.apache.log4j-1.5.0.jar@start,
tomcat/com.springsource.javax.servlet-2.5.0.jar@start,
tomcat/com.springsource.javax.el-1.0.0.jar@start,
tomcat/com.springsource.javax.servlet.jsp-2.1.0.jar@start,
tomcat/com.springsource.org.apache.commons.el-1.0.0.jar@start,
tomcat/jasper.osgi-5.5.23-20080305.122359-4.jar,
tomcat/com.springsource.org.apache.taglibs.standard-1.1.2.jar@start,
tomcat/com.springsource.javax.servlet.jsp.jstl-1.1.2.jar@start,
tomcat/catalina.osgi-5.5.23-SNAPSHOT.jar@start,
tomcat/catalina.start.osgi-1.0-20080425.161832-4.jar@start
eclipse.ignoreApp=true
Warning
All statements added to Eclipse Equinox's osgi.bundles parameter require a trailing backslash ), except for the last one—prior to eclipse.ignoreApp=true. Ensure this syntax is enforced; otherwise Eclipse Equinox will not load these files at startup.
The first five bundles added to the Eclipse Equinox configuration file are those pertaining to logging, which will allow you to observe debugging information for Apache Tomcat and any other bundle deployed onto OSGi relying on either Jakarta Commons, Log4J, or SLF4J for logging purposes. Place each of these bundles under a subdirectory named logging in the same directory as Eclipse Equinox's JAR file, consulting Table 3-2 for the corresponding download links for these bundles.
The remaining bundles are those related to the OSGi'fied version of Apache Tomcat, hence their location under a subdirectory named tomcat, which also needs to be created alongside Eclipse Equinox's main JAR file.
The first bundle is Java EE's OSGi'fied servlet implementation, which allows the execution of such components.
Next, you will find six supporting libraries also needed by Apache Tomcat that include those supporting JavaServer Pages (JSP), Java Standard Tag Libraries (JSTL), and the expression language used in these last two front-end Java technologies. See Table 3-2 for the corresponding download links on these OSGi bundles.
The second-to-last line is Apache Tomcat's OSGi bundle itself, with the last line providing the bootstrapping bundle necessary to publish Apache Tomcat as an OSGi service. See Table 3-1 for the corresponding download links on these OSGi bundles.
Once you copy all these OSGi'fied JARs into a subdirectory named tomcat in the same directory of Eclipse Equinox main JAR file, perform the following test to ensure Apache Tomcat's correct operation:
Execute
java -jar org.eclipse.osgi_3.5.0.v20080804-1730.jar -consoleto start an OSGi session. At this point you will be placed inside an OSGi shell that, prior to presenting a final prompt, will display a list with all the installed OSGi bundles running in the system, including those related to Apache Tomcat.If you open a browser and point it to
http://localhost:8080/, you should see an empty page served by Tomcat; the empty page is on account of there being no applications running on the server.In case this test fails, consult the error messages in Eclipse Equinox's configuration directory. Check under the
configurationdirectory of Eclipse Equinox for files with alogextension—these will contain detailed information on errors.
Installing the Remaining Downloads
The remaining downloads are OSGi bundles that will aid you in the creation of the Hello World Spring-OSGi application. For now, just take note of their location; you will move them around when the need arises.
Setting Up the Hello World "Playground" Directory Structure
Now that you've got the tools working, it's time to create the proper workspace in which to maneuver. Building on a similar approach to earlier chapters, create a directory structure like the one illustrated in Figure 3-6.

The directory structure functions as follows:
build.xml: This is the main Java Ant configuration file containing the necessary tasks to build the application.classes: All compiled Java classes are placed in this directory.dist: All built bundles are placed in this directory.lib: All JARs needed to compile Java sources are placed in this directory.src: All Java sources files composing the application are placed accordingly in subdirectories inside this directory, including the application descriptor used in the web-tier bundle insideWEB-INF/ch3and the corresponding OSGi manifests for each bundle placed insideMETA-INF/ch3/<bundle_type>.
The domain model you are about to create will be composed of a single class, and it will serve the Data Access Object (DAO) that you will create later on. Unlike the domain model presented in Chapter 2, this domain model will be employed only by a DAO using in-memory access and not a RDBMS; the reasons for this will become more apparent later on in Chapters 5 and 7 when you explore Java persistence in the context of OSGi, which is considered a little more elaborate to set up than a Hello World example.
Listing 3-2 contains the HelloWorld class used as the domain model in this introductory Spring-OSGi application.
Example 3-2. HelloWorld Model Class
package com.apress.springosgi.ch3.model;

import java.util.Date;

public class HelloWorld {

    private String message;
    private Date currentTime;
    private double modelVersion;

    public void setMessage(String message) {
        this.message = message;
    }
public String getMessage() {
return message;
}
public void setCurrentTime(Date currentTime) {
this.currentTime = currentTime;
}
public Date getCurrentTime() {
return currentTime;
}
public void setModelVersion(double modelVersion) {
this.modelVersion = modelVersion;
}
public double getModelVersion() {
return modelVersion;
}
public HelloWorld(String message, Date currentTime, double modelVersion) {
this.message = message;
this.currentTime = currentTime;
this.modelVersion = modelVersion;
}
public HelloWorld() {
}
}As you can observe, the model is a standard POJO with three getter/setter methods and corresponding constructor methods; the actual data, though, will never make it beyond memory and will only be actioned one-way through the data service used by the application.
The domain class will be contained in its own OSGi bundle, making it the first of four bundles in which the Hello World application will be partitioned. Since this bundle will possess only one class, the requirements for the accompanying OSGi manifest, which can be observed in Listing 3-3, are simple.
Example 3-3. MANIFEST.MF for the Application Model
Bundle-Version: 1.0
Bundle-SymbolicName: com.apress.springosgi.ch3.model
Bundle-Name: HelloWorld Spring-OSGi Model
Bundle-Vendor: Pro Spring-OSGi
Export-Package: com.apress.springosgi.ch3.model;version="1.0.0"
Bundle-ManifestVersion: 2
Most of the key-value pairs used in this OSGi manifest should be familiar to you from your initial OSGi exploration. They are used for indicating versioning and naming characteristics for the bundle, as well as the packages a bundle makes available to other bundles in the system.
As far as creating the actual bundle, you will once again rely on Apache Ant to output a package containing the model class and OSGi manifest. Copy the MANIFEST.MF file in Listing 3-3 to the /META-INF/ch3/model/ subdirectory of your Hello World "playground." Next, modify the main build.xml file located in your Hello World "playground" to include the Ant task presented in Listing 3-4.
Note
If you skipped the example presented in Chapter 1, you will not have a preexisting build.xml file to modify. If this is the case, you will need to copy the build.xml file presented in Listing 1-6, which is the base Apache Ant file needed by Listing 3-4.
Example 3-4. Ant Task for Building the OSGi Model Bundle
<target name="ch3" depends="compile" description="Build Chapter 3 Spring-OSGi Application"> <echo message="-------------- Building Chapter 3 Spring-OSGi Applicationfor Pro Spring-OSGi --------------"/> <property name="ch3.dir" value="${dist.dir}/ch3/"/> <mkdir dir="${ch3.dir}"/><jar destfile="${ch3.dir}/helloworld-model.jar" manifest="${src.dir}/META-INF/ch3/model/MANIFEST.MF"><fileset dir="${build.dir}"><include name="com/apress/springosgi/ch3/model/*"/></fileset><metainf dir="${src.dir}/META-INF/ch3/model/"/></jar></target>
This Ant task starts by defining a dependency on the compile target, guaranteeing that all classes are compiled prior to creating a bundle, followed by the creation of a subdirectory in which the application bundles are placed.
Next is the actual <jar> definition that creates the bundle; it will equip the bundle with the manifest file located in ${src.dir}/META-INF/ch3/model/, as well as include the class files located under the com/apress/springosgi/ch3/model subdirectory—the domain model package—and inclusively copy any files located in the subdirectory ${src.dir}/META-INF/ch3/model/ to the bundle's META-INF directory.
Ensuring you have copied all the necessary bundles files to the appropriate "playground" directories, execute the command ant ch3, and the model bundle should be generated with the name helloworld-model.jar and placed under the dist/ch3 subdirectory.
For the moment, you will leave the deployment of the model bundle until you have a little more to work with. The text that follows will continue describing the packaging of the service bundle.
Following the same pattern as the stand-alone Spring application presented in Chapter 2, the data service used in this Hello World application will be composed of an interface describing the various actions performed on the model, as well as an implementation class containing the actual DAO. Listings 3-5 and 3-6 contain the classes corresponding to the HelloWorld service.
Example 3-5. HelloWorldService Service Interface
package com.apress.springosgi.ch3.service;

import com.apress.springosgi.ch3.model.HelloWorld;

public interface HelloWorldService {

    public HelloWorld find();

    public HelloWorld update(HelloWorld hw);

    public void save(HelloWorld hw);

    public void delete(HelloWorld hw);
}
Example 3-6. HelloWorldService Service Implementation Class
package com.apress.springosgi.ch3.servicedao;

import com.apress.springosgi.ch3.service.HelloWorldService;

import java.util.Date;
import com.apress.springosgi.ch3.model.HelloWorld;

public class HelloWorldDAO implements HelloWorldService {

    public HelloWorld find() {
        // Model object will be create here
        HelloWorld hw = new HelloWorld("Hello World",new Date(),1.0);
        return hw;
    }

    public HelloWorld update(HelloWorld hw) {
        hw.setCurrentTime(new Date());
        return hw;
    }

    public void save(HelloWorld hw) {
        throw new UnsupportedOperationException("Can't save anything, no RDBMS
back here");
    }

    public void delete(HelloWorld hw) {
      throw new UnsupportedOperationException("Can't delete anything, no RDBMS
back here");
  }

}
back here");
}
public void delete(HelloWorld hw) {
throw new UnsupportedOperationException("Can't delete anything, no RDBMS
back here");
}
}The first thing to note about these last listings is that both belong to different Java packages. Since OSGi grants access to a bundle's classes on a package basis, this ensures that other bundles are capable of accessing a service only by its interface, thereby protecting the DAO implementation from being accessed directly by other bundles.
The service in theory supports the standard CRUD (Create, Read, Update, Delete) operations performed on most data models—though technically two are supported, since two explicitly throw an exception given the lack of a data store: the find() method, which instantiates an inline HelloWorld object via the class's constructor method, and the update() method, which modifies a HelloWorld object's currentTime field.
Armed with these code listings, let's explore how each one needs to be packaged in order to be deployed in an OSGi environment.
Unlike the model bundle, the packaging for the application's service is a little more interesting, since it will not only rely on the model bundle, but also need to eventually provide functionality to the web bundle in order to expose data. Following the recommended practice of separating interface and implementing class into different bundles, the application's service will be split into a service implementation (DAO) bundle and an accompanying service interface bundle.
Listing 3-7 contains the service implementation (DAO) bundle manifest, and Listing 3-8 contains the service interface bundle manifest.
Example 3-7. MANIFEST.MF for the Application Service Implementation (DAO)
Bundle-Version: 1.0
Bundle-SymbolicName: com.apress.springosgi.ch3.servicedao
Bundle-Name: HelloWorld Spring-OSGi Service DAO
Bundle-Vendor: Pro Spring-OSGi

Import-Package: com.apress.springosgi.ch3.model;version="1.0.0",
 com.apress.springosgi.ch3.service;version="1.0.0",

 org.springframework.util;version="2.5.4",
 org.springframework.beans.factory.xml;version="2.5.4",
 org.springframework.aop;version="2.5.4",
 org.springframework.aop.framework;version="2.5.4",

 org.springframework.osgi.service.exporter.support;version="2.5.4",

Bundle-ManifestVersion: 2
Example 3-8. MANIFEST.MF for the Service Interface
Bundle-Version: 1.0

Bundle-SymbolicName: com.apress.springosgi.ch3.service

Bundle-Name: HelloWorld Spring-OSGi Service

Bundle-Vendor: Pro Spring-OSGi

Import-Package: com.apress.springosgi.ch3.model;version="1.0.0"

Export-Package: com.apress.springosgi.ch3.service;version="1.0.0"

Bundle-ManifestVersion: 2
As with the model bundle, both manifests import and export packages, including the model's package and several other Spring packages on which the service implementation (DAO) relies. However, merely exporting the class as in the earlier bundle is not all that's required for the service implementation (DAO) bundle. Since the service bundle contains a bean, this particular bean needs to be placed in the OSGi service registry in order for it to be actionable from other bundles.
This registration process relies on the use Spring descriptors, which are employed for both wiring a bean in the standard DI Spring manner—as you did in Chapter 2—and registering a bean in OSGi's central registry as a service. Listing 3-9 contains the Spring descriptor used by the service bundle to fulfill these purposes.
Example 3-9. osgi-context.xml Spring Descriptor
<?xml version="1.0" encoding="UTF-8"?> <beans xmlns="http://www.springframework.org/schema/beans" xmlns:xsi="http://www.w3.org/2001/XMLSchema-instance" xmlns:osgi="http://www.springframework.org/schema/osgi" xsi:schemaLocation="http://www.springframework.org/schema/beans http://www.springframework.org/schema/beans/spring-beans.xsd http://www.springframework.org/schema/osgi http://www.springframework.org/schema/osgi/spring-osgi.xsd"> <!-- Create the helloWorldDAO bean --> <bean id="helloWorldDAO" class="com.apress.springosgi.ch3.servicedao.HelloWorldDAO"/> <!-- Export helloWorldDAO as a service to OSGi via its interface --> <osgi:service ref="helloWorldDAO" interface="com.apress.springosgi.ch3.service.HelloWorldService"/> </beans>
The descriptor in Listing 3-9 is identical to those used in stand-alone Spring applications in one aspect: it instantiates a bean and assigns it an id so other Spring artifacts used in the descriptor can make reference to it. The second declaration is used to register this latter bean as a service using Spring-DM.
At this juncture, there are two points worth emphasizing. The OSGi service registration is made using an interface just like you did in Chapter 1. And the service's underlying object is an actual Spring bean with all the connotations this implies, contrary to a standard Java class that might be intertwined with explicit dependencies.
As to where this descriptor has to be placed, it has to be packaged inside a special subdirectory named spring within a bundle's META-INF directory, allowing Spring-DM to validate and execute such instructions. Don't worry if the explanation behind this descriptor seems a little scant, for the moment this will do; the next chapter is dedicated to describing all the elements available in such a descriptor.
Moving along, and in order to build the application's service bundles, place yourself back at the HelloWorld "playground." Copy the MANIFEST.MF file in Listing 3-7 to /META-INF/ch3/servicedao/, the one in Listing 3-8 to /META-INF/ch3/service/, and the osgi-context.xml file in Listing 3-9 to the subdirectory /META-INF/ch3/servicedao/spring/ of the same "playground." Next, add the instructions presented in Listing 3-10 to the ch3 Ant task of your build.xml file.
Example 3-10. Ant Instruction for Building the OSGi Service Bundle
<jar destfile="${ch3.dir}/helloworld-service.jar" manifest="${src.dir}/META-INF/
ch3/service/MANIFEST.MF">
         <fileset  dir="${build.dir}">
           <include name="com/apress/springosgi/ch3/service/*"/>

         </fileset>
        <metainf dir="${src.dir}/META-INF/ch3/service/"/>
</jar>
<jar destfile="${ch3.dir}/helloworld-servicedao.jar" manifest="${src.dir}/
META-INF/ch3/servicedao/MANIFEST.MF">

         <fileset  dir="${build.dir}">

           <include name="com/apress/springosgi/ch3/servicedao/*"/>

         </fileset>

        <metainf dir="${src.dir}/META-INF/ch3/servicedao/"/>

</jar>
The first <jar> Ant instruction in this listing is charged with creating a bundle with the classes contained under the com/apress/springosgi/ch3/service/ subdirectory and the manifest file located at ${src.dir}/META-INF/ch3/service/. Additionally, the second <jar> Ant instruction creates a bundle with the classes contained under the com/apress/springosgi/ch3/servicedao/ directory and the manifest file located at ${src.dir}/META-INF/ch3/servicedao/, as well as copying the file inside ${src.dir}/META-INF/ch3/servicedao/spring/ to the bundle's /META-INF/spring/ directory, which corresponds to the special spring subdirectory containing the descriptor outlined in Listing 3-9.
If you execute the ant ch3 instruction from the main Hello World "playground" directory once again, the service implementation (DAO) bundle and its corresponding service interface bundle should be generated with the names helloworld-servicedao.jar and helloworld-service.jar and placed under the dist/ch3 subdirectory.
You now have three OSGi bundles ready to be deployed; however, you're still short one bundle, the one pertaining to the user interface. So up next, you will set out on the task of creating the last bundle needed by the Hello World application, the same one that will provide a web-bound interface.
For the web bundle, you will be making use of Spring's MVC project in order to tap into the application bundles created in the last section. I will spare you from discussion of a few of the more Spring MVC-centric subjects to concentrate on Spring-DM/Spring MVC integration issues, so if you are unfamiliar with Spring MVC, I advise you to look over Chapter 2, which details the use of Spring MVC in stand-alone fashion.
The first order of business for the web bundle is creating a controller to broker requests between an application's views and its data services. Listing 3-11 contains the controller used for the Spring OSGi application.
Example 3-11. Spring MVC Controller for Building the OSGi Web Bundle
package com.apress.springosgi.ch3.web;

import java.util.List;
import java.util.Date;

import org.springframework.beans.factory.annotation.Autowired;
import org.springframework.stereotype.Controller;
import org.springframework.web.bind.annotation.RequestMapping;
import org.springframework.web.bind.annotation.RequestMethod;
import org.springframework.web.bind.annotation.RequestParam;
import org.springframework.web.bind.annotation.ModelAttribute;
import org.springframework.ui.ModelMap;

import com.apress.springosgi.ch3.model.HelloWorld;
import com.apress.springosgi.ch3.service.HelloWorldService;

@Controller
public class HelloWorldController {

    private HelloWorldService helloWorldService;

    public void setHelloWorldService(HelloWorldService helloWorldService) {
        this.helloWorldService = helloWorldService;
    }

    public HelloWorldService getHelloWorldService() {
        return helloWorldService;
    }
@RequestMapping(method = RequestMethod.GET)
@ModelAttribute("helloworld")
public HelloWorld home() {
return this.helloWorldService.find();
}
}The first interesting thing to note about this Controller class is how it gets ahold of the HelloWorldService through the setHelloWorldService() method that will serve as an injection point for the service. By using this approach, the service is injected when the controller bean is instantiated in a Spring descriptor. In this case, Spring-DM performs the injection of services into classes, just like Spring performs the injection of beans.
Besides the service's getter/setter methods, the Controller class has one more method, named home(), that returns a HelloWorld object obtained from the HelloWorldService, which according to Spring MVC annotations is invoked when a request to a URL named home is made, placing the returned data inside a variable name helloworld to manipulate within a view template possessing a logical view named home.
The remaining parts of the web bundle are strictly application descriptors. Listing 3-12 contains the first one in the form of web.xml, which is the standard descriptor used in Java web applications.
Example 3-12. web.xml Descriptor for the Web Bundle
<?xml version="1.0" encoding="ISO-8859-1"?>
<web-app xmlns="http://java.sun.com/xml/ns/j2ee"
        xmlns:xsi="http://www.w3.org/2001/XMLSchema-instance"
        xsi:schemaLocation="http://java.sun.com/xml/ns/j2ee http://java.sun.com/
xml/ns/j2ee/web-app_2_4.xsd"
        version="2.4">
        <display-name>Simple Osgi WebApp Bundle</display-name>
        <description>Simple OSGi War</description>

        <context-param>
          <param-name>contextClass</param-name>
          <param-value>org.springframework.osgi.web.context.support.OsgiBundleXml
WebApplicationContext</param-value>
        </context-param>

        <listener>
          <listener-class>
           org.springframework.web.context.ContextLoaderListener
          </listener-class>
        </listener>
<servlet>
<description>
Pro Spring-OSGi MVC Dispatch Servlet
</description>
<display-name>DispatcherServlet</display-name>
<servlet-name>helloworld</servlet-name>
<servlet-class>
org.springframework.web.servlet.DispatcherServlet
</servlet-class>
<load-on-startup>1</load-on-startup>
<init-param>
<param-name>contextClass</param-name>
<param-value>org.springframework.osgi.web.context.support.OsgiBundle
XmlWebApplicationContext</param-value>
</init-param>
</servlet>
<servlet-mapping>
<servlet-name>helloworld</servlet-name>
<url-pattern>/spring/*</url-pattern>
</servlet-mapping>
<welcome-file-list>
<welcome-file>index.html</welcome-file>
</welcome-file-list>
</web-app>This Spring MVC web.xml descriptor is practically the same as any non-OSGi counterpart, with one exception: the use of OsgiBundleXmlWebApplicationContext, a class designed to let a web bundle access OSGi resources.
Recall that you won't be deploying the MVC application to a standard Java EE server designed to access resources from directories like /WEB-INF/lib or /WEB-INF/classes, but rather to an OSGi'fied application server that needs to locate resources under an OSGi environment, hence the need for this class provided by Spring-DM.
Notice that both Spring's context listener used in standard WARs and the servlet itself are assigned to this special context. This is done so both can resolve class and resource lookups from OSGi's administered classpath. Copy the web.xml file in Listing 3-12 to the /src/WEB-INF/ch3/ directory of your Hello World "playground."
Next, you need to define the initial artifacts brought into the bundle's context. For this you will rely on the default applicationContext.xml file used in Spring applications. Listing 3-13 contains a snapshot of this file.
Example 3-13. applicationContext.xml Descriptor for the Web Bundle
<?xml version="1.0" encoding="UTF-8"?>
<beans xmlns="http://www.springframework.org/schema/beans"
       xmlns:xsi="http://www.w3.org/2001/XMLSchema-instance"

       xmlns:context="http://www.springframework.org/schema/context"
       xsi:schemaLocation="http://www.springframework.org/schema/beans
                           http://www.springframework.org/schema/beans/
spring-beans.xsd
                           http://www.springframework.org/schema/context
                           http://www.springframework.org/schema/context/
spring-context-2.5.xsd
">

    <context:component-scan base-package="com.apress.springosgi.ch3.web"/>
</beans>
The only statement scans for the presence of annotations in the package corresponding to the controller servlet, a process that will instantiate the servlet with all its MVC annotations, and a declaration that is identical to the one used in Chapter 2. You will need to copy the applicationContext.xml file in Listing 3-13 to the /src/WEB-INF/ch3/ directory of your Hello World "playground." Given the controller servlet is named helloworld, you need to define a descriptor used by the servlet itself that by convention would be named helloworld-servlet.xml. Listing 3-14 illustrates such a descriptor.
Example 3-14. helloworld-servlet.xml Descriptor for the Web Bundle
<?xml version="1.0" encoding="UTF-8"?>
<beans xmlns="http://www.springframework.org/schema/beans"
       xmlns:xsi="http://www.w3.org/2001/XMLSchema-instance"
       xmlns:osgi="http://www.springframework.org/schema/osgi"
       xmlns:context="http://www.springframework.org/schema/context"
       xsi:schemaLocation="http://www.springframework.org/schema/beans
                           http://www.springframework.org/schema/beans/
spring-beans.xsd
                           http://www.springframework.org/schema/context
                           http://www.springframework.org/schema/context/
spring-context-2.5.xsd
                           http://www.springframework.org/schema/osgi
                           http://www.springframework.org/schema/osgi/
spring-osgi.xsd">
<osgi:reference id="helloWorldService" interface="com.apress.springosgi.ch3.service.HelloWorldService"/> <bean id="helloWorldController" class="com.apress.springosgi.ch3.web.HelloWorldController"> <property name="helloWorldService" ref="helloWorldService"/> </bean> <bean id="urlMapper" class="org.springframework.web.servlet.handler.SimpleUrlHandlerMapping"> <property name="mappings"> <props> <prop key="/**">helloWorldController</prop> </props> </property> </bean> <bean id="jspViewResolver" class="org.springframework.web.servlet.view.InternalResourceViewResolver"> <property name="viewClass" value="org.springframework.web.servlet.view.JstlView"/> <property name="prefix" value="/jsp/"/> <property name="suffix" value=".jsp"/> </bean> </beans>
The first statement corresponds to Spring-DM's way of referencing a service present in OSGi's central registry; via this declaration alone, the service registered in the last bundle is brought into this bundle's context with an id value of helloWorldService. The reference ID is important in the sense that the controller servlet in Listing 3-11 is expecting to inject a service by this particular name, given its getter/setter method.
The remaining statements are strictly in line with those of any other Spring MVC project, indicating the following:
The creation of the
helloWorldControllerbean corresponding to the appropriate controller class, which also injects thehelloWorldServiceas a bean property.A URL mapper statement, indicating that all requests, -- <
prop key="/**"> --, for the Dispatcher servlet be managed by thehelloWorldControllerbean.A view resolver, indicating that all logical views returned by the servlet be mapped to files under the
/jsp/directory and with a.jspextension. In this application's case, the servlet returns a logical view named home, and will in turn attempt to render a file namedhome.jsplocated under a bundle's/jsp/subdirectory. Listing 3-15 shows this JSP.
Once you copy the Spring-MVC servlet descriptor in Listing 3-14 to the /src/WEB-INF/ch3/ directory of the Hello World "playground," you will need to define the actual graphical user interface for the application. Listing 3-15 presents the JSP used by the application, which you need to place in the src/GUI/ch3/jsp/ directory of the Hello World "playground."
Example 3-15. JSP for the Web Bundle
<!DOCTYPE HTML PUBLIC "-//W3C//DTD HTML 4.01//EN"
        "http://www.w3.org/TR/html4/strict.dtd">
<%@ taglib prefix="c" uri="http://java.sun.com/jsp/jstl/core" %>
<html>
<head>
  <title> Spring DM HelloWorld </title>
</head>
<body>
<p> Results from accessing Spring-DM service bundle: </p>
<p> Message: <c:out value="${helloworld.message}"/> </p>
<p> Current Time: <c:out value="${helloworld.currentTime}"/> </p>
<p> Model Version: <c:out value="${helloworld.modelVersion}"/> </p>

</body>
The template shown in Listing 3-15 is nothing more than a JSP displaying the values returned by the controller servlet, per instructions used in the servlet's view resolver, located in a bundle's absolute directory /jsp/home.jsp.
Since Java web applications rely on the presence of an index.html file as their primary entry point, you also need to define this file. Listing 3-16 illustrates the index.html file used by the web bundle.
Example 3-16. index.html File for Web Bundle
<html>
<head>
  <meta http-equiv="Refresh" content="0; URL=spring/home.jsp">
</head>
</html>
This index.html file simply redirects control over to Spring's MVC controller present at the application's /spring/ directory—see Listing 3-12's servlet mapping. Further, it makes a call to home.jsp, which per Spring-MVC behavior invokes the home() controller method, finally returning control and results to the home.jsp JSP presented earlier. Place the index.html file in Listing 3-16 directly inside the src/GUI/ch3/ directory of the Hello World "playground."
Next, you need to create the OSGi manifest used by the web bundle. Listing 3-17 contains a snapshot of this file.
Example 3-17. MANIFEST.MF for the Web Bundle
Bundle-Version: 1.0
Bundle-SymbolicName: com.apress.springosgi.ch3.web
Bundle-Name: HelloWorld Spring-OSGi Web
Bundle-Vendor: Pro Spring-OSGi
Bundle-Classpath: WEB-INF/classes

Import-Package: com.apress.springosgi.ch3.model;version="1.0.0",
 com.apress.springosgi.ch3.service;version="1.0.0",

 javax.servlet;version="2.5.0",
 javax.servlet.http;version="2.5.0",
 javax.servlet.resources;version="2.5.0",

 javax.servlet.jsp;version="2.0.0",

 javax.servlet.jsp.jstl.core;version="1.1.2",

 javax.servlet.jsp.jstl.fmt;version="1.1.2",

 javax.servlet.jsp.jstl.tlv;version="1.1.2",

 org.apache.taglibs.standard.functions;version="1.1.2",

 org.apache.taglibs.standard.resources;version="1.1.2",

 org.apache.taglibs.standard.tag.common.core;version="1.1.2",

 org.apache.taglibs.standard.tag.common.fmt;version="1.1.2",

 org.apache.taglibs.standard.tag.rt.core;version="1.1.2",

 org.apache.taglibs.standard.tag.rt.fmt;version="1.1.2",
org.apache.taglibs.standard.tei;version="1.1.2",

 org.apache.taglibs.standard.tlv;version="1.1.2",

 org.springframework.aop;version="2.5.4",

 org.springframework.core;version="2.5.4",

 org.springframework.ui;version="2.5.4",

 org.springframework.stereotype;version="2.5.4",

 org.springframework.context.support;version="2.5.4",

 org.springframework.web.context;version="2.5.4",

 org.springframework.web.context.support;version="2.5.4",

 org.springframework.web.servlet;version="2.5.4",

 org.springframework.web.servlet.handler;version="2.5.4",

 org.springframework.web.servlet.mvc;version="2.5.4",

 org.springframework.web.servlet.view;version="2.5.4",

 org.springframework.web.bind.annotation;version="2.5.4",

 org.springframework.osgi.service.importer;version="1.2.0",

 org.springframework.osgi.web.context.support;version="1.2.0",

 org.springframework.osgi.service.importer.support;version="1.2.0"

Web-ContextPath: /
Bundle-ManifestVersion: 2
Besides the usual suspects used for naming and versioning, this bundle manifest makes extensive declarations in the Import-Package line and uses the Bundle-Classpath OSGi statement. The reason behind the extensive imports—even though the bundle contains one class—is that all these packages are needed to support Spring's MVC, JSP, and JSTL in a bundle, hence they need to be localized and activated by OSGi prior to starting this bundle. It's essentially OSGi's dynamic behavior at work telling the environment "I need to make use of the packages x, y, z. Please load them into memory now."
The Bundle-Classpath OSGi value is simply used as a convenience. Notice how its value is pointing to the /WEB-INF/classes directory, which is a standard location used by Java web applications to find classes. In this situation, you are indicating to OSGi that it instead should load its classes from that specific directory, allowing you to maintain the standard location used by Java web applications and yet still load the classes into the OSGi environment.
Finally, the Web-ContextPath header is a Spring-DM parameter used to indicate on what context path the web bundle (WAR) will be deployed on the OSGi'fied Apache Tomcat. In this case, the value / indicates the web bundle will be deployed on the root context (e.g., http://localhost:8080/). By default, if no Web-ContextPath header is declared, Spring-DM will deploy a web bundle (WAR) based on its name (e.g., a web bundle named helloworld-web would be deployed by default to http://localhost:8080/helloworld-web/).
As a last step, copy the OSGi manifest in Listing 3-17 to the src/META-INF/ch3/ directory of the Hello World "playground." This does it as far as descriptors are concerned for the web bundle. It's time to put it all together and package our last application bundle.
The layout for our web bundle will look something like a hybrid between an OSGi bundle and a standard WAR. Listing 3-18 contains the additional instructions you need to add to your ch3 Ant task in order to create this type of bundle.
Example 3-18. Ant Instructions for the Web Bundle
<war destfile="${ch3.dir}/helloworld-web.war" webxml="${src.dir}/WEB-INF/ch3/

web.xml" manifest="${src.dir}/META-INF/ch3/web/MANIFEST.MF">
         <metainf dir="${src.dir}/META-INF/ch3/web/"/>
         <webinf dir="${src.dir}/WEB-INF/ch3/"/>
         <zipfileset dir="${src.dir}/GUI/ch3/" prefix=""/>
         <classes dir="${build.dir}">
            <include name="com/apress/springosgi/ch3/web/*"/>
         </classes>
</war>
Warning
You need to ensure all compile dependencies for the web bundle are placed in the lib directory of your Hello World "playground," since a web bundle requires that its classes be compiled prior to packaging. If you skipped Chapter 2, you will need to copy the spring-beans.jar, spring-webmvc.jar, and spring-context.jar files, available in the dist/modules subdirectory of the Spring Framework's download, to the lib directory of the Hello World "playground."
These last Ant instructions make use of the <war> statement, indicating that a WAR package should be created using the web.xml and manifest files specified in the corresponding attributes, as well as placing all the contents located inside ${src.dir}/META-INF/ch3/web/ into the package's META-INF directory, all the contents inside ${src.dir}/META-INF/ch3/web/ into the package's WEB-INF directory, and all the contents inside ${src.dir}/GUI/ch3/ into the package's root directory, and finally copying all the classes inside the subdirectory com/apress/springosgi/ch3/web/ to the package's /WEB-INF/classes/ directory.
Initially you might be taken by surprise at the use of a <war> statement; after all, you will be deploying this as an OSGi bundle. As it turns out, there is nothing special about a WAR file in itself, it's simply a JAR file with a particular layout. And since an OSGi bundle is a JAR file equipped with special manifest, there is nothing wrong with using this Ant instruction for building purposes, because a WAR file is fully compatible as an OSGi bundle so long as it has its corresponding manifest.
If you place yourself in the Hello World "playground" root directory and execute ant ch3, the web bundle should be generated with the name helloworld-web.war and placed under the dist/ch3 subdirectory.
With all three OSGi bundles composing the entire application on hand, it's time to take the final step in the form of deployment.
With a running OSGi'fied Apache Tomcat container, as outlined in the section "Installing Apache Tomcat (OSGi'fied)" presented earlier in the chapter, deploying an application consists of two simple steps: loading the application's dependency bundles and later loading the actual application bundles.
Besides the dependencies required by applications themselves, using Spring and OSGi together always requires the presence of a certain set of bundles in order to operate correctly, many of which are simply OSGi'fied versions of the same libraries used in standard Spring applications, as well as those bundles that make up the Spring-DM.
The easiest approach to loading such libraries is by defining them in the startup sequence for the OSGi environment, a process that you already explored when you set up your OSGi'fied Apache Tomcat instance. Listing 3-19 shows the additional library bundles required by most Spring/OSGi applications.
Example 3-19. Spring-OSGi Dependencies Defined in the Eclipse Equinox config.ini
tomcat/catalina.osgi-5.5.23-SNAPSHOT.jar@start,

tomcat/catalina.start.osgi-1.0-20080425.161832-4.jar@start,

springcore/com.springsource.edu.emory.mathcs.backport-3.0.0.jar@start, springcore/com.springsource.org.apache.commons.collections-3.2.0.jar@start,springcore/com.springsource.net.sf.cglib-2.1.3.jar@start,springcore/com.springsource.org.aopalliance-1.0.0.jar@start,springcore/org.springframework.core-2.5.4.A.jar@start,springcore/org.springframework.beans-2.5.4.A.jar@start,springcore/org.springframework.aop-2.5.4.A.jar@start,springcore/org.springframework.context-2.5.4.A.jar@start,springcore/org.springframework.context.support-2.5.4.A.jar@start,springcore/org.springframework.web-2.5.4.A.jar@start,springcore/org.springframework.web.servlet-2.5.4.A.jar@start,springcore/spring-osgi-io-1.2.0.jar@start,springcore/spring-osgi-core-1.2.0.jar@start,springcore/spring-osgi-extender-1.2.0.jar@start,springcore/spring-osgi-web-1.2.0.jar@start,springcore/spring-osgi-web-extender-1.2.0.jar@starteclipse.ignoreApp=true ....
Warning
All statements added to Eclipse Equinox's osgi.bundles parameter require a trailing backslash (), except for the last one—prior to eclipse.ignoreApp=true. Ensure this syntax is enforced; otherwise Eclipse Equinox will not load these files at startup.
The listing starts off with four bundles supporting the operation of the Spring Framework, followed by seven bundles that form part of the Spring distribution (see Table 3-2 earlier in the chapter for the corresponding download links) with the five remaining bundles belonging to Spring-DM, libraries that can be located in the dist directory of this last package's download.
The last two loaded bundles in this sequence are special in the sense that they provide the functionality needed to inspect and process all bundles containing Spring-DM descriptors. If these two bundles are not active at the time a Spring-DM bundle is installed, a bundle will simply be loaded as a run-of-the-mill OSGi package with no Spring bean activation or service registration taking place.
Strictly speaking, the spring-osgi-extender bundle looks for a spring directory inside a bundle's META-INF directory, while the spring-osgi-web-extender bundle looks for a .war extension to recognize whether a bundle is to be wired with the underlying OSGi'fied application server/container (OSGi's HttpService); the next chapter will detail this particular process in depth.
Once you add these files to a subdirectory named springcore in the same directory as Eclipse Equinox's JAR file, and modify the config.ini file to reflect the new additions in Listing 3-19, execute java -jar org.eclipse.osgi_3.5.0.v20080804-1730.jar -console, and you will automatically initiate an Eclipse Equinox instance ready to accept and deploy Spring-OSGi bundles.
In order to install the Hello World application bundles while inside an Eclipse Equinox session, simply perform the following instructions:
> install file:<dir_to_bundles>/helloworld-model.jar
> start <model bundle number assigned in last step>
> install file:<dir_to_bundles>/helloworld-service.jar
> start <service bundle number assigned in last step>
> install file:<dir_to_bundles>/helloworld-servicedao.jar
> start <servicedao bundle number assigned in last step>
> install file:<dir_to_bundles>/helloworld-web.war
> start <web bundle number assigned in last step>
Alternatively, you could also add four more declarations to Eclipse Equinox's config.ini file containing the application's bundles, allowing the Hello World application to be started automatically upon an Apache Felix session.
With all four Spring-OSGi Hello World application bundles started in the system, open up a browser and point it toward the URL http://localhost:8080/.
Once you do this, you will then be able to see an end-to-end application designed completely on Spring-OSGi principles.
In this chapter you learned how Spring and OSGi address complementary issues in the Java ecosystem, with both OSGi standing to gain from Spring's IoC/DI approach, and Spring benefiting from OSGi's dynamic-loading and versioning capabilities for the Java platform.
To support the integration of Spring and OSGi, you also learned about the various application layers that need to be attended to in order to support the integration of both platforms, which include application design, application packaging, and application server layers. The chapter further discussed how certain initiatives serve as aids in each corresponding layer, including Spring-DM, SpringSource Enterprise Bundle Repository, and SpringSource dm Server.
Additionally, you explored firsthand how to partition an application into numerous bundles, specifically model, service, and web bundles, learning how to package each one leveraging Spring-DM in order to expose each unit with the behavioral patterns present in both Spring and OSGi.
Finally, you learned how to deploy bundles in an OSGi environment accompanied by an OSGi'fied application server/container, therefore gaining experience on the process of deploying an end-to-end web-enabled OSGi application using Spring technology as the underlying Java framework.