The Spring Framework evolved from the code written for Expert One-on-One J2EE Design and Development by Rod Johnson (Wrox, 2002).1 The framework combines best practices for Java Enterprise Edition (JEE) development from the industry and integration with the best-of-breed third-party frameworks. It also provides easy extension points to write your own integration if you need one that doesn’t exist yet. The framework was designed with developer productivity in mind, and it makes it easier to work with the existing, sometimes cumbersome Java and JEE APIs.
Spring Boot was released in April 2014 to simplify application development for the cloud era. Spring Boot makes it easy to create stand-alone, production-grade Spring-based applications. The applications “just run” either stand-alone or deployed to a traditional Servlet container or JEE server.
Spring Boot takes an opinionated view of the Spring platform as a whole and supported third-party libraries. It gets you started with little effort but gets out of your way if you want more complex configurations or make configuration easier for you.
Before starting our journey into Spring MVC and Spring WebFlux, we provide a quick refresher on Spring (also known as the Spring Framework). Spring is the de facto standard for Java enterprise software development. It introduced dependency injection, aspect-oriented programming (AOP), and programming with plain-old-Java-objects (POJOs).
In this chapter, we cover dependency injection and AOP. Specifically, we cover how Spring helps us implement dependency injection and how to use programming to our advantage. To do the things mentioned here, we explore the Inversion of Control (IoC) container; the application context.
We only touch on the necessary basics of the Spring Framework here. If you want more in-depth information about it, we suggest the excellent Spring Framework documentation2 or books such as Pro Spring 5 (Apress, 2017)3 or Spring 5 Recipes, 4thEdition (Apress, 2017)4.
Next to the Spring Framework refresher, we also touch on the basics of Spring Boot. For more in-depth information on Spring Boot, we suggest the excellent Spring Boot Reference Guide5 or Spring Boot 2 Recipes (Apress, 2018)6.
Let’s begin by taking a quick look at the Spring Framework and the modules that comprise it.
You can find the sample code for this chapter in the chapter2-samples project. Different parts of the sample contain a class with a main method, which you can run to execute the code.
The Spring Framework
In the introduction, we mentioned that the Spring Framework evolved from code written for the book Expert One-on-One J2EE Design and Development by Rod Johnson. This book was written to explain some of the complexities in JEE and how to overcome them. And while many of the complexities and problems in JEE have been solved in the newer JEE specifications (especially since JEE 6), Spring has become very popular due to its simple (not simplistic!) approach to building applications. It also offers a consistent programming model for different technologies, be they for data access or messaging infrastructure. The framework allows developers to target discrete problems and build solutions specifically for them.
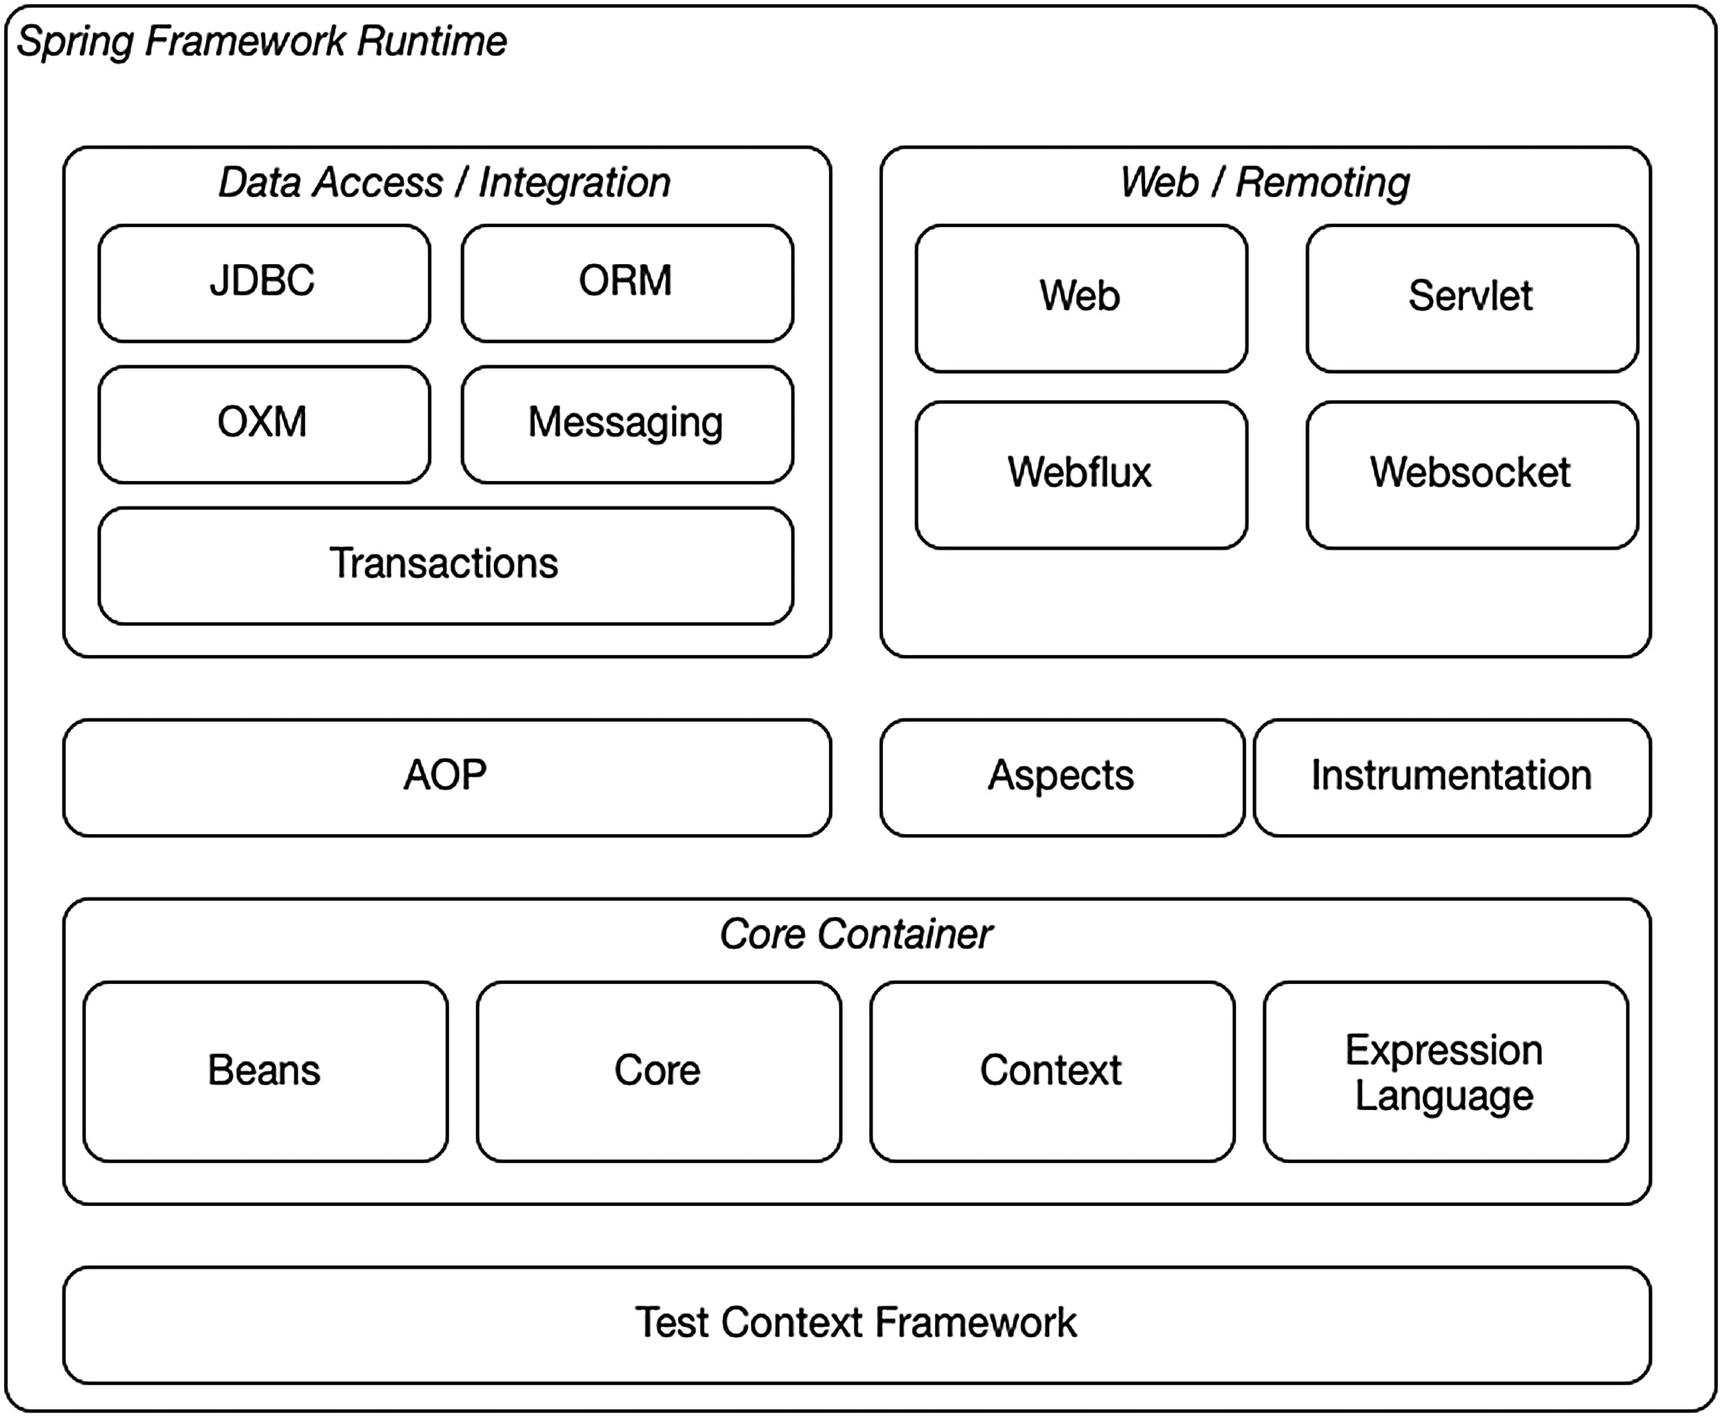
The framework consists of several modules (see Figure 2-1) that work together and build on each other. We can pretty much cherry-pick the modules we want to use.
Figure 2-1
Overview of the Spring Framework
All the modules from Figure 2-1 represent jar files that we can include in the classpath if we need a specific technology. Table 2-1 lists all the modules that comes with Spring 5.2 and includes a brief description of each module’s content and any artifact names used for dependency management. The name of the actual jar file might differ, depending on how you obtain the module.
Table 2-1
The Spring Framework Module Overview
Module
Artifact
Description
AOP
spring-aop
The proxy-based AOP framework for Spring
Aspects
spring-aspects
AspectJ-based aspects for Spring
Beans
spring-beans
Spring’s core bean factory support
Context
spring-context
Application context runtime implementations; also contains scheduling and remoting support classes
Context
spring-context-indexer
Support for providing a static index of beans used in the application; improves startup performance
Context
spring-context-support
Support classes for integrating third-party libraries with Spring
Core
spring-core
Core utilities
Expression Language
spring-expression
Classes for the Spring Expression Language (SpEL)
Instrumentation
spring-instrument
Instrumentation classes to be used with a Java agent
JCL
spring-jcl
Spring specific replacement for commons-logging
JDBC
spring-jdbc
JDBC support package that includes datasource setup classes and JDBC access support
JMS
spring-jms
JMS support package that includes synchronous JMS access and message listener containers
ORM
spring-orm
ORM support package that includes support for Hibernate 5+ and JPA
Messaging
spring-messaging
Spring messaging abstraction; used by JMS and WebSocket
OXM
spring-oxm
XML support package that includes support for object-to-XML mapping; also includes support for JAXB, JiBX, XStream, and Castor
Test
spring-test
Testing support classes
Transactions
spring-tx
Transaction infrastructure classes; includes JCA integration and DAO support classes
Web
spring-web
Core web package for use in any web environment
WebFlux
spring-webflux
Spring WebFlux support package Includes support for several reactive runtimes like Netty and Undertow
Servlet
spring-webmvc
Spring MVC support package for use in a Servlet environment Includes support for common view technologies
WebSocket
spring-websocket
Spring WebSocket support package Includes support for communication over the WebSocket protocol
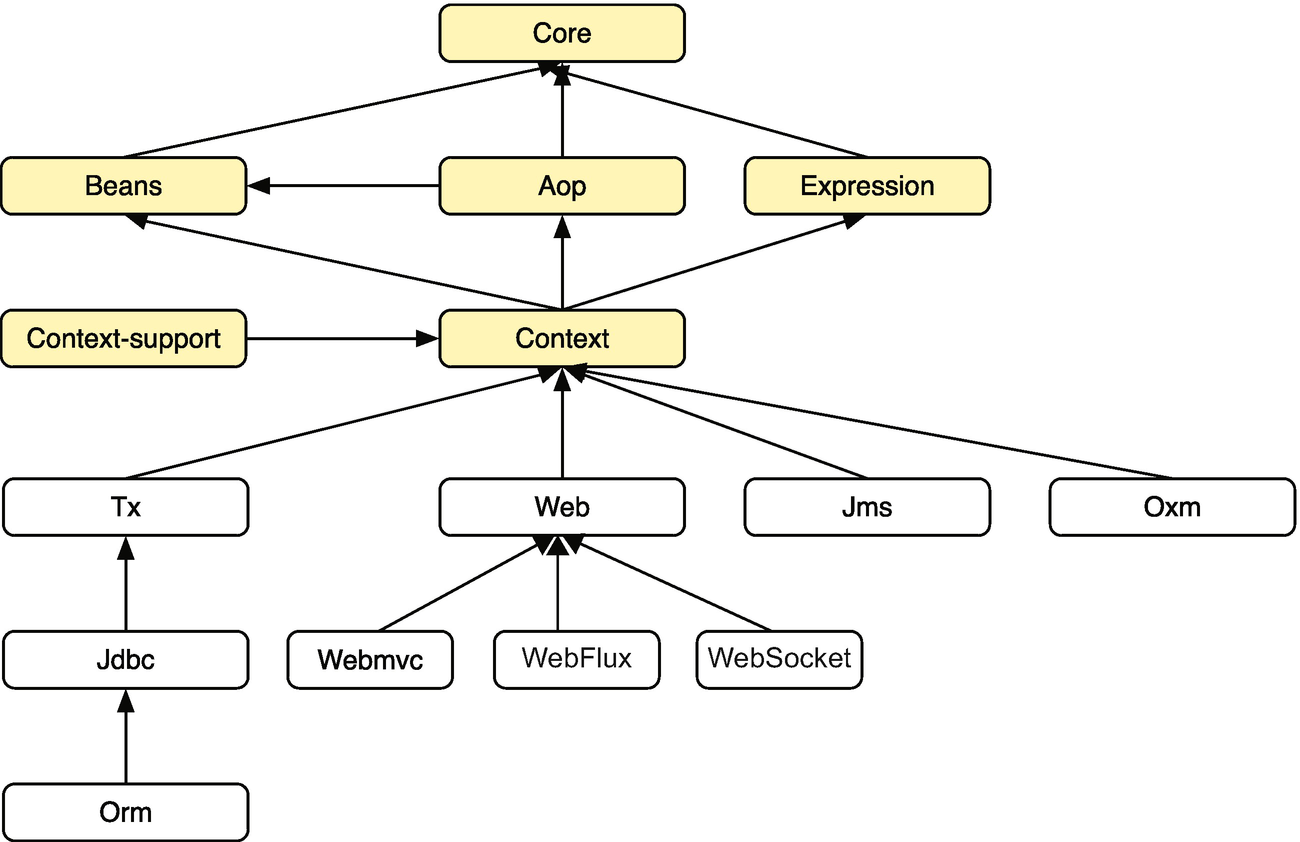
Most of the modules have a dependency on some other module in the Spring Framework. The core module is an exception to this rule. Figure 2-2 gives an overview of the commonly used modules and their dependencies on other modules. Notice that the instrumentation, aspect, and test modules are missing from the figure; this is because their dependencies depend on the project and what other modules are used. The other dependencies differ based on the needs of the project.
Figure 2-2
The Spring Framework module dependencies
Dependency Injection
In dependency injection (DI), objects are given their dependencies at construction time. It is a Spring Framework foundation. You have probably heard of Inversion of Control(IoC).7 IoC is a broader, more general concept that can be addressed in different ways. IoC lets developers decouple and focus on what is important for a given part of an enterprise application, but without thinking about what other parts of the system do. Programming to interfaces is one way to think about decoupling.
Almost every enterprise application consists of multiple components that need to work together. In the early days of Java enterprise development, we simply put all the logic of constructing those objects (and the objects they needed) in the constructor (see Listing 2-1). At first sight, there is nothing wrong with that approach; however, as time progresses, object construction became slow, and objects had a lot of knowledge they shouldn’t have had (see the single-responsibility principle).8 Those classes became hard to maintain, and they were also hard to the unit and/or integration test.
MoneyTransferTransaction transaction = new MoneyTransferTransaction(src, dst, amount);
this.transactionRepository.store(transaction);
return transaction;
}
}
Listing 2-1
A MoneyTransferService Implementation with Hardcoded Dependencies
The class from Listing 2-1 programs to interfaces, but it still needs to know about the concrete implementation of an interface simply to do object construction. Applying IoC by decoupling the construction logic (collaborating objects) makes the application easier to maintain and increases testability. There are seven ways to decouple this dependency construction logic.
Factory pattern
Service locator pattern
Dependency injection
Constructor based
Setter based
Field based
Contextualized lookup
When using the factory pattern, service locator pattern, or contextualized lookup, the class that needs the dependencies still has some knowledge about obtaining the dependencies. This can make things easier to maintain, but it can still be hard to test. Listing 2-2 shows a contextualized lookup from JNDI (Java Naming and Directory Interface). The constructor code would need to know how to do the lookup and handle exceptions.
MoneyTransferService Implementation with Contextualized Lookup
The immediately preceding code isn’t particularly clean; for example, imagine multiple dependencies from different contexts. The code would quickly become messy and increasingly hard, if not impossible, to unit test.
To solve the construction/lookup logic in the constructor of an object, we can use dependency injection. We simply pass the object the dependencies it needs to do its work. This makes our code clean, decoupled, and easy to test (see Listing 2-3). Dependency injection is a process where objects specify the dependencies they work with. The IoC container uses that specification; when it constructs an object, it also injects its dependencies. This way, our code is cleaner, and we no longer burden our class with construction logic. It is easier to maintain and easier to do the unit and/or integration test. Testing is easier because we could inject a stub or mock object to verify the behavior of our object.
public class MoneyTransferServiceImpl implements MoneyTransferService {
private final AccountRepository accountRepository;
private final TransactionRepository transactionRepository;
public MoneyTransferServiceImpl(AccountRepository accountRepo,
TransactionRepository transactionRepo) {
this.accountRepository = accountRepo;
this.transactionRepository = transactionRepo;
}
//transfer method omitted, same as listing 2-1
}
Listing 2-3
A MoneyTransferService Implementation with Constructor-Based Dependency Injection
As the name implies, constructor-based dependency injection uses the constructor to inject the dependencies in the object. Listing 2-3 uses constructor-based dependency injection. It has a constructor that takes two objects as arguments: com.apress.prospringmvc.moneytransfer.repository.AccountRepository and com.apress.prospringmvc.moneytransfer.repository.TransactionRepository. When we construct an instance of com.apress.prospringmvc.moneytransfer.constructor.MoneyTransferServiceImpl, we need to hand it the needed dependencies.
Setter-based dependency injection uses a setter method to inject the dependency. The JavaBeans specification defines both setter and getter methods. If we have a method named setAccountService, we set a property with the name accountService. The property name is created using the name of the method, minus the “set” and with the first letter lowercased (the full specification is in the JavaBeans specification)9. Listing 2-4 shows an example of setter-based dependency injection. It isn’t mandatory to have both a getter and setter for a property. A property can be read-only (only a getter method is defined) or write-only (only a setter method is defined). Listing 2-4 only shows the setter method because we only need to write the property; internally, we can directly reference the field.
A MoneyTransferService Implementation with Setter-Based Dependency Injection
Finally, there is field-based dependency injection using annotations (see Listing 2-5). We do not need to specify a constructor argument or a setter method to set the dependencies for this to work. We begin by defining a class-level field that can hold the dependency. Next, we put an annotation on that field to express our intent to have that dependency injected into our object. Spring accepts several different annotations: @Autowired, @Resource, and @Inject. All these annotations more or less work in the same way. It isn’t within the scope of this book to explain the differences among these annotations in depth, so we suggest the Spring Boot Reference Guide or Pro Spring 5 (Apress, 2017) if you want to learn more. The main difference is that the @Autowired annotation is from the Spring Framework, whereas @Resource and @Inject are Java standard annotations.
A MoneyTransferService Implementation with Field-Based Dependency Injection
@Autowiredand@Injectcan be placed on methods and constructors to express dependency injection configuration, even when there are multiple arguments! When there is only a single constructor for the object, you can omit the annotations.
To sum things up, we want to use dependency injection for the following reasons.
Cleaner code
Decoupled code
Easier code testing
The first two reasons make our code easier to maintain. The fact that the code is easier to test should allow us to write unit tests to verify the behavior of our objects—and thus, our application.
ApplicationContexts
To do dependency injection in Spring, you need an application context. In Spring, this is an instance of the org.springframework.context.ApplicationContext interface. The application context is responsible for managing the beans defined in it. It also enables more elaborate things like applying AOP to the beans defined in it.
Spring provides several different ApplicationContext implementations (see Figure 2-3). Each of these implementations provides the same features but differs in how it loads the application context configuration. Figure 2-3 also shows us the org.springframework.web.context.WebApplicationContext interface, which is a specialized version of the ApplicationContext interface used in web environments.
Figure 2-3
Various ApplicationContext implementations (simplified)
As mentioned previously, the different implementations have different configuration mechanisms (i.e., XML or Java). Table 2-2 shows the default configuration options and indicates the resource loading location.
Table 2-2
An ApplicationContext Overview
Implementation
Location
File type
ClassPathXmlApplicationContext
Classpath
XML
FileSystemXmlApplicationContext
File system
XML
AnnotationConfigApplicationContext
Classpath
Java
XmlWebApplicationContext
Web Application Root
XML
AnnotationConfigWebApplicationContext
Web Application Classpath
Java
Let’s look at a Java-based configuration file—the com.apress.prospringmvc.moneytransfer.annotation.ApplicationContextConfiguration class (see Listing 2-6). There are two annotations used in the class: org.springframework.context.annotation.Configuration and org.springframework.context.annotation.Bean. The first stereotypes our class as a configuration file, while the second indicates that the method’s result is used as a factory to create a bean. The name of the bean is the method name by default.
In Listing 2-6, there are three beans. They are named accountRepository, transactionRepository, and moneyTransferService. We could also explicitly specify a bean name by setting the name attribute on the @Bean annotation.
public TransactionRepository transactionRepository() {
return new MapBasedTransactionRepository();
}
@Bean
public MoneyTransferService moneyTransferService() {
return new MoneyTransferServiceImpl();
}
}
Listing 2-6
The ApplicationContextConfiguration Configuration File
Configuration classes can be abstract; however, they cannot be final. To parse the class, Spring might create a dynamic subclass of the configuration class.
Having a class with only the @Configuration annotation isn’t enough. We also need something to bootstrap our application context. We use this to launch our application. In the sample project, this is the responsibility of the MoneyTransferSpring class (see Listing 2-7). This class bootstraps our configuration by creating an instance of org.springframework.context.annotation.AnnotationConfigApplicationContext and passes it the class containing our configuration (see Listing 2-6).
Transaction transaction = service.transfer("123456", "654321", new BigDecimal("250.00"));
logger.info("Money Transfered: {}", transaction);
}
}
Listing 2-7
The MoneyTransferSpring Class
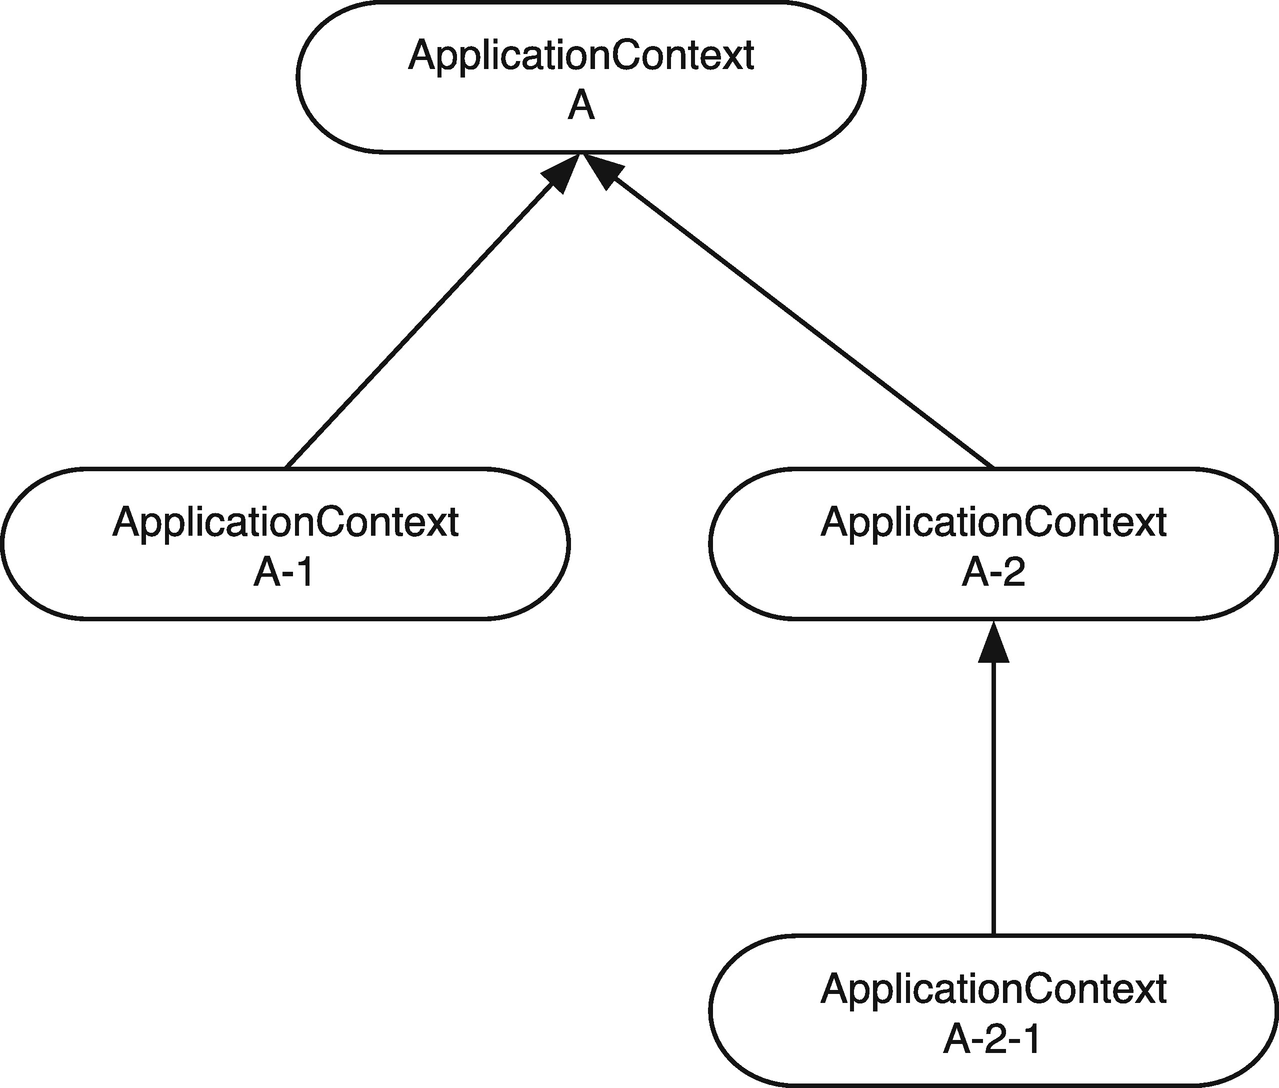
Finally, note that application contexts can be in a hierarchy. We can have an application context that serves as a parent for another context (see Figure 2-4). An application context can only have a single parent, but it can have multiple children. Child contexts can access beans defined in the parent context; however, parent beans cannot access beans in the child contexts. For example, if we enable transactions in the parent context, this won’t apply to child contexts (see the “Enabling Features” section later in this chapter).
Figure 2-4
The ApplicationContext Hierarchy
This feature allows us to separate our application beans (e.g., services, repositories, and infrastructure) from our web beans (e.g., request handlers and views). It can be useful to have this separation. For example, assume that multiple servlets need to reuse the same application beans. Instead of recreating them for each servlet, we can simply reuse the already existing instances. This can be when there is one servlet handling the web UI and another that is handling the web services.
Resource Loading
Table 2-2 provided an overview of the different ApplicationContext implementations and the default resource loading mechanisms. However, this doesn’t mean that you are restricted to loading resources only from the default locations. You can also load resources from specific locations by including the proper prefix (see Table 2-3).
Table 2-3
A Prefixes Overview
Prefix
Location
classpath:
The root of the classpath
file:
File system
http:
Web application root
Besides being able to specify where to load files from, you can also use ant-style regular expressions to specify which files to load. An ant-style regular expression is a resource location containing ** and/or * characters. A * character indicates “on the current level” or “a single level,” whereas multiple * characters indicate “this and all sublevels.”
Table 2-4 shows some examples. This technique only works when dealing with file resources on the classpath or file system; it does not work for web resources or package names.
Table 2-4
Ant-Style Regular Expressions
Expression
Description
classpath:/META-INF/spring/*.xml
Loads all files with the XML file extensions from the classpath in the META-INF/spring directory
file:/var/conf/*/.properties
Loads all files with the properties file extension from the /var/conf directory and all subdirectories
Component Scanning
Spring also has something called component scanning. In short, this feature enables Spring to scan your classpath for classes that are annotated with org.springframework.stereotype.Component (or one of the specialized annotations like @Service, @Repository, @Controller, or org.springframework.context.annotation.Configuration). If we want to enable component scanning, we need to instruct the application context to do so. The org.springframework.context.annotation.ComponentScan annotation enables us to accomplish that. This annotation needs to be put on our configuration class to enable component scanning. Listing 2-8 shows the modified configuration class.
Implementing Component Scanning with ApplicationContextConfiguration
A look at Listing 2-8 reveals that the class has no more content. There are only two annotations. One annotation indicates that this class is used for configuration, while the other enables component scanning. The component-scan annotation is configured with a package to scan.
It is considered bad practice to scan the whole classpath by not specifying a package or to use too broad a package (like com.apress). This can lead to scanning most or all classes, which severely impacts your application’s startup time.
Scopes
By default, all beans in a Spring application context are singletons. As the name implies, there is a single instance of a bean, and it is used for the whole application. This doesn’t typically present a problem because our services and repositories don’t hold state; they simply execute a certain operation and (optionally) return a value.
However, a singleton would be problematic if we wanted to keep the state inside our bean. We are developing a web application that we hope attracts thousands of users. If there is a single instance of a bean, and all users operate in the same instance, the users see and modify each other’s data or data from several users combined. This is not something we want. Fortunately, Spring provides several scopes for beans to use to our advantage (see Table 2-5).
Table 2-5
An Overview of Scopes
Prefix
Description
singleton
The default scope. A single instance of a bean is created and shared throughout the application.
prototype
Each time a certain bean is needed, a fresh instance of the bean is returned.
thread
The bean is created when needed and bound to the currently executing thread. If the thread dies, the bean is destroyed.
request
The bean is created when needed and bound to the lifetime of the incoming javax.servlet.ServletRequest. If the request is over, the bean instance is destroyed.
session
The bean is created when needed and stored in javax.servlet.HttpSession. When the session is destroyed, so is the bean instance.
globalSession
The bean is created when needed and stored in the globally available session (which is available in Portlet environments). If no such session is available, the scope reverts to the session scope functionality.
application
This scope is very similar to the singleton scope; however, beans with this scope are also registered in javax.servlet.ServletContext.
Profiles
Spring introduced profiles in version 3.1. Profiles make it easy to create different configurations of our application for different environments. For instance, we can create separate profiles for our local environment, testing, and our deployment to CloudFoundry. Each of these environments requires some environment-specific configuration or beans. You can think of database configuration, messaging solutions, and testing environments, stubs of certain beans.
To enable a profile, we need to tell the application context in which profiles are active. To activate certain profiles, we need to set a system property called spring.profiles.active (in a web environment, this can be a servlet initialization parameter or web context parameter). This is a comma-separated string containing the names of the active profiles. If we now add some (in this case static inner) classes (see Listing 2-9) with the org.springframework.context.annotation.Configuration and org.springframework.context.annotation.Profile annotations, then only the classes that match one of the active profiles are processed. All other classes are ignored.
public MoneyTransferService moneyTransferService() {
return new MoneyTransferServiceImpl();
}
@Configuration
@Profile(value = "test")
public static class TestContextConfiguration {
@Bean
public TransactionRepository transactionRepository() {
return new StubTransactionRepository();
}
}
@Configuration
@Profile(value = "local")
public static class LocalContextConfiguration {
@Bean
public TransactionRepository transactionRepository() {
return new MapBasedTransactionRepository();
}
}
}
Listing 2-9
ApplicationContextConfiguration with Profiles
Listing 2-10 shows some example bootstrap code. In general, we are not setting the active profiles from our bootstrap code. Instead, we set up our environment using a combination of system variables. This enables us to leave our application unchanged, but still have the flexibility to change our runtime configuration.
MoneyTransferService service = ctx.getBean("moneyTransferService", MoneyTransferService.class);
Transaction transaction = service.transfer("123456", "654321", new BigDecimal("250.00"));
logger.info("Money Transfered: {}", transaction);
}
}
Listing 2-10
MoneyTransferSpring with Profiles
You might wonder why we should use profiles, anyway. One reason is that it allows flexible configurations. This means that our entire configuration is under version control and in the same source code, instead of being spread out over different servers, workstations, and so on. Of course, we can still load additional files containing some properties (like usernames and passwords). This can prove useful if a company’s security policy doesn’t allow us to put these properties into version control. We use profiles extensively when we cover testing and deploying to the cloud because the two tasks require different configurations for the datasource.
Enabling Features
The Spring Framework offers a lot more flexibility than dependency injection; it also provides many different features we can enable. We can enable these features using annotations (see Table 2-6). Note that we won’t use all the annotations in Table 2-6; however, our sample application uses transactions, and we use some AOP. The largest part of this book is about the features provided by the org.springframework.web.servlet.config.annotation.EnableWebMvc and org.springframework.web.reactive.config.EnableWebFlux annotations.
Spring Boot automatically enables some of these features; it depends on the classes detected on the classpath.
Table 2-6
An Overview of the Features Enabled by Annotations
Enables support for load-time weaving. By default, Spring uses a proxy-based approach to AOP; however, this annotation enables us to switch to load-time weaving. Some JPA providers require it.
Enables support for annotation-driven scheduling, letting us parse bean methods annotated with the org.springframework.scheduling.annotation.Scheduled annotation.
Enables support for applying dependency injection to non-Spring managed beans. In general, such beans are annotated with the org.springframework.beans.factory.annotation.Configurable annotation. This feature requires load-time or compile-time weaving because it needs to modify class files.
Enables annotation-driven transaction support, using org.springframework.transaction.annotation.Transactional or javax.ejb.TransactionAttribute to drive transactions.
Enables support for the powerful and flexible annotation-driven controllers with request handling methods. This feature detects beans with the org.springframework.stereotype.Controller annotation and binds methods with the org.springframework.web.bind.annotation.RequestMapping annotations to URLs.
Enables support for the powerful and flexible reactive web implementation using the well-known concepts from Spring Web MVC and, where possible, extend on them.
Yes
For more information on these features, we recommend that you examine the Java documentation for the different annotations and the dedicated reference guide chapters.
Aspect-Oriented Programming
To enable the features listed in Table 2-4, Spring uses aspect-oriented programming (AOP). AOP is another way of thinking about the structure of software. It enables you to modularize things like transaction management or performance logging, features that span multiple types and objects (cross-cutting concerns). In AOP, there are a few important concepts to keep in mind (see Table 2-7).
Table 2-7
Core AOP Concepts
Concept
Description
Aspect
The modularization of a cross-cutting concern. In general, this is a Java class with the org.aspectj.lang.annotation.Aspect annotation.
Join Point
A point during the execution of a program. This can be the execution of a method, the assignment of a field, or the handling of an exception. In Spring, a join point is always the execution of a method!
Advice
The specific action taken by an aspect at a particular join point. There are several types of advice: before, after, after throwing, after returning, and around. In Spring, an advice is called an interceptor because we are intercepting method invocations.
Pointcut
A predicate that matches join points. The advice is associated with a pointcut expression and runs at any join point matching the pointcut. Spring uses the AspectJ expression language by default. Join points can be written using the org.aspectj.lang.annotation.Pointcut annotation.
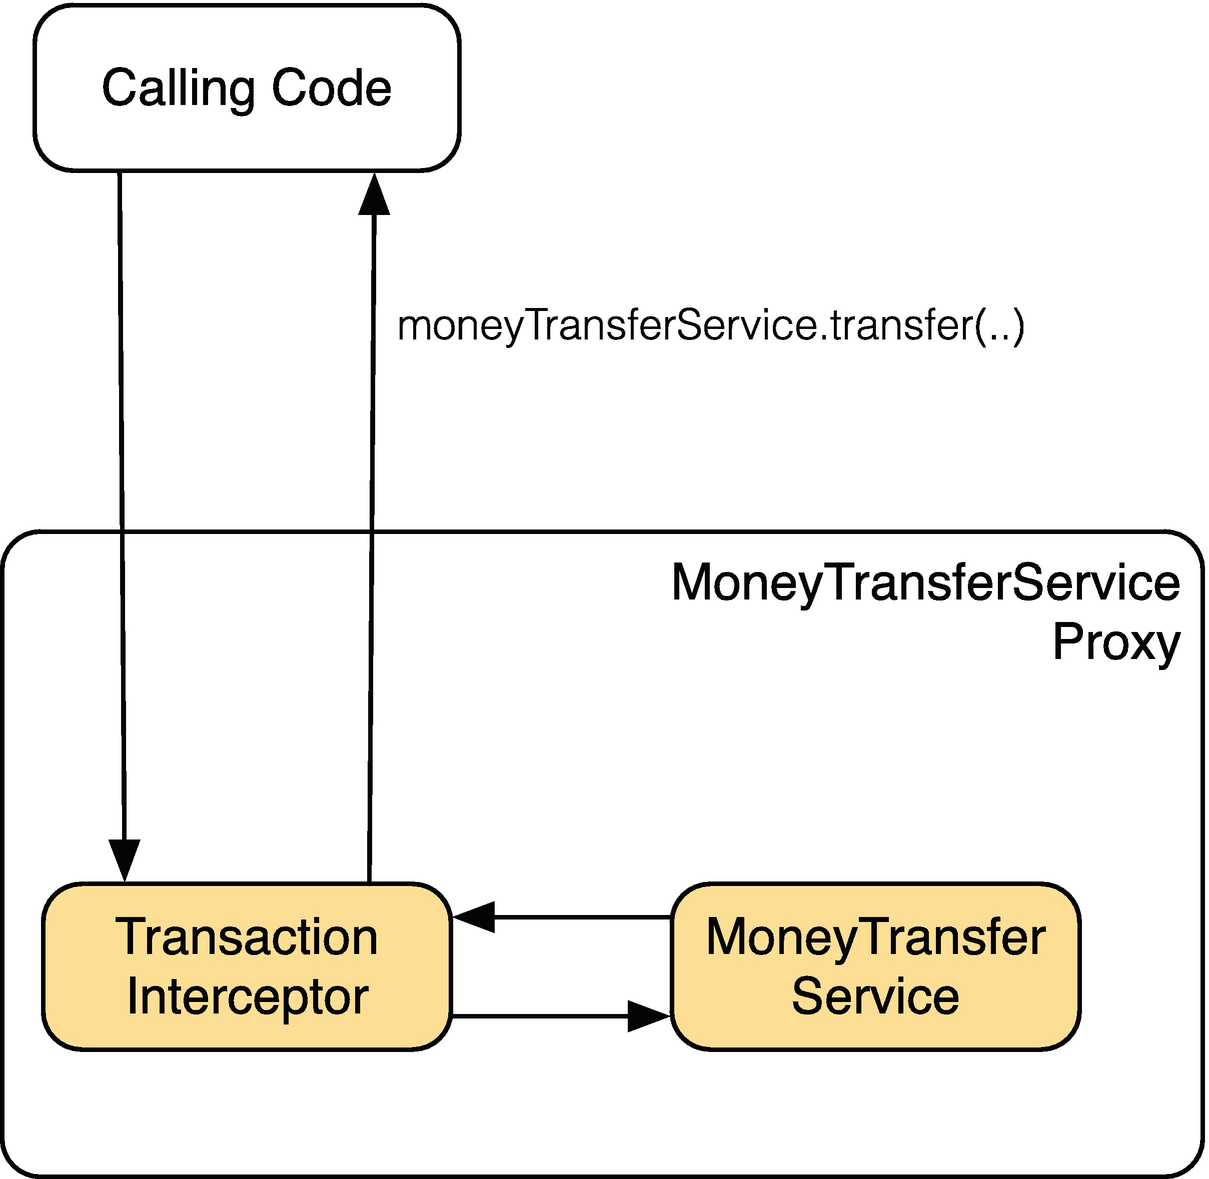
Now let’s look at transaction management and how Spring uses AOP to apply transactions around methods. The transaction advice, or interceptor, is org.springframework.transaction.interceptor.TransactionInterceptor. This advice is placed around methods with the org.springframework.transaction.annotation.Transactional annotation. To do this, Spring creates a wrapper around the actual object, which is known as a proxy (see Figure 2-5). A proxy acts like an enclosing object, but it allows (dynamic) behavior to be added (in this case, the transactionality of the method).
Figure 2-5
A proxy method invocation
The org.springframework.transaction.annotation.EnableTransactionManagement annotation registers the beans containing the pointcut (acting on the org.springframework.transaction.annotation.Transactional annotation). At this point, the interceptor is ready to use. The other annotations for enabling features work similarly; they register beans to enable the desired feature, including AOP (and thus proxy creation) for most features.
Web Applications
So how does all that technology apply to a web application? For example, how do application contexts play a role? And what about all the other things mentioned?
When developing a web application, there is actual business logic (e.g., services, repositories, and infrastructure information), and there are web-based beans. These things should be separated, so we need to have multiple application contexts and relationships.
We also need code that bootstraps our application, or else nothing happens. In this chapter’s examples, we used a MoneyTransferSpring class with a main method to start the application context. This is not something we can do in a web environment. Spring ships with two components that can bootstrap an application: org.springframework.web.servlet.DispatcherServlet and org.springframework.web.context.ContextLoaderListener. Both components bootstrap and configure an application context.
Let’s look at the class that configures DispatcherServlet. This is the com.apress.prospringmvc.bookstore.web.BookstoreWebApplicationInitializer class (see Listing 2-11). Our Servlet 3.0+ container detects this class, and it initializes our application (see Chapter 3 for more information on this topic). We create the DispatcherServlet and pass it org.springframework.web.context.support.AnnotationConfigWebApplicationContext. Next, we map the servlet to everything (the “/”) and tell it to load on startup.
Let’s make things a bit more interesting by adding a ContextLoaderListener class so that we can have a parent context and a child context (see Listing 2-12). The newly registered listener uses com.apress.prospringmvc.bookstore.config.InfrastructureContextConfiguration (see Listing 2-13) to determine which beans to load. The already configured DispatcherServlet automatically detects the application context loaded by ContextLoaderListener.
The Modifcation for the BookstoreWebApplicationInitializer Class
Listing 2-13 is our main application context. It contains the configuration for our services and repositories. This listing also shows our JPA entity manager, including its annotation-based transaction support.
public LocalContainerEntityManagerFactoryBean entityManagerFactory(DataSource dataSource) {
LocalContainerEntityManagerFactoryBean emfb = new LocalContainerEntityManagerFactoryBean();
emfb.setDataSource(dataSource);
emfb.setJpaVendorAdapter(jpaVendorAdapter());
return emfb;
}
@Bean
public JpaVendorAdapter jpaVendorAdapter() {
return new HibernateJpaVendorAdapter();
}
@Bean
public PlatformTransactionManager transactionManager(EntityManagerFactory emf) {
return new JpaTransactionManager(emf);
}
@Bean
public DataSource dataSource() {
return new EmbeddedDatabaseBuilder().setType(EmbeddedDatabaseType.H2).build();
}
}
Listing 2-13
The InfrastructureContextConfiguration Source File
Spring Boot
All the things mentioned previously in this chapter also apply to Spring Boot. Spring Boot builds upon and extends the features of the Spring Framework. It does make things a lot easier, however. Spring Boot automatically configures the features it finds on the classpath by default. When Spring Boot detects Spring MVC classes, it starts Spring MVC. When it finds a DataSource implementation, it bootstraps it.
Customizations can be done by adding properties to the application.properties or application.yml files. You can configure the datasource, view handling, and server port, among others, through this. Another option is to configure things manually, as you would do in a regular Spring application. When Spring Boot detects the preconfigured parts of a feature, it typically refrains from autoconfiguring that feature.
The application from the previous sections can be reduced with Spring Boot (see Listing 2-14 and Listing 2-15).
The BookstoreApplication class has @SpringBootApplication, which enables autoconfiguration of detected features and third-party libraries. In this case, it extends SpringBootServletInitializer because the application is packaged as a WAR and deployed onto a container. Instead of writing our own WebApplicationInitializer, Spring Boot provides one out-of-the-box. It enables most Spring Boot features in a classic container.
Configuration properties can be given in an application.properties or application.yml file (see Listing 2-15) to configure the features needed when the defaults wouldn’t apply. For a list of the most common features, check Appendix A10 of the Spring Boot Reference Guide.
server.port=8080 # 8080 is also the default servlet port
spring.application.name=bookstore
Listing 2-15
application.properties
One of the nice features of Spring Boot is that when running on different environments, we can use profiles to load different/additional configuration files. For instance, when enabling the local profile, Spring Boot would also load an application-local.properties or application-local.yml. When running in a cloud-based situation, the properties could also be obtained from a Git repository or the Docker environment.
Summary
This chapter covered the bare basics of Spring Core. We reviewed dependency injection and briefly covered three different versions of dependency injection. We also covered constructor-based, setter-based, and annotation-based dependency injection.
Next, we stepped into the Spring world and examined org.springframework.context.ApplicationContexts, including the role they play in our application. We also explained the different application contexts (e.g., XML or Java-based) and the resource loading in each of them. In our web environment, we use a specialized version of an application context in an implementation of the org.springframework.web.context.WebApplicationContext interface. We also covered how beans in an application context are singleton scoped by default. Fortunately, Spring provides us with additional scopes, such as request, session, globalSession, prototype, application, and thread.
To use different configurations in different environments, Spring also includes profiles. We briefly explained both how to enable profiles and how to use them. We use profiles in our sample application when we test it and deploy it to Cloud Foundry.
We also delved into the way several enabling annotations are required for Spring to enable certain features. These annotations register additional beans in the application context that enable the desired feature. Most of these features rely on AOP to be enabled (e.g., declarative transaction management). Spring creates proxies to apply AOP to beans registered in our application contexts.
Finally, we took a quick look at Spring Boot and how that makes our lives as software developers easy. Spring Boot uses autoconfiguration to configure features detected on the classpath. It builds upon and extends the Spring Framework where needed.
The next chapter looks at the architecture of an MVC web application, the different layers, and their roles in our application.