
Controllers play a crucial role in a web application: they execute the actual request, prepare the model, and select a view to render. In conjunction with the dispatcher servlet, controllers also play a crucial role in the request processing workflow. The controller is the glue between the core application and the web interface to the application. This chapter looks at the two different controller approaches and covers the out-of-the-box implementations provided with the Spring Framework and as configured by Spring Boot.
This chapter also looks at the supporting components for request processing. For example, we cover form submission and how to apply internationalization (I18N).
In this chapter, we work with Thymeleaf HTML templates. JSP views are supported with Spring MVC using Apache Tiles, but we do not recommend that you use JSP views when using Spring Boot and an embedded container.1
Introducing Controllers
The controller is the component that is responsible for responding to the action the user takes. This action could be a form submission, clicking a link, or simply accessing a page. The controller selects or updates the data needed for the view. It also selects the name of the view to render or can render the view itself. With Spring MVC, we have two options when writing controllers. We can either implement an interface or put an annotation on the class. The interface is org.springframework.web.servlet.mvc.Controller, and the annotation is org.springframework.stereotype.Controller. The main focus of this book is the annotation-based approach for writing controllers. However, we feel that we still need to mention the interface-based approach.
Although both approaches work for implementing a controller, there are two major differences between them. The first difference is about flexibility, and the second is about mapping URLs to controllers. Annotation-based controllers allow very flexible method signatures, whereas the interface-based approach has a predefined method on the interface that we must implement. Getting access to other interesting collaborators is harder (but not impossible!).
For the interface-based approach, we must do explicit external mapping of URLs to these controllers; in general, this approach is combined with org.springframework.web.servlet.handler.SimpleUrlHandlerMapping, so that all the URLs are in a single location. Having all the URLs in a single location is one advantage the interface-based approach has over the annotation-based approach. The annotation-based approach has its mappings scattered throughout the codebase, which makes it harder to see which URL is mapped to which request-handling method. The advantage of annotation-based controllers is that you can see which URLs it is mapped to when you open a controller.
This section shows how to write both types of controllers and how to configure basic view controllers.
Interface-based Controllers
The Controller Interface
An Interface-based IndexController
In addition to writing this controller, we would need to configure an instance of org.springframework.web.servlet.HandlerMapping to map /index.htm to this controller (see Chapter 3 for more information). We would also need to make sure that org.springframework.web.servlet.mvc.SimpleControllerHandlerAdapter is registered to execute the interface-based controllers (this is registered by default).
The sample given here is straightforward. Now imagine a controller that has some page flow. In that case, we would need to check whether the request is a GET or POST request; based on that, we would need to execute different controller logic. With large controllers, this can become cumbersome.
A List of Existing Controller Implementations
Controller implementation | Description |
|---|---|
UrlFilenameViewController | A controller implementation that takes the path of a URL and transforms that into a view name. It can be configured to append a prefix and/or suffix to the view name. |
ParameterizableViewController | A controller that returns a configured view name. |
ServletForwardingController | A controller implementation that forwards the request to a named servlet, which can be a servlet without any mapping. It is useful if you want to use the Spring MVC infrastructure to dispatch requests and apply interceptors. |
ServletWrappingController | A controller implementation that wraps and manages a servlet implementation. It is useful if you want to use the Spring MVC infrastructure to dispatch requests and apply interceptors. |
![]() All controllers listed in Table 5-1 reside in the org.springframework.web.servlet.mvc package.
All controllers listed in Table 5-1 reside in the org.springframework.web.servlet.mvc package.
Annotation-based Controllers
An Annotation-based IndexController
The controller contains a method with the @RequestMapping annotation, and it specifies that it should be mapped to the /index.htm URL, which is the request-handling method. The method has no required parameters, and we can return anything we want; for now, we want to return a ModelAndView.
The mapping is in the controller definition, and we need an instance of org.springframework.web.servlet.mvc.method.annotation.RequestMappingHandlerMapping to interpret these mappings (registered by default).
Configuring View Controllers
A ParameterizableViewController Configuration
A ViewController Configuration

The index page
Request-Handling Methods
Writing request-handling methods can be a challenge. For example, how should a method be mapped to an incoming request? Several things could be a factor here, including the URL, the method used (e.g., GET or POST),2 the availability of parameters or HTTP headers,3 or even the request content type or the content type (e.g., XML, JSON, or HTML) to be produced. These and more can influence which method is selected to handle the request.
The first step in writing a request-handling method is to put an org.springframework.web.bind.annotation.RequestMapping annotation on the method. This mapping is detected by the org.springframework.web.servlet.mvc.method.annotation.RequestMappingHandlerMapping to create the mapping of incoming URLs to the correct method (see the “Spring MVC Components” section in Chapter 4 for more information on handler mapping). Next, we need to specify which web request we want to execute the specified handler.
The annotation can be put on both the type (the controller) and the method level. We can use the one on the type level to do some coarse-grained mapping (e.g., the URL), and then use the annotation on the method level to further specify when to execute the method (e.g., a GET or POST request).
The RequestMapping Attributes
Attribute | Description | |
|---|---|---|
name | The name to use for this mapping. The name can be used with the MvcUriComponentsBuilder to generate dynamic links. | |
value or path | Specifies to which URL or URLs this controller reacts, such as /order.htm. We can also use ant-style expressions to specify the URLs. | |
method | Binds the method on specific HTTP methods. Supported methods include GET, POST, PUT, DELETE, HEAD, OPTIONS, and TRACE. By default, OPTIONS and TRACE are handled by org.springframework.web.servlet.DispatcherServlet. To have those methods passed onto controllers, we need to set dispatchOptionsRequest and/or dispatchTraceRequest to true respectively on the servlet. | |
params | Narrows on the existence or absence of request parameters. Supported expressions include the following: | |
param-name=param-value | The specified param must have a certain value | |
param-name!=param-value | The specified param must not have a certain value. | |
!param-name | The specified param must be absent from the request. | |
headers | Narrows on the existence or absence of HTTP request headers.4 Supported expressions include the following: | |
header-name=header-value | The specified header must have a certain value. | |
header-name!=header-value | The specified header must not have a certain value. | |
!header-name | The specified header must be absent from the request header. | |
The value in the expression can also contain a wildcard (*) in Content-Type or Accept headers (i.e., content-type="text/*" will match all text-based content types). | ||
consumes | Specifies the consumable media types of the mapped request. We use this to narrow the primary mapping. For instance, text/xml maps all requests for the content-type of XML, but we could also specify text/* to match all textual content types. We can also negate it: !text/xml matches all content types except this one. This parameter is preferred over using the headers parameter to specify a Content-Type header because it is more explicit. | |
produces | Specifies the producible media types this request-handling method accepts. It narrows the primary mapping. The same rules that apply to the consumes parameter also apply to this parameter. This parameter is preferred over using the headers parameter to specify an Accept header because it is more explicit. |
Sample Mappings
Class | Method | Description |
|---|---|---|
@RequestMapping(value="/order.htm") | Maps to all requests on the order.htm URL | |
@RequestMapping("/order.htm") | @RequestMapping(method=RequestMethod.GET) | Maps to all GET requests to the order.html URL |
@RequestMapping("/order.*") | @RequestMapping(method={RequestMethod.PUT, RequestMethod.POST}) | Maps to all PUT and POST requests to the order.* URL. * means any suffix or extension such as .htm, .doc, .xls, and so on |
@RequestMapping(value="/customer.htm", consumes="application/json") | @RequestMapping(produces="application/xml") | Maps to all requests that post JSON and accept XML as a response |
@RequestMapping(value="/order.htm") | @RequestMapping(params="add-line", method=RequestMethod.POST) | Maps to all POST requests to the order.htm URL that include an add-line parameter |
@RequestMapping(value="/order.htm") | @RequestMapping(headers="!VIA") | Maps to all requests to the order.htm URL that don’t include a VIA HTTP header |
Supported Method Argument Types
The Supported Method Argument Types
Argument Type | Description |
|---|---|
javax.servlet.ServletRequest | The request object that triggered this method. |
javax.servlet.http.HttpServletRequest | The HTTP request object that triggered this method. |
org.springframework.web.multipart.MultipartRequest | The request object that triggered this method only works for multipart requests. This wrapper allows easy access to the uploaded files(s). Only exposes methods for multipart file access. |
org.springframework.web.multipart.MultipartHttpServletRequest | The MultipartHttpServletRequest exposes both the HttpServletRequest and MultipartRequest methods. |
javax.servlet.ServletResponse | The response associated with the request. It is useful if we need to write the response ourselves. |
javax.servlet.http.HttpServletResponse | The response associated with the request. It is useful if we need to write the response ourselves. |
javax.servlet.http.HttpSession | The underlying http session. If no session exists, one is initiated. This argument is therefore never null. |
org.springframework.web.context.request.WebRequest | Allows more generic access to request and session attributes without ties to an underlying native API(e.g., Servlet or JSF). |
org.springframework.web.context.request.NativeWebRequest | WebRequest extension that has accessor methods for the underlying request and response. |
java.util.Locale | The currently selected locale as determined by the configured org.springframework.web.servlet.LocaleResolver. |
java.io.InputStream | The stream as exposed by the getInputStream method on the ServletRequest |
java.io.Reader | The reader exposed by the getReader method on the ServletRequest. |
java.io.OutputStream | The responses stream as exposed by the getOutputStream method on the ServletResponse. It can write a response directly to the user. |
java.io.Writer | The responses writer exposed by the getWriter method on the ServletResponse. It can write a response directly to the user. |
javax.security.Principal | The currently authenticated user (can be null). |
java.util.Map | The implicit model belonging to this controller/request. |
org.springframework.ui.Model | The implicit model belonging to this controller/request. Model implementations have methods to add objects to the model for added convenience. When adding objects allows method chaining as each method returns the model. |
org.springframework.ui.ModelMap | The implicit model belonging to this controller/request. The ModelMap is a map implementation that includes some methods to add objects to the model for added convenience. |
org.springframework.web.multipart.MultipartFile | Binds the uploaded file(s) to a method parameter (multiple files are only supported by the multipart support of Spring). It works only when the request is a multipart form submission. The name of the request attribute to use is either taken from an optional org.springframework.web.bind.annotation.RequestPart annotation or derived from the name of the argument (the latter works only if that information is available in the class). |
javax.servlet.http.Part | Binds the uploaded file(s) to a method parameter (multiple files are only supported by the multipart support of Spring). It works only when the request is a multipart form submission. The name of the request attribute to use is either taken from an optional org.springframework.web.bind.annotation.RequestPart annotation or derived from the name of the argument (the latter works only if that information is available in the class). |
org.springframework.web.servlet.mvc.support.RedirectAttributes | Enables specification of the exact list of attributes in case you want to issue a redirect. It can also add flash attributes. This argument is used instead of the implicit model in a redirect. |
org.springframework.validation.Errors | The binding and validation results for a preceding model object. |
org.springframework.validation.BindingResult | The binding and validation results for a preceding model object. Has accessor methods for the model and underlying infrastructure for type conversion. (For most use cases this isn’t needed, use Errors instead). |
org.springframework.web.bind.support.SessionStatus | A handler used to mark handling as complete, which triggers the cleanup of session attributes indicated by org.springframework.web.bind.annotation.SessionAttributes. See the “Using SessionAttributes” section later in this chapter for more information. |
org.springframework.web.util.UriComponentsBuilder | A URI builder for preparing a URL relative to the current request URL. |
org.springframework.http.HttpEntity<?> | Represents an HTTP request or response entity. It consists of headers and a body of the request or response. |
Form objects | Binds request parameters to bean properties using type conversion. These objects are exposed as model attributes. Can optionally be annotated with org.springframework.web.bind.annotation.ModelAttribute. |
Request body object | Binds the request body to bean properties using message conversion. These objects need to be annotated with org.springframework.web.bind.annotation.RequestBody. |
RedirectAttributes
The org.springframework.web.servlet.mvc.support.RedirectAttributes deserve a little more explanation than what is shown in Table 5-4. With RedirectAttributes, it is possible to declare exactly which attributes are needed for the redirect. By default, all model attributes are exposed when doing a redirect. Because a redirect always leads to a GET request, all primitive model attributes (or collections/arrays of primitives) are encoded as request parameters. However, with annotated controllers, there are objects in the model (like path variables and other implicit values) that don’t need to be exposed and are outside of our control.
The RedirectAttributes can help us out here. When this is a method argument, and a redirect is issued, only the attributes added to the RedirectAttributes instance are added to the URL.
In addition to specifying attributes encoded in the URL, it is also possible to specify flash attributes , which are stored before the redirect and retrieved and made available as model attributes after the redirect. This is done by using the configured org.springframework.web.servlet.FlashMapManager. Flash attributes are useful for objects that cannot be encoded (non-primitive objects) or to keep URLs clean.
UriComponentsBuilder
The UriComponentsBuilder Sample Code
The sample given is simple; however, it is possible to specify more variables (e.g., bookId) and replace them (e.g., specify the port or host). There is also the ServletUriComponentsBuilder subclass, which we can use to operate on the current request. For example, we might use it to replace, not only path variables, but also request parameters.
Supported Method Argument Annotations
The Supported Method Argument Annotations
Argument Type | Description |
|---|---|
RequestParam | Binds the argument to a single request parameter or all request parameters. |
RequestHeader | Binds the argument to a single request header or all request headers.5 |
RequestBody | Gets the request body for arguments with this annotation. The value is converted using org.springframework.http.converter.HttpMessageConverter. |
RequestPart | Binds the argument to the part of a multipart form submission. |
ModelAttribute | Binds and validates arguments with this annotation. The parameters from the incoming request are bound to the given object. |
PathVariable | Binds the method parameter to a path variable specified in the URL mapping (the value attribute of the RequestMapping annotation). |
CookieValue | Binds the method parameter to a javax.servlet.http.Cookie. |
SessionAttribute | Binds the method parameter to a session attribute. |
RequestAttribute | Binds the method parameter to a request attribute (not to be confused with a request parameter). |
MatrixVariable | Binds the method parameter to a name-value pair within a path-segment. |
All the parameter values are converted to the argument type by using type conversion. The type-conversion system uses org.springframework.core.convert.converter.Converter or java.beans.PropertyEditor to convert from a String type to the actual type.
![]() All annotations live in the org.springframework.web.bind.annotation package.
All annotations live in the org.springframework.web.bind.annotation package.
The HandlerMethodArgumentResolver Interface
Let’s take a closer look at all the different annotation types we can use. All these annotations have a few attributes that we can set and that have default values or may be required.
All the annotations in Table 5-5 have a value attribute. This value attribute refers to the name of the object to use (what it applies to depends on the annotation). If this value isn’t filled, then the fallback uses the name of the method argument. This fallback is only usable if the classes are compiled with parameter information.6 An exception to this rule occurs when using the ModelAttribute annotation. Instead of the name of the method argument, it infers the name from the type of argument, using the simple classname as the argument name. If the type is an array or collection, it makes this plural by adding List. If we were to use our com.apress.prospringmvc.bookstore.domain.Book as an argument, the name would be book; if it were an array or collection, it would become bookList.
RequestParam
The RequestParam Attributes
Attribute | Default Value | Description |
|---|---|---|
required | true | Indicates whether the parameter is required. If it is required and the parameter is missing, then org.springframework.web.bind.MissingServletRequestParameterException is thrown. |
defaultValue | null | Indicates the default value to use when the parameter is missing from the request. Setting a default value is implicitly setting required to false. The value can either be a hardcoded value or a SpEL expression. |
value or name | Empty string | Indicates the name of the parameter to look up from the request. If no name is specified, then the name is derived from the method argument name. If no name can be found, java.lang.IllegalArgumentException is thrown. |
RequestHeader
The RequestHeader Attributes
Attribute | Default Value | Description |
|---|---|---|
required | True | Indicates whether the parameter is required. If it is required and the parameter is missing, org.springframework.web.bind.ServletRequestBindingException is thrown. When set to false, null is used as the value; alternatively, the defaultValue is used when specified. |
defaultValue | Null | Indicates the default value to use when the parameter is missing from the request. Setting a default value is implicitly setting required to false. The value can either be a hardcoded value or a SpEL expression. |
value or name | Empty string | Indicates the name of the request header to bind to. If no name is specified, then the name is derived from the method argument name. If no name can be found, java.lang.IllegalArgumentException is thrown. |
RequestBody
The @RequestBody annotation marks a method parameter we want to bind to the body of the web request. The body is converted into the method parameter type by locating and calling org.springframework.http.converter.HttpMessageConverter. This converter is selected based on the requests content-type. If no converter is found, org.springframework.web.HttpMediaTypeNotSupportedException is thrown. By default, this leads to a response with code 415 (SC_UNSUPPORTED_MEDIA_TYPE) sent to the client.
Optionally, method parameters can also be annotated with javax.validation.Valid or org.springframework.validation.annotation.Validated to enforce validation for the created object. You can find more information on validation in the “Validation of Model Attributes” section later in this chapter.
RequestPart
The RequestPart Attributes
Attribute | Default Value | Description |
|---|---|---|
required | true | Indicates whether the parameter is required. If it is required and the parameter is missing, org.springframework.web.bind.ServletRequestBindingException is thrown. When set to false, null is used as a value; alternatively, defaultValue is used when specified. |
value or name | Empty string | The name of the request header to bind to. If no name is specified, the name is derived from the method argument name. If no name is found, java.lang.IllegalArgumentException is thrown. |
ModelAttribute
The ModelAttribute Attributes
Attribute | Default Value | Description |
|---|---|---|
value or name | Empty string | The name of the model attribute to bind to. If no name is specified, the name is derived from the method argument type. |
PathVariable
The @PathVariable annotation can be used in conjunction with path variables. Path variables can be used in a URL pattern to bind the URL to a variable. Path variables are denoted as {name} in our URL mapping. If we were to use a URL mapping of /book/{isbn}/image, ISBN would be available as a path variable. (see the “Data Binding” section and Table 5-10 for more information).
CookieValue
This @CookieValue annotation can be placed on any argument in the request-handling method. When present, it retrieves a cookie. When placed on an argument of type javax.servlet.http.Cookie, we get the complete cookie; otherwise, the value of the cookie is converted into the argument type. (see the “Data Binding” section and Table 5-11 for more information).
SessionAttribute
This @SessionAttribute annotation can be placed on any argument in the request-handling method. When present, it retrieves an attribute from the HttpSession. (see the “Data Binding” section and Table 5-12 for more information).
RequestAttribtue
This @RequestAttribtue annotation can be placed on any argument in the request-handling method. When present, it retrieves an attribute from the HttpServletRequest. Attributes are obtained using the getAttribute method of the request and shouldn’t be confused with parameters. For the latter, use the @RequestParam annotation. (see the “Data Binding” section and Table 5-13 for more information).
Supported Method Return Values
In addition to all the different method argument types, a request handling method can also have several different return values. Table 5-14 lists the default supported and handling of method return values for request handling methods.
When an arbitrary object is returned, and there is no ModelAttribute annotation present, the framework tries to determine a name for the object in the model. It takes the simple name of the class (the classname without the package) and lowercases the first letter—for example, the name of our com.apress.prospringmvc.bookstore.domain.Book becomes book. When the return type is a collection or array, it becomes the simple name of the class, suffixed with List. Thus a collection of Book objects becomes bookList.
This same logic is applied when we use a Model or ModelMap to add objects without an explicit name. This also has the advantage of using the specific objects, instead of a plain Map to gain access to the underlying implicit model.
The HandlerMethodReturnValueHandler Interface
The PathVariable Attribute
Attribute | Default Value | Description |
|---|---|---|
value or name | Empty string | The name of the path variable to bind to. If no name is specified, then the name is derived from the method argument name. If no name is found, java.lang.IllegalArgumentException is thrown. |
Writing Annotation-based Controllers
Let’s take some of the theory we’ve developed thus far and apply it to our controllers. For example, all the menu options we have on our page lead to a 404 error, which indicates that the page cannot be found.
In this section, we add some controllers and views to our application. We start by creating a simple login controller operating with the request and request parameters. Next, we add a book search page that uses an object. And finally, we conclude by building a controller that retrieves and shows the details of a book.
A Simple Login Controller
The CookieValue Attributes
Attribute | Default Value | Description |
|---|---|---|
required | true | Indicates whether the parameter is required. If it is required and the parameter is missing, org.springframework.web.bind.ServletRequestBindingException is thrown. When set to false, null is used as a value; alternatively, defaultValue is used when specified. |
defaultValue | null | Indicates the default value to use when the parameter is missing from the request. Setting a default value is implicitly setting required to false. The value can either be a hardcoded value or a SpEL expression. |
value or name | Empty string | Indicates the name of the cookie to bind to. If no name is specified, the name is derived from the method argument name. If no name is found, java.lang.IllegalArgumentException is thrown. |
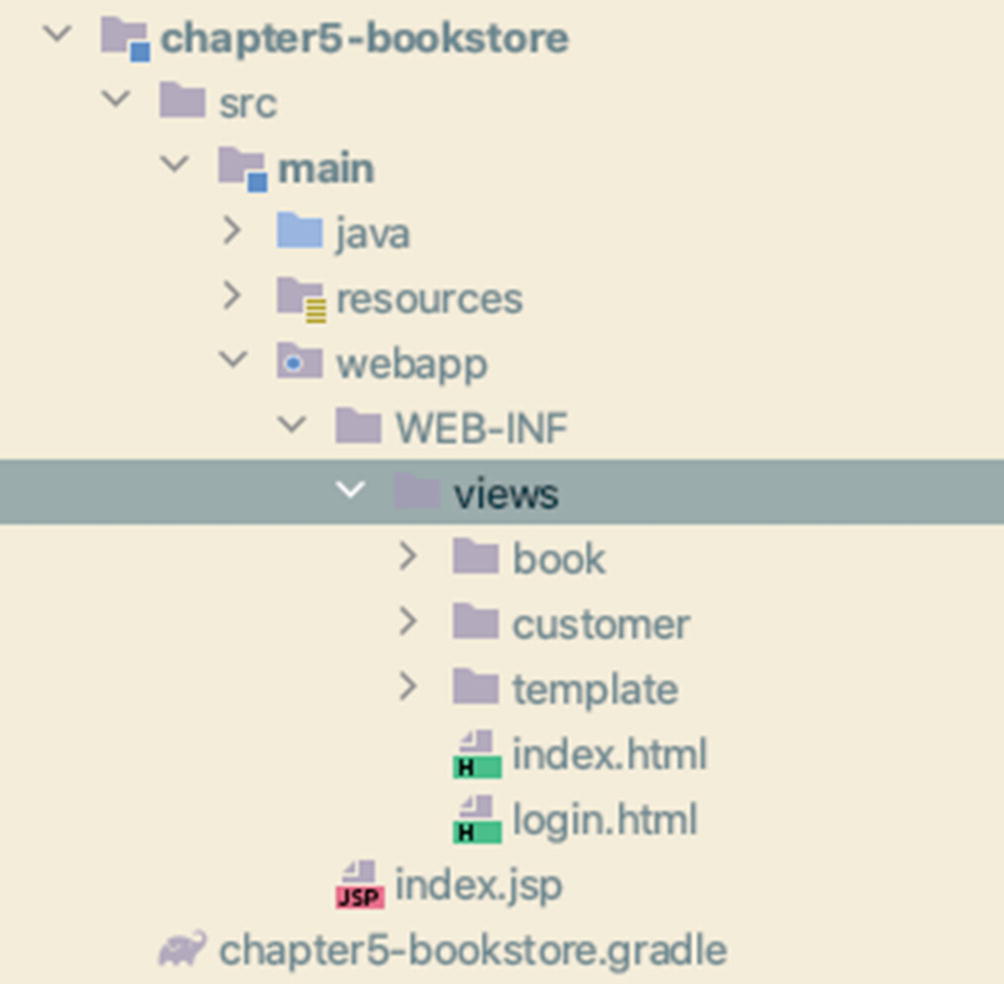
The directory structure after adding login.html
The Login Page, login.html
The SessionAttribute Attributes
Attribute | Default Value | Description |
|---|---|---|
required | true | Indicates whether the parameter is required. If it is required and the parameter is missing, org.springframework.web.bind.ServletRequestBindingException is thrown. When set to false, null is used as a value. |
value or name | Empty string | Indicates the name of the cookie to bind to. If no name is specified, the name is derived from the method argument name. If no name is found, java.lang.IllegalArgumentException is thrown. |
The Initial LoginController
The RequestAttribtue Attributes
Attribute | Default Value | Description |
|---|---|---|
required | true | Indicates whether the parameter is required. If it is required and the parameter is missing, org.springframework.web.bind.ServletRequestBindingException is thrown. When set to false, null is used as a value. |
value or name | Empty string | Indicates the name of the cookie to bind to. If no name is specified, the name is derived from the method argument name. If no name is found, java.lang.IllegalArgumentException is thrown. |
The Supported Method Return Values
Argument Type | Description |
|---|---|
org.springframework.web.servlet.ModelAndView | When a ModelAndView is returned, this is used as-is. It should contain the full model to use and the name of a view (or the View) to render (the latter is optional). |
org.springframework.ui.Model | Indicates that this method returned a model. Objects in this model are added to the controller’s implicit model and made available for view rendering. The name of the view is determined by org.springframework.web.servlet.RequestToViewNameTranslator. |
java.util.Maporg.springframework.ui.ModelMap | The map elements are added to the controller’s implicit model and made available for view rendering. The name of the view is determined by org.springframework.web.servlet.RequestToViewNameTranslator. |
org.springframework.web.servlet.View | The view to render. |
java.lang.CharSequence (generally java.lang.String) | The name of the view to render. If annotated with @ModelAttribute, it is added to the model. |
java.lang.Void | The model is already prepared by the controller, and the name of the view is determined by org.springframework.web.servlet.RequestToViewNameTranslator. |
org.springframework.http.HttpEntity<?>org.springframework.http.ResponseEntity<?> | Specifies the headers and entity body to return to the user. The entity body is converted and sent to the response stream through org.springframework.http.converter.HttpMessageConverter. Optionally, the HttpEntity can also set a status code to send to the user. |
org.springframework.http.HttpHeaders | Specifies the headers to return to the user. |
org.springframework.web.servlet.mvc.method.annotation.StreamingResponseBody | Asynchronously write a result to the client. Requires async processing to be enabled (on by default). |
org.springframework.web.context.request.async.DeferredResultorg.springframework.util.concurrent.ListenableFuturejava.util.concurrent.CompletionStagejava.util.concurrent.Callable | Async result types for use in a async processing environment. Requires async processing to be enabled (on by default). |
Any other return type | All other return types are used as model attributes. The name is either derived from the return type or the name specified in org.springframework.web.bind.annotation.ModelAttribute. Unless the method return value is annotated with @ResponseBody, it is written to client using a HttpMessageConverter instead of being used as a model attribute. For more insights, see Chapter 7 on REST controllers. |
The ConfigurableWebBindingInitializer Properties
Attribute | Description |
|---|---|
autoGrowNestedPaths | If set to true, a path containing a null value is populated with a default object value instead of resulting in an exception. Moreover, this default value is used for further traversal of the expression. This property also controls auto growing of collections when an out-of-bounds index is accessed. The default value is true. |
bindingErrorProcessor | Sets the org.springframework.validation.BindingErrorProcessor implementation. |
conversionService | Sets the instance of org.springframework.core.convert.ConversionService. |
directFieldAccess | When set to true, we don’t need to write getters/setters to access the fields. The default is false. |
messageCodesResolver | Sets org.springframework.validation.MessageCodesResolver. |
propertyEditorRegistrar propertyEditorRegistrars | Registers one or more org.springframework.beans.PropertyEditorRegistrars. It is useful when we have old-style PropertyEditors that we want to use for type conversion. |
Validator | Sets the org.springframework.validation.Validator implementation. |
WebDataBinder properties .
Attribute | Description |
|---|---|
allowedFields | Specifies the fields that are allowed for binding. It is a white list; only fields included in this list are used for binding. Field names can also contain an asterisk (*) for matching field names with a certain pattern. By default, all fields are allowed. See the disallowedFields attribute for information on excluding fields from binding. |
autoGrowCollectionLimit | Sets the maximum size to auto grow a collection when binding. This setting can prevent out of memory errors when binding on large collections. By default, it is set to 256. |
autoGrowNestedPaths | If set to true, populates a path containing a null value with a default object value instead of raising an exception. This default object value is used for further traversal of the expression. This property also controls auto growing of collections when an out-of-bounds index is being accessed. By default, it is set to true. |
bindEmptyMultipartFiles | By default, replaces the already bound multipart files with an empty multipart file holder if the user resubmits a multipart form without choosing a different file. If this isn’t desired and you want null instead, then turn this property off. |
bindingErrorProcessor | Sets the org.springframework.validation.BindingErrorProcessor implementation. Spring provides org.springframework.validation.DefaultBindingErrorProcessor as a default implementation. |
conversionService | Sets org.springframework.core.convert.ConversionService. |
disallowedFields | Specifies the fields that aren’t allowed for binding. It is a blacklist of request parameter names to ignore during binding. In general, it is wise to put fields like the ID and version fields in there. Like allowedFields, this property can contain an * for matching field names with a certain pattern. |
extractOldValueForEditor | Specifies whether to extract the old values for editors and converters. By default, the old values are kept in the binding result. If this isn’t desired, set this property to false. It is also useful to set this to false if you have getters with side effects (e.g., they set other properties or default values). |
fieldDefaultPrefix | Specifies the prefix to identify parameters that contain default values for empty fields. The default value is !. |
fieldMarkerPrefix | Specifies the prefix to identify parameters that mark fields that aren’t submitted. Generally, this is useful with checkboxes. A checkbox that isn’t checked isn’t submitted as part of the request. Note that this mechanism still lets us receive a value. The default marker is _ (underscore). |
ignoreInvalidFields | If set to true, ignores invalid fields. Should we ignore bind parameters with corresponding fields in our model object, but which aren’t accessible? Generally this happens with a nested path, when part of that path resolves to null. The default is false (i.e., it does not ignore these fields). |
ignoreUnknownFields | Indicates whether to ignore parameters that aren’t represented as parameters on our model objects. When set to false, all the parameters that are submitted must be represented on our model objects. The default is true. |
messageCodesResolver | Sets org.springframework.validation.MessageCodesResolver. Spring provides org.springframework.validation.DefaultMessageCodesResolver as the default implementation. |
requiredFields | Sets the fields that are required. When a required field is not set, this leads to a bind error. |
validator | Sets the org.springframework.validation.Validator implementation. |
The SessionAttributes Attributes
Argument Name | Description |
|---|---|
value | The names of the model attributes that should be stored in the session. |
types | The fully qualified classnames (types) of model attributes should be stored in the session. All attributes in a model of this type are stored in the session, regardless of their names. |
The Thymeleaf standard expression types .
Construct | Expression Type | Comment |
|---|---|---|
${...} | Variable expressions. | OGNL expressions or Spring EL executed on the model attributes. |
*{...} | Selection expressions. | OGNL expressions or Spring EL executed on an object previously selected with a variable expression. |
#{...} | Message (i18n) expressions. | Also called internationalization expressions to allow retrieval of locale-specific messages. |
@{...} | Link (URL) expressions. | Builds URLs and adds useful context and session info. |
~{...} | Fragment expressions. | An easy way to represent fragments of markup and move them around templates. Can specify inheritance or overriding of template elements. |
Thymeleaf expressions used in the Bookstore project.
Expression | Description |
|---|---|
<head th:replace="~{template/layout :: head('Search books')}"></head> | Parametrizable fragment expression: the <head../> element in the current template is replaced with the one from template/layout.html, and the argument value is injected wherever required in this <head../> element declaration. |
<div id="header" th:replace="~{template/layout :: header}" ></div> | Fragment expression: this div element is replaced with the one with the same ID from template template/layout.html. |
<h1 id="pagetitle" th:text="#{book.search.title}">SEARCH TITLE</h1> | Message expression: the value of the <h1> element is replaced with the message value matching the book.search.title message key. The resulting HTML element, for and EN locale is <h1 id="pagetitle">Search Books</h1>. |
th:action="@{/book/search}" | Link expression: this generates a full URL by adding the protocol, domain name, and application context in front of the value provided as argument (e.g., http://localhost:8080/chapter5-bookstore/book/search). It provides a POST endpoint for a form. |
th:object="${bookSearchCriteria}" | Variable expression: this declares the model object to use for collecting the form data. |
<th:block th:each="book : ${bookList}"> </th:block> | Variable expression – iteration: the content within the block is repeated for each element in the bookList |
<td><input type="text" th:field="{title}"/><span th:if="${#fields.hasErrors('title')}" class="error" th:errors="{title}"></span></td> | Variable expression – validation: within a bean-backed form, secondary elements can display validation errors. In general, if the user enters a title that violates the @Valid constraints, it bounces back to this page with the error message displayed. |
Spring’s Default Property Editors in use by Spring MVC
Class | Explanation |
|---|---|
ByteArrayPropertyEditor | An editor for byte arrays that converts Strings to their corresponding byte representations. |
CharterEditor | An editor for Character or char fields. It converts a (Unicode) String into a character. Throws java.lang.IllegalArgumentException if more than one character is being parsed. Registered by default. |
CharsetEditor | An editor for java.nio.charset.Charset that expects the same name syntax as the name method of java.nio.charset.Charset. |
ClassEditorClassArrayEditor | An editor that parses Strings representing classes into actual classes and vice versa. When a class is not found, java.lang.IllegalArgumentException is thrown. |
CurrencyEditor | An editor for Currency that translates currency codes into Currency objects. It also exposes the currency code as the text representation of a Currency object. |
CustomBooleanEditor | A customizable property editor for Boolean properties. |
CustomCollectionEditor | A property editor for collections that converts any source Collection into a given target Collection type. |
CustomMapEditor | Property editor for Map that converts any source Map into a given target Map type. |
CustomDateEditor | A customizable property editor for java.util.Date that supports a custom DateFormat. It is not registered by default, and it must be user registered as needed with the appropriate format. |
CustomNumberEditor | A customizable property editor for any Number subclass like Integer, Long, Float, and so on. It is registered by default, but can be overridden by registering a custom instance of it as a custom editor. |
FileEditor | An editor capable of resolving Strings to java.io.File objects. It is registered by default. |
InputStreamEditor | A one-way property editor capable of taking a text string and producing java.io.InputStream, so that InputStream properties may be directly set as Strings. Note that the default usage does not close the InputStream for you! It is registered by default. |
LocaleEditor | An editor capable of resolving to Locale objects and vice versa (the String format is [country][variant], which is the same behavior the toString() method of Locale provides). It is registered by default. |
PatternEditor | An editor capable of resolving Strings to JDK 1.5 Pattern objects and vice versa. |
PropertiesEditor | An editor capable of converting Strings (formatted using the format as defined in the Javadoc for the Properties class) to Properties objects. It is registered by default. |
StringTrimmerEditor | A property editor that trims Strings. Optionally, it allows transforming an empty String into a null value. It is not registered by default; it must be registered by the user as needed. |
TimeZoneEditor | An editor for Timezone that translates timezone IDs into TimeZone objects. Note that it does not expose a text representation for TimeZone objects. |
URIEditor | An editor for java.net.URI that directly populates a URI property instead of using a String property as a bridge. By default, this editor encodes String into URIs. |
URLEditor | An editor capable of resolving a String representation of a URL into an actual java.net.URL object. It is registered by default. |
UUIDEditor | Converts a String into java.util.UUID and vice versa, registered by default. |
ZoneId | Converts a String into java.time.ZoneId and vice versa, registered by default. |
The Error Codes for Field Errors
Pattern | Example |
|---|---|
code + object name + field | required.newOrder.name |
code + field | required.name |
code + field type | required.java.lang.String |
Code | required |
The Error Codes for Field Errors with JSR-303 Annotations
Pattern | Example |
|---|---|
annotation name + object name + field | NotEmpty.newOrder.name |
annotation name + field | NotEmpty.name |
annotation name + field type | NotEmpty.java.lang.String |
annotation name | NotEmpty |
A MessageSource Overview
Class | Description |
|---|---|
ResourceBundleMessageSource | Uses the ResourceBundle facility available on the JVM. It can only load resources from the classpath. |
ReloadableResourceBundleMessageSource | Works similarly to the ResourceBundleMessageSource but adds reloading and caching capabilities. It allows the resources to be anywhere on the file system; it uses the resource loading mechanism in Spring. |
The LocaleResolver Overview
Class | Description |
|---|---|
FixedLocaleResolver | Always resolves to a fixed locale. All the users of our website use the same locale, so changing the locale isn’t supported. |
SessionLocaleResolver | Resolves (and stores) the locale in the user’s HttpSession. The attribute stores the locale can be configured and the default locale to use if no locale is present. The drawback to this is that the locale isn’t stored between visits, so it must be set at least once on the user’s session. |
AcceptHeaderLocaleResolver | Uses the HTTP accept header to resolve the locale. In general, this is the locale of the user’s operating system, so changing the locale isn’t supported. It is also the default LocalResolver used by the DispatcherServlet. |
CookieLocaleResolver | Uses a cookie to store the user’s locale. The advantage of this resolver is that the locale is kept on the client’s machine, so it is available on subsequent visits to the website. The cookie name and timeout can be configured, as well as the default locale. |

The login page
The Modified LoginController
Before we move on, let’s drill down on how the handleLogin method works. The username and password parameters are retrieved from the request; they call the login method on the AccountService. If the correct credentials are supplied, we get an Account instance for the user (which we store in the session), and then we redirect to the index page. If the credentials are not correct, the service throws an authentication exception, which is handled by the controller for now. The exception is stored as a request attribute, and we return the user to the login page.
The LoginController with RequestParam
Using the @RequestParam annotation simplified our controller. However, our exception handling dictates that we still need access to the request. This changes in the next chapter when we implement exception handling.
The LoginController with RedirectAttributes
When the application is redeployed, and we log in, typing in the wrong username/password combination raises an error message; however, when we press the Back button, the popup request for a form submission is gone.
Until now, everything we have done is low level. Our solutions include working with the request and/or response directly or through a bit of abstraction with org.springframework.web.bind.annotation.RequestParam. However, we work in an object-oriented programming language, and where possible, we want to work with objects. We explore this in the next section.
Book Search Page
We have a bookstore, and we want to sell books. At the moment, however, there is nothing in our web application that allows the user to search for or even see a list of books. Let’s address this by creating a book search page so that the users of our application can search for books.
The Search Page Form
The BookSearchController with Search
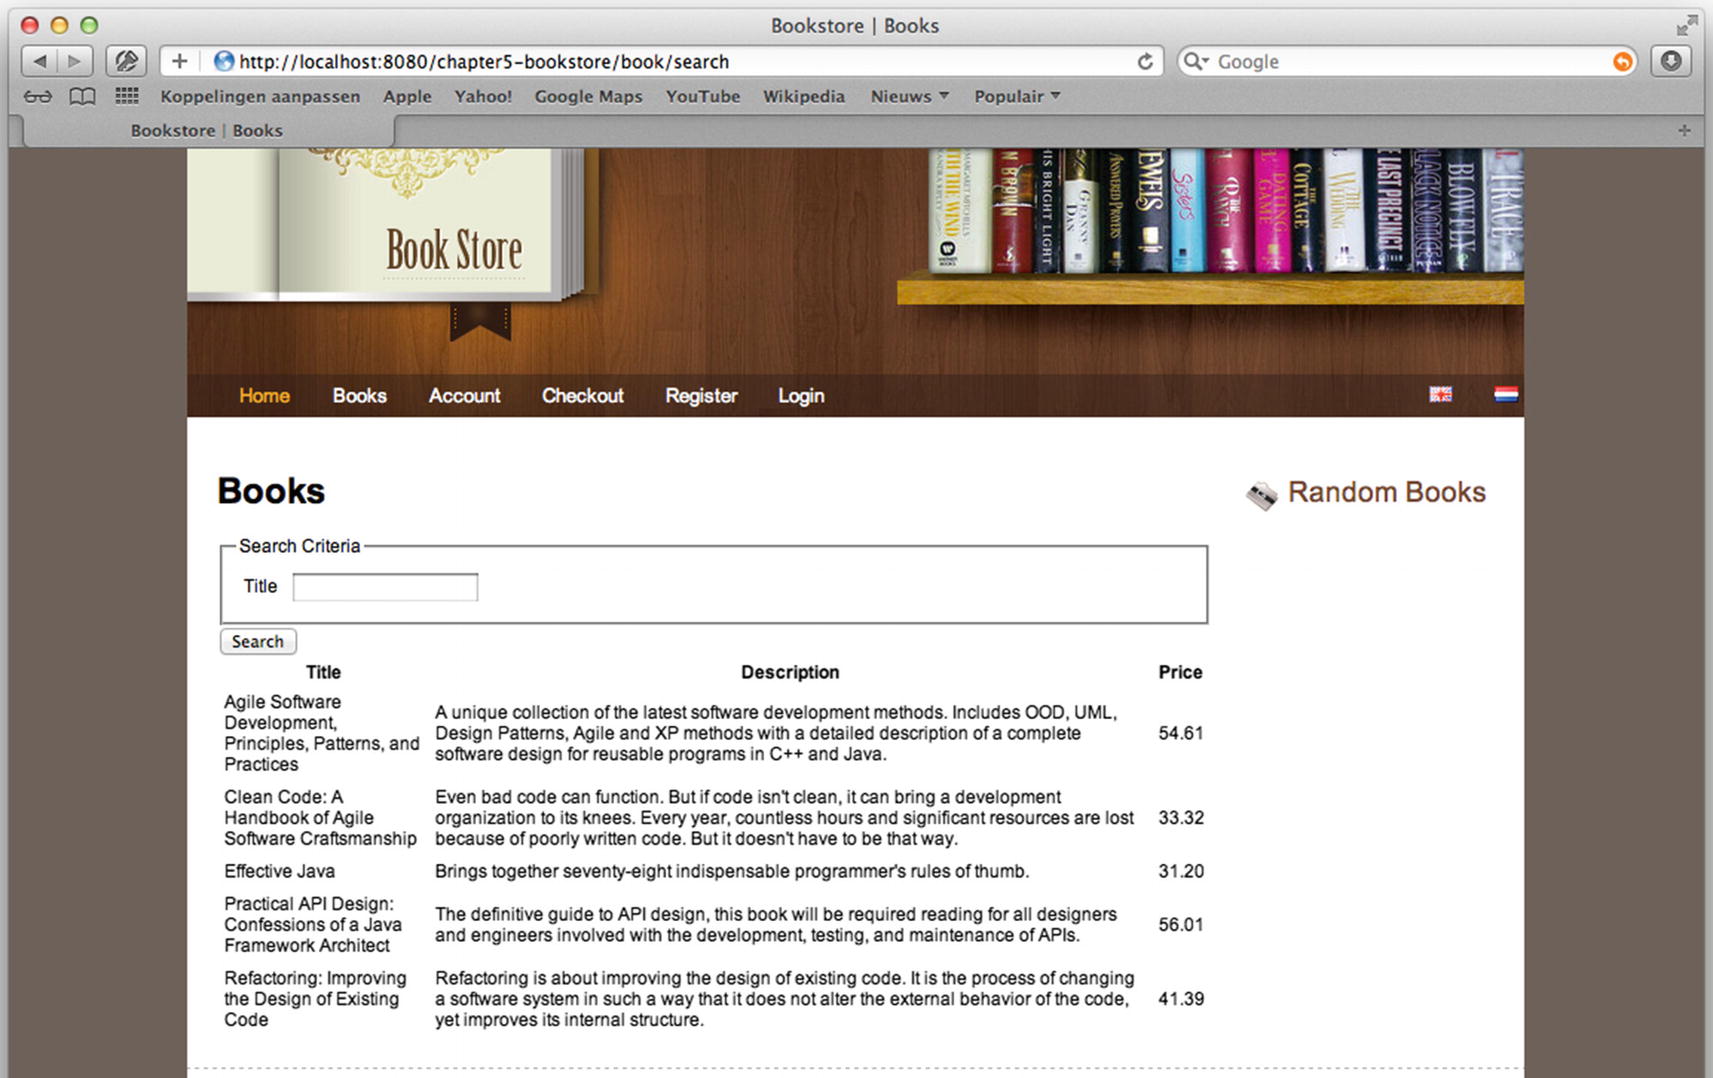
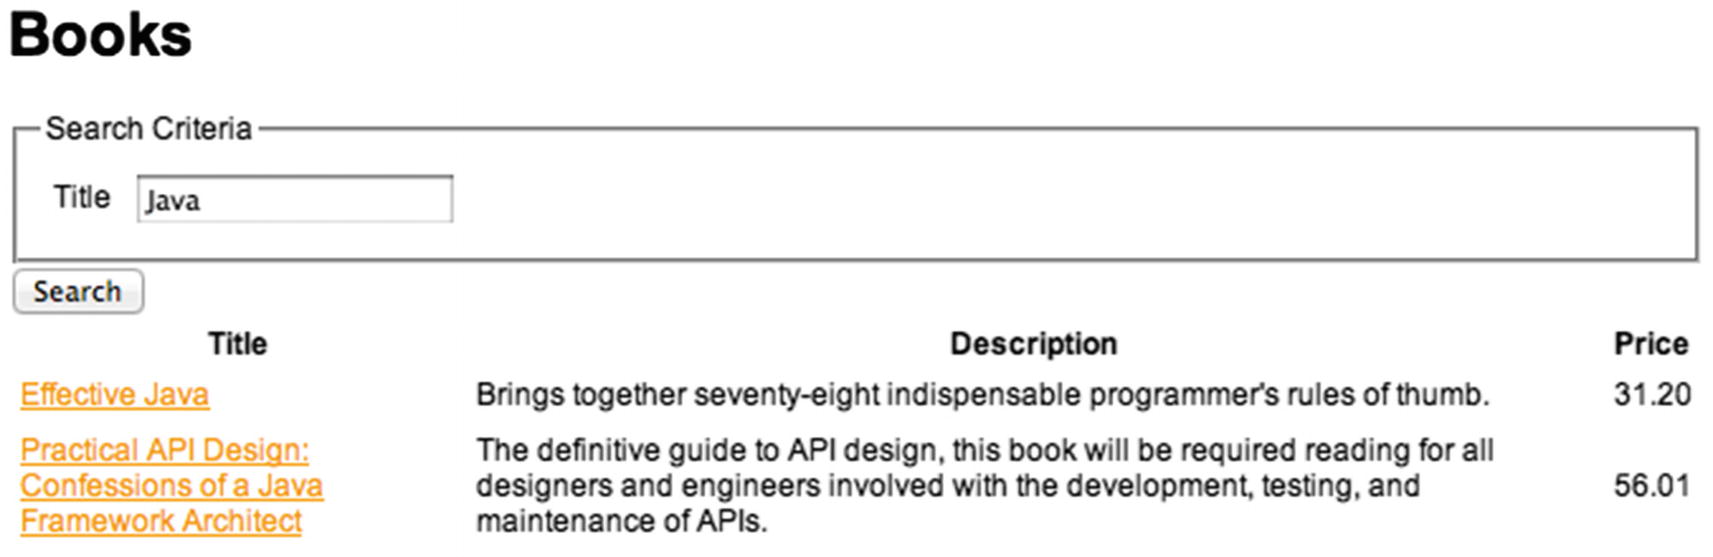
The book search page showing the results
The BookSearchController with BookSearchCriteria as a Method Argument
In Spring MVC, this is called data binding. To enable data binding, we needed to modify com.apress.prospring.bookstore.web.controller.BookSearchController, so it uses a method argument, instead of working with the request directly (see Listing 5-14). Alternatively, it could use RequestParam to retrieve the parameters and set them on the object. This forces Spring to use data binding on the criteria method argument. Doing so maps all request parameters with the same name as one of our object’s properties to that object (i.e., the request parameter title is mapped to the property title). Using data binding simplifies our controller (you can find more in-depth information on this in the “Data Binding” section of this chapter).
The BookSearchController Alternate Version
Book Detail Page
The Modified Search Page
The BookDetailController
The Book’s detail.html Page

The book’s details page
Data Binding
The BookSearchCriteria JavaBean
Assume we receive the following request: http://localhost:8080/chapter5-bookstore/book/search?title=Agile. In this case, the title property receives the value of Agile. Behind the scenes, Spring calls the setTitle method on our JavaBean, which we specified as a method argument in the list method on our controller. If there were a parameter named category in the request, Spring would call the setCategory method; however, it would first try to convert the parameter (which is always a String) to com.apress.prospring.bookstore.domain.Category JavaBean.
However, data binding isn’t limited to simple setter methods. We can also bind to nested properties and even indexed collections like maps, arrays, and lists. Nested binding happens when the parameter name contains a dot (.); for instance, address.street=Somewhere leads to getAddress().setStreet("Somewhere").
To bind to indexed collections, we must use a notation with square brackets to enclose the index. When using a map, this index doesn’t have to be numeric. For instance, list[2].name would bind a name property on the third element in the list. Similarly, map['foo'].name would bind the name property to the value under the key foo in the map.
Customizing Data Binding
We have two options for customizing the behavior of data binding: globally or per controller. We can mix both strategies by performing a global setup and then fine-tuning it per controller.
Global Customization
To customize data binding globally, we need to create a class that implements the org.springframework.web.bind.support.WebBindingInitializer interface. Spring MVC provides a configurable implementation of this interface, org.springframework.web.bind.support.ConfigurableWebBindingInitializer. An instance of the interface must be registered with the handler mapping implementation to be used. After an instance of org.springframework.web.bind.WebDataBinder is created, the initBinder method of org.springframework.web.bind.support.WebBindingInitializer is called.
The provided implementation allows us to set a couple of properties. When a property is not set, it uses the defaults as specified by org.springframework.web.bind.WebDataBinder. If we were to want to specify more properties, it would be easy to extend the default implementation and add the desired behavior. It is possible to set the same properties here as in the controller (see Table 5-15).
Configure the ConfigurableWebBindingInitializer
![]() Notice the Validator and FormattingConversionService dependencies in the method signature. These are needed to enable validation and type conversion from the incoming String parameter to the actual type needed.
Notice the Validator and FormattingConversionService dependencies in the method signature. These are needed to enable validation and type conversion from the incoming String parameter to the actual type needed.
Per Controller Customization
For the per controller option, we must implement a method in the controller and put the org.springframework.web.bind.annotation.InitBinder annotation on that method. The method must have no return value (void) and at least org.springframework.web.bind.WebDataBinder as a method argument. The method can have the same arguments as a request-handling method. However, it cannot have a method argument with the org.springframework.web.bind.annotation.ModelAttribute annotation. This is because the model is available after binding, and in this method, we configure the way we bind.
The org.springframework.web.bind.annotation.InitBinder annotation has a single attribute named value that can take the model attribute names or request parameter names that this init-binder method applies to. The default is to apply to all model attributes and request parameters.
To customize binding, we need to configure our org.springframework.web.bind.WebDataBinder. This object has several configuration options (setter methods) that we can use, as shown in Table 5-16.
An Example init-binder Method
ModelAttributes
To fully utilize data binding, we have to use model attributes. Furthermore, we should use one of these model attributes as the object our form fields are bound to. In our com.apress.prospringmvc.bookstore.web.controller.BookSearchController, we added an object as a method argument, and Spring used that as the object to bind the request parameters to. However, it is possible to have more control over our objects and how we create objects. For this, we can use the org.springframework.web.bind.annotation.ModelAttribute annotation. This annotation can be put both on a method and method arguments.
Using ModelAttribute on Methods
We can use the @ModelAttribute annotation on methods to create an object to be used in our form (e.g., when editing or updating) or to get reference data (i.e., data that is needed to render the form like a list of categories). Let’s modify our controller to add a list of categories to the model and an instance of a com.apress.prospring.bookstore.domain.BookSearchCriteria object (see Listing 5-24).
The BookSearchController with ModelAttribute Methods
Methods annotated with @ModelAttribute have the same flexibility in method argument types as request-handling methods. Of course, they shouldn’t operate on the response and cannot have @ModelAttribute annotation method arguments. We could also have the method return void; however, we would need to include org.springframework.ui.Model, org.springframework.ui.ModelMap, or java.util.Map as a method argument and explicitly add its value to the model.
The annotation can also be placed on request-handling methods, indicating that the method’s return value is a model attribute. The name of the view is then derived from the request that uses the configured org.springframework.web.servlet.RequestToViewNameTranslator.
Using ModelAttribute on Method Arguments
When using the annotation on a method argument, the argument is looked up from the model. If it isn’t found, an instance of the argument type is created using the default constructor.
The BookSearchController with ModelAttribute Annotation on a Method Argument
Using SessionAttributes
It can be beneficial to store a model attribute in the session between requests. For example, imagine we need to edit a customer record. The first request gets the customer from the database. It is then edited in the application, and the changes are submitted back and applied to the customer. If we don’t store the customer in the session, then the customer record must be retrieved from the database. This can be inconvenient.
In Spring MVC, you can tell the framework to store certain model attributes in the session. For this, you can use the org.springframework.web.bind.annotation.SessionAttributes annotation (see Table 5-17). You should use this annotation to store model attributes in the session to survive multiple HTTP requests. However, you should not use this annotation to store something in the session and then use the javax.servlet.http.HttpSession to retrieve it. The session attributes are also only usable from within the same controller, so you should not use them as a transport to move objects between controllers. If you need that, we suggest using plain access to the HttpSession.
The SessionStatus Interface
Thymeleaf expressions
To use all the data binding features provided by the framework, we rely on the view technology, in this case, Thymeleaf. Thymeleaf parses the search.html template and evaluates the various template expressions to render the form. Spring Framework can be used with JSP views, and in this case, the Spring Tag Library can write forms and bind form elements to Spring objects.
When using Thymeleaf views, regardless of template types (HTML, text, etc.), you can use five types of standard expressions (or constructs). They are listed in Table 5-18.
A number of these expressions have been used in the examples in this chapter. Table 5-19 lists a few of these with a short explanation for each.
The Title field remains filled
Adding Categories to the search.html Model
The Search Page with a Category Drop-down Element
Type Conversion
Property editors
Converters
Formatters
Property editors are old-style type conversion, whereas converters and formatters are the new way. Converters and formatters are more flexible; as such, they are also more powerful than property editors. Also, relying on property editors pulls in the whole java.beans package, including all its support classes, which you don’t need in a web environment.
Property Editors
Support for property editors has been part of the Spring Framework since its inception. To use this kind of type conversion, we create a PropertyEditor implementation (typically by subclassing PropertyEditorSupport). Property editors take a String and convert it into a strongly typed object—and vice versa. Spring provides several implementations for accomplishing this out of the box (see Table 5-20).
![]() All property editors are in the org.springframework.beans.propertyeditors package.
All property editors are in the org.springframework.beans.propertyeditors package.
Converters
The converter API in Spring is a general-purpose type-conversion system. Within a Spring container, this system is used as an alternative to property editors to convert bean property value strings into the required property type. We can also use this API to our advantage in our application whenever we need to do type conversion. The converter system is a strongly typed conversion system and uses generics to enforce this.
Converter
ConverterFactory
GenericConverter
ConditionalGenericConverter
Let’s explore the four different APIs.
The Converter API
The ConverterFactory API
The GenericConverter API
An example of this type of conversion logic would be a converter that converts from an array to a collection. A converter first inspects the type of element being converted to apply additional conversion logic to different elements.
The ConditionalGenericConverter API
The ConversionService API
Formatters
The Formatter API
The Sample DateFormatter
The AnnotationFormatterFactory Interface
The DateFormatAnnotationFormatterFactory Class
Configuring Type Conversion
If we want to use org.springframework.core.convert.converter.Converter or org.springframework.format.Formatter in Spring MVC, then we need to add some configuration.
The FormatterRegistry Interface
The StringToEntityConverter
The CategoryConverter Configuration
In addition to the category conversion, we also need to do date conversions. Therefore, Listing 5-38 also includes org.springframework.format.datetime.DateFormatter with a pattern for converting dates.
Using Type Conversion
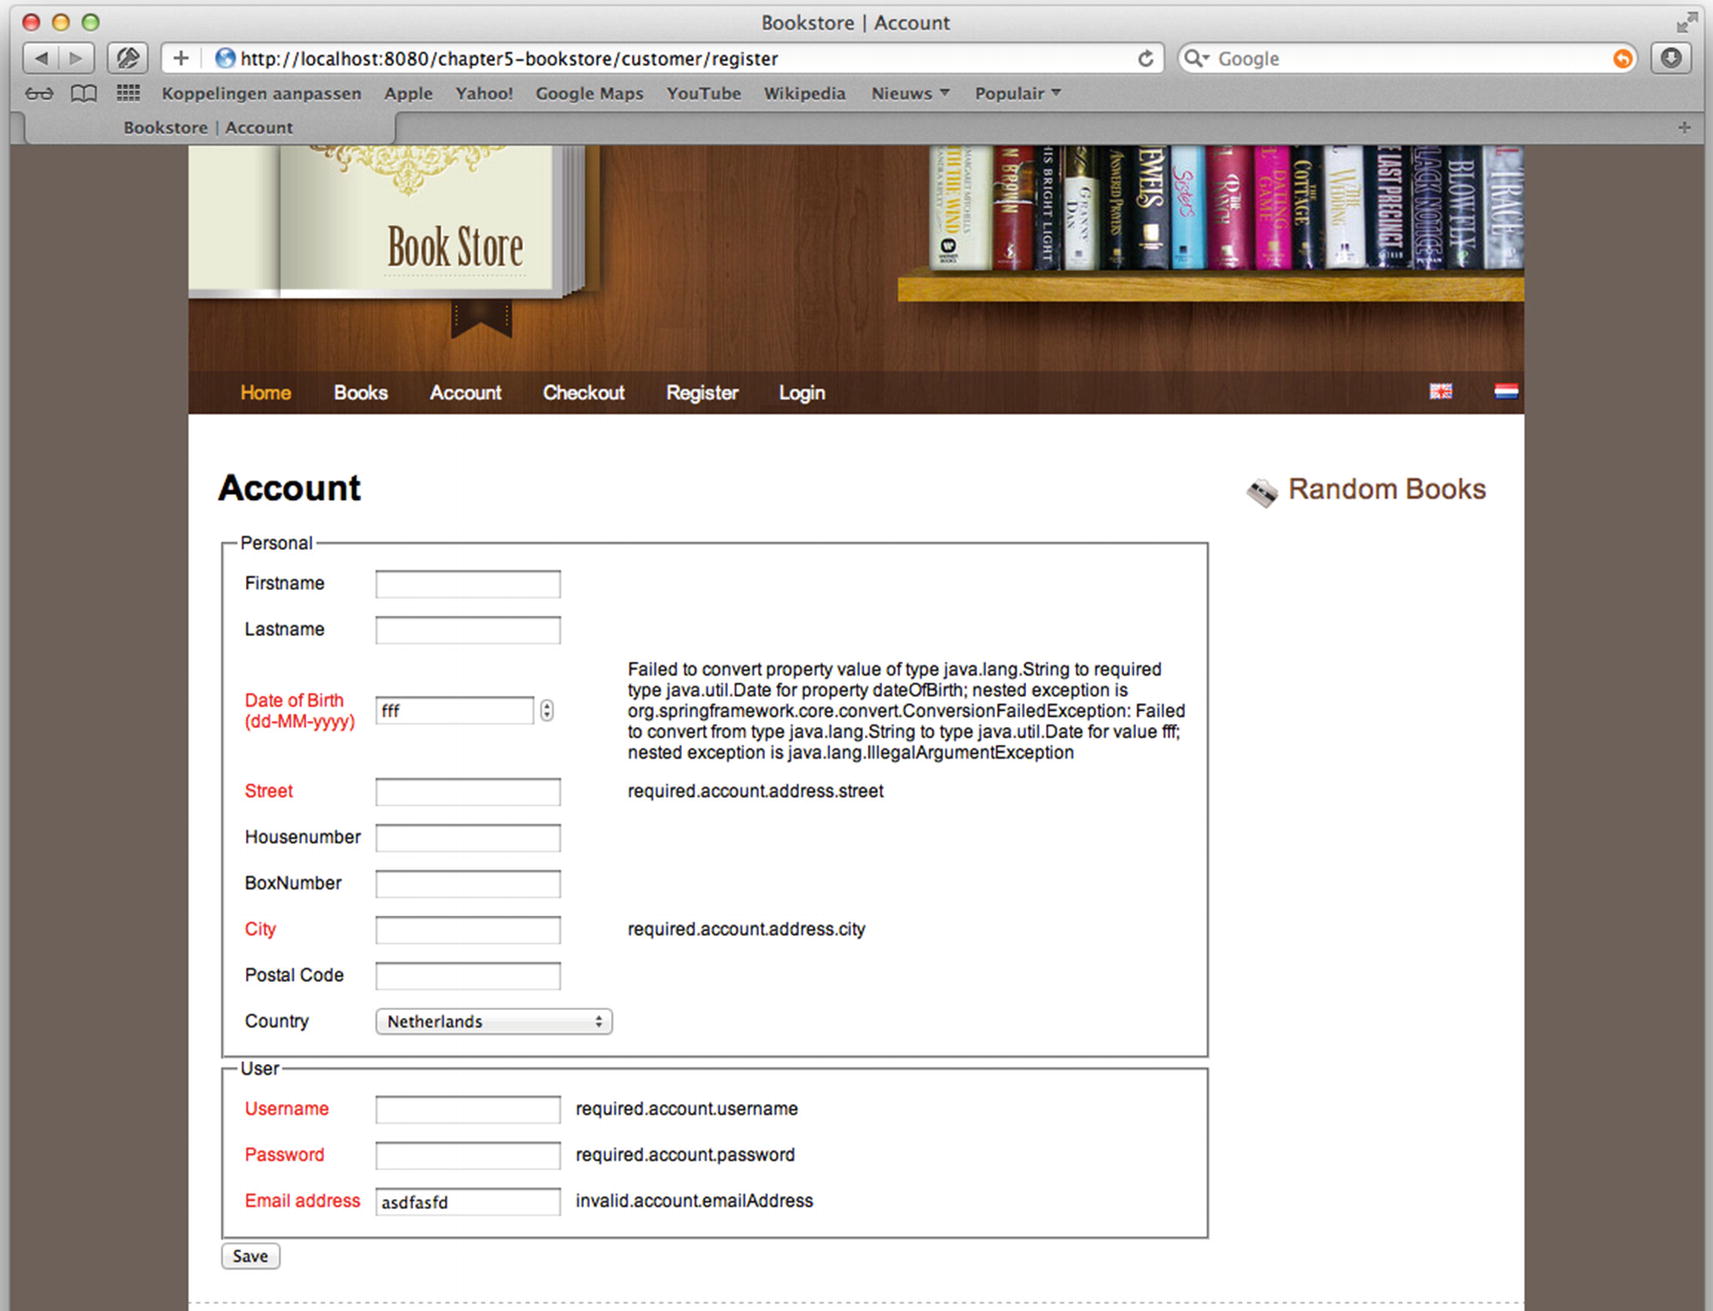
The Registration Page
The RegistrationController

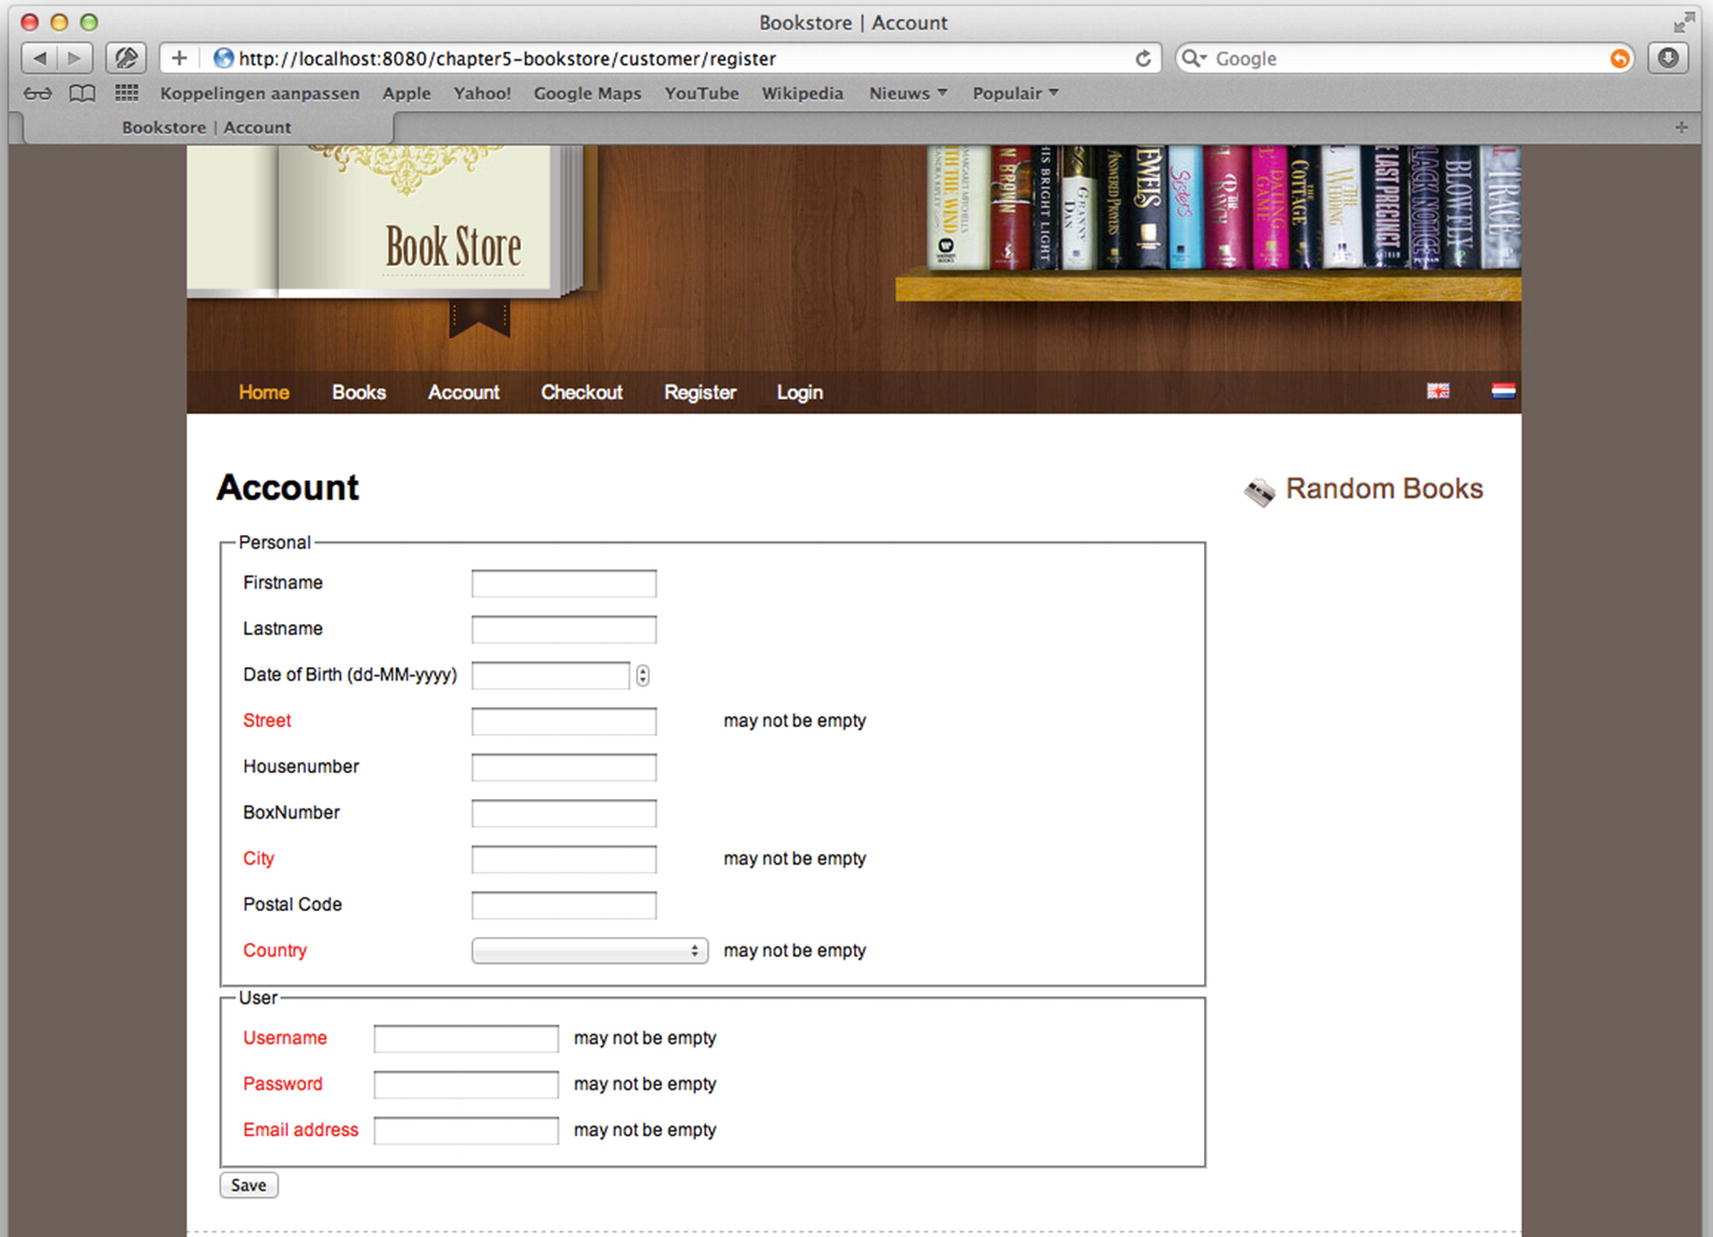
The account registration page

The account registration page showing some errors
The error messages are created by the data binding facilities in Spring MVC. Later in this chapter, you see how we can influence the messages displayed. For now, let’s leave them intact. If we fill in proper information and click Save, we are redirected to an account page (for which we already have provided the basic controller and implementation).
Validating Model Attributes
We’ve already mentioned validation a couple of times. We’ve also referred to the org.springframework.validation package a couple of times. Validating our model attributes is easy to accomplish with the validation abstraction from the Spring Framework. Validation isn’t bound to the web; it is about validating objects. Therefore, validation can also be used outside the web layer; in fact, it can be used anywhere.
The Validator Interface
The supports method is called to see if a validator can validate the current object type. If that returns true, the framework calls the validate method with the object to validate and an instance of an implementation of the org.springframework.validation.Errors interface. When binding, this is an implementation of org.springframework.validation.BindingResult. When doing validation, it is good to include an Errors or BindingResult (the latter extends Errors) method attribute. This way, we can handle situations where there is a bind or validation error. If this is not the case, org.springframework.validation.BindException is thrown.
When using Spring MVC, we have two options for triggering validation. The first is to inject the validator into our controller and call the validate method on the validator. The second is to add the javax.validation.Valid (JSR-303) or org.springframework.validation.annotation.Validated annotation to our method attribute. The annotation from the Spring Framework is more powerful than the one from the javax.validation package. The Spring annotation enables us to specify hints; when combined with a JSR-303 validator (e.g., hibernate-validation), we can specify validation groups.
The MessageSource Configuration Bean
We configure a message source and then configure it to load a resource bundle with basename messages (you learn more about this in the “Internationalization” section later in this chapter). When a message is not found, we return the code as the message. This is especially useful during development because we can quickly see which message codes are missing from our resource bundles.
Let’s implement validation for our com.apress.prospringmvc.bookstore.domain.Account class. We want to validate whether an account is valid, and for that, we need a username, password, and a valid e-mail address. To handle shipping, we also need an address, city, and country. Without this information, the account isn’t valid. Now let’s see how to use the validation framework to our advantage.
Implementing Our Validator
The AccountValidator Implementation
![]() Specifying requiredFields on org.springframework.web.bind.WebDataBinder would result in the same validation logic as with the ValidationUtils.rejectIfEmptyOrWhiteSpace. In our case, however, we have all the validation logic in one place, rather than having it spread over two places.
Specifying requiredFields on org.springframework.web.bind.WebDataBinder would result in the same validation logic as with the ValidationUtils.rejectIfEmptyOrWhiteSpace. In our case, however, we have all the validation logic in one place, rather than having it spread over two places.
This validator implementation checks if the fields are not null and non-empty. If the field is empty, it registers an error for the given field. The error is a collection of message codes determined by an org.springframework.validation.MessageCodesResolver implementation. The default implementation, org.springframework.validation.DefaultMessageCodesResolver, resolves to four different codes (see Table 5-21). The order in the table is also how the error codes are resolved to a proper message.
The RegistrationController with Validation
The registration page with error codes
Using JSR-303 Validation
An Account with JSR-303 Annotations
The registration page with error messages
Internationalization
For internationalization to work, we need to configure different components to resolve messages based on the language (locale) of the user. For example, there is org.springframework.context.MessageSource, which lets us resolve messages based on message codes and locale. To resolve the locale, we also need org.springframework.web.servlet.LocaleResolver. Finally, to change the locale, we also need to configure org.springframework.web.servlet.i18n.LocaleChangeInterceptor (the next chapter covers interceptors in more depth).
Message Source
The message source is the component that resolves our message based on a code and the locale. Spring provides a couple of implementations of the org.springframework.context.MessageSource interface. Two of those implementations are implementations that we can use, while the other implementations simply delegate to another message source.
The two implementations provided by the Spring Framework are in the org.springframework.context.support package. Table 5-23 briefly describes both of them.
We configure both beans more or less the same way. One thing we need is a bean named messageSource. Which implementation we choose doesn’t matter. For example, we could even create our own implementation that uses a database to load the messages.
The MessageSource Configuration in WebMvcContext
The messages.properties Snippet
messages_nl.properties
LocaleResolver
For the message source to do its work correctly, we also need to configure org.springframework.web.servlet.LocaleResolver (this can be found this in the org.springframework.web.servlet.i18n package). Several implementations ship with Spring that can make our lives easier. The locale resolver is a strategy that detects which Locale. The different implementations each use a different way of resolving the locale (see Table 5-24).
LocaleChangeInterceptor
The Full Internationalization Configuration
![]() In general, it is a good idea to have LocaleChangeInterceptor as one of the first interceptors. If something goes wrong, we want to inform the user in the correct language.
In general, it is a good idea to have LocaleChangeInterceptor as one of the first interceptors. If something goes wrong, we want to inform the user in the correct language.
The Book Search Page with the Message Tag

The book search page in English
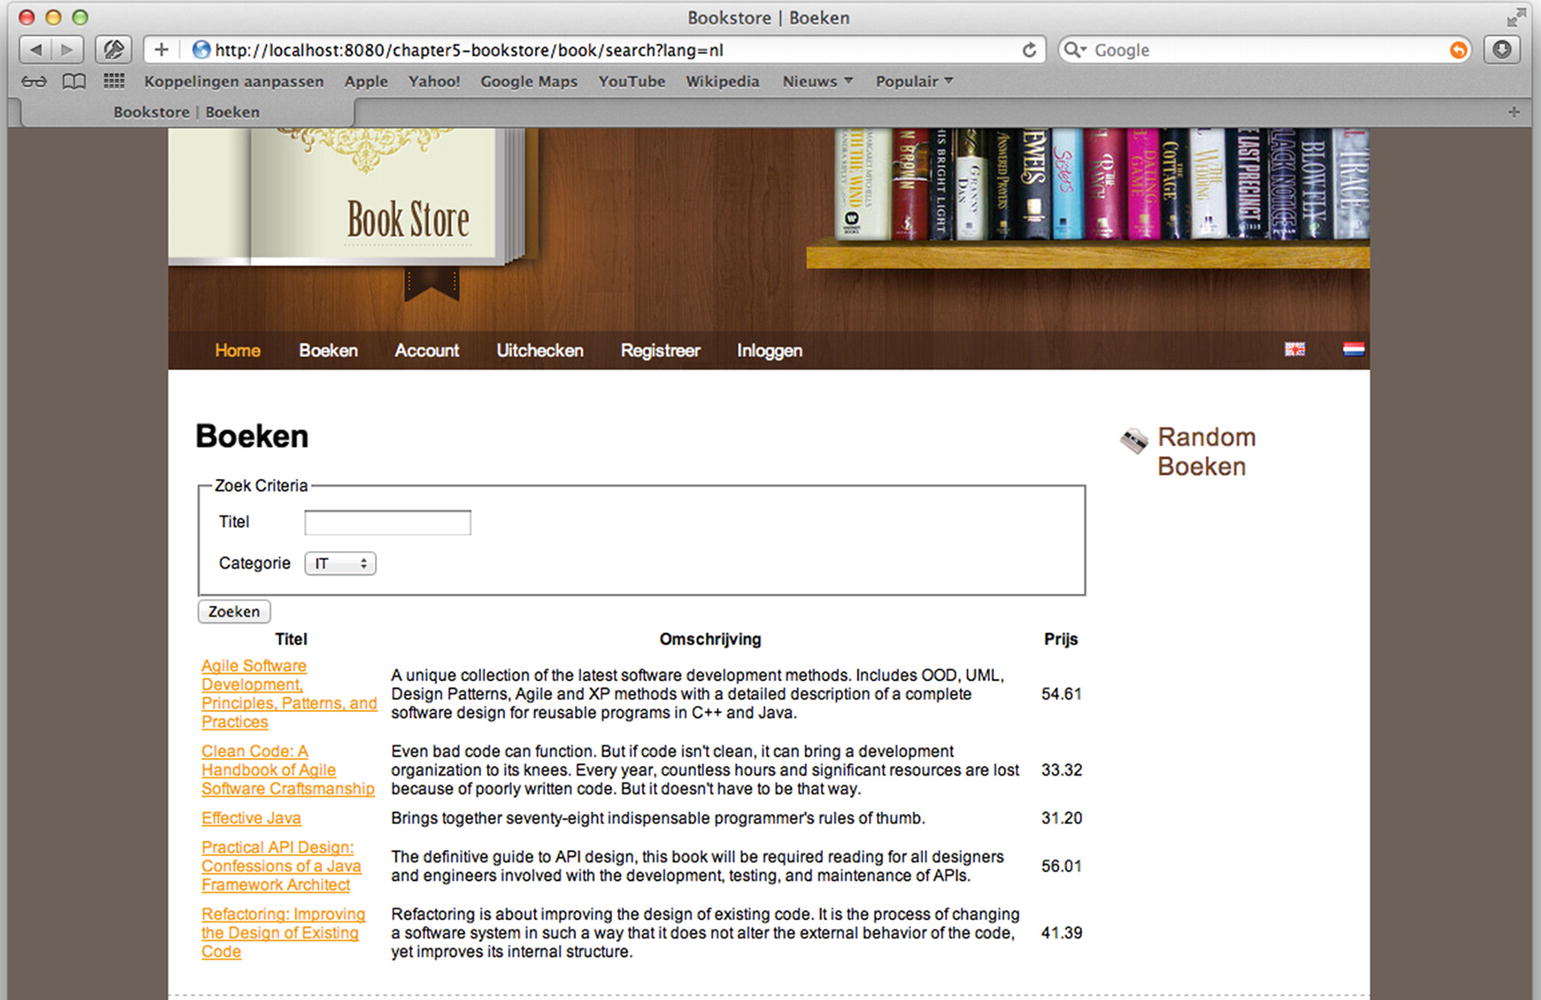
The book search page in Dutch
Summary
This chapter covered all things we need to write controllers and handle forms. We began by exploring the @RequestMapping annotation and how that can map requests to a method to handle a request. We also explored flexible method signatures and covered which method argument types and return values are supported out of the box.
Next, we dove into the deep end and started writing controllers and modifying our existing code. We also introduced form objects and covered how to bind the properties to fields. And we explained data binding and explored Spring’s type-conversion system and how that converts from and to certain objects. We also wrote our own implementation of a Converter to convert from text to a Category object.
In addition to type conversion, we also explored validation. There are two ways to validate: we can create our own implementation of a Validator interface or use the JSR-303 annotations on the objects we want to validate. Enabling validation is done with either the @Valid or the @Validated annotation.
To make it easier to bind certain fields to a form object’s attributes, there is the Spring Form Tag library, which helps us to write HTML forms. This library also helps us to display bind and validation errors to the user.
Finally, we covered how to implement internationalization on our web pages and how to convert the validation and error codes to proper messages to show to the end user.
In the next chapter, we explore some more advanced features of Spring MVC. Along the way, you see how to further extend and customize the existing infrastructure.