
![]()
Building Custom Workflow Activities
In Chapter 3, you built a solid foundation for workflow activities and learned how they can be used for authoring workflows. WF provides many workflow activities that can handle most of the functionality required by workflows, but occasionally there are business requirements that require custom activities. Most of the time, custom activities are required to define workflow logic that simplifies the modeling experience so the workflow is easier to manage.
This chapter will show you how to build custom workflow activities that model business logic for domain-specific business processes. There are different types of workflow activities, so I will suggest patterns and practices for building the right type of custom activity based on different workflow scenarios. The chapter will also show you how to define the physical layout for a custom activity so it can be used declaratively within workflows.
Activity Base Classes
The authoring experience has not changed much between WF4 and WF4.5, but, regardless of WF version, it is important to understand how to build custom workflow activities since they are the basic unit of functionality that drive a workflow.
Before you start building custom workflow activities, let’s first talk about workflow activities on a coding level, since this is how custom activities will built within this chapter. I mentioned earlier in the book that workflow activities are the basic building blocks for authoring workflows. Classes defined as code could also be considered the same for defining software. For instance, the .NET Framework is built from defined classes that work together.
There are base classes that represent foundational characteristics that other classes can inherit from. This is the same principle that applies to the activity base classes. For example, a Person class can be defined as a base class so that other classes can inherit from it, and the Person class might contain the following properties:
- DOB
- Age
- SSN
Another class called, for instance, Student can now inherit from the Person class and is defined by additional properties, such as
- StudentNumber
- HomeRoom
- CurrentGrade
A Student class can inherit from the Person class, and in doing so, it too will have the additional properties defined within the Person class.
Polymorphism is an object-oriented programming (OOP) technique that builds on the concept of inheritance, in this case by implying that the Student class has all the characteristics of a person, together with those special characteristics that distinguish a student. The same concept applies to the activity base classes because even though a custom activity can be built, it still uses the activity base class it inherits from to represent the base type of the activity.
Encapsulation is another important OOP technique; it abstracts or hides the implementation of an interface so the caller is not aware of exactly how the functionality is defined because the caller only cares about the end result. An example of encapsulation could be registering a new student at a new school. One way of handling this through code might be passing a new Student class and supplying values for the DOB, Age, and SSN properties of the Student object. The detailed logic for registering the student is hidden, but the results returned show that the student has in fact been registered. The Student object returned now has values associated with the StudentNumber, HomeRoom, and CurrentGrade properties. Since encapsulation drives code reuse, this example of functionality could be built into a custom activity, which can be used to author more than one workflow.
WF defines the base classes within the System.Activities namespace, which can be extended for building custom workflow activities. System.Activities.Activity is used as the base class for defining all activities, including the service activities for modeling WCF services. This applies to out-of-the-box activities within WF and custom workflow activities. Table 7-1 shows the different activity types that derive from System.Activities.Activity and the Extended column indicates whether the activity type can be extended for custom activities.
Table 7-1. Activity Types That Derive from System.Activities.Activity
The activity types listed in Table 7-1 that can be used for extending custom workflow activities are illustrated in a class diagram in Figure 7-1. The class diagram shows the relationships for the classes that can be extended to create custom workflow activities.
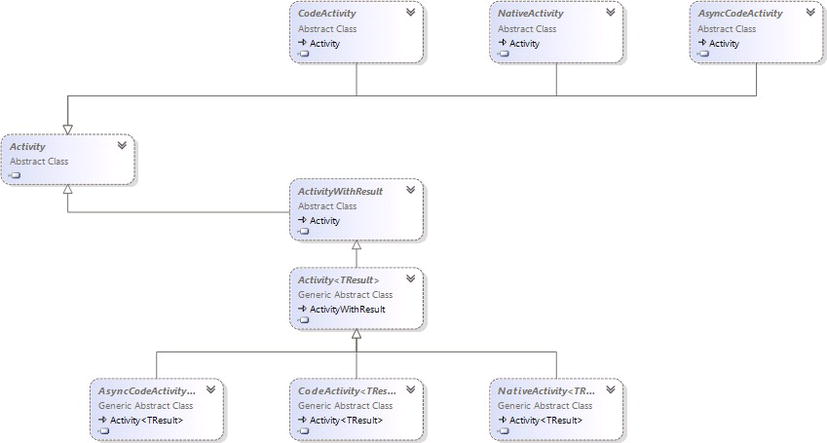
Figure 7-1. Class diagram showing the relationships for the activity base classes
![]() Note Custom workflow activities do not have to be built using code. Composite activities can be built declaratively using the WF designer. A composite activity is composed of more than one activity with the expectation of being reused within multiple workflows. Chapter 5 covers how a custom composite activity is built and used within a workflow.
Note Custom workflow activities do not have to be built using code. Composite activities can be built declaratively using the WF designer. A composite activity is composed of more than one activity with the expectation of being reused within multiple workflows. Chapter 5 covers how a custom composite activity is built and used within a workflow.
Getting Started
When building custom activities, it is important to make sure the activities being built can be executed and tested. Adding custom activities to a workflow and executing the workflow can all be done through code; however, being able to declaratively add your own custom activities to a workflow and seeing them execute is more exciting. Opening VS2012 and adding a new Workflow Console Application project to a solution provides the WF plumbing needed to test activities derived from CodeActivity, as illustrated in Figure 7-2.
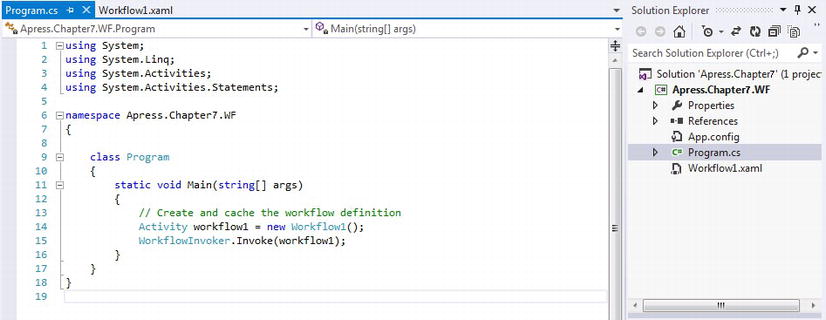
Figure 7-2. Boilerplate code for hosting a workflow within a console application
The project contains boilerplate code that uses WorkflowInvoker to host the default workflow that comes with the project Workflow1.xaml. Workflow.xaml will be used to test new custom activities.
The next step is to add another project to the solution to contain the custom activities that will be built. Custom activities can also be created within the same workflow project, but creating its own project provides a flexible way to distribute and manage custom activities. Figure 7-3 shows that a new Class Library project has been added to the solution. A Class Library project is used to define logic within a .NET assembly using one or more classes. In this case, a default class is already generated with the project. The file Class1.cs will be used to define a custom activity, and if there are different types of custom activities, they can be classified within the solution by using folders. This project shows that the folder CodeActivity has been added to hold just activities that inherit from CodeActivity.
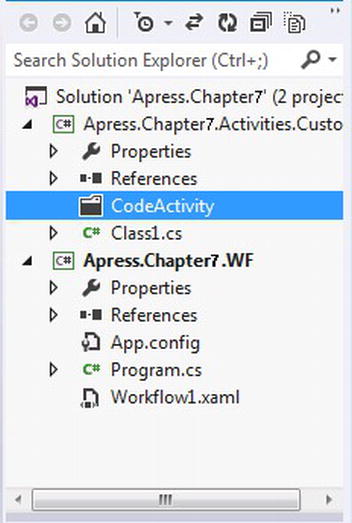
Figure 7-3. Custom activities are contained within their own project
Code Activity
Most of the examples used in this book derive from CodeActivity when a custom activity is used to demonstrate functionality. Activities that derive from CodeActivity behave much like the behavior around a C# function. A C# function might have parameters passed into it and return something back. Table 7-2 identifies some of the out-of-the-box activities that derive from System.Activities.CodeActivity; however, in this section I will demonstrate how additional custom code activities can be created to provide additional logic when using these out-of-the-box activities does not provide the functionality needed.
Table 7-2. Out-of-the-box Activities That Derive from System.Activities.CodeActivity
| Activity Name | Table Head |
|---|---|
| System.Activities.Statements.AddToCollection<T> | Adds an object to a collection. |
| System.Activities.Statements.Assign | Assigns a value to another object. |
| System.Activities.Statements.Assign<T> | Assigns a value to another object based on a specified type. |
| System.Activities.Statements.ClearCollection<T> | Clears out items within a collection. |
| System.Activities.Statement.Throw | Throws an exception within a workflow. |
| System.Activities.Statements.WriteLine | Writes string information from the workflow. |
Figure 7-3 also shows that a folder called CodeActivity has been added to the Apress.Chapter7.Activities.Custom project, which will contain workflow activities that derive from CodeActivity. The default class called Class1.cs has been renamed to FirstCodeActivity and will be used to implement the first custom code activity. Therefore, System.Activities needs to be referenced within project Apress.Chapter7.Activities.Custom, so the FirstCodeActivity class can derive from CodeActivity (see Figure 7-4).
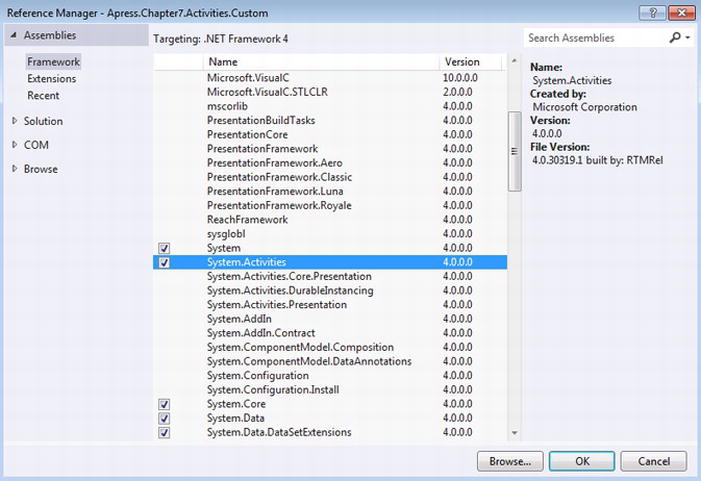
Figure 7-4. Referencing System.Activities
After the reference to System Activities is made, the code within FirstCodeActivity.cs can now inherit from CodeActivity, as illustrated in Figure 7-5, and the using statement using System.Activities has been added. Right-clicking on CodeActivity within the class shows an option called Go To Definition, which allows the CodeActivity’s metadata to be explored within Visual Studio to learn more about the base class (see Figure 7-5).

Figure 7-5. Implementing the base class CodeActivity
Listing 7-1 illustrates the metadata for CodeActivity that appears after selecting Go To Definition.
Listing 7-1. CodeActivity Metadata Shown in Visual Studio
#region Assembly System.Activities.dll, v4.0.0.0
// C:Program FilesReference AssembliesMicrosoftFramework.NETFrameworkv4.0System.Activities.dll
#endregion

using System;
using System.Runtime;

namespace System.Activities
{
    // Summary:
    //     An abstract class for creating a custom activity with imperative behavior
    //     defined with the System.Activities.CodeActivity.Execute(System.Activities.CodeActivityContext)
    //     method, which gives access to variable and argument resolution and extensions.
    public abstract class CodeActivity : Activity
    {
        // Summary:
        //     When implemented in a derived class, creates an instance of the derived class.
        [TargetedPatchingOptOut("Performance critical to inline this type of method across NGen image boundaries")]
        protected CodeActivity();
        // Summary:
        //     Not supported.
        //
        // Returns:
        //     Always returns null.
        protected override sealed Func<Activity> Implementation { get; set; }
        // Summary:
        //     Not implemented. Use System.Activities.CodeActivity.CacheMetadata(System.Activities.CodeActivityMetadata)
        //     instead.
        //
        // Parameters:
        //   metadata:
        //     Not implemented.
        protected override sealed void CacheMetadata(ActivityMetadata metadata);
        //
        // Summary:
        //     Creates and validates a description of the activity's arguments, variables,
        //     child activities, and activity delegates.
        //
        // Parameters:
        //   metadata:
        //     The activity's metadata that encapsulates the activity's arguments, variables,
        //     child activities, and activity delegates.
        protected virtual void CacheMetadata(CodeActivityMetadata metadata);
        //
        // Summary:
        //     When implemented in a derived class, performs the execution of the activity.
        //
        // Parameters:
        //   context:
        //     The execution context under which the activity executes.
        protected abstract void Execute(CodeActivityContext context);
    }
}
Figure 7-5 also shows an option called Implement Abstract Class, another feature that implements a base class so specific parts of the class can be overridden. Listing 7-2 shows how the class FirstCodeActivity now overrides the base method Execute from the CodeActivity class, after Implement Abstract Class is selected within the FirstCodeActivity class.
Listing 7-2. Implementing the CodeActivity Class
using System;
using System.Activities;
using System.Collections.Generic;
using System.Linq;
using System.Text;

namespace Apress.Chapter7.Activities.Custom
{
    public class FirstCodeActivity:CodeActivity
    {

        protected override void Execute(CodeActivityContext context)
        {
            throw new NotImplementedException();
        }
    }
}
Now that the FirstCodeActivity’s Execute method is overridden, the new custom activity is ready to implement some code that will be executed within a workflow. Since the workflow will be hosted within a console application, let’s prove that the Execute method will execute any code that is written inside of its method. The line of code
throw new NotImplementedException();
can be removed and replaced with a simple:
Console.WriteLine("FirstCodeActivity has executed!");
Right-clicking on activity project Apress.Chapter7.Activities.Custom and selecting Build will compile the activity so it can be added within the Apress.Chapter7.WF project’s workflow. After the Apress.Chapter7.Activities.Custom compiles successfully, a reference to it needs to be added to the Apress.Chapter7.WF project. The other project, Apress.Chapter7.WF, now needs to be compiled after making the reference. The FirstCodeActivity activity now shows up within its own section within the activity WF toolbox called Apress.Chapter7.Activities.Custom and is ready to be used within Workflow1.xaml (see Figure 7-6).
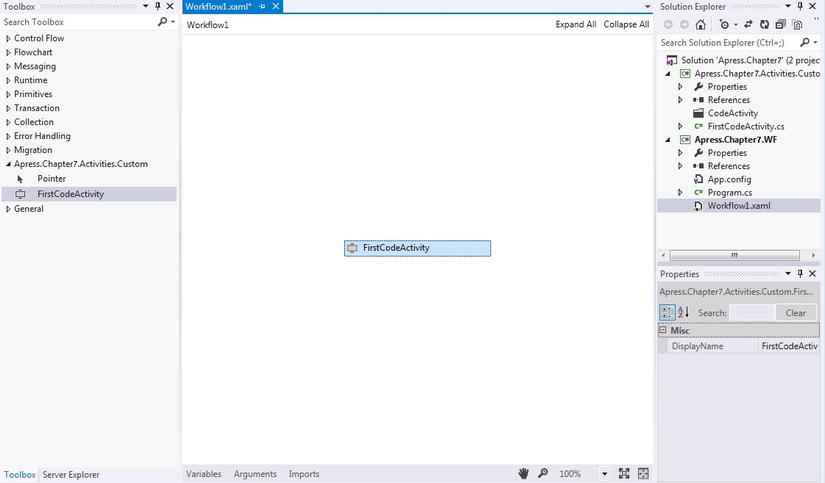
Figure 7-6. Adding the FirstCodeActivity activity to a workflow
In order to see what happens as the workflow is hosted, Console.Read() needs to be added to the Program.cs file just after the workflow is invoked through WorkflowInvoker.
WorkflowInvoker.Invoke(workflow1);
Console.WriteLine("Press any key to end...");
Console.Read();
Now that the workflow is ready to run, what happens as the console application hosts the workflow is that the message “FirstCodeActivity has executed!” will be written to the console from the workflow. Although the workflow has finished executing, the syntax Console.Read() will allow the console window to stay open so the message can be observed. Pressing any key within the console window will end the execution of the console application (see Figure 7-7).
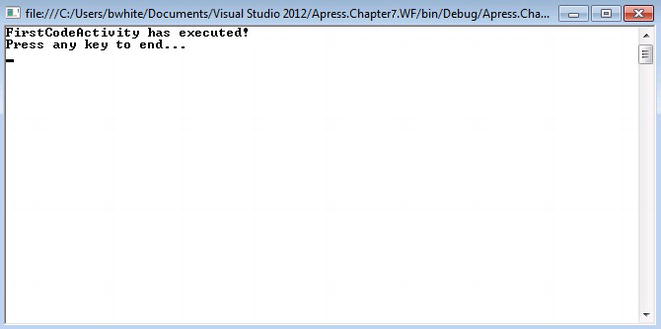
Figure 7-7. FirstCodeActivity activity has been executed
Activity Arguments
Workflows can accept and return data to a workflow host through the WF runtime. Predefined arguments provide the vehicle for getting data to and from a workflow. Since a workflow is defined from one or more activities, data passed into the workflow also needs to be passed to its activities because an activity may need to execute code based on the data that was passed into the workflow. So far, a custom workflow activity that derives from CodeActivity has been built. The activity has been added to a workflow declaratively and the Execute method executed custom code, showing the results to the console. Now the custom activity needs to use arguments so data can be passed in and out of the activity.
The next custom activity that will be demonstrated takes two arguments that are passed into the activity to calculate sales commission based on net sales. Arguments can be passed into an activity through two different types of arguments. One type of WF argument to use is an InArgument, which specifies that data will be passed into an activity. An InOutArgument can also be used, which would specify that an object can be passed in first and then passed out. This is similar to passing objects ByRef through C#.
The new activity will be a SalesCommission activity. Listing 7-3 shows that a new class called SalesCommission has been created, which also inherits from CodeActivity. Two variables of type InArgument have been created so they can be passed into the SalesCommission activity. Code has been added within the Execute method so the two arguments will be used for calculating a salesperson’s commission based on what was sold. Instead of directly getting the data values for NetSales and Percentage, these values are retrieved from the CodeActivityContext parameter context, which is passed into the Execute method during execution. The code context.GetValue(NetSales) and context.GetValue(Percentage) retrieves the WF argument values passed into the SalesCommission activity. The sales commission is then calculated and the result is written to the console.
Listing 7-3. SalesCommission Activity Calculates Commission Based on Sales
using System;
using System.Activities;
using System.Collections.Generic;
using System.Linq;
using System.Text;

namespace Apress.Chapter7.Activities.Custom
{
    public class SalesCommission:CodeActivity
    {
        public InArgument<decimal> NetSales { get; set; }
        public InArgument<decimal> Percentage { get; set; }

        protected override void Execute(CodeActivityContext context)
        {
            var sales = context.GetValue(NetSales);
            var salesPercentage = context.GetValue(Percentage);
            var commission = sales*(salesPercentage/100);
            Console.WriteLine("For sales of {0:C} and sales percentage at {1}%, the sales commission is {2:C}", sales, salesPercentage, commission);
        }
    }
}
After successfully compiling the Apress.Chapter7.Activities.Custom project first and then the Apress.Chapter7.WF project, the SalesCommission activity will show up in the WF toolbox under the FirstCodeActivity activity (see Figure 7-8).
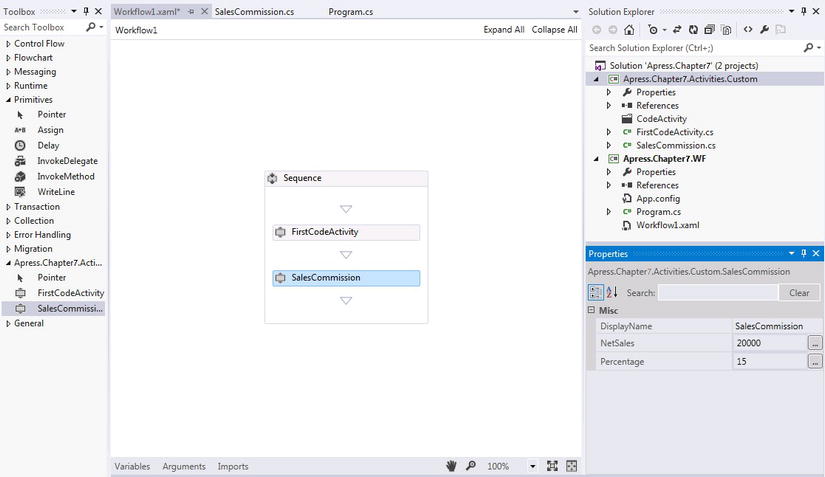
Figure 7-8. An addition activity shows up within the toolbox
The SalesCommission activity can now be added to the workflow directly under the FirstCodeActivity activity. After adding the Addition activity, the Properties window will show the two arguments, NetSales and Percentage. Let’s say that net sales are $20,000 and the salesperson is at a sales percentage of 15%. Figure 7-9 shows the results written to the console window as the workflow is executed.
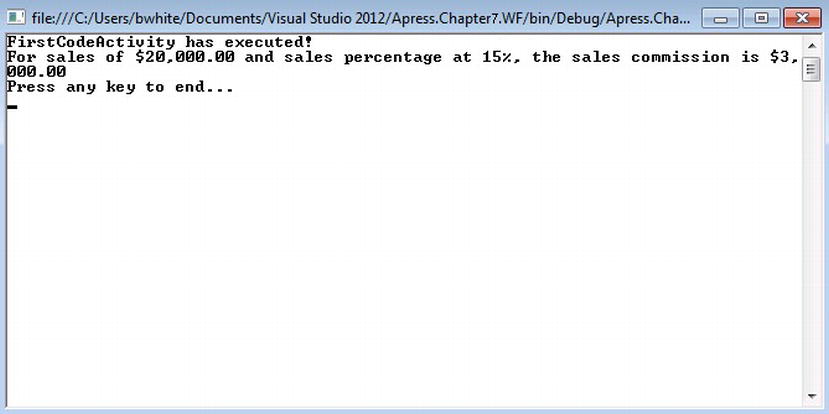
Figure 7-9. Executing the FirstCodeActivity and SalesCommission activities within the workflow
Writing information out to the console is a great way to test activities within a workflow; however, it might not be practical when data needs to be returned from the workflow to the host. In this case, an OutParameter can be used and set within the Execute method. Listing 7-4 shows the code used to pass an OutParameter from the SalesCommission activity. A new OutArgument named CalculatedCommission has been added to the activity and is set within the Execute method.
Listing 7-4. Using an OutParameterto Pass Data from the CalculatedCommission Activity
using System;
using System.Activities;
using System.Collections.Generic;
using System.Linq;
using System.Text;

namespace Apress.Chapter7.Activities.Custom
{
    public class SalesCommission:CodeActivity
    {
        public InArgument<decimal> NetSales { get; set; }
        public InArgument<decimal> Percentage { get; set; }

        public OutArgument<decimal> CalculatedCommission { get; set; }
        protected override void Execute(CodeActivityContext context)
        {
            var sales = context.GetValue(NetSales);
            var salesPercentage = context.GetValue(Percentage);
            var commission = sales*(salesPercentage/100);
            context.SetValue(CalculatedCommission, commission);
        }
    }
}
This time, after rebuilding the activity and viewing the workflow, the Properties window now shows that CalculatedCommission can be set for the activity within the workflow. Figure 7-10 shows that the WF variable varCommission has been defined for the workflow and set to the CalculatedCommission OutArgument for the SalesCommission activity. A WriteLine activity has been added and its Text property has been set to String.Format("Calculated commission is {0:C}",varCommission) to demonstrate that the SalesCommission activity has passed sales commission to the workflow.
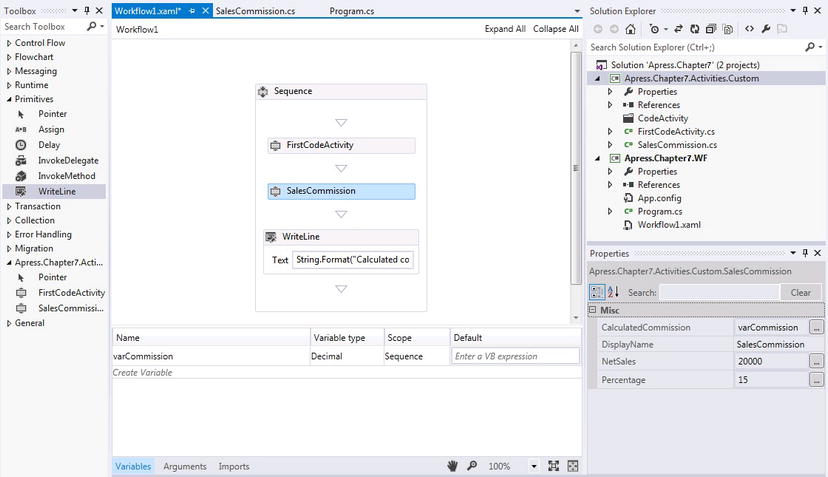
Figure 7-10. Setting the CalculatedValue so it can be passed to the workflow
Running the workflow shows that the CalculatedCommission WF argument has been passed to the WF variable varCommission and used within the WriteLine activity by writing the calculated value to the console window (see Figure 7-11).
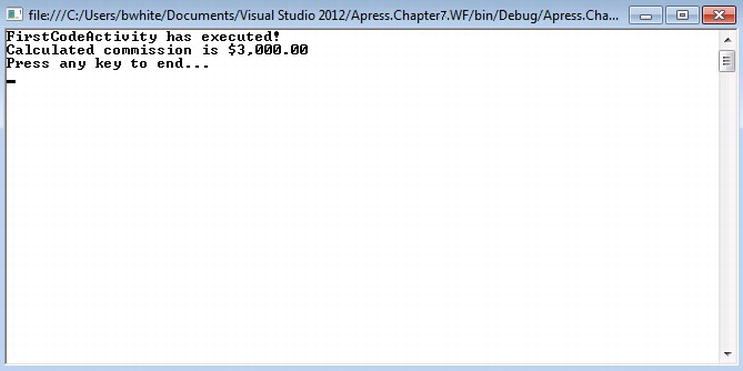
Figure 7-11. The calculated commission has been written to the console
CodeActivity<TResult>
An easier way of returning the value for the SalesCommission activity is to inherit from CodeActivity<TResult> instead of CodeActivity. CodeActivity<TResult> has the additional properties of Result for returning an argument and ResultType for defining the type of OutArgument returned. Listing 7-5 shows the code that has been changed so that the SalesCommission activity returns a decimal, which will be the commission after it is calculated. The first noticeable change to the SalesCommission activity is that it now inherits from CodeActivity<decimal>. This means that the activity is expecting to return a decimal. The second change is the new Execute method, protected override decimal Execute(CodeActivityContext context), which by default now returns a decimal represented as the commission value returned from the activity.
Listing 7-5. Changing the SalesCommission Activity to Inherit from CodeActivity<decimal>
using System;
using System.Activities;
using System.Collections.Generic;
using System.Linq;
using System.Text;

namespace Apress.Chapter7.Activities.Custom
{
    public class SalesCommission:CodeActivity<decimal>
    {
        public InArgument<decimal> NetSales { get; set; }
        public InArgument<decimal> Percentage { get; set; }

        protected override decimal Execute(CodeActivityContext context)
        {
            var sales = context.GetValue(NetSales);
            var salesPercentage = context.GetValue(Percentage);
            var commission = sales*(salesPercentage/100);
            return commission;
        }

    }
}
Recompiling the project Apress.Chapter7.Activities.Custom and then viewing the workflow in Apress.Chapter7.WF now shows a Result property within the Properties window (see Figure 7-12).
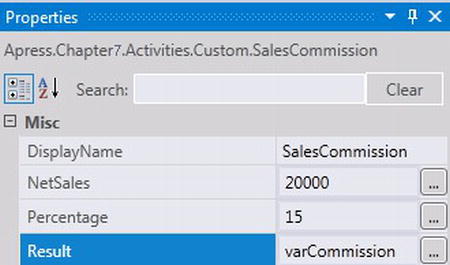
Figure 7-12. Result property for the Addition activity
So what happens if either the Percentage or NetSales arguments for the SalesCommission activity are not wired within the workflow? The workflow will still compile, but when it tries to calculate the commission, it can’t; you don’t get an error, except the calculated commission is $0.00. Validation could be coded within the activity to check that data has been entered; however, a better approach is to make sure that as the activity is added to the workflow, it is wired up correctly. After adding a SalesCommission activity in Figure 7-13, the WF designer displays a little blue stop sign with an exclamation mark indicating that something is wrong. Visual Studio’s Error List also explains that there are issues with the workflow. By allowing the workflow to validate how activities are configured during design time, there is less to triage and overlook when running into errors during runtime.
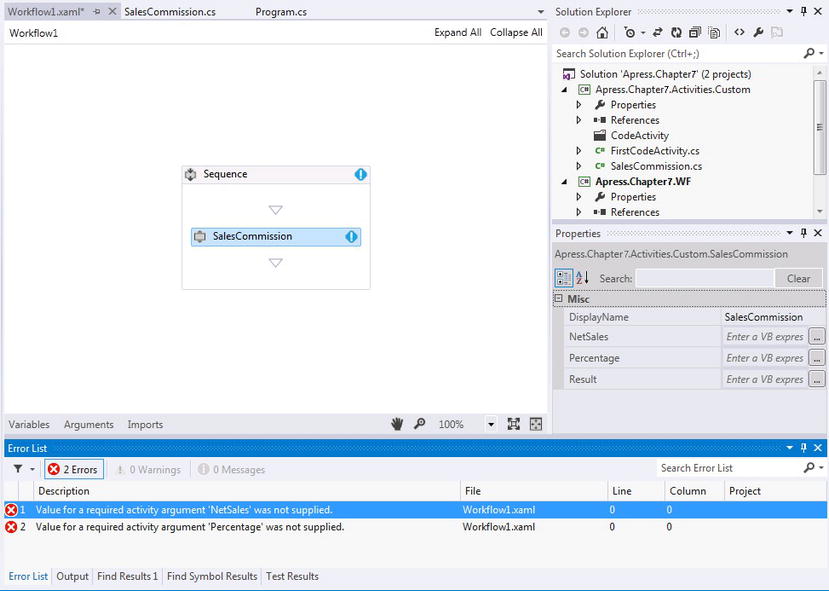
Figure 7-13. Design-time validation for activity arguments
The only change that is required to make sure activity arguments are set during design time is to add the [RequiredArgument] attribute to the argument(s) expected to be passed into the activity. Once values to the arguments are added so that sales and percentage information is passed into the activity, the WF designer no longer throws the errors.
[RequiredArgument]
public InArgument<decimal> NetSales { get; set; }
[RequiredArgument]
public InArgument<decimal> Percentage { get; set; }
Let’s say the company’s model for paying commission changes, so now the company will not pay commissions over 20%. Again, there are a couple of ways to handle this business process change using WF. The workflow can be modified declaratively to validate that the sales percentage is less than 20%, but what really needs to happen is the sales percentage should be checked before the workflow starts executing.
There is a method called CacheMetadata, and it is available via the CodeActivity base class. It can be used for handling custom design-time validation for data input for an activity. But there is a catch, and actually it makes logical sense! Data passed into an activity of type InArgument cannot be validated at design time. Arguments are intended to be set through resources within the workflow, although their values can be set to values, as illustrated in Figure 7-12. Logically speaking, there is no need to check data passed into an activity during design time, except when data is set to a value directly within activity. Figure 7-12 shows that data is being set to the arguments for the SalesCommission activity. This data should be validated if there are certain values that should not be allowed. To validate the data in Figure 7-12, the SalesCommission activity will use standard properties instead of workflow arguments. Listing 7-6 shows that NetSales and Percentage have been traded from using arguments to using standard properties. The CacheMetadata method can now be used to validate the properties as their values are set during design time. The validation checks that the properties NetSales and Percentage are not less than 0 and also that Percentage is not higher than 20% to make sure sales commissions are not overpaid.
Listing 7-6. Validating Property DataDuring Design Time
using System;
using System.Activities;
using System.Collections.Generic;
using System.Linq;
using System.Text;

namespace Apress.Chapter7.Activities.Custom
{
    public class SalesCommission : CodeActivity<decimal>
    {
        public decimal NetSales { get; set; }
        public decimal Percentage { get; set; }

        protected override decimal Execute(CodeActivityContext context)
        {
            var commission = NetSales*(Percentage/100);
            return commission;
        }

        protected override void CacheMetadata(CodeActivityMetadata metadata)
        {
                base.CacheMetadata(metadata);
                if (NetSales <= 0)
                    metadata.AddValidationError("Sales cannot be less than 0!");
                else if (Percentage <= 0)
                    metadata.AddValidationError("Sales percentgage cannot be less than 0!");
                else
                {
                    if (Percentage> 20)
                        metadata.AddValidationError(string.Format("Sales percentgage {0} cannot be greater than 20%", Percentage));
                }
        }
    }
}
Now after the SalesCommission activity is compiled, it is immediately validated if it is still part of the workflow. If not, reading the activity will also immediately show that it is being validated, as illustrated in Figure 7-14. Hovering the mouse over the exception indicator on the activity will also pop up the exception messages.

Figure 7-14. Validating SalesCommission activity properties during design time
After entering a value of 1000 for the NetSales property and a value of 21 for the Percentage property, Figure 7-15 shows the exception that the sales percentage must be less than 20%.
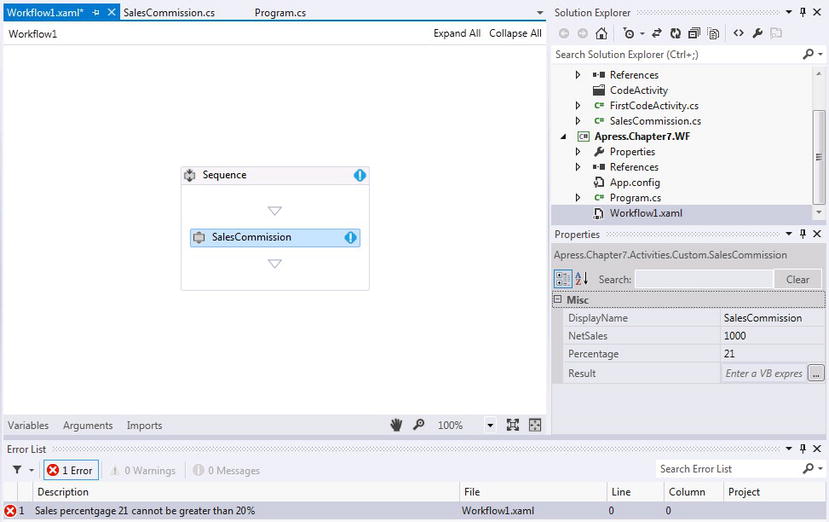
Figure 7-15. Validates that sales percentage cannot be greater than 21
Passing Data In and Out of a Workflow
In Figure 7-15, the net sales and a sales person’s percentage for earning commission on sales are not defined during runtime. Net sales should really be an argument into the workflow because sales will surely change over time.
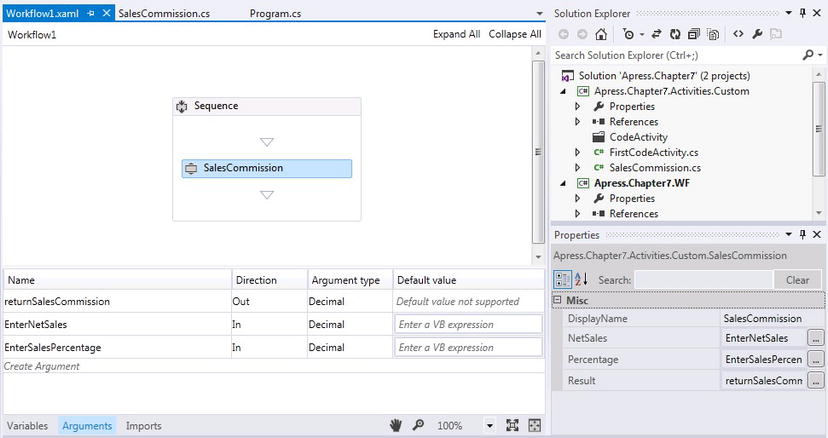
Figure 7-16. Adding workflow arguments for passing data in and out of the workflow
The percentage used for sales could change, too. Earlier I demonstrated that limits on the max allowable percentage that can be paid based on sales had changed, so there could be a case for making sales percentage dynamic, too. Figure 7-16 shows that three workflow arguments have been created. The arguments EnterNetSales and EnterSalesPercentage are InArgument types, while returnSalesCommission is of type OutArgument. The SalesCommission activity can now use the arguments for having net sales and sales percentage passed into the SalesCommission activity and returning the commission to the workflow so the data can be used by the workflow host. The SalesCommission activity needs to be reverted back to the code in Listing 7-5 so it can use arguments instead of the properties.
The code within the workflow host needs to be added so it can handle getting user input from the console application, validating the data, and then passing it to the workflow. After the workflow completes, the sales commission will be written to the console window from the workflow host. Listing 7-7 shows the updated Program.cs file that hosts the workflow.
Listing 7-7. Updated Program.cs File for Passing User Input to the Workflow
using System;
using System.Linq;
using System.Activities;
using System.Activities.Statements;
using System.Collections.Generic;

namespace Apress.Chapter7.WF
{

    class Program
    {
        static void Main(string[] args)
        {
            try
            {
                Activity workflow1 = new Workflow1();
                var netSales = new Decimal();
                var salesPercentage = new Decimal();

                Console.WriteLine("Enter net sales: ");
                try
                {
                    netSales = Convert.ToDecimal(Console.ReadLine());
                }
                catch (Exception)
                {
                    throw new ApplicationException("Net sales was not entered as a number!");
                }

                Console.WriteLine("Enter sales percentage: ");
                try
                {
                    salesPercentage = Convert.ToDecimal(Console.ReadLine());
                }
                catch (Exception)
                {
                    throw new ApplicationException("Sales percentage was not entered as a number!");
                }

                var inArgs = new Dictionary<string, object>();
                inArgs.Add("EnterNetSales", netSales);
                inArgs.Add("EnterSalesPercentage", salesPercentage);
                var arg = WorkflowInvoker.Invoke(workflow1, inArgs);
                Console.WriteLine("Calculated commission is {0:C}", arg["returnSalesCommission"]);
                Console.WriteLine("Press any key to end...");
                Console.Read();
            }
            catch(ApplicationException ex)
            {
                Console.WriteLine(ex.Message);
                Console.WriteLine("Press any key to end...");
                Console.Read();30
            }
            catch (Exception ex)
            {
                Console.WriteLine("An error has occured!");
                Console.WriteLine("Press any key to end...");
                Console.Read();
            }
        }
    }
}
Figure 7-17 shows how sales and percentage data can be entered through the console application and sent to the workflow. The workflow then returns the calculated sales commission, and the console application displays how much to pay the salesperson based on the data that was entered.
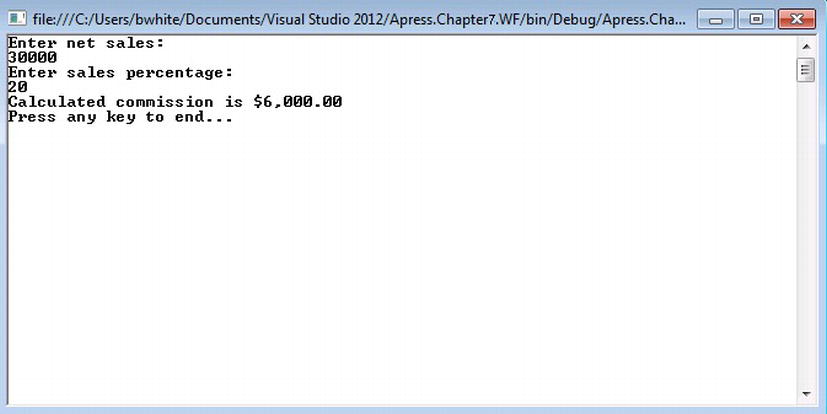
Figure 7-17. Entering sales data and percentage outside of the workflow
The ActivityDesigner Experience
Designing activities has become much easier than it was in WF3.x. Earlier I mentioned that WF4 harnesses the power of Windows Presentation Foundation (WPF) for not only rehosting the WF Designer but for building custom activity designers as well. The base class ActivityDesigner is part of the System.Activities.Presentation namespace and provides the components necessary for building custom UIs for workflow activities; however, there are some characteristics to consider when constructing a custom activity. The first characteristic to think about is how the activity will be configured so data can be passed in and out of the activity.
The custom activities built so far in this chapter have relied on the standard user interface (UI) WF provides for activities. Depending on the business requirements for building custom activities, the default UI experience may be all that is needed, especially when the primary goal for building an activity is based on the custom functionality it provides. There are times, though, when a custom activity’s UI needs to be customized, sometimes to provide custom interaction that compliments the activity or circumstances where the properties window within the WF designer is not available for configuring the activity. To get started in defining an activity designer, take a look at Figure 7-18.
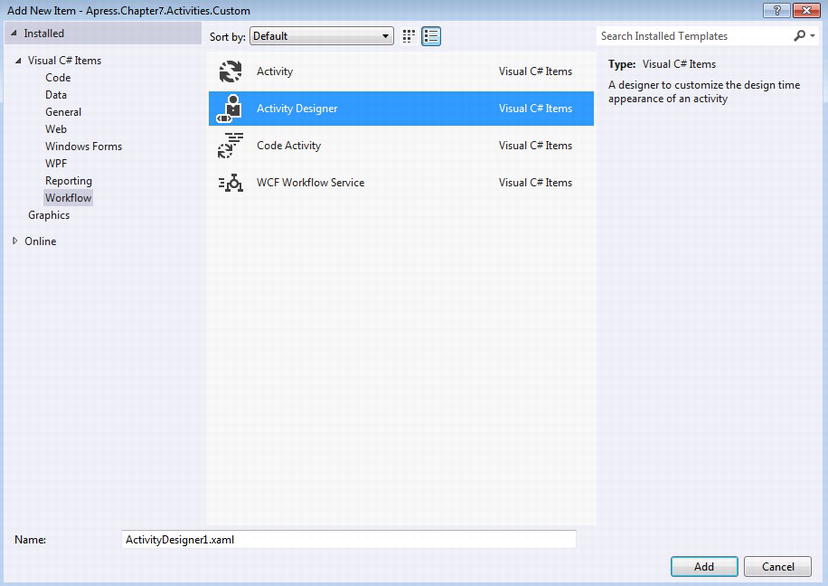
Figure 7-18. Adding the Activity Designer component in Visual Studio
The Activity Designer template provides the XAML file required to customize how a custom activity will look. After adding the file, a default activity designer provides the basic layout for the activity. The default icon that comes with the activity designer is the first thing to change so the workflow can be branded as an activity authored by you. The ActivityDesigner class contains the property icon that controls an activity’s current icon, so since the activity that was built on earlier calculated commissions, the activity icon needs to be represented by a money icon. After finding a good image file and adding it to the project, its Build Action property needs to be changed to Resource so Visual Studio will embed the file. This allows all files within an assembly to reference it. The XAML between the start and closing tags for <sap:ActivityDesigner.Icon> in Listing 7-8 changes the icon (see Figure 7-19).
Listing 7-8. Changing the Default Icon for the Activity Designer
<sap:ActivityDesigner x:Class="Apress.Chapter7.Activities.Custom.ActivityDesigner1"
    xmlns="http://schemas.microsoft.com/winfx/2006/xaml/presentation"
    xmlns:x="http://schemas.microsoft.com/winfx/2006/xaml"
    xmlns:sap="clr-namespace:System.Activities.Presentation;assembly=System.Activities.Presentation"
    xmlns:sapv="clr-namespace:System.Activities.Presentation.View;assembly=System.Activities.Presentation">
    <sap:ActivityDesigner.Icon>
        <DrawingBrush>
            <DrawingBrush.Drawing>
                <ImageDrawing>
                    <ImageDrawing.Rect>
                        <Rect Location="0,0" Size="16,16"></Rect>
                    </ImageDrawing.Rect>
                    <ImageDrawing.ImageSource>
                        <BitmapImage UriSource="Imagesmoney.png"></BitmapImage>
                    </ImageDrawing.ImageSource>
                </ImageDrawing>
            </DrawingBrush.Drawing>
        </DrawingBrush>
    </sap:ActivityDesigner.Icon>
    <Grid>

    </Grid>
</sap:ActivityDesigner>

Figure 7-19. Branding the activity designer with a default icon
Now that the icon has been changed, the SalesCommission activity can be associated with the new activity designer. The only step that needs to happen in order to associate the designer is to add the type of designer as an attribute to the custom activity. The designer has been renamed to SalesCommissionDesigner, so the attribute for the class SalesCommission looks like this:
[Designer(typeof(SalesCommissionDesigner))]
public class SalesCommission : CodeActivity<decimal>
After rebuilding the solution and adding a SalesCommission activity to the workflow, the activity will now be represented with a new icon.
ExpressionTextBox UserControl
The namespace System.Activities.Presentation.View contains a class called ExpressionTextBox that inherits from UserControl. The class ExpressionTextBox provides the implementation for customized editing of expressions for a custom activity. The SalesCommission activity contains two in arguments and returns an argument of type decimal since it inherits from CodeActivity<decimal>. Figure 7-16 shows how the default activity is rendered within the WF designer and also how its properties are set within the WF Property window. Simple textboxes will be used for setting the arguments for passing data to the activity and for returning data from the activity (see Figure 7-20).
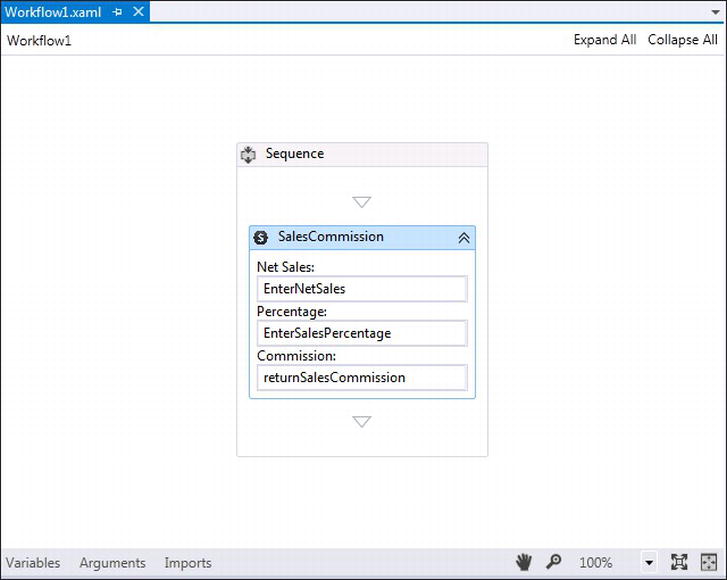
Figure 7-20. Using an activity designer for configuring arguments
Listing 7-9 illustrates how to add three textboxes to the activity designer’s grid. An ExpressionTextBox has been added for each of the workflow arguments and bound to each of the arguments within the SalesCommission activity. An Expression is required when using an ExpressionTextBox to declaratively bind arguments with an activity. The ConvertParameter is set to In for in arguments and Out for out arguments. Also, for the ExpressionTextBox used for the out argument, the UseLocationExpression is set to True and the Binding Path is set to ModelItem.Result to indicate the data returned from the activity.
Listing 7-9. Using ExpressionTextBox to Edit Expressions
<sap:ActivityDesigner x:Class="Apress.Chapter7.Activities.Custom.SalesCommissionDesigner"
    xmlns="http://schemas.microsoft.com/winfx/2006/xaml/presentation"
    xmlns:x="http://schemas.microsoft.com/winfx/2006/xaml"
    xmlns:sap="clr-namespace:System.Activities.Presentation;assembly=System.Activities.Presentation"
    xmlns:sapv="clr-namespace:System.Activities.Presentation.View;assembly=System.Activities.Presentation"
    xmlns:sapc="clr-namespace:System.Activities.Presentation.Converters;assembly=System.Activities.Presentation">
    <sap:ActivityDesigner.Resources>
        <ResourceDictionary>
            <sapc:ArgumentToExpressionConverter x:Key="ArgumentToExpressionConverter" />
        </ResourceDictionary>
    </sap:ActivityDesigner.Resources>
    <sap:ActivityDesigner.Icon>
        <DrawingBrush>
            <DrawingBrush.Drawing>
                <ImageDrawing>
                    <ImageDrawing.Rect>
                        <Rect Location="0,0" Size="16,16"></Rect>
                    </ImageDrawing.Rect>
                    <ImageDrawing.ImageSource>
                        <BitmapImage UriSource="Imagesmoney.png"></BitmapImage>
                    </ImageDrawing.ImageSource>
                </ImageDrawing>
            </DrawingBrush.Drawing>
        </DrawingBrush>
    </sap:ActivityDesigner.Icon>
    <Grid>
        <StackPanel>
            <TextBlock HorizontalAlignment="Left" VerticalAlignment="Center">Net Sales:</TextBlock>
            <sapv:ExpressionTextBox Expression="{Binding Path=ModelItem.NetSales,Mode=TwoWay, Converter={StaticResource ArgumentToExpressionConverter}, ConverterParameter=In}" OwnerActivity="{Binding Path=ModelItem}" MinLines="1" MaxLines="1" MinWidth="50" HintText="Enter the total net sales"/>
            <TextBlock HorizontalAlignment="Left" VerticalAlignment="Center">Percentage:</TextBlock>
            <sapv:ExpressionTextBox Expression="{Binding Path=ModelItem.Percentage,Mode=TwoWay, Converter={StaticResource ArgumentToExpressionConverter}, ConverterParameter=In}" OwnerActivity="{Binding Path=ModelItem}" MinLines="1" MaxLines="1" MinWidth="50" HintText="Enter the commission percentage"/>
            <TextBlock HorizontalAlignment="Left" VerticalAlignment="Center">Commission:</TextBlock>
            <sapv:ExpressionTextBox UseLocationExpression="True" Expression="{Binding Path=ModelItem.Result,Mode=TwoWay, Converter={StaticResource ArgumentToExpressionConverter}, ConverterParameter=Out}" OwnerActivity="{Binding Path=ModelItem}" MinLines="1" MaxLines="1" MinWidth="50" HintText="Commission returned to"/>
        </StackPanel>
    </Grid>
</sap:ActivityDesigner>
After applying the XAML in Listing 7-9, editing the textboxes causes a drop-down to appear so the appropriate value can be selected, as you can see in Figure 7-21. After setting the value, the bound argument value for the activity is set as well.

Figure 7-21. Selecting an existing argument from the drop-down menu
WorkflowItemPresenter ContentControl
Another characteristic to consider is if an activity will be standalone building block within a workflow, or if a custom activity will act as a parent that will contain child activities. The namespace System.Activities.Presentation has two classes for allowing one or more activities to be placed within a custom activity. In order to drag and drop one activity, the WorkflowItemPresenter class is used as a predefined control that WF provides. Since WorkflowItemPresenter inherits from ContentControl, it can serve as a parent control so a child activity can be added (see Figure 7-22).
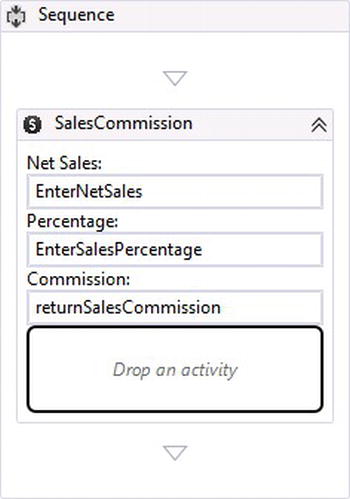
Figure 7-22. Adding a child activity through the designer to a custom activity
Listing 7-10 shows how easy it is to add a WorkflowItemPresenter to an activity designer but first another assembly should be added that references System.Activities.Statements:
xmlns:sa="clr-namespace:System.Activities.Statements;assembly=System.Activities">
This will allow the WorkflowItemPresenter to limit what activities get added, as illustrated in Listing 7-10, which limits the activities added to only WriteLine activities. The Binding path is set to ModelItem.ChildWriteLine which refers to an activity property, public Activity ChildWriteLine { get; set; }, which is required to be added within a custom activity. After adding the XAML in Listing 7-10, a WriteLine activity will be the only activity that can be added to the custom activity. If you attempt to add another activity, the WF designer will visually indicate that another activity cannot be added.
![]() Caution Although I am demonstrating how to use an activity designer to add child activities and in this case limit the child activity to a WriteLine activity, once the WriteLine activity is added, it will never execute. This is because the custom activity SalesCommission inherits from CodeActivity. Child activities that are added to custom activities must be scheduled using the WF runtime. Later in the chapter, I will show how this is done when I cover custom activities that inherit from NativeActivity.
Caution Although I am demonstrating how to use an activity designer to add child activities and in this case limit the child activity to a WriteLine activity, once the WriteLine activity is added, it will never execute. This is because the custom activity SalesCommission inherits from CodeActivity. Child activities that are added to custom activities must be scheduled using the WF runtime. Later in the chapter, I will show how this is done when I cover custom activities that inherit from NativeActivity.
Listing 7-10. Adding a WorkflowItemPresenter to Limit the Kinds of Activities that can be Added
    <Grid>
        <StackPanel>
            <TextBlock HorizontalAlignment="Left" VerticalAlignment="Center">Net Sales:</TextBlock>
            <sapv:ExpressionTextBox Expression="{Binding Path=ModelItem.NetSales,Mode=TwoWay, Converter={StaticResource ArgumentToExpressionConverter}, ConverterParameter=In}" OwnerActivity="{Binding Path=ModelItem}" MinLines="1" MaxLines="1" MinWidth="50" HintText="Enter the total net sales"/>
            <TextBlock HorizontalAlignment="Left" VerticalAlignment="Center">Percentage:</TextBlock>
            <sapv:ExpressionTextBox Expression="{Binding Path=ModelItem.Percentage,Mode=TwoWay, Converter={StaticResource ArgumentToExpressionConverter}, ConverterParameter=In}" OwnerActivity="{Binding Path=ModelItem}" MinLines="1" MaxLines="1" MinWidth="50" HintText="Enter the commission percentage"/>
            <TextBlock HorizontalAlignment="Left" VerticalAlignment="Center">Commission:</TextBlock>
            <sapv:ExpressionTextBox UseLocationExpression="True" Expression="{Binding Path=ModelItem.Result,Mode=TwoWay, Converter={StaticResource ArgumentToExpressionConverter}, ConverterParameter=Out}" OwnerActivity="{Binding Path=ModelItem}" MinLines="1" MaxLines="1" MinWidth="50" HintText="Commission returned to"/>
            <StackPanel Orientation="Horizontal">
                <Border BorderBrush="Black" Width="200" BorderThickness="2" CornerRadius="5">
                   <sap:WorkflowItemPresenter HintText="Drop an activity" Item="{Binding Path=ModelItem.ChildWriteLine, Mode=TwoWay}"  AllowedItemType="{x:Type sa:WriteLine}"/>
                </Border>
            </StackPanel>
        </StackPanel>
    </Grid>
![]() Note There is also another class, WorkflowItemsPresenter, that allows more than one child activity to be added to a custom activity. This is beneficial for adding activities like a Parallel activity, which can contain other activities.
Note There is also another class, WorkflowItemsPresenter, that allows more than one child activity to be added to a custom activity. This is beneficial for adding activities like a Parallel activity, which can contain other activities.
Asynchronous Activities
A major feature released with .NET Framework 4.0 was a simplified level of abstraction for applying asynchronous patterns through code. Although modeling asynchronous processes was possible before .NET 4.0, it was not as straightforward to implement.
What does asynchronous really mean and how is it different than multi-threaded applications? Many IT professionals think of asynchronous as just another multi-threaded pattern. Although this is not entirely wrong, it is not entirely correct either. Technically, more than one thread can execute, but not necessarily within the workflow. When I think of building a multi-threaded application, I think of all of the complexities, from memory overhead for starting up new threads and managing each additional thread’s execution. This is not the case when implementing asynchronous execution. An asynchronous execution simply allows a thread to continue to execute, even after making I/O calls like reading a file or making web service calls. Instead of blocking additional execution as a synchronous invocation does, an asynchronous invocation allows the thread to continue execution. Once the I/O process finishes, the initiating thread is notified so it can process the results from the I/O call. Although both multi-threading and asynchronous executions can lead to better performing code, an asynchronous execution pattern is much easier to implement and should be used instead.
WF supports asynchronous work to be performed, which does not block the workflow scheduler thread so scheduled activities can still be executed at the same time. The base class System.Activities.AsyncCodeActivity allows asynchronous work to be processed within an activity while other activities are executing in parallel; however, the workflow cannot be persisted during execution of asynchronous work because AsyncCodeActivity creates a no-persist block. The WF runtime also prevents the workflow from unloading while the workflow is technically still executing.
Execution logic is implemented through code for an activity that derives from AsyncCodeActivity by overriding the BeginExecute and EndExecute methods. These methods share state by passing an AsyncCodeActivityContext object using the UserState property. There is also a Cancel override that is optional when the activity is cancelled. When an AsyncCodeActivity activity is cancelled, the MarkCanceled method should be called from the AsyncCodeActivityContext object after its property IsCancellationRequested is checked.
Asynchronous activities should be used for handling long running processes or I/O operations, as mentioned earlier. Placing asynchronous activities within a parallel activity allows multiple activities to execute concurrently, which provides task parallelism.
Consider a scenario where two files need to be read so the contents of each can be read to the console. An advantage of using WF to do this type of operation instead of using straight C# code is the simplicity WF provides for implementing asynchronous patterns. The code in Listing 7-11 demonstrates how a file is opened within the Execute method based on the path and file name provided by the WF argument PathAndFile. After the file’s content is read, the thread sleeps for two seconds to simulate that the activity is busy working to read the content of the file. As the thread wakes up, the content of the file is returned from the activity.
Listing 7-11. Code Activity That Reads From a File and Returns its Content as a String
using System;
using System.Collections.Generic;
using System.Linq;
using System.Text;
using System.Activities;
using System.IO;
using System.Threading;

namespace Apress.Chapter7.Activities.Custom
{
    public sealed class ReadFile : CodeActivity<string>
    {
        // Define an activity input argument of type string
        public InArgument<string> PathAndFile { get; set; }

        // If your activity returns a value, derive from CodeActivity<TResult>
        // and return the value from the Execute method.
        protected override string Execute(CodeActivityContext context)
        {
            // Obtain the runtime value of the Text input argument
            string pathFile = context.GetValue(this.PathAndFile);
            var fileText = File.ReadAllText(pathFile);
            Thread.Sleep(2000);

            return fileText;
        }
    }
}
The ReadFile activity can now be used to read the content of other files from a workflow. Based on the scenario, the workflow will need to use two ReadFile activities so the content of both files can be read. The two files that are read are other workflows represented as XAML. Figure 7-23 shows that two files are being read and the content of each of the files is being stored within a WF variable. The path and file name are passed in through the ReadFile activity’s PathAndFile InArgument<string>. The workflow also has an argument called ReturnFileContent. The Assign activity in Figure 7-23 is used to set its value to the files’ combined content so it can be returned from the workflow and displayed within the console window. Listing 7-12 shows the code that will be used to host the workflow that uses the code activities to read and combine the file.
Listing 7-12. Code Activity That Reads from a File and Returns its Content as a String
var CodeTest = new TestCode();
var arg = WorkflowInvoker.Invoke(CodeTest);

Console.WriteLine("File content : {0}", arg["ReturnFileContent"]);
Console.Read();
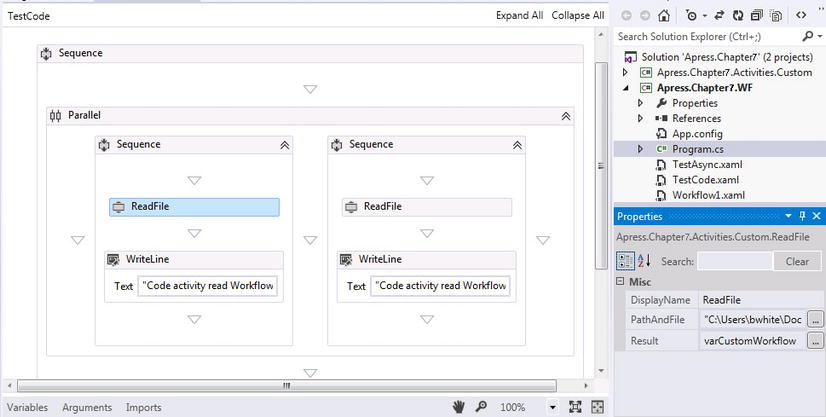
Figure 7-23. Reading content from two files
After running the code in Listing 7-12, for a brief two seconds nothing is written to the console window. Then the console window displays “Code activity read Workflow1”. This is because the thread sleeps for two seconds within the ReadFile activities. Finally, after the thread wakes up, the other file is read and both files’ contents are read to the console window (see Figure 7-24).
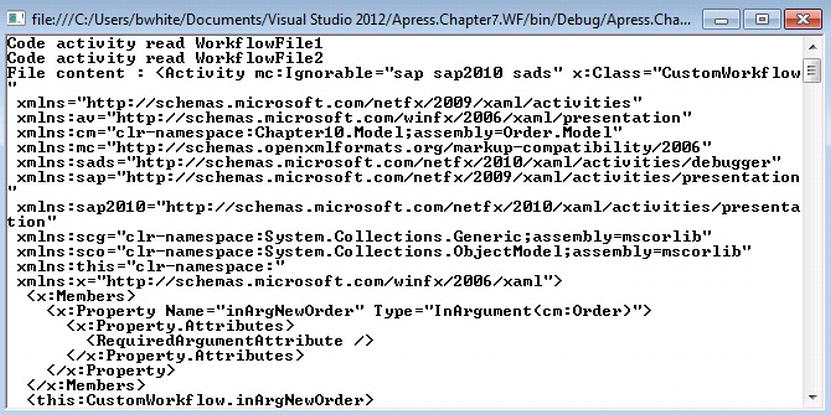
Figure 7-24. Reading the contents from two files to the console window
This is where the AsyncCodeActivity comes into play and allows the Parallel activity to read each of the files asynchronously instead of waiting for each file to finish, as simulated by forcing the thread to sleep for two seconds. Listing 7-13 show the code for building a custom activity that can read a file asynchronously.
Listing 7-13. Reading a File Asynchronously
using System;
using System.Collections.Generic;
using System.Linq;
using System.Text;
using System.Activities;
using System.IO;
using System.Threading;

namespace Apress.Chapter7.WF
{

    public sealed class ReadFileAsync : AsyncCodeActivity<string>
    {
        // Define an activity input argument of type string
        public InArgument<string> PathAndFile { get; set; }

        protected override IAsyncResult BeginExecute(AsyncCodeActivityContext context, AsyncCallback callback, object state)
        {
            var filePath = context.GetValue(PathAndFile);
            Func<string,string> ReadFileDelegate = new Func<string,string>(ReadFile);
            context.UserState = ReadFileDelegate;
            Thread.Sleep(2000);
            return ReadFileDelegate.BeginInvoke(filePath,callback,state);
        }

        protected override string EndExecute(AsyncCodeActivityContext context, IAsyncResult result)
        {
            Func<string, string> ReadFileDelegate = (Func<string, string>)context.UserState;
            return Convert.ToString(ReadFileDelegate.EndInvoke(result));
        }

        string ReadFile(string FilePath)
        {
            var fileText = File.ReadAllText(FilePath);

            return fileText;
        }

    }
}
In Listing 7-13, a new custom activity is created that inherits from AsyncCodeActivity<string>. It has the same InArgument, PathToFile, defined and overrides both the BeginExecute and EndExecute method and function. The BeginExecute code is similar to the code in Figure 7-11, except that a delegate initialized as Func<string,string> is used so that the function ReadFile can be delegated and called. ReadFile simply reads a file based on the file and path defined within the WF argument PathAndFile. The results are then stored within context.UserState and the delegate is invoked. After the file’s contents are gathered, the callback function EndExecute then executes the file’s content. The file contents are then returned to the workflow. You might have also notice that the thread is forced to sleep for two seconds before the delegate is invoked. Changing the code in Listing 7-12 from
var CodeTest = new TestCode();
var arg = WorkflowInvoker.Invoke(CodeTest);
to
var asyncTest = new TestAsync();
var arg = WorkflowInvoker.Invoke(asyncTest);
allows the new TestAsync workflow that uses the ReadFileAsync activities to execute. The TestAsync workflow is exactly the same as the workflow in Figure 7-23, except the TestAsync workflow uses the ReadFileAsync activities defined in Listing 7-13 instead of using the ReadFile code activities in Listing 7-11.
Running the new workflow immediately demonstrates how the ReadFileAsync activities are being fired asynchronously, instead of waiting for the first scheduled ReadFileAsync activity to finish executing. Take a closer look at how the workflows run by modifying the code in the Program.cs. Comment out
Console.WriteLine("File content : {0}", arg["ReturnFileContent"]);
so the combined file contents are not read to the console. Then let both workflows execute and use
var CodeTest = new TestCode();
var arg = WorkflowInvoker.Invoke(CodeTest);
var asyncTest = new TestAsync();
var arg = WorkflowInvoker.Invoke(asyncTest);
so each workflow is fired at the same time. What you will notice is that the first message, “Code activity read FirstFile”, appears after two seconds. Then “Code activity read SecondFile” appears after two more seconds. Then, as the asyncTest workflow is then invoked and both of the threads wake up, messages about both files being read appear at the same time. Therefore, there is no delay in reading the two files. This proves that both files are being read asynchronous from each other instead of having to wait for each activity to read the file before executing the next file read.
Although this example simply combines two files, any number of files could be used in the workflow and read using the custom ReadFileAsync activity asynchronously.
![]() Note While watching Microsoft’s launch for VS2012 and .NET 4.5, one of the takeaways I remember was Microsoft’s goal of making it easier for implementing asynchronous patterns through code syntax, and how it should be just as simple as writing regular synchronous applications. There are more improvements in .NET 4.5 for asynchronous code; however, it does not change asynchronous activities in WF4.5.
Note While watching Microsoft’s launch for VS2012 and .NET 4.5, one of the takeaways I remember was Microsoft’s goal of making it easier for implementing asynchronous patterns through code syntax, and how it should be just as simple as writing regular synchronous applications. There are more improvements in .NET 4.5 for asynchronous code; however, it does not change asynchronous activities in WF4.5.
Native Activities
Sometimes activities need WF runtime support to
- Communicate from outside of a workflow.
- Schedule and cancel child activity execution.
- Abort activities.
These are examples of functionality that the other custom activities, CodeActivity and AsyncCodeActivity (which were introduced earlier), cannot provide. This is because these activities are not considered native activities. Even though they are citizens in WF and can run within a workflow, non-native activities simply run within workflows without any real interaction to the WF runtime. This is where native activities are different because they have direct interaction to the WF runtime as they are executed within a workflow. They have full access to features that the WF runtime provides, such as communication through bookmarks, scheduling of child activities, and persistence. As a workflow is being executed through the WF runtime, there are times when an activity needs this interaction.
There are quite a few out-of-the-box activities that inherit from System.Activities.NativeActivity. This is not hard to believe since the WF runtime provides a majority of the functionality that the workflows provide. For instance, the code in Listing 7-14 shows that the custom WaitForResponse activity inherits from the abstract class NativeActivity. Bookmarks, which were first introduced in Chapter 3, establish communication through the WF runtime and can provide external interaction with a workflow. An approval process is a good example because a Bookmark can be created from an activity that inherits from NativeActivity so a workflow can wait for an approval response. Once a response is received by the WF runtime from outside of the workflow, the bookmark is used to resume the workflows execution. Listing 7-14 illustrates the code that derives from NativeActivity and can be used within a workflow to receive events from outside the workflow. Chapters 4 and 5 demonstrate how bookmarks can be used in both state machine and flowchart workflows.
Listing 7-14. WaitForResponse Activity That Allows Communication to a Workflow Through Bookmarks
using System;
using System.Collections.Generic;
using System.Linq;
using System.Text;
using System.Activities;

namespace FlowFocus.WF.Activities
{
    public sealed class WaitForResponse<TResult> : NativeActivity<TResult>
    {
        public WaitForResponse()
            : base()
        {

        }

        public string ResponseName { get; set; }
        protected override bool CanInduceIdle
        { //override when the custom activity is allowed to make he workflow go idle
            get
            {
                return true;
            }
        }

        protected override void Execute(NativeActivityContext context)
        {
            context.CreateBookmark(this.ResponseName, new BookmarkCallback(this.ReceivedResponse));
        }

        void ReceivedResponse(NativeActivityContext context, Bookmark bookmark, object obj)
        {
            this.Result.Set(context, (TResult)obj);
        }
    }
}
The WaitForResponse activity overrides the CanInduceIdle property, so the workflow knows that the workflow needs to go idle. Then the WF runtime knows that a Bookmark has been created and that it needs to wait for the Bookmark or some other condition before continuing the execution of the workflow. The overridden Execute method uses NativeActivityContext and its CreateBookmark method for creating a Bookmark.
Scheduling Activities
In addition to creating bookmarks, activities that derive from NativeActivity also allow custom control flow to be implemented within an activity. This requires that the parent activity has control over scheduling of its own child activities. Once an activity schedules a child activity, it can execute.
Once a class inherits from NativeActivity, a new property can be added to the class that represents a child activity. As the custom activity executes, the Activity type property can then be scheduled. The Execute method for a custom activity that inherits from NativeActivity uses a parameter of type NativeActivityContext, which has a ScheduleActivity method that is used to schedule child activities. After the child activity executes, a callback method can be used to notify once the child activity has completed it execution (see Listing 7-15).
Listing 7-15. Scheduling Child Activities
using System;
using System.Activities;
using System.Collections.Generic;
using System.ComponentModel;
using System.Linq;
using System.Text;
using Apress.Chapter7.Activities.Custom;

namespace Apress.Chapter7.WF
{
    [Designer(typeof(IamNativeDesigner))]
    public sealed class IamNative:NativeActivity
    {
        public Activity childActivity { get; set; }
        protected override void Execute(NativeActivityContext context)
        {
            context.ScheduleActivity(childActivity, ChildActivityCompleted);
        }

        void ChildActivityCompleted(NativeActivityContext context, ActivityInstance instance)
        {
 Console.WriteLine("WriteLine activity completed its execution!");
        }
    }
}
To declaratively add a child activity to the custom native activity, XAML similar to Listing 7-10 can be used for using the WorkflowItemPresenter control within an ActivityDesigner. The only change is setting the Binding Path property to Model.childActivity, which is the name used for the Activity type property. By keeping everything else the same, the only allowed type of child activity that can be added is the WriteLine activity. This will allow child activities to be added to the custom activity (see Figure 7-25).
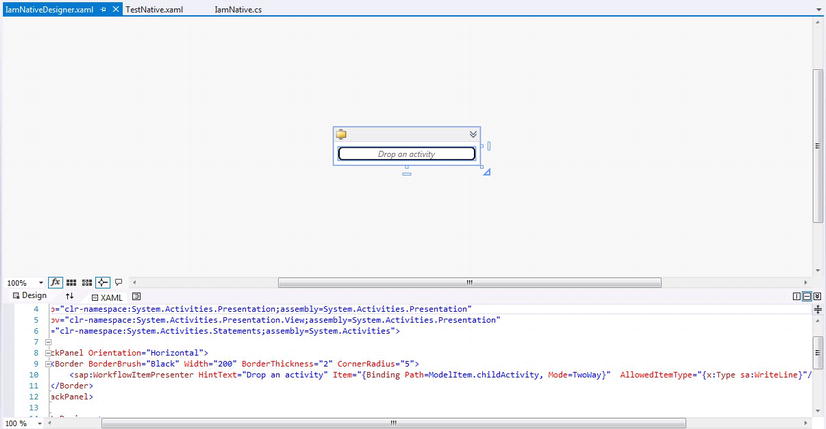
Figure 7-25. Adding an activity designer so child activities can be declaratively added
After compiling and adding a new IamNative activity to a workflow, the only child activity that can be added is a WriteLine activity (see Figure 7-26).
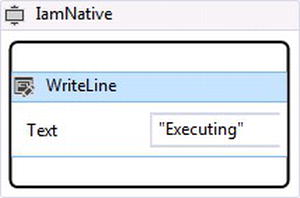
Figure 7-26. Executing a WriteLine child activity
After running the workflow, the console window will demonstrate that the WriteLine activity is executing and the custom activity notifies when it has completed (see Figure 7-27).
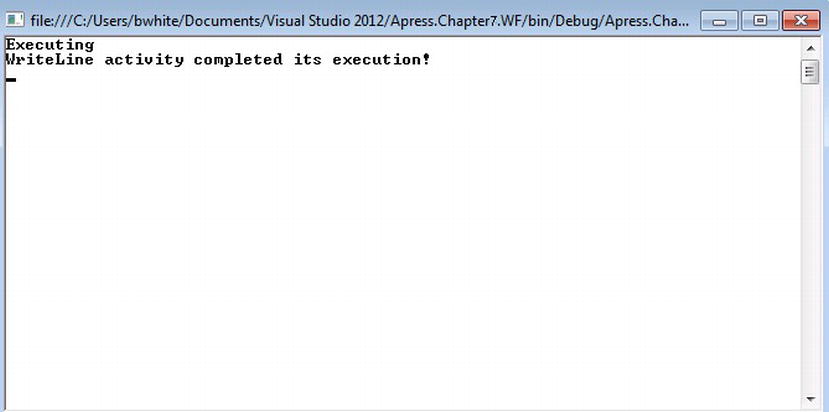
Figure 7-27. Executing a child WriteLine activity
Multiple child activities can also be added instead of adding only one child activity as in the previous example. A collection of type activities can be added as a property by specifying Collection<Activity>. Each member of the activity collection can then be scheduled using an index for the collection. The WorkflowItemsPresenter control is used to declaratively add multiple controls to the activity.
![]() Tip There is no guarantee of the execution order of scheduled activities, so if you want to execute an activity only after another one finishes, the activity should be scheduled within the first activity’s completed execution callback.
Tip There is no guarantee of the execution order of scheduled activities, so if you want to execute an activity only after another one finishes, the activity should be scheduled within the first activity’s completed execution callback.
CacheMetadata
In Listing 7-6, I showed how validation can be added to an overridden CacheMetadata method so design-time validation could be implemented for a custom activity. The CacheMetadata method is also used to let the WF runtime know about specific parts of a custom activity. For instance, when public properties are used for declaring activities, variables, or arguments, the default implementation of CacheMetadata reaches out to these properties through reflection and declares them. Since reflection is not the best for performance, it can be avoided by commenting out the standard implementation and implementing custom code for adding these properties as metadata. Instead, activities, variables, and arguments can be added through custom code, as illustrated in Listing 7-16.
Listing 7-16. Using Custom Code to Add Non-public Properties as Metadata
protected override void CacheMetadata(NativeActivityMetadata metadata)
{
   //base.CacheMetadata(metadata);
   // activities
            foreach (Activity activity in this.Activities)
            {
                metadata.AddChild(activity);
            }

            // variables
            foreach (Variable variable in this.Variables)
            {
                metadata.AddVariable(variable);
            }
            metadata.AddImplementationVariable(this.lastIndexHint);
            // add arguments
            metadata.AddArgument(new RuntimeArgument(<ArgName>, typeof(<datatype>), <ArgumentDirection>, <Required>));
}
Distributing Custom Activities
Distributing custom activities so they can be hosted within activities is as simple as referencing the assembly that is compiled. Chapters 10 and 12 will talk more about using custom activities and even using them within workflows where the WF designer is rehosted outside of Visual Studio. Figure 7-28 illustrates that the SalesCommission activity that was created earlier has been referenced within a rehosted WF designer.
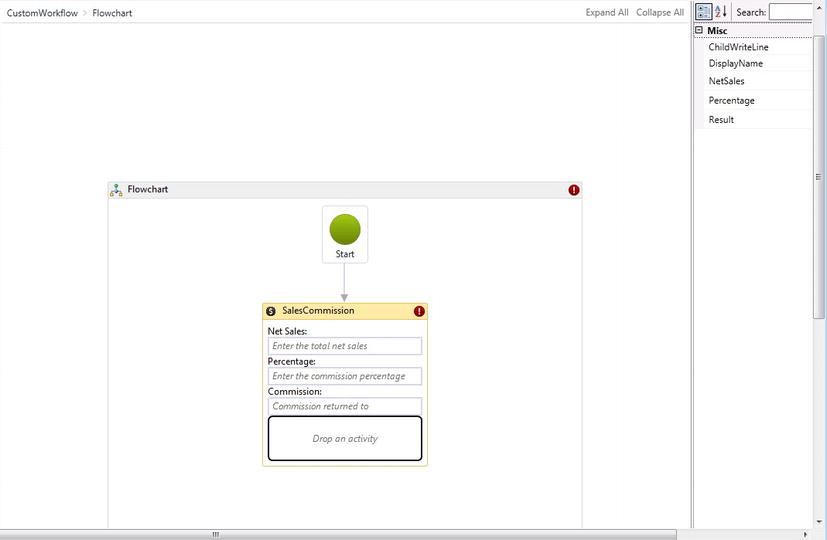
Figure 7-28. Rehosting a custom activity within a rehosted WF designer
Summary
This chapter built on Chapter 3 by showing how custom workflow activities can be built and used to author workflows. Different types of activities can be built based on the requirement for the workflow, and there are different abstract classes that WF provides for building activities. The chapter went through these base Activity classes and demonstrated how each of the base classes were used to benefit different functionality within workflows and applied patterns, and showed practices for when the different types of activities should be built and used for authoring a workflow. As a reminder, if a custom activity is required for performing a short burst of code, then the activity should implement from CodeActivity. If functionality is needed for standard I/O, like reading and writing a file or calling web services, then AsyncCodeActivity should be inherited. Finally, if an activity needs to enlist scheduling of child activities or if functionality is required of the WF runtime, like scheduling activities and using bookmarks for long-running workflows, then NativeActivity should be inherited.