
![]()
Persisting Workflows
What would happen if a server hosting one or more applications was accidentally unplugged or shut down? Maybe there is a hardware failure or a server is hacked because it was not protected appropriately. These are just a few of the many scenarios that can bring a server down. Depending on what applications are hosted on a given server, situations like this can be devastating. So developers should always plan for the worst case, ideally going for a high availability (HA) infrastructure.
How bad is it really when a server goes down? If it is hosting an e-commerce web solution, there might be a few sales lost, but once the server is restarted customers can continue placing orders because the order process only lasts for a couple of minutes or even a few seconds. It looks like a fire fight until the servers are back up because sales cannot be completed and new customers cannot create orders; but because the process is so short for creating the order, business quickly gets back to normal after the restart.
What happens when an order process takes longer than a couple of minutes and instead lasts for days, months, or even years? These are referred to as long-running processes, and because WF supports implementation for long-running business processes, persisting workflows is the solution for managing a long-running process successfully.
This chapter focuses on showing how workflows can be persisted for long periods of time using the WorkflowApplication and WorkflowServiceHost hosting options. Persisting workflows with Windows Server AppFabric and hosting workflows within the cloud with Windows Azure will be covered in other chapters. After reading this chapter you will have a better understanding of how persistence can be achieved for hosting long-running workflows within WF4.5.
Persistence Behavior
Workflow persistence is not set by default because it is not configured to be used with the WF runtime. In fact, all workflow instances that are created run within memory, so if a server that is hosting WF goes down, all of the workflow instances are lost, and there is no way of knowing where each of the business processes left off during execution. All of the data schema, plumbing, and implementation for persisting workflows are available out of the box with WF, so the only thing left to do is to configure workflow persistence. Once it is configured, workflows can be persisted within SQL Server and it is less of a worry if a server goes down, because each instance of a running workflow can quickly recover once the server is back up.
Workflow persistence is what allows long-running workflows to process efficiently. As the number of workflows being processed at the same time grows, so does the memory allocation required to process each workflow instance. Persisting workflows allows the WF runtime to take snapshots of an executing workflow and save them to a data store at key points of its execution. Most of the time, it is when the workflow becomes idle; and this makes logical sense because when a workflow instance is waiting for an external event or checking for logical conditions, it can be removed from memory, freeing up RAM.
At this point, the workflow, so to speak, is cryogenically stored and available for future execution. A workflow initiated and persisted through one hosting application can later be resumed through another workflow hosting application. To illustrate multiple workflow hosts used to host a workflow, imagine if a workflow is initiated based on customers placing orders from an e-commerce web site. Then, later the employees in the warehouse fill the order using mobile devices or another internal Windows application.
A workflow instance is an execution of a workflow. An example of a workflow instance could be a workflow executing a single order from a customer. Therefore, each new order created by a customer would also initiate another workflow instance. So think of a workflow instance as the train on the tracks of a workflow, but with a slight twist. There can be many trains on the track, and each train can be at a different location on the track. Some trains are stationary at certain locations on a track, while others are barreling down the track. The good part is that the workflow host coordinates all of the workflow’s execution. Therefore, many orders can be created by customers and will follow the same workflow, and all will be communicated, monitored, and managed during execution through the WF runtime.
The WF runtime manages persistence for workflow instances. After building a custom hosting application for hosting workflows, persistence can only be configured to use with the WorkflowApplication and WorkflowServiceHost hosts because of their strong interaction with the WF runtime (see Figure 8-1). Therefore, WorkflowInvoker cannot be configured to use out-of-box persistence. Persistence for a workflow can be initiated in several ways:
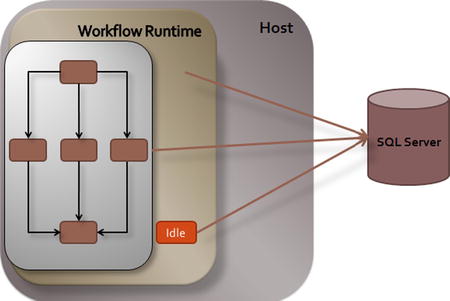
Figure 8-1. Workflow persistence
- Idle workflows that are configured to “persist on idle.”
- When the WF runtime is instructed to persist or unload a workflow.
- Completion or termination of a workflow.
The following activities trigger persistence as well:
- After completion of
- TransactedReceiveScope
- TransactionScope
- During execution of
- Persist activity
Workflows can become idle when they are in a state of waiting on instructions to resume execution. While a workflow waits, it is said to be idle, and while a workflow instance is idle, the WF runtime can inform a workflow hosting application that the workflow instance has become idle. While the workflow instance is idle, it’s a great opportunity to take a picture or snapshot of the workflow instance to record the latest progress that has been performed at that point in time.
A workflow instance can be persisted when instructed to do so from the WF runtime. The WorkflowApplication host has a Persist method that can be called from the hosting application, which also causes it to persist the workflow instance even without the workflow going idle. Therefore, a workflow can be persisted even before it is started. After the workflow runs and becomes idle it can be persisted again. The WorkflowApplication can also dictate when a workflow should be unloaded by using the Unload method. When a workflow instance is unloaded, it is first persisted; then it is unloaded from memory.
![]() Note If the operation for the methods Unload and Persist takes longer than thirty seconds, a TimeoutException will be thrown.
Note If the operation for the methods Unload and Persist takes longer than thirty seconds, a TimeoutException will be thrown.
Before a workflow instance has been persisted, it is said to be in a non-persisted state. When a workflow instance is in such a state, it cannot be retrieved if there is a failure with the workflow hosting application or once it is removed from memory. When a workflow is in a non-persisted state and experiences an exception before it has had a chance to be persisted, an UnhandledExceptionAction catches the exception. The UnhandledExceptionAction can be set to Abort, Cancel, and Terminate. Setting the UnhandledExceptionAction to Abort writes information pertaining to why the workflow instance was aborted to the instance store, but the workflow instance cannot be reloaded. If the UnhandledExceptionAction is set to Cancel or Terminate, information about why the workflow was aborted is also written to the instance store and the instance state is set to Closed.
As non-persisted workflow instances are written to the instance store, there is no feature for managing clean up for the instances. One way to clean up the instance store is to check for workflow instances that have not been persisted. This can be done by checking the database table called System.Activities.DurableInstancing. The following SQL command that hits a view can be used to find all non-persisted instances:
SELECT
Instance,
CreationTime
FROM
       [System.Activities.DurableInstancing].[Instances]
WHERE
       IsInitialized = 0
The same view can be used to see if non-persisted instances are currently not loaded by checking the CurrentMachine field to see if it is null.
SELECT
Instance,
CreationTime
FROM
       [System.Activities.DurableInstancing].[Instances]
WHERE
       IsInitialized = 0
AND
       CurrentMachine is NULL
Non-persisted instances can be removed from the data store; however, it is important to verify that the record can be removed before running the following delete script:
DELETE
[System.Activities.DurableInstancing].[Instances]
WHERE
       InstanceId = '0234jh54-fdg4-3jde-5j4c-f8ds-fd9s8d7g7d9s'
In order to maintain performance and scalability, it is recommended that workflow instances be persisted as early as possible within their lifecycle. This can easily be done by initiating the persistence either by the WF runtime or within the workflow, and by taking advantage of the Persist activity. However, to manage scalability and performance, there are a couple of settings that can be optimized based on the WF runtime environment. A smaller number of workflow instances that are created and required to be hosted within a single custom application should stay loaded in memory after they have been persisted and become idle. This prevents other applications from accessing the persisted workflow instances and allows better performance since they do not have to be reloaded. The Persist activity and Persist command can be used to make sure that the workflow instance is persisted at key points in case of application or computer failure.
When short durations are used with the Delay activity, it is better to persist the workflow but not unload the workflow from the WF runtime. This will provide better performance by reducing the overhead of reloading workflow instances into memory from the persistence store.
SQL Server Persistence
SQL Server persistence has been available since the first release of WF, and SQL scripts are provided with each release. Running the appropriate SQL script provided through the .NET Framework is required for setting up the instance store. Because each of the SQL scripts is coordinated with a release of the .NET Framework, they can be found in the Windows path at C:WindowsMicrosoft.NET (see Figure 8-2). If a 64-bit runtime is installed, the scripts can be found in the Framework64 folder, but if not, they are located in the Framework folder.
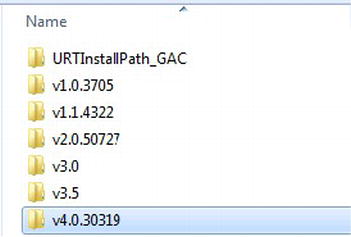
Figure 8-2. .NET Framework versions
Expand the folder displays each of the versions of .NET that is installed, and since WF was released with .NET 3.0, there are SQL scripts for each version of .NET for 3.0 through 4.0 (see Figure 8-3). However, the scripts for persisting all versions of WF, including WF4.5, are located within the file path v4.0.30319SQLen.
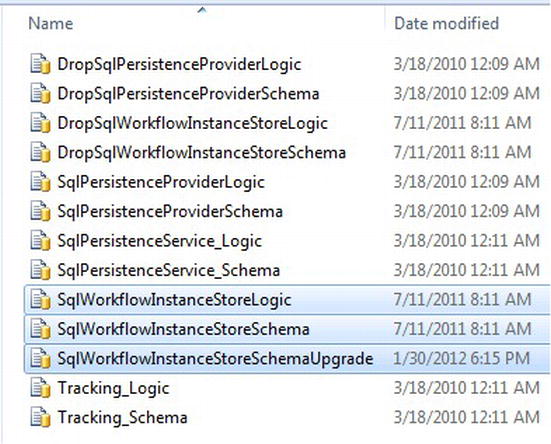
Figure 8-3. SQL scripts for persisting all versions of WF
There are a couple of SQL scripts for each version of WF persistence and each comes with a two SQL script files.
- Schema
- Logic
The files ending in “Schema” set up the database schema, which includes the tables and views used storing information on persisted workflow instances. The other files ending in “Logic” include the SQL stored procedures and functions used for automating the persistence database process. For certain versions of persistence, there are also script files that start with “Drop,” indicating that the scripts remove persistence data stores from SQL Server that were previously installed (see Figure 8-3). The drop scripts can be used for starting from scratch and reloading a new persistence data store.
Table 8-1 gives details for each of the scripts that are provided with WF4.5; however, the only scripts that are important to use for implementing persistence are the following:
- SqlWorkflowInstanceStoreSchema.sql
- SqlWorkflowInstanceStoreLogic.sql
Table 8-1. Persistence SQL Scripts
SQL Server Data Store
When building the persistence data store for WF4.5, it is important that the SqlWorkflowInstanceStoreSchema.sql script is run first so the database is created; then stored procedures and functions can be created by running the SqlWorkflowInstanceStoreLogic.sql script. In order to run the scripts, a new database needs to be created. Once SQL Server is installed on the machine along with SQL Server’s Management Studio, a new database needs to be created.
I usually give the database the name of WFPersist; however, if you are already using persistence with other versions of WF, it might be better if the persistence database is named WF4Persist. After the database has been created, the SqlWorkflowInstanceStoreSchema.sql file can be opened by browsing to its location on the file system mentioned earlier (see Figure 8-4). After the script file opens, it is important to make sure that the right database will be used to run the script against. If not, it can be selected from the drop-down box beside the Execute command button within the toolbar for Management Studio.
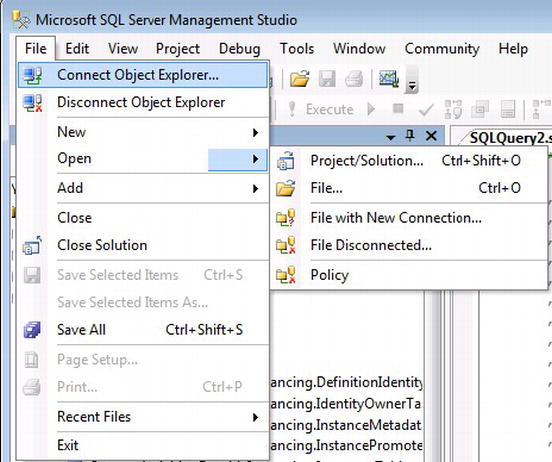
Figure 8-4. Opening script file within Management Studio
After the script has run, the database can be refreshed, revealing that the tables and views were created successfully (see Figure 8-5). After checking that the tables and views have been created, SqlWorkflowInstanceStoreLogic.sql can be opened the same way within Management Studio to build the stored procedures and SQL functions.
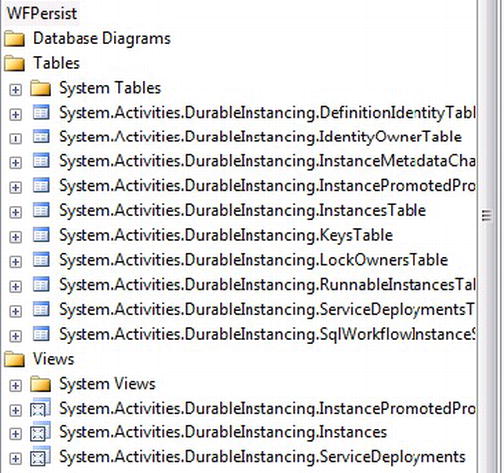
Figure 8-5. Schema tables and views
After the SqlWorkflowInstanceStoreLogic.sql script file has been run against the same database, refreshing the database again should reveal the same as Figure 8-6 and show the stored procedures and SQL functions that were created.
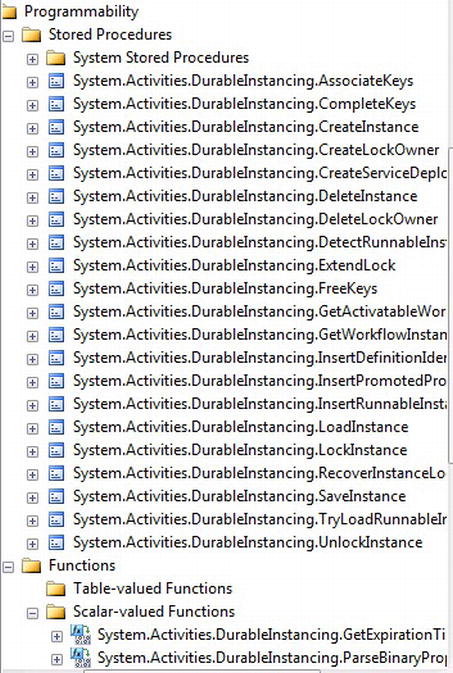
Figure 8-6. Stored procedures and functions
![]() Note If a persistence data store was created before the beta or release of WF4.5, then SQLWorkflowInstanceStoreSchemaUpgrade.sql is all that is required to upgrade.
Note If a persistence data store was created before the beta or release of WF4.5, then SQLWorkflowInstanceStoreSchemaUpgrade.sql is all that is required to upgrade.
SQL Server Profiler
One advantage in having the persistence data store kept in SQL Server is monitoring activity between the WF runtime and the tables within the persistence store. The SQL Server Profiler can be started up within the Microsoft SQL Server Management Studio by clicking on Tools from the toolbar and selecting SQL Server Profiler. After launching the profiler, a login (which is the same login used to log into Management Studio) requires authentication (see Figure 8-7).
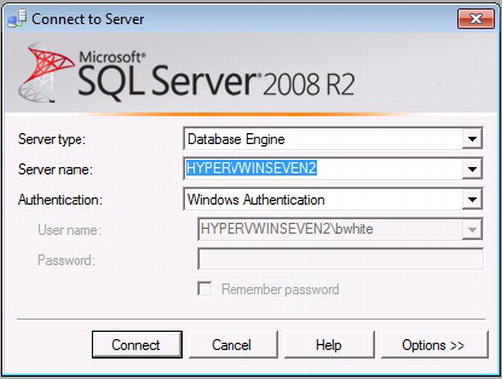
Figure 8-7. Profiler login
SQL Server Profiler uses profiles for what events are traced. The Standard (default) template can be used, and the trace can be started by clicking Run (see Figure 8-8).
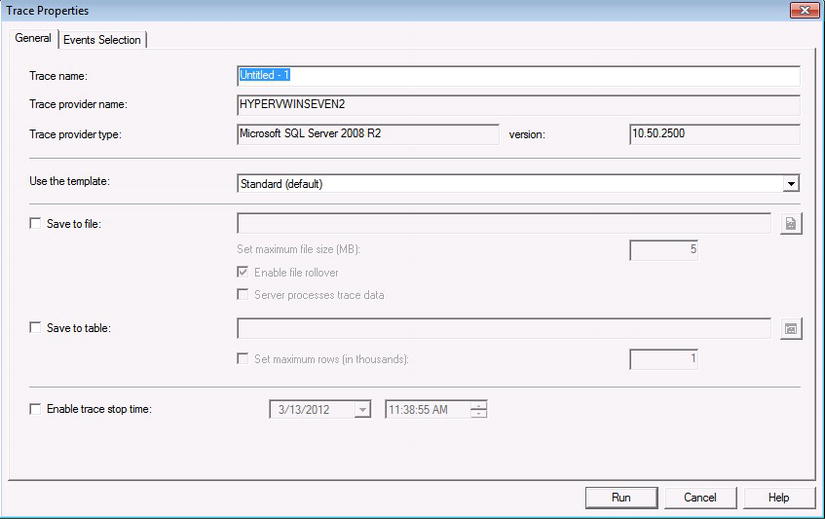
Figure 8-8. Standard (Default) trace template
After the trace starts, depending on your SQL Server environment, there can be a ton of events being traced. To focus on the events that are tied to the persistence database, the template can be filtered. To learn more about how to filter events using the profiler, visit http://msdn.microsoft.com/en-us/library/ms175520.aspx.
Once the trace is running, new events will load into the profiler, as demonstrated in Figure 8-9.
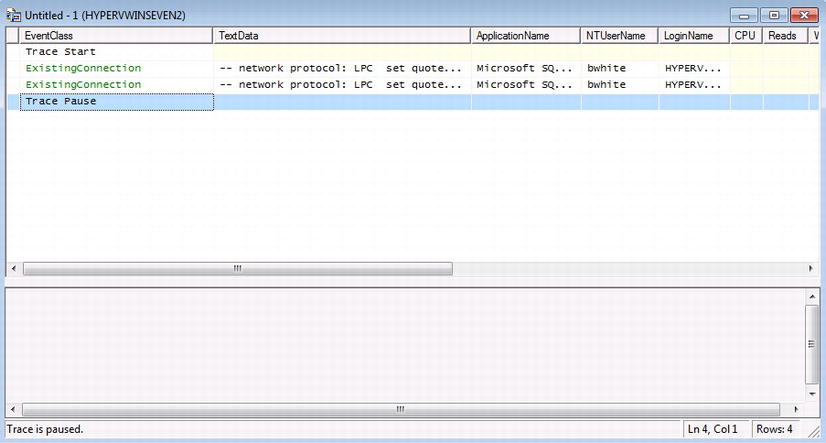
Figure 8-9. Profiler trace
After the persistence data store has been created by running the scripts mentioned earlier, it needs to be wired up to the WF runtime using the SqlWorkflowInstanceStore. The SqlWorkflowInstanceStore object inherits from an abstract class called InstanceStore for out-of-the-box persistence configuration with the WF runtime, and there are two ways to configure it within solutions. One way is through code, and the other is through XML configuration using files like the app.config or Web.config. The SqlWorkflowInstanceStore requires configuration with a database; therefore, as changes happen within server environment, there may be more cases when it makes sense to configure persistence through XML configuration.
After the database has been created using the SQL scripts, the SqlWorkflowInstanceStore needs to be set up to use the database through its ConnectionString property so it can serve as a middle man between the instance store and the WF runtime.
SqlWorkflowInstanceStore instanceStore = new SqlWorkflowInstanceStore;
instanceStore.ConnectionString =
       "Server=HYPERVWINSEVEN2;Database=WFPersist;Trusted_Connection=yes";
After the ConnectionString property is set, SqlWorkflowInstanceStore can be added to a WF runtime host like the WorkflowApplication:
Activity rentalWorkflow = new Exercise1.wfRentalEquipment();

var wfApp = new WorkflowApplication(rentalWorkflow);
wfApp.InstanceStore = instanceStore;
PersistableIdleAction Property
Technically, persistence is wired and ready to go; however, there an event called PersistableIdle that needs to be configured. It is a delegate, so it can be wired like this:
wfApp.PersistableIdle = delegate(WorkflowApplicationIdleEventArgs e)
{
       Return PersistableIdleAction.Unload;
}
The PersistableIdle event gets fired when a workflow instance has become idle and is set to become persisted, but it will only fire after persistence has been set up properly to the WF runtime. Setting the return value for the PersistableIdle provides a level of granularity when configuring the behavior for how persisting workflows should function. The return type PersistableIdleAction has three different members that can be set, determined by how the application will be used with persisting workflow instances.
- Persist: Tells the WF runtime that after a workflow instance goes idle, it can simply be persisted.
- Unload: Indicates to the WF runtime that after a workflow instance goes idle, it should unload from the memory; however, remember that the workflow is persisted first before it is unloaded from the WF runtime.
- None: No persistence or unloading needs to take place when a workflow instance goes idle.
![]() Note After persistence is configured, the Idle event will fire before the PersistableIdle event.
Note After persistence is configured, the Idle event will fire before the PersistableIdle event.
PERSISTING WITH WORKLFLOWAPPLICATION
The exercise will demonstrate how to use the WorkflowApplication host with the SqlWorkflowInstanceStore for persisting workflow instances. After workflow instances are created, the PersistableIdleAction will be changed between Unload and Persist and instance ownership will be demonstrated with how it reacts to the PersistableIdleAction being modified.
The scenario anticipates that persistence has already been created using the scripts discussed earlier; therefore this exercise will use the new persistence data store for persisting workflow instances with a simple equipment rental workflow that tracks when rentals should be returned. The goal is to keep track of the rentals and when equipment needs to be returned, even when the application goes down. Because the exercise uses the WorkflowApplication, each persisted workflow instance will need to be loaded manually, so I will show you how to use Entity Framework’s code first pattern to pull persisted records from the persistence store. Finally, I will demonstrate how to use extensions to communicate from the workflow back to the hosting application. Let’s get started.
- Open Visual Studio 2012, and create a new Project.
- Select the Workflow template to see a list of installed workflow templates.
- Select a new Activity Library, and name it ApressChapter8.
- Rename the Activity1.xaml that is included with the project to wfRentalEquipment.xaml.
- Rename the project to Exercise1.
- Right-click on the solution and add new Visual C# class library. Name it Rental.DataModel. This project will maintain the EquipmentRental entities that will be passed from the workflow hosting application to the workflow.
- Rename the file Class1.cs that was added by default to Equipment.cs.
- Paste the following code into the Equipment.cs file:
using System;
 using System.Collections.Generic;
 using System.Linq;
 using System.Text;
 using System.Threading.Tasks;
 using System.ComponentModel;

 namespace Rental.DataModel
 {
     public class Equipment
     {
         public int EquipmentId { get; set; }
         public string EquipmentName { get; set; }
         public decimal Price { get; set; }
         public DateTime DateRented { get; set; }
         public int RentalMinutes { get; set; }
         public DateTime ReturnedOn { get; set; }
     }
} - Add another class to the Rental.DataModel project and name it EquipmentRental.cs.
- Paste the following code into the Equipment.cs file:
using System;
 using System.Collections.Generic;
 using System.Linq;
 using System.Text;
 using System.Threading.Tasks;

 namespace Rental.DataModel
 {
     public class EquipmentRental
     {
         public int EquipmentId { get; set; }
         public int RentalId { get; set; }
         public Equipment RentedEquipment { get; set; }
     }
} - Right-click on the solution and add new Visual C# class library. Name it WFPersistence.DataModel. This project will retrieve the workflow instances that have been persisted using the [System.Activities.DurableInstancing].Instances view that is standard with the persistence database that was generated.
- Rename the file Class1.cs that was added by default to PersistedInstance.cs.
- Paste the following code into the PersistedInstance.cs file:
using System;
 using System.Collections.Generic;
 using System.Linq;
 using System.Text;
 using System.Threading.Tasks;
 using System.ComponentModel.DataAnnotations;
 using System.Collections.ObjectModel;

 namespace WFPersistence.DataModel
 {
     public class Instance
     {
         public Guid InstanceId { get; set; }
         public DateTime? PendingTimer { get; set; }
         public DateTime? CreationTime { get; set; }
         public DateTime? LastUpdatedTime { get; set; }
         public int? ServiceDeploymentId { get; set; }
         public string SuspensionExceptionName { get; set; }
         public string SuspensionReason { get; set; }
         public string ActiveBookmarks { get; set; }
         public string CurrentMachine { get; set; }
         public string LastMachine { get; set; }
         public string ExecutionStatus { get; set; }
         public bool? IsInitialized { get; set; }
         public bool? IsSuspended { get; set; }
         public bool? IsCompleted { get; set; }
         public byte? EncodingOption { get; set; }
         public byte[] ReadWritePrimitiveDataProperties { get; set; }
         public byte[] WriteOnlyPrimitiveDataProperties { get; set; }
         public byte[] ReadWriteComplexDataProperties { get; set; }
         public byte[] WriteOnlyComplexDataProperties { get; set; }
         public string IdentityName { get; set; }
         public string IdentityPackage { get; set; }
         public long? Build { get; set; }
         public long? Major { get; set; }
         public long? Minor { get; set; }
         public long? Revision { get; set; }
     }

     public class Instances : Collection<Instance>
 {
     }
} - Add another class to the WFPersistence.DataModel project and name it WFPersistence.cs.
- Paste the following code into the WFPersistence.cs file:
using System;
 using System.Collections.Generic;
 using System.Data.Entity;
 using System.Linq;
 using System.Text;
 using System.Threading.Tasks;

 namespace WFPersistence.DataModel
 {
     public class WFPersistenceStore : DbContext
     {
         public WFPersistenceStore()
             : base("WFPersist")
         {
         }

         public DbSet<Instance> PersistedInstances { get; set; }
         protected override void OnModelCreating(DbModelBuilder modelBuilder)
         {
             modelBuilder.Entity<Instance>().ToTable("System.Activities.DurableInstancing.Instances");
         }
     }
 }
This snippet of code implements the code-first pattern for EF4.3 a little differently. Code-first indicates that code is written before the database, but in this case the persistence data store has already been created. Therefore, you can write code modeling the data structure you want to retrieve data from and use the class above as the DbContext object for getting the records; in this case, the structure is a database view System.Activities.DurableInstancing.Instances. Notice also that the constructor points to a base description of WFPersist. This tells EF code first that a database already exists so there is no need to modify it, and to use a connectionstring within a config file for connecting to the database.
Creating a POCO object called Instances will not work alone for retrieving records from the view because it does not match the view name, and surely creating an object called System.Activities.DurableInstancing.Instances will not work, so instead the POCO class Instance is mapped to the System.Activities.DurableInstancing.Instances view . - Now that the classes are built, a reference to the EF4.3 needs to be added. Right-click on References for the WFPersistence.DataModel and select Manage NuGet Packages, as shown in Figure 8-10.
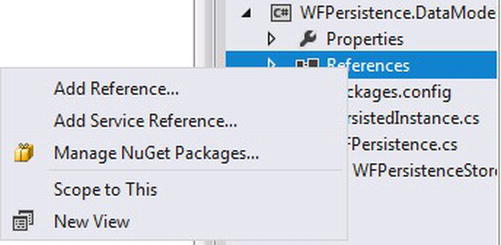
Figure 8-10. Manage NuGet Packages
- Check to see if Entity Framework 4.3 is installed by checking to see if it has a green check, which is located in the upper right corner as indicated in Figure 8-11. If it is not installed, an Install button can be pressed to download Entity Framework 4.3.
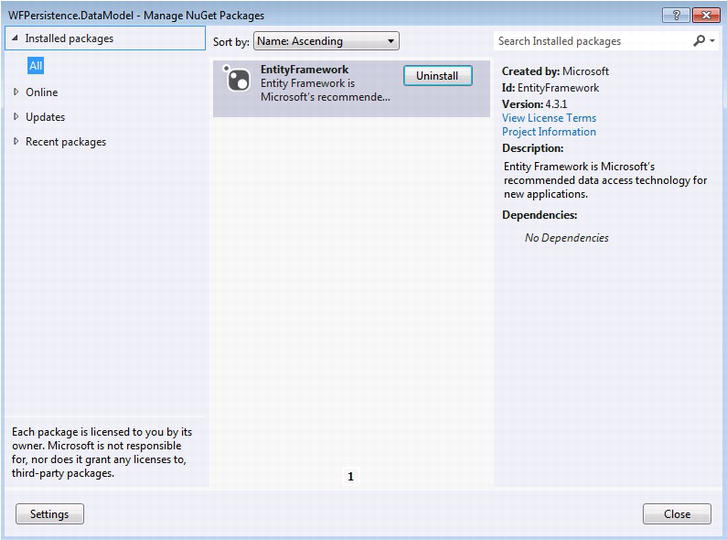
Figure 8-11. Checking if EntityFramework 4.3 is installed
As workflow instances are persisted, this project will be responsible for retrieving the persisted instances from the application hosting the workflows. - Open wfRentalEquipment.xaml within the Exercise1 project so it can be viewed within the workflow designer. This workflow is going to be a pretty simple one so there is no need for it to be anything other than a sequential workflow. It is a sequential workflow because it does not rely on a flowchart or state machine style.
- Right-click on the Exercise1 project and select Add Reference to theRental.DataModel project by clicking the checkbox for the project.
- Click the Arguments tab and add a new argument called argInRental. Set the Direction for the argument to In and select “Browse for Types.” Select Rental.DataModel located under <Referenced assemblies> for the Argument type EquipmentRental. This argument will accept a new equipment rental that will be used within the workflow.
- Click the Variables tab and create a new variable called varDelayDuration. This variable will be used to calculate the duration for how long the workflow should wait until the equipment rental becomes overdue. Change the Variable type to TimeSpan and set the Default value for the variable to TimeSpan.FromMinutes(argInRentedEquipment.RentalMinutes). The variable will be set based on the number of minutes passed in through the argInRental argument.
- Drag a Delay activity from the toolbox and place it on the designer canvas and set its Duration property to varDelayDuration.
- Right-click the Exercise1 project and create a new folder called Activities.
- Right-click the folder and add a new class file. Name the file NotifyHost.cs and replace the current code by pasting in the code that follows. This code will communicate with the hosting application when rental equipment has become overdue using a workflow extension.
using System;
 using System.Collections.Generic;
 using System.Linq;
 using System.Text;
 using System.Threading.Tasks;
 using System.Activities;
 using Rental.DataModel;
 namespace Apress Chapter8 .Activities
 {
     public class NotifyHost : CodeActivity
     {
         [RequiredArgument]
         public InArgument<EquipmentRental> inRental { get; set; }
         protected override void Execute(CodeActivityContext context)
         {
             var rental = new EquipmentRental();
             rental = context.GetValue(inRental);
             INotifyHost host = context.GetExtension<INotifyHost>();
             if (rental.RentedEquipment.DateRented.AddMinutes(rental.RentedEquipment.RentalMinutes)<DateTime.Now)
                 host.OverDueRental(string.Format("{0} rental is Overdue!",
                     rental.RentedEquipment.EquipmentName),
                     context.WorkflowInstanceId);
         }
     }
} - A workflow extension in the form of a simple interface needs to be created so the NotifyHost activity knows how to communicate with the hosting application. Right-click the folder and add a new class file. Name the file INotifyHost.cs and replace the current code with the following code:
using System;
 using System.Collections.Generic;
 using System.Linq;
 using System.Text;
 using System.Threading.Tasks;

 namespace Apress Chapter8 .Activities
 {
     public interface INotifyHost
     {
         void OverDueRental(string RentalStatus, Guid InstanceId);
     }
} - Right-click on Exercise1 and select Build to make sure the workflow and NotifyHost activity builds correctly. Once the Exercise1 project builds successfully, drag the new NotifyHost activity located at the top of the toolbox, under the AppressChapter8.Activities section, and add it beneath the Delay activity added earlier. A sequence activity will be created automatically and will serve as the container for both the Delay and NotifyHost activities (see Figure 8-12).
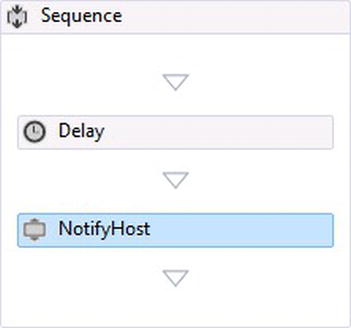
Figure 8-12. Delay and Notify activities
- Set the inRental argument for the NotifyHost activity to the Inargument for the workflow, argInRental.
At this point the workflow and the data models that will be used with the workflow have been created. The last step is setting up the workflow hosting application. Instead of using a WPF app, a simple WinForms app will be created. - Right-click on the ApressChapter8 solution and select Add and then New Project. Select the Windows template and add a new Windows Forms Application. Name the project RentalHost.
- Add the solution references in Figure 8-13 to the new RentalHost project.
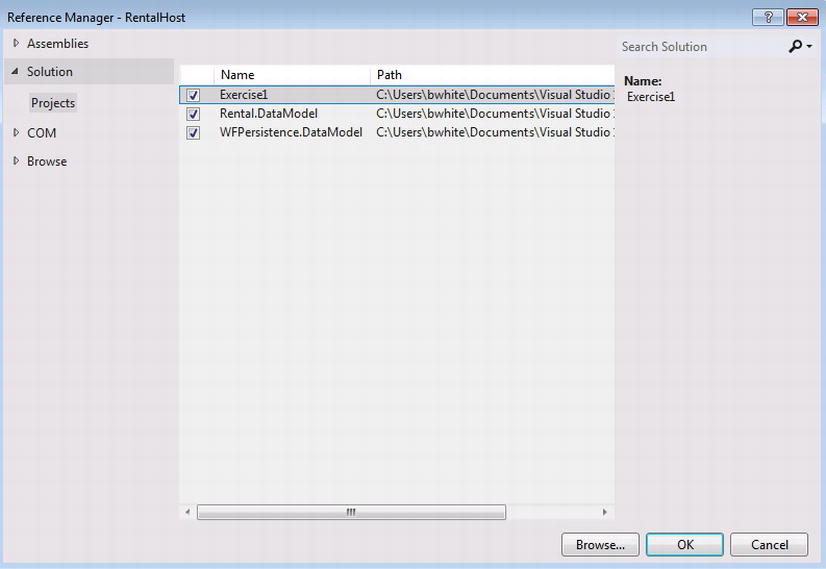
Figure 8-13. WFPersistence.DataModel references
- Make sure to reference Entity Framework 4.3, and if not, use Nuget to install it.
- Right-click on References and add the Framework references checked in Figure 8-14.
Figure 8-14. .NET Framework references
- Open the default Form1.cs file so the form can be created. Figure 8-15 shows the basic user interface that needs to be created.

Figure 8-15. RentalHost form
- Drag a ListView from the toolbox and place it at the top of the form. After it is added, click the Columns property and add following three columns (also shown in Figure 8-16):
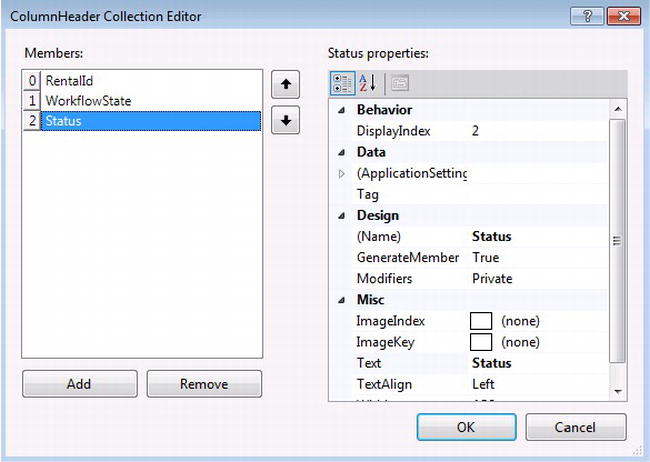
Figure 8-16. Adding ListView columns
Name:“RentalId” Text:“Rental Number”
Name:“WorkflowState” Text:“ WorkflowState”
Name:“Status” Text:“Status” - Drag a Label to the form and set the Text property to Equipment Rental. Use a font size of 12.
- Drag another Label to the form and set the Text property to Equipment just below the first label.
- Drag a Combobox and place it directly below the label above. Set the Id property to cboEquipment.
- Click on the arrow located on the top right of the cboEquipment to add the default items (see Figure 8-17):
-select-
 Backhoe
 Stump Grinder
 Compactor
Figure 8-17. Adding Equipment values
- Drag another Label to the form and set the Text property to Rental Minutes just below the cboEquipment.
- Drag another Combobox and place it directly below the previous label. Set the Id property to cboRentalMinutes and do the same thing as Step 35 for adding the items but instead use the following:
-select-
1
2
3 - Drag a new Button from the toolbox and place it just below cboRentalMinutes. Set the Name property to cmdCreateRental and the Text value to Create Rental.
- Drag another Button from the toolbox and place it in the far right corner of the form. Set its Name property to cmdUnloadInstances and the Text value to Release.
Drag another Button from the toolbox and place it within far right corner but on the left-hand side from cmdUnloadInstances. Set its Name property to cmdCreateRental and the Text value to Create Rental. - Double-click each of the buttons to create their click events.
- Right-click the Windows form, select View Code, and replace the code with the following:
using System;
 using System.Collections.Generic;
 using System.ComponentModel;
 using System.Data;
 using System.Drawing;
 using System.Linq;
 using System.Text;
 using System.Threading.Tasks;
 using System.Windows.Forms;
 using System.Activities;
 using System.Threading;
 using System.Runtime.DurableInstancing;
 using System.Activities.DurableInstancing;
 using System.Xml.Linq;
 using WFPersistence.DataModel;
 using Rental.DataModel;
 using System.ServiceModel.Activities;
 using Apress Chapter8 .Activities;

 namespace RentalHost
 {
     public partial class Form1 : Form,INotifyHost
     {
         private WorkflowApplication _wfApp;
         private SqlWorkflowInstanceStore _instanceStore;
          public Form1()
         {
             InitializeComponent();
             listView1.View = View.Details;
             CreatePersistenceStore();
             CreateInstanceStoreOwner();
             LoadInstancesIntoListView();
             cmdSetOwner.Enabled = false;
         }

          private void LoadInstancesIntoListView()
          {
              try
              {
                  var instances =
                      GetPersistedInstances();
                  listView1.Items.Clear();

                  if (instances.Count> 0)
                  {

                      foreach (var instance in instances)
                      {
                          InitiateWorkflowRuntime();
                          _wfApp.Load(instance.InstanceId);
                          _wfApp.Run();
                          var item = new ListViewItem(
                          new string[3]
                             {
                                 _wfApp.Id.ToString(),
                                 "Loaded",
                                 "Not Overdue"

                             });
                          listView1.Items.Add(item);
                      }
                  }
              }
              catch (Exception ex)
              {
                  throw;
              }
          }

         private UnhandledExceptionAction OnUnhandledException(WorkflowApplicationUnhandledExceptionEventArgs uh)
         {
             return UnhandledExceptionAction.Terminate;
         }

         private Instances GetPersistedInstances()
         {
             var PersistedWFInstances = new Instances();
             try
             {
                 using (var PersistStore = new WFPersistenceStore())
                 {
                     var result = from t in PersistStore.PersistedInstances
                                  select t;

                     foreach (var instance in result)
                     {
                         PersistedWFInstances.Add(
                         new Instance
                         {
                             InstanceId = instance.InstanceId,
                             PendingTimer = instance.PendingTimer,
                             CreationTime = instance.CreationTime,
                             LastUpdatedTime = instance.LastUpdatedTime,
                             ServiceDeploymentId = instance.ServiceDeploymentId,
                             SuspensionExceptionName = instance.SuspensionExceptionName,
                             SuspensionReason = instance.SuspensionReason,
                             ActiveBookmarks = instance.ActiveBookmarks,
                             CurrentMachine = instance.CurrentMachine,
                             LastMachine = instance.LastMachine,
                             ExecutionStatus = instance.ExecutionStatus,
                             IsInitialized = instance.IsInitialized,
                             IsSuspended = instance.IsSuspended,
                             IsCompleted = instance.IsCompleted,
                             EncodingOption = instance.EncodingOption,
                             ReadWritePrimitiveDataProperties = instance.ReadWritePrimitiveDataProperties,
                             WriteOnlyPrimitiveDataProperties = instance.WriteOnlyComplexDataProperties,
                             ReadWriteComplexDataProperties = instance.ReadWriteComplexDataProperties,
                             WriteOnlyComplexDataProperties = instance.WriteOnlyComplexDataProperties,
 IdentityName = instance.IdentityName,
                             IdentityPackage = instance.IdentityPackage,
                             Build = instance.Build,
                             Major = instance.Major,
                             Minor = instance.Minor,
                             Revision = instance.Revision
                         });

                     }
                 }
             }
             catch (Exception ex)
             {
                 throw ex;
             }
             return PersistedWFInstances;
         }

         /// <summary>
         /// The on workflow completed.
         /// </summary>
         /// <param name="wc">
         /// The event args
         /// </param>
         private void OnWorkflowIdle(WorkflowApplicationIdleEventArgs iw)
         {

         }
         /// <summary>
         /// The on workflow completed.
         /// </summary>
         /// <param name="wc">
         /// The event args
         /// </param>
         private void OnWorkflowCompleted(WorkflowApplicationCompletedEventArgs wc)
         {
             foreach (ListViewItem item in listView1.Items)
             {
                 if (item.Text == wc.InstanceId.ToString())
                     listView1.Items[item.Index].SubItems[1].Text = "Completed";

             }
         }

         private PersistableIdleAction OnWorkflowPersitableIdle(WorkflowApplicationIdleEventArgs ia)
         {
             return PersistableIdleAction.Unload;
         }

         private void InitiateWorkflowRuntime(Dictionary<string,object> WFArg=null)
         {
             try
             {
                 Activity rentalWorkflow = new Exercise1.wfRentalEquipment();

                 if(WFArg!=null)
                     _wfApp = new WorkflowApplication(rentalWorkflow, WFArg);
                 else
                     _wfApp = new WorkflowApplication(rentalWorkflow);
      _wfApp.SynchronizationContext = SynchronizationContext.Current;
                 _wfApp.OnUnhandledException = OnUnhandledException;
                 _wfApp.Completed = OnWorkflowCompleted;
                 _wfApp.Idle = OnWorkflowIdle;
                 _wfApp.PersistableIdle = OnWorkflowPersitableIdle;
                 _wfApp.InstanceStore = _instanceStore;
                 _wfApp.Extensions.Add(this);
             }
             catch (Exception ex)
             {
                 throw ex;
             }
         }

         private EquipmentRental BuildWorkflowArg()
         {
             EquipmentRental rental = null;
             try
             {
                 if (cboEquipment.SelectedIndex> 0)
                 {
                     rental = new EquipmentRental();
                     rental.RentedEquipment =
                         new Equipment
                         {
                             DateRented = DateTime.Now,
                             EquipmentName = cboEquipment.SelectedItem.ToString(),
                             RentalMinutes = Convert.ToInt32(cboRentalMinutes.SelectedItem)
                         };
                 }
             }
             catch (Exception)
             {
                 throw;
             }
             return rental;
         }

         private void CreatePersistenceStore()
         {
             try
             {
                 _instanceStore = new SqlWorkflowInstanceStore();
                 _instanceStore.ConnectionString =
                     "Server=ServerName;Database=WFPersist;Trusted_Connection=yes";
             }
             catch (Exception)
             {

                 throw;
             }
         }
         private void CreateInstanceStoreOwner()
         {
             try
             {

      InstanceHandle handle = _instanceStore.CreateInstanceHandle();
                 InstanceView view = _instanceStore.Execute(handle,
                                                 new CreateWorkflowOwnerCommand(),
                                                 TimeSpan.FromSeconds(30));

                 handle.Free();
                 _instanceStore.DefaultInstanceOwner = view.InstanceOwner;
             }
             catch (Exception ex)
             {
                 throw;
             }
         }
         private void LoadNewRental()
         {
             try
             {
                 var DateAndTimeRented = DateTime.Now.ToShortDateString()+" "+DateTime.Now.ToShortTimeString();
                 var DateAndTimeDue = DateTime.Now.AddMinutes(Convert.ToInt32(cboRentalMinutes.SelectedItem));
                 var Due = DateAndTimeDue.ToShortDateString()+" "+DateAndTimeDue.ToShortTimeString();
      var item = new ListViewItem(
                 new string[3]
                 {
                     _wfApp.Id.ToString(),
                     "Started",
                     string.Format("Rented on {0} and due back by {1}"
                                 ,DateAndTimeRented
                                 ,Due)

                 });
                 listView1.Items.Add(item);
             }
             catch (Exception ex)
             {
                 throw ex;
             }
         }
         private void cmdCreateRental_Click(object sender, EventArgs e)
         {
             var rental = BuildWorkflowArg();
             if (rental != null)
             {
                 Dictionary<string, object> wfArg = new Dictionary<string, object>(){
                         {
                             "argInRental",rental
                         }
                     };

                 InitiateWorkflowRuntime(wfArg);
                 _wfApp.Run();
                 LoadNewRental();
             }

         }
         private void cmdUnloadInstances_Click(object sender, EventArgs e)
         {
             try
             {
                 InstanceHandle handle = _instanceStore.CreateInstanceHandle();

      InstanceView view = _instanceStore.Execute(handle,
                                                 new DeleteWorkflowOwnerCommand(),
                                                 TimeSpan.FromSeconds(30));
                 handle.Free();

                 listView1.Items.Clear();
                 cmdUnloadInstances.Enabled = false;
                 cmdSetOwner.Enabled = true;

             }
             catch (Exception)
             {

                 throw;
             }
         }

         public void OverDueRental(string RentalStatus,Guid InstanceId)
         {
             foreach (ListViewItem item in listView1.Items)
 {
                 if (item.Text == InstanceId.ToString())
                 {
                     listView1.Items[item.Index].SubItems[2].Text = RentalStatus;
                 }
             }
         }

         private void cmdSetOwner_Click(object sender, EventArgs e)
         {
             try
             {
                 CreatePersistenceStore();
                 CreateInstanceStoreOwner();
                 LoadInstancesIntoListView();
                 cmdSetOwner.Enabled = false;
                 cmdUnloadInstances.Enabled = true;
             }
             catch (Exception ex)
             {
                 throw ex;
             }
         }

     }
} - Make sure the Connectionstring property is correct and matches the server and database name used to build the persistence store.
Server=ServerName;Database=WFPersist;Trusted_Connection=yes; - Press F5 to run the application. Once the application starts, equipment can be selected from the drop-down box as well as a value for the minutes for how long it can be rented. Click Create Rental to add a new equipment rental.
As equipment is rented and the workflow goes idle, each workflow instance will be persisted and unloaded. To simulate a system failure, the application can be stopped and then restarted and each of the persisted instances will be loaded into memory. When the workflow is idle, it will then persist and unload from memory again. The Set Owner and Release buttons can be used to reload persisted workflow instances. Once the workflow instance completes the workflow, it will be removed from the persistence data store and will no longer be viewed within the application.
A cool feature that persistence provides is the ability to rehost persisted workflow instances that were created using other hosts. This means that a workflow created on one computer can be rehosted on another. An example of this is an application that is used to create a customer’s order on one computer and another computer is used to view and manage the orders. In order for this magic to take place, the DefaultInstanceOwner needs to be set to indicate which WF runtime is hosting the workflow instance.
Exercise1 used the WorkflowApplication for hosting workflow instances. It does not provide as much functionality as the WorlkflowServiceHost, but it does provide a way to build custom applications for hosting workflows and taking advantage of persisting workflows. It is good practice to indicate to the instance store ownership for a workflow instance while it has been persisted but is yet still running within the WF runtime using WorkflowApplication. Exercise1 included the code to do this within the Set Owner and Release button click events; however, Exercise1 had the PersistableIdleAction set to Unload, which unloaded the workflow instances from the WF runtime every time they went idle. Changing the code within the PersistableIdle delegate in Exercise1 to Persist will not allow any of the workflow instances to be unloaded from memory but instead will just be persisted within the instance store. Even though a workflow instance has been persisted, it is still running in memory, and the persistence store takes this precaution until it is otherwise indicated. An owner lock remains on the workflow instance after the host that initiated the workflow persistence is shut down, as the following error message indicates:
The execution of an InstancePersistenceCommand was interrupted because the instance 'db5dd1e2-498d-4a84-972b-13d83e1b0988' is locked by a different instance owner. This error usually occurs because a different host has the instance loaded. The instance owner ID of the owner or host with a lock on the instance is '713955de-99ed-414b-a099-0b9a7d0f5c59'.
Now the owner lock will eventually expire, releasing the persisted workflow instance to other potential hosts, so to stay safe, the first suggestion is to just set the PersistableIdleAction to Unload, which is what Exercise1 initially demonstrated; it indicates that the instance within the instance store is not locked and has been removed from the hosting application. This mechanism is practical if the workflow host ever fails for reasons that cannot be controlled. However, the correct way for managing ownership of a persisted workflow instance is wiring up ownership for a workflow instance, as shown in Listing 8-1.
Listing 8-1. Setting a Default Workflow Instance Owner
InstanceHandle handle = _instanceStore.CreateInstanceHandle();
InstanceView view = _instanceStore.Execute(handle,
                      new CreateWorkflowOwnerCommand(),
                      TimeSpan.FromSeconds(30));
Handle.Free();
_instanceStore.DefaultInstanceOwner = view.InstanceOwner
Listing 8-1 demonstrates setting a globally defined SqlWorkflowInstanceStore, _instanceStore and lets the instance store know that there is a workflow instance owner. As workflows are persisted, they need be locked until they are either unloaded from the WF runtime or the host indicates that other hosts can host a workflow instance by executing the DeleteWorkflowOwnerCommand(). PersistableIdleAction can now be set to Persist so workflow instances will not be unloaded from the WF runtime; however, it is important to call DeleteWorkflowOwnerCommand() when the application host is ready to shut down. The code in Listing 8-2 demonstrates how to let the instance store know that even though the workflow instances are not unloaded but just persisted, it is ok for other hosting applications to load them from the persistence store.
Listing 8-2. Removing the Workflow Owner Lock
InstanceHandle handle = _instanceStore.CreateInstanceHandle();
InstanceView view = _instanceStore.Execute(handle,
                      new DeleteWorkflowOwnerCommand(),
                      TimeSpan.FromSeconds(30));
Handle.Free();
This exercise makes a change to Exercise1 and demonstrates how to persist workflow instances without unloading them from memory and the behavior that takes place when the hosting application fails.
- Open Exercise1 within Visual Studio 2012.
- Open Microsoft SQL Server Management Studio and connect the persistence store database. Open up a query window that is connected to the persistence store database as well.
- Add the following queries to the query window. The first query uses the view Instances to get all of the persisted instances. The second gets all of the owner locks for the persisted instances.
SELECT TOP 1000 *
  FROM [WFPersist].[System.Activities.DurableInstancing].[Instances]

SELECT TOP 1000 *
FROM [WFPersist].[System.Activities.DurableInstancing].[LockOwnersTable] - Open Form1.cs to view the code. Find the OnWorkflowPersistedIdle function and replace
return PersistableIdleAction.Unload;
with
return PersistableIdleAction.Persist; - Run the application. This will change the behavior of the workflow instances to NOT unload from memory after the workflow instance goes Idle.
Select an equipment rental and 1 minute for the duration and then click Create Rental. You will notice that the WorkflowState column says Started. - Wait one minute and notice how the workflow instance information changes in the ListView (see Figure 8-18).
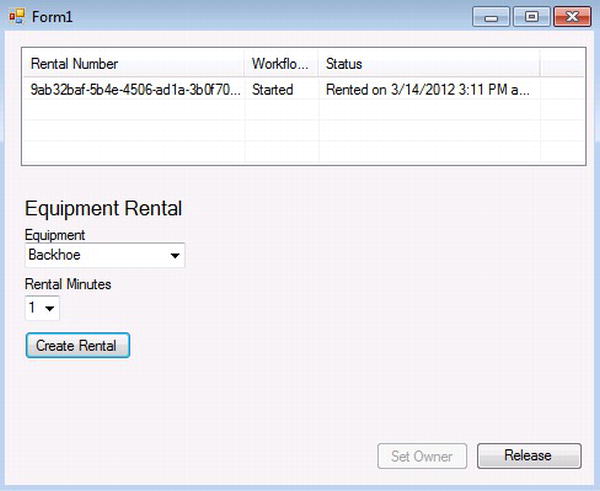
Figure 8-18. Persisted but not unloaded
After a minute has passed and without interacting with the application, the equipment rental becomes overdue. Notice that the WorkflowState has changed from started to completed, which indicates that the workflow instance has completed the workflow. The status has also changed to indicate that the rental is overdue (see Figure 8-19).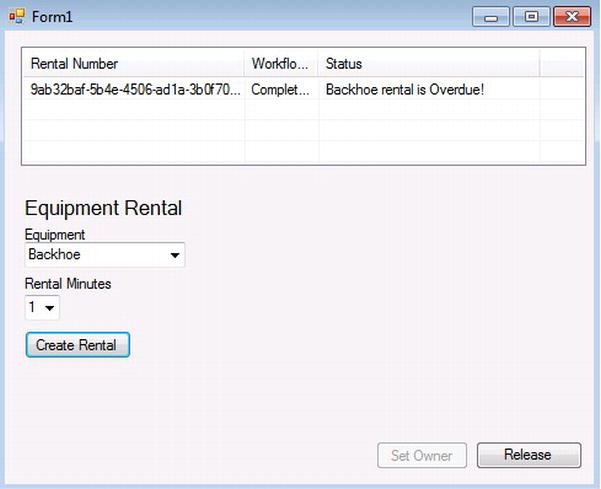
Figure 8-19. Equipment rental is overdue
Multiple rentals can now be added and given different rental durations. As each duration expires, the application updates the rental status (see Figure 8-20).
Figure 8-20. Multiple rentals
- Click the Release button after adding a rental. This tells the WF runtime that the persisted workflow instance can be picked up by another application. If the rentals have become overdue, then the workflow has completed and it is removed from the persistence data store by default.
Now let’s demonstrate how persisted workflow instances are locked from other hosts. - Select another equipment rental and 2 minutes for the duration, and then click Create Rental.
- Click the Release button so the owner lock is removed and then shut down the application. Make sure the application is no longer within Visual Studio, too.
- Start up the application to simulate a new hosing application. The workflow instance will be reloaded and this time simulated as a new hosting application. After 2 minutes the workflow will complete.
- Select another equipment rental and 2 minutes for the duration, and then click Create Rental.
- Now shut down the application, and make sure the application is no longer within Visual Studio, too.
- Start up the application to simulate a new hosing application. The application will break with an error similar to that in Figure 8-21.
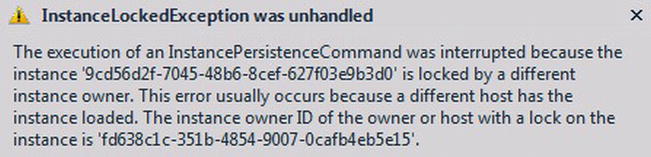
Figure 8-21. InstanceLockException
Exercise2 has demonstrated on top of Exercise1 how to persist workflows instead of unloading them and how to release ownership of workflow instances so other workflow hosts can access them. I also demonstrated what can happen if a persisted workflow instance is not released from a host while another host tries to access it.
HostLockRenewalPeriod
Exercise2 covered what can happen with owner locks for persisted workflow instances, but let’s dig deeper into what is really happening behind the scene. In Exercise2, an equipment rental was started, but when the application was shut down and then restarted, the WF runtime saw another application trying to access the persisted workflow instance. There was an owner lock issued, so the application that was started could not obtain the workflow instance. When a new workflow instance is started, a new record associated with the workflow instance creates an owner lock within the LockOwnersTable. While additional workflow instances are created, each new workflow instance that is persisted uses the same lock. By default, an owner lock has a time out period of 30 seconds plus the Host Lock Renewal Period and will do so as long as the originating workflow host does not renew the lock. This is a good thing because it provides a way to access persisted instances safely after a given time period.
HostLockRenewalPeriod is a property provided with the SqlWorkflowInstanceStore that can be configured. Exercise1 set up the SqlWorkflowInstanceStore within the CreatePersistenceStore method, so when _instanceStore.HostLockRenewalPeriod = TimeSpan.FromMinutes(5); is added, the owner lock renewal period changes to 5 minutes.
The SqlWorkflowInstanceStore has a property called InstanceCompletionAction, and if it is not set, the default behavior for persisted workflow instances is that they are removed from the persisted data store once they have completed. There may be times where this is not the desired behavior and instead purging the instances from the persistence data store needs to be done manually. There are two settings that control this behavior:
- DeleteNothing: Persisted workflow instances are stored even after they are completed and all data and metadata is retained.
- DeleteAll: Default behavior for persisted workflow instances, which deletes them from the persisted data store once the workflow has been completed.
Changing the setting within an application is simple. Exercise1 does not set the InstanceCompletionAction so, and each persistence record is automatically removed upon completion. To change the setting within Exercise1, _instanceStore.InstanceCompletionAction = InstanceCompletionAction.DeleteNothing(); can be added within the CreatePersistenceStore method. However, other considerations need to be made within Exercise1 for how it reloads persisted workflows, because currently it anticipates all of the records returned to be active persisted workflow instances. If Exercise1 is run after making the change, you’ll get the error in Figure 8-22.

Figure 8-22. Loading completed workflow instance
One way to verify if a persisted instance will be removed after completion or not is the DeletesInstanceOnCompletion field within the LockOwnersTable table of the persistence database. The DeleteInstanceOnCompletion is a bit datatype, so if it has a value of 0, then persisted instances related to the locking record will not be deleted, and if the value is 1, then completed persisted instances will be removed (see Figure 8-23).
![]()
Figure 8-23. DeletesInstanceOnCompletion field
WorkflowServiceHost provides a custom Windows Communication Service (WCF) hosting application that allows workflows to perform business logic instead of writing code alone. WorkflowServiceHost also provides more functionality for working with persisting workflows. There are two ways to setup persistence with the WorkflowServiceHost. One way is to use the DurableInstanceingOptions.InstanceStore, which can be set to a configured SqlWorkflowInstanceStore object, because SqlWorkflowInstanceStore inherits from InstanceStore (see Listing 8-3).
Listing 8-3. Building the InstanceStore
var instanceStore = new SqlWorkflowInstanceStore();
instanceStore.ConnectionString =
"Server=ServerName;Database=DatabaseName;Trusted_Connection=yes";

wfServiceHost.DurableInstancingOptions.InstanceStore = instanceStore;
Another way is by taking advantage of the System.ServiceModel.Activities.Description.SqlWorkflowInstanceStoreBehavior which is tailored more for working with workflows that are exposed as WCF services, as shown in Listing 8-4.
Listing 8-4. Building the SqlWorkflowInstanceBehavior
SqlWorkflowInstanceStoreBehavior instanceStoreBehavior
                    = new SqlWorkflowInstanceStoreBehavior("Server=ServerName;Database=DatabaseName;Trusted_Connection=yes");
instanceStoreBehavior.HostLockRenewalPeriod = new TimeSpan(0, 0, 5);
instanceStoreBehavior.RunnableInstancesDetectionPeriod = new TimeSpan(0, 0, 2);
instanceStoreBehavior.InstanceCompletionAction = InstanceCompletionAction.DeleteAll;
instanceStoreBehavior.InstanceLockedExceptionAction = InstanceLockedExceptionAction.AggressiveRetry;
         instanceStoreBehavior.InstanceEncodingOption = InstanceEncodingOption.GZip;

wfServiceHost.Description.Behaviors.Add(instanceStoreBehavior);
Configuring persistence with the WF runtime can be done in two ways. One way is to use code for the settings as mentioned in the previous section; however these settings can be added through configuration file, either through the Web.config or app.config file. There is a serviceBehavior element that can be used in conjunction with the SqlWorkflowInstanceStoreBehavior object. When the configuration is used, DurableInstancingOptions.InstanceStore is set based on the settings within the ServiceBehavior element during runtime therefore there is no reason to use both (see Listing 8-5).
Listing 8-5. Configuring persistence through XML
<serviceBehaviors>
    <behavior name="">
        <sqlWorkflowInstanceStore
                    connectionString="Data Source=(local);Initial Catalog=DefaultPersistenceProviderDb;Integrated Security=True;Async=true"
                    instanceEncodingOption="GZip | None"
                    instanceCompletionAction="DeleteAll | DeleteNothing"
                    instanceLockedExceptionAction="NoRetry | BasicRetry | AggressiveRetry"
                    hostLockRenewalPeriod="00:00:30"
                    runnableInstancesDetectionPeriod="00:00:05">
        <sqlWorkflowInstanceStore/>
    </behavior>
</serviceBehaviors>
Other behaviors can be added that facilitate how the runtime manages persistence, such as OnIdle (see Listing 8-6), and the behavior a workflow instance performs while it becomes idle, such as TimeToPersist and TimeToUnload.
- TimeToPersist: The duration of time the WF runtime needs to wait to persist after a workflow instance becomes idle and while the workflow instance is still loaded within memory.
- TimeToUnload: The duration of time the WF runtime needs to wait to unload a workflow instance after it has become idle and when the workflow instance should be unloaded from the WF runtime.
TimeToUnload should never be less than TimeToPersist because the workflow instance has to be loaded into memory before it can be persisted. If TimeToUnload is less, it is ignored; however, TimeToPersist must finish before unloading of a workflow instance can occur, so in some cases it could occur after the TimeToUnload is originally set to occur.
Listing 8-6. Configuration for OnIdle
<behavior name="">
        <workflowIdle timeToPersist="00:00:05" timeToUnload="00:00:30"/>
 </behavior>
Persistence Participant
There are two classes, PersistenceParticipant and PersistenceIOParticipant, that provide the mechanics for providing additional data to a workflow instance that can be persisted along with the workflow instance. A persistence participant is useful for adding data to workflow not only through the host but also through the workflow itself, and the data can come from sources other than the workflow. So if a workflow is associated with a line-of-business (LOB) solution, data can be associated between the workflow and the solution. Using persistence participants becomes ideal when there is additional information that needs to be added after the workflow has been created, along with all of the arguments and variables. WF provides persistence participants as extensions so they can be added later, extending the data that needs to be stored per workflow instance.
PersistenceParticipant is an abstract class that can be extended to create a custom persistence, and PersistenceIOParticipant extends PersistenceParticipant to provide additional functionality for providing I/O under a persistence transaction while the host persists an instance and while loading a persistence instance.
In this scenario, equipment is rented; if it is not returned, it is flagged as late. The workflow is already built; however, the date due was only calculated to indicate when it is due. The workflow needs a way to track when the equipment rental became overdue and persisted with the workflow when it is persisted. In this case, a persistence participant will be used to grab the overdue date and write it to the service screen indicating the actual date the equipment went overdue. This could be implemented in a couple of different ways; however, the persistence participant provides a very low impact way of creating this functionality without changing the mechanics of the workflow.
To build a custom persistence participant, a new class needs to inherit from PersistenceParticipant, so the project must reference System.Activities.Persistence. A new class is added to a new project, or in this case it can be added within the same project as the workflow. Since the persistence participant is considered a workflow extension, it is a good idea to create a dedicated folder called Extensions and a new class. There is already a default reference to the System.Activities.Persistence namespace, so the next step is to inherit from the PersistenceParticipant, as shown in Listing 8-7.
Listing 8-7. Inherit from PersistenceParticipant
using System;
using System.Activities.Persistence;
using System.Collections.Generic;
using System.Linq;
using System.Text;
using System.Threading.Tasks;
using System.Xml.Linq;

namespace wfEquipmentRentalService.Extensions
{
    public class DateOverdueExtension : PersistenceParticipant
    {
To make sure that the persistence participant is unique, a custom namespace can be added to introduce the participant’s unique name. To add these properties, the System.Xml.Linq namespace must be added, too, as indicated in Listing 8-8.
Listing 8-8. Configuring Unique Participant Namepace and Name
static XNamespace DateOverDueNamespace = XNamespace.Get("urn:schemas-Apress:Chapter8/Persistence");
static XName ParticipantName = DateOverDueNamespace.GetName("DateOverdue");
Next, a property needs to be added that will be set internally through the participant. Here is where the real magic can take place because custom logic can be added to the extension for grabbing data from other systems or it can just retain the characteristics about the workflow environment. In this case, a simple DateOverdue property is added, so it can be set internally within the participant. Then a simple internal method of SetDateOverDue is created to set the DateOverdue property. The internal declaration just indicates that the call cannot be made externally from the DLL that is compiled for the project (see Listing 8-9).
Listing 8-9. Property and Method Used for Holding and Setting the DateOverdue Value
public DateTime DateOverdue { get; set; }

internal void SetDateOverDue()
{
DateOverdue = DateTime.Now;
}
One of the overrides that needs to take place is the Collection CollectValues(out IDictionary<XName, object> readWriteValues, out IDictionary<XName, object> writeOnlyValues). This method gets the value that was set for the participant and creates a Dictionary<XName, object> object signature so the value can be automatically persisted within the SQL Server data store (see Listing 8-10).
Listing 8-10. Overriding CollectValues for Setting Persistence Value
protected override void CollectValues(out IDictionary<XName, object> readWriteValues, out IDictionary<XName, object> writeOnlyValues)
{
      readWriteValues = new Dictionary<XName, object>(1) { { ParticipantName, DateOverdue } };
      writeOnlyValues = null;
}
The last override is the PublishValues(IDictionary<XName, object> readWriteValues), which allows the value to be returned and set back to the DateOverdue property provided within the participant (see Listing 8-11).
Listing 8-11. Overriding PublishValues for Getting Persisted Value
protected override void PublishValues(IDictionary<XName, object> readWriteValues)
        {
            object loadedData;
            if (readWriteValues.TryGetValue(ParticipantName, out loadedData))
            {
                if (loadedData != null)
                    DateOverdue = Convert.ToDateTime(loadedData);
            }
        }
PERSISTING WITH WORKFLOWSERVICEHOST
This exercise builds on the concept for equipment rentals used in the earlier exercises. The workflow that is built in this exercise will provide a workflow client a way to return equipment that was rented, and the workflow itself will indicate to the service host when an equipment rental becomes overdue. The WorkflowServiceHost will be used to host the workflow as a WCF service; however, the focus will be around setting up the workflow instance persistence and using the XML to define the configuration settings, and the persistence participant that was discussed earlier will be implemented. You will also learn how a workflow can use it as an extension for persisting internal data.
- Open Exercise2 within Visual Studio 2012.
- Open Microsoft SQL Server Management Studio and connect the persistence store database. Open a query window that is connected to the persistence store database.
- Add the following queries below to the query window. The first query uses the view Instances to get all of the persisted instances. The second gets all of the owner locks for the persisted instances. The third query grabs all of the workflows that are deemed runnable because they have unloaded from the WF runtime and gone idle.
SELECT TOP 1000 *
  FROM [WFPersist].[System.Activities.DurableInstancing].[Instances]
  SELECT TOP 1000 *
  FROM [WFPersist].[System.Activities.DurableInstancing].[LockOwnersTable]
  SELECT TOP 1000 *
FROM [WFPersist].[System.Activities.DurableInstancing].[RunnableInstancesTable] - A console application will be used for hosting the workflow service, so right-click on the solution and add a new Console application and name it ServiceHost.
- Add the references shown in Figure 8-24 to the project.
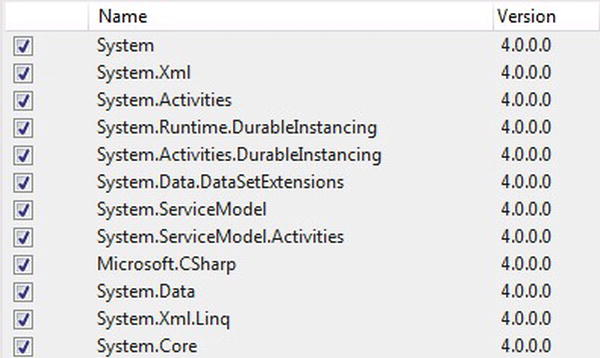
Figure 8-24. ServiceHost Framework references
- Open the Program.cs file and replace the existing code with the following:
using System;
 using System.Collections.Generic;
 using System.Linq;
 using System.Text;
 using System.Threading.Tasks;

 using System.Activities;
 using System.Runtime.DurableInstancing;
 using System.Activities.DurableInstancing;

 using System.ServiceModel.Activities;

 using Rental.DataModel;
 using System.ServiceModel.Activities.Description;
 using System.ServiceModel;

 namespace ServiceHost
 {
     class Program
     {
         [ServiceContract]
         public interface IEquipmentRental
         {
             [OperationContract( IsOneWay=false)]
             string CreateNewRental(EquipmentRental NewRental);
             [OperationContract(IsOneWay = false)]
             string RentalReturned(EquipmentRental CurrentRental);
             [OperationContract(IsOneWay = false)]
             string RentalReturnedLate(EquipmentRental LateRental);
         }

         const string hostAddress = " http://localhost:8080/EquipmentRentalService ";
         static void Main(string[] args)
         {
             try
             {
                 using (WorkflowServiceHost wfServiceHost
                     = new WorkflowServiceHost(new wfEquipmentRentalService.Activity1(), new Uri(hostAddress)))
                 {
                     wfServiceHost.AddServiceEndpoint("IEquipmentRental", new BasicHttpBinding(), hostAddress);
                     Console.WriteLine("Added http Service endpoint...");
                     Console.WriteLine("Adding persistence and metadata behaviors...");
                     // Open service host.
                     wfServiceHost.Open();
                     Console.WriteLine("Started Equipment rental service...");
                     Console.WriteLine("Press [ENTER] to exit");

                     // Create a client that sends a message to create an instance of the workflow.
                     //IEquipmentRental client = ChannelFactory<IEquipmentRental>.CreateChannel(new BasicHttpBinding(), new EndpointAddress(hostAddress));
                     //var ret = client.CreateNewRental(new EquipmentRental
                     //{
                     //     RentalId = 1,
                     //     RentedEquipment = new Equipment{
                     //          EquipmentName="Backhoe",
                     //           RentalMinutes = 2,
                     //            DateRented=DateTime.Now
                     //     }
                     //});

                     Console.ReadLine();
                     wfServiceHost.Close();
                 }
             }
             catch (Exception ex)
             {
                 throw;
             }

         }
     }
} - Right-click the ServiceHost project and add a new app.config. The template is found under Visual C# Items and is called Applications Configuration File Visual C# Items.
- Replace the content for the newapp.config file with the following:
<?xml version="1.0" encoding="utf-8" ?>
<configuration>
    <startup>
        <supportedRuntime version="v4.0" sku=".NETFramework,Version=v4.5" />
    </startup>
  <system.serviceModel>
    <services>
      <service name="EquipmentRentalService" behaviorConfiguration="">
      </service>
    </services>
    <behaviors>
      <serviceBehaviors>
        <behavior name="">
          <sqlWorkflowInstanceStore
            connectionString="Server=HYPERVWINSEVEN2;Database=WFPersist;Trusted_Connection=yes"
            hostLockRenewalPeriod="00:00:30"
            runnableInstancesDetectionPeriod="00:02:00"
            instanceCompletionAction="DeleteAll"
            instanceLockedExceptionAction="AggressiveRetry"
            instanceEncodingOption="GZip"
            />
          <workflowIdle timeToPersist="00:00:15" timeToUnload="00:00:30"/>
          <serviceMetadata httpGetEnabled="true"/>
          <serviceDebug includeExceptionDetailInFaults="true"/>
        </behavior>
      </serviceBehaviors>
    </behaviors>
  </system.serviceModel>
</configuration> - Right-click the solution and add a new Activity Library called wfEquipmentRentalService.
- Rename the Activity1.xaml that is included with the project to wfEquipmentRentalService.xaml.
- Right-click the wfEquipmentRentalService project and select Build so it can be referenced within the ServiceHost project.
- Add the solution references in Figure 8-25.

Figure 8-25. Solution references
- Expand the Rental.DataModel and add the serialization attribute to the the top of the Equipment.cs and EquipmentRental.cs class as follows:
[Serializable]
public class Equipment
And
[Serializable]
public class EquipmentRental - Expand the wfEquipmentRentalService project and open up the wfEquipmentRentalService.xaml workflow activity. Drag a new Flowchart activity onto the designer canvas.
- Drag a Sequence activity and auto-connect it to the Start activity. Then double-click the Sequence activity to view its container.
- Drag a new ReceiveAndSendReply activity within the Sequence activity. Then drag a WriteLine activity and place it between the Receive and SendReplyToReceive activities.
- Drag a new Pick activity and auto-connect it with the Sequence activity, as shown in Figure 8-26.
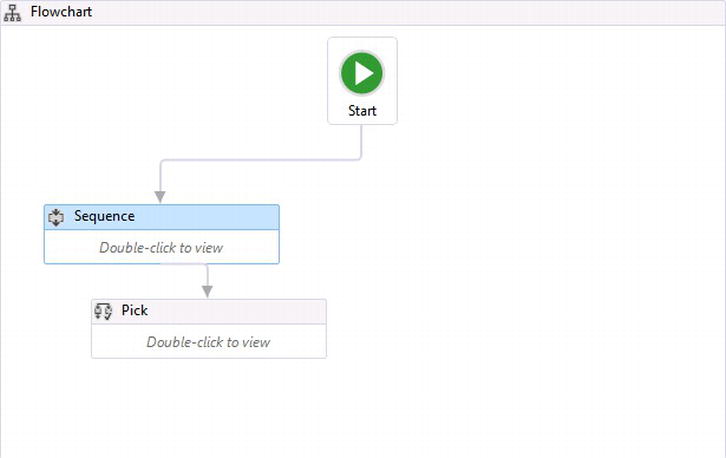
Figure 8-26. Equipment rental workflow
- Double-click the Pick activity. Within the Trigger activity of the left Branch activity, add a new Sequence activity.
- Drag a new ReceiveAndSendReply activity within the Sequence activity. Then drag a WriteLine activity and place it between the Receive and SendReplyToReceive activities.
- Add a Delay activity within the Trigger activity for the right Branch activity and set the Duration property to TimeSpan.FromMinutes(varRental.RentedEquipment.RentalMinutes).
- Add a new Sequence activity within the Action activity of the right Branch activity.
- Add a new WriteLine activity and set the Text property to string.Format("Rental Id {0} is overdue!",varRental.RentalId).
- Within the right Branch activity, drag a new ReceiveAndSendReply activity within the Sequence activity. Then drag a WriteLine activity and place it between the Receive and SendReplyToReceive activities.
- Navigate back to the Flowchart activity by selecting Flowchart at the top of the workflow designer.
- Click on the Variables tab and add a new variable named varRental. Browse for the variable type and set it to Rental.DataModel.EquipmentRental. Because Receive activities have been added, a default CorrelationHandle has been added (see Figure 8-27). Change its name to _RentalId and make sure it has Scope for the Flowchart activity. Correlation will be discussed in detail within the chapter discussing workflows hosted as services, but just remember that correlation is used to uniquely identify existing workflow instances that are running. This is different than Exercise1 where the GUID was used to uniquely identify a running workflow instance.

Figure 8-27. Workflow variables
- Double-click the Sequence activity connected to the Start activity to view its container. Click the existing Receive activity and add CreateNewRental to the OperationName property.
- Change the ServiceContractName to IEquipmentRental and check the checkbox representing CanCreateInstance, since this will be the activity that starts the workflow (see Figure 8-28).
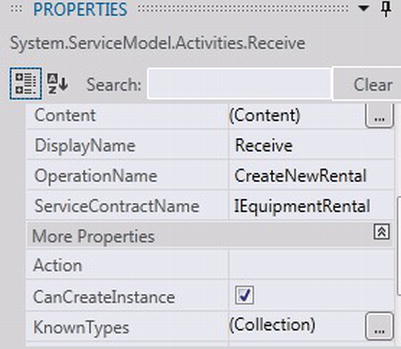
Figure 8-28. ServiceContract and CanCreateInstance properties
CreateNewRental is the call that the workflow service will use to create a new equipment rental, so a new parameter for the Receive activity needs to be added. Click the Content property and click the Parameters radio button. Add a new parameter named NewRental and set its type to Rental.DataModel.EquipmentRental. Assign the parameter to the workflow variable varRental. This will allow the variable to be used within the workflow with other activities (see Figure 8-29).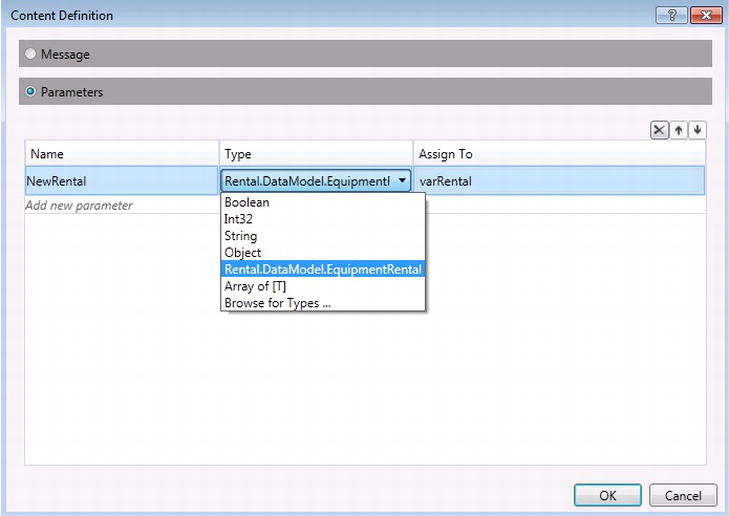
Figure 8-29. Creating a Receive parameter
- Set up the correlation for the parameter that is passed in and how the workflow instance will be uniquely identified. Click the CorrelatesOn property and add a new Key. Clicking the drop-down box will analyze the parameter type EquipmentRental to select what value will be used to uniquely identify the workflow instance. Select the RentalId. A new key will be created, as indicated in Figure 8-30.
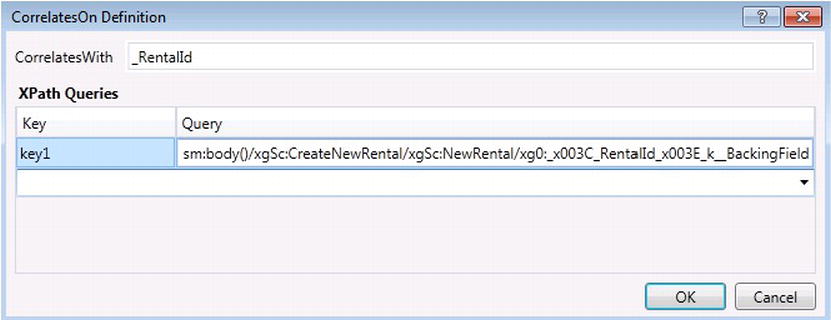
Figure 8-30. CorrelatesWith Property assigned to RentalId
- Set the correlatesWith property to _RentalId. Click CorrelationInitializers and make sure that _RentalId has been added as an initializer and that the Request-reply correlation initializer has been selected within the drop-down box (see Figure 8-31).
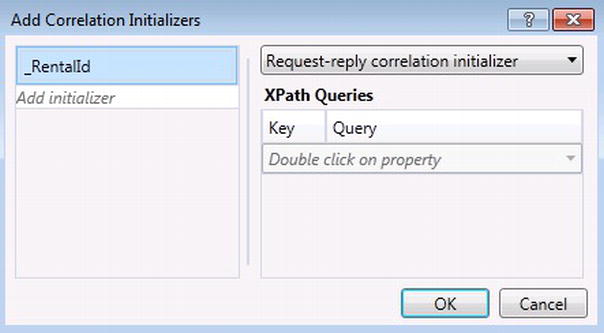
Figure 8-31. Adding the Correlation Initializer
- Set the Text property for the WriteLine activity to
string.Format("A rental request for a {0} has been received!",varRental.RentedEquipment.EquipmentName).
Click the SendReplyToReceive activity Content property and click the Parameters radio button. Add a new parameter named SendReplyMessage and set its type to String. Assign the parameter the value "Your rental request has been received!" - Navigate back to the Flowchart activity by selecting Flowchart at the top of the workflow designer. Double-click the Pick activity, and within the left Branch activity, change the Receive activities OperationName property to RentalReturned.
- Change the ServiceContractName to IEquipmentRental but make sure to leave the CanCreateInstance checkbox unchecked.
- RentalReturned is the call that the workflow service will use to indicate that the equipment rental has been returned on time, so a new parameter for the Receive activity needs to be added. Click the Content property and click the Parameters radio button. Add a new parameter named CurrentRental and set its type to Rental.DataModel.EquipmentRental.
- Click the CorrelatesOn property and use the RentalId associated with the CurrentRental parameter created in the previous step (see Figure 8-32).
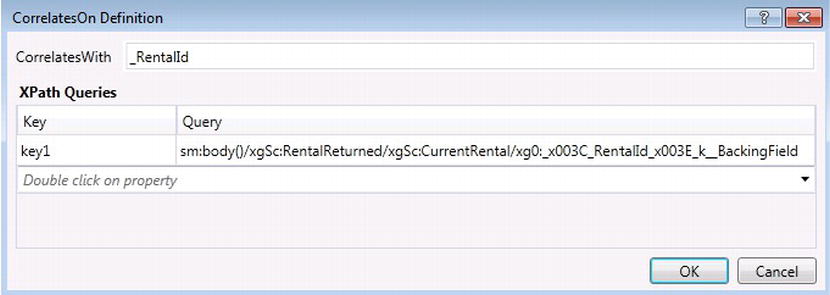
Figure 8-32. CorrelatesOn property for parameter
- Set the correlatesWith property to _RentalId.
- Click the CorrelationInitializers and make sure that _RentalId has been added as an initializer and that the Request-reply correlation initializer has been selected within the drop-down box.
- Set the Text property for the WriteLine activity to "Rental has been returned!"
- Click the SendReplyToReceive activity Content property and click the Parameters radio button. Add a new parameter named retMessage and set its type to String. Assign the parameter the value "Rental has been returned on time!"
- Click the WriteLine activity in the same Action activity and its Text property to string.Format("Rental has been returned late on {0}!", DateTime.Now).
- Click the Receive activity within the Action activity of the right Branch activity. Change the Receive activities OperationName property to RentalReturnedLate.
- Change the ServiceContractName to IEquipmentRental but make sure to leave the CanCreateInstance checkbox unchecked.
- RentalReturnedLate is the call that the workflow service will use to indicate the equipment rental has been returned after it has become overdue, so a new parameter for the Receive activity needs to be added. Click the Content property and click the Parameters radio button. Add a new parameter named LateRental and set its type to Rental.DataModel.EquipmentRental.
- Click the CorrelatesOn property and use the RentalId associated with the LateRental parameter created in the previous step (see Figure 8-33).
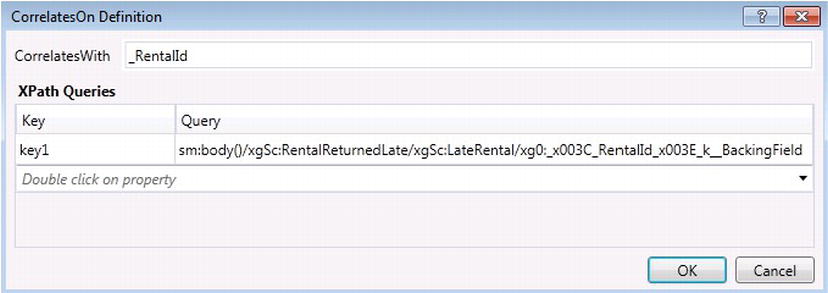
Figure 8-33. CorrelatesOn LateRental parameter
- Set the correlatesWith property to _RentalId.
- Click the CorrelationInitializers and make sure that _RentalId has been added as an initializer and that the Request-reply correlation initializer has been selected within the drop-down box.
- Click the SendReplyToReceive activity Content property and click the Parameters radio button. Add a new parameter named retMessage and set its type to String. Assign the parameter the value of "Rental has been returned late!"
At this point the workflow is complete for creating a new equipment rental and indicating when the rental has been returned on time or if it has become overdue. Figure 8-34 shows the Receive activity, which is used to initialize the workflow instance and create an equipment rental.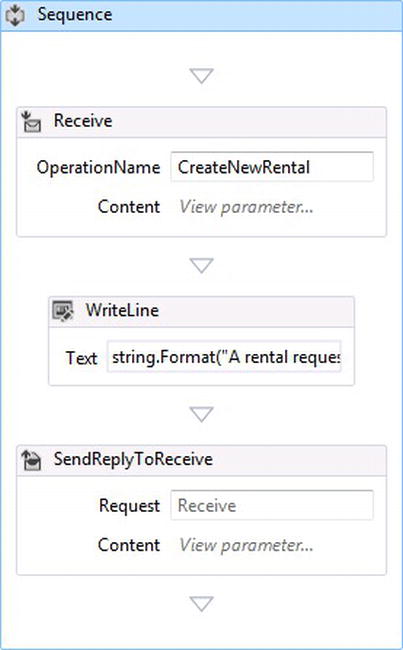
Figure 8-34. CreateNewRental Receive activity
Figure 8-35 shows the left Branch for the Pick activity that was built.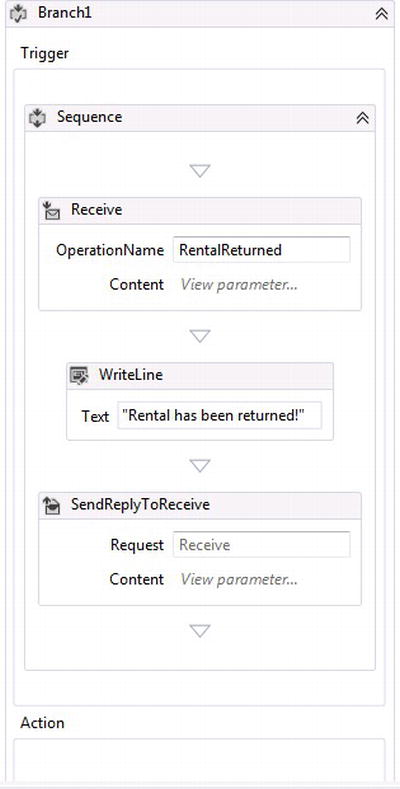
Figure 8-35. RentalReturned Receive activity
There is still some work to do on the right Branch activity of the Pick activity but at this point the workflow host can be started. As it starts, a console window will open displaying the information shown in Figure 8-36.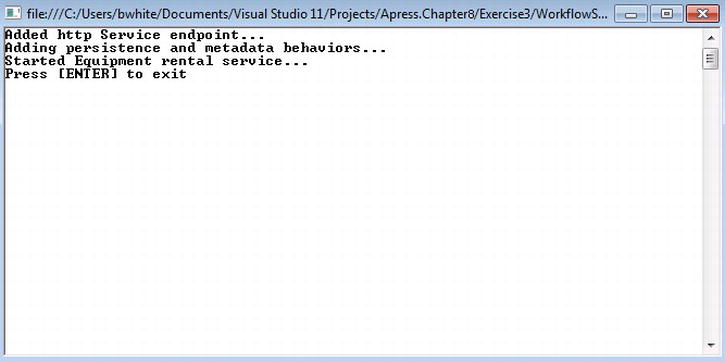
Figure 8-36. Starting the workflow service host
There is some code that was added but commented out within the workflow service that shows how an equipment rental can be added via a host. The final part of the exercise is to build a simple client that can call the workflow service, but first the persistence participant needs to be built to grab the rental overdue date so it can be presented within the console window in Figure 8-36. Two custom activities also need to be created to add the persistence participant extension to the workflow to set and retrieve the overdue date if a rental is not returned on time. - Open the wfEquipmentRentalService project and add two new folders to the project, Activities and Extensions.
- Add two new class files to the Activities folder and one new class file to the Extensions folder.
- Rename the class file within the Extensions folder to DateOverdueExtension.cs and replace the existing code with the following code:
using System;
 using System.Activities.Persistence;
 using System.Collections.Generic;
 using System.Linq;
 using System.Text;
 using System.Threading.Tasks;
 using System.Xml.Linq;

 namespace wfEquipmentRentalService.Extensions
 {
     public class DateOverdueExtension : PersistenceParticipant
     {
         static XNamespace DateOverdueNamespace = XNamespace.Get("urn:schemas-Apress: Chapter8 /Persistence");
         static XName ParticipantName = DateOverdueNamespace.GetName("DateOverdue");

         public DateTime DateOverdue { get; set; }

         internal void SetDateOverDue()
         {
             DateOverdue = DateTime.Now;
         }
         protected override void CollectValues(out IDictionary<XName, object> readWriteValues, out IDictionary<XName, object> writeOnlyValues)
         {
             readWriteValues = new Dictionary<XName, object>(1) { { ParticipantName, DateOverdue } };
             writeOnlyValues = null;
         }

         protected override void PublishValues(IDictionary<XName, object> readWriteValues)
         {
             object loadedData;
             if (readWriteValues.TryGetValue(ParticipantName, out loadedData))
             {
                 if (loadedData != null)
                     DateOverdue = Convert.ToDateTime(loadedData);
             }
         }
     }
} - Rename one of the class files within the Activities folder to GetDateOverdue.cs and replace the existing code with the following code:
using System;
 using System.Collections.Generic;
 using System.Linq;
 using System.Text;
 using System.Threading.Tasks;
 using System.Activities;
 using wfEquipmentRentalService.Extensions;

 namespace wfEquipmentRentalService.Activities
 {
     public sealed class GetDateOverdue : CodeActivity
     {
         protected override void CacheMetadata(CodeActivityMetadata metadata)
         {
             base.CacheMetadata(metadata);
             metadata.AddDefaultExtensionProvider(() => new DateOverdueExtension());
         }

         protected override void Execute(CodeActivityContext context)
         {
             DateOverdueExtension dateOverdueExtension = context.GetExtension<DateOverdueExtension>();
             Console.WriteLine(string.Format("Equipment became overdue on {0}",dateOverdueExtension.DateOverdue));
         }
     }
} - Rename the other class file within the Activities folder to SetDateOverdue.cs and replace the existing code with the following code:
using System;
 using System.Collections.Generic;
 using System.Linq;
 using System.Text;
 using System.Threading.Tasks;
 using System.Activities;

 namespace wfEquipmentRentalService.Extensions
 {
     public sealed class SetOverdueDate : CodeActivity
     {
         protected override void CacheMetadata(CodeActivityMetadata metadata)
         {
             base.CacheMetadata(metadata);
             metadata.AddDefaultExtensionProvider(() => new DateOverdueExtension());
         }

         protected override void Execute(CodeActivityContext context)
         {
             DateOverdueExtension dateOverdueExtension = context.GetExtension<DateOverdueExtension>();
             dateOverdueExtension.SetDateOverDue();
         }
     }
} - Right-click wfEquipmentRentalService and select Build. This will compile the two new activities that will take advantage of using the custom persistence participant that was created and will add them to the toolbox.
- Grab the SetOverdueDate and drag it onto the designer canvas within the right Branch activity’s Action activity and just above the WriteLine activity. As a rental becomes overdue, the SetOverdueDate activity will add the date that the rental became late as a persistence participant.
- Grab the GetDateOverdue activity and drag it onto the designer canvas just below the other WriteLine activity that is between the Receive and SendReplyToReceive activities. The right Branch of the Pick activity should now look like Figure 8-37.
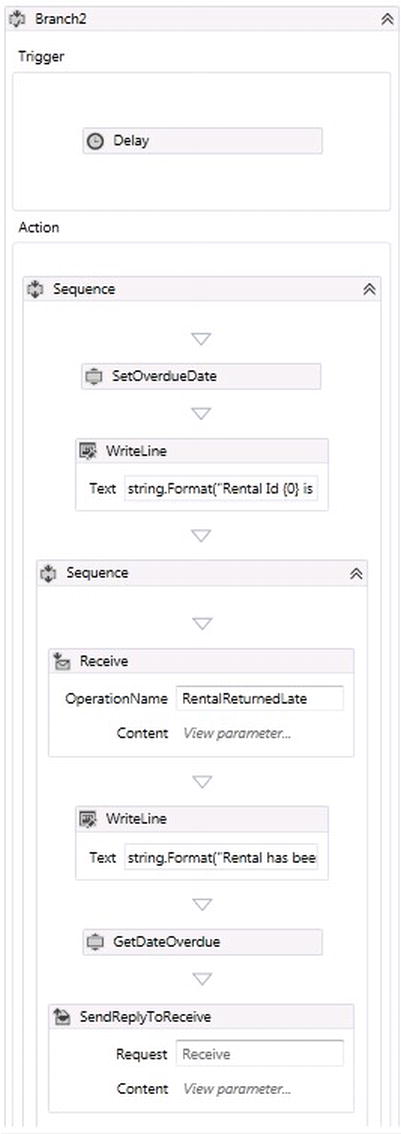
Figure 8-37. Overdue rental using a persistence participant
Finally, create a simple client that will use the new equipment rental service that was just built. - Create a new solution outside of the Apress.Chapter8 solution and create a new Windows Forms Application. Name the solution ExternalClient.
- Open the RentalHost project that was created in Exercise1 and hold Ctrl while at the same time using the mouse to click on the controls indicated in Figure 8-38.
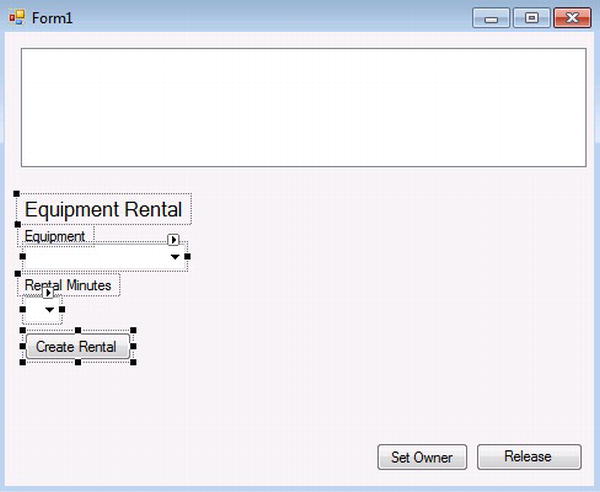
Figure 8-38. Selecting controls for new host
- Copy the controls by pressing Ctrl-C at the same time. Double-click the Form1.cs within the ExternalClient project and press Ctrl-V to paste the controls onto the new form.
- Drag a new checkbox control and button to the new form. Name the new button cmdReturnedRental and set the Text property to Return Rental.
- Set the Text property of checkbox1 to Returned Late. Position the new controls similar to Figure 8-39 and then double-click the cmdReturnedRental button so the click event code is created.

Figure 8-39. Referencing Rental.DataModel.dll
- Add a new reference for the project by searching the file location for Exercise1 and setting a reference to the Rental.DataModel.dll (see Figure 8-40).
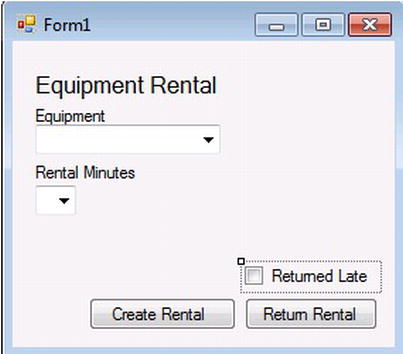
Figure 8-40. Equipment rental client UI
- Right-click Form1 and select View Code. Replace the existing code with the following:
using System;
 using System.Collections.Generic;
 using System.ComponentModel;
 using System.Data;
 using System.Drawing;
 using System.Linq;
 using System.Text;
 using System.Threading.Tasks;
 using System.Windows.Forms;
 using Rental.DataModel;

 using System.ServiceModel;

 namespace ExternalClient
 {
     [ServiceContract]
     public interface IEquipmentRental
     {
         [OperationContract(IsOneWay = false)]
         string CreateNewRental(EquipmentRental NewRental);
         [OperationContract(IsOneWay = false)]
         string RentalReturned(EquipmentRental CurrentRental);
         [OperationContract(IsOneWay = false)]
         string RentalReturnedLate(EquipmentRental LateRental);
     }

     public partial class Form1 : Form
     {
         public Form1()
         {
             InitializeComponent();
         }
         private EquipmentRental BuildWorkflowArg()
         {
             EquipmentRental rental = null;
             try
             {
                 if (cboEquipment.SelectedIndex> 0)
                 {
                 rental = new EquipmentRental();
                     rental.RentedEquipment =
                         new Equipment
                         {
                             DateRented = DateTime.Now,
                             EquipmentName = cboEquipment.SelectedItem.ToString(),
                             RentalMinutes = Convert.ToInt32(cboRentalMinutes.SelectedItem)
                         };
                 }
             }
             catch (Exception)
             {

                 throw;
             }
             return rental;
         }

         private void cmdCreateRental_Click(object sender, EventArgs e)
         {
             try
             {
                 var rental = BuildWorkflowArg();

                 // Create a client that sends a message to create an instance of the workflow.
                 IEquipmentRental client = ChannelFactory<IEquipmentRental>.CreateChannel(new BasicHttpBinding(), new EndpointAddress(" http://localhost:8080/EquipmentRentalService "));

                 rental.RentalId = 1;
                 var ret = client.CreateNewRental(rental);
             }
             catch (Exception ex)
             {
                 throw ex;
             }
         }

         private void cmdReturnedRental_Click(object sender, EventArgs e)
         {
             try
             {
                 // Create a client that sends a message to create an instance of the workflow.
                 IEquipmentRental client = ChannelFactory<IEquipmentRental>.CreateChannel(new BasicHttpBinding(), new EndpointAddress(" http://localhost:8080/EquipmentRentalService "));
                 var ret = string.Empty;
                 if(checkBox1.Checked)
                      ret = client.RentalReturnedLate(new EquipmentRental { RentalId = 1 });
                 else
                     ret = client.RentalReturned(new EquipmentRental { RentalId = 1 });
             }
             catch (Exception ex)
             {
                 throw ex;
             }
         }
     }
 }
At this point, all the code has been added to run the workflow host and use a custom client for managing equipment rentals. Note that the RentalId within the custom client application has a hard coded value of 1 for demonstration purposes, so be sure that an equipment rental has been returned before trying to add another rental while one already exists. Right-click on the ServiceHost project, select “Set as StartUp Project,” and press F5 to run the solution. - After the ServiceHost project starts running, press F5 to start the ExternalClient project.
- Select one of the equipment rentals and select 2 for the Rental minutes. Notice what happens (see Figure 8-41).
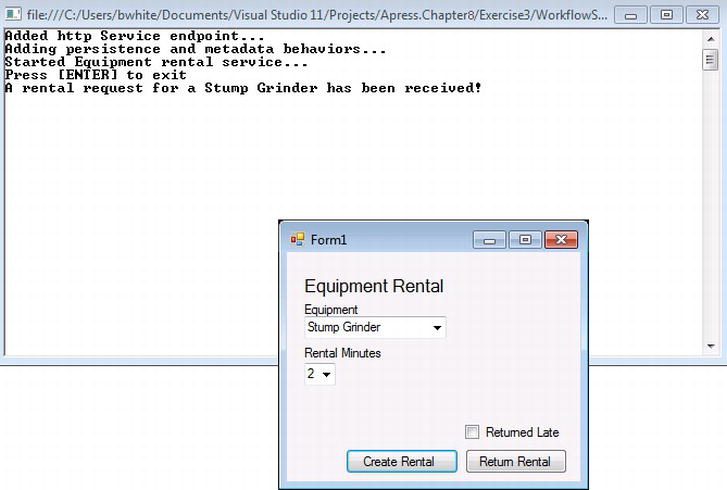
Figure 8-41. Renting equipment
After waiting two minutes the workflow service host shows that the rental has become late (see Figure 8-42).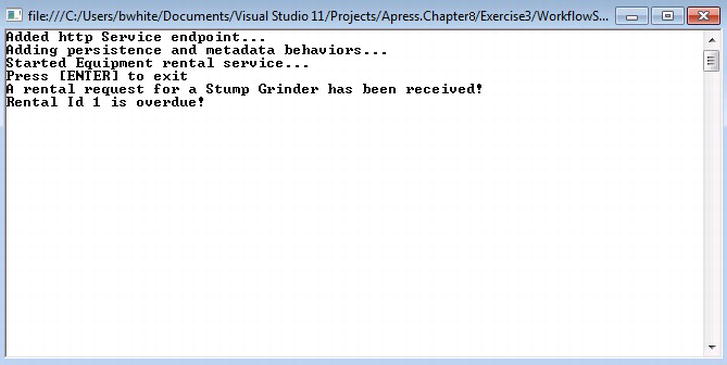
Figure 8-42. Rental is overdue
- Now that the rental is overdue, click the checkbox acknowledging that the rental is late and press the Return Rental button (see Figure 8-43).
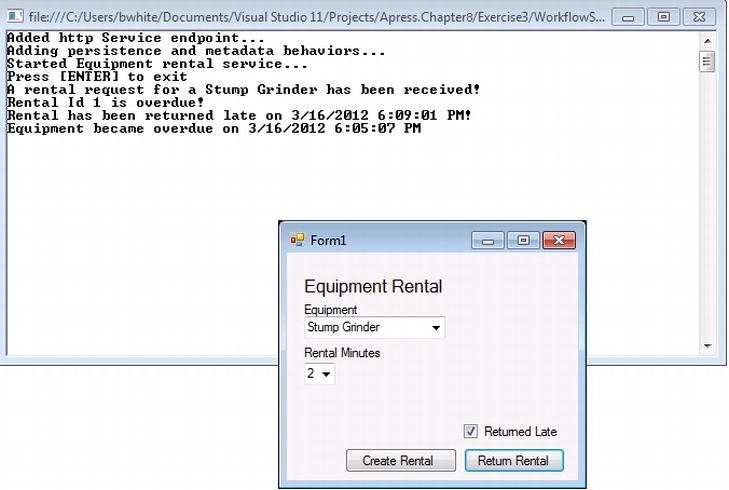
Figure 8-43. Returning late equipment
Figure 8-43 indicates that the persistence participant was added as an extension to the workflow and returned the overdue date value by showing it within the console, using both the SetOverdueDate and GetDateOverdue activities. Next, let’s create another rental and check to see what gets logged to SQL Server. - Create another rental just like before, but this time set the value for the rental minutes to 3. After creating the new rental, Figure 8-44 shows that the workflow instance has been persisted and that an owner lock has been created; however, there are no records within the RunnableInstancesTable.
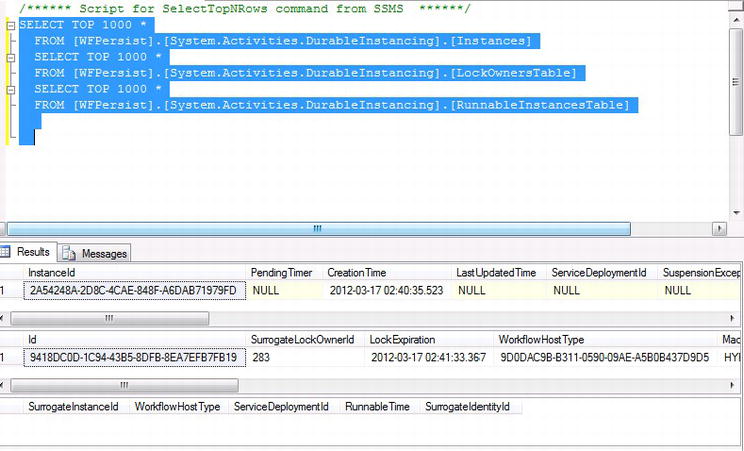
Figure 8-44. Workflow instance persisted and locked
The workflow has been configured within the app.config to unload the workflow instance after 30 seconds. Because the workflow uses a Delay activity, the workflow comes idle while waiting a 3 minute rental duration. Running the query again results in the workflow instance being added to the RunnableInstancesTable (see Figure 8-45).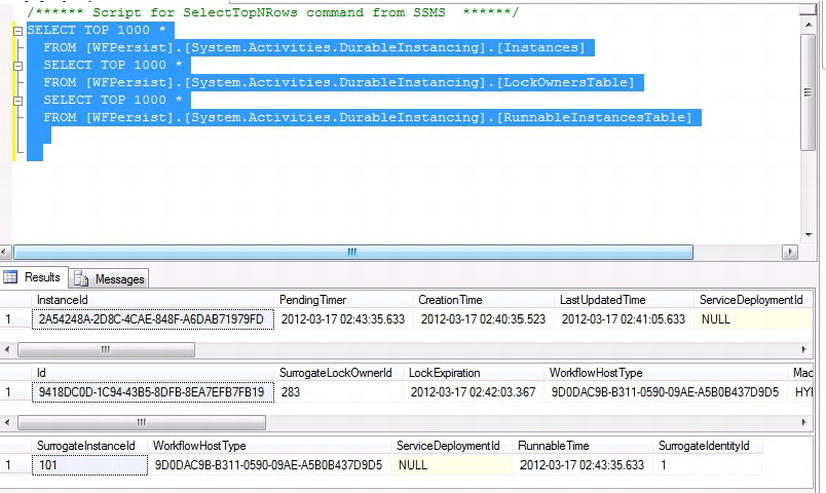
Figure 8-45. RunnableInstancesTable contains idled workflow instance
Also configured for persistence within the app.config is the check for runnable instances every 2 minutes, which means that the record will be removed from the RunnableInstancesTable indicating it has been reloaded into memory and ready to finish processing. - Now that another rental has become overdue, click the checkbox acknowledging that the rental is late and press the Return Rental button.
- Create another equipment rental. Once the service acknowledges that the rental has been created, make sure the Returned Late checkbox is not checked and click the Return Rental button. The service then acknowledges that the rental has been returned and without being late.
This exercise showed how WorkflowServiceHost can be used to persist workflow instances with a custom persistence participant and how to configure persistence using the app.config. Behavior of the SQL Server persistence data store was also demonstrated based on the persistence configuration.
Summary
This chapter focused on giving you a solid understanding of why workflow persistence is important and how it works.
Workflow persistence is provided out of the box and implements a WF instance data store within either SQL Server 2005 or 2008 and later. Persistence is built within SQL Server by running the SQL scripts that come out of the box with the .NET frameworks; this includes the database, stored procedures, and database functions within SQL Server.
The chapter also offered detailed insight into the different WF objects used to configure persistence with the WF runtime. Once the persistence data store was created, examples of how to use persistence and the behavior for how persistence works were demonstrated within custom applications.
There are a couple of things about WF persistence that were not covered in the chapter, so I want to mention them now. A custom persistence data store can be built, so persistence does not have to use the SQL Server persistence provided with the .NET runtime SQL scripts. The WF runtime provides libraries that can be implemented to create a custom data store like XML or system files, and this can be a viable solution for smaller workflow applications. However, to effectively handle WF persistence within enterprise solutions, I recommend using the out-of-the-box persistence through SQL Server. Most of the time, Microsoft server technologies that utilize WF will provide their own persistence.
The last thing I want to talk about is querying the SQL Server persistence data store. Although the records are contained in SQL Server and it is possible to write SQL commands or LINQ statements against the persistence database, I recommend using the provided views instead of querying directly from the database tables.
There is also a WF concept called promoted properties that allows custom data to be provided with workflow instances so they can be tied to other LOB systems; however, there are other methods of connecting WF data with LOB applications, either through WF tracking or managing workflow instances solely through correlations of LOB data or GUIDs generated through the WF runtime. Persisting workflows allows them to run for long periods of time. Understanding a workflow’s execution is important for making sure the workflow is running correctly by tracking its execution events. The next chapter will explain how tracking workflows is implemented to understand what is happening underneath the covers while a workflow executes.