
![]()
Hosting Workflows in Windows Server
There are no significant improvements in WF4.5 with regards to Microsoft AppFabric 1.1 for Windows Server, but this book would not be complete without pointing out that AppFabric provides the perfect vehicle for running and managing WF4.5 workflows. This chapter will first explain why AppFabric was created, and then the caveats that might arise while installing it. Finally, AppFabric Server will be used to host WF4.5 workflows to demonstrate the tooling that it offers for running and managing workflows.
WF provides the framework for hosting, tracking, and persisting workflow instances, but building the infrastructure for hosting workflows and providing transparency for how workflow instances execute can be challenging. As WF matured throughout the years, it became painfully obvious to developers that a robust solution for hosting and managing workflows was needed out of the box. A standardized solution for hosting and managing workflows would make a better case for building applications and solving business needs using WF.
Before AppFabric, a workflow monitoring solution had to be custom built, tested, and implemented. Architecting a solution that provides and manages a dynamic transparency model can be complicated, and sometimes the solution is over-engineered or becomes too complex to manage workflow execution. AppFabric provides an out-of-the-box solution for managing workflow execution “on premises” or on local servers and for providing a hosting solution that has high availability (HA) and reliable services that can scale.
Architectural Components
AppFabric builds on top of Internet Information Service (IIS) 7.0 and gives developers an infrastructure for deploying and hosting workflow services that scale and are easier to manage by extending capabilities of Windows Server services. Although this chapter will focus primarily on the capabilities for hosting services within AppFabric, caching is also supported. Figure 13-1 gives an illustration how caching is handled within a cache cluster using AppFabric.
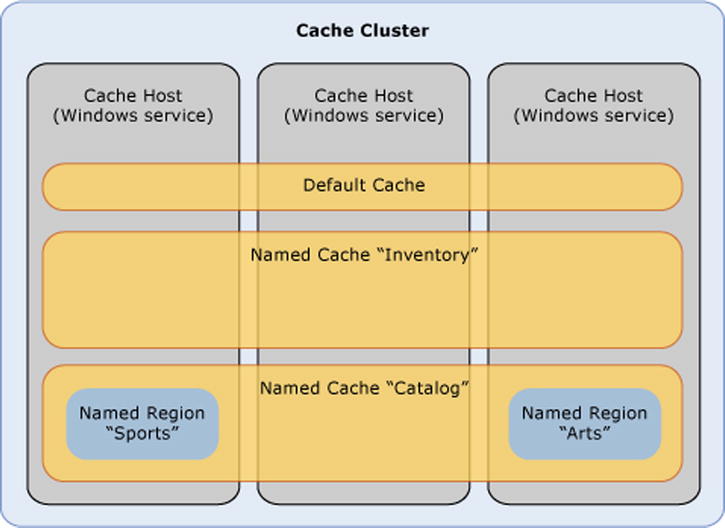
Figure 13-1. Cache cluster within a server farm
- Caching Services: Ability to cache information so frequently read data can be reduced between applications and data stores like SQL Server. Figure 13-1 illustrates how caches have names like “Inventory” and “Catalog” and that within a cache there can be regions, such as 13“Sports” and “Arts.”
- Hosting Services: Additional support for services built using workflows that builds on the capabilities of Windows Process Activation Service (WAS), which serves as the configuration and process manager for hosting Windows Communication Services (WCF) and within IIS 7.0.
Hosting Services
Figure 13-2 gives an overview of the architectural components provided with AppFabric and shows the services and components used to host and manage workflows as services; however, these capabilities have related instrumentation for managing them within AppFabric and are provided out of the box. Hosting workflows as services rely on WAS and take advantage of its hosting functionality and managing workflows through the Workflow Management Service (WMS). The tooling that is provided reduces the need to manually change configuration files that would normally have to be done through custom workflow management solutions.
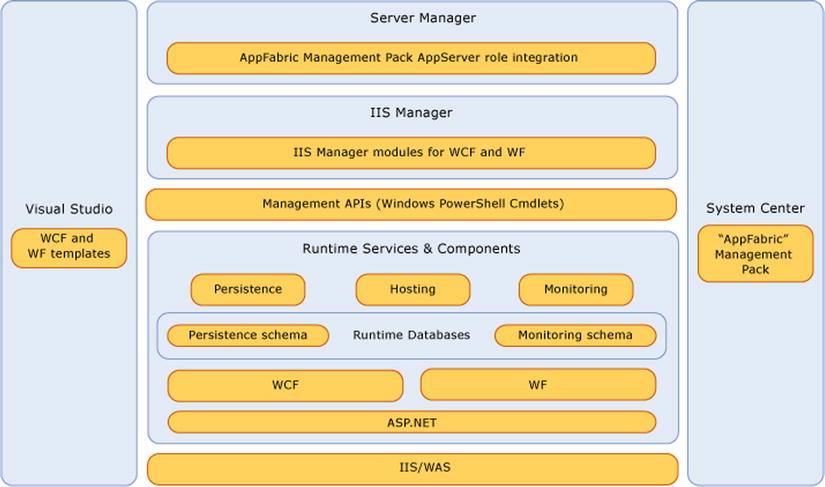
Figure 13-2. AppFabric architecture
Figure 13-2 illustrates that AppFabric resides within IIS, which provides for hosting web applications like ASP.NET; however, the goal for AppFabric is to provide a way to easily deploy WCF and WF solutions as long running services through persistence and monitoring.
- ASP.NET: Ability to receive WCF and WF messages over HTTP.
- WCFand WF: The primary focus of AppFabric, it provides the foundation for building SOA applications, which support long-running processes and interoperability with other technologies.
- Runtime Databases: Provides a data store that is secure, scalable, and reliable for storing data about SOA applications.
Some of the familiar capabilities that are provided within WF include
- Persistence: Preserves data across system failures or restarts. AppFabric provides its own preconfigured database for persisting workflows within SQL Server.
- Hosting: Integrates with the WorkflowServiceHost provider within IIS and WAS.
- Monitoring: Provides tooling for controlling the level of transparency for managing execution data for workflow instances. AppFabric provides its own preconfigured database for monitoring workflows within SQL Server.
The IIS Manager within AppFabric provides the user interface for managing and configuring WCF and WF services, including MSDeploy for deploying services that need to be hosted within WAS. Functionality exposed through the IIS manager can be driven by scripting custom PowerShell cmdlets, commands that are executed from the PowerShell command prompt to perform configuration and other tasks within an operating system or application.
AppFabric Windows Services
There are two services that are installed after AppFabric is installed.
- AppFabric EventCollection Service: Collects Event Tracing for Windows (ETW) events that are subscribed to during WCF and WF service execution, and stores them within the monitoring store.
- AppFabric Workflow Management Service: Manages the activation of workflow instances that are ready to be activated within the durable instance store.
AppFabric EventCollection Service
Up to ten EventCollection services can run on a single server for loading ETW events within the monitor store. This service can be configured based on the level of tracking data that is required using the settings found within the application’s web.config. The service subscribes to multiple WCF and WF applications and sends the events to a specified SQL Server database. It does support more than one monitoring database and can route different events based on the subscribing application to be loaded into different SQL Server databases.
AppFabric Workflow Management Service
WMS manages workflow instances as they become runnable. For example, a workflow instance has an expired instance lock, or the workflow had a Delay activity that expired but initially caused the workflow to persist. Workflows that are hosted as services within AppFabric are the only workflow instances within a persistence store activated; in other words, WMS will not activate workflow services hosted through a different host.
![]() Note AppFabric Workflow Management Service is similar to the Windows service that hosts the same WMS used when hosting workflows as services through the WorkflowServiceHost.
Note AppFabric Workflow Management Service is similar to the Windows service that hosts the same WMS used when hosting workflows as services through the WorkflowServiceHost.
AppFabric provides one data store by default for persisting and monitoring workflow instances within SQL Server; however, as demand grows for the services hosted within AppFabric, the data store can become a bottleneck for performance as a correlation of database inserts updates and deletes occur within a short time span (see Figure 13-3 ).
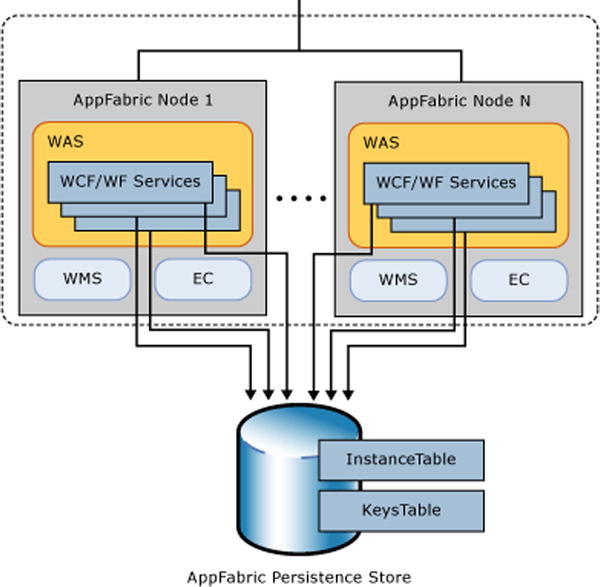
Figure 13-3. Database contengency
By providing multiple persistence and monitoring databases, performance can be increased to handle larger volumes of activity. Each instance store can be routed to a certain service or logically related services that have been deployed within AppFabric (see Figure 13-4).
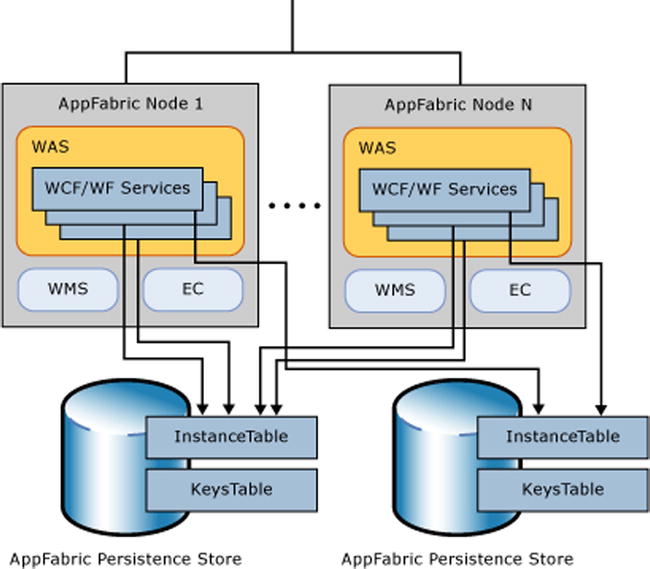
Figure 13-4. Multiple persistence data stores
When service monitoring is executed, a SQL Agent job checks for new events, loads the event data, and writes the events to the monitoring data store. Database views are then used to retrieve the events to be viewed with the AppFabric Dashboard or other custom reporting solutions.
The type of deployment for AppFabric should solely be driven by the business requirements and needs of the hosted applications. AppFabric provides options for different types of deployments and guidance as to which type of deployment suits certain application business requirements. The two types of deployment are as follows:
- Single server
- Server farm
Single server deployment installs and executes everything on a single computer and can be used for prototyping and developing different types of applications that should be hosted. Single server deployment is often inappropriate when applications must scale flexibly. A local installation of SQL Server can be used for monitoring and persistence, but remember because it is single server, the environment forfeits high availability (HA). If the server goes down, all the deployed applications go down as well. Also, more resources have to be shared between the hosting and the instance and monitor store. Although persistence exists for workflow instances, it should not be solely relied upon as a disaster recovery solution.
Figure 13-5 illustrates a single server deployment where multiple clients can connect to clients through a single server hosting AppFabric. Figure 13-5 also illustrates that the persistence and monitoring databases are installed on a separate server from the server where AppFabric is installed.

Figure 13-5. Single server deployment
Production environments, on the other hand, need to be scalable for increasing performance and providing high availability, so they usually incorporate multiple servers within a server farm. There is usually more than one server dedicated to SQL Server for persisting and monitoring long-running services using clustering for failover protection, load balancers for managing available resources, and queuing for incoming messages. Figure 13-6 illustrates a server farm that hosts AppFabric (which is clustered for reliability) for clients subscribing to the services hosted.
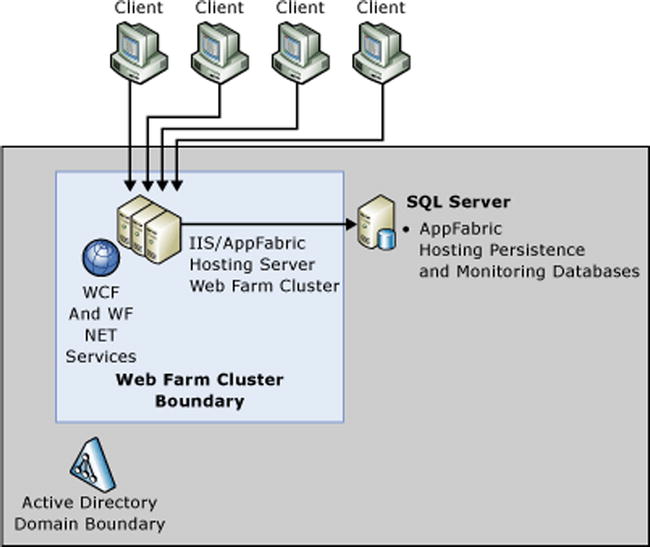
Figure 13-6. Server farm deployment
When providing long-running processes, it is important that the services provided are able to withstand system failures, restarts, and other unmanageable events that render applications unavailable. With single server deployments, persisted workflow instances can wait until the available server is back up and running; however, until the server is back up, applications deployed on a single server are unavailable. Workflow instances deployed on a server farm running AppFabric can continue execution on any of the available servers within the farm. If the execution of a workflow instance is being processed on one server and a message arrives on another server for the same workflow instance, there are specific rules for handling race conditions where persistence will move the executing workflow instance to the computer waiting to process a message to the workflow so it can also be processed within the workflow instance.
Installing AppFabric
During the beta period for AppFabric, it was given the codename “Dublin” for hosting capabilities of WCF and WF; for its caching capabilities, it was given the codename “Velocity.” Although the name has changed a couple of times since then, today it is simply referred to as AppFabric for Windows Server—not to be confused with Windows Azure AppFabric. Windows Azure AppFabric, which is no longer branded as a single technology, refers to various features offered through Windows Azure. To learn more about WF and Windows Azure, refer to Chapter 12. AppFabric for Windows Server is referred to as AppFabric 1.1. The most current download, which is a free install, can be found at Microsoft’s Download Center via www.microsoft.com/download/en/details.aspx?id=27115. This latest release of AppFabric includes the following features, which affect its caching capabilities:
- Read-through and write-behind provider support
- Graceful shutdown
- Domain account support
- New ASP.NET session state and output caching providers
- Compression
- Multiple cache client application configuration sections
There is good news if you need to upgrade from AppFabric 1.0: Microsoft does provide support for doing so. However, make sure you read the possible and known issues (found in the release notes from the same link that provides the installation setup). The other option is to use the uninstall tool that can be downloaded from http://go.microsoft.com/fwlink/?LinkId=188172. The uninstall tool provides a cleanup utility that removes AppFabric 1.0 so a fresh installation of AppFabric 1.1 can be installed.
There are two setups provided from the link. The setup file WindowServerAppfabricSetupx64.exe is obviously for 64-bit systems and WindowServerAppfabricSetupx32.exe is for 32-bit systems. The minimum hard disk space is 2GB and single processors require a computer with an Intel Pentium-compatible CPU that is 1GHz or faster. Dual processors require 900GHz or faster, and quad processors require 700 MHz or faster.
Both 32- and 64-bit setups can be installed on the following operating systems:
- Windows 7
- Windows Server 2008 Service Pack 2
- Windows Server 2008 R2
- Windows Vista Service Pack 2
Microsoft .NET Framework 4 needs to be installed as a prerequisite along with the following:
- Not required for Windows 7 and Windows Server 2008 R2
All features of AppFabric require Microsoft .NET Framework 4, but some features like the caching service can use Microsoft .NET Framework 3.5. The cache client can also use .NET Framework 3.5 with Service Pack 1.
![]() Note Although AppFabric can use .NET 4.0, in order to run services built with WF4.5, .NET 4.5 is required so they can be hosted within AppFabric.
Note Although AppFabric can use .NET 4.0, in order to run services built with WF4.5, .NET 4.5 is required so they can be hosted within AppFabric.
Installation and Configuration
There are different types of installations and configurations that can be performed. I will walk through a single server installation using the wizard for installing specific features on a machine running Windows 7. Configuration can be done later for an initial installation using the same wizard. Another option is using script-based automation for installing and configuring AppFabric 1.1.
INSTALLING AND CONFIGURING APPFABRIC 1.1
In this exercise AppFabric 1.1 will be installed on a single server running Windows 7; it already has SQL Server 2008 R2 and Visual Studio 2012 installed. Since Visual Studio 2012 is installed, there is no reason to install another instance of SQL Server, if SQL Server Express was installed during the installation of Visual Studio 2012. Visual Studio also installed .NET Framework 4.5, so that is taken care of as well. Also, since Windows 7 is the operating system that will be hosting Windows Server AppFabric 1.1, there is no need to Windows Powershell 2.0.
1. Before installing AppFabric 1.1, the first step is to make sure the machine has all of the latest critical Windows updates installed. In Windows 7, clicking on the Windows orb and entering “update” into the search box brings up a window that automatically selects Window Update. Pressing Enter will then open up the update panel (see Figure 13-7).

Figure 13-7. Searching for the Windows Update panel
2. Selecting “Check for updates” will search for any updates that the computer does not currently have loaded. Make sure to get all of the critical Windows updates13.
Microsoft .NET Framework 4.5 needs to be installed for hosting services built using WF4.5, This demo already has Visual Studio 11 installed so .NET 4.5 is already installed. Likewise, Windows PowerShell 2.0 is also already installed; however, if you are running Windows Server 2008 or Windows Vista, make sure to download and install Windows PowerShell 2.0. For more information on getting Windows PowerShell 2.0, go to http://support.microsoft.com/kb/968929/en-us.
3. Make sure that at least Internet Information Services (IIS) 7 is installed (see Figure 13-8). If it is not installed, clicking on the Windows orb and entering “add” into the search box will bring up a list of options. Select “Add or remove programs” and then “Turn Windows features on or off.”
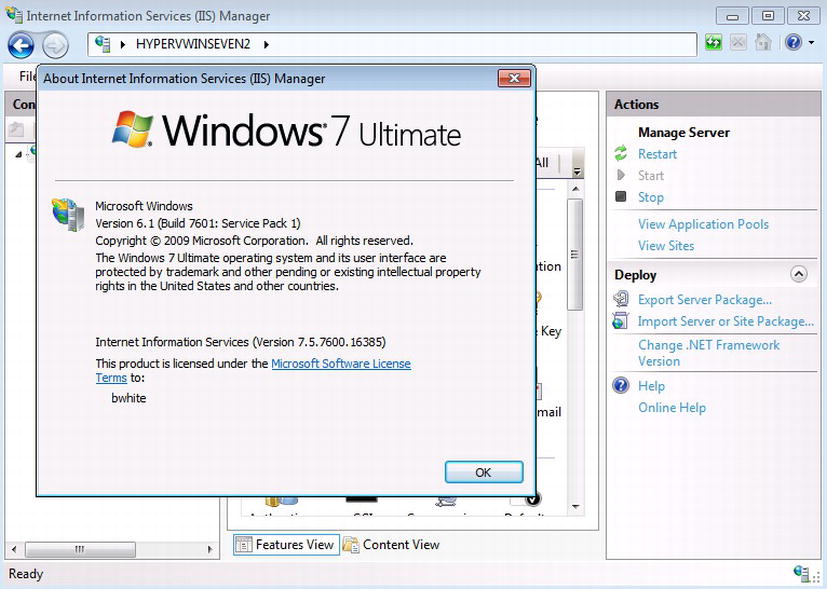
Figure 13-8. Indicates that IIS 7.5 is installed
Find the Internet Information Services checkbox and expand it (see Figure 13-9). Make sure that the following key components are selected. If IIS was not installed, it might take a little time to get the feature installed, so while IIS is installing, go to www.microsoft.com/download/en/details.aspx?id=27115 and install Microsoft AppFabric 1.1 for Windows Server. Remember that there are two installs: one for 32-bit (x86) and one for 64-bit operating systems.
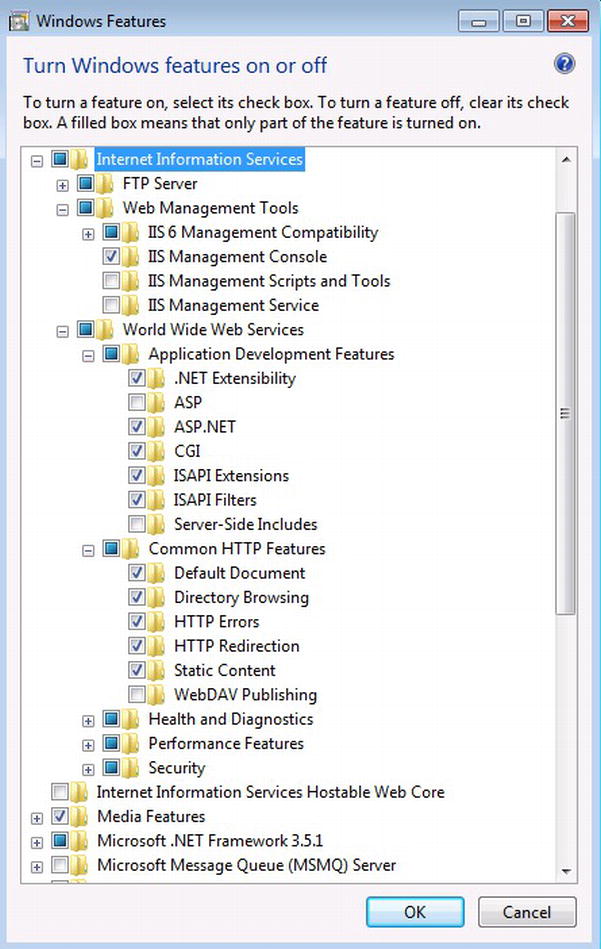
Figure 13-9. Components installed with IIS
4. After IIS and its components have been installed and the setup file for AppFabric 1.1 has been downloaded, click on the WindowsServerAppFabric setup file that was downloaded and accept the terms and license agreement. Figure 13-10 shows the wizard that will guide the installation for AppFabric 1.1.
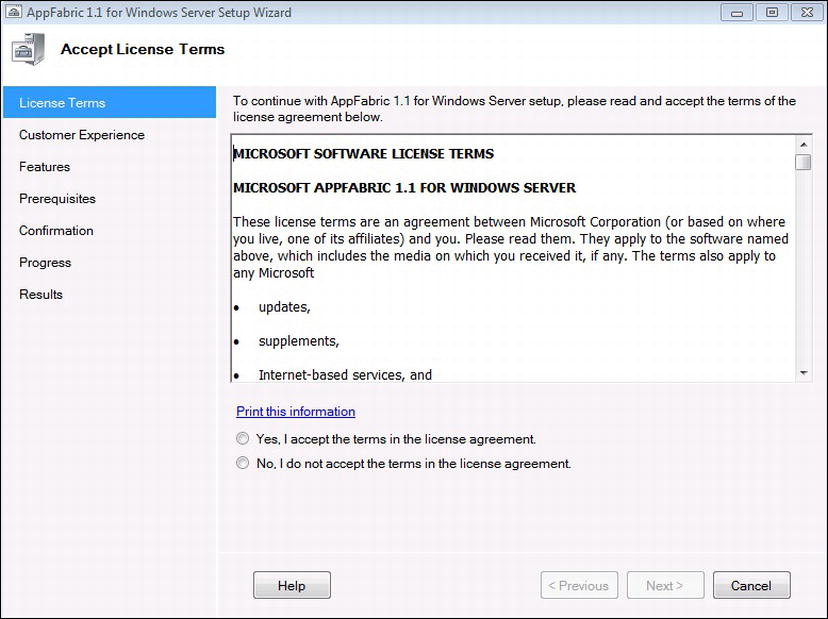
Figure 13-10. Microsoft AppFabric wizard
5. The next step refers to customer experience and if you are willing to contribute. If you like helping, check “Yes” to send information about your experience and select the “Yes” radio button to participate in the program. Then select Next.
6. Features are the next part of the wizard. Since caching is beyond the scope of the demo in this chapter, Cache Client can be unchecked. The default location for where AppFabric will be installed is fine. The Administration Tools are the tooling that will be added within IIS, so IIS will look different once AppFabric is installed. Select Next after the selected features mimic the selection in Figure 13-11.
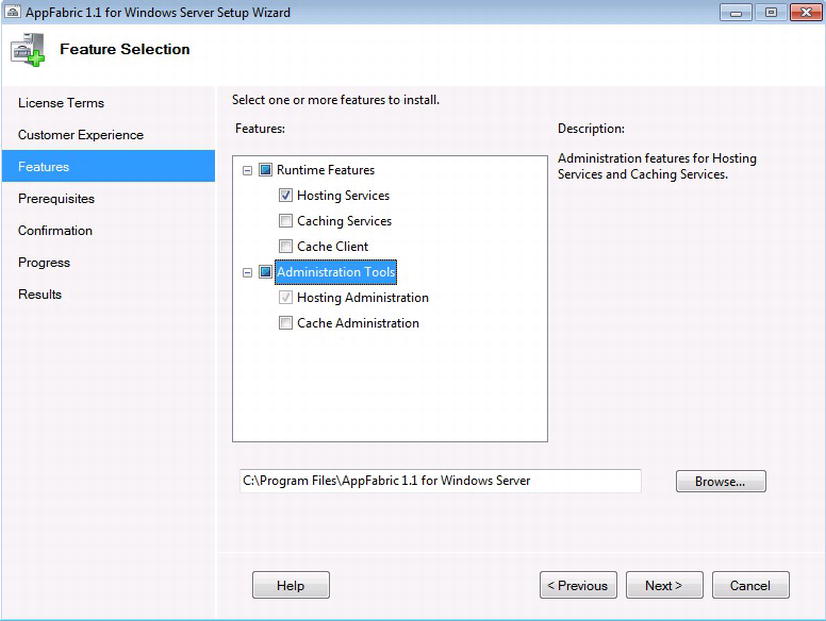
Figure 13-11. Installing features for AppFabric
7. Prerequisites are the next part of the wizard; if any components were missed before the AppFabric 1.1 installation wizard started, they are caught within this part of the wizard. Figure 13-12 indicates that IIS Manager for Remote Administration is not installed.
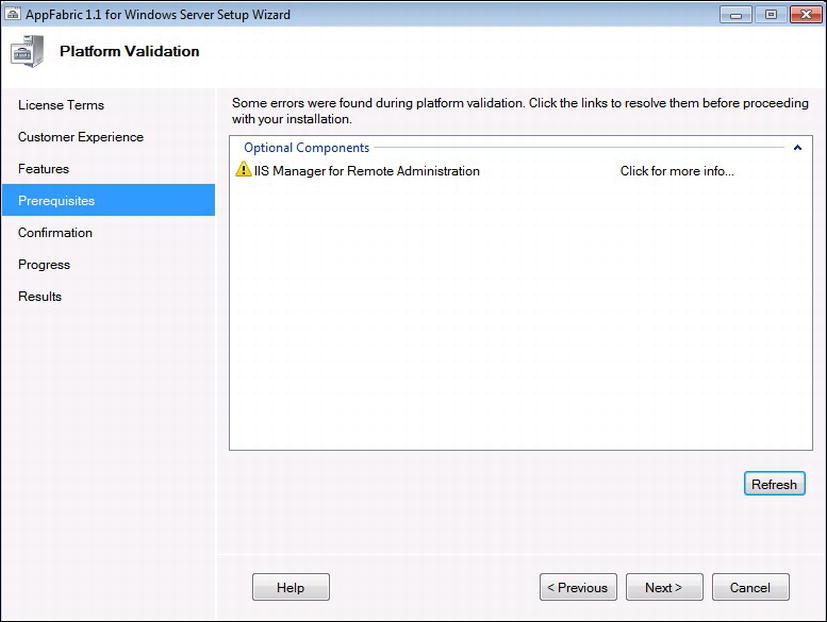
Figure 13-12. A perequisite is missing
IIS Manager for Remote Administration can be downloaded from www.iis.net/download/IISManager.After clicking on the link, make sure to select either x86 or x64 as it pertains to the operating system (see Figure 13-13).
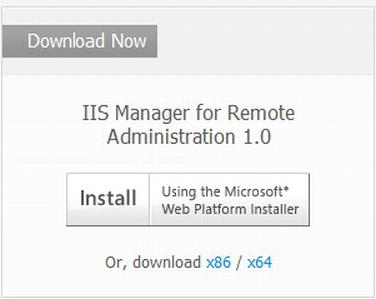
Figure 13-13. IIS Manager download
The setup wizard will start after selecting an IIS Manager setup. The end user license needs to be accepted and the default installation path can be used. The next step installs the IIS Manager. The install should complete rather quickly.
8. After the IIS Manager has been successfully installed, click back to the AppFabric 1.1 install and click the Refresh button, which will indicate to the install wizard to check again to make sure IIS Manager for Remote Administration has been installed. The screen should refresh with a message indicating that no issues were detected. Press the Next button to continue the installation.
9. The Confirmation screen confirms that the installation will install the listed dependent Windows components. Clicking the Install button will confirm that it is ok for the wizard to install the components (see Figure 13-14).

Figure 13-14. Confirmation of dependent Windows components
10. The Progress screen is next, and it shows that the installation has started installing AppFabric 1.1 and all its necessary components.
11. Finally, the Results screen indicates any issues that might have occurred during installation. If there were no issues, the Results screen should look like Figure 13-15.

Figure 13-15. Successful results for the installation
12. Make sure that the checkbox for “Launch configuration tool” is selected, and then click Finish. This will open the configuration wizard (see Figure 13-16). The wizard will help configure the AppFabric server for Event Collection configuration for managing the monitoring and persistence data stores. Also, another opportunity to help Microsoft make AppFabric better is offered. Select Next to start the configuration process.
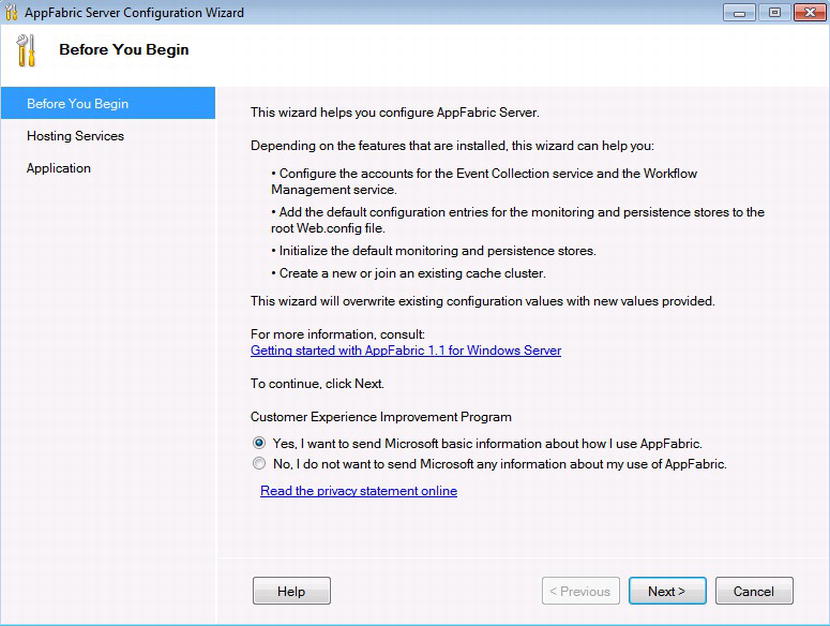
Figure 13-16. Configuring the AppFabric server
13. Hosting Services is the first part of the AppFabric server that can be configured. This is where the monitoring and persistence configuration can be set. This is much easier than trying to configure persistence and providing a custom monitoring solution, since there are only three settings that need to be completed.
- Service accounts that will perform the work.
- Data provider namespace that will be used for the data stores.
- Security around the data stores.
14. Select “Set Monitoring configuration” and select System.Data.SqlClient as the monitoring provider (see Figure 13-17).
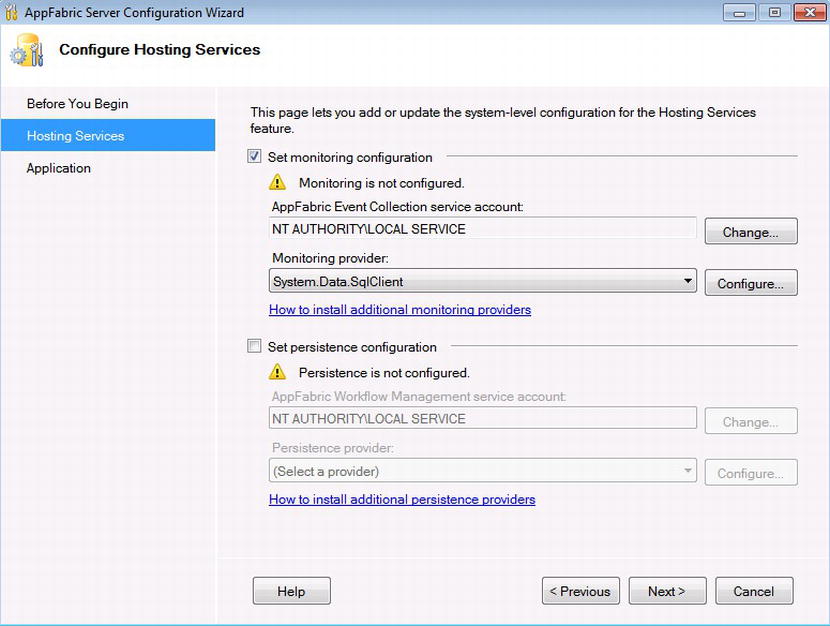
Figure 13-17. Configuring monitoring
15. Click the Configure button and select “Register AppFabric monitoring store in root web.config” and “Initialize monitoring store.”
16. Enter the database name AppFabMonitor as the database. If Windows authentication is set up for SQL Server, the default settings for using Windows authentication can remain. If not, then select SQL Server authentication and add the credentials that need to be used. Selecting OK will confirm the configuration that was added for monitoring (see Figure 13-18).
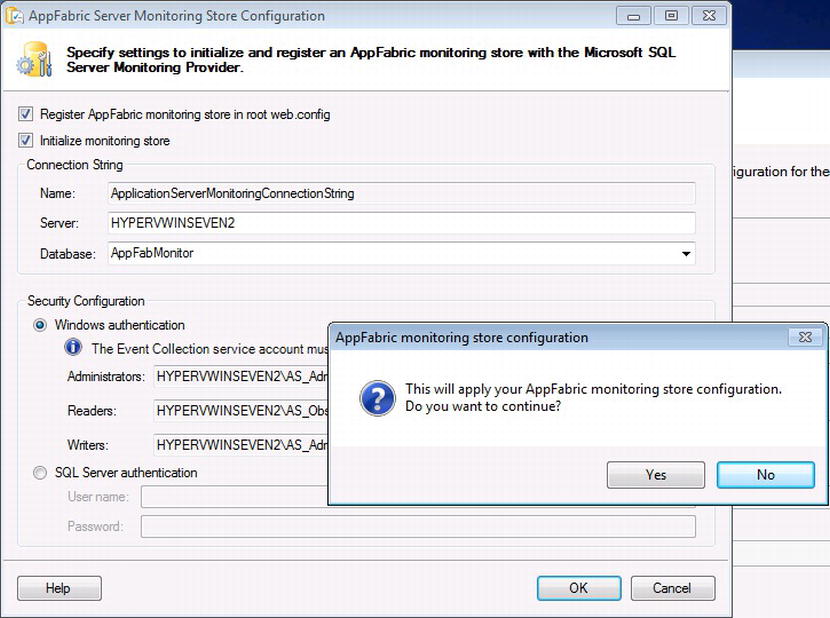
Figure 13-18. Confirming monitoring configuration
17. If configuration for monitoring was not successful, the configuration wizard will indicate what issue is occurring. Figure 13-19 indicates that the wizard did not see the SQL Agent Service running, so in order for the AppFabric Dashboard to display event data, it needs to be started.
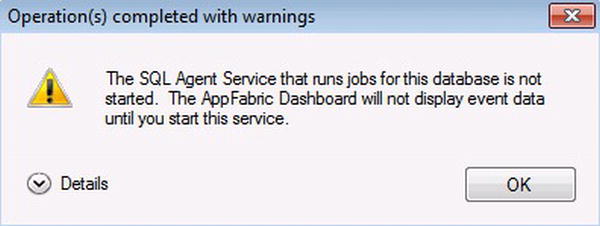
Figure 13-19. SQL Agent Service is not started
Clicking the Windows orb again and typing “service” will find the Component Services program that can be clicked and opened. Find the Services section from the Console Root and expand the services. Scroll down until the SQL Server Agent service is located. Right-click the service and select Start (see Figure 13-20). After the service starts, clicking OK on the message box will allow the configuration screen to come back up, indicating that the default monitoring store is registered.
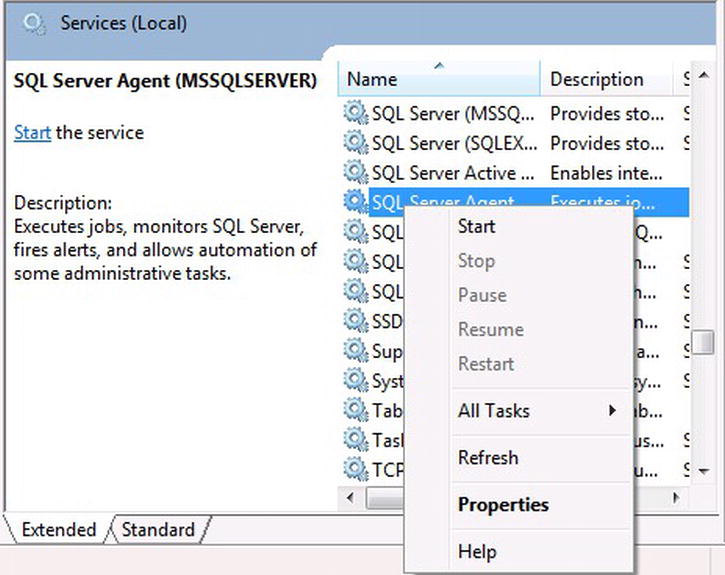
Figure 13-20. Starting SQL Server Agent service
18. Select the “Set persistence configuration” checkbox. For the persistence provider, select sqlStoreProvider; select the Configure button for persistence.
19. Select “Register AppFabric persistence store in root web.config” and “Initialize persistence store.” Enter AppFabPersist as the database name that will be used for persistence.
20. If Windows authentication is set up for the SQL Server, the default settings for using Windows authentication can remain. If not, then select SQL Server authentication and add the credentials that need to be used. Select OK to confirm the configuration for persistence (see Figure 13-21).
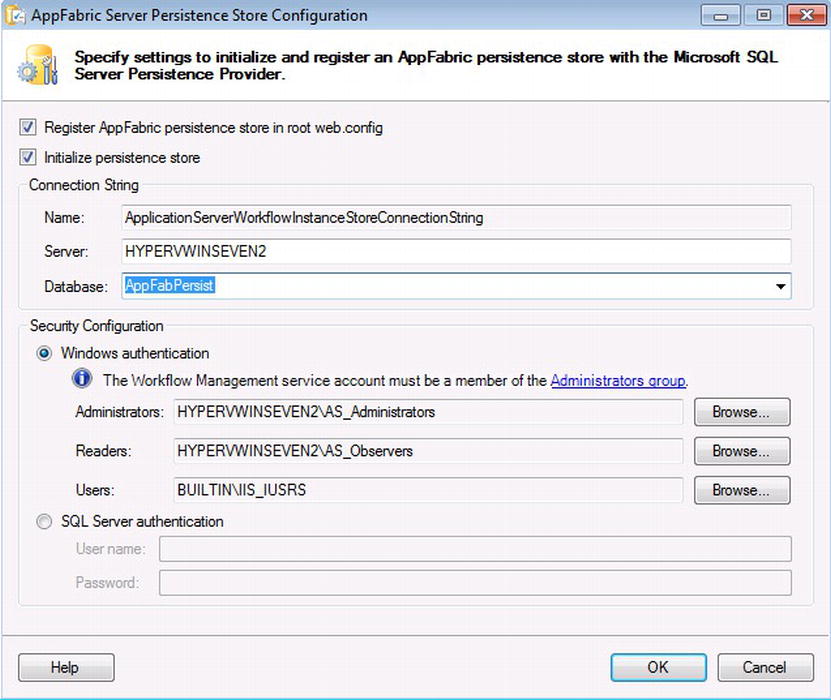
Figure 13-21. Confirming persistence configuration
If the configuration is successful, the message in Figure 13-22 will show.
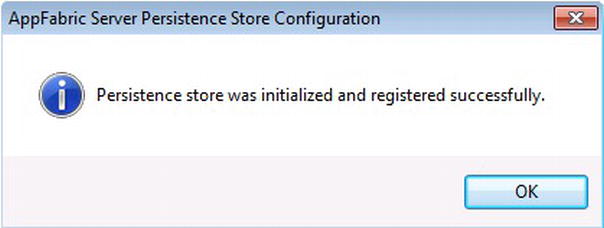
Figure 13-22. Successful persistence setup
21. At this point both monitoring and persistence have been configured and initialized. Select Next to start the IIS Manager. This is the final step that just confirms that additional configuration settings for the Hosting feature can be made. Make sure “Start Internet Information Services (IIS) Manager” is selected and then select Finish.
AppFabric 1.1 has now been successfully installed as a single server instance. When the IIS Manager opens, you will notice a new section at the top of IIS named “AppFabric,” as shown in Figure 13-23 .
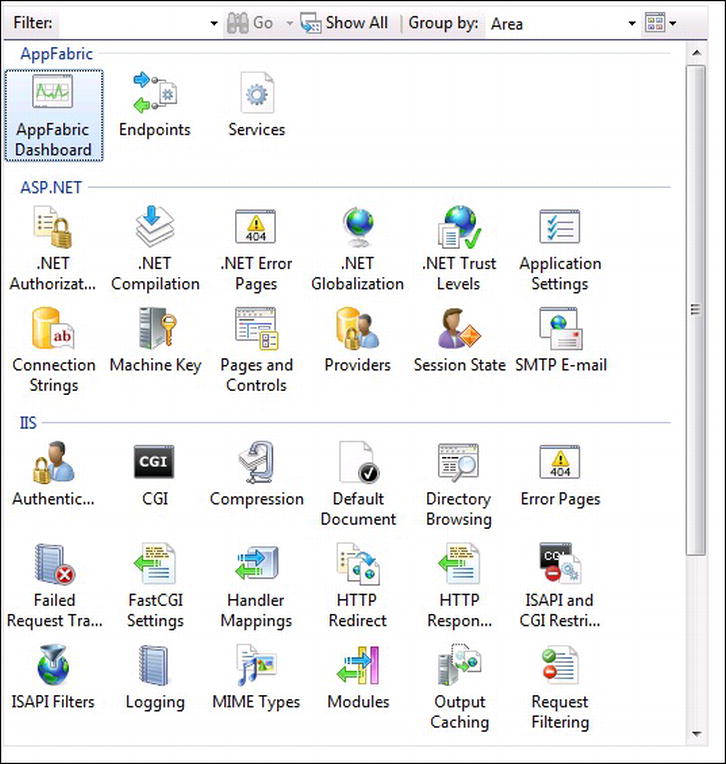
Figure 13-23. AppFabric section within IIS
Since monitoring and persistence were configured, Microsoft SQL Server Management Studio can be used to see the new databases, AppFabPersist and AppFabMonitor, that have been created (see Figure 13-24).
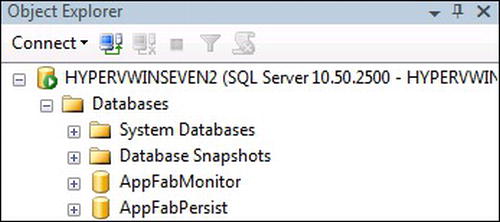
Figure 13-24. AppFabric Monitor and Persistence databases
Deploying to AppFabric
AppFabric and Visual Studio 2012 simplify the steps for deploying workflow services. Visual Studio 2012 provides a workflow project template called WCF Workflow Service Application. This project provides a template for building workflow services that will be hosted within AppFabric (see Figure 13-25).
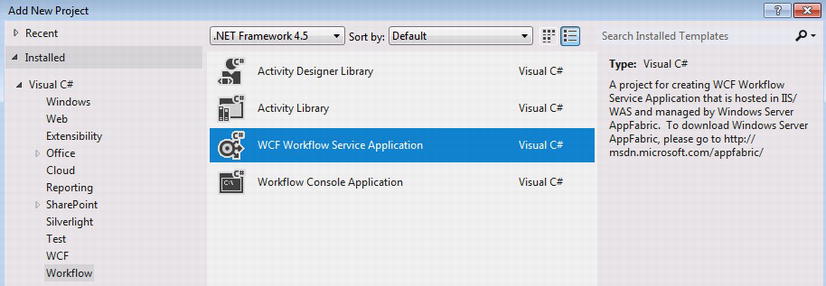
Figure 13-25. WCF Workflow Service Application project template
Figure 13-26 illustrates that once the WCF workflow project loads, it provides a workflow that has a different extension than the XAML workflows. An extension for a WCF workflow is .xamlx and is one way to tell that the workflow is intended to be used as a WCF service and that it is intended to be hosted as a WCF service within AppFabric. The project is called Workflow.JeepParts because of a recent process I experienced for ordering parts for my Jeep at a local warehouse store. The parts can be ordered onsite at the store, and once they are ordered, a list of parts is sent to a huge warehouse where someone on the warehouse staff picks the parts for the order. I picked up the parts by driving to the warehouse and going to a location the store called “Will Call.” There I waited for someone in the warehouse to bring me the parts I had ordered. If I did not want to pick them up, or if I created the order over the phone, the parts were still picked; however they were placed back on shelves after a certain time expired from when the order was created.
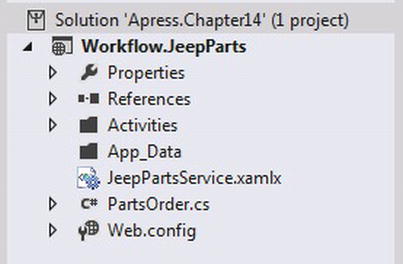
Figure 13-26. .xamlx Workflow service extension
The workflow for ordering and picking up Jeep parts is a simple Flowchart workflow, so more attention can be focused on the deployment effort of having the service hosted within AppFabric (see Figure 13-27).
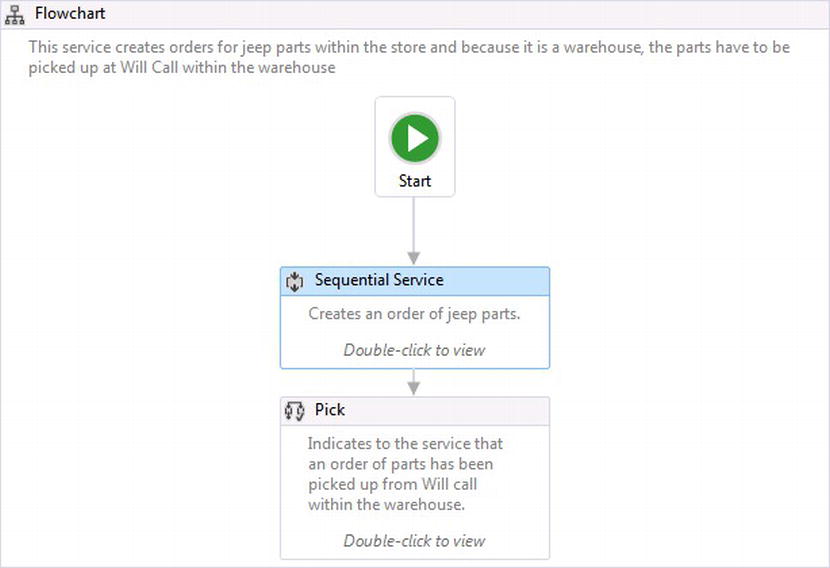
Figure 13-27. Ordering and picking up Jeep parts
Figure 13-28 illustrates that clicking on the Sequential service activity reveals the ReceiveRequest and SendResponse activities that are used for creating the order and sending notification that the order has been created along with an OrderID, which is a System.Guid type.
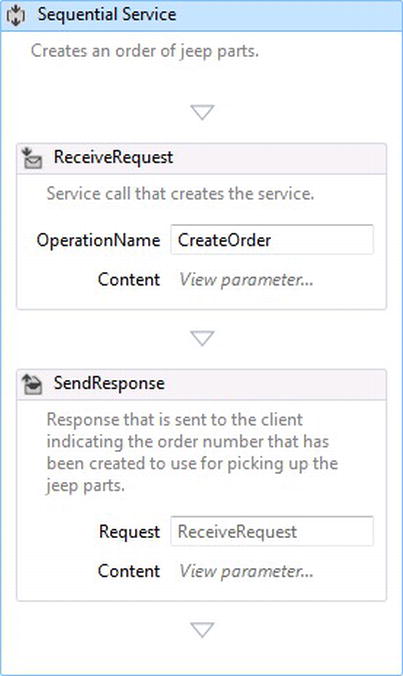
Figure 13-28. Creating the order and sending the OrderId back to the client
After the Jeep order has been created, Figure 13-29 indicates that the order then waits for one minute using a Delay activity for the Jeep parts to be picked up by the customer. A Receive activity is used to indicate that the parts have been picked up. If the parts are not picked up after a minute, the parts are restocked.
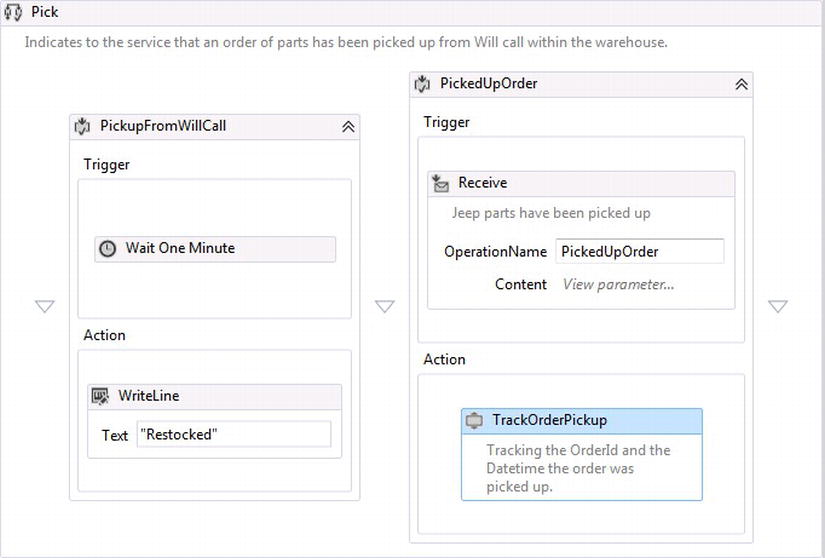
Figure 13-29. Waiting for order to be picked up
Figure 13-29 also illustrates that once an order is picked up, a custom activity called TrackOrderPickup tracks the OrderID and date and time the order was picked up. Listing 13-1 shows the code used to create a custom tracking record. While the service runs, the tracking record can emit the custom tracking information for the OrderID and the time the order was picked up within the warehouse.
Listing 13-1. Activity to Build a Custom Tracking Record
using System;
using System.Activities;
using System.Collections.Generic;
using System.Linq;
using System.Text;
using System.Threading.Tasks;
using System.Threading;
using System.Activities.Tracking;

namespace Workflow.JeepParts
{
    public class TrackOrderPickup : CodeActivity
    {
        protected override void Execute(CodeActivityContext context)
        {
            var record = new CustomTrackingRecord("WorkingLevel")
            {
                Data =
                                {
                                    {"OrderId", context.WorkflowInstanceId},
                                    {"DateTimePickedUp", DateTime.Now}
                                }
            };

            context.Track(record);
        }
    }
}
One cool feature of using a WCF Workflow Service Application is that the project can be run within Visual Studio. Pressing F5 starts the WCF workflow project and automatically hosts the Workflow as a service within the WCF Test Client (see Figure 13-30).
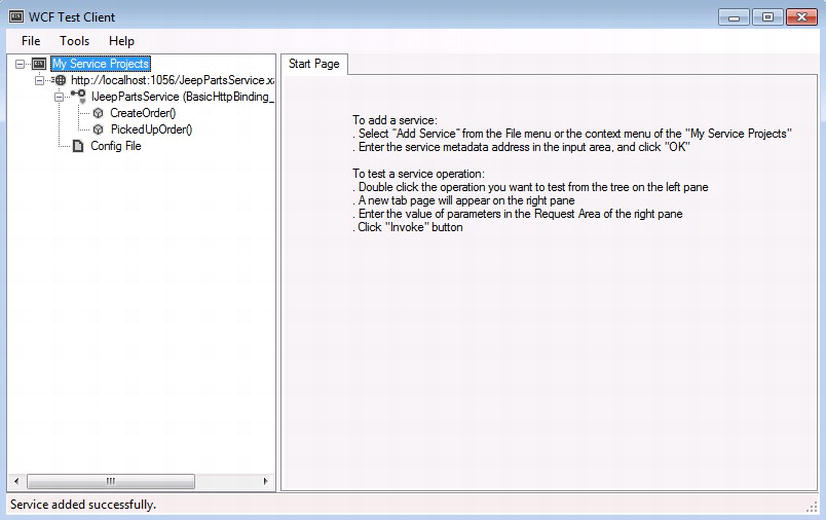
Figure 13-30. Hosting WF services within the WCF Test Client
While hosting the service within the WCF Test Client, an actual test client can be created to see how the workflow service responds to calls issued by a client. Once the service has been tested and is ready to be deployed, the next step is creating the deployment package that AppFabric requires for importing new application services.
Visual Studio makes it extremely simple to deploy workflow services to AppFabric using MSDeploy. A project can be deployed by first building a deployment package by right-clicking on the project and selecting “Build Deployment Package.” After the deployment package has been created, “Publish succeeded” is indicated within the bottom left corner of Visual Studio 2012.
Importing the service is just as simple: right-click on the location for where the service should be deployed, select Deploy, and then Import Application. In this case it will be deployed within the default web site (see Figure 13-31).
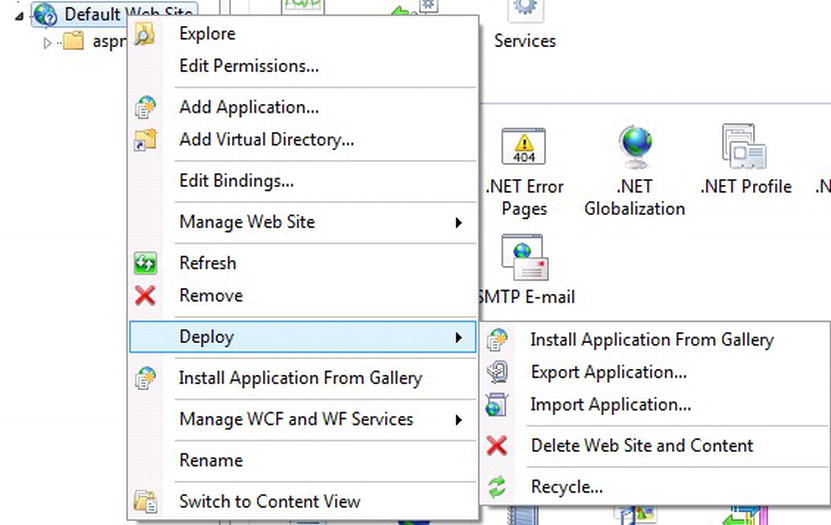
Figure 13-31. Import Application package
AppFabric will then walk through a wizard by first requesting where the package is located. After supplying the package location, AppFabric checks the contents of the package and provides a last change for what will be installed. Any file can be prevented from being installed by unchecking it (see Figure 13-32).
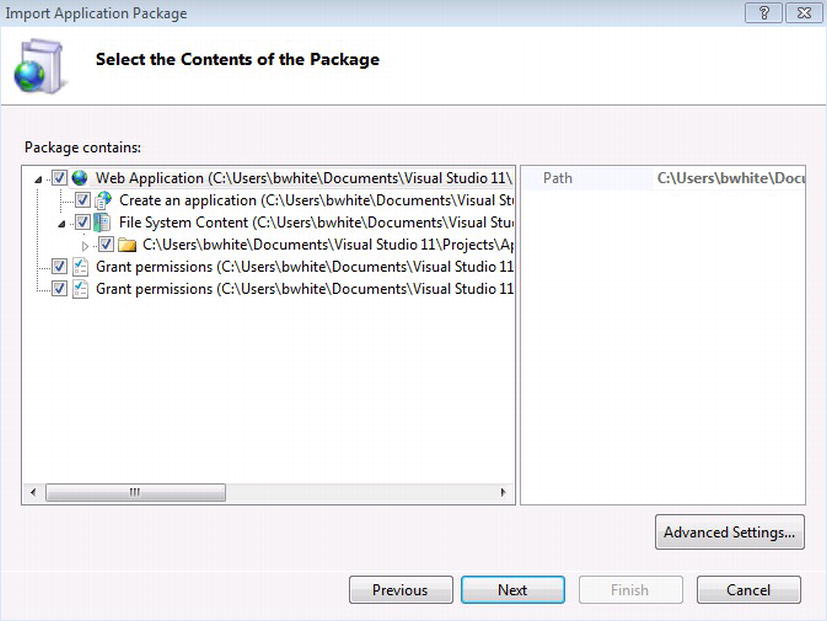
Figure 13-32. Selecting contents of the package to install
The next step of the wizard is the Enter Application Package Information screen, which asks for the application name that will be used to reference the service (see Figure 13-33).

Figure 13-33. Enter application name for the service
The last step indicates that the service has been installed and reports the progress that was made to install the service. There is also a Detail tab in case any of the steps need to be reviewed. The Workflow.JeepParts service is now installed and can be referenced using a service client. A client application can simply reference the service within Visual Studio, which will provide a proxy class to communicate with the hosted service. Figure 13-34 illustrates how to reference the service deployed to AppFabric and the two calls that are supported within the service contract the service implements.
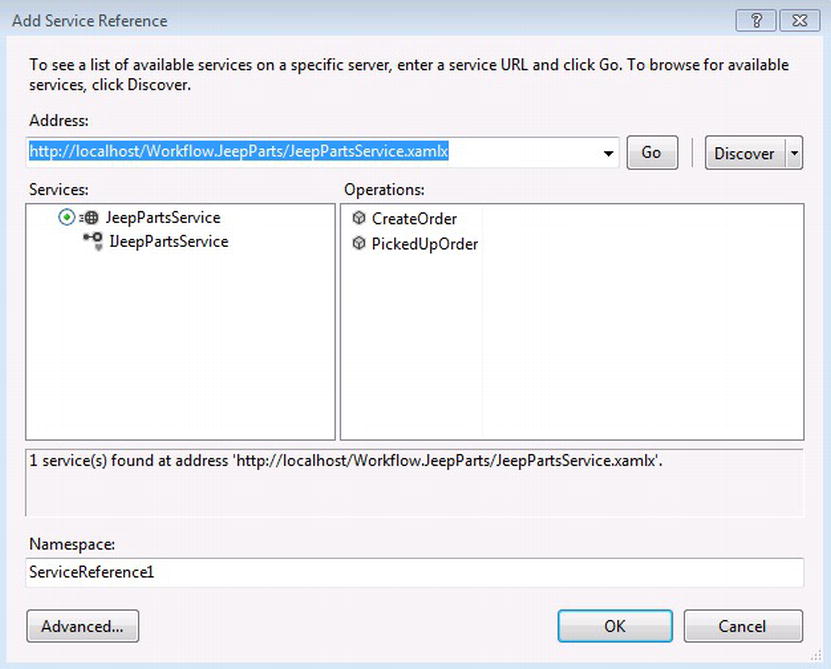
Figure 13-34. Referencing a hosted service within a client application
AppFabric’s dashboard is hosted within the IIS Manager and provides a standard view for managing and viewing information on the health for WCF and WF services that are hosted within AppFabric. All of the data is real-time, based on persistence and monitoring data stores. Individual workflow service instances can be drilled down into for more information and provide an intuitive process for diagnosing and understanding how a service instance is executing. After installing AppFabric, the first thing to notice is the Application and Service count located in the top right corner. Applications includes web sites and the default count is 1 since there is one site, which is the default web site. There are no services currently being hosted so the service count is 0.
Moving down a little further, there are two dropdown boxes, one for View and one for Time Period. The View can be toggled between the following two options:
- Local: Metric values originating from the local computer.
- All: Data for a selected scope, based on any computer that processed the service invocation.
The Time Period displays values for the time based on the selected time period value. The dashboard provides two types of metrics:
- Summary Metrics: Contained within the shaded part of the section, these metrics represent the summary information for data located directly below.
- Expanded Area Metrics (EAM): Located directly below the shaded area, these metrics tie to the summary metrics and represent the detailed data for the summary metrics. There are also pages that show the detail view for clicked on metrics:
- Individual Metrics Enumeration Pages: Provide detail information for solving critical issues. The pages are navigated to by clicking on any of the links within the summary metrics section.
The AppFabric Dashboard is divided into three summary metric sections, as shown in Figure 13-35.
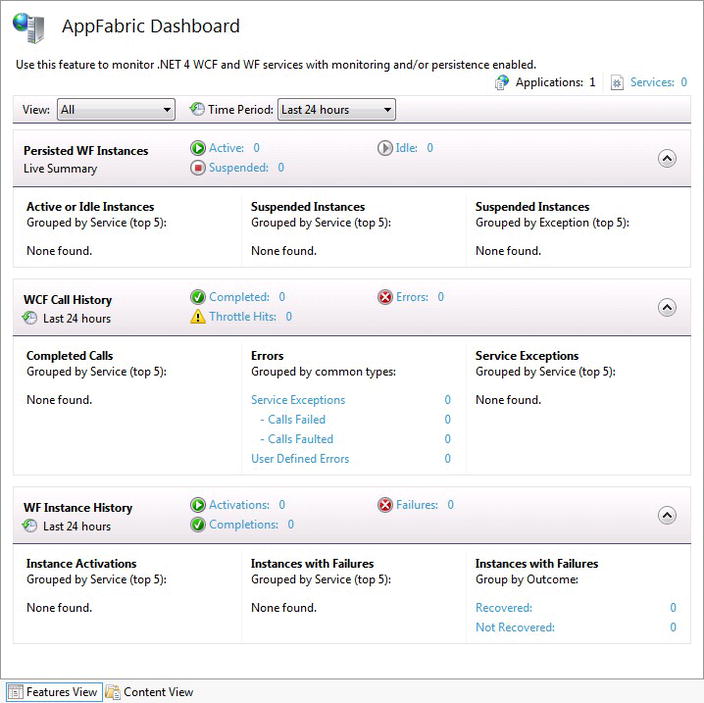
Figure 13-35. AppFabric Dashboard
- Active: Shows a count of WF instances that have a state of Active within a selected time frame.
- Idle: Shows a count of WF instances that have a state of Idle within a selected time frame.
- Suspended: Shows a count of WF instances that have a state of Suspended. This is an important metric because WF instances that are suspended could have been caused by errors within a certain service or application within a selected time frame.
- Completed: Number of service calls that completed within a selected time frame.
- Throttle Hits: Number of throttle hits for counters like MaxConcurrentCalls, MaxConcurrentInstances, etc. within a selected time frame.
- Errors: Number of errors for service calls within a selected time frame.
- Activations: Number of instances that began but have or have not completed within a selected time frame.
- Failures: Number of instances that have had failures within a selected time frame. Some instance may be able to complete if they were persisted and resumed.
- Completions: Number of errors for service calls within a certain time frame.
The Action pane is located in the right side panel of the dashboard, and based on which screen within AppFabric is up, it dynamically changes menu items. For instance, while an application is selected within the left-handed Connections pane, the Actions pane resembles Figure 13-36. A couple of menu items that are worth mentioning are the following:
- Browse *:80 (http): Selecting this from the Actions menu allows the service to be viewed within an Internet browser, so information about a service can be gathered, including the URL that needs to be used within a client application.
- Advanced Settings: WF services require net.pipes to be used, so clicking on Advanced Settings from the Actions menu allows the Enabled Protocols property to be set.
- Import Application: Selecting this from the Actions menu allows service packages to be installed.
- Configure: Selecting this from the Actions menu allows configuration for functionality like persistence and monitoring that AppFabric will use as metrics within the dashboard.
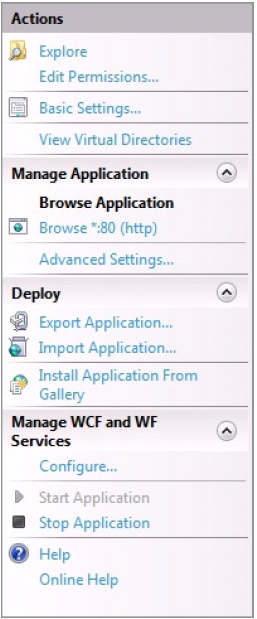
Figure 13-36. Actions menu
Service configuration is managed by either selecting the Configure menu item within the Actions pane, or by right-clicking on an installed service, selecting “Manage WCF and WF Services,” and then Configure.
Two important configurations that need to be set are Workflow Persistence and Monitoring. Usually while building workflow applications, this has to be custom built, but with AppFabric the infrastructure already exists but still needs to be configured. In the earlier exercise, you encountered a wizard that was used to configure workflow monitoring (Figure 13-17) and persistence (Figure 13-21). However, what really happened was that monitoring and persistence stores were created as well as the connections string for reading and inserting data into the database tables. After installing a service, the monitoring configuration can to be tailored to make sure the right information is retained about a services execution. Just as Chapter 9 demonstrated how to use different tracking profiles, the same functionality is provided out of the box within AppFabric, and it too can be changed using predefined tracking profiles. Logging can also be used as a supplement to having events tracked within the database where a log file receives of the events based on a predefined file path.
Persistence can also be configured, based on how the database was initially configured after installing AppFabric. Selecting the SQL Server Store verifies the connection string that will be used, and advanced configuration can be added that would normally configure persistence within a custom workflow application’s app or web configuration file, such as:
- Encode instance (GZip)
- Keep instances after completion
- Action on instance lock exception
- Host lock renewal period (in seconds)
- Runnable instances detection period (in seconds)
![]() Caution When adding net.pipes to the Enabled Protocols property from the Advance Settings menu on the Actions pane, it is important that the protocols are comma-separated and there are no spaces between them. For example, to add net.pipes to an already existing http it would be http,net.pipe.
Caution When adding net.pipes to the Enabled Protocols property from the Advance Settings menu on the Actions pane, it is important that the protocols are comma-separated and there are no spaces between them. For example, to add net.pipes to an already existing http it would be http,net.pipe.
Persisted WF Instances
The data store for persisting workflows can be configured for the entire server, sites, or applications hosted within the left-handed Connections pane. Figure 13-37 illustrates that an application has been deployed onto the server.
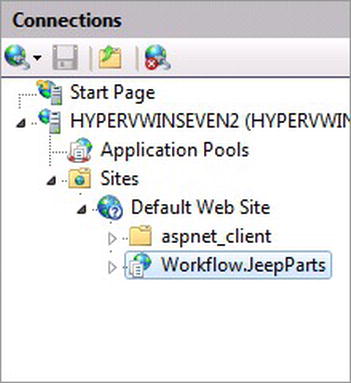
Figure 13-37. Connections pane
Instead of configuring persistence at the HYPERVWINSEVEN2 server or the default web site level, persistence has been set up at the Workflow.JeepParts service application level. Although the choice has to be made to share a persistence store at higher levels than the application service level, it is nice to have the flexibility to dedicate a persistence store per service if required. Sharing a persistence store might be a good option if there aren’t many service applications sharing the same persistence store.
Persistence is configured by either right-clicking on a service and selecting “Manage WCF and WF Services” or by using the Configure menu within the Actions pane. Once the Configure WCF and WF for Application screen appears, selecting Workflow Persistence allows you to change the configuration for persistence. Even though the persistence data store was configured and initialized, the services deployed onto the server still have to be configured to use the new persistence data store. Figure 13-38 illustrates selecting a SQL Server Store that was configured in the first exercise after installing AppFabric.
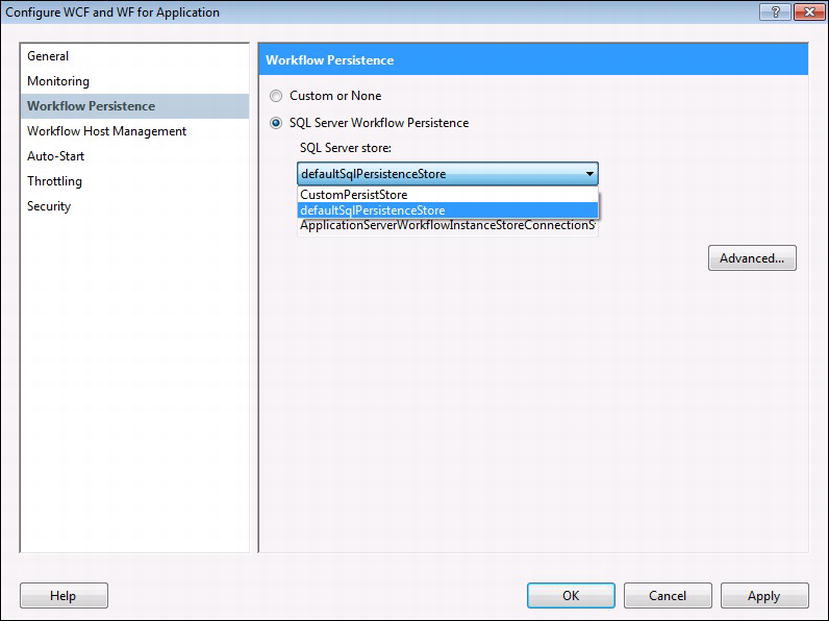
Figure 13-38. Selecting SQL Server Store
Figure 13-38 also shows another persistence store that was configured (although this was not done in the first exercise). Using the configuration tool for AppFabric only allows the configuration of one default persistence store. Within the first exercise you may recall checking the setting Register AppFabric persistence store in root web.config, illustrated within Figure 13-21. What this setting does is build the configuration for the persistence store within the web.config within the root directory for the .NET runtime. The file can be found at C:WindowsMicrosoft.NETFrameworkv4.0.30319Config.
Opening the file within Visual Studio 2012 and scrolling down towards the bottom of the file, Listing 13-2 represents the configuration for persistence, which includes both SQL Server stores that can be used for persisting workflow instances for the service. There is also the configuration for initializing the monitoring data store.
Listing 13-2. Initialized Instance and Monitoring Stores
 <instanceStores>
                  <add name="defaultSqlPersistenceStore" provider="SqlPersistenceStoreProvider" connectionStringName="ApplicationServerWorkflowInstanceStoreConnectionString" />
<add name="CustomPersistStore" provider="SqlPersistenceStoreProvider" connectionString="Data Source=HYPERVWINSEVEN2;Initial Catalog=AppFabPersist2;Integrated Security=True" />
 </instanceStores>

<connectionStrings>
        <add connectionString="Data Source=HYPERVWINSEVEN2;Initial Catalog=AppFabMonitor;Integrated Security=True" name="ApplicationServerMonitoringConnectionString" />
        <add connectionString="Data Source=HYPERVWINSEVEN2;Initial Catalog=AppFabPersist;Integrated Security=True" name="ApplicationServerWorkflowInstanceStoreConnectionString" />
    </connectionStrings>
Windows PowerShell is one of the components required when installing AppFabric because Windows PowerShell provides an alternative approach for automating configuration within AppFabric. Windows PowerShell allows commands to be run to manage functionality for a computer through its operating system and programs that run within the operating system like AppFabric. Creating a Windows PowerShell script that combines one or more Windows PowerShell cmdlets for adding configuration or functionality, the script can be used as a type of automation so configuration changes do not need to be manually performed.
Windows PowerShell can be found by clicking on the Windows orb and searching for “power.” The first program that is found is Windows PowerShell. Clicking on it opens the command prompt for running PowerShell commands. To initialize Windows PowerShell cmdlets that can be used for AppFabric, the import-model ApplicationServer command must be run, as illustrated in Figure 13-39.
![]()
Figure 13-39. Import command for ApplicationServer
One feature that is accomplished using a Windows PowerShell command is initializing additional persistence data stores so that WF services can choose from more than just the default persistence store, as indicated in Figure 13-38. To add another persistence store, the Windows PowerShell command Add-ASAppSqlInstanceStore must be used (see Figure 13-40).
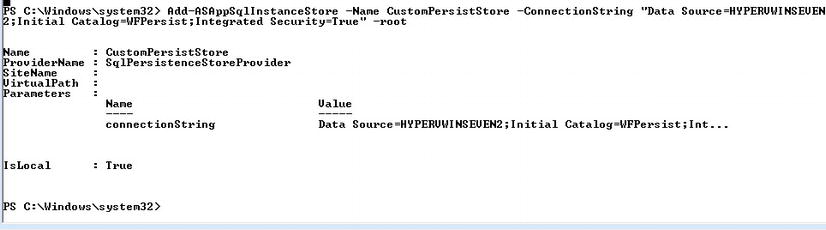
Figure 13-40. Initializing a persistence store with PowerShell
The changes reflected by the Add-ASAppSqlInstanceStore command are immediately reflected within the root web.config configuration illustrated in Listing 13-2. Changes to the new configuration for the new persistence store can also be done by running Set-ASAppSqlInstanceStore,as illustrated in Figure 13-41 to change the ConnectionString property.
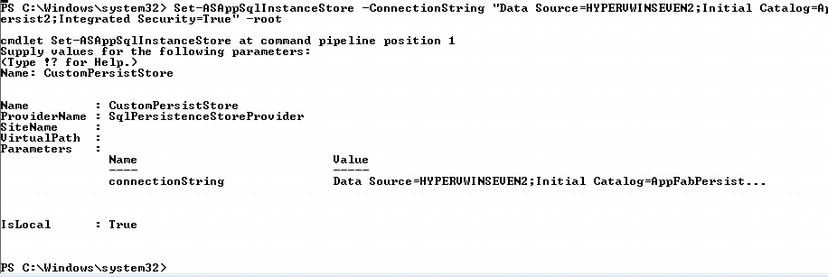
Figure 13-41. Updating an initialized persistence data store
![]() Note WCF services do not use persistence—only the services built using WF. Because workflow services persist, they are known as “stateful services” compared to a WCF service, which simply makes accepts a call and completes. WCF and WF do share the capability for tracking events.
Note WCF services do not use persistence—only the services built using WF. Because workflow services persist, they are known as “stateful services” compared to a WCF service, which simply makes accepts a call and completes. WCF and WF do share the capability for tracking events.
Monitoring can also be configured at a server, site, or site application level, just like persistence. Once monitoring as an initialized instance data store, a service can be configured to use an initialized monitoring instance data store (see Figure 13-42).
Figure 13-42. Configuring WF event monitoring
Figure 13-42 illustrates a couple of features and settings that can be applied to monitor WF events. The first feature that can be turned on or off is writing events to a database. If the checkbox is not checked, then events will not be stored within the monitoring database that was initialized earlier. The Connection string property refers to the connection string that was configured after AppFabric was installed. There are two other connection strings, LocalSqlServer and ApplicationServerWorkflowInstanceStoreConnectionString, that might be selectable; however, make sure that ApplicationServerMonitoringConnectionString is selected, as illustrated in Figure 13-42.
A monitoring level can also be selected based on how much monitoring information needs to be applied to monitor a service. There are five different levels of monitoring, including a level for turning monitoring off. Other than turning monitoring off, the following monitoring levels can from the minimal amount of monitoring available out of the box to the most that can be tracked within AppFabric.
- Errors Only: This setting only reports on errors and critical warning events.
- Health Monitoring: This setting is the default setting for monitoring and should be used for populating metrics within the AppFabric Dashboard. Error events are inherited from the Errors Only profile.
- End-to-End Monitoring: This setting subscribes to the flow of events within workflows and between other WCF services. Health monitoring events are inherited from the Health Monitoring profile.
- Troubleshooting: This setting is required for subscribing to events that can assist with application-level diagnostics. This setting should not be left running within production applications because it can affect performance of the application. End-to-end monitoring events are inherited within this setting as well.
Each of these profiles is just a predefined tracking profile (covered in Chapter 9). The profiles reside within the root web.config located at C:WindowsMicrosoft.NETFrameworkv4.0.30319Config. Listing 13-3 shows the each of the tracking profiles that are stored within the root web.config.
Listing 13-3. AppFabric Monitoring Profile Settings
<tracking>
   <profiles>
       <trackingProfile name="ErrorsOnly Tracking Profile">
            <workflow activityDefinitionId="*">
                <workflowInstanceQueries>
                     <workflowInstanceQuery>
                          <states>
                                <state name="UnhandledException" />
                                <state name="Aborted" />
                        </states>
                </workflowInstanceQuery>
        </workflowInstanceQueries>
        <faultPropagationQueries>
                <faultPropagationQuery faultSourceActivityName="*" faultHandlerActivityName="*" />
        </faultPropagationQueries>
 </workflow>
 	</trackingProfile>
 	<trackingProfile name="HealthMonitoring Tracking Profile">
                <workflow activityDefinitionId="*">
                        <workflowInstanceQueries>
                                <workflowInstanceQuery>
                                        <states>
                                                <state name="Started" />
                                                <state name="Completed" />
                                                <state name="Terminated" />
                                                <state name="Canceled" />
                                                <state name="Unsuspended" />
                                                <state name="Persisted" />
                                                <state name="Aborted" />
                                                <state name="UnhandledException" />
                                       </states>
                                </workflowInstanceQuery>
                        </workflowInstanceQueries>
                        <activityStateQueries>
                                <activityStateQuery activityName="*">
                                   <states>
                                           <state name="Closed" />
                                  </states>
                          </activityStateQuery>
                  </activityStateQueries>
                  <faultPropagationQueries>
                          <faultPropagationQuery faultSourceActivityName="*" faultHandlerActivityName="*" />
                  </faultPropagationQueries>
                  <customTrackingQueries>
                  <customTrackingQuery name="*" activityName="*" />
                  </customTrackingQueries>
          </workflow>
  </trackingProfile>
  <trackingProfile name="EndToEndMonitoring Tracking Profile">
          <workflow activityDefinitionId="*">
                  <workflowInstanceQueries>
                          <workflowInstanceQuery>
                                   <states>
                                           <state name="*" />
                                  </states>
                          </workflowInstanceQuery>
                     </workflowInstanceQueries>
                     <activityStateQueries>
                             <activityStateQuery activityName="*">
                                     <states>
                                             <state name="Executing" />
                                             <state name="Closed" />
                                    </states>
                             </activityStateQuery>
                     </activityStateQueries>
                     <faultPropagationQueries>
                             <faultPropagationQuery faultSourceActivityName="*" faultHandlerActivityName="*" />
                     </faultPropagationQueries>
                     <customTrackingQueries>
                             <customTrackingQuery name="*" activityName="*" />
                     </customTrackingQueries>
             </workflow>
     </trackingProfile>
     <trackingProfile name="Troubleshooting Tracking Profile" implementationVisibility="All">
             <workflow activityDefinitionId="*">
                     <workflowInstanceQueries>
                             <workflowInstanceQuery>
                                      <states>
                                              <state name="*" />
                                     </states>
                          </workflowInstanceQuery>
                    </workflowInstanceQueries>
                    <activityStateQueries>
                            <activityStateQuery activityName="*">
                                    <states>
                                            <state name="*" />
                                   </states>
                     </activityStateQuery>
                </activityStateQueries>
                <activityScheduledQueries>
                        <activityScheduledQuery activityName="*" childActivityName="*" />
                </activityScheduledQueries>
                <cancelRequestedQueries>
                       <cancelRequestedQuery activityName="*" childActivityName="*" />
                </cancelRequestedQueries>
                <faultPropagationQueries>
                        <faultPropagationQuery faultSourceActivityName="*" faultHandlerActivityName="*" />
                </faultPropagationQueries>
                <bookmarkResumptionQueries>
                        <bookmarkResumptionQuery name="*" />
                </bookmarkResumptionQueries>
                <customTrackingQueries>
                        <customTrackingQuery name="*" activityName="*" />
                </customTrackingQueries>
        </workflow>
</trackingProfile>
</profiles>
 	</tracking>
Diagnostic Tracing and Message Logging
Diagnostic tracing and message logging can also be configured for monitoring. It is disabled by default; however, it can be enabled by clicking the Configure button. Enabling tracing and logging can cause the services it is enabled for to take a performance hit, and it is a great tool for sending information about how a service is performing to a predetermined file. After clicking the Configure button, Figure 13-43 illustrates how WCF and WF tracing can be configured for a level of tracing. The Browse button predefines the file path and name that will be used to trace events. Message logging allows different parts of a WCF message to be logged, along with a predefined file path and name.
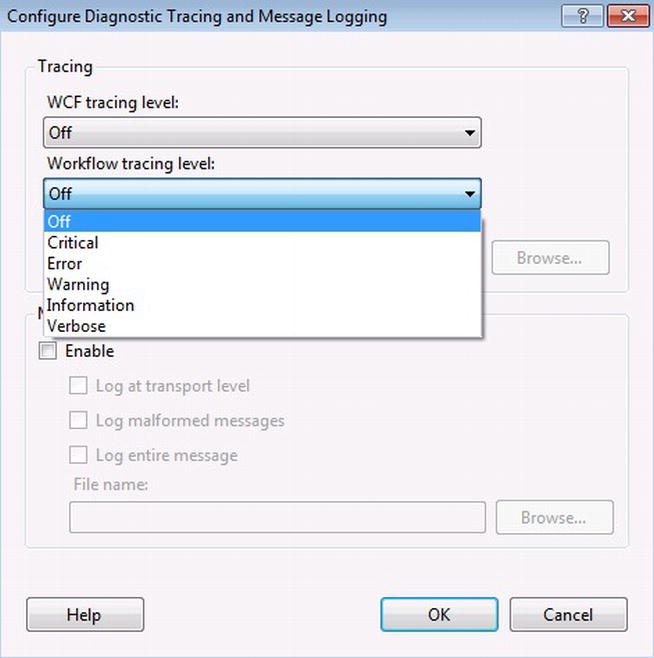
Figure 13-43. Configuring tracing and message logging
PowerShell can be used to initialize a monitoring data store instead of using the configuration wizard, which can be run after installing AppFabric. After running the PowerShell command import-module ApplicationServer, the initialize-ASMonitoringSqlDatabase cmdlet can also set up the monitoring data store. Figure 13-44 shows that the command can be run without any parameters, yet PowerShell prompts for the Database, Server, and ConnectionString properties.
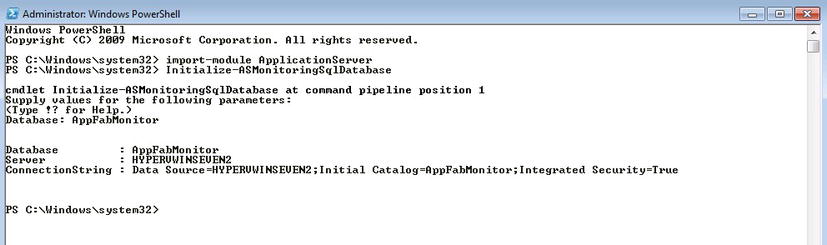
Figure 13-44. Initializing monitoring with Powershell
Troubleshooting Monitoring
Setting up monitoring within AppFabric can be complicated. The exercise in this chapter simply configured and created a monitoring store that can be used within AppFabric. However, configuring the monitoring store to be used for tracking a service can become difficult; and it can also be hard to debug why events are not being tracked for workflow instances if the whole monitoring process is not fully understood.
Figure 13-45 is an overall illustration of how AppFabric monitoring works. A WF tracking provider emits tracking records and, based on the tracking profile that is used, the ETW Tracking Participant sends the subscribed tracking events to the ETW so the tracking events and data within a workflow instance can be logged. Remember that the ETW Tracking Participant comes out of the box with WF. AppFabric then logs the tracked events within the database that was either initialized after installing AppFabric for monitoring or a database that is initialized afterwards using Windows PowerShell.
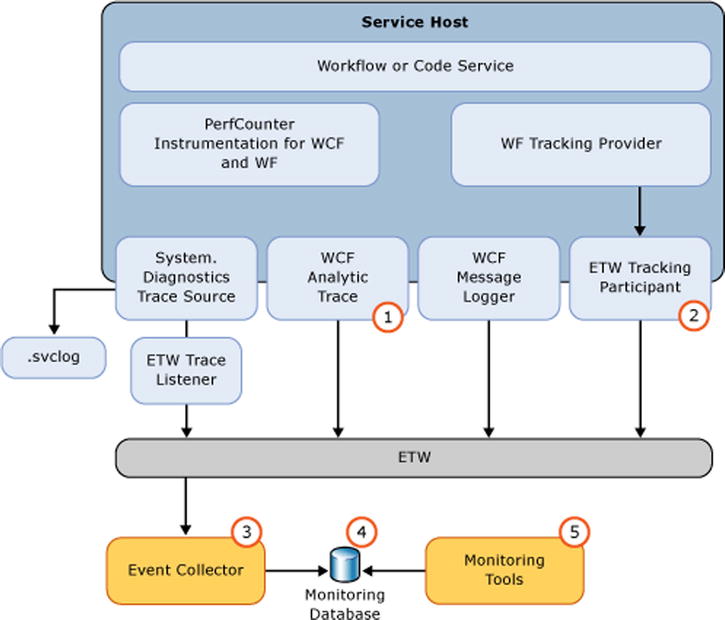
Figure 13-45. Overall monitoring architecture for monitoring
Complications for monitoring WF instances are noticeable when reading the AppFabric Dashboard and realizing that there are no metrics being tallied for workflow instances being tracked, so let’s dig a little deeper into how AppFabric performs monitoring. Figure 13-46 illustrates that Event Collection Service collects events from the ETW and writes the data to a staging table within the monitoring database that was initialized, but sometimes the data does not get there because of permission issues. If there are no issues, a SQL Agent job grabs the events data and send it to the normalized monitoring database tables, so the provided database views then represent the data within the AppFabric Dashboard.
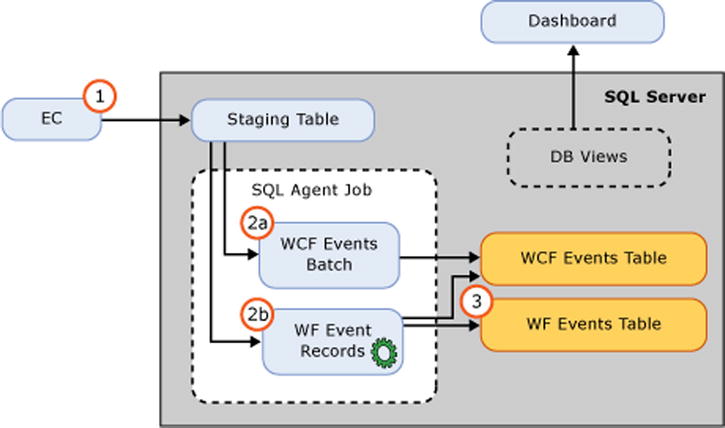
Figure 13-46. Looking closer at monitoring event collection
If monitoring metrics are not being loaded, the first thing to check is that the AppFabric Event Collection Service is running and that the SQL Server Agent service is also running. Clicking on the Windows orb and searching for “Services” will bring up Component Services. Clicking on Component Services and then Services (Local) will provide a list of services installed on the computer. Clicking on the service allows it to be started if it is not currently running. Figure 13-47 shows that the AppFabric Event Collection Service is running.
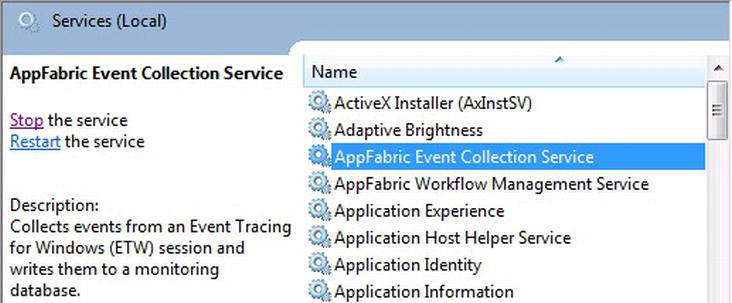
Figure 13-47. Verifies the AppFabric Event Collection Service is running
Figure 13-48 illustrates that the SQL Server Agent Service is running.
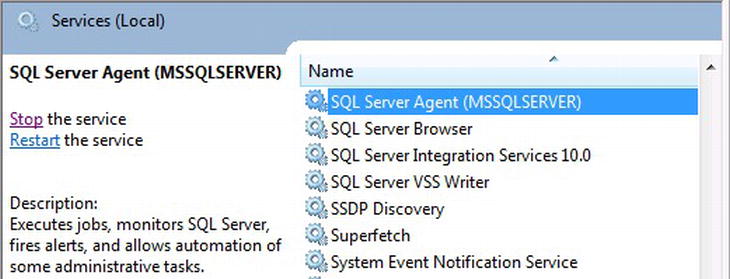
Figure 13-48. Verifies SQL Server Agent is running
Once it is clear that both the AppFabric Event Collection Service and the SQL Server Agent Service are running, the ETW needs to be checked to see if there are any issues for the AppFabric Event Collection Service. Service issues are logged within Event Viewer ![]() Applications and Services Logs
Applications and Services Logs ![]() Microsoft
Microsoft ![]() Windows
Windows ![]() Application Server-System Services
Application Server-System Services ![]() Admin. If there are any issues with services, they are logged here. Figure 13-49 shows a couple of issues; looking under the General tab while selecting an Error gives a description for the problem with a service.
Admin. If there are any issues with services, they are logged here. Figure 13-49 shows a couple of issues; looking under the General tab while selecting an Error gives a description for the problem with a service.
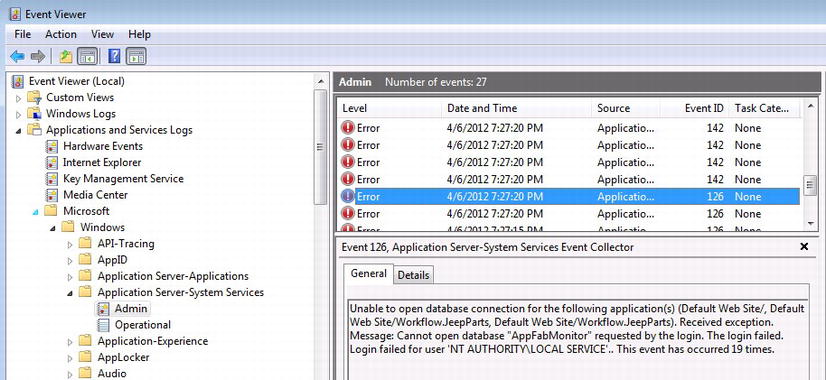
Figure 13-49. Errors for the Event Collection Service
The errors in Figure 13-49 illustrate that there is a security issue for the login NT AUTHORITYLOCAL SERVICE and the monitoring database AppFabMonitor that was initialized. This account is selected by default when the wizard is used to set up the monitoring data store. To make sure this is the problem, open the configuration program that can be found within All Programs and AppFabric for Windows Server. Figure 13-50 illustrates how the AppFabric Event Collection service account can be changed by selecting an account with permission to log in to the monitoring database.
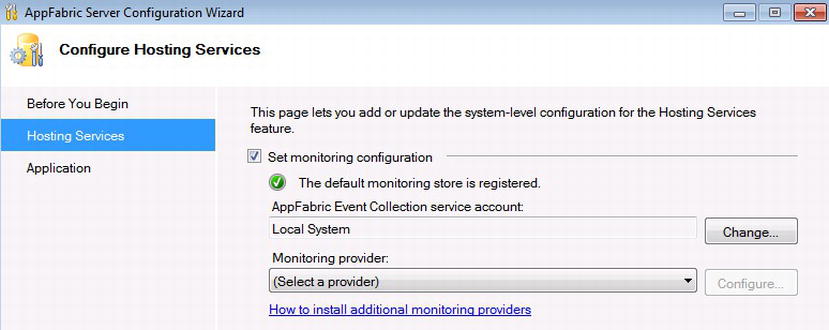
Figure 13-50. Changing the Event Collection service account
Checking the AppFabric Dashboard will determine if changing the service account fixed the issue of displaying monitoring metrics. If this did not fix the issues, and metrics are still not being displayed within the dashboard, the next step is to check the SQL Server Agent jobs that were set up during the install. Open Microsoft SQL Server Management Studio and connect to the local computer. Expand the SQL Server Agent section within the Object Explorer. Figure 13-51 illustrates the four SQL Server agent jobs that were installed with AppFabric.
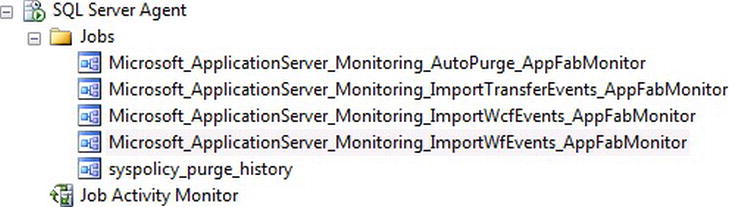
Figure 13-51. SQL Server Agent jobs for monitoring
Right-clicking on any of the jobs and selecting View History will show the job’s execution history. Figure 13-52 illustrates that there are issues where the SQL Server agent job cannot obtain information about a certain user that the job is running under. Issues like this can be fixed by removing the initialized database by running the PowerShell cmdlet Remove-ASMonitoringSqlDatabase, providing the Database and Server parameters for the monitoring database that was created using AppFabric Configuration, then running the Initialize-ASMonitoringSqlDatabase cmdlet illustrated in Figure 13-44. Running the PowerShell cmdlet as a local user sets the permissions for the SQL job’s execution.
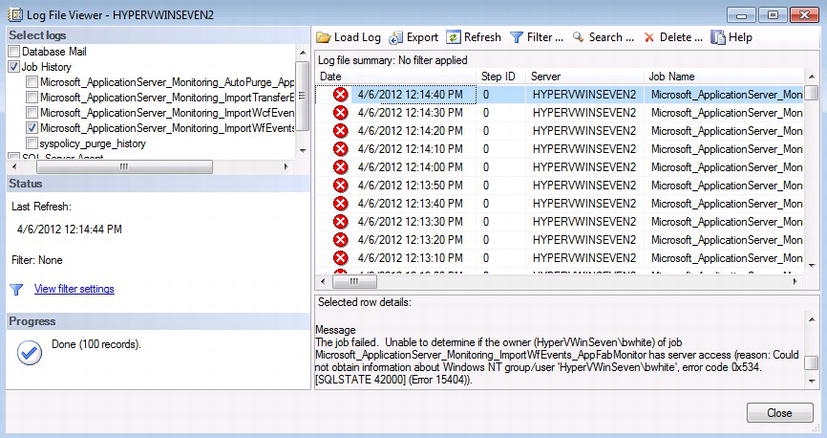
Figure 13-52. Log File Viewer for SQL Server job
After recreating the monitoring store and revisiting the SQL job’s log file, the jobs should start logging successful events (see Figure 13-53).
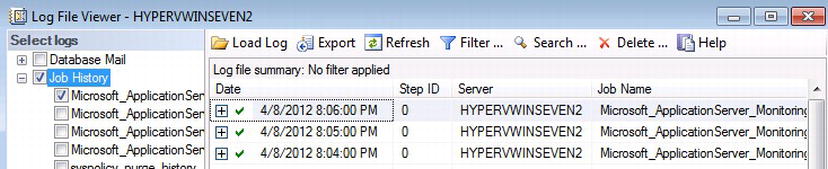
Figure 13-53. Successful SQL job execution
MSDN provides a checklist to follow for troubleshooting monitoring within AppFabric at http://msdn.microsoft.com/en-us/library/ee677384.aspx. It might be worth visiting the MSDN page if any other issues occur.
Now that persistence and monitoring have been set up successfully, the AppFabric Dashboard should be showing metrics not only for persisted workflow instances, but also tracking events based on the tracking profile that was selected. By default, Health Monitoring is selected so services that are hosted within AppFabric that are called by client applications should reflect metrics about service activity.
Figure 13-54 shows that there is one service deployed within the default web site called Workflow.JeepParts. The dashboard shows that there is some tracking information that already exists. One WCF service call has been made to the Workflow.JeepParts service indicated by the Completed metric within the WCF Call History section of the dashboard. There is a workflow instance that has been activated based on the Activation metric and it has been persisted, as indicated by the Idle metric. All of this information is based on the Workflow.JeepParts service13.
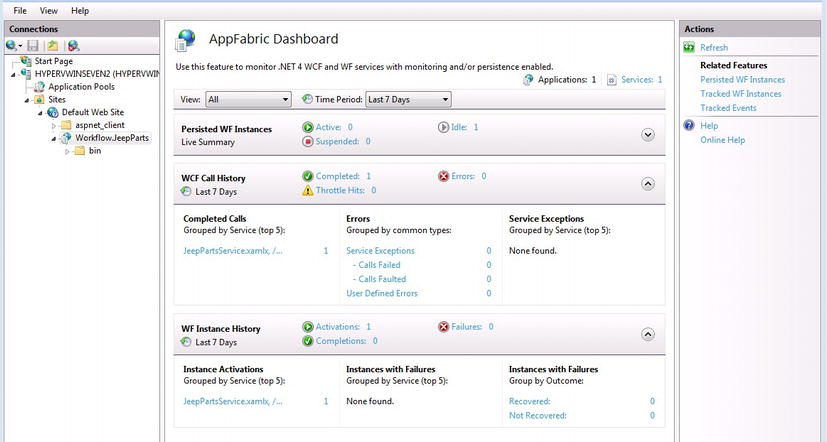
Figure 13-54. Observing monitoring metrics within the dashboard
Using the Refresh link located at the top right of the dashboard, new information about the workflow instance indicates that it is no longer persisted and that it has completed successfully because the Completions metric within the WF Instance History section now shows 1 (see Figure 13-55).
Clicking on metrics within the WCF Call History does not show as much monitoring information since there is not as much to a plain WCF service compared to a WF service since the service uses a workflow and more information needs to be tracked to add transparency for managing the workflow service.

Figure 13-55. Refreshing the dashboard
Clicking on either the Activation or Completion metric drills into the service by opening the Tracked WF Instances screen. There is a search feature at the top of the screen that can be used for filtering tracked instances. Clicking the Completion metric automatically puts the filter criteria in for filtering Statuses that have the value Completed. Clicking the tracked instance adds additional menu choices within the left Actions pane (see Figure 13-56). Clicking “View Tracked Events” opens the Tracked Events screen, which has all of the tracked events logged for the workflow instance.
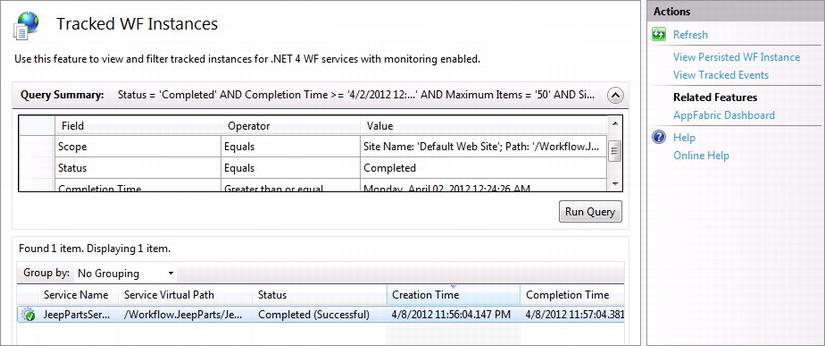
Figure 13-56. Filtering tracked WF instances
All of the events that have been subscribed to from the default Health Monitoring tracking profile are logged within the Tracked Events screen. Figure 13-57 shows the list of tracked events for the workflow instance service.
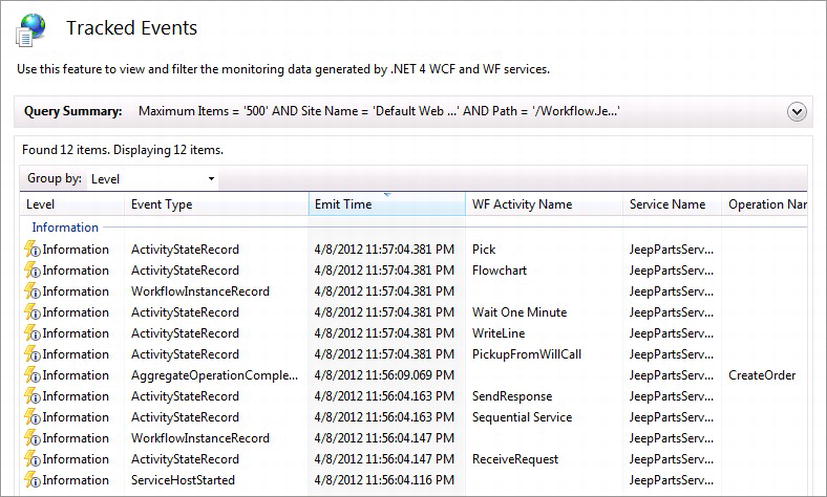
Figure 13-57. Tracked Events
![]() Caution While testing services within AppFabric and gathering metrics within the dashboard, depending on the latest activity, you may not see the metrics displayed that were displayed earlier. Increasing the time period using the drop-down will increase visibility for past metrics. If the time period was set for 24hrs, that time may have passed; setting the time period to Last 7 Days will find the older metrics.
Caution While testing services within AppFabric and gathering metrics within the dashboard, depending on the latest activity, you may not see the metrics displayed that were displayed earlier. Increasing the time period using the drop-down will increase visibility for past metrics. If the time period was set for 24hrs, that time may have passed; setting the time period to Last 7 Days will find the older metrics.
Purging Tracked Events
Monitoring data can be purged for a monitoring data store using PowerShell. In fact, tracking data can be archived within another data store using PowerShell as well; this way data can be retained for historical reporting and the AppFabric Dashboard can be cleared out (see Figure 13-58).
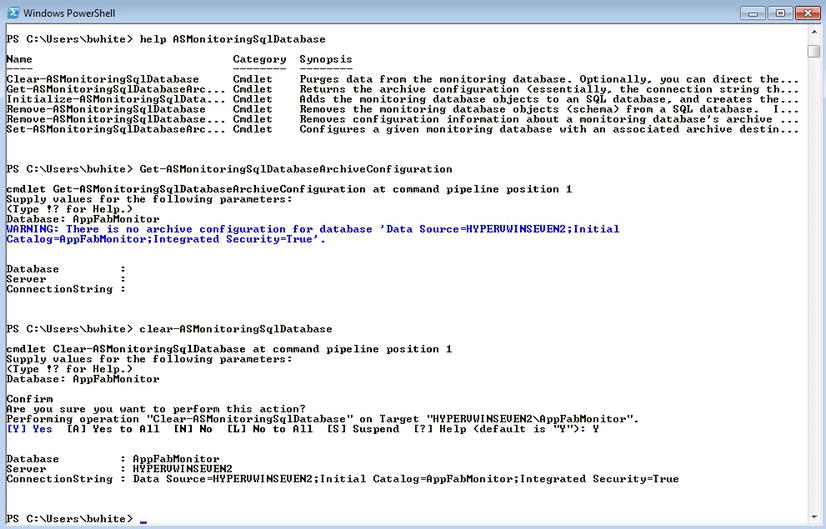
Figure 13-58. PowerShell commands for managing the monitoring data store
Workflow management can be configured within custom applications using either an app or web configuration file. The same configuration can be managed within AppFabric (see Figure 13-59). The options are as follows:
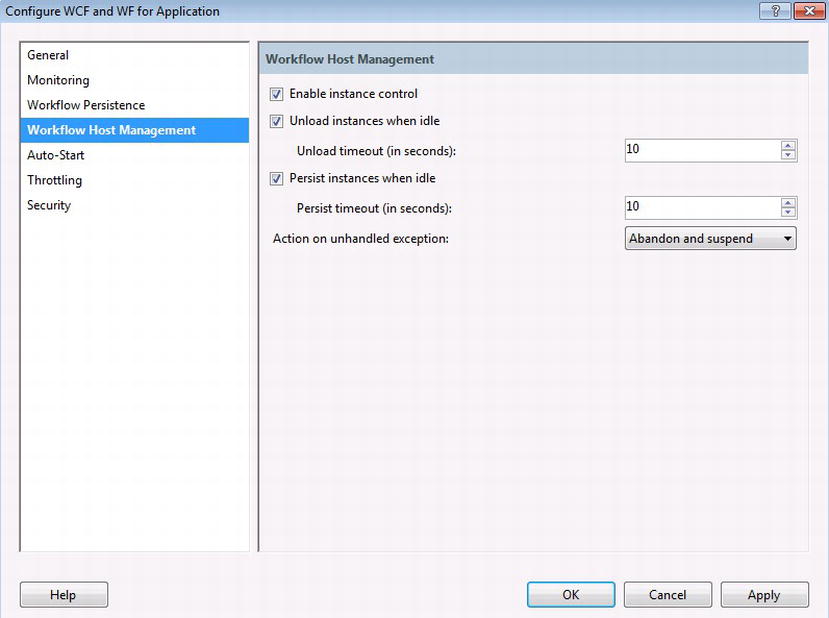
Figure 13-59. Workflow Host Management
- Enable instance control: Enables commands that can be signaled to workflow instances from within AppFabric like cancel, suspend, and resume.
- Unload instance when idle: Indicates if workflow instances should be unloaded after they become idle. Number of seconds can be entered through the list box for how long after an idle a workflow instance should be unloaded.
- Persist instance when idle: Indicates if workflow instances should be persisted after they become idle. Number of seconds can be entered through the list box for how long after an idle a workflow instance should be persisted after being idle.
- Action on unhandled exception: Indicates the type of action that should be performed for unhandled exceptions. The choices are as follows:
- Abandon
- Abandon and suspend
- Cancel
- Terminate
The auto-start feature for AppFabric is built on top of IIS 7.5 and provides better performance by improving host responsiveness. By setting services to auto-start, services are initialized within applications to start before a client initiates the first call to a hosted service. Setting the auto-start for all services within an application can be done in three different ways:
- PowerShell cmdlet: Using the AppFabric Windows PowerShell console and using the Set-ASApplication command with the –AutoStartMode parameter and setting it to either All for all services within the application or Custom for specific services within the application.
- IIS Manager: Clicking on an application within Manager for starting all services within the application.
- Configured: Certain services can be configured to auto-start using the web.config.
Another scenario for setting services to auto-start is for unforeseen conditions like a server that has been restarted. As the server restarts, services that are configured to auto-start are automatically started when a server reboots (see Figure 13-60).
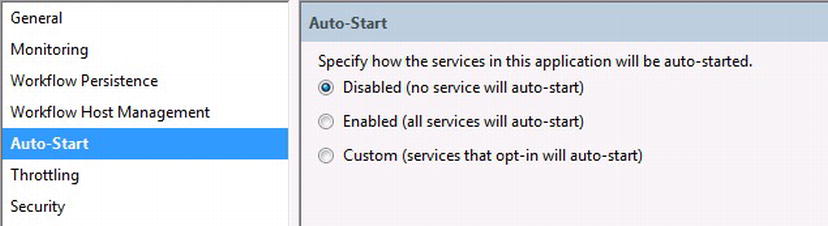
Figure 13-60. Configuring auto-start
Summary
This chapter focused on hosting workflow services using MicrosoftWindows Server AppFabric instead of building a custom solution to host and manage workflows. Before AppFabric, there was no good solution for hosting and managing workflows as services. It can be used for providing a robust solution for hosting workflows on-premise or within a proprietary data center. AppFabric also extends IIS 7.0 and Windows Processing Activation Service (WAS) and provides an easier way to deploy workflows as services through MSDeploy. AppFabric provides a first class experience of providing non-technical team members the ability to configure workflow execution, manage persistence, and provide a level of monitoring required for workflow instance execution.
AppFabric is a great solution for running enterprise-class solutions that need to host WCF and workflow services because it offers single server deployment or server farm deployment that provides high availability for hosting reliable services that can be scaled across many servers within a server farm. Most of the functionality that is manually done to configure AppFabric can also be accomplished by running PowerShell commands.
I want to thank you for taking the time to read this book. A lot of time and effort went into writing it, as I wanted to make sure the latest material was included, based on the bits that Microsoft released around WF4.5. I hope you have enjoyed reading the information I have presented about WF4.5, and that it helps you with hurdles you may have come across or with future challenges when building workflows in WF4.5.