To an optimist, the glass is half full. To a pessimist, the glass is half empty. To a good tester, the glass is twice as big as it needs to be.
—Anonymous
Introduction
You cannot start writing tests without a deep understanding of how Xcode projects are built and how the testing layer integrates with it.
- 1.
The basic terms such as scheme, target, and project
- 2.
How to customize your testing flows using schemes and test bundles
- 3.
How to disable specific tests from running
- 4.
How to take advantage of Xcode 11 great feature – Test Plan – to take your testing flows to the next level
Basic Terms
To start testing your app, you need to understand some basic terms in Xcode and how your projects are built.
Let’s start with one of the core Xcode terms – Project.
An Xcode project is a repository for all the files, resources, and information required to build one or more software products. A project contains all the elements used to build your products and maintains the relationships between those elements. It contains one or more targets, which specify how to build products. A project defines default build settings for all the targets in the project (each target can also specify its own build settings, which override the project build settings).
—Apple Documentation
A project contains one or more definitions of products called “targets.”
Target – A target represents a product to build and contains all the instructions on how to build it, including what files to compile, the build settings, build phases, code signing, and capabilities. A target doesn’t have to be an “app.” It can also be a framework/library, an extension (such as Today Widget), and, in our case, unit/UI test bundles that test other targets.
So, we understand that a target can be the app itself, and it can be the unit test product that tests the app. But how can we tell Xcode what test targets to run when we either start our test, build for the app store, or are just debugging and on what configuration?
That’s what Schemes are for.
Schemes – Scheme connect targets with different scenarios (Build, Run, Test, Profile, Analyze, and Archive), and it also specifies what targets to run and on what configuration.
The best way to explain that is with Xcode, so let’s start a new app called “My Weather” App.
“My Weather” App

Xcode project template box
Not every platform can be tested using Xcode tools. We’ll discuss it later in this section.

New project setup box
As I mentioned earlier, not all platforms and templates include those options. For example, as of this writing, you cannot add tests at all to an Apple Watch app. If you create a framework or a library, you can only add unit tests and not UI tests. Since our new cutting-edge and award-winning “My Weather” app is an iOS app, we can add both unit and UI tests.

Test targets appear both in the target list and in the file hierarchy
There are “Groups ” in the project navigator that represent links to actual folders, and there are “Groups” that represent logical folders. In this case, the two groups that were created refer to two folders in the project root folder.
Add Test Targets to an Existing Project

Adding test target to an existing project

Choose options for new test target
Link Everything Together
At the beginning of the chapter, I mentioned the term “Schemes.” Schemes let you define all the build configurations and options for different types of scenarios. You can have multiple schemes that can help you configure different scenarios and states for your app. For example, you can have a scheme that works with your development environment or a scheme that runs performance tests with an optimized code.

Scheme’s popup menu in the toolbar

Scheme edit box
Build – Compile your app without running it.
Run – Build your app and run it either on a simulator or a device.
Test – Build your app and run the enabled tests defined in the scheme.
Profile – Run your app, and profile it with instruments.
Analyze – Build the app with insights about your code.
Archive – Build your app and create an IPA file from it to submit to the App Store.
In this chapter, I focus on the Test action. Tapping on the “Test” action displays four tabs: Info, Arguments, Options, and Diagnostics.
The Info Tab
Info – The Info tab contains general information about your test action in the scheme. The two most important settings here are the Build Configuration and the list of tests .
In Build Configuration, you can define if your tests run in Debug, Release, or your custom build configuration. There are cases where this is important – for example, sometimes you want to run a test against an optimized code for the App Store, or sometimes you want to run your tests with certain flags.
In the list of tests, you can see all the tests that are relevant for the executable product in the scheme. Remember, you can create as many tests as you want, but this is the place where you define what tests are executed when you test your app with this scheme.

Test options menu in scheme editor
The options menu is unknown for many developers, and the button may look unimportant, but it holds extremely valuable settings.
Parallel Testing
The first option is the ability to execute your tests in parallel. Up until Xcode 9, you could only run your tests on one simulator at a time. In Xcode 9, Apple gave the ability to run your tests in multiple simulators. Xcode launches several simulators and runs the full test bundle on each one of them. Although this option speeds up the execution of the tests in case you want to run them on different devices, it doesn’t speed up the test bundle itself.
Xcode 10 finally brings real parallel testing – it launches multiple test runners (Simulators), and each test runner receives a different test class from executing. The number of simulators is a derivative of the number of the available cores in the running machines.
Parallel testing consumes a lot of processing power. If you want to take advantage of this feature, it’s better to run it on a heavy machine as part of a continuous integration process.
In parallel testing, each simulator receives different test classes. Different test classes mean that you cannot create dependencies in your tests. For example, testB() cannot rely on the success of the testA() and should run independently. Independent tests are important, especially in UI tests, when sometimes tests are expected to start in a particular state that is the result of another test.
In case your tests are working against a server, running them in parallel can cause a bottleneck in network requests and as a result of that timeouts and test failures. In general, it’s not the best practice to rely on a network in your tests, but sometimes you cannot avoid them in a certain integration and edge-to-edge scenarios.
Randomize Execution Order
In my opinion, “Randomize Execution Order” is a more significant thing than running your tests in parallel. While the latter influences the duration of your test run, the “randomize execution order” option influences the way you write tests.
The hack the developer here tried to do is to make those tests run in a specific order. XCTest framework runs tests by the lexicographic order, and because 01 is bigger than 02, test01 runs before test02.
Running tests in a constant order can be convenient for some. It can help you start the test from the state the previous test ended and save you precious time when you want to test user flows. But this feature comes with a price – running tests in a constant order creates dependencies between your tests, and this makes your test suite much more fragile. Every small change can make one of the tests fail and, as a result of that, make the rest of the other tests to fail.
Tests supposed to run in isolation and not be dependent on an external or previous state of another test. The only way to ensure your tests are stable is to turn on the “Randomize Execution Order.” Randomizing the test order forces you to write independent tests. It’s better to rely on dependency injection and make your code more testable.
Location and Application Data
One of the most challenging tasks in integration and UI Tests is to simulate different conditions such as device location and application state. If we could use dependency injection in integration tests to somehow solve it, it’s much harder to do that in UI Tests. A widespread use case for that is to simulate a particular condition for a bug or an edge case hard to debug.
In the scheme editor under the “test” action, we have two more options: Location and Application Data. Let’s go over them.
Location
The Location option lets you simulate a specific geo-location for your test bundle or even a movement. Without the location feature, it is tough to simulate location changes or movement tracking.
The location popup menu in the editor scheme has a list of predefined locations like London, Moscow, New York, and more.

Creating GPX file template

Selecting the new custom location from the locations list
Application Data
One of the neat features Xcode has is the ability to load the app in a specific app state, including persistent data, user defaults, and even cache. Loading the app with specific data is done using something called XCAppData file. XCAppData file is a files package that contains all the app data, including documents, Library, cache, and temporary file.

Download application data container from your connected iPhone

Expanded app data package in the finder
As you can see in Figure 2-12, the package contains all the app data that your device stores, including documents, temporary files, states, and even app screenshots the system uses for app switching user experience.
If you want to use the app data package (.xcappdata file) in your Xcode settings, you need to add it to your project.
Create a new group in your project, let’s say “Tests Data,” and add the package to that folder. Make sure the xcappdata doesn’t belong to any target.
Files that you want to use in your scheme such as GPX files and data packages should not be added to any target, not even your test target. If a file belongs to a certain target, it will be bundled with the final product and not only will increase the application size, but it can also reveal security and sensitive privacy information.
The Arguments Tab

The Arguments tab in scheme editor
The Arguments tab lets you control the runtime of your app by setting arguments and variables that applied to the app only in this scheme.
Launch Arguments
Let’s say we want to add an “In-App Purchase” capability to our “My Weather” app, and we want to run integration and UI tests when the user is already registered to our premium subscription.
Returning “true” might work fine when you do your checks during development, but running tests like that may not be the right solution.
Fortunately, we can change values in runtime easily using the “Arguments Passed on Launch ” list.
Arguments are a list of values passed to the app on launch and can be read in the code easily.
Your app can use arguments to run with specific flags without recompiling or using different targets. Arguments can be handy in testing because there are times when you want to mock different layers in your app, such as network, database, and more.

List of added arguments
If you don’t want an argument to pass on launch, you don’t need to delete it from the list; uncheck the checkbox near its name.
There are two similar ways to read the list of arguments in your code, CommandLine and ProcessInfo .
To clarify the differences between the two, CommandLine is part of Swift, and its primary goal is to read the command-line arguments, and, in this case, Arguments passed on launch.
ProcessInfo is part of foundation, and it contains information about the current process, including variables, host name, and also, just like CommandLine, the list of arguments.
For the goal of reading the arguments, you can use both of them.
Environment Variables
Just like many other development environments, iOS also has something similar called “Environment Variables.” An environment variable is a collection of key–value which let you configure your app not just with a list of argument but also with values.

Adding new environment variable to a scheme
Adding Environment Variables is also a great way to configure UI Tests by launching the app dynamically with different arguments each time. UI Tests will be covered later in this book.
The Options Tab

The options tab in the scheme editor

The Application Language settings
Application Language – One of the biggest challenges of mobile development is localization – LTR vs. RTL and languages that contain long words and phrases. Not only can you set the device language using that option, but you can also simulate different text directions and even double the length of the texts to detect UI layout glitches.
Application Region – Different regions mean different date formats, different currencies, and different measuring systems. By choosing the application region, you can test your app as if the device is in another region.
Note While it’s a convenience to set different languages and regions to test functions, sometimes it can be not very easy when you want to run a unit test multiple times for different regions. Later in this book, I will cover how to do this without the need of scheme options but with excellent and testable architecture.
UI Testing – Unlike unit and integration tests, getting the reason why the UI test failed can be a little tricky. Screenshots and attachments are the best way to display the failure reason and the app state at that time. The UI Testing options let configure how your test treats attachments and screenshots.
Code Coverage – We discussed code coverage in Chapter 1. Without marking this option, Xcode won’t collect code coverage during your tests.
The Diagnostics Tab

Application Language and Application Region settings

The Diagnostics Tab in the Scheme Editor

Disable specific test from the scheme editor

Figure 2-21.

Scheme editor, “Convert to use Test Plans…” button

Converting a scheme to use test plans
Scheme converted to use test plans in its tests

Test Plan edit screen
Test Plan configuration

How Scheme, Test Plans, Tests, and configurations are linked together

Run only English configuration
Since those tools are not explicitly related to testing, I will go over them in short.
- Address Sanitizer – This tool, introduced in Xcode 7, can help you debug memory corruption issues with your app. Those issues don’t have to be just crashes – it can be general bugs as well. The combination of Address Sanitizer and Unit Tests can be beneficial under challenging bugs, but you should be aware of two downsides regarding this tool:
Address Sanitizer is much more relevant for C and Objective-C code rather than Swift.
Address Sanitizer comes with a cost – your app consumes 2x–3x more memory and 2x–5x more CPU power when enabled. While this may seem not a big issue when running tests, it can be an issue when running performance tests when you measure critical metrics such as CPU time and memory.
Thread Sanitizer – Thread Sanitizer is another LLVM-based tool that can help you detect data race between threads, which can cause unpredictable behavior. Just like Address Sanitizer, Thread Sanitizer doesn’t come without a cost – memory usage increases by 5x–10x, and CPU performance increases by 2x–20x. Also, you cannot run Thread Sanitizer on a device, only on simulators.
Main Thread Checker – One of the first rules every developer learns when he starts developing for iOS is never to run UI operations in the background but only on the main thread. Main Thread Checker stops your app at the point when it detects UI operation done on any background thread. This can be great in UI testing when you entirely run your app and feel safe all of your operations are on the right thread as they should.
Malloc Scribble – Helps you debug reference counting cycles by filling freed memory with predefined values and by that to get more accurate results in memory graph.
Malloc Guard Edges – Add guard pages before and after large allocations.
Guard Malloc – Helps you catch common memory problems such as buffer overruns and use-after-free.
Zombie Objects – One of the most popular tools Xcode has to offer. Zombie Objects are objects that were released (reference count 0) and replaced by a zombie object. Zombie Objects can help you track variables by keeping a copy of them in memory.
Exclude Test Classes
You might be wondering, “There’s a whole chapter describing the importance of tests. Why on earth we want to exclude some of them from our test bundles?”
Well, in big, old projects, there are situations where tests may fail or even are not compiled because of a massive structural change, and we wish to disable them from running temporarily.
Xcode lets you not only disable test bundles in your scheme settings but also disable specific test classes and even test functions.
There are three ways of doing that – from scheme editor, from the Test Navigator, and by renaming test functions.
Disable Tests from the Scheme Editor
If you want to disable a test in a specific scheme, unchecking it from the scheme editor is one way of doing that. Open the scheme editor, and under Test ➤ Info, expand the test bundle in the list of test bundles (see Figure 2-20).
Remember , the disabling test only disables it from the specific scheme, so make sure you are doing this operation on the desired scheme.
Also, you can disable the whole class by unchecking the checkbox near the class name or disable the whole test bundle by unchecking the checkbox near the test bundle name.
Disable Tests from the Test Navigator
Maybe the easiest way to disable a test is from the Test Navigator or the code editor.
From the Navigator pane, open the Test Navigator by selecting it or pressing ⌘-6.
Search the test you want to disable and right-click it (see Figure 2-21).
Select “Disable <name of the test>” from the popup menu. Disabling can be done for classes and test bundles as well. In case the test is already disabled, you can re-enable it again from the same menu.
This approach also works from the code editor – right-click the function of the class you want to disable and choose “Disable <name of the function>”.
Disable Tests by Renaming Them
In the preceding example, Xcode ignores the third function since we changed its prefix.
In general, renaming test functions is considered to be an anti-pattern, and you should follow the natural way of disabling the tests using the scheme editor or the Test Navigator. The renaming test function does have one advantage, though – you can set a different prefix for a different reason and then relocate them by searching their prefix. Renaming a function name is a convenient way when you’re doing a big refactor and want to disable tests by categories.
It would be best if you never left disabled tests forever. Having disabled tests should be a temporary situation only; it exists only to let our project compile. Those tests are there for a reason; remember that.
How Many Test Bundles to Create?
The number of test bundles changed from project to project, but if I have to choose one rule of thumb, I would say it’s a separation of concerns. If you remember from the first chapter, there are several types of tests: UI tests; unit tests, which include BDD and TDD; integration tests, and performance tests. Unit tests can be used both for BDD, TDD, Integration, and performance. UI Tests can be used for BDD. But it’s a best practice to separate your test bundles according to your company flows. For example, if you have a significant new feature in development, you can create a test bundle for it, and it will be easier to run it only when needed.
Separate BDD from TDD.
Separate regression tests from sanity and feature testing.
Separate significant features from the others.
Separating your project to different test bundles can give you necessary flexibility in the future and can help maintain your test’s infrastructure and control it.
Test Plans
We saw that schemes are great tools to configure your test runs. Now let’s say you want to run your tests several times with a different configuration each time. Different configurations mean you need to either create different schemes and run them one by one or change your current test scheme configuration each time before you run it.
Fortunately, Apple introduced a new feature in Xcode 11 called “Test Plans” which aims to solve exactly that – running the same test suite multiple times but with a different configuration.
Test Plans to Make Your Life Easier
Test Plans take the power of the test run customization in Xcode to the next level by giving you the flexibility to run your tests with different settings multiple times. Each Test Plan can test different issues that you may have in your app. Maybe the most common problem developers have with their apps is localization – you can create a test plan dedicated to localization and run the same tests over and over again but with different languages and regions.
The same goes for almost every option you currently have in your scheme editor.
Create Your First Test Plan
The easiest way to start with the Test Plan’s feature is right from the scheme editor. Go to your scheme editor, and in the Test action, you can find a button called “Convert to user Test Plans…” under the list of your test bundles (see Figure 2-22).
After tapping the button, you’ll have a dialog when you need to choose how to convert your new scheme to use test plans instead (see Figure 2-23).
Create Test Plan from Scheme – This option creates a Test Plan based on the current scheme configuration. After all, the test plan configuration is similar to the scheme test configuration, and it’s easy to create a new test plan with the old options. “Creating Test Plan from Scheme” is the recommended option for the first test plan of your project.
Create Empty Test Plan – Creates a new test plan template regarding the scheme test configuration.
Choose Test Plan – Add an existing test plan to the scheme. It can be a test plan you created from scratch (Test Plan is an XML file; you can create it with any text editor), but in most cases, this option comes in handy when you create a new scheme and want to connect it to an existing test plan from another scheme.
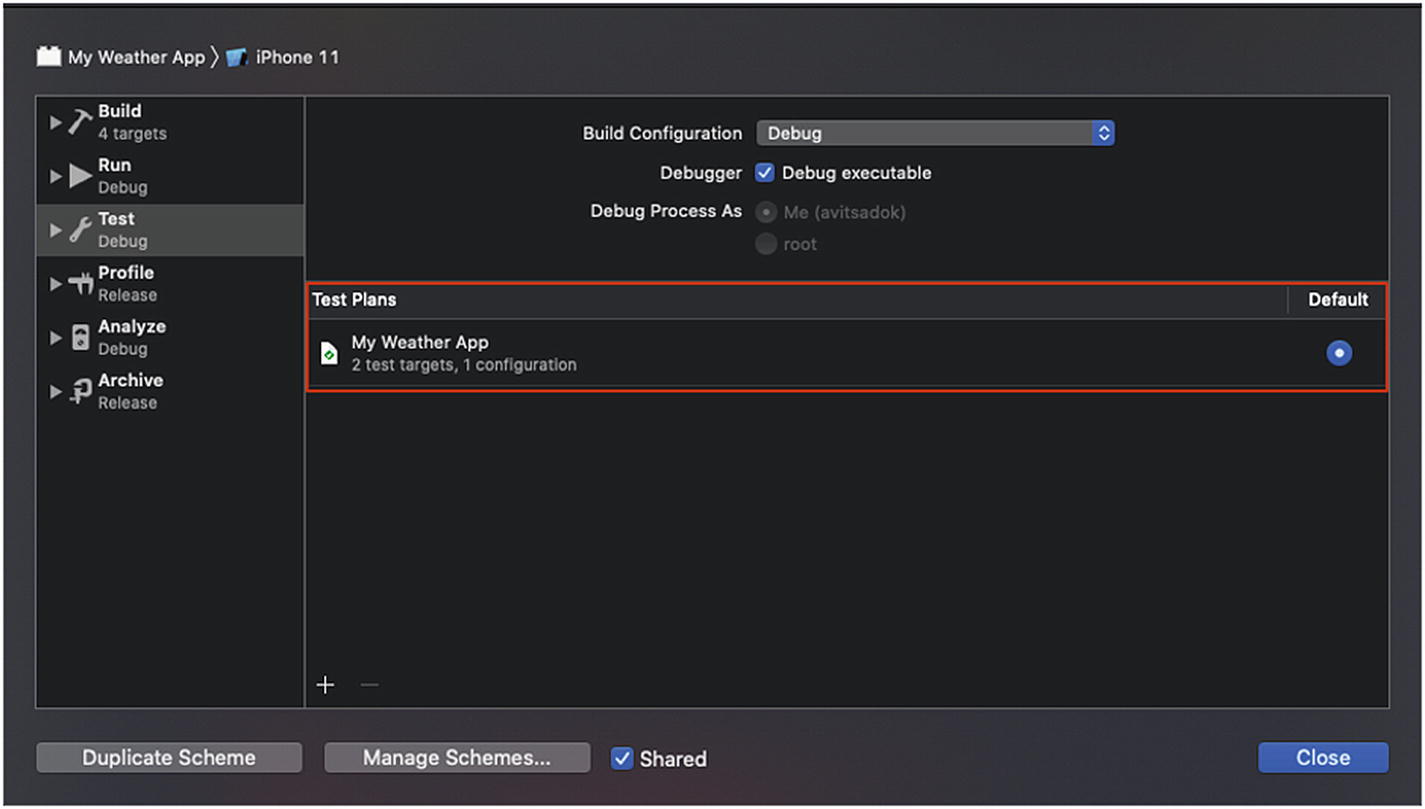
After creating the test plan, it is saved to your project, and the Xcode upgrades the scheme to use Test Plans instead of the old Info/Arguments/Options/Diagnostics screen we covered earlier (see Figure 2-24).
Scheme can contain multiple test plans. In each test plan, you can see how many test targets it runs and how many different configurations it has.
When you select “Test” for this scheme (Command + U), the test plan, which is marked as default, runs according to its configuration.
Test Plan Configurations
Although we are not supposed to edit the .xctestplan file directly, we can learn that Test Plan is quite simple. It contains an array of configurations and an array of test targets. Test Plan also has a default options section in case they are not set in the configurations themselves.
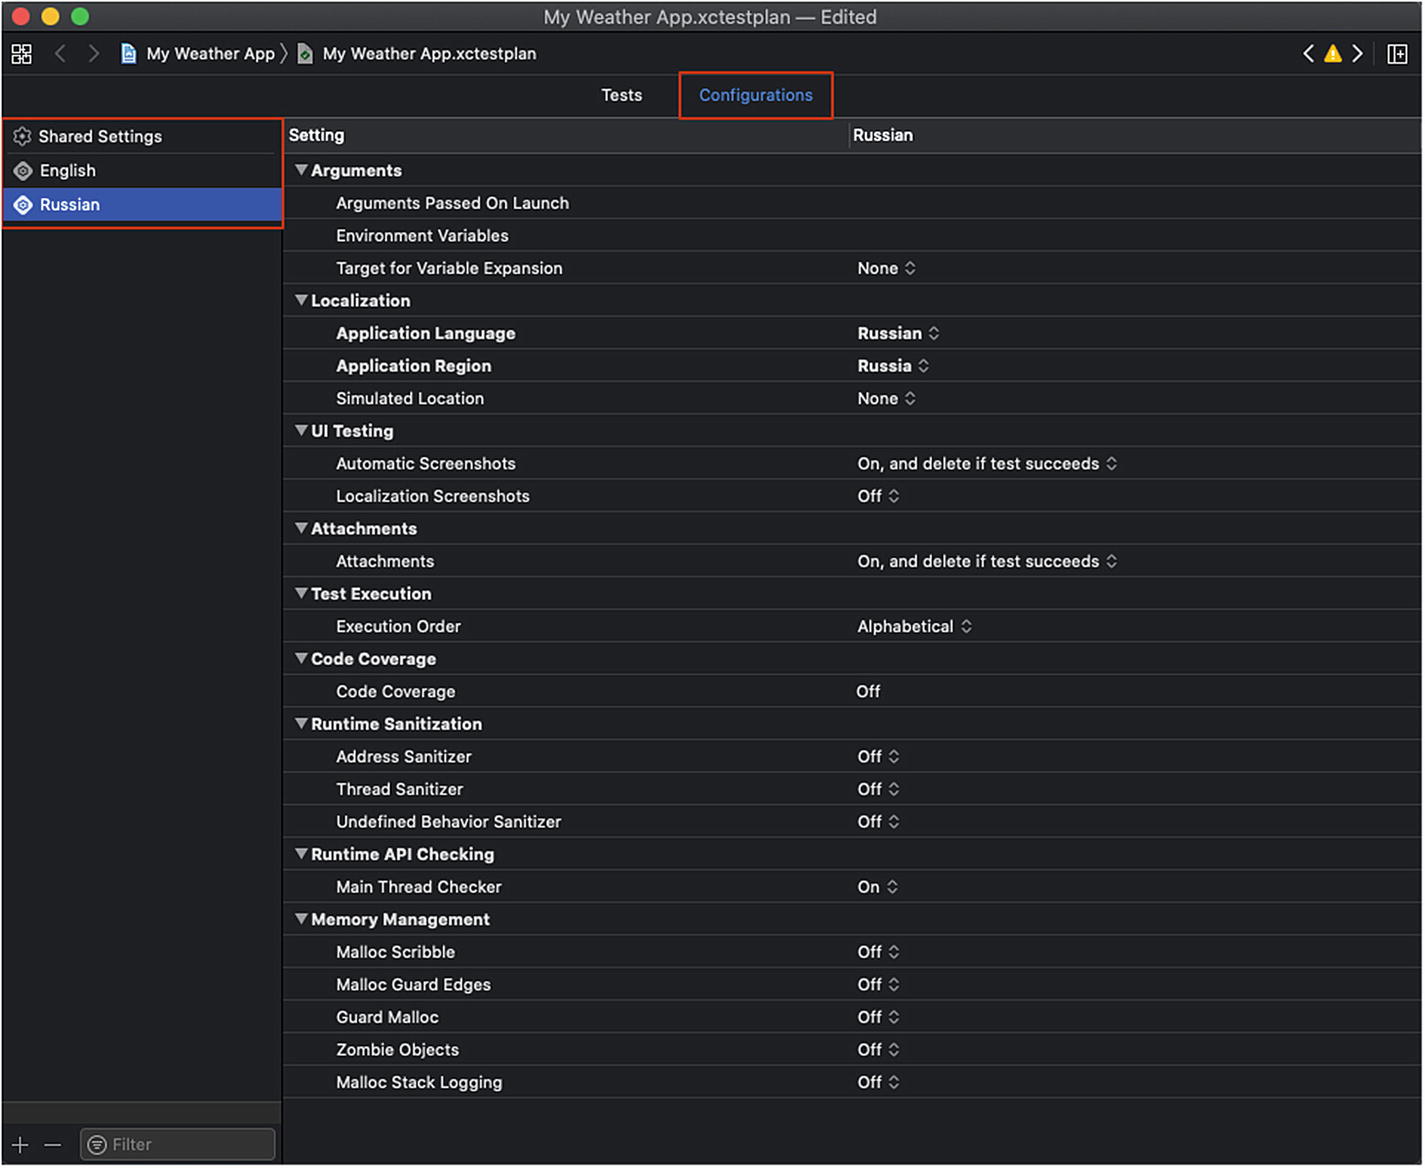
Tapping on the test plan in the project navigator will open the test plan edit screen (see Figure 2-25).
As you can see, you can enable/disable test bundles, classes, and functions just like you can do in your scheme editor. If you notice, you also have a new tab named “Configurations”. If the “Tests” define what your test plan runs, “Configurations” define how your test plan runs it. A test plan configuration contains a list of values like location, region, and more, very similar to the options you had in your scheme editor. The significant difference here is that you can create as many configurations as you want (see Figure 2-26).
The test plan in Figure 2-26 tries to test the app in different localization. Localization is one example of how a Test Plan can be useful. You can have several test plans that can handle different issues such as memory and performance issues, localization, and more. Whenever you run a test plan, Xcode runs the selected tests one time for each configuration, and there’s no limit on the number of configurations you can create. This is something tough to do without using a test plan.
There’s no need to go over the list of options in a test plan configuration, as it was covered earlier in this chapter.
If you want to disable a test configuration from running, right-click the configuration name and select “Disable”.
Running Your Test Plans
Because we added a new layer of complexity, let’s try to simplify what we have learned till now and how everything is linked together (see Figure 2-27).
As you can see from the preceding diagram, a scheme can have multiple test plans, but when you run a test, only one of them executes.
To run the test plan selected for the scheme, press Command + U or run it from the Test Navigator.
Running Only One Configuration
As already mentioned, a test plan can contain many configurations. While it’s important to run them all as part of a continuous integration flow, during development, you may want to run just one configuration to save precious time.
In that case, it’s effortless to run the test plan according to a specific configuration.
To do that, right-click the desired test function/class/ bundle and select the desired configuration (see Figure 2-28).
Summary
From now on, schemes, targets, and test plans should be your best friends. Knowing them well can help you adapt your tests to your daily development flow, and it’s a prerequisite for the next chapters where we are going to learn how to write tests in all colors and forms.
Are you ready to start testing?