Pay attention to zeros. If there is a zero, someone will divide by it.
—Dr. Cem Kaner
Introduction
In the previous chapter, we have learned how to set up our infrastructure for testing. It seems we are ready to write. But, even when your code is excellent, with pure functions and dependency injection, we need to learn the basics of how to write proper tests that we can maintain over time.
What exactly are unit tests
What are the XCTest framework and XCTestCase class
How to configure your target and your test bundle to work together
About the XCTestCase life cycle and how it works under the hood
How to write a simple unit test method and how it is built
What assertions we have and how we can create our assertions
How to test asynchronous operations
What Exactly Are Unit Tests?
Unit Test is a function that tests a specific piece of code and assets in the case the results of the test are not according to the requirements.
When you try to add a test, you have two options – Unit Tests and UI Tests. In this step, “Unit Test” is just a tool that can help you create different kinds of tests – integration tests, performance tests, regressions tests, and more.
But “Unit Tests” in the traditional way of meaning is a software testing method.
The goal of the unit test method is to check a code, isolated, without examining its side effects on other layers or objects.
They should run fast. There shouldn’t be any real heavy loaded code in Unit Tests or integration with a server or a database. A normal test suite should run in seconds. If this is not the case, you should check if all the tests you created are unit tests.
Unit Tests are easy to build. You shouldn’t work hard to set up a unit test. If it takes too much effort on your side, maybe it’s not a unit test or maybe your code is not testable enough. In this case, go over the previous chapter to learn how to improve your code testability.
Unit Tests need the ability to run in parallel. Isolation is the key here. Running in parallel is the best way to ensure your unit tests don’t have any unknown side effects that can influence not just other tests but also your code in an unpredictable way.
Unit Tests are in charge of checking the behavior of a method or even a specific piece of code. Unit Tests are not supposed to check how layers in your app work together, find memory leaks, or make sure your code runs fast enough.
You should write as many unit tests as you can as part of your daily development routine. If you write a readable and clear code, it’s not supposed to be a difficult task.
Unit Tests are not TDD, and TDD is not Unit Tests. Developers often mix those terms. Unit Tests are what you test, and TDD is when you test it. In TDD, you write your unit test before the actual code, and unit tests are integrated in this process.
XCTest and XCTestCase
XCTest is the framework used to write tests for your app. It comes as part of your Xcode, and there is no additional setup required to start writing tests.
XCTest is also the name of the abstract class for creating and executing tests, both Unit Tests and UI Tests. To create a new test class, we are going to make use of XCTest’s subclass – XCTestCase.
XCTestCase
When we want to create a new test class, we need to subclass XCTestCase. In unit tests, we usually want to create one test class to handle one “regular” class in our project. The recommended name can be the name of the tested class with the addition of the word “tests.” For example, for a class named “LoginHandler”, we can create a test class named “LoginHandlerTests”. This can help us understand exactly what this class tests and also prevent redeclaration of the same class name by mistake.
Adding a New XCTestCase Subclass

Adding new Unit Test Case Class
After tapping “Next”, give a name for the test class and choose its location in your project just like any other file.

Selecting a target for your test class
Our First Test Class
Congratulations, it’s a test class!
- 1.
import XCTest – In order to subclass XCTestCase and add it to the test runner, we need to import the XCTest framework just like any other framework we want to use.
- 2.
class DemoTests: XCTestCase – Always make sure you are subclassing from XCTestCase.
- 3.
setUpWithError() – This method runs before every test method execution. It will be explained later in this chapter.
- 4.
tearDownWithError() – This method runs after every test method execution. It also will be explained later in this chapter.
- 5.
testExample() – This is our first unit test example. Currently, it’s empty.
- 6.
testPerformanceExample() – This is a performance test example. It will be explained later in this book.
Enable Testability
Before we move on and add more tests, we need to make sure everything is linked up correctly in our project.
Your test code is not part of your executable. It’s a different module in your Xcode project, and for your tests to have access to your app code, you need to take care of access privileges.
But don’t worry; there is a fairly simple flag to help you with the access privileges problem, and it’s called “Enable Testability”.
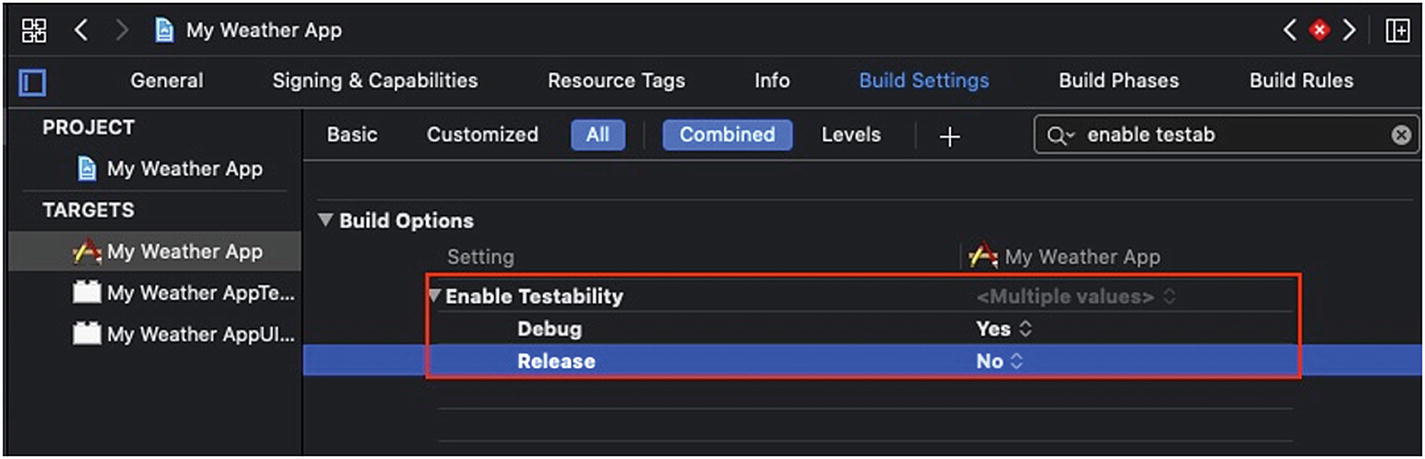
Set "Enable Testability" to YES
One thing we notice here is that this flag is set to NO in release configuration. One reason for that is that we do not need access to the executable code since we usually don’t test our app in release configuration. The more important reason for that is that this option prevents code optimization, which is used in release configuration and is not suitable for your tests and for debugging.
@testable
So now after we took care of the settings in the executable side, we need to import the executable target to the test class.
Public – Anyone can access within the module and in external code that imports the module.
Open – It is same as Public, but it is possible to subclass it from any module and not just the original class module.
Internal – Access is prohibited outside the module. The internal access level is the default level for classes and methods.
Fileprivate – Access is only from the current file.
Private – Access is only from the same class or struct.
If you notice, the default access for classes and methods is internal. Because Unit Tests require full access to your code outside the module, we may have a problem here assuming your access level for most classes and methods is set to the default one.
What @testable does is to elevate access levels in the imported module. Members marked as Public now behave as Open, and members marked as Internal behave as Public.
There are some discussions in the Swift developers’ community about @testable. Some claim @testable attribute is a “hack” who tries to overcome the access level issue in testing. Those who claim that, say that since it’s a “hack,” why not give private and fileprivate public access level as well?
CocoaPods and Testing Targets
Many projects today use Dependency Manager to integrate with external libraries and frameworks. One of the most popular managers is CocoaPods with over 72,000 libraries, and it’s used in more than three million apps.
One of the tasks CocoaPods does when linking a new framework is to update the header search path according to the new integrated frameworks.
Adding pods to the test target is something developers usually forget during test writing, so the key to remember that is to treat the test target as a separate app. Everything you want to use, you need to link it to your test target, just as you would do in your executable target.
XCTestCase Life Cycle
XCTestCase life cycle is a little bit different than what you would expect in standard Swift classes. Because test cases are part of a test runner, the test runner calls the test case methods in a specific timing, suitable for testing.
Class Method setUp()
Method setUpWithError () throw
After class method setup(), XCTest locates all the methods in the class that start with “test” and don’t have any arguments.
For each one of those methods, XCTest calls setUpWithError() function before it runs the test method itself. This is the place where you can prepare any instance variables you have instead of duplicating those steps in every test method.
Also, an instance method setup() is called after each setUpWithError() call.
If setUpWithError() throws, it means that the test that follows it will fail as well.
Test Methods
It belongs to a subclass of XCTestCase.
Its name starts with “test”.
The method doesn’t have any arguments.
A test method passes if it doesn’t have any failed assertions or crashes. We’ll talk about how to write test methods later in this chapter.
Teardown Block
You can add as many teardown blocks as you want, and it’s explicit for changes made at this function only. To create a teardown code that runs after each method, you need to override the tearDownWithError() method .
Method tearDownWithError() throw
tearDownWithError method runs after each test method whether it failed or passed. We use this method to clean up any side effect your test method might have caused, and in most cases, it should be the inverse function of setUpWithError() method.
Just like setUpWithError() and setup(), tearDownWithError() is called before “tearDown()”. They are both valid so that you can use them in your projects.
Class Method tearDown()
How It All Fits Together
Confused? Well, that sounds normal. But setting up the initial state for a test and cleaning it up afterward are crucial steps to achieve stability in your test run.
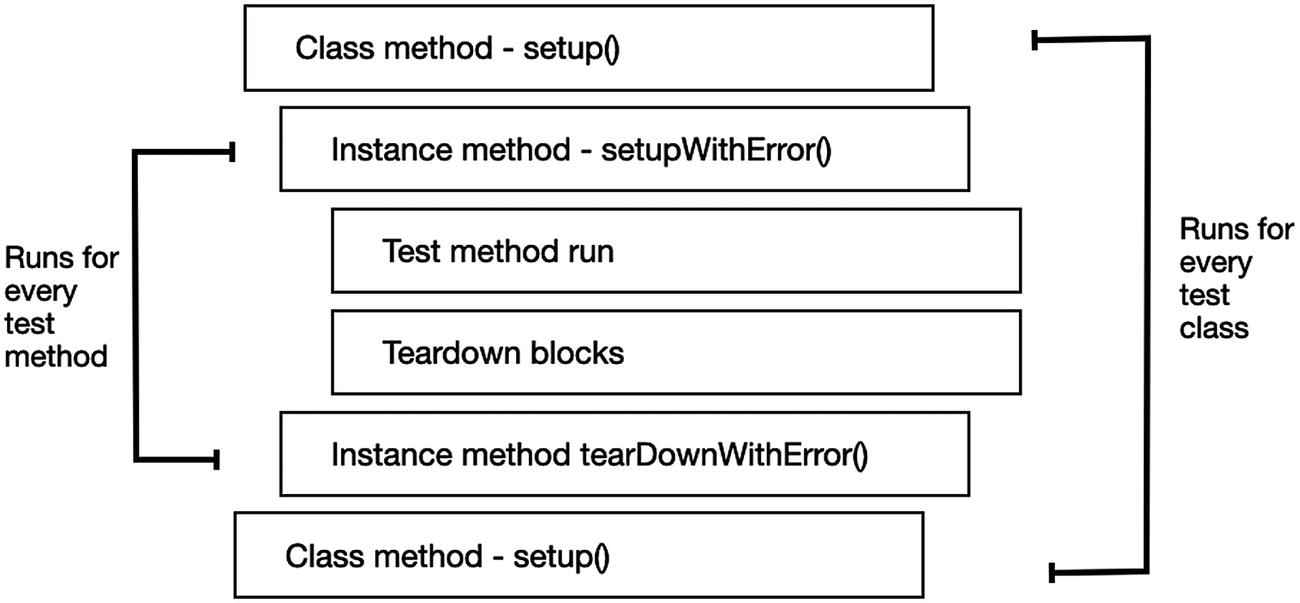
XCTestCase life cycle
XCTest Creates an XCTestCase Instance for Every Test Method
Some may think that before a test case class starts its execution, XCTest creates an instance of this class and just runs all the tests one by one. While that makes sense in standard classes, this is not the case in XCTest classes.
When Xcode starts its test suite, it actually creates an XCTestCase instance for every test method and adds it to its test runner queue before the test execution even begins.
Let’s say you have a test class named “LoginTests” with four different test methods. When the test run begins, XCTest creates four instances of LoginTests class, one for each test method, and adds them to the test runner. Those four instances get deallocated at the end of the run, only after all the other tests finished their execution.
And this is important because it can give you a sense about how states are managed during the test run execution. For example, you cannot share an instance variable value across different test methods, since each one of those methods has its own class instance.
And regarding memory management, you need to remember that none of the class instances get deallocated until the end of the test run. This means you need to pay attention to what you are doing in the setup and tearDown methods and make sure to release and reset any data that can affect other test methods.
Writing Unit Tests
As I said before, not only unit tests are fast to run, but they also need to be written fast. But don’t worry; you don’t have to invent the wheel here – there are particular pattern and structure on how to write unit tests. If you’ll keep a constant pattern, not only will they be easy to write but also readable.
Unit Test Anatomy
As you can see, in a unit test, we have three steps Arrange, Act , Assert, or in short AAA. We can also call it GWT (Given-When-Then ). Some developers prefer AAA since its terminology is closer to the code level, and some prefer GWT for easier communication with the business level.
Arrange/Given – Do all the setup for the test here. Connect dependencies, set properties, and allocate variables. Remember what we learned about the life cycle. If it’s something you do in every test method, consider moving it to the setup() method to save yourself code duplication.
Act/When – This is the place when you execute the function you want to test. In this stage, it is best practice to save the value you want to verify against your requirements in a local variable.
Assert/Then – The final setup is the actual validation of the test. In this step, you check if the test fulfills the expectation, generally by asserting (we will discuss it later).
Separating your test method into three steps makes your testing code much more readable and easier to understand.
Assertions
List of XCTest Assertions
Name | Description |
|---|---|
XCTFail | Unconditionally fails the test |
XCTAssertNil | Failure when the passed object is not nil |
XCTAssertNotNil | Failure when the object is nil |
XCTAssertEqual | Failure when expressions are not equal |
XCTAssertNotEqual | Failure when expressions are equal |
XCTAssertNotEqualObjects | Failure when objects are not equal |
XCTAssertNotEqualObjects | Failure when objects are equal |
XCTAssertNoThrow | Failure when expression throws expression |
XCTAssertGreaterThan | Failure when the first object is not greater than the second object |
XCTAssertLessThan | Failure when the first object is not smaller than the second object |
XCTAssertLessThanOrEqual | Failure when the first object is greater than the second object |
XCTUnwrap | Failure when the given expression tries to unwrap and returns nil |
You may wonder, “Why do I need to learn the full assertions list? I can just use XCTAssertTrue.”
So basically, you are right. If you use XCTAssertTrue and pass the condition you want, this will actually do the job.

XCTAssertTrue failure in Xcode
Do you see the problem? Sure, “x == y” is not “true”. But we didn’t want to check a Boolean expression; we wanted to check if two objects are equal.

XCTAssertEqual failure in Xcode
As you can see, using the right assertion can help you get a descriptive failure message free of charge.
Creating a Custom Assertion
Believe it or not, there are cases when the existing assertions are not the precise and convenient tool for validating your tests.
Luckily, there’s a way of creating your custom assertions and making your testing code much cleaner.
Duplicate Assertion Code – Let’s say you want to validate an object configuration, and you need to check a few properties. You can either use one big assertion that checks several values (an ugly solution) or use multiple assertions which is not an elegant solution either. The bottom line is when you see a repeated use of assertion sequence, you should consider a custom assertion.
When Your Assertion Code Is Too Big – If you need to parse a JSON every time and check a certain value or if you need to analyze a string or to do some calculation, write your own assertion. When you feel that the last part of your test (the “Assert” or “Then” part) is too big and can be a good fit to a function of its own, this is a sign you should create a custom assertion.
When Your Assertion Doesn't Speak the Right Language – If you are checking that an email address is valid or the string contains only one “@”, or maybe you want to check if a date object is in a certain month or year. Sure, you can use a standard assertion for that, but the standard assertions don’t speak the “same language.” “Bigger than,” “Equal,” or “isTrue” is fine to use, but for a more stylish way, it is better to use your assertion to do those validations.
I’m In. How to Write My Own Assertion?
The basic method of writing your own assertion is, well, a new method in your tests.
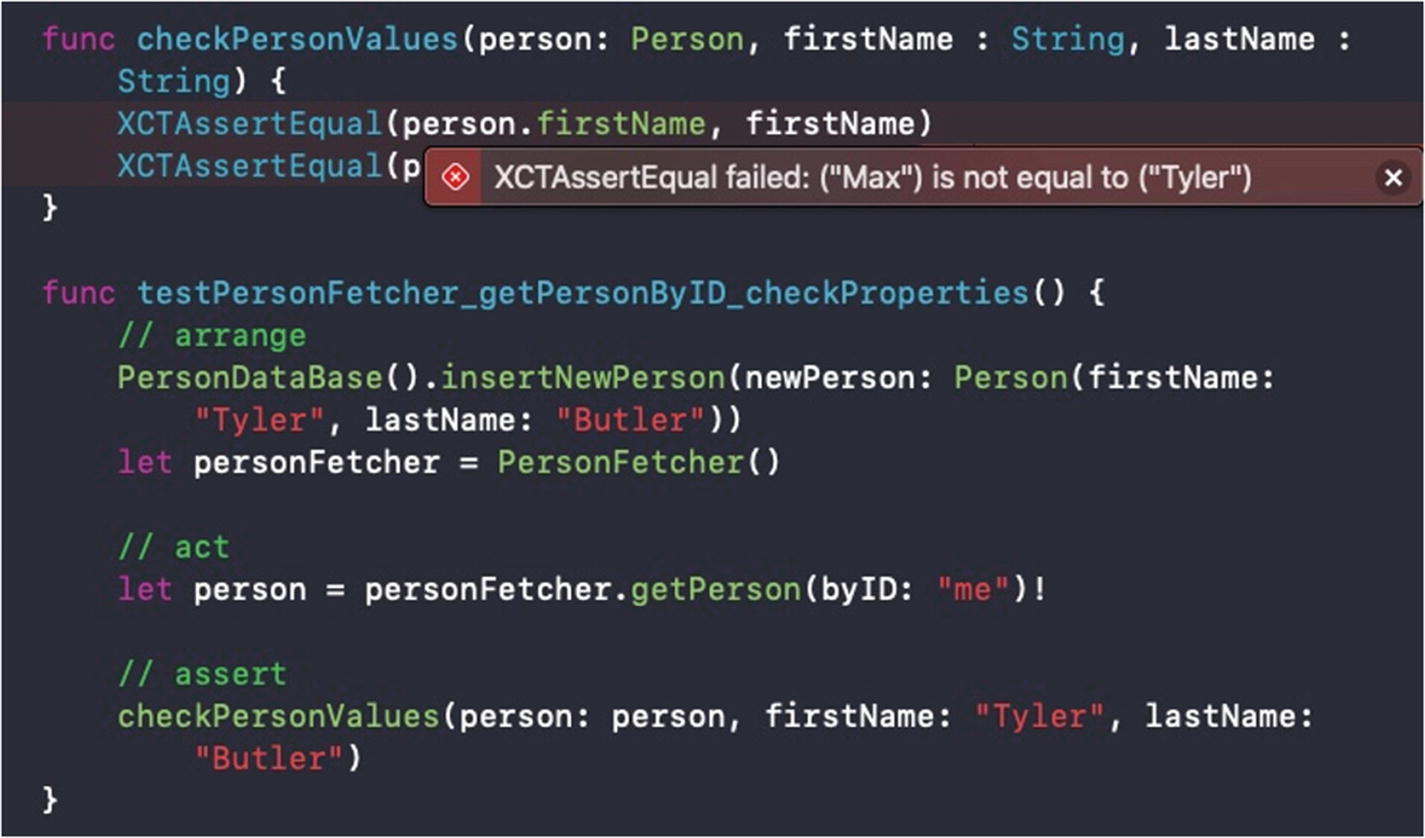
Running test with external assertion method
Our test failed, but this is not the issue. Do you see the problem here? From the preceding screenshot, we see the two methods – the test method and the assertion method. We also see the failure message, but instead of pointing on the test method, it points on the assertion method!
We see that we have no way of connecting the failure message to the correct test method. Also, in case of several failed test methods, we are going to have multiple failure messages in the same place, one above the other – it’s a testing nightmare!
As you can see, besides the expression and the message arguments, we also have two more arguments – file and line.
File (String) and Line (UInt) contain the information on where in the code XCTest shows the failure message. By default, both of them have the values of the place where we call the assertion function.
#file and #line are two expressions that are part of the Swift language. You can use them not only in your tests but also in your project code. Swift also has more interesting expressions you can use in your tests and in general, like #function, #column, and more.
Let me explain what I did here – our custom assertion method has two more arguments, line and file, filled with default values. The default values are the actual place where we call the function. Later then, we pass those two arguments to the assertion methods inside, overriding their default values. I can say we are kind of tricking the system into getting a clear failure message.

Custom assertion method with line and file arguments
Great! Now our failure message displayed is in the right place – in the test method and not in the assertion method. Also, we didn’t have to change anything in the test method.
To sum it up, custom assertion methods can help you maintain your testing code easier by making it more readable and less duplicated (DRY). Whenever you feel your assertion code is a little bit complex or confusing, just write your own method. It’s that easy.
Write Asynchronous Operations
In the preceding code, we want to test the method findCuteCats(), which receives an image and is supposed to find the number of cute cats shown in the picture (which is basically the total number of cats displayed since all cats are cute).
We presented an image with three cats and expected to get three as the return answer, but the test failed. At the end of the test, the cuteCats variable is still 0, and this is because findCuteCats() is an asynchronous method. Our intuitive fix for that is putting the assertion line inside the completion block of the function, but this makes it even worse – now, we get a false positive and our test always succeeds because the test run ends before the completion block gets executed!
We need to find a way of keeping the test method, waiting for the findCuteCats() method to finish before it asserts it.
Expect, Wait, Fulfill, and Assert
Define the Expectation – We need to work with some kind of expectation object that can be transferred into the completion block and to help us manage the process. The definition is done using something called XCTestExpectation.
Mark the Expectation As Fulfill – It’s not enough for the completion block to finish; we need to tell the expectation object we created that we have all the data that we need, and we are now ready to assert.
Pause the Test Method Run Until We Have an Answer – We need to halt the run of the test method before we assert; otherwise, it will just continue to the end of the method without waiting for an answer. Also, we need to define some timeout to prevent the test execution from running forever.
XCTestExpectation Pattern
When we want to create an asynchronous test, we create a XCTestExpectation object. On its initialization, we pass an informative description that can help us understand what expectation was not fulfilled if our test failed.
Before the assertion part, we call waitForExpectations() method. What this method does is to stop the test execution until all the expectations are fulfilled or the timeout was reached.
Fulfill Multiple Times for One Expectation
A good use case for that is a music player that needs to update the progress of the song a few times. The expectation can count the number of times it gets called and then moves on to the assertion part when it reaches a specific number.
Assert When the Expectation Is Not Fulfilled
OK, I need you to stay focused on this one. There are cases when we want to make sure a code is not being executed. In other words, if our expectation is fulfilled, our test fails.
A good use case for isInverted property is permissions handling. We want to make sure parts of our code are not being executed in a specific configuration and states.
Expect Array of Expectations, Ordered
XCTestExpectation Subclasses
Now that you have “wait” + “fulfill” + “assert” tools, basically, every a-sync job can be tested using XCTestExpectation. But Xcode 8.3 brought several improvements in that area in order to make those tasks much easier to build and read.
In this code, we are trying to test if a notification was raised. We add an observer, and when we receive it, we fulfill the expectation. In the following line, we post the notification and wait 0.1 seconds for the expectation for being fulfilled.
In the preceding example, we have some data layers and a UI Screen. The test is to save some data and check if the screen receives a “data updated” notification.
We understand that the posting notification code is inside the data layer and the observer code is inside the UI Screen. So how do we check it?
The current discussed example is not really a “unit test,” but an integration test. We'll talk about Integration tests later in this book.
OK, so we can add some closure or delegate pattern to pass the event from the myScreen class to the test method, but this requires us to change our code only to make our tests easier to test. This may be true in many cases, but not in this case – no one observes this event, only the test method.
Fortunately, we have the ability to observe notification calls in our tests very easily.
As you can see, we are adding expectation(forNotification:). When the notification is raised, the expectation is fulfilled. Notice we are not checking if myScreen receives the notification. This is something you need to do some other way, for example, checking its state.
Summary
XCTest is a robust framework, and it can help you set up an excellent testing suite very easily.
Also, we’ve learned how to write structured test methods and how to write them as part of a test case life cycle.
But those are only the basics – in the next chapter, we will learn how to leverage our skill and write useful and maintainable unit tests.