
![]()
Using the Datepicker Widget
This chapter focuses on the jQuery UI datepicker widget, which provides a convenient mechanism for helping users select dates. Getting date information from users is notoriously problematic because of the wide range of formats in which dates can be expressed. The datepicker widget can make it easier for the user to select a date in a way that is more consistent and less prone to errors and using a regular text input element. Table 21-1 provides the summary for this chapter.
Table 21-1. Chapter Summary
| Problem | Solution | Listing |
|---|---|---|
| Create a pop-up jQuery UI datepicker | Use the datepicker method on an input element | 1 |
| Create an inline datepicker | Use the datepicker method on a span or div element | 2 |
| Specify the date displayed by the datepicker | Use the defaultDate setting | 3 |
| Specify an additional element that will be updated when the user selects a date | Use the altField setting | 4 |
| Change the action that causes a pop-up datepicker to appear | Use the showOn setting | 5 |
| Specify the text displayed in the datepicker trigger button | Use the buttonText setting | 6 |
| Show an image in place of the trigger button | Use the buttonImage and buttonImageOnly settings | 7 |
| Restrict the date selection | Use the constrainInput, minDate, and maxDate settings | 8, 9 |
| Display several months in the datepicker | Use the numberOfMonths setting | 10–12 |
| Enable drop-down menus to aid navigation to months and years | Use the changeMonth and changeYear settings | 13 |
| Show week information in the datepicker | Use the showWeek and weekHeader settings | 14 |
| Fill the date grid with dates from the previous and subsequent months | Use the showOtherMonths and selectOtherMonths settings | 15 |
| Display a button bar at the base of the datepicker | Use the showButtonBar and gotoCurrent settings | 16 |
| Show a formatting hint to the user | Use the appendText setting (or the HTML5 placeholder feature) | 17, 18 |
| Get or set the date programmatically | Use the getDate and setDate methods | 19 |
| Show or hide a pop-up datepicker programmatically | Use the show and hide methods | 20 |
| Respond to the user navigating to a new month or year | Use the onChangeMonthYear event | 21 |
| Respond to a pop-up datepicker closing | Use the onClose event | 22 |
| Localize the datepicker | Use the jQuery UI i8n support | 23 |
Creating the Datepicker
You can use the datepicker in two ways. The most common is to attach the widget to an input element, using the datapicker method. There is no immediate visual change to the input, but when the element gains the focus (because the user either tabs from other elements or clicks the input field), the datepicker pops up to help the user select a date. Listing 21-1 demonstrates this pop-up datepicker.
Listing 21-1. Creating a Pop-up Datepicker
<!DOCTYPE html>
<html>
<head>
    <title>Example</title>
    <script src="jquery-2.0.2.js" type="text/javascript"></script>
    <script src="jquery-ui-1.10.3.custom.js" type="text/javascript"></script>
    <link rel="stylesheet" type="text/css" href="styles.css"/>
    <link rel="stylesheet" type="text/css" href="jquery-ui-1.10.3.custom.css"/>
    <style type="text/css">
        input {width: 200px; text-align: left}
    </style>
    <script type="text/javascript">
        $(document).ready(function() {
            $("#datep").datepicker();
        });
    </script>
</head>
<body>
    <h1>Jacqui's Flower Shop</h1>
    <form method="post" action="http://node.jacquisflowershop.com/order">
      <div class="ui-widget">
        <label for="datep">Date: </label><input id="datep"/>
      </div>
    </form>
</body>
</html>
You can see how focusing on the input element displays the datepicker in Figure 21-1.
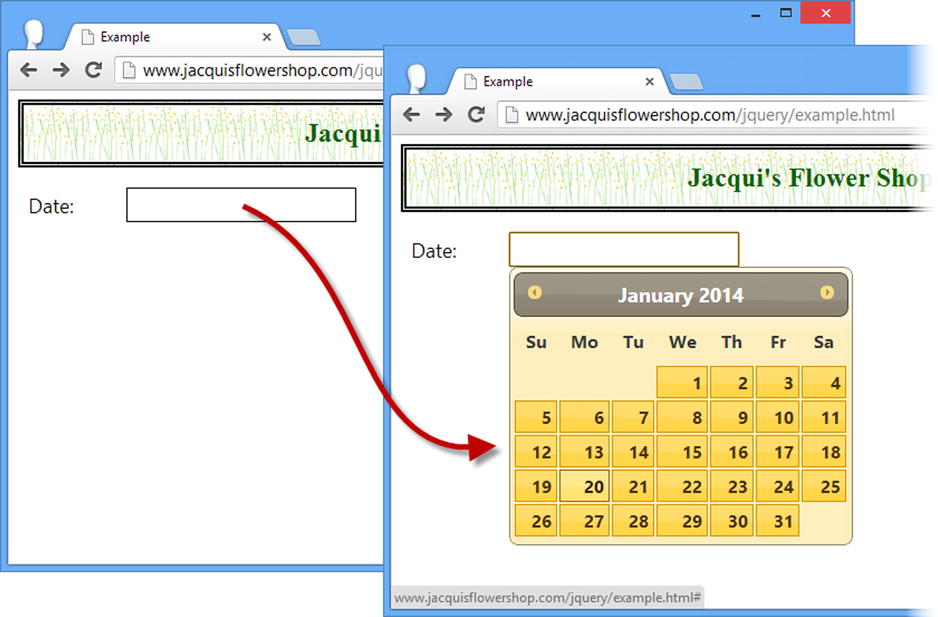
Figure 21-1. The datepicker pop ups up when the input element gains the focus
When the datepicker pop-up is displayed, the user can choose to enter a date manually or use the datepicker window to select a date. The datepicker pop-up disappears when the input element loses the focus or when the user hits the Enter or Escape keys.
Creating an Inline Datepicker
The other way to use the datepicker is to use it inline. To achieve this, you select a div or span element using jQuery and then call the datepicker method. An inline datepicker is visible whenever the underlying element is visible. Listing 21-2 demonstrates the creation of an inline datepicker.
Listing 21-2. Creating an Inline Datepicker
<!DOCTYPE html>
<html>
<head>
    <title>Example</title>
    <script src="jquery-2.0.2.js" type="text/javascript"></script>
    <script src="jquery-ui-1.10.3.custom.js" type="text/javascript"></script>
    <link rel="stylesheet" type="text/css" href="styles.css"/>
    <link rel="stylesheet" type="text/css" href="jquery-ui-1.10.3.custom.css"/>
    <style type="text/css">
        input {width: 200px; text-align: left; margin-right: 10px}
        #wrapper > * {float: left}
    </style>
    <script type="text/javascript">
        $(document).ready(function () {
            $("#inline").datepicker();
        });
    </script>
</head>
<body>
    <h1>Jacqui's Flower Shop</h1>
    <form method="post" action="http://node.jacquisflowershop.com/order">
        <div id="wrapper" class="ui-widget">
            <label for="datep">Date: </label>
            <input id="datep"/>
            <span id="inline"></span>
        </div>
    </form>
</body>
</html>
In this example, I have added a span element and used it as the target of the datepicker method. You can see the effect in Figure 21-2.
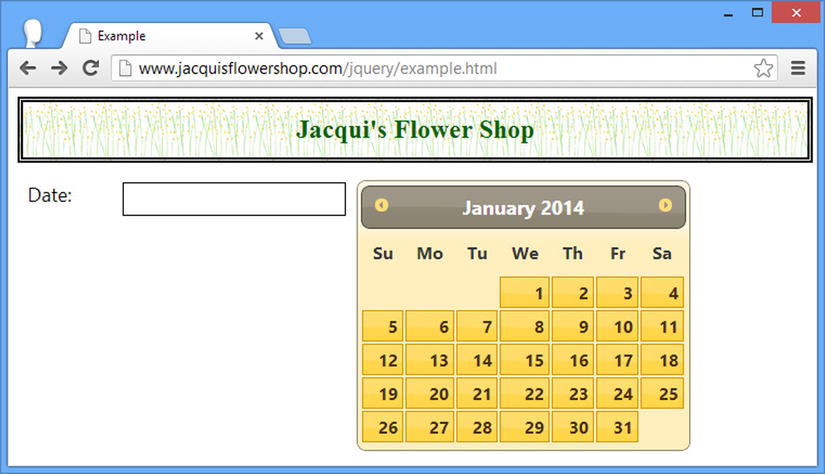
Figure 21-2. An inline datepicker
An inline datepicker can be useful when you don’t want to work with pop-ups. In some applications dates are so important that it makes sense to display the datepicker all of the time, but in most cases hiding the pop-up until it is required is more sensible. The problem with hiding and showing an inline datepicker is that the layout of the document has to flex to accommodate the datepicker, which can cause presentation problems. For almost all situations, I find the pop-up datepicker to be more useful.
Configuring the Datepicker
If you have done any work with dates before, you will understand that they are complicated to deal with. You see this complexity reflected in the large number of settings supported by the datepicker widget. In the following sections, I describe groups of related settings that can be used to configure the datepicker.
Performing Basic Configuration
Table 21-2 describes the settings that perform the basic configuration for the datepicker widget. I show you how to use these settings in the sections that follow.
Table 21-2. Basic Datepicker Settings
| Setting | Description |
|---|---|
| altField | Specifies an additional field that will be updated with the data selection. |
| buttonImageOnly | Specifies that the image specified by buttonImage should be contained in an img element rather than a button. The default is false. |
| buttonImage | Specifies the URL of an image to use for the pop-up trigger button. Not used by default. |
| buttonText | Specifies the text for the pop-up trigger button. The default is an ellipsis (...). |
| defaultDate | Sets the date to highlight when the datepicker is displayed. |
| disabled | Specifies whether the datepicker widget is initially disabled. The default is false. |
| showOn | Specifies the trigger for displaying a pop-up datepicker. The default is focus. |
Specifying the Default Date
The most basic setting is also one of the most useful. The defaultDate setting specifies the date that will be shown when the datepicker is displayed. If you don’t provide a value for the defaultDate setting, then the current date will be used. (This is, of course, the date as defined by the user’s system. Time zones, date lines, and misconfiguration can all present the user with a different date from the one you might be expecting to appear.)
![]() Tip This setting is used only if there isn’t a value attribute for the input element. If there is, either because you have included the value attribute in the document or because the user has previously made a selection, then the datepicker ignores the setting.
Tip This setting is used only if there isn’t a value attribute for the input element. If there is, either because you have included the value attribute in the document or because the user has previously made a selection, then the datepicker ignores the setting.
If you don’t want today’s date, then you can choose from several different formats to express the date you want to start with. Table 21-3 shows the range of formats and values you can use.
Table 21-3. Formats and Values for the defaultDate Setting
| Value/Format | Description |
|---|---|
| null | Use the current system date. |
| Date object | Use the value represented by the Date object. |
| +days, -days | Use the date that is the specified number of days from today. For example, +3 means show three days from today, and -2 means show the date two days ago. |
| +1d +7w -1m +1y | Use a date that is relative to today, expressed as a number of days (d), weeks (w), months (m), and years (y) in the future (+) or in the past (-). Positive and negative values can be mixed in a single date so that a value of -1d +1m used on November 12, 2011, selects the date December 11, 2011. |
Listing 21-3 shows the use of the defaultDate setting to specify a date five years in the future.
Listing 21-3. Using the defaultDate Setting
...
<script type="text/javascript">
    $(document).ready(function() {
        $("#datep").datepicker({
            defaultDate: "+5y"
        });
    });
</script>
...
I am writing this chapter in June 2013, and you can see in Figure 21-3 that the +5y value for the defaultDate setting focuses the datepicker on June 2018.
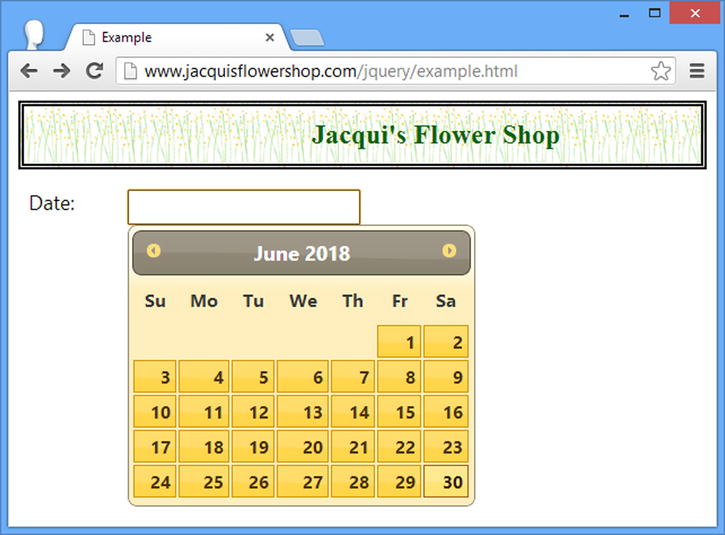
Figure 21-3. Displaying a future date using the defaultDate setting
As in the example, you can omit any interval that you don’t want to change such that you can use +5y rather than +0d +0w +0m +5y. You can mix and match negative and positive values for different intervals to zero in on the date you want.
Specifying the Alternate Element
The altField setting specifies an input element that will be updated when you make a date selection. This is the easiest way of linking an input element with an inline datepicker. Listing 21-4 shows the use of the altField setting as a means of displaying the selection from an inline datepicker.
Listing 21-4. Using the altField Setting with an Inline Datepicker
...
<script type="text/javascript">
    $(document).ready(function() {
        $("#inline").datepicker({
            altField: "#datep"
        });
    });
</script>
...
In Listing 21-4, I have used a selector string to identify the element I want to use, but the altField setting will also accept a jQuery object or a Document Object Model (DOM) HTMLElement object. The effect of this example is that the input element displays the date each time I make a selection using the datepicker, as shown in Figure 21-4.
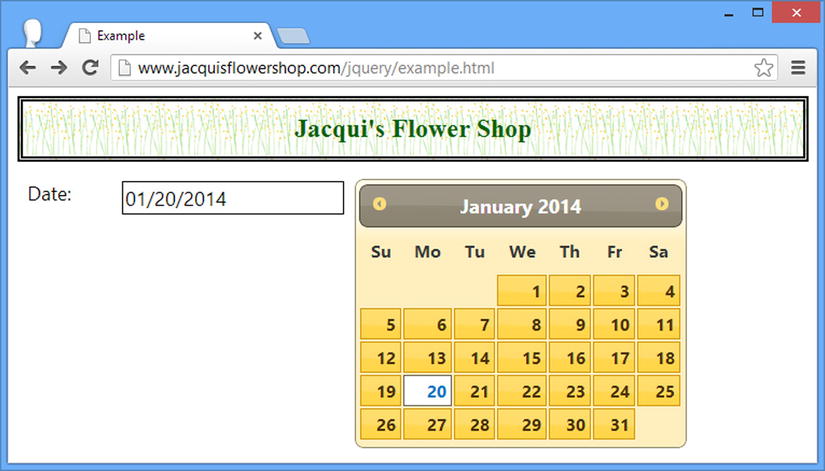
Figure 21-4. Specifying the input element that the datepicker will update
Managing the Pop-up Trigger
The showOn setting controls what causes a pop-up datepicker to be shown to the user. There are three allowed values for this setting.
- focus: The pop-up is shown when the input element gains the focus. This is the default.
- button: The pop-up is shown when a button is clicked.
- both: The pop-up is shown when a button is clicked or when the input gains focus.
When you use the button or both value, the datepicker widget creates a button element and adds it to the document immediately after the input element. Listing 21-5 shows the use of the showOn setting.
Listing 21-5. Using the showOn Setting
...
<script type="text/javascript">
    $(document).ready(function() {
        $("#datep").datepicker({
            showOn: "both"
        });
    });
</script>
...
You can see the button element created by the widget in Figure 21-5. Since I used the both value in this example, the pop-up will be displayed when the user either clicks the button or focuses on the input element.
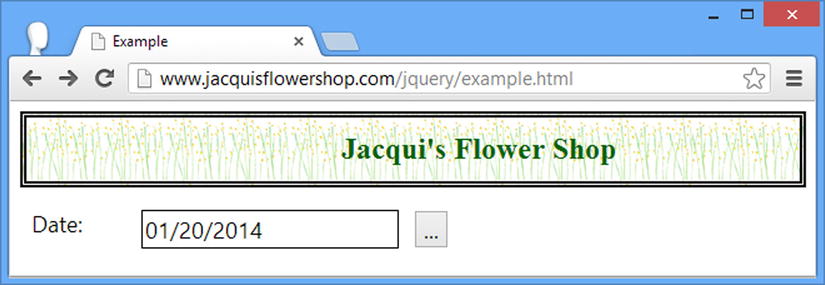
Figure 21-5. The button added in response to the showOn setting
![]() Tip The button that the datepicker widget adds is not a jQuery UI button widget. If you want to keep your buttons consistent, then you will need to select the button element and call the jQuery UI button method, as described in Chapter 18.
Tip The button that the datepicker widget adds is not a jQuery UI button widget. If you want to keep your buttons consistent, then you will need to select the button element and call the jQuery UI button method, as described in Chapter 18.
You can format the button element using the buttonImage or buttonText setting. If you set buttonImage to a URL, the datepicker widget will use the image in the button. Alternatively, you can use the buttonText setting to set a phrase to replace the default content (which is ...). Listing 21-6 shows the use of the buttonText setting.
Listing 21-6. Using the buttonText Setting
...
<script type="text/javascript">
    $(document).ready(function() {
        $("#datep").datepicker({
            showOn: "both",
            buttonText: "Select"
        });
    });
</script>
...
You can do away with the button text entirely if you use the buttonImage and buttonTextOnly settings together. This causes the datepicker to add an img element to the document rather than a button. Listing 21-7 provides a demonstration.
Listing 21-7. Using an Image Rather Than a Button
<!DOCTYPE html>
<html>
<head>
    <title>Example</title>
    <script src="jquery-2.0.2.js" type="text/javascript"></script>
    <script src="jquery-ui-1.10.3.custom.js" type="text/javascript"></script>
    <link rel="stylesheet" type="text/css" href="styles.css"/>
    <link rel="stylesheet" type="text/css" href="jquery-ui-1.10.3.custom.css"/>
    <style type="text/css">
        input {width: 200px; text-align: left}
        #dpcontainer * {vertical-align: middle}
        #dpcontainer img {width: 35px;}
    </style>
    <script type="text/javascript">
        $(document).ready(function() {
            $("#datep").datepicker({
                showOn: "both",
                buttonImage: "right.png",
                buttonImageOnly: true
            });
        });
    </script>
</head>
<body>
    <h1>Jacqui's Flower Shop</h1>
    <form method="post" action="http://node.jacquisflowershop.com/order">
      <divid="dpcontainer"class="ui-widget">
        <label for="datep">Date: </label><input id="datep"/>
      </div>
    </form>
</body>
</html>
I have specified an image called right.png and set buttonImageOnly to true. I have also added some CSS styles to the document to control the appearance of the image relative to the label and input elements. The datepicker widget isn’t particularly smart about how it creates the img element, so I need to compensate to bring the style of the image in line with the rest of the document. You can see the effect of having an image rather than a button in Figure 21-6.
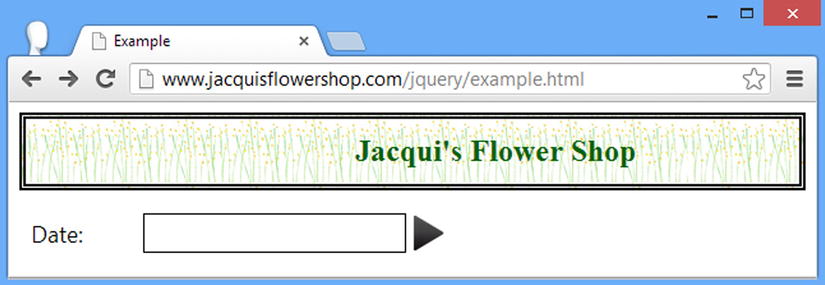
Figure 21-6. Using an image instead of a button with a pop-up datepicker
You will often want to apply constraints to the range of dates that the user can select using the datepicker widget. Table 21-4 describes the settings that allow you to apply selection constraints to guide the user to a date you can work with.
Table 21-4. Datepicker Settings for Managing Date Selection
| Setting | Description |
|---|---|
| changeMonth | When true, the datepicker displays a drop-down menu that allows direct navigation to a month. The default is false. |
| changeYear | When true, the datepicker displays a drop-down menu that allows direct navigation to a year. The default is false. |
| constrainInput | When true, limits the characters in the input element to those contained in a valid date. The default is true. |
| hideIfNoPrevNext | When true, the previous and next buttons are hidden, rather than disabled, when there are no selectable dates in the past or future relative to the displayed period. The default is false. |
| maxDate | Specifies the latest date that the user can select. The default is to allow the user to select any date. |
| minDate | Specifies the earliest date that the user can select. The default is to allow the user to select any date. |
| numberOfMonths | Specifies the number of months displayed by the datepicker. The default is 1. |
| showCurrentAtPos | Specifies where the current or default month is displayed in a multimonth datepicker. The default is 0. |
| stepMonths | Specifies the number of months that the display jumps when the previous and next buttons are clicked. The default is 1. |
| yearRange | Specifies the range of years that can be selected in the drop-down list that is enabled by the changeYear setting. The default is to display ten years before and ten years after the present year. |
Limiting the Input Character and Date Range
When set to true, the constrainInput setting restricts the characters that can be entered into the input element to those that are contained in a valid date. The set of characters is dependent on the localization configuration you are using, which I talk more about in the section “Localizing Date Selection.” If you have not localized the datepicker widget, then you can expect the input element to be restricted so that the user can enter only numbers and the / character.
This setting doesn’t mean that the user can only enter valid dates because a value like 99/99/99 can be entered, but it can help reduce errors. The importance of this setting increases when the showOn setting is set to button because the pop-up won’t automatically appear when the input element gains the focus. Users will typically select from the datepicker when it is presented to them but won’t always realize that a button will display a picker. Every opportunity you give the user to enter a date directly increases the chances you have to process a badly formatted value. Listing 21-8 shows the use of the constrainInput setting.
Listing 21-8 . Applying Basic Constraints to the Date Selection
<!DOCTYPE html>
<html>
<head>
    <title>Example</title>
    <script src="jquery-2.0.2.js" type="text/javascript"></script>
    <script src="jquery-ui-1.10.3.custom.js" type="text/javascript"></script>
    <link rel="stylesheet" type="text/css" href="styles.css"/>
    <link rel="stylesheet" type="text/css" href="jquery-ui-1.10.3.custom.css"/>
    <style type="text/css">
        input {width: 200px; text-align: left; margin-right: 10px}
        #wrapper > * {float: left}
    </style>
    <script type="text/javascript">
        $(document).ready(function() {
            $("#datep").datepicker({
                constrainInput: true,
                minDate: "-3",
                maxDate: "+5"
            });
        });
    </script>
</head>
<body>
    <h1>Jacqui's Flower Shop</h1>
    <form method="post" action="http://node.jacquisflowershop.com/order">
      <div id="wrapper" class="ui-widget">
        <label for="datep">Date: </label><input id="datep"/><span id="inline"></span>
      </div>
    </form>
</body>
</html>
The constrainInput setting is true by default, so I have added values for the minDate and maxDate settings as well, just to make the example a little more interesting. These settings allow me to specify the earliest and latest dates that the user can select. As with the defaultDate setting I showed you in section “Specifying the Default Date,” I can specify the dates for the minDate and maxDate settings as null (no date), a Date object, a number of days, or a relative date string. In Listing 21-8, I used the number option that specifies the number of days relative to today. In Figure 21-7, you can see that the datepicker widget disables any date that the user cannot select.
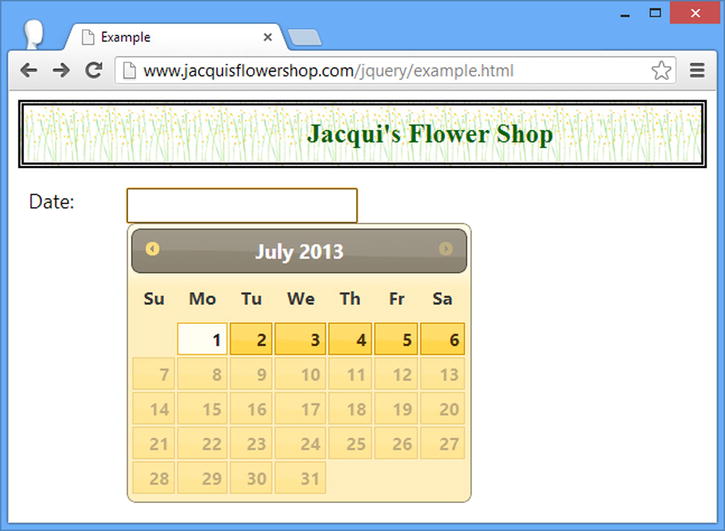
Figure 21-7. Restricting the dates that the user can select
![]() Tip Notice that the previous and next buttons are disabled automatically when they are not required. These are the buttons at the top left and top right of the datepicker that allow the user to move to the previous and next months. In Figure 21-7, all of the dates that the user can select are in the current or previous month, so the next button is disabled. You can hide, rather than disable, buttons in this situation by setting hideIfNoPrevNext to true.
Tip Notice that the previous and next buttons are disabled automatically when they are not required. These are the buttons at the top left and top right of the datepicker that allow the user to move to the previous and next months. In Figure 21-7, all of the dates that the user can select are in the current or previous month, so the next button is disabled. You can hide, rather than disable, buttons in this situation by setting hideIfNoPrevNext to true.
The minDate need not be in past, the maxDate need not be in the future, and you don’t have to provide values for both settings. If you need the user to pick a date for which there is some kind of lead time, you can specify a future date for the minDate setting to prevent dates from being selected that are inside the period you need to prepare, as shown in Listing 21-9.
Listing 21-9. Providing One Date Restriction to Create a Delay Window
...
<script type="text/javascript">
    $(document).ready(function() {
        $("#datep").datepicker({
            minDate: "+7"
        });
    });
</script>
...
In this example, I have specified that the user cannot select any date that occurs sooner than a week from today. There is no maxDate value, meaning that any future date after a week from now can be selected. You can see the result in Figure 21-8. Notice that the next button (which allows the user to navigate to the next month) is enabled in this figure, but the previous button is disabled (since there are no dates in the past that the user is allowed to select).
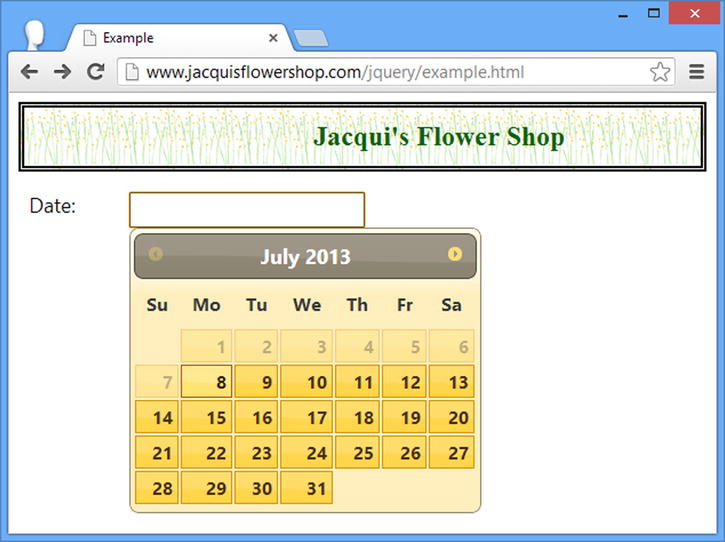
Figure 21-8. Creating an open-ended date selection range
![]() Tip The minDate and maxDate settings work in conjunction with the defaultDate setting, meaning that you can specify ranges of dates relative to a date that is not today.
Tip The minDate and maxDate settings work in conjunction with the defaultDate setting, meaning that you can specify ranges of dates relative to a date that is not today.
The datepicker allows you to specify how many months are displayed to the user through the numberOfMonths setting. You can specify either a number of months or a two-element array, which specifies the size of a grid of months. Listing 21-10 shows the array-based approach, which I find is most suited to inline datepickers because the grid is often too big to use as a pop-up (I’ll explain why in a moment).
Listing 21-10. Using the numberofMonths Setting
...
<script type="text/javascript">
    $(document).ready(function() {
        $("#inline").datepicker({
            numberOfMonths: [1, 3]
        });
    });
</script>
...
In this example, I have specified a grid of one month high and three months wide. You can see the effect in Figure 21-9.
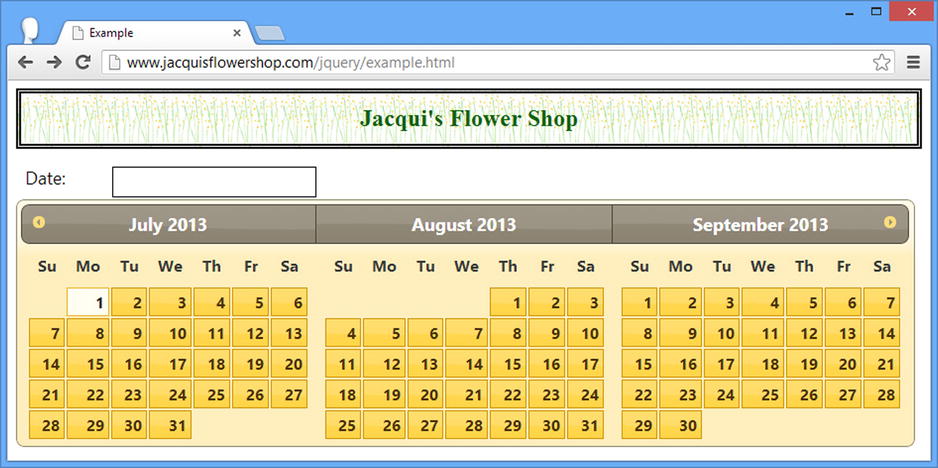
Figure 21-9. Displaying a grid of months
![]() Tip The two-element array [1, 3] is equivalent to the numeric value 3. When you provide a number for the numberOfMonths setting, the datepicker displays the specified number of months in a single row.
Tip The two-element array [1, 3] is equivalent to the numeric value 3. When you provide a number for the numberOfMonths setting, the datepicker displays the specified number of months in a single row.
The reason that I rarely use this feature with pop-up datepickers is that a large grid requires assumptions about the size of the user’s browser window and display. The datepicker pop-up isn’t an operating system dialog box. It is a carefully formatted HTML element that is displayed as part of the HTML document. This means that when a large datepicker is displayed on a small screen or in a small browser window, much of the detail is displaced off the edge of the screen. Listing 21-11 shows a grid of months applied to a pop-up datepicker.
Listing 21-11. Using the numberOfMonths Setting with a Pop-up Datepicker
...
<script type="text/javascript">
    $(document).ready(function() {
        $("#datep").datepicker({
            numberOfMonths: [1, 3]
        });
    });
</script>
...
You can see the result in Figure 21-10. Not only are many of the available dates hidden from the user, but the next button (which allows the user to advance the displayed months) is off the screen as well.

Figure 21-10. Displaying a large pop-up datepicker
You can change the position of the selected date in a multimonth datepicker using the showCurrentAtPos setting. As you can see in Figures 21-9 and 21-10, the default is to display the current month first, followed by the next two months in the future. The showCurrentAtPos setting takes a zero-based index value that specifies the location where the current month should be displayed. This is a handy feature if you need to allow the user to select dates on either side of today. Listing 21-12 shows the use of this setting.
Listing 21-12. Using the showCurrentAtPos Setting
...
<script type="text/javascript">
    $(document).ready(function() {
        $("#inline").datepicker({
            numberOfMonths: 3,
            showCurrentAtPos: 1
        });
    });
</script>
...
I have specified that the current date should be shown in the middle of the three months shown by the datepicker. You can see the result in Figure 21-11.
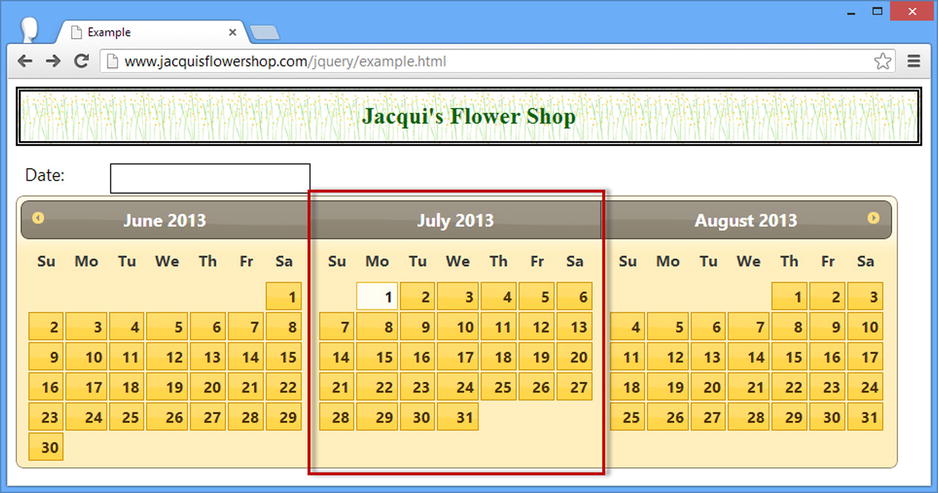
Figure 21-11. Specifying the location of the current month in a multimonth datepicker
Providing Direct Access to Months and Years
You can replace the month and year in the header of the datepicker header with drop-down menus that provide direct access to months and years. This can be a useful shortcut for users when there is a large date range to select from. The settings that control these features are changeMonth and changeYear. A true value for these settings enables the corresponding menu, and the menus can be enabled independently of one another. Listing 21-13 shows the use of these settings.
Listing 21-13. Providing Direct Access to Months and Years Through Drop-Down Menus
...
<script type="text/javascript">
    $(document).ready(function() {
        $("#datep").datepicker({
            changeMonth: true,
            changeYear: true,
            yearRange: "-1:+2"

        });
    });
</script>
...
In this listing, I have enabled both drop-down menus. I have also used the yearRange setting to limit the range of years that the user can navigate to. I specified a value of -1:+2, which means that the user can select one year back from today through to two years into the future. Since I am writing this chapter in 2013, the range of years that the user is presented with is 2012 to 2015. You can see how the menus are displayed (and how the year range appears) in Figure 21-12.
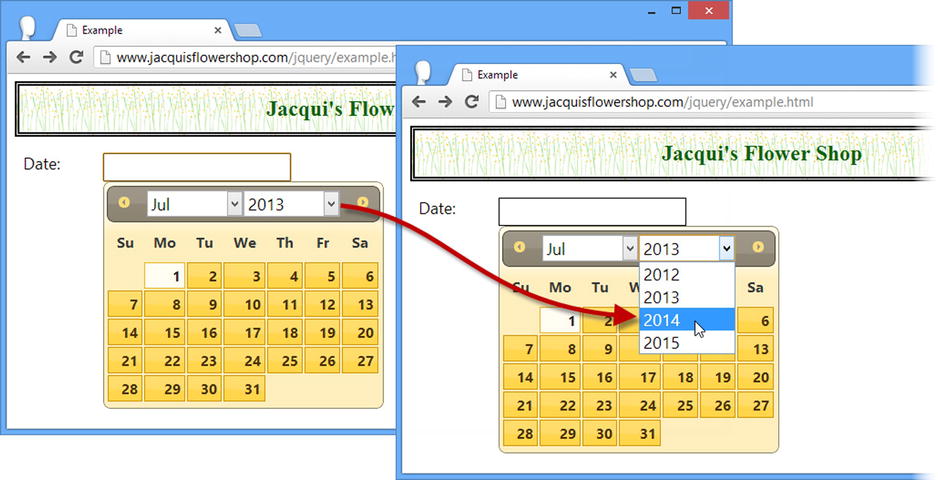
Figure 21-12. Providing the user with direct access to months and years
![]() Tip You can also supply a range of actual years for the yearRange setting. I could have achieved the same result in Figure 21-12 with a value of 2012:2015.
Tip You can also supply a range of actual years for the yearRange setting. I could have achieved the same result in Figure 21-12 with a value of 2012:2015.
Managing the Appearance of the Datepicker
You can use a number of settings to tailor the appearance of the datepicker when it is displayed to the user. For general date selection purposes, the default appearance that you have seen in earlier examples is usually suitable, but the ability to tweak the appearance to suit the requirements of a web application is extremely useful. Table 21-5 describes the appearance-related settings.
Table 21-5. Datepicker Settings for Controlling Appearance
| Setting | Description |
|---|---|
| appendText | Specifies a formatting hint that will be inserted into the document after the input element. |
| closeText | Specifies the text to use for the button in the button bar that dismisses a pop-up datepicker. The default is Done. |
| currentText | Specifies the text to use for the button in the button bar that returns to the current date. The default is Today. |
| duration | Specifies the speed or duration for the animation specified by the showAnim setting is performed. The default is normal. I described the jQuery UI animation effects in Chapter 35. |
| gotoCurrent | When true, the Today button in the button bar will return to the selected date rather than today’s date. The default is false. |
| selectOtherMonths | When true, the dates shown as a result of the showOtherMonths setting can be selected. The default is false. |
| showAnim | Specifies the animation used to show and hide pop-up datepickers. I describe the jQuery UI animation effects in Chapter 35. The default is show. |
| showButtonPanel | When true, the datepicker displays a button bar allowing the user to jump to the current date and (when used with a pop-up) to dismiss the datepicker. The default is false. |
| showOptions | Specifies the options for the animation defined by the showAnim setting. I describe the jQuery UI animation effects in Chapter 35. |
| showOtherMonths | When true, the datepicker fills blanks in the date grid with dates from the previous and subsequent months. The default is false. |
| showWeek | When true, the datepicker displays a column showing week information. The default is true. |
| weekHeader | Sets the header for the week column enabled through the showWeek setting. The default is Wk. |
Displaying Weeks
For some applications, knowing which week of the year a date falls in is essential. This is often the case in budget management applications, for example. The jQuery UI datepicker can display week information, configured through the showWeek and weekHeader settings, as shown in Listing 21-14.
Listing 21-14. Displaying Week Information in the Datepicker
...
<script type="text/javascript">
    $(document).ready(function() {
        $("#datep").datepicker({
            showWeek: true,
            weekHeader: "Week"
        });
    });
</script>
...
When the showWeek setting is true, the datepicker displays a column that shows week numbers. You can use the weekHeader setting to change the title of the week column from the default, Wk. In the example, I have enabled the week column and changed the title to Week. You can see the result in Figure 21-13.
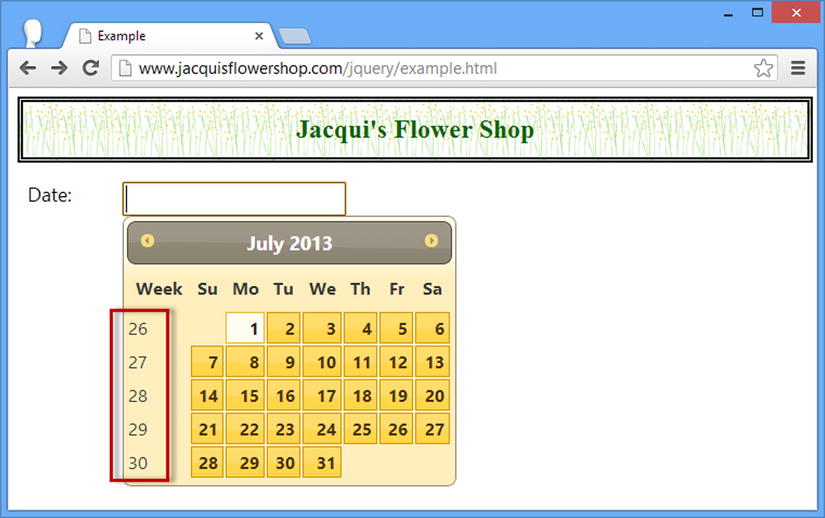
Figure 21-13. Showing week information in the datepicker
The datepicker displays only the dates in the current month by default. This means there are blank entries in the date grid before and after the range of dates. You can show dates from the previous and next months by using a value of true for the showOtherMonth setting, as shown in Listing 21-15.
Listing 21-15. Allowing Months to Bleed into One Another
...
<script type="text/javascript">
    $(document).ready(function() {
        $("#datep").datepicker({
            showOtherMonths: true
        });
    });
</script>
...
You can see the result in Figure 21-14. The dates from the other months cannot be selected unless selectOtherMonths is set to true.

Figure 21-14. Showing dates from previous and subsequent months
When true, the showButtonBar setting enables a button bar at the bottom of the datepicker window. When using a pop-up datepicker, the button bar contains Today and Done buttons. The Today button jumps back to the current date, and the Done button dismisses the pop-up. You can see the buttons in Figure 21-15. When part of an inline datepicker, only the Today button is shown.
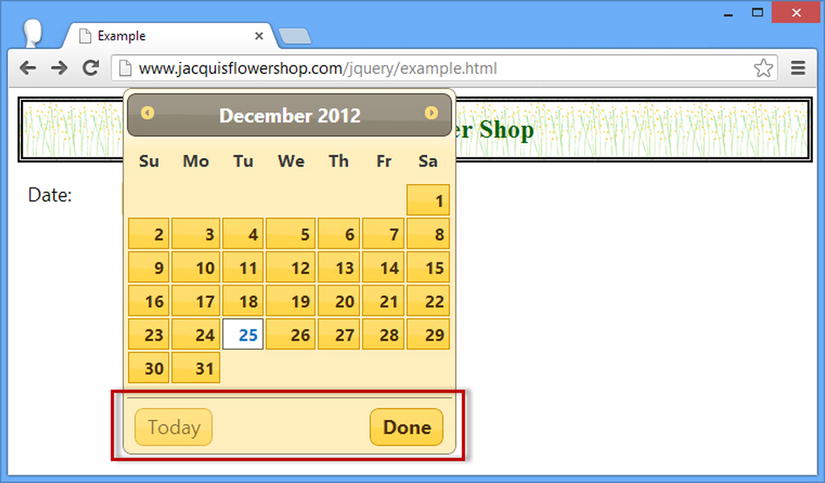
Figure 21-15. Showing the button bar
![]() Tip You can change the text used for the Today and Done buttons using the currentText and closeText settings.
Tip You can change the text used for the Today and Done buttons using the currentText and closeText settings.
When true, the gotoCurrent setting will return the datepicker to the currently selected date rather than today’s date. This is useful when you have configured the datepicker with the defaultDate setting. It doesn’t always make sense to return to the current date if the purpose of the date selection is related to historical or future events. Listing 21-16 contains an example.
Listing 21-16. Using the gotoCurrent Setting
...
<script type="text/javascript">
    $(document).ready(function() {
        $("#datep").datepicker({
            showButtonPanel: true,
            gotoCurrent: true,
            defaultDate: "+1m +1y"
        }).val("12/25/2012");
    });
</script>
...
Note that the gotoCurrent setting causes the button to go to the selected date. In Listing 21-16, the date will be taken from the value attribute of the input element, but if the user selects another date and later opens the datepicker again, the button will return to the date the user selected rather than the dates you specified.
Providing a Format Hint to the User
You can use the appendText setting to provide the user with a hint about the date format that you are expecting. Listing 21-17 demonstrates.
Listing 21-17. Using the appendText Setting to Provide a Format Hint
...
<script type="text/javascript">
    $(document).ready(function() {
        $("#datep").datepicker({
            appendText: "(mm/dd/yyyy)"
        });
    });
</script>
...
The datepicker inserts the text you specify into the document, as shown in Figure 21-16.
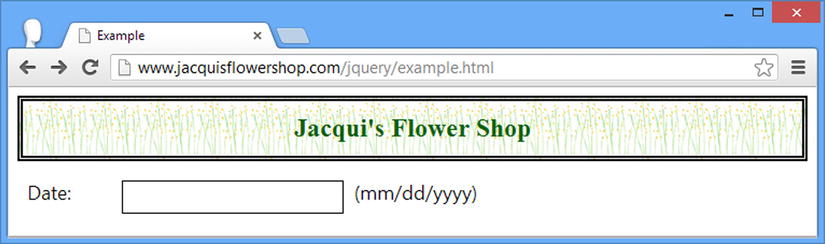
Figure 21-16. Using the appendText setting to provide a format hint to the user
This setting is most useful when you rely on a button to make the pop-up datepicker appear. When the user is free to enter the text without the datepicker, then the hint you give her about the format can significantly reduce the errors you have to deal with (which is good for you and less frustrating for the user). Recently, I have started using the HTML5 placeholder attribute for input elements as a neater alternative to the datepicker appendTo setting. Listing 21-18 demonstrates.
Listing 21-18. Providing a Formatting Hint Using the HTML5 Placeholder Attribute
...
<script type="text/javascript">
    $(document).ready(function() {
        $("#datep").attr("placeholder", "mm/dd/yyyy").datepicker();
    });
</script>
...
Obviously, this requires the user to have an HTML5-enabled browser, but the effect is more elegant. The user is presented with the hint in grayed-out text that disappears as soon as he starts typing. I prefer this because it is more closely associated the formatting hint with the input element, and it doesn’t require space in the document layout. You can see how the placeholder is displayed in Google Chrome in Figure 21-17.
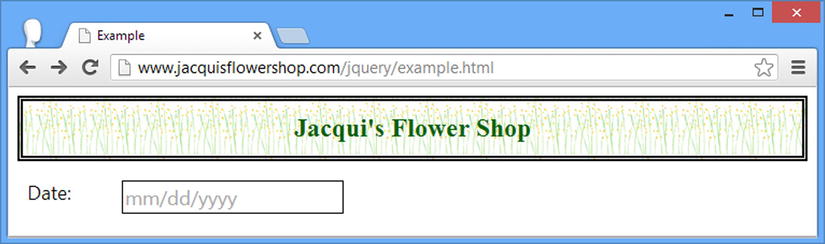
Figure 21-17. Using an HTML5 placeholder as a formatting hint
The datepicker widget supports the methods that are shown in Table 21-6.
Table 21-6. Accordion Methods
| Method | Description |
|---|---|
| datepicker("destroy") | Removes the datepicker from the underlying element |
| datepicker("disable") | Disables the datepicker |
| datepicker("enable") | Enables the datepicker |
| datepicker("option") | Sets one or more options for the datepicker |
| datepicker("isDisabled") | Returns true if the datepicker is disabled |
| datepicker("hide") | Hides a pop-up datepicker |
| datepicker("show") | Shows a pop-up datepicker |
| datepicker("refresh") | Refreshes a datepicker to reflects changes in the underlying element |
| datepicker("getDate") | Gets the selected date from the datepicker |
| datepicker("setDate", date) | Sets the selected date for the datepicker |
Getting and Setting the Date Programmatically
I find the getDate and setDate methods most useful when I am using multiple inline date pickers to allow the user to select a date range. In this situation, I don’t want to display the selected dates in input elements. I want to display just the number of days between the first and second dates. Listing 21-19 demonstrates.
Listing 21-19. Using Two Datepickers to Select a Date Range
<!DOCTYPE html>
<html>
<head>
    <title>Example</title>
    <script src="jquery-2.0.2.js" type="text/javascript"></script>
    <script src="jquery-ui-1.10.3.custom.js" type="text/javascript"></script>
    <link rel="stylesheet" type="text/css" href="styles.css"/>
    <link rel="stylesheet" type="text/css" href="jquery-ui-1.10.3.custom.css"/>
    <style type="text/css">
        input {width: 200px; text-align: left; margin-right: 10px}
        #wrapper > * {float: left}
        #result {margin: auto; padding: 10px; width: 200px; clear: left}
    </style>
    <script type="text/javascript">
        $(document).ready(function() {

            $("#result").hide();

            $("#dateStart, #dateEnd").datepicker({
                minDate: "-7d",
                maxDate: "+7d",
                onSelect: function(date, datepicker) {
                    if (datepicker.id == "dateStart") {
                        $("#dateEnd").datepicker("setDate", date)
                            .datepicker("enable").datepicker("option", "minDate", date)
                    }

                    if (!$("#dateEnd").datepicker("isDisabled")) {
                        var startDate = $("#dateStart").datepicker("getDate");
                        var endDate = $("#dateEnd").datepicker("getDate");
                        var diff = endDate.getDate() - startDate.getDate();
                        $("#dayCount").text(diff).parent().show();
                    }
                }

            }).filter("#dateEnd").datepicker("disable");
        });
    </script>
</head>
<body>
    <h1>Jacqui's Flower Shop</h1>
    <form method="post" action="http://node.jacquisflowershop.com/order">
      <div id="wrapper" class="ui-widget">
        <label for="dateStart">Start: </label><span id="dateStart"></span>
        <label for="dateEnd">End: </label><span id="dateEnd"></span>
      </div>
      <div id="result" class="ui-widget">
        Number of Days: <span id="dayCount"></span>
      </div>
    </form>
</body>
</html>
There are two datepickers in Listing 21-19, the second of which is disabled when the document is first loaded. I use the onSelect event (which is triggered when a date is selected) to respond to the user making date selections. When the user makes a selection in the first datepicker, I use the setDate method to prepare the second datepicker and the getDate method to get the dates from both datepicker in order to work out the number of days between the first and second selected dates (to keep this example simple, I have done a comparison that assumes that both dates are in the same month). You can see how this document is displayed in the browser in Figure 21-18.
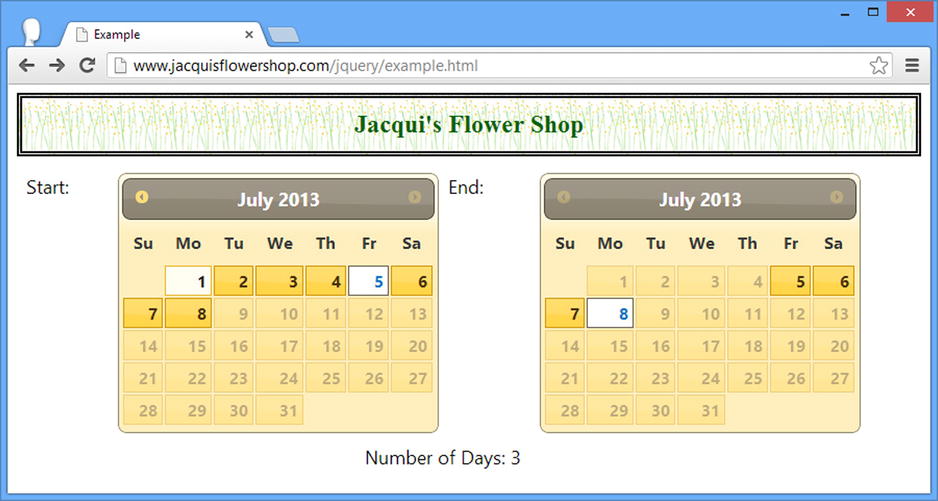
Figure 21-18. Using the getDate and setDate methods
Showing and Hiding Pop-up Datepickers Programmatically
You can use the show and hide methods to programmatically control the presence of a pop-up datepicker on the screen. This can be useful if you want to associate the datepicker with something other than the focus of the input element or the button that the datepicker widget creates. I am not much of a fan of letting the datepicker create a button in the document, so I occasionally find myself using these methods to control the datepicker from a button I have added myself, as demonstrated in Listing 21-20.
Listing 21-20. Using the show and hide Methods
<!DOCTYPE html>
<html>
<head>
    <title>Example</title>
    <script src="jquery-2.0.2.js" type="text/javascript"></script>
    <script src="jquery-ui-1.10.3.custom.js" type="text/javascript"></script>
    <link rel="stylesheet" type="text/css" href="styles.css"/>
    <link rel="stylesheet" type="text/css" href="jquery-ui-1.10.3.custom.css"/>
    <style type="text/css">
        input {width: 200px; text-align: left; margin-right: 10px}
        #wrapper > * {float: left}
        label {padding: 4px; text-align: right; width: auto}
    </style>
    <script type="text/javascript">
        $(document).ready(function() {

            $("#datep").datepicker();

            $("button").click(function(e) {
                e.preventDefault();
                $("#datep").datepicker("show");
                setTimeout(function() {
                    $("#datep").datepicker("hide");
                }, 5000)
            })


        });
    </script>
</head>
<body>
    <h1>Jacqui's Flower Shop</h1>
    <form method="post" action="http://node.jacquisflowershop.com/order">
      <div id="wrapper" class="ui-widget">
        <label for="datep">Date: </label><input id="datep"/><span id="inline"></span>
        <button>Datepicker</button>
      </div>
    </form>
</body>
</html>
I call the datepicker show method when the button is clicked. I don’t often use the hide method because I want the user to be able to dismiss the pop-up when he has made a selection, but for completeness, I have used the setTimeout function so that the pop-up is dismissed five seconds after the button has been pressed.
Using the Datepicker Events
Like all jQuery UI widgets, the datepicker supports a set of events that allow you to receive notifications of important changes. Table 21-7 describes these events.
Table 21-7. Datepicker Events
| Event | Description |
|---|---|
| create | Triggered when the datepicker is created |
| onChangeMonthYear | Triggered when the user moves to a different month or year |
| onClose | Triggered when a pop-up datepicker is closed |
| onSelect | Triggered when the user selects a date |
I am not going to demonstrate the onSelect method again because I have already used it in a couple of examples, including the one in the section “Getting and Setting the Date Programmatically.” The arguments passed to the handler function for this event are a string representation of the selected date and the datepicker that has triggered the event.
Responding to a Month or Year Change
The onChangeMonthYear event allows you to respond when the user selects a new month or year, either from the drop-down menus enabled by the changeMonth and changeYear settings or through the previous and next buttons. Listing 21-21 shows how you can use this event to keep two datepickers consistent.
Listing 21-21. Using the onChangeMonthYear Event
<!DOCTYPE html>
<html>
<head>
    <title>Example</title>
    <script src="jquery-2.0.2.js" type="text/javascript"></script>
    <script src="jquery-ui-1.10.3.custom.js" type="text/javascript"></script>
    <link rel="stylesheet" type="text/css" href="styles.css"/>
    <link rel="stylesheet" type="text/css" href="jquery-ui-1.10.3.custom.css"/>
    <style type="text/css">
        input {width: 200px; text-align: left; margin-right: 10px}
        #wrapper > * {float: left}
    </style>
    <script type="text/javascript">
        $(document).ready(function() {

            $("#dateStart, #dateEnd").datepicker({
                onSelect: function(date, datepicker) {
                    if (datepicker.id == "dateStart") {
                        $("#dateEnd").datepicker("setDate", date)
                    }
                },
                onChangeMonthYear: function(year, month, datepicker) {
                    if (datepicker.id == "dateStart") {
                        var newDate = new Date();
                        newDate.setMonth(month -1);
                        newDate.setYear(year);
                        $("#dateEnd").datepicker("setDate", newDate);
                    }
                }
            })
        });
    </script>
</head>
<body>
    <h1>Jacqui's Flower Shop</h1>
    <form method="post" action="http://node.jacquisflowershop.com/order">
      <div id="wrapper" class="ui-widget">
        <label for="dateStart">Start: </label><span id="dateStart"></span>
        <label for="dateEnd">End: </label><span id="dateEnd"></span>
      </div>
    </form>
</body>
</html>
The three arguments to the function for this event are the displayed year, the displayed month, and the datepicker that triggered the event. The this variable is set to the input element for pop-up datepickers. When the user navigates to a new month or year on the first datepicker, I set the date on the second datepicker to keep them in sync.
Notice that the datepicker widget represents January as month 1 while the JavaScript Date object uses 0. This is why I have to make an ugly adjustment like this
...
newDate.setMonth(month -1);
...
when I am creating the date I want displayed in the second datepicker.
Responding to the Pop-up Closing
You can use the onClose method to respond to the pop-up datepicker being closed. This event is triggered even when the user has not made a date selection. The arguments to the handler function are a string representation of the date (or the empty string if the user dismissed the datepicker without making a selection) and the datepicker that triggered the event. Listing 21-22 shows a simple response to this event.
Listing 21-22. Using the onClose Event
<!DOCTYPE html>
<html>
<head>
    <title>Example</title>
    <script src="jquery-2.0.2.js" type="text/javascript"></script>
    <script src="jquery-ui-1.10.3.custom.js" type="text/javascript"></script>
    <link rel="stylesheet" type="text/css" href="styles.css"/>
    <link rel="stylesheet" type="text/css" href="jquery-ui-1.10.3.custom.css"/>
    <style type="text/css">
        input {width: 200px; text-align: left; margin-right: 10px}
        #wrapper > * {float: left}
    </style>
    <script type="text/javascript">
        $(document).ready(function() {
            $("#datep").datepicker({
                onClose: function(date, datepicker) {
                    if (date != "") {
                        alert("Selected: " + date);
                    }
                }
            });
        });
    </script>
</head>
<body>
    <h1>Jacqui's Flower Shop</h1>
    <form method="post" action="http://node.jacquisflowershop.com/order">
      <div id="wrapper" class="ui-widget">
        <label for="datep">Date: </label><input id="datep"/>
      </div>
    </form>
</body>
</html>
In Listing 21-22, I display an alert box to the user displaying the selection, if one has been made. I must admit that I have never found myself using this event in a real project; the onSelect event is the one that I find most useful.
The jQuery UI datepicker has comprehensive support for the different date formats used around the world. To use them, you need to import an additional JavaScript file into your document and tell the datepicker which locale you want to use. Listing 21-23 provides an example.
Listing 21-23. Using the Localized Datepicker
<!DOCTYPE html>
<html>
<head>
    <title>Example</title>
    <script src="jquery-2.0.2.js" type="text/javascript"></script>
    <script src="jquery-ui-1.10.3.custom.js" type="text/javascript"></script>
    <script src="jquery-ui-i18n.js" type="text/javascript"></script>
    <link rel="stylesheet" type="text/css" href="styles.css"/>
    <link rel="stylesheet" type="text/css" href="jquery-ui-1.10.3.custom.css"/>
    <style type="text/css">
        input {width: 200px; text-align: left; margin-right: 10px}
        #wrapper > * {float: left}
    </style>
    <script type="text/javascript">
        $(document).ready(function() {
            $("#inline").datepicker($.datepicker.regional["es"]);
        });
    </script>
</head>
<body>
    <h1>Jacqui's Flower Shop</h1>
    <form method="post" action="http://node.jacquisflowershop.com/order">
      <div id="wrapper" class="ui-widget">
        <label for="datep">Date: </label><input id="datep"/><span id="inline"></span>
      </div>
    </form>
</body>
</html>
The jquery-ui-i18n.js file can be found in the development-bundle/ui/i18n folder of the customized jQuery UI download you created in Chapter 17. Copy this file into place alongside the main jQuery and jQuery UI script files and add the following to your document:
...
<script src="jquery-ui-i18n.js" type="text/javascript"></script>
...
You can specify the locale to use for the datepicker when you create it, as follows:
...
$("#inline").datepicker($.datepicker.regional["es"]);
...
This is a messy syntax, but it allows you to specify the localized formats you want. In this example, I have specified es, which means that I will be using the Spanish date formats. You can see the result in Figure 21-19.
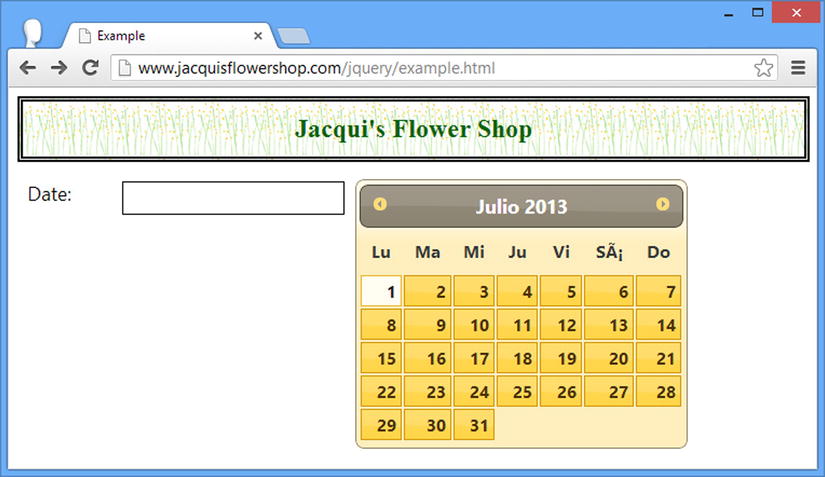
Figure 21-19. Localizing the date display
My advice for localization is that it should be done properly or not at all. This means going far beyond just date formats and presenting the user with an interface that fully follows language, address, gender, currency, time, and every other local convention. Users find it jarring if you localize only part of a web application or following conventions inconsistently. To properly localize an application, you should hire an individual or a company that specializes in such work. There are so many ways to go wrong that you are doomed to fail without professional support.
If you find yourself trying to localize an application using Google Translate (which is not uncommon), then I recommend you just deliver the application using US English and US localization conventions. This limits your customer base to those who are familiar with US variants on spelling, dates, currency, and so on, but at least you will avoid the train wreck that almost always arises when ad hoc localization is attempted.
Summary
In this chapter, I showed you the workings of the jQuery UI datepicker widget, which you can use to assist the user in selecting dates. The datepicker is a flexible widget that allows you to tailor the way that date selections are made and the appearance of the datepicker. My own experience with datepickers is that they are invaluable for reducing the number of formatting problems I have to deal with when requesting date information from users. In Chapter 22, I show you the jQuery UI dialog and spinner widgets.