7
Designing Materials With Production Details
In This Chapter
![]() A three-step design process for virtual success
A three-step design process for virtual success
![]() Three ways to document who does what, when, and how
Three ways to document who does what, when, and how
![]() Visual production details and instructions to assist attendees
Visual production details and instructions to assist attendees
The two most important parts of having a plan in place when producing a live online session are managing the what and the when: what technical tasks need to be managed, and when should they be addressed? I’ve delivered hundreds of virtual training sessions, online meetings, and webinars, and every time I am with a live audience it is so easy to lose track of the technical details as I focus on my attendees. I forget I have polls to run and annotation tools to enable, and even if I am working with another person to help with these tasks, they too need to know the what and the when. Having designed a plan for these specific details helps me deliver a more focused and engaging session.
When more than one person is responsible for the successful production of an online session, notes on how things will run are important for clarity and organization. In order to remember and refer to all that you have learned about the platform and the plans that have been put in place to produce your session, having a clear and usable set of materials to follow will keep the producer, the presenter, and the attendees organized and on track. Participants are often confused about how to use the features of the platform properly, so providing them with instructions on-screen and details in handouts is an excellent way to minimize any problems. Additionally, having a clear outline for the host and presenter on who does what, how, and when will keep everyone in alignment, ensuring nothing is missed during the live delivery of the session.
Whichever instructional design theory and process are used to develop the content of your program, the tasks for the live virtual delivery of the session will be essentially the same. Webex, Zoom, Adobe Connect, and so on are the delivery method, acting as a physical space or room does, informing how things move, act, and feel, but not directly deciding the goals, objectives, and content that is being shared. The approaches and theories used to design your content still apply virtually, and referring to the information, processes, guidelines, and examples in this chapter will help you make the most of your live online experiences, no matter your instructional design approach.
Materials such as presenter notes, outlines, facilitator and participant guides, and even PowerPoint slides will help you manage the session if the platform unexpectedly stops working while you are live. Asking participants to refer to their handouts and provided content while conducting the session via teleconference is one way to proceed if the platform and the computer interface go down. It’s typically the case with today’s technologies that they will not stay down for long, allowing everyone to reconnect or automatically reconnecting them within a short period of time. Requesting attendees refer to handouts, resources, and other materials that have been shared with an them in advance and conducting a conversation with them via a teleconference until the platform is up and running again is an excellent way to stay on schedule and keep people engaged.
When conducting a small online meeting, it may not be necessary to provide materials or create a fully documented plan on how to technically run the meeting. Keeping it simple with an agenda and a few notes on which features to use during the meeting is likely enough. For example, include notes on the PowerPoint slides to remind yourself to enable annotation tools for collaboration on a whiteboard or to use chat to capture ideas from a brainstorm. If the meeting is a large online, all-company meeting where multiple presenters will be involved and many attendees will be joining in, it is a best practice to have a documented plan, shared by all who are leading the meeting, so everyone is clear on how things will work.
Three-Step Design Process for Virtual Success
To design the flow of interactions and learning activities for your large online meeting, webinar, and virtual instructor-led training sessions, follow this three-step process. Begin by clearly outlining the why, the who, and the how for your program or session. This design process is especially useful for determining how to convert traditional in-person training into the virtual instructor led environment. It serves as a guide for what needs to be included, for what purpose, how many people, how much time, and what features of the platform to use.
1. Identify the Goal and Objectives
What needs to be accomplished and what does that look like?
2. Determine What’s Social
Which objectives are best completed with other people together at the same time?
3. Map the Interactions to the Features
Which features of your live online platform allow those interactions?
1. Identify the Goal and Objectives
What needs to be accomplished and what does that look like? What is the purpose of the webinar or training session, and what are the specific things the participants will do once they have completed the session? It’s important to be clear on the point of your session to avoid an ineffective lecture or an uninteresting reading of PowerPoint slides.
It is also a good practice to make your point clearly on actions that participants will take rather than just assuming what you present is for their “understanding.” For instance, “Attendees will be updated on our newest products,” versus “Attendees will be able to list the latest features and benefits of our newest products.” The clearer the objective, the easier it is to decide what to present live online and exactly how to do it in a way that engages participants. It also helps identify what should be done in other formats such as independent reading, recordings, discussion boards, microlearning, and all the other learning approaches available.
2. Determine What’s Social
Which objectives are best completed with other people together at the same time? Look back through each of the objectives of your presentation or training. To determine what should be delivered live online, choose the objectives that will be best learned with people participating at the same time. Some objectives will be best experienced together, such as creating a new process or brainstorming ideas, while others will be slightly more difficult, such as reviewing leading practices or outlining specific steps in a process. Sometimes it is less about the program’s learning objectives and more about the need to bring a group of peple together for other reasons, such as team bonding or communication strengthening. Ultimately, the decision is made based on your organizational goals, the needs of your participants, and the availability of time and technologies. Focusing on the objectives where people will have a better experience learning together will produce the most impact.
In addition to writing books, I teach trainers how to be live online virtual trainers. An obvious objective of the program is to master the virtual classroom technology. As part of this, I do not walk through the steps of how to use each feature in a live online session with all participants present. Instead, I train using all the features I can in each session, providing a model of how each feature can be used as a form of inspiration. Each participant is then given an independent assignment to open their own virtual classroom session, in their own platform, walking through each feature on their own. We then regroup in another live session to review and pose questions.
It would be a waste of participants’ time to maintain a social component by having them in the live virtual session watch me click around or watching each other. Instead, I’ve designed the activity to be done independently, while they can learn together during the review. This leaves participants inspired by the possibilities available to them with the features of the platform and able to use the features of the platform to create engaging learning experiences themselves.
3. Map the Interactions to the Features
Which features of your live online platform allow the desired interactions? The difficult analysis work is complete; now you need to determine which features of the platform to use. Whatever the choice—whiteboard, chat, webcam, breakout—it simply needs to support and encourage the social interactions and learning objectives of the session. After exploring all that your platform has to offer, you’ll likely have an idea of what kinds of experiences you want to create.
A helpful guideline: When they need to type long sentences, use chat, and when they could circle, point, or choose things, consider a whiteboard or an annotated slide. The same types of interactions can be done in breakouts, and by adding discussions, webcams, software usage, and website explorations, there are many choices for you to create interaction as well as collaboration in your live online meetings, webinars, and virtual classroom training sessions.
Consider what you would do if you needed to conduct a brainstorm. I find using the chat feature to be the most effective way to facilitate this discussion. Participants usually have more than one word to type and using their keyboards in chat is more comfortable than a text tool on a whiteboard. For a pros versus cons brainstorm activity, it’s easy to organize the chat by typing PROS first, and asking participants to provide their responses. Once they have responded, type CONS next as a divider, and ask participants to follow with responses. All the messages can be saved and referred to later, or even reviewed in the moment using a scrolling feature.
As a second example, I like to develop a slide with space for annotating when debriefing an activity. The centralized visual serves as a place to focus without being distracted. I often type key words as participants take turns talking and it helps everyone focus and listen as the words appear.
Documenting Who Does What, When, and How
There are many details to recall when presenting a webinar or delivering a training, both in-person and live online. In-person is likely more familiar, and most people have confidence that they will effectively manage all that needs to be done given their previous experience. Yet, presenters and trainers for in-person sessions still create presentations, lesson plans, activities, and resources ahead of time to stay on schedule, on topic, and in tune with participant needs and expectations. Delivering live online sessions is no different when it comes to the topic and participant needs, but it is vastly different in that the physical space becomes a virtual one, requiring the use of technology to manage the entire experience.
How, after all the hard work of using the three-step process to design the live online session, does this get documented clearly and usefully for delivering live to an audience? It’s important that this documentation can be easily referenced while providing technical support at the same time. Things move quickly when presenting online, and if there are too many words, or too many details, they tend to get ignored and go unused. But it remains crucial to have a plan documented for the delivery of a webinar or a virtual instructor-led training so you can remember what needs to be done during each segment. And if you are partnering with someone who is likely at their own computer in an entirely separate location, then the documentation is even more valuable.
It’s necessary to plan each segment of the session from the moment it opens until the close. What’s being shown, what’s being said, how the technology is being used, how much time is needed, and who is doing each of these things all need to be determined. And, it needs to be easy to use, ideally referenced at a glance, so that the focus remains on the experience of the online session. There are several ways to do this; listed next are three approaches that work well.
PowerPoint Notes
Using the notes section of PowerPoint works well for small online meetings and uncomplicated webinars, where presenting, chatting, and polling comprise the extent of the interactions planned. Drafting a version of the script, adding key points as needed, and indicating what to do technically will help you stay on track and communicate to anyone else with whom you may be working. See Figure 7-1 for an example of what this may look like.
Figure 7-1. Introductory Slide for a Webinar

Virtual Facilitator and Producer Guide
In all the years I’ve been designing, delivering, and producing live online training, webinars, and meetings, I’ve tried many different formats for documenting the plan, but none has been more effective and useful than the one I learned from my mentor and friend, Nanette Miner, the Training Doctor. It remains my preferred format for all the virtual classroom instructor materials I develop, and I remain grateful for her guidance and encouragement early in my virtual training career.
Her template is effective because the simple layout manages not only content and technology, but also the timing of exactly who does what and when. I have always appreciated that important detail because we’ve all attended webinars when links were sent in chat for participants who were not ready for them, or breakouts were launched before the instructions on what to do in them were explained. It’s details such as these that differentiate a well-planned, intentionally designed online delivery from one hastily pulled together using the same processes and materials from a similar in-person program.
Space is provided for scripted content for the facilitator and the producer, and there is also room for bulleted key points or extra instructions. Importantly, space is provided for the technology and any production tasks, and in such a way that the timing is clearly indicated based on their position in the column.
The template itself is primarily a three-column table: an image of the visuals, the facilitator’s script and instructions, and the production tasks and platform details. This template works even when not using a designated person as a producer as it separates the technical details from the content details. For instance, in the case of a breakout activity, the facilitator column would contain the setup for the small group activity including instructions and details on what needs to be accomplished. Also included would be ideas on what to expect as a result of the activity and how to properly debrief it once the participants return. The producer (technical) column would indicate details on how many breakout rooms to set up, how much time to allot, and what materials to load into each one, if applicable. Scripting may be included, but if it is similar each time, it is best to create a seperate file for repeated use.
The same principle applies to any step-by-step technical instructions for the features. Create a separate document for things that remain the same. This is efficient for the instructional design team and creates a master file that can stay current with software updates and changes to the interface.
The template in Figure 7-2 is used with permission from Nanette Miner. And following the template in Figure 7-3 is an example activity from one of my actual learning activities, One Word, from my Online Virtual Facilitator Certificate.
Also consider this story from Nanette on the importance of design for virtual production: “I can’t emphasize enough the importance of the header information at the start of each new topic or segment of your facilitator guide. I learned this lesson the hard way when sitting in on a course I had designed, which was being taught by someone else and the trainer started drawing unintended conclusions from the activity. I thought to myself, ‘Where the heck is she going with this?’
“Then, like any good trainer, I realized that if the learners don’t do what you expected, 99 percent of the time it is because you gave poor instructions—so I examined why she did not understand the purpose of the activity and realized that it was because I had not made it clear. Without that direction she was left to draw her own conclusions and fill in the blanks. From that point on I added the short overview you see in Figure 7-2 to every facilitator guide I’ve created.”
Figure 7-2. Sample From Nanette Miner’s Facilitator and Producer Guide Template

Figure 7-3. My Example of a Facilitator and Producer Guide Template


Session Checklist
A third method of documenting who does what, when, and how is to develop a session checklist, commonly used by a vendor who provides production services. Working with a vendor is an excellent way to get the support and technical expertise needed to ensure your webinars and virtual classroom training sessions are successful without having to formally employ a person in the role, or create additional tasks for existing employees. Working with such vendors requires information to be shared with them on how you expect the session to run and the content you intend to share. Companies such as the Virtual Learning Collaborative help individuals and organizations create engaging learning experiences by partnering with them to deliver live online sessions. The session checklist I have used with them has been easy to use, efficient, and effective for communicating to the producers.
Their session checklist includes information like the title, date, time, and duration. Also listed is both the producer’s and presenters’ or instructor’s contact information including emails, phone numbers, instant messaging names, and backup mobile phone numbers. Important platform information includes the links, logins that will be used during live delivery, and technical information such as whether the session will be recorded. And finally, there is an area for additional notes and special information such as info on extra presenters, or other instructions that will affect the delivery of the session.
Once the general information about the session is documented, the session is listed chronologically according to the slide numbers or other visuals presented. This list is then used by the producer, making it their responsibility to follow along and perform as the session is delivered. Such a checklist is easy to follow and quick to put together. It helps planners and designers of sessions be clear on what is happening each moment throughout the sessions. Though the checklist is focused primarily on the production tasks and platform management, there is room for notes and extra tips as needed. The content script is not included in a checklist such as this, so presenters and trainers should use either the formal facilitator’s guide as mentioned before or notes in PowerPoint slides if the session is not too complicated.
See Figure 7-4 for a sample of what was included in a VLC session checklist for one of my two-hour live online workshops, called Interact and Engage! Activities for Spectacular Live Online Events.
Sonia Furini, owner of Virtual Learning Collaborative, has this to say about session checklists: “A session checklist paves the way to success in our producer’s preparation of their duties in the virtual classroom. Not everyone understands the need for a checklist or that such a thing exists! We work with our clients to provide a thorough overview of the many benefits of checklists, and then we move forward in assisting them to develop this resource. The session logistics, contact information, and required tasks are invaluable components of a well-developed checklist. We always work with one to ensure the best outcomes!”
Figure 7-4. Example Session Checklist for Producer Activities


Production Details for the Audience
The development of materials thus far has been focused on the perspective of the hosts, trainers, presenters, and other session leaders, but what about the participants? What will help them be successful connecting to and participating in your live online session? Chapter 8 is focused on strategies and techniques to fully prepare attendees for participating and learning in the live virtual environment, but support for that experience begins with the design of visual cues and instructions. Placing instructions and guidelines on PowerPoint slides and including technical instructions in handouts ensures you won’t be reliant only on audio. People are not always listening, may have technical problems that cause their audio connection to cut out, and sometimes just don’t hear things, so having details in other places is a leading practice. Use the following examples as guidelines when creating your materials.
Visual Cues
Participants do well with visual cues on slides that remind them which feature to use. Such cues also serve as a reminder to trainers and presenters! The slide in Figure 7-5 is an example of how to open a session and request participants use the features as soon as they connect. Placing instructions like this on the slide helps those who have not yet opened their audio connections to also begin participating in the session. Figure 7-6 shows a second example of a cue, this time not only alerting participants that there is a poll, but also reminding the presenter to refer to it.
Figure 7-5. Opening Activities Using Features
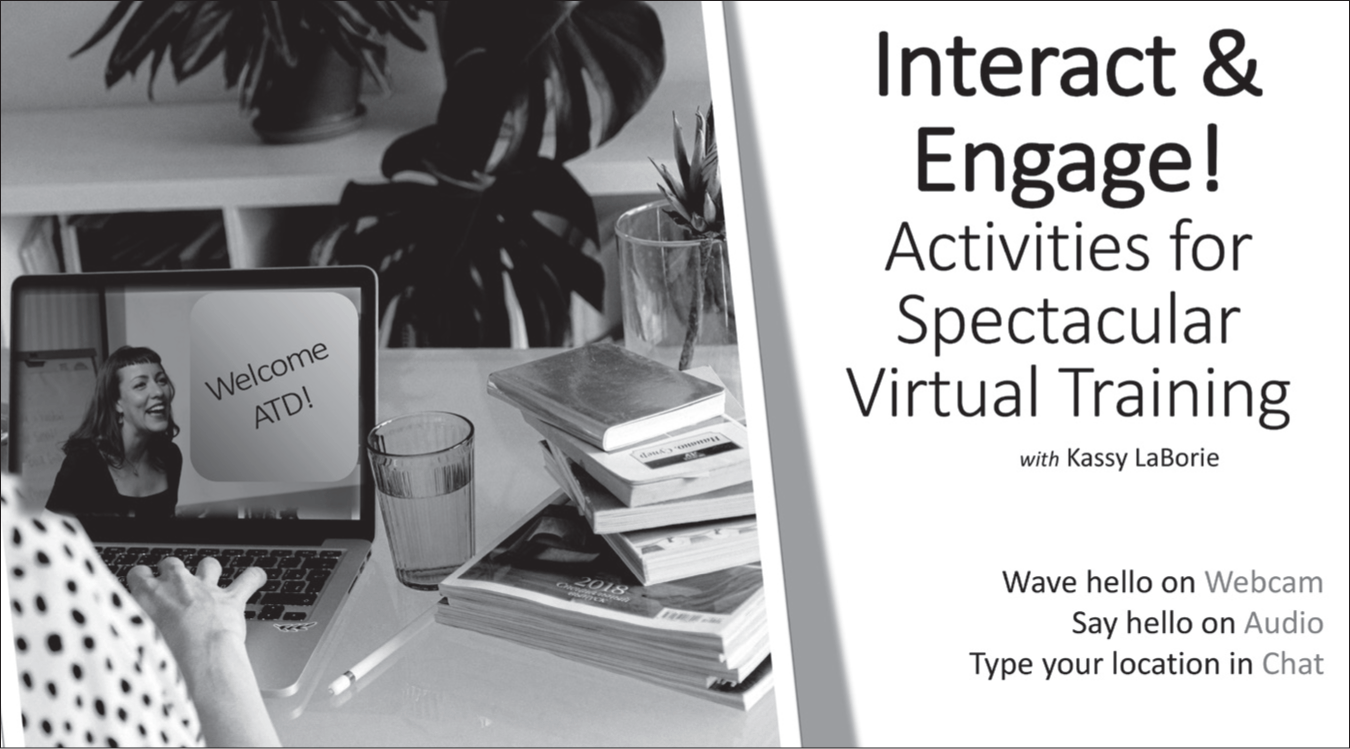
Figure 7-6. A Presenter’s Reminder to Ask a Question Using the Polling Feature

Instructions
Virtual attendees need instructions to participate in specific activities and to be successful in the virtual environment in general. When sending participants to another application—for example, to search a website or to work on a spreadsheet to do an assignment—they will need to know how to navigate back to the virtual classroom’s main window. When placing participants into breakout rooms to work together in small groups, it is easy for them to get lost or be confused on how to work in that new environment. Note that participants moving to breakout rooms for the first time may be nervous about it, thus more concerned with that than the actual assignment, so be sure to provide clear instructions at the moment of need.
In Figures 7-7 and 7-8, participants are performing a website scavenger hunt that requires them to look for answers on a website and then compete to finish first. They need the link, instructions to document their answers including the page number, and directions to indicate they are ready and to speak when called upon. Figure 7-7 shows the slide used, and the accompanying participants manual references are shown in Figure 7-8.
In Figures 7-9 and 7-10, participants are working in small groups to review what they have learned during the session using the Geometric Close. It is helpful to have content instructions separate from technical directions, so note the use of a T chart format to organize the two. Figure 7-9 is of the slide in the virtual classroom, and Figure 7-10 is a copy of what is in the printed participant manual. Note how the technical instructions are repeated in the manual.
Last, consider the breakout example script that appears in Figure 7-11 for how to explain and manage breakouts with participants.
Figure 7-7. Website Scavenger Hunt Slide
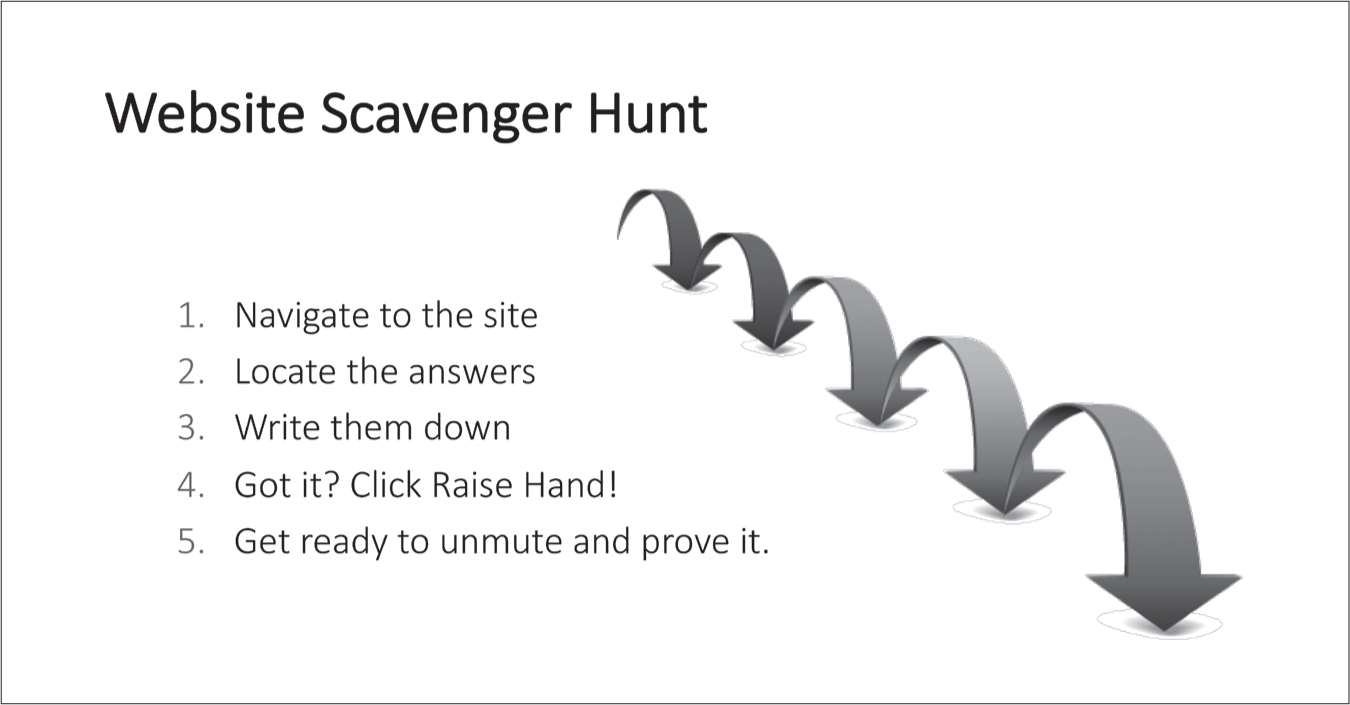
Figure 7-8. Website Scavenger Hunt Participant Manual

Figure 7-9. Final Session Breakout Activity Slide

Figure 7-10. Final Session Breakout Activity Participant Manual

Conclusion
Whether designing a virtual learning session, organizing a meeting, or presenting a webinar, it is important to be clear on who does what, when, and how. So many of these details may seem to be for the people leading the session, but as we saw, it is also valuable for the attendees. Providing written and visual details like what to do, where to look, and how to participate will help keep everyone engaged. Given how much is expected of attendees, let’s now examine how best to prepare them to successfully engage in a live online session.
Reflection Questions
![]() Which part of the three-step virtual design process resonates with you and why?
Which part of the three-step virtual design process resonates with you and why?
![]() Which ideas from the three ways to document who does what, when, and how will you likely use the most?
Which ideas from the three ways to document who does what, when, and how will you likely use the most?
![]() What ways will you add visual cues to your slides for your attendees?
What ways will you add visual cues to your slides for your attendees?
Figure 7-11. Breakout Example Script

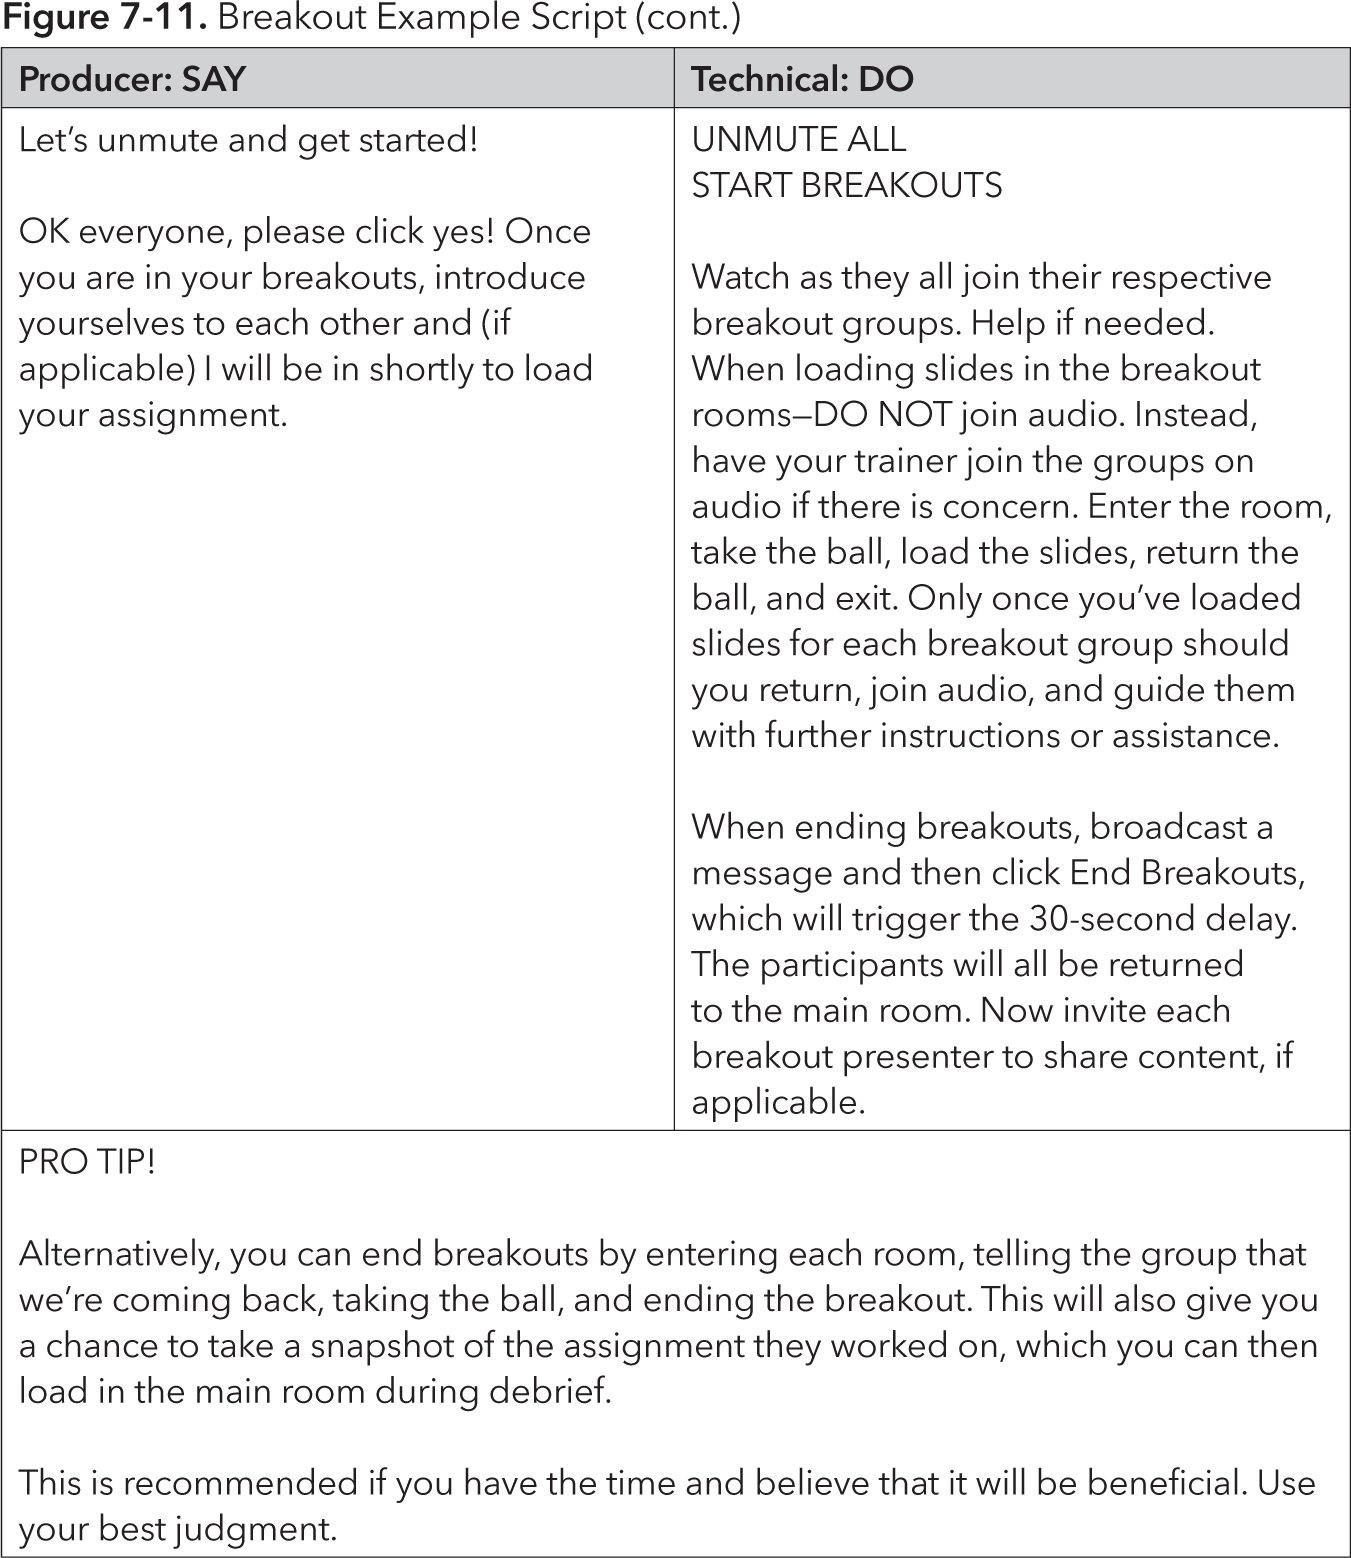
This script is used with Webex Training Center and adapted from Joe Murray, Digital Operations Manager at Dale Carnegie Training.