5 IMAGE ANALYSES AND LIGHTING SETUPS

Jar of Moisturizing Cream with Splashes
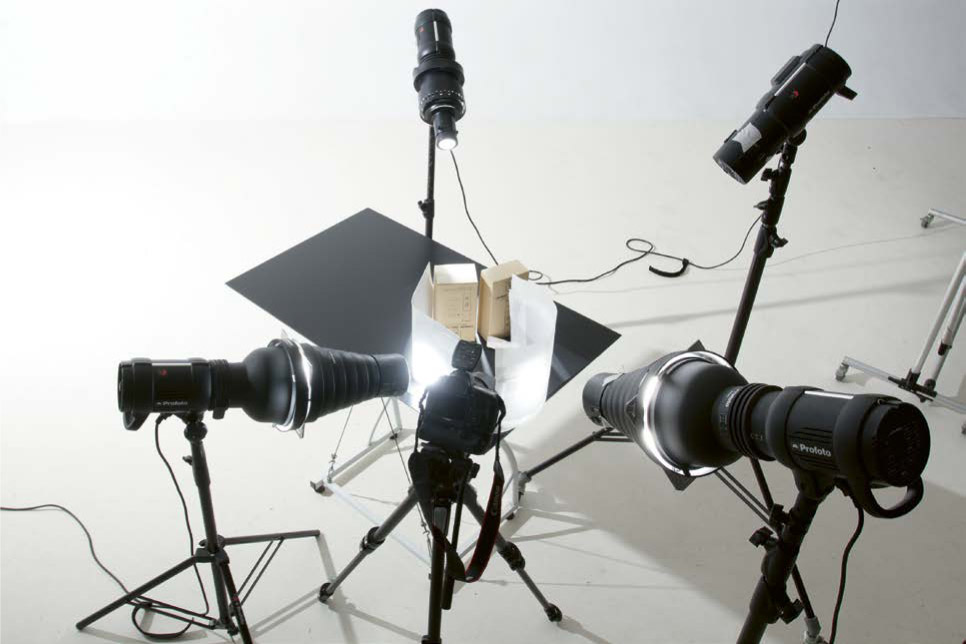
We will now study seventeen different photographs of objects to understand how to obtain a variety of results, in terms of both lighting and art direction. The photographs presented in this final chapter were taken with flashes; flashes are more comfortable to work with, but we could have obtained similar results with continuous lights, as long as the shapers were identical. What matters is the quality of the lights as well as the harmony between the strength of the light sources and the settings of the camera. The most important thing in lighting an object is not so much the actual power of the light sources as it is their proportions to each other. What is the use of knowing that one flash is measured at f/5.6 and another one at f/11 if no one explains that what makes the shot interesting is precisely the fact that the second source is projecting a light that is 2 EV more powerful than the first one? Understanding the mechanics of a lighting arrangement will allow you to make much more progress than if you were just following the steps of a recipe, of which there are large numbers to be found, without an understanding of its deeper meaning. Thus, I invite you, in the following exercises, to try to understand the harmonies that exist among the various sources, their respective roles, and the artistic goal that underlies each arrangement. It is by completely immersing yourself in this way of thinking about light that you will learn to truly master it. The range of photos shown here is, of course, subjective, but they cover a large number of the lighting situations that you might face in the course of your practice. Rather than give you the actual measurements of each light source in the lighting plans for the photos on the following pages, I have chosen to indicate the proportions with respect to the camera settings, along these lines: “flash directed toward the back of the cup (+1.33 EV).” This makes it possible to apply these lighting scenarios to every kind of situation and every setting. UNDERSTANDING AND APPLYING LIGHT STRENGTH HARMONICS For every example, you will also find the distance, the type of shaper used, and the angle of placement of the light sources. These are crucial pieces of information that will allow you to understand the placement of the light and shadows, and therefore the effects produced by the objects being lit. To say that a source is placed “at a showerhead angle” above the coffee cup is not at all useful if it isn’t spelled out whether the light source is completely vertical above the subject or whether it is at a 30° angle with respect to the vertical. The specific angle changes everything: in the first case, we would obtain a direct reflection on the entire surface of the coffee, whereas in the second, the edge of the cup would create a visible reflection on the liquid. UNDERSTANDING TECHNICAL DATA SHEETS The values are always given in relation to the stated camera setting. For instance, if we write “D1 flash directed at the model (+1.33 EV),” and the stated camera setting is f/5.6, ISO 100, 1/125 s, that means that the flash must be measured at f/9 (written as “83” on the screen of the flash meter). It is relatively easy to apply the harmonies (in other words, the balance between each of the sources and the camera setting) onto all of the lighting systems (see diagram on previous page). Of course, this will require a little bit of mental gymnastics, but it is easy to understand that you get the same exposure at f/4, ISO 100, 1/100 s as you do at f/5.6, ISO 200, 1/100 s, or at f/5.6, ISO 100, 1/50 s. I invite you to reproduce the shots on the following pages after gaining an understanding of the steps of placement, light quality and quantity, art direction, and color harmony. Also make sure to spend some time studying how the light is diffused on each of the objects that you will be shooting to determine what the best lighting is in each case. This is not about releasing the shutter: trust your eyes and learn to look. Study involving several kinds of lighting on the same watch, with different diffusions and intensities.
Jewelry is probably one of the most difficult realms in product photography. The objects are small, which makes the lighting of their various parts complex and requires precision. This is why we often use very narrow light sources, like snoots, usually fitted with honeycombs. The fact that most pieces of jewelry are rounded means that we need to use diffusers that are also rounded, in order for the lighting to faithfully follow the curves without jerkiness. In the lighting scheme I propose here, flash no. 1 is positioned very close to a rounded PMMA plexiglass diffuser, which is itself very close to the jewelry, so that the lighting of the interior of the large ring is smooth and even. It is easy to see what happens if the lighting is not diffused this way in the three small shots at the top of the next page. We proceed the same way in lighting the diamonds on the small ring: they will not appear in all of their splendor unless we use a slightly lateralized lighting, whose flux is enlarged and pointed in directions compatible with the arrangement of the stones, so that they are all illuminated and produce little bursts of light. Here, too, we use a rounded diffuser. Finally, we place a snoot equipped with a honeycomb, using Paramount lighting, still behind a rounded diffuser, to light the outside of the two rings and cause reflections to appear on each of the ridges. A behind-the-scenes view of the production of the shot on the following page. TECHNICAL DATA SHEET Camera: Canon 5DS R Lens: EF 100mm f/2.8L Macro IS USM Focal distance: 100mm Aperture: f/11 Speed: 1/160 s Sensitivity: ISO 100 To accentuate the sense of these shapes and make the rings stand out from the black background (a sheet of Canson anthracite paper, because black is hard to light correctly), I placed a small optic shaper in backlight, with two small barn doors meant to create a rather thin ray of light between the objects. LIGHTING DIAGRAM
For this ad for a pair of sneakers, I wanted a somewhat vintage atmosphere. I therefore chose a black marble base that had been previously dirtied up with anthracite and mouse-gray paint, rubbed with a sponge. The goal was also to present the shoes the way they might be found at the foot of a teenager’s bed, one shoe halfway on top of the other. Therefore, it was important to play with the lighting to create a dynamic scene, while also making a point of the sneakers’ material and texture. The sneakers are first positioned on the prepared, and thoroughly dried, marble slab. A rim light (a flash equipped with a snoot, positioned high and directed down at an angle) is used to create a spot of rounded light around the shoes, also lighting the back of the shoes at the same time. This flash is set for optimized metering at +1.33 EV. A second source, of the same kind as the first one, is placed laterally to simultaneously light the upper part of the shoes (including the laces), the sides, and, by reflection on reflector no. 4, the opposite side of the shoes. The third source (flash no. 1) is placed in the front, angled at about 45°, to light the front of the shoes (especially the soles). A measurement of +0.3 EV is sufficient (the reflector also redirects some of the light of the other flashes). In the vintage spirit, we wanted to bring out the sense of a shoe that had been worn, to use the lighting to avoid making the textile too smooth, but without that getting in the way of what we wanted to communicate. This is one of the roles of backlighting: hitting the edge of the sneakers at a grazing angle, it brings out the hollows and bumps of the fabric, which gives more substance to the final image. TECHNICAL DATA SHEET Camera: Canon 5DS R Lens: EF 100mm f/2.8L Macro IS USM Focal distance: 100mm Aperture: f/8 Speed: 1/125 s Sensitivity: ISO 100 A behind-the-scenes view of the production of the shot on the following page. LIGHTING DIAGRAM
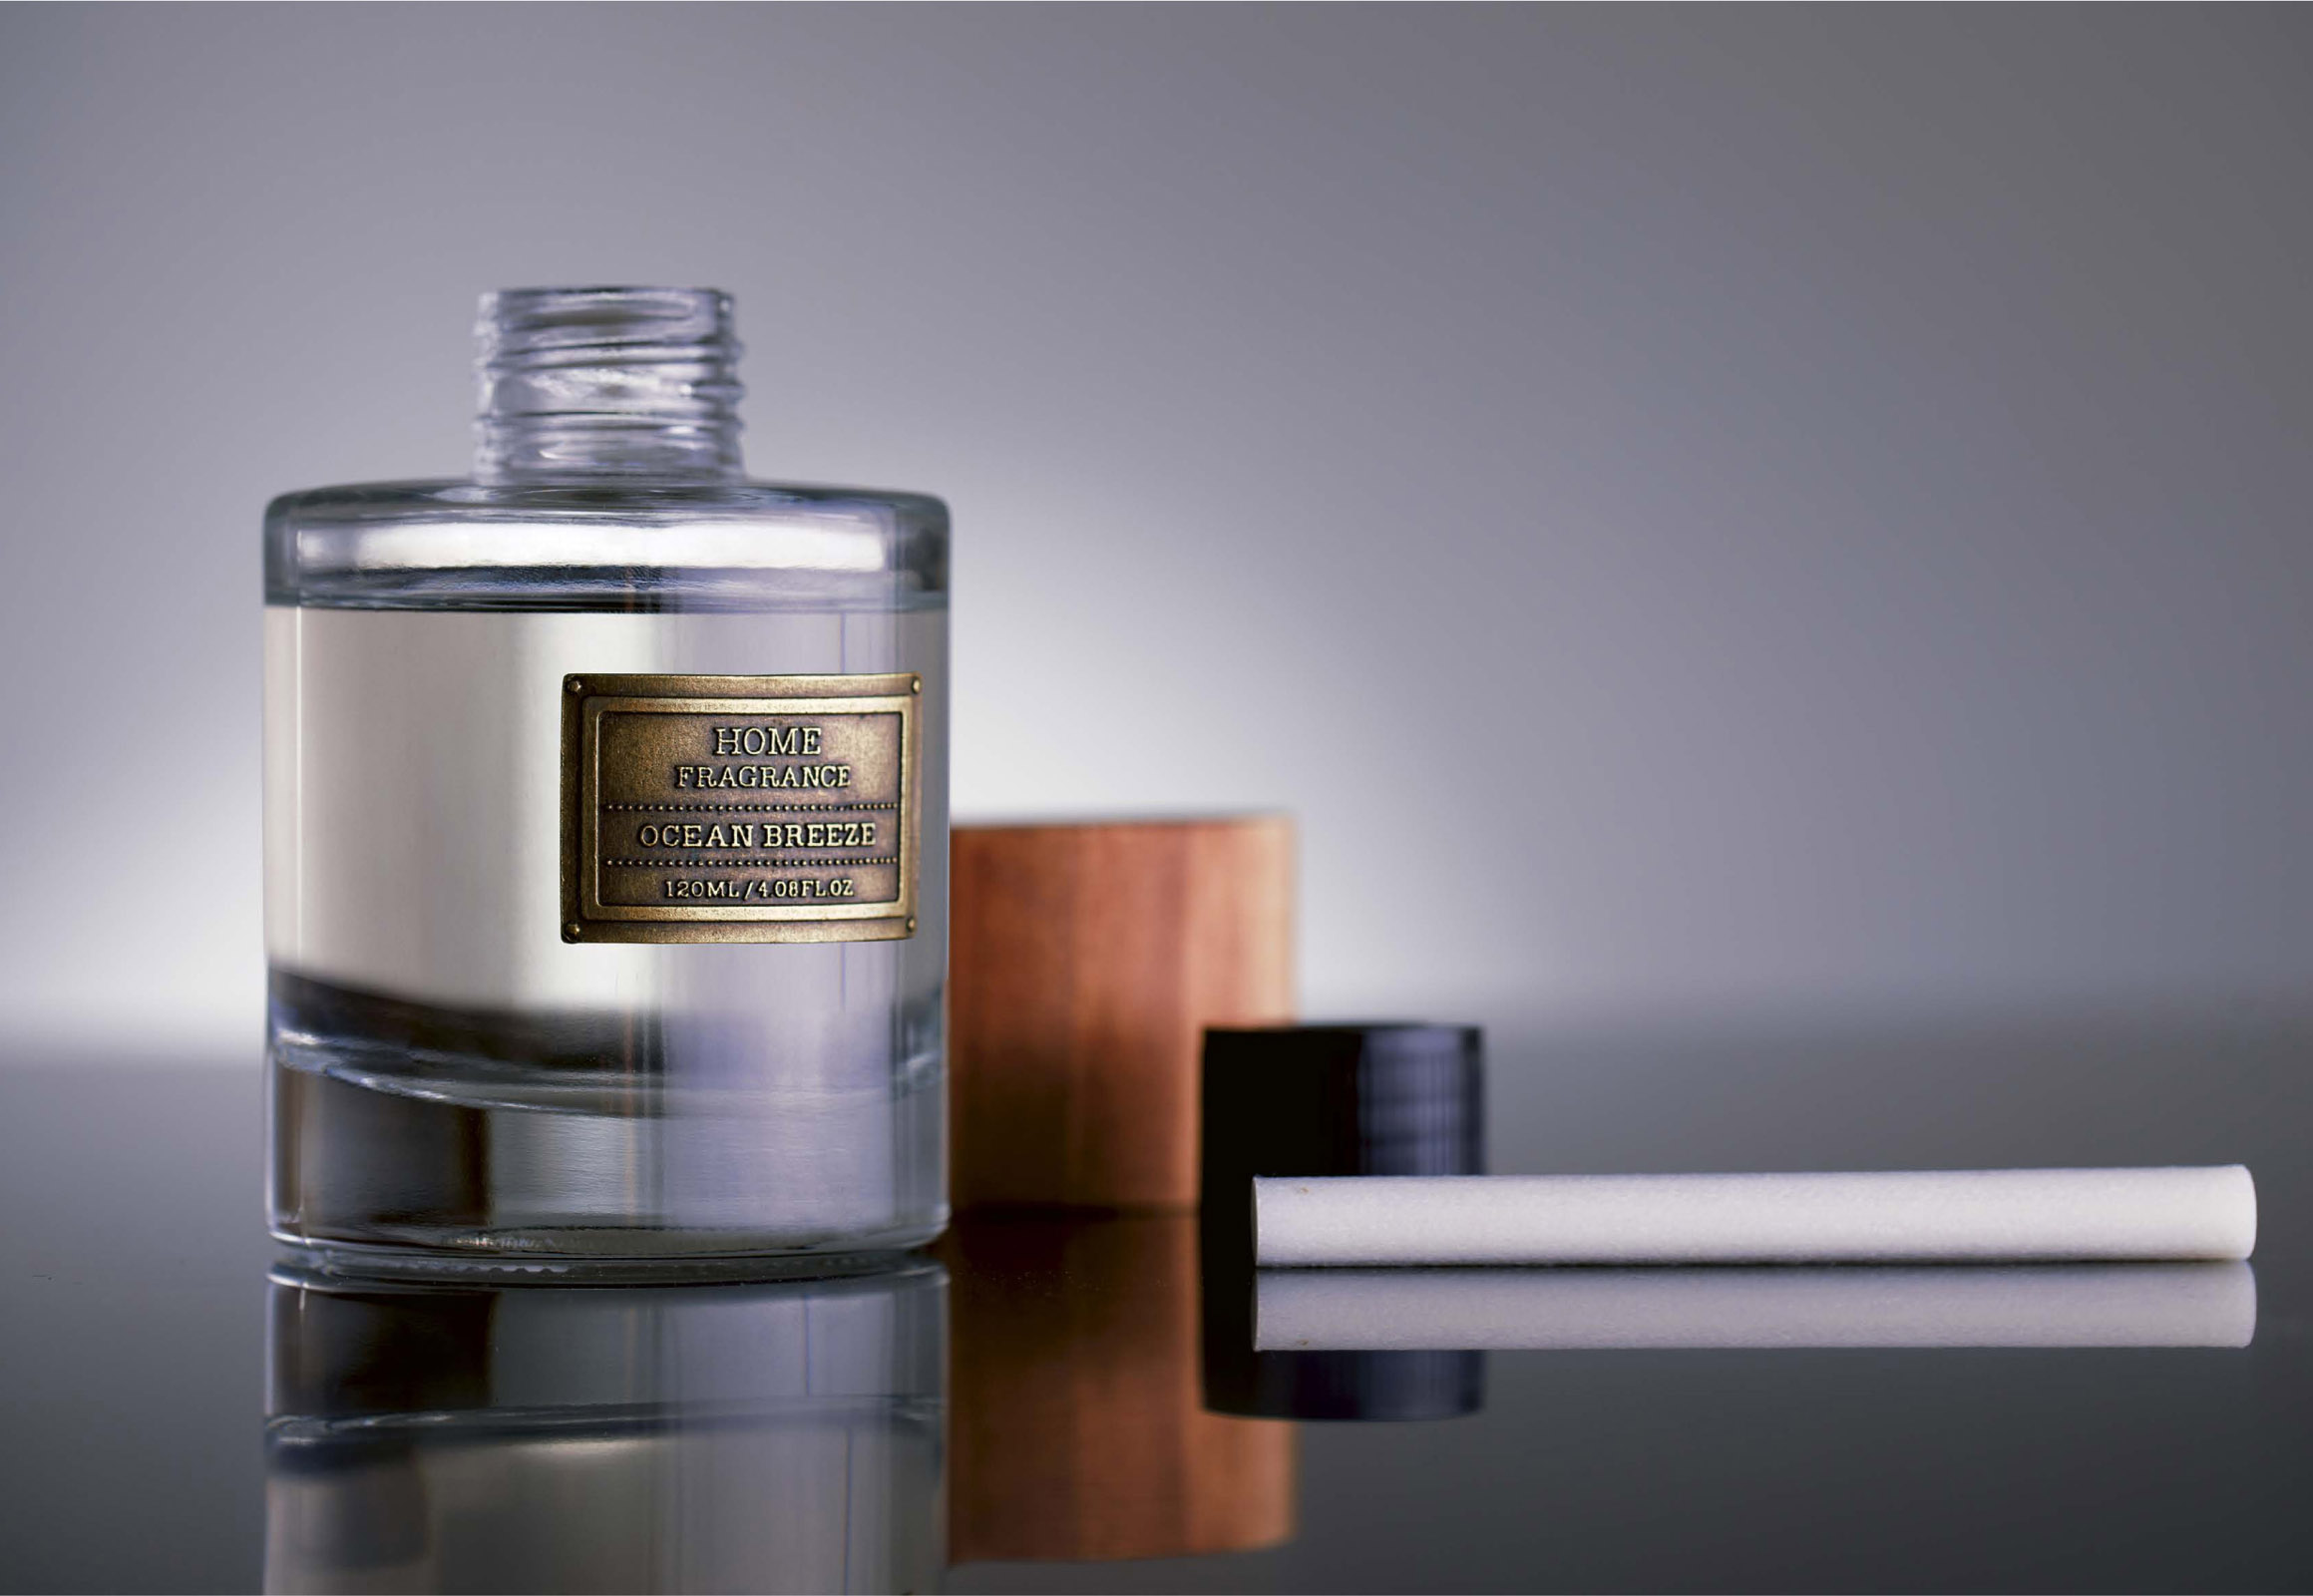
To present this home fragrance diffuser, we wanted to play with verticals. We had noticed that underneath a rear lateral lighting, the light refracted into a multitude of parallel vertical lines in the thick glass fragrance bottle, which worked well with the two stoppers and the cotton rod that we wanted to place horizontally, in counterpoint. A black metal base is placed underneath the bottle to create a dark foundation for the image—but the lighting will partially brighten this surface. The verticalities are accentuated by the glossy base, which shows the reflections of the flask and the stoppers. In terms of light, we have seen that we always need to light transparent glass bottles from behind, even more so if the liquid they contain is also transparent. But rather than proceeding with direct backlighting, we thought it would be fun here to light the background with reflection. Therefore, a reflector is placed behind the fragrance bottle and a light source is positioned on the ground, directed toward the reflector. The aim is for the interior of the bottle to be illuminated along with the background, with localized highlights. A second source, equipped with a light box, is placed laterally, in a feathered position, to light the edge of the cylinder without creating any direct reflections, so that the metal label is nicely legible, with the rest of the light beam dying out against the reflector while brightening the background. A behind-the-scenes view of the production of the shot on the following page. TECHNICAL DATA SHEET Camera: Canon EOS 5D MARK IV Lens: EF 100mm f/2.8L Macro IS USM Focal distance: 100mm Aperture: f/6.3 Speed: 1/125 s Sensitivity: ISO 100 There were several possible scenarios for the organization of the four elements: centering the bottle or not; placing the stoppers in a stepped arrangement (what was finally chosen); or placing the small black stopper closer to the bottle. The cotton rod could also have been presented vertically, or even diagonally, but the arrangement that was finally adopted has the benefit of giving center stage to the most important object: the bottle. LIGHTING DIAGRAM
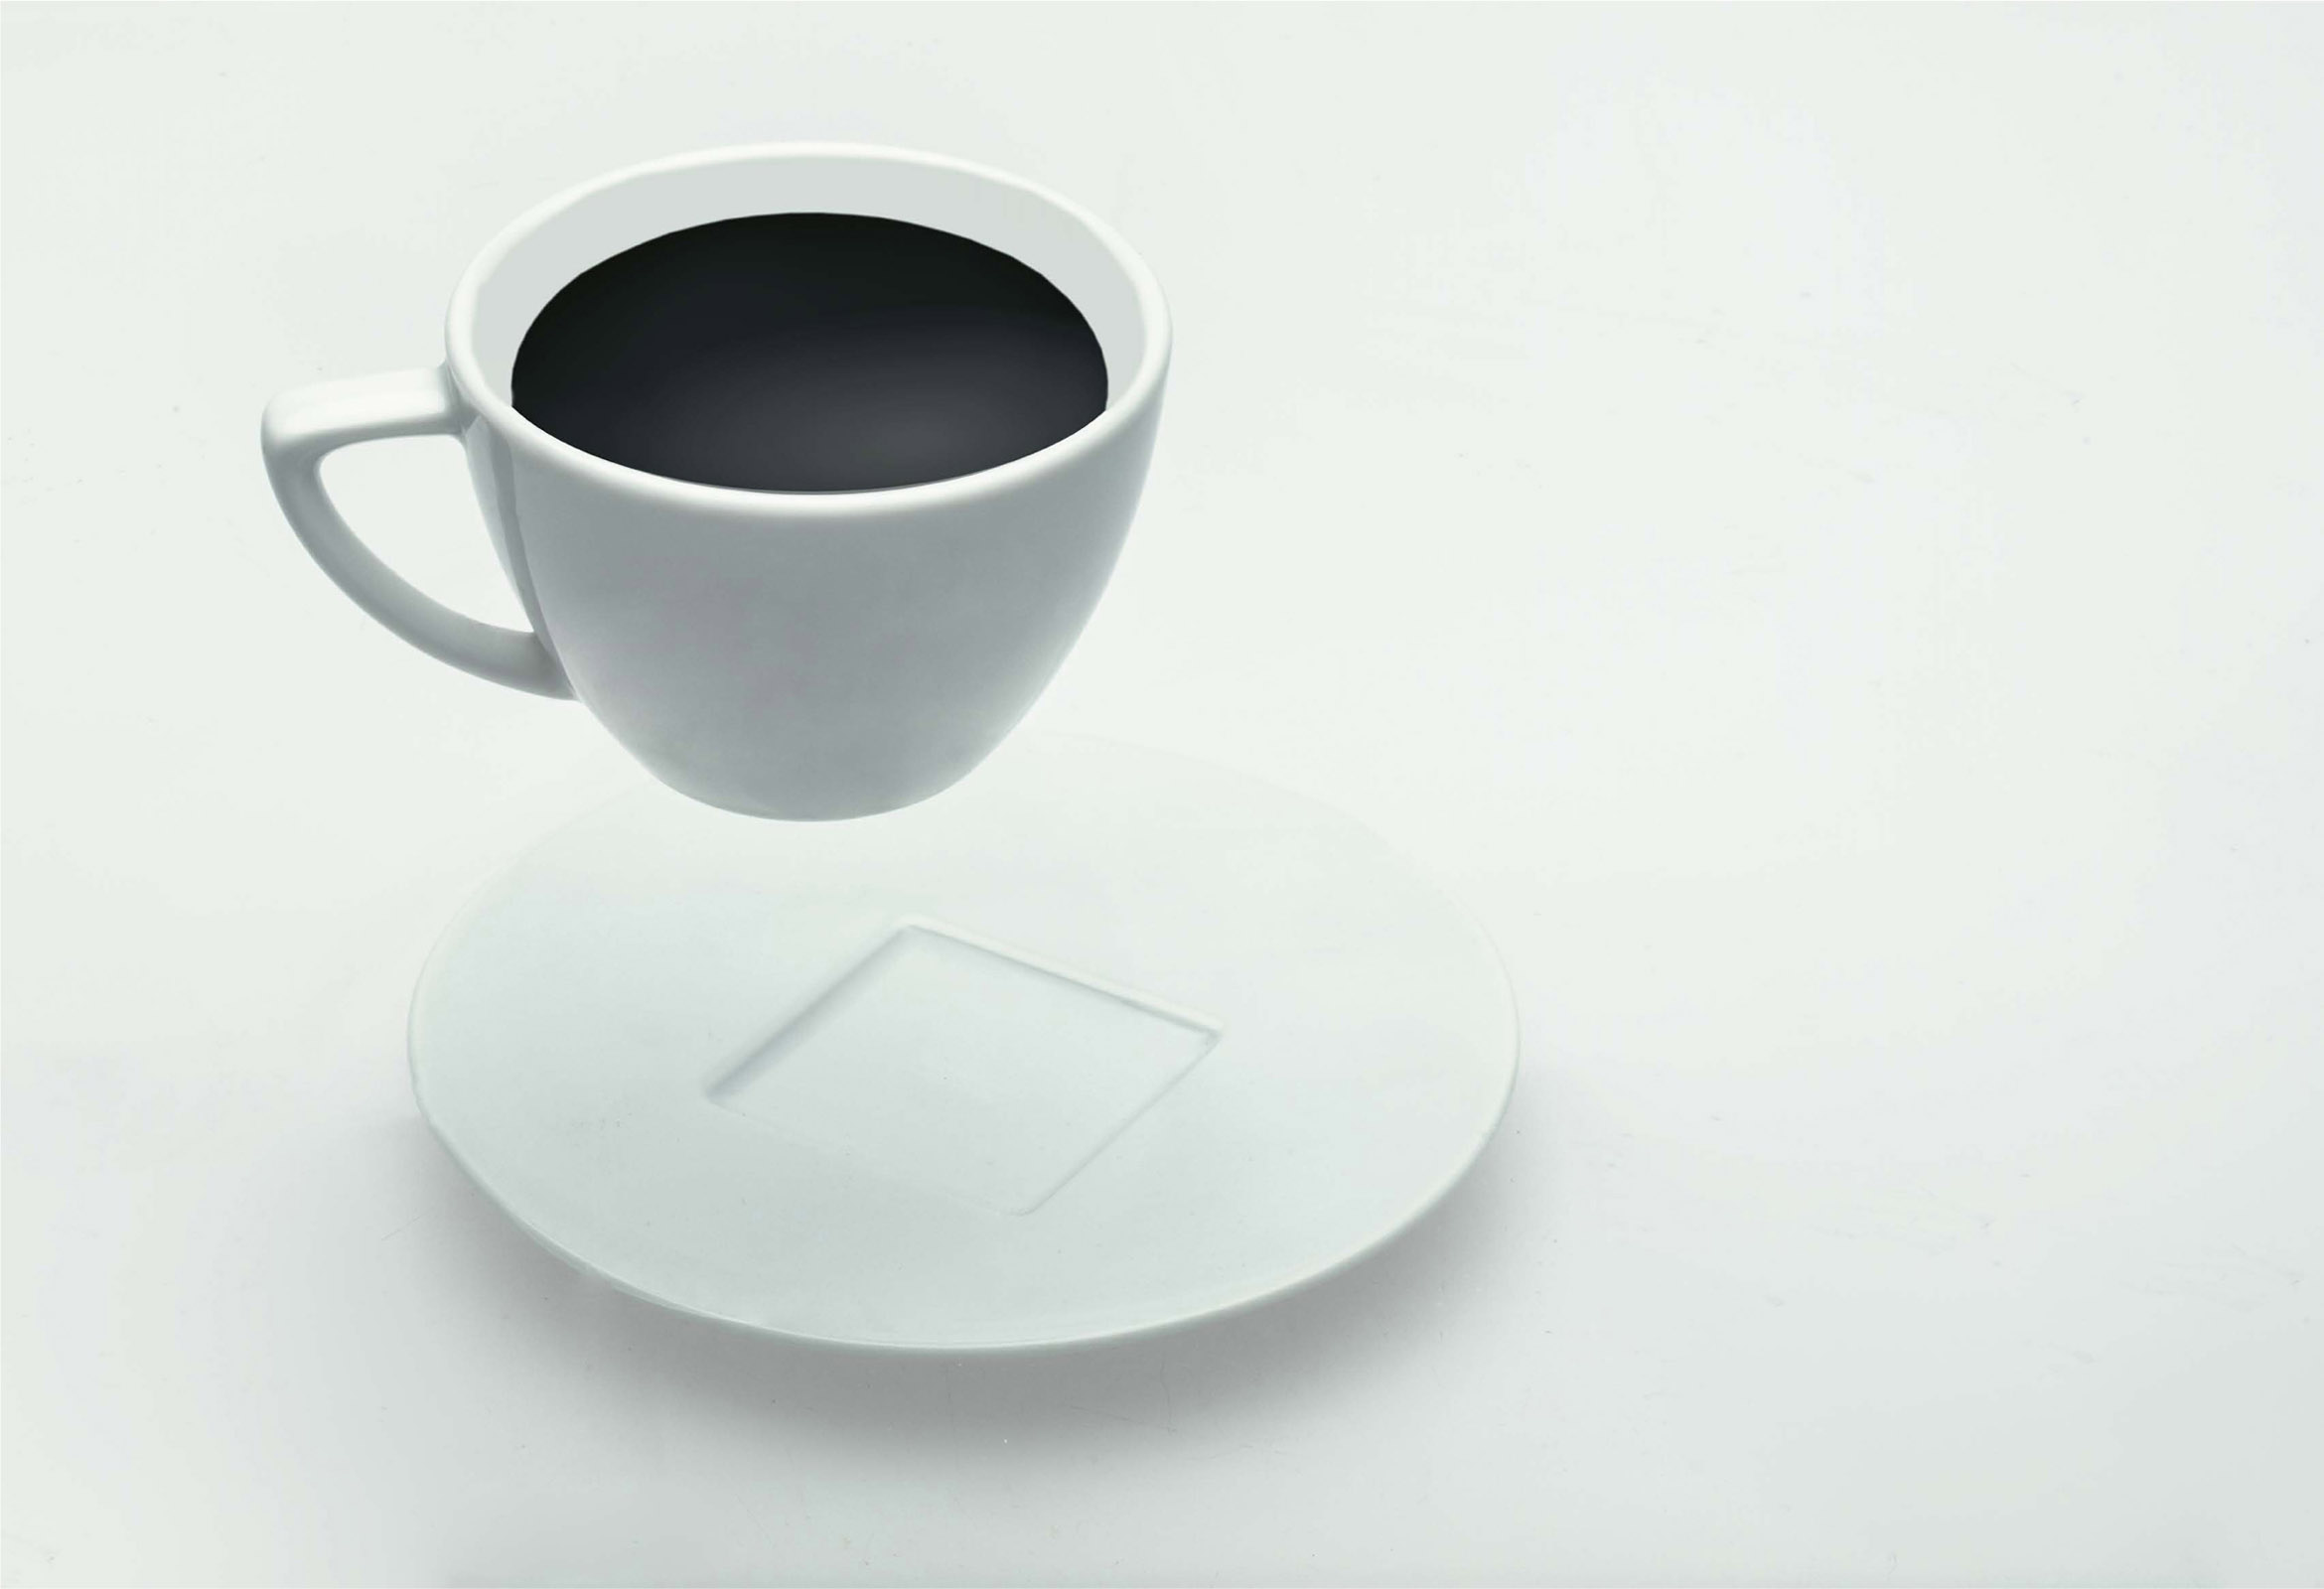
The phenomenon of direct transmission is ideal for making shadows disappear or, even better, shifting them to where you want them, depending on the height you’ve chosen for the sheet of glass in relation to an opaque base placed underneath it, and the angle of the light source. This arrangement allows you to create all sorts of illusions and bring many different images to life. A saucer is placed on a translucent sheet of plexiglass (in this case, a packshot table), lit from below using a placed vertically flash, whose beam is directed toward the saucer. A sheet of glass is positioned across two wedges, holding it in place about ten centimeters above the saucer. On the glass is a cup filled with black gouache diluted with water (more aesthetically pleasing in a photo than actual coffee): its shadow should appear on the saucer to accentuate the impression of levitation. A flash equipped with a large octabox is placed vertical to the entire arrangement to illuminate the cup and the saucer and create a shadow of the cup on the saucer. In connection with the lighting under the table, this lighting will allow us to even out the light on the translucent plexiglass. Photographed outside of the family of angles of the reflection of the glass, that reflection will disappear. That’s it. A behind-the-scenes view of the production of the shot on the following page. TECHNICAL DATA SHEET Camera: Canon 5DS R Lens: EF 100mm f/2.8L Macro IS USM Focal distance: 100mm Aperture: f/13 Speed: 1/200 s Sensitivity: ISO 100 LIGHTING DIAGRAM Version staged according to the same principle.
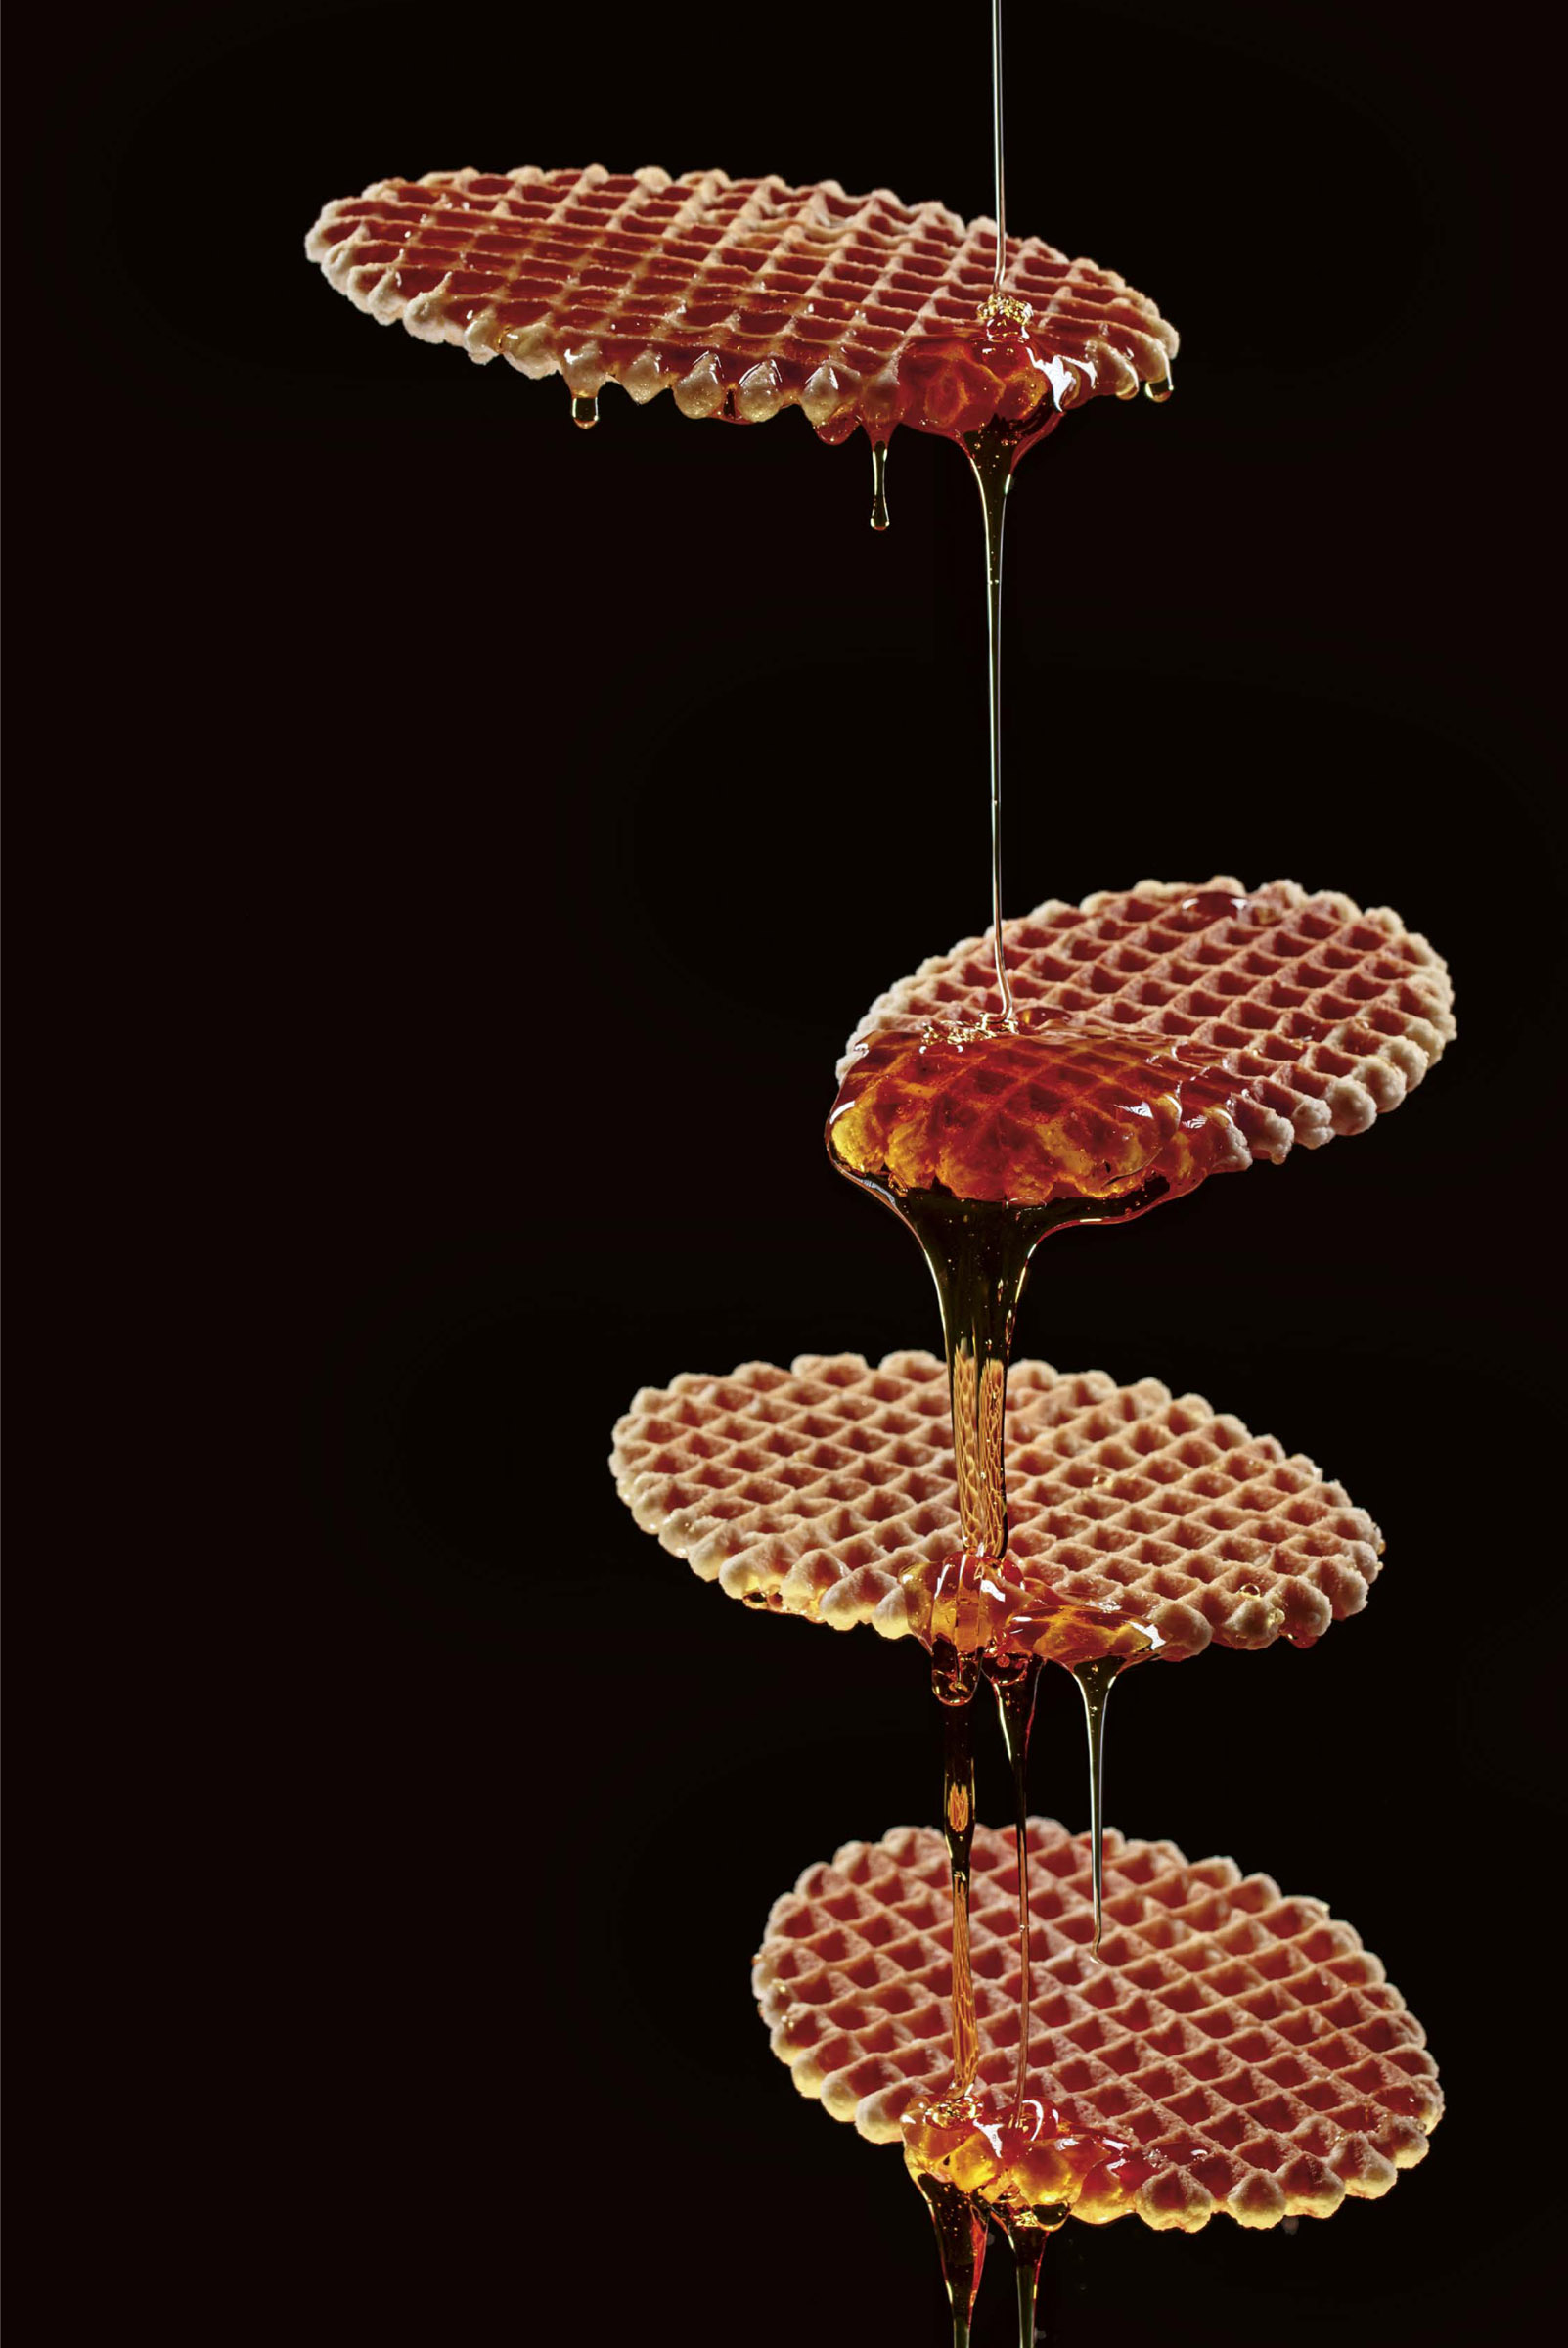
The photographic study of light on viscous liquids, like honey, is always fascinating. It can be a good exercise for novice photographers before they try photographing splashing water. Honey has the benefit of flowing more slowly than water, which makes it easier to catch the best moment for releasing the shutter. This setup includes four pairs of parallel lines of “invisible” nylon thread, installed with the threads of each pair about two inches apart. They will hold up waffles, suspended in the air, with lighting arranged so that the viewer can believe the waffles are levitating. Two flashes equipped with strip boxes are placed at two different levels: the first is responsible for lighting the top of the waffles, while the second lights the edge of the waffles and the side of the waffles tilted toward that flash. A third flash is placed on the ground, vertically, to light the lower edge of the waffles as well as the honey that we are going to pour. To avoid any possible splashes of liquid onto that flash, a sheet of glass is placed between the flash and the waffles. The honey that has dripped onto the sheet of glass, lit by flash no. 3, produces a lovely out-of-focus bokeh effect, with a shallow depth of field. A behind-the-scenes view of the production of the shot on the following page. TECHNICAL DATA SHEET Camera: Canon 5DS R Lens: EF 100mm f/2.8L Macro IS USM Focal distance: 100mm Aperture: f/8 Speed: 1/200 s Sensitivity: ISO 100 Then all that is left to do is pour the honey, preheated so that it pours easily. LIGHTING DIAGRAM
This shot is more of a creative study of complementary colors than it is a complex study of lighting, but I think it’s interesting to show that we can get very elegant results with few resources and good art direction. This image is meant to amuse the public while playing with color. An orange, its leaf, and its stem are painted blue. Once dry, the fruit is cut cleanly in half so that we can see the orange color and the juiciness of the inside. The mismatch between the blue and orange colors echoes the contrast between the lushness of the fruit and the roughness of its peel and the paper (in the same blue color) placed beneath it. The glossiness of the orange is accentuated by painting it with a little bit of peanut oil. The lighting is very simple to manage, with one light source, as soft as possible—in this case, a 60-inch octabox placed in backlight and tilted down at an angle (130° in relation to the camera). A white reflector installed laterally six inches from the fruit is responsible for redirecting part of the lighting as fill light, to clear the shadow and light the front part of the peel. LIGHTING DIAGRAM TECHNICAL DATA SHEET Camera: Canon 5DS R Lens: EF 100mm f/2.8L Macro IS USM Focal distance: 100mm Aperture: f/11 Speed: 1/200 s Sensitivity: ISO 100 Behind-the-scenes view of the production of the shot on the following page.
Most ads for soda and beer cans are created using composite photography and require quite a bit of work. For this exercise, I wanted to play with perspective and angles by photographing this beer can from below, as if it were flying into the sky and I was watching it from the ground. It is easy to imagine photographing the bottle by suspending it with nylon thread, for example, but there is the danger that the threads might give way and the can, which is pretty heavy, could fall on the photographer or the flash. To be safer, a sheet of glass is positioned across two bar stools, acting as trestles, and the can is placed on top of the glass. The easiest way to light the object is with a backlighting that will produce two nice bright lines on the edges of the can, and to place a rounded reflector in front of it to distribute the light evenly and regularly across the visible part of the can. A large barn door is set up to avoid flare and keep the background of the composition perfectly black. This lighting arrangement is perfect for highlighting the front of the can, but it leaves the back of it in shadow. Therefore, a flash equipped with a small honeycomb is placed on the ground, positioned vertically and directed toward the sheet of glass. Thanks to the phenomenon of direct transmission, there is no risk of reflections, as long as the angle of the shot is properly situated outside the family of angles. A behind-the-scenes view of the production of the shot on the following page. TECHNICAL DATA SHEET Camera: Canon 5DS R Lens: EF 100mm f/2.8L Macro IS USM Focal distance: 100mm Aperture: f/11 Speed: 1/200 s Sensitivity: ISO 100 Once all of the lights are set up, it turns out that the sensation of flight will be more pronounced if ice cubes are arranged on the sheet of glass (actually cubes of acrylic glass, to avoid traces of melted ice). Then all that remains is to photograph the composition while making sure that the barn door, which has been tilted, takes up all of the background of the photo, and that we do not see the reflector. LIGHTING DIAGRAM
Water in motion is always fascinating to light. It also has the advantage of harmonizing well with the objects that we want to stage. Here is a way to successfully create this kind of image, which has been common on social media ever since product photographer Frank Castillo, based in Florida, started the trend. A shallow waterproof container (because the ideal for this photo is for it to be uniformly black, I suggest a black cafeteria tray) is filled with water to at least half an inch deep. The perfume bottle is positioned so that its key parts are out of the water (if necessary, a small transparent glass wedge can be slid underneath). Note that this only works with objects whose shape can be shown with backlighting. A large diffuser is placed behind the tray, angled so that the light falling on it provokes a direct reflection over the entire surface of the liquid—in other words, at about 60°. A large, soft light source is also added to the setup—for instance, by using a large light box behind. The idea is for the entire diffuser to be lit so that an even reflection appears on the water. Finally, the camera is positioned at a radical bird’s-eye view above the tray to obtain a framing that includes the product and the water. A behind-the-scenes view of the production of the shot on the following page. TECHNICAL DATA SHEET Camera: Canon 5DS R Lens: EF 100mm f/2.8L Macro IS USM Focal distance: 100mm Aperture: f/8 Speed: 1/200 s Sensitivity: ISO 100 A blower (ideally a wireless electric dust remover with a directional nozzle made for computers; see the behind-the-scenes view below) is used to project air (from a good distance away to avoid splashing water on the bottle) onto the surface of the liquid, which will then be covered with small waves. Then it’s time to shoot. You can get interesting results by using paraffin oil instead of water, or by substituting a transparent back-lit tray. LIGHTING DIAGRAM
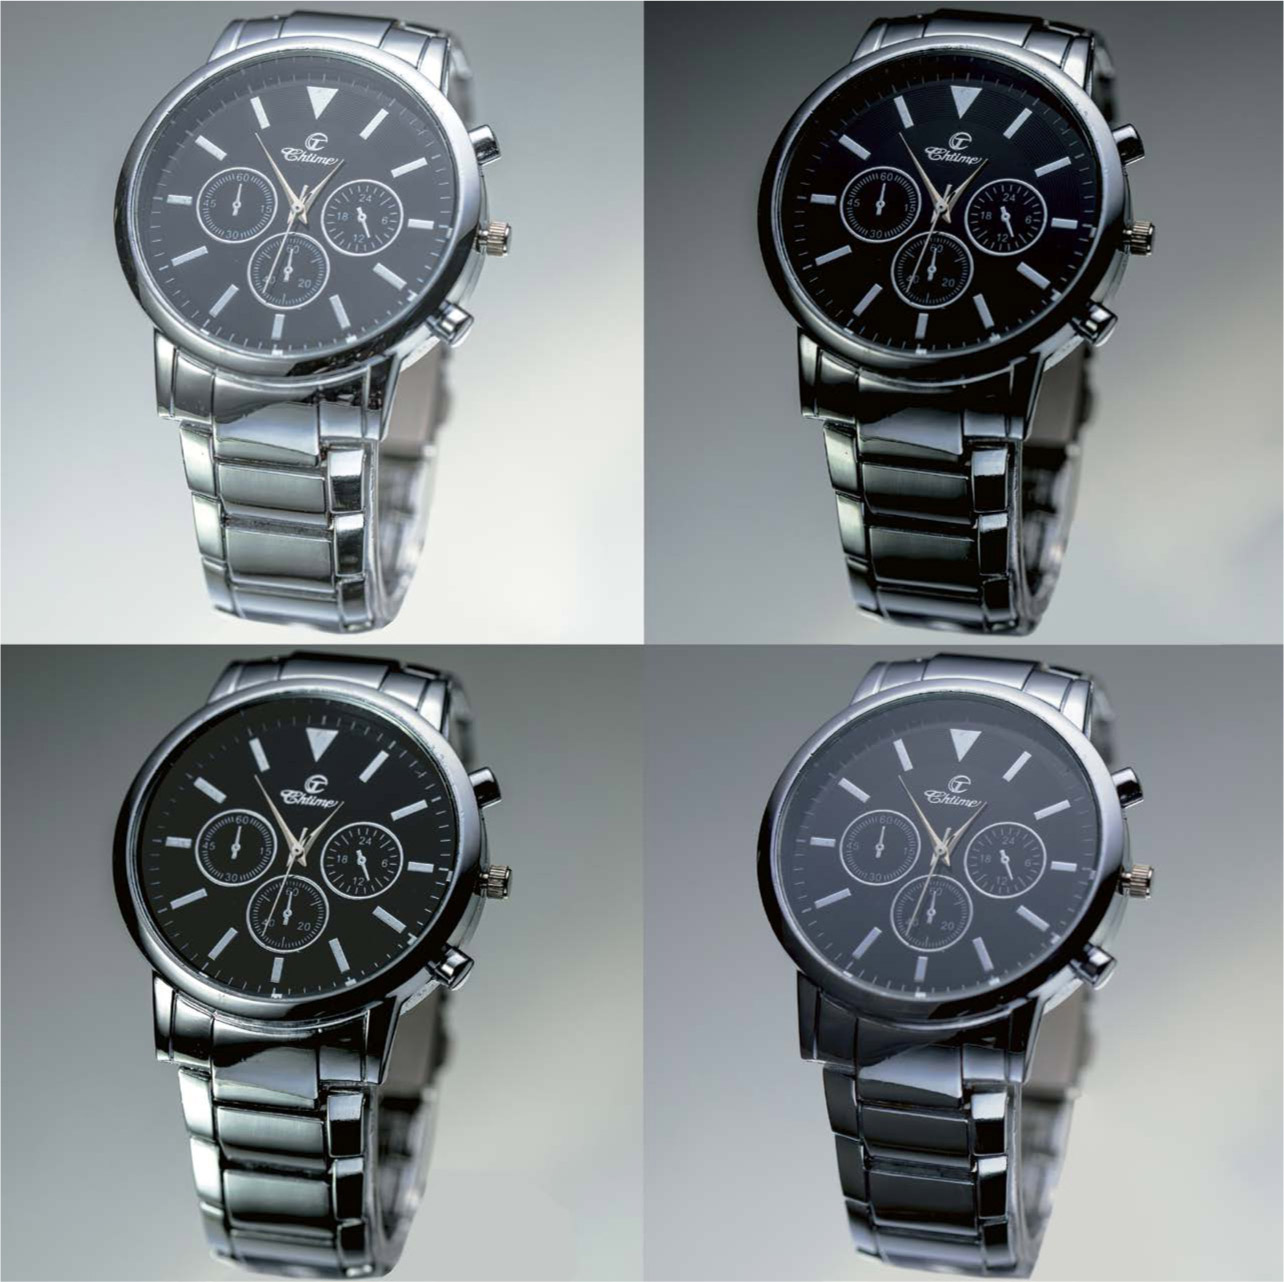
For this little scene staged around a polished steel watch, I needed some accessories that would be dark enough not to draw too much attention but amusing enough to be interesting. They would also have to react correctly to the required lighting for the watch. Online, I found some small satiny black plastic ants that would work well. A sheet of anthracite Canson paper is arranged on the table and a transparent plastic supporting bracelet is placed inside the wristband of the watch so that it will stay in place during the shot. The watch is set to 11:05 to allow the brand logo and the three round screens to be perfectly visible and not hidden by the watch hands. The ants are arranged around the watch as if they had found a very attractive object, like a pile of sugar. Two diffusing panels are set up behind the watch and to the side, with a flash equipped with a light box behind each of them. The rear diffusing panel (no. 4 on the diagram) is sufficiently tilted so that the light is also diffused across the dial. The function of flash no. 1 is to illuminate the front of the wristband, the dial, and the ants. The second flash, placed laterally behind a diffuser (no. 3), serves to light the inside of the wristband, the ants, and the paper support. To avoid having the front of the wristband stay in shadow, a mirror is placed in front of it to redirect the light produced by the backlighting (flash no. 1). The angle of the mirror, tilted toward the camera (see the photo of the behind-the-scenes view), makes it possible to maintain black areas on the lower part of the wristband frame, adding visual interest to the image. A behind-the-scenes view of the production of the shot on the following page. TECHNICAL DATA SHEET Camera: Canon 5DS R Lens: EF 100mm f/2.8L Macro IS USM Focal distance: 100mm Aperture: f/10 Speed: 1/200 s Sensitivity: ISO 100 LIGHTING DIAGRAM
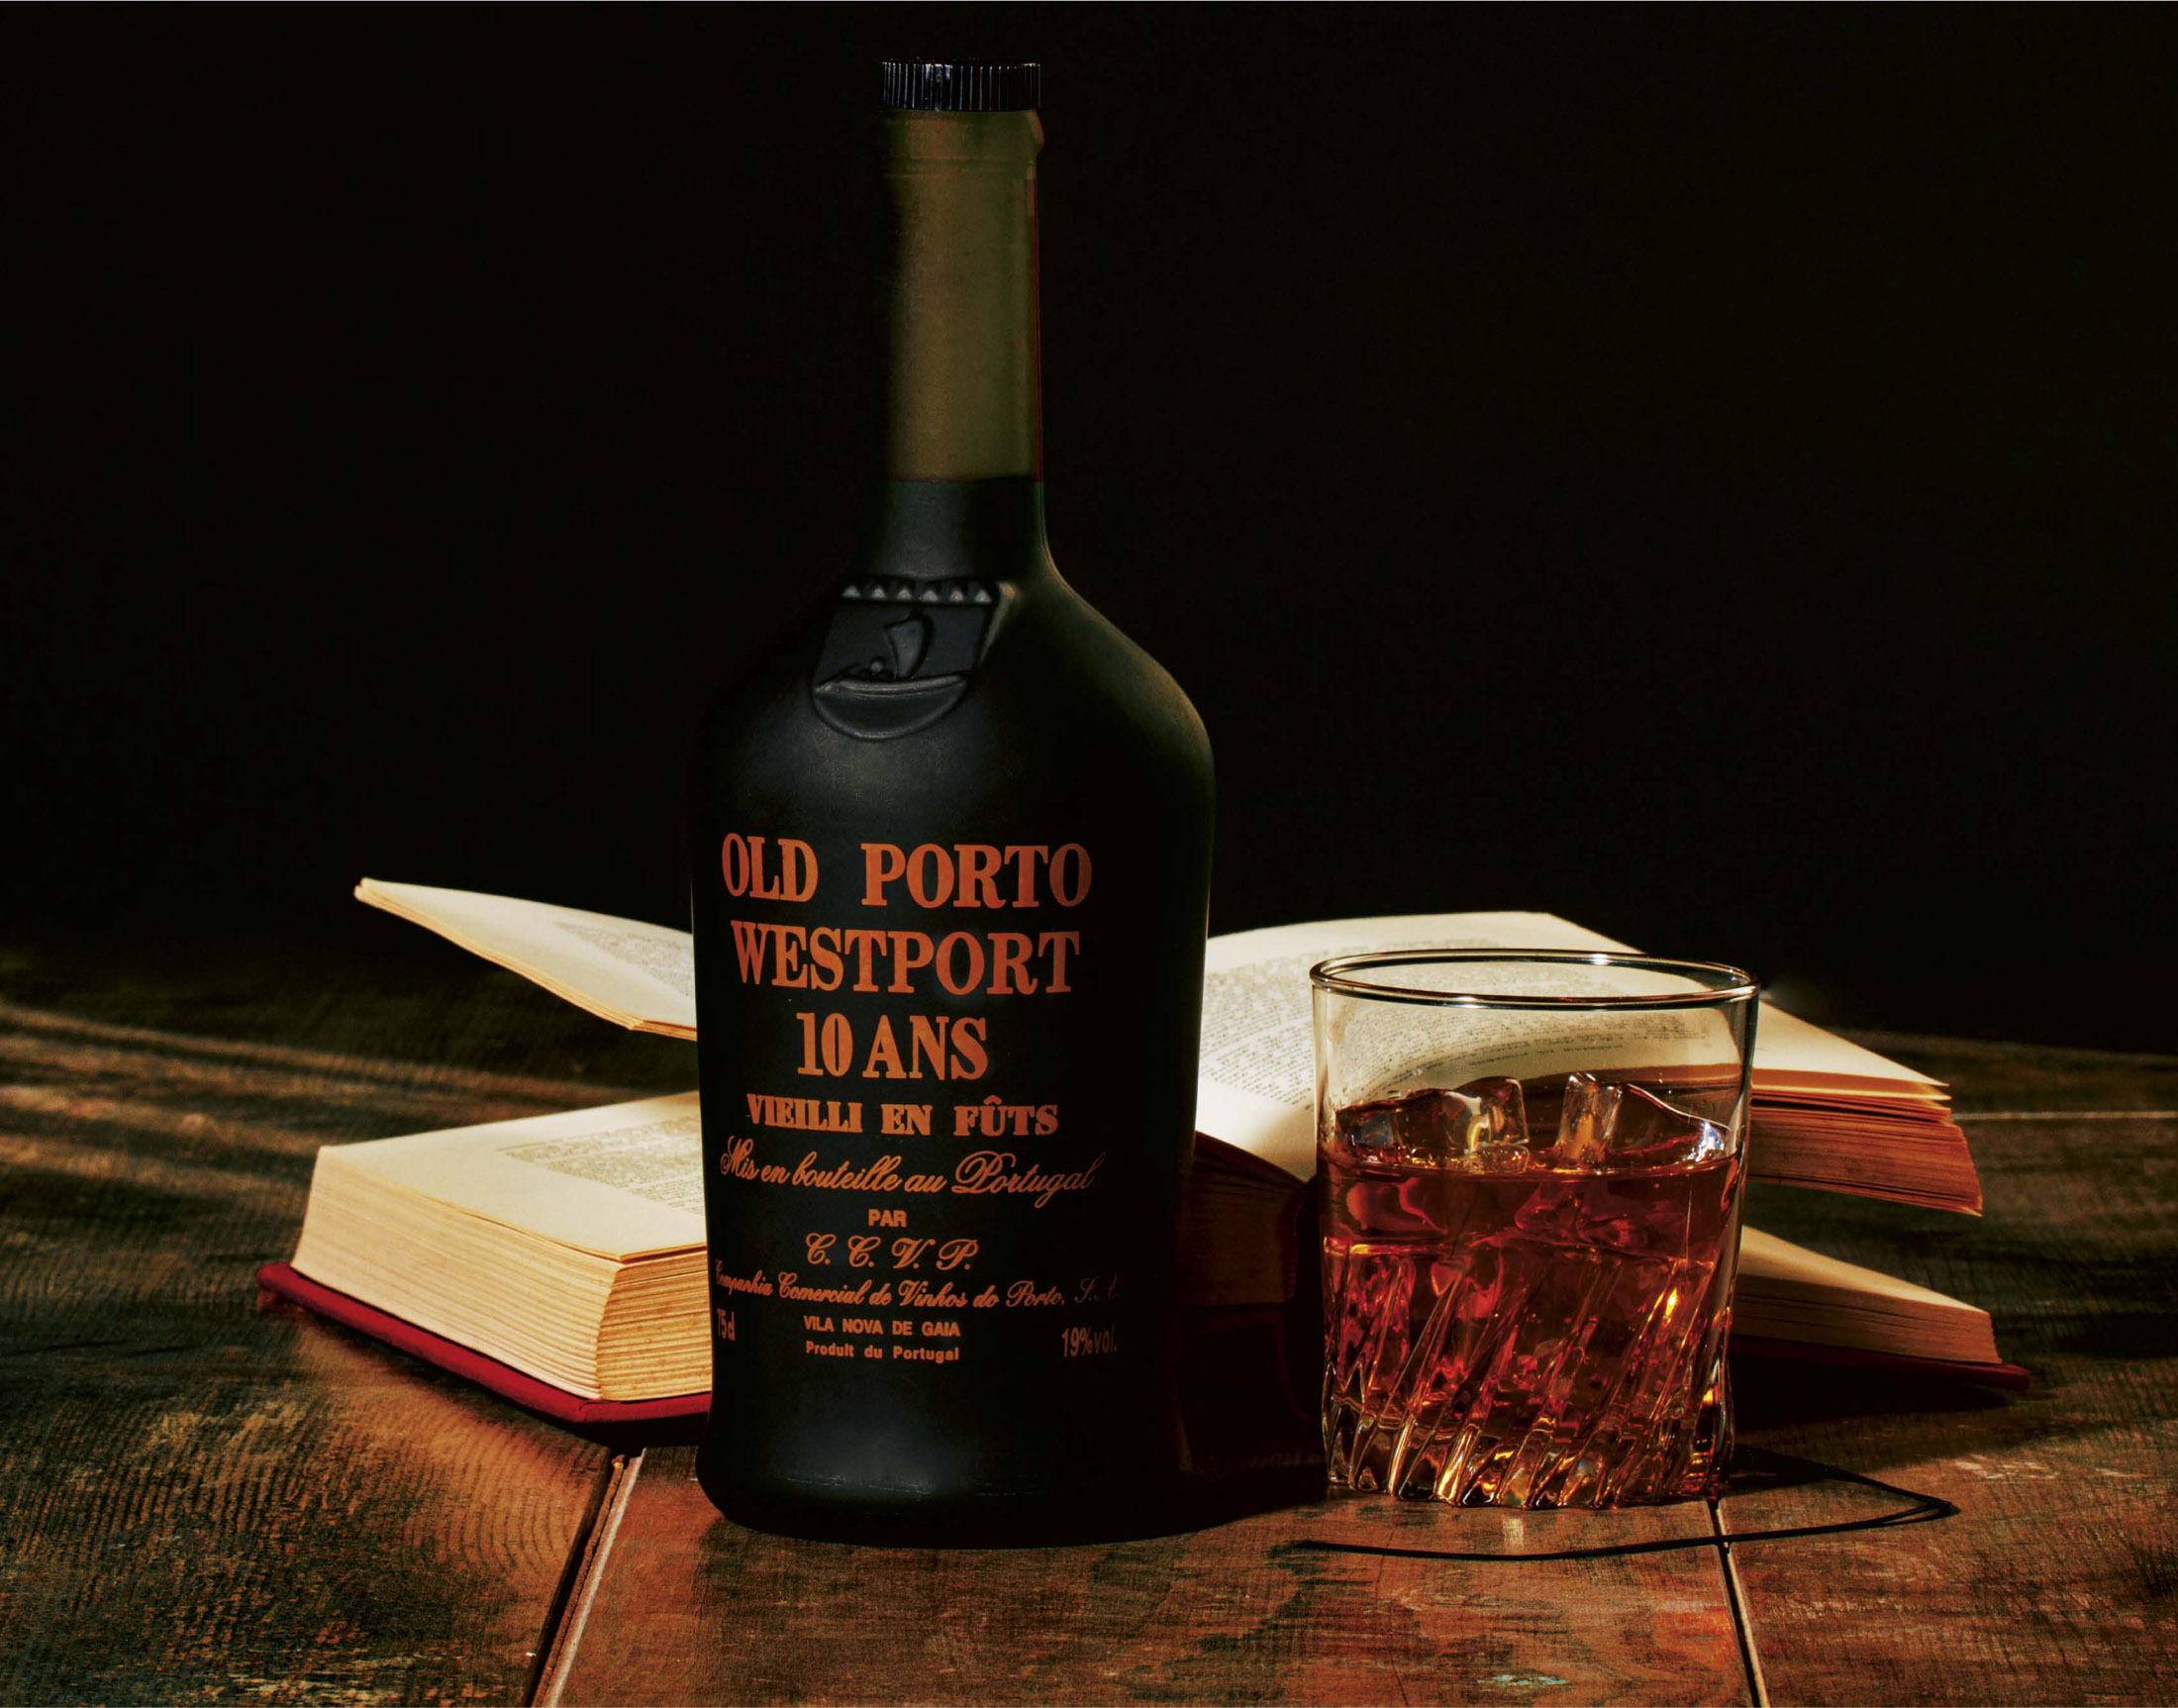
This bottle of port required a traditional presentation, with wood, warm colors, and a subdued interior atmosphere. Some strips of old parquet flooring in oak tones are arranged on a table, in a color similar to the inscriptions on the bottle. To keep the southern spirit, an optic shaper (no. 2 in the diagram) is placed as backlight, equipped with a gobo cut into the shape of a window blind, to dress up the background and strengthen the sense of an interior scene. The bottle is turned slightly toward the left of the image (because it is a nostalgic image), a glass filled with port is positioned on the right side of the image, and an open book is placed in the background—its pages are held in the air by two small wedges, arranged so as not to appear in the shot. All that’s left to be done is to light the objects on the table. A flash equipped with a light box is placed as backlight on the right side to light the book, the glass, and the right edge of the bottle. For the bottle itself, the method is simple: because it is made of frosted glass, it cannot produce very unpleasant direct reflections, as long as a very diffuse, yet focused light is used, so as not to overwhelm the scene. Thus, a flash equipped with a snoot is directed downward from above, toward the bottle; this angle has the advantage of nicely highlighting the embellishment of the boat, the little half-spheres, and the base of the crest, while also lighting the inscriptions. Because this lighting alone still produces a few direct reflections on the bottle (it was rather old and had not been preserved under the best of conditions), we set up a diffuser (a thick sheet of translucent paper) to limit the reflections and even out the lighting. A behind-the-scenes view of the production of the shot on the following page. TECHNICAL DATA SHEET Camera: Canon 5DS R Lens: EF 100mm f/2.8L Macro IS USM Focal distance: 100mm Aperture: f/13 Speed: 1/200 s Sensitivity: ISO 100 LIGHTING DIAGRAM
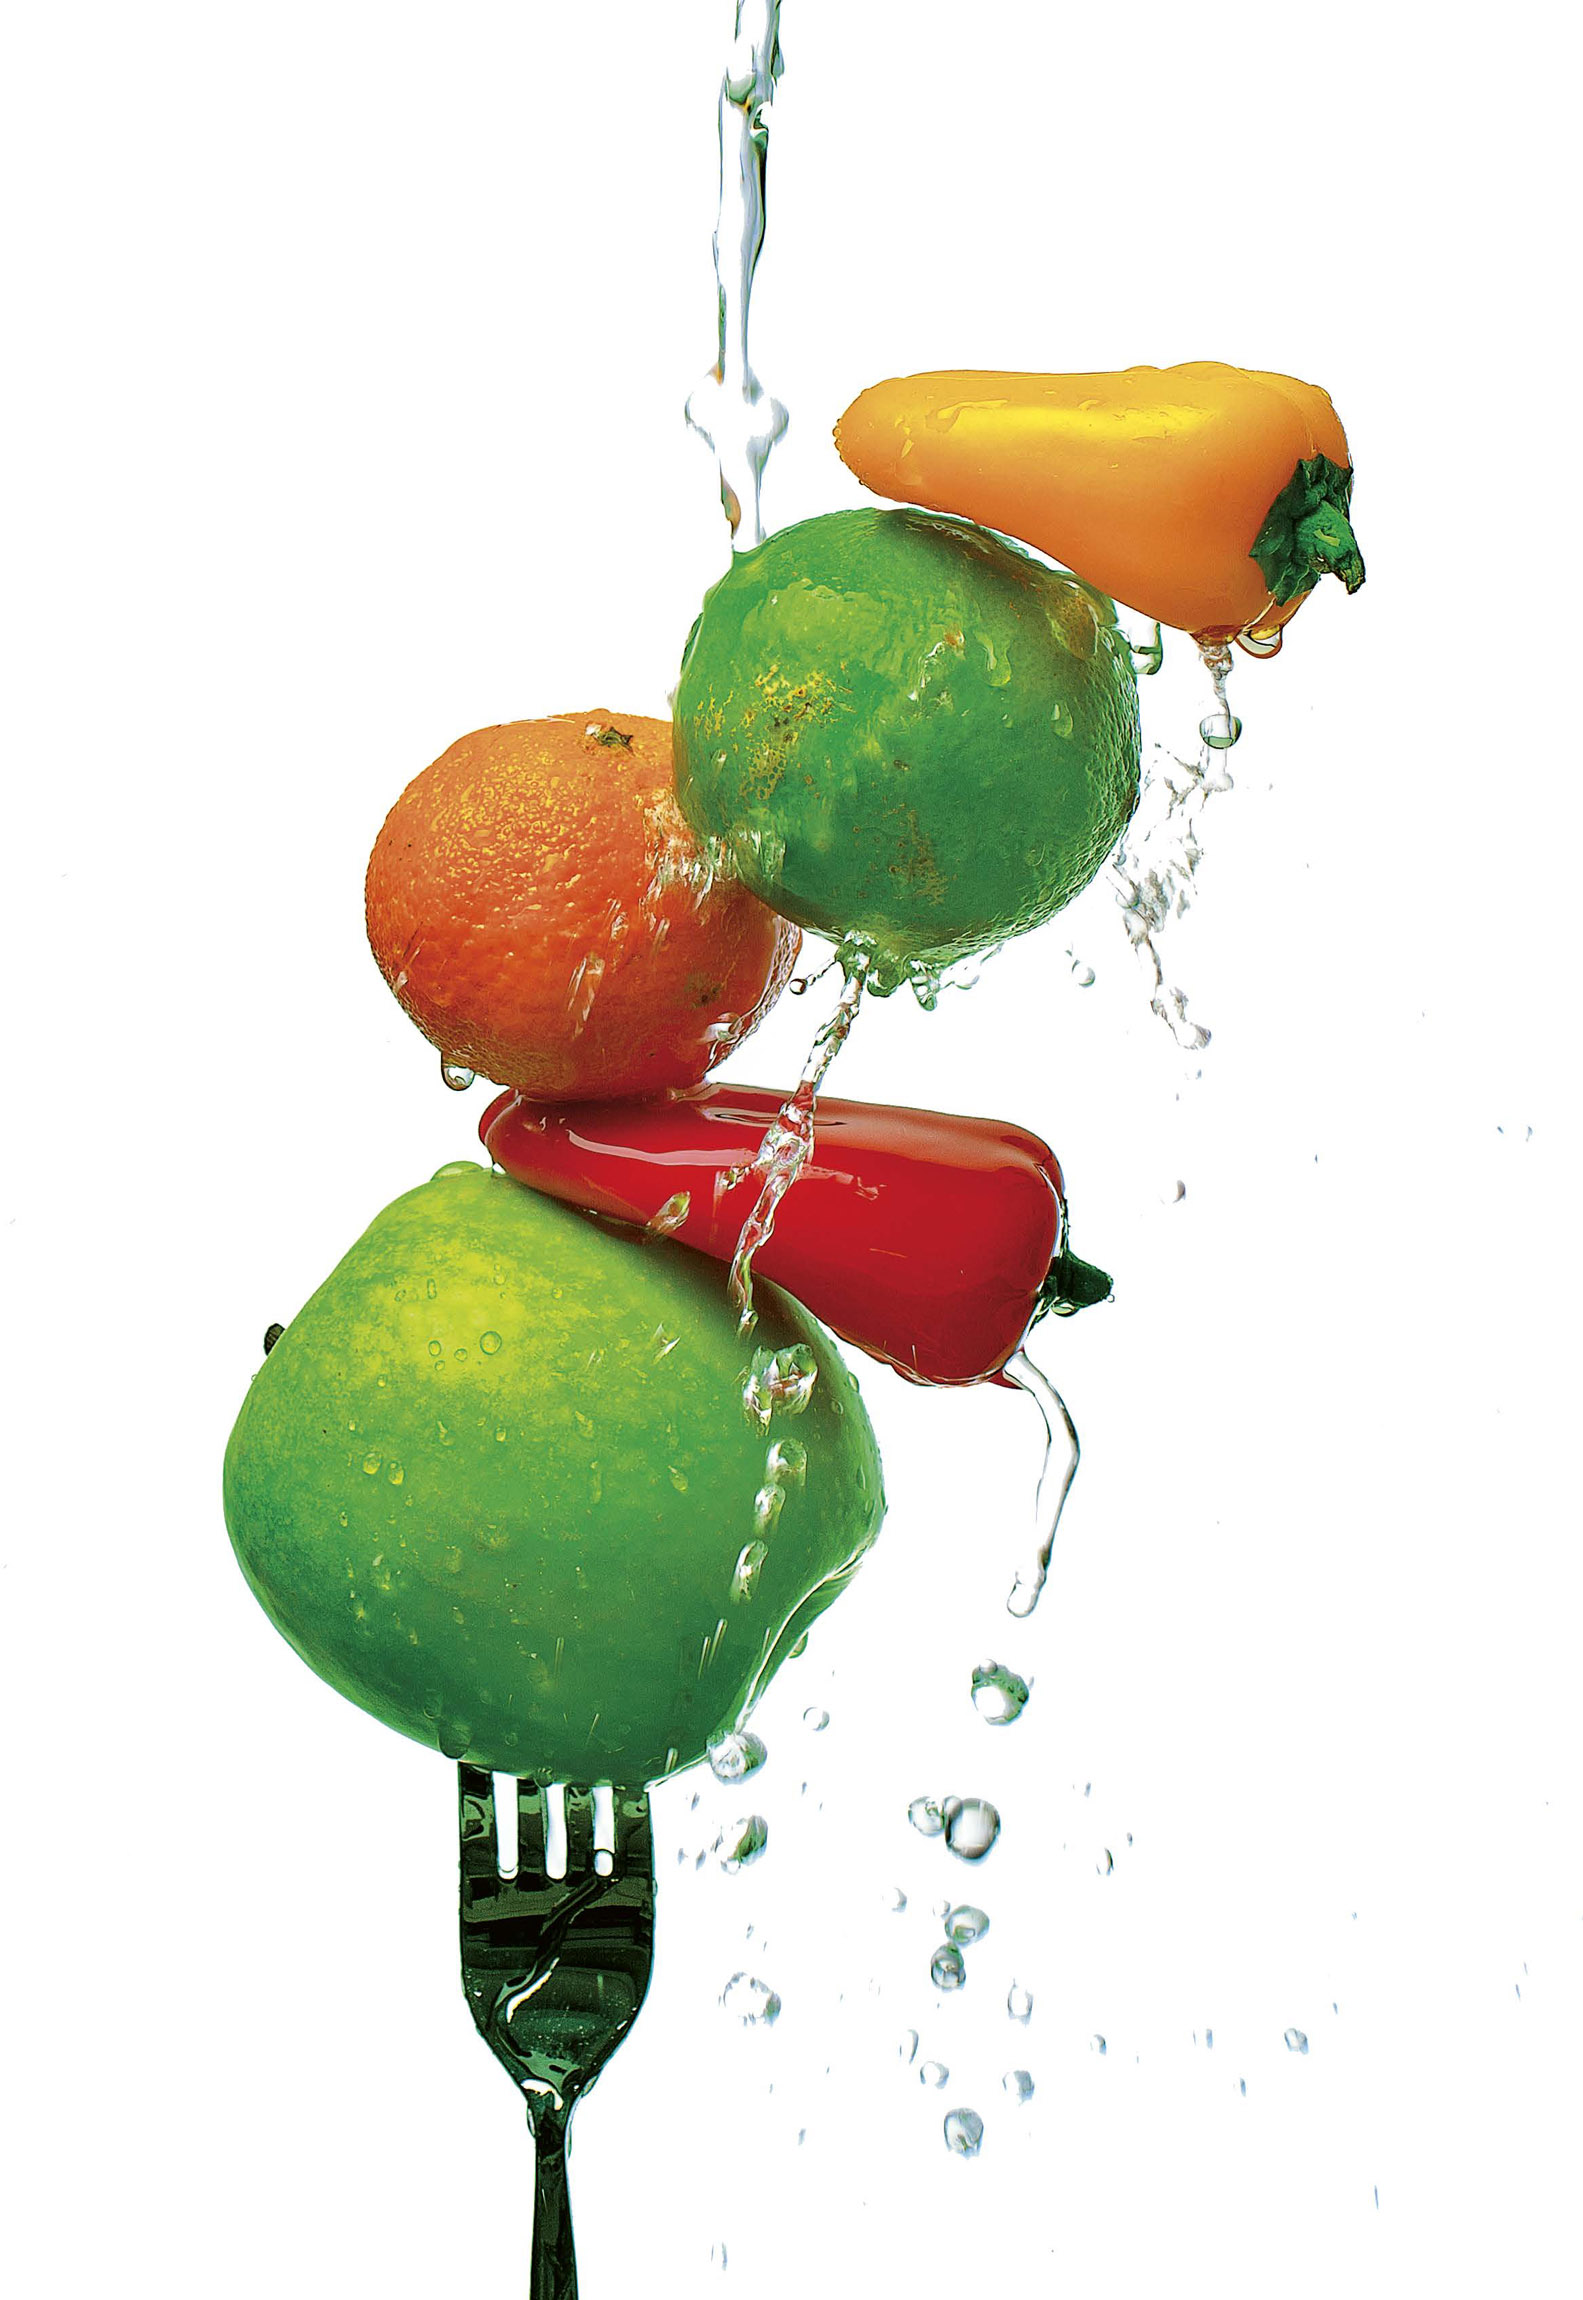
For this composition, fresh and colorful, I wanted to be able to quickly change the look of the background (from black to white, in this case) while still keeping the same optical effect on the water. The initial arrangement consists of a fork planted in a Granny Smith apple and small wooden toothpicks connecting a red pepper, a tangerine, a lime, and a yellow pepper. The fork is kept in place with gaffer tape on a plexiglass wedge and a tray is positioned to catch the water below. For the lighting, an octabox is arranged in backlight to light the back of the fruit and spotlight the water. A second flash, equipped with a small light box, is set up at a slight bird’s-eye view for a lateral lighting. A third flash equipped with a light box is directed toward the white wall behind the scene. Once the flash has been set to +3.33 EV in relation to the camera setting, the wall looks uniformly white; when the flash is off, the wall is completely black. Now all that’s left to do is pour water over the yellow pepper, let gravity do its work, and release the shutter at the right moment. In this photo, we did without flash no. 3. TECHNICAL DATA SHEET Camera: Canon 5DS R Lens: EF 100mm f/2.8L Macro IS USM Focal distance: 100mm Aperture: f/8 Speed: 1/200 s Sensitivity: ISO 100 A behind-the-scenes view of the production of the shot on the following page. LIGHTING DIAGRAM
Photos of glass objects submerged in the water of an aquarium are always delightful. When they are underwater, objects always look better lit, cleaner, and have more pronounced contrasts. And the submersion produces splashes that are always interesting for this kind of shot. The aquarium is placed on a table that is sturdy enough to support the weight of the water. The bottom third of the tank is filled with water, so that there is a large enough frame and we can catch the splash behind the glass without seeing the edge. Two flashes equipped with light boxes are arranged in backlight, one on either side of the aquarium, to light the glass jar appropriately and give substance to the water when it splashes. Then a bare-head flash equipped with a blue gel is directed toward the back wall so that the color of the background will be in harmony with the darker blue of the jar of moisturizing cream. Now we just need to drop the jar into the water and take the shot when the splash looks best. Of course, this will take several tries, especially for finding the axis along which to drop the object (here, a light rotation of 20° turned out perfect for the splashes to be just right). Unfortunately, there is a downside to this arrangement: when the water splashes, there is a projection of little drops that hit the inside of the glass wall of the aquarium. We could, of course, erase them in post-production, but I suggest instead that you make them disappear by pouring water on the glass wall. This will only take a few seconds, whereas the post-production editing would take infinitely longer, especially in areas where the splash and the water droplets overlap. A behind-the-scenes view of the production of the shot on the following page. TECHNICAL DATA SHEET Camera: Canon 5DS R Lens: EF 100mm f/2.8L Macro IS USM Focal distance: 40mm Aperture: f/11 Speed: 1/200 s Sensitivity: ISO 100 LIGHTING DIAGRAM
As with the blue-colored orange, this exercise has more to do with playing with the aesthetics and organization of and among objects than with studying complex lighting. Here, we are presenting different kinds of red chili peppers (cayenne peppers and West Indian hot peppers), chosen for their similarity in color and surface condition, which looks lacquered under direct lighting. To obtain a perfect monochrome, the peppers are arranged on a base of the same color: a sheet of glossy red plexiglass. The difficulty is in making the reflections appear on the peppers but not on the plexiglass, which would look white or pink if we placed a light source within its family of angles. One light source is enough, as long as it is large and diffuse enough. A 24 x 36-inch light box is set up 20 inches from the peppers, in backlight, at a lightly feathered angle, so that the light will reflect on the peppers but not on the plexiglass. Now the shadow produced by that light source needs to be cleared. A rounded reflector placed in fill light makes the light softer and better distributed, and offers a more effective result than a flash, which would produce overly localized direct reflections on the peppers. A behind-the-scenes view of the production of the shot on the following page. TECHNICAL DATA SHEET Camera: Canon 5DS R Lens: EF 100mm f/2.8L Macro IS USM Focal distance: 100mm Aperture: f/10 Speed: 1/200 s Sensitivity: ISO 100 LIGHTING DIAGRAM
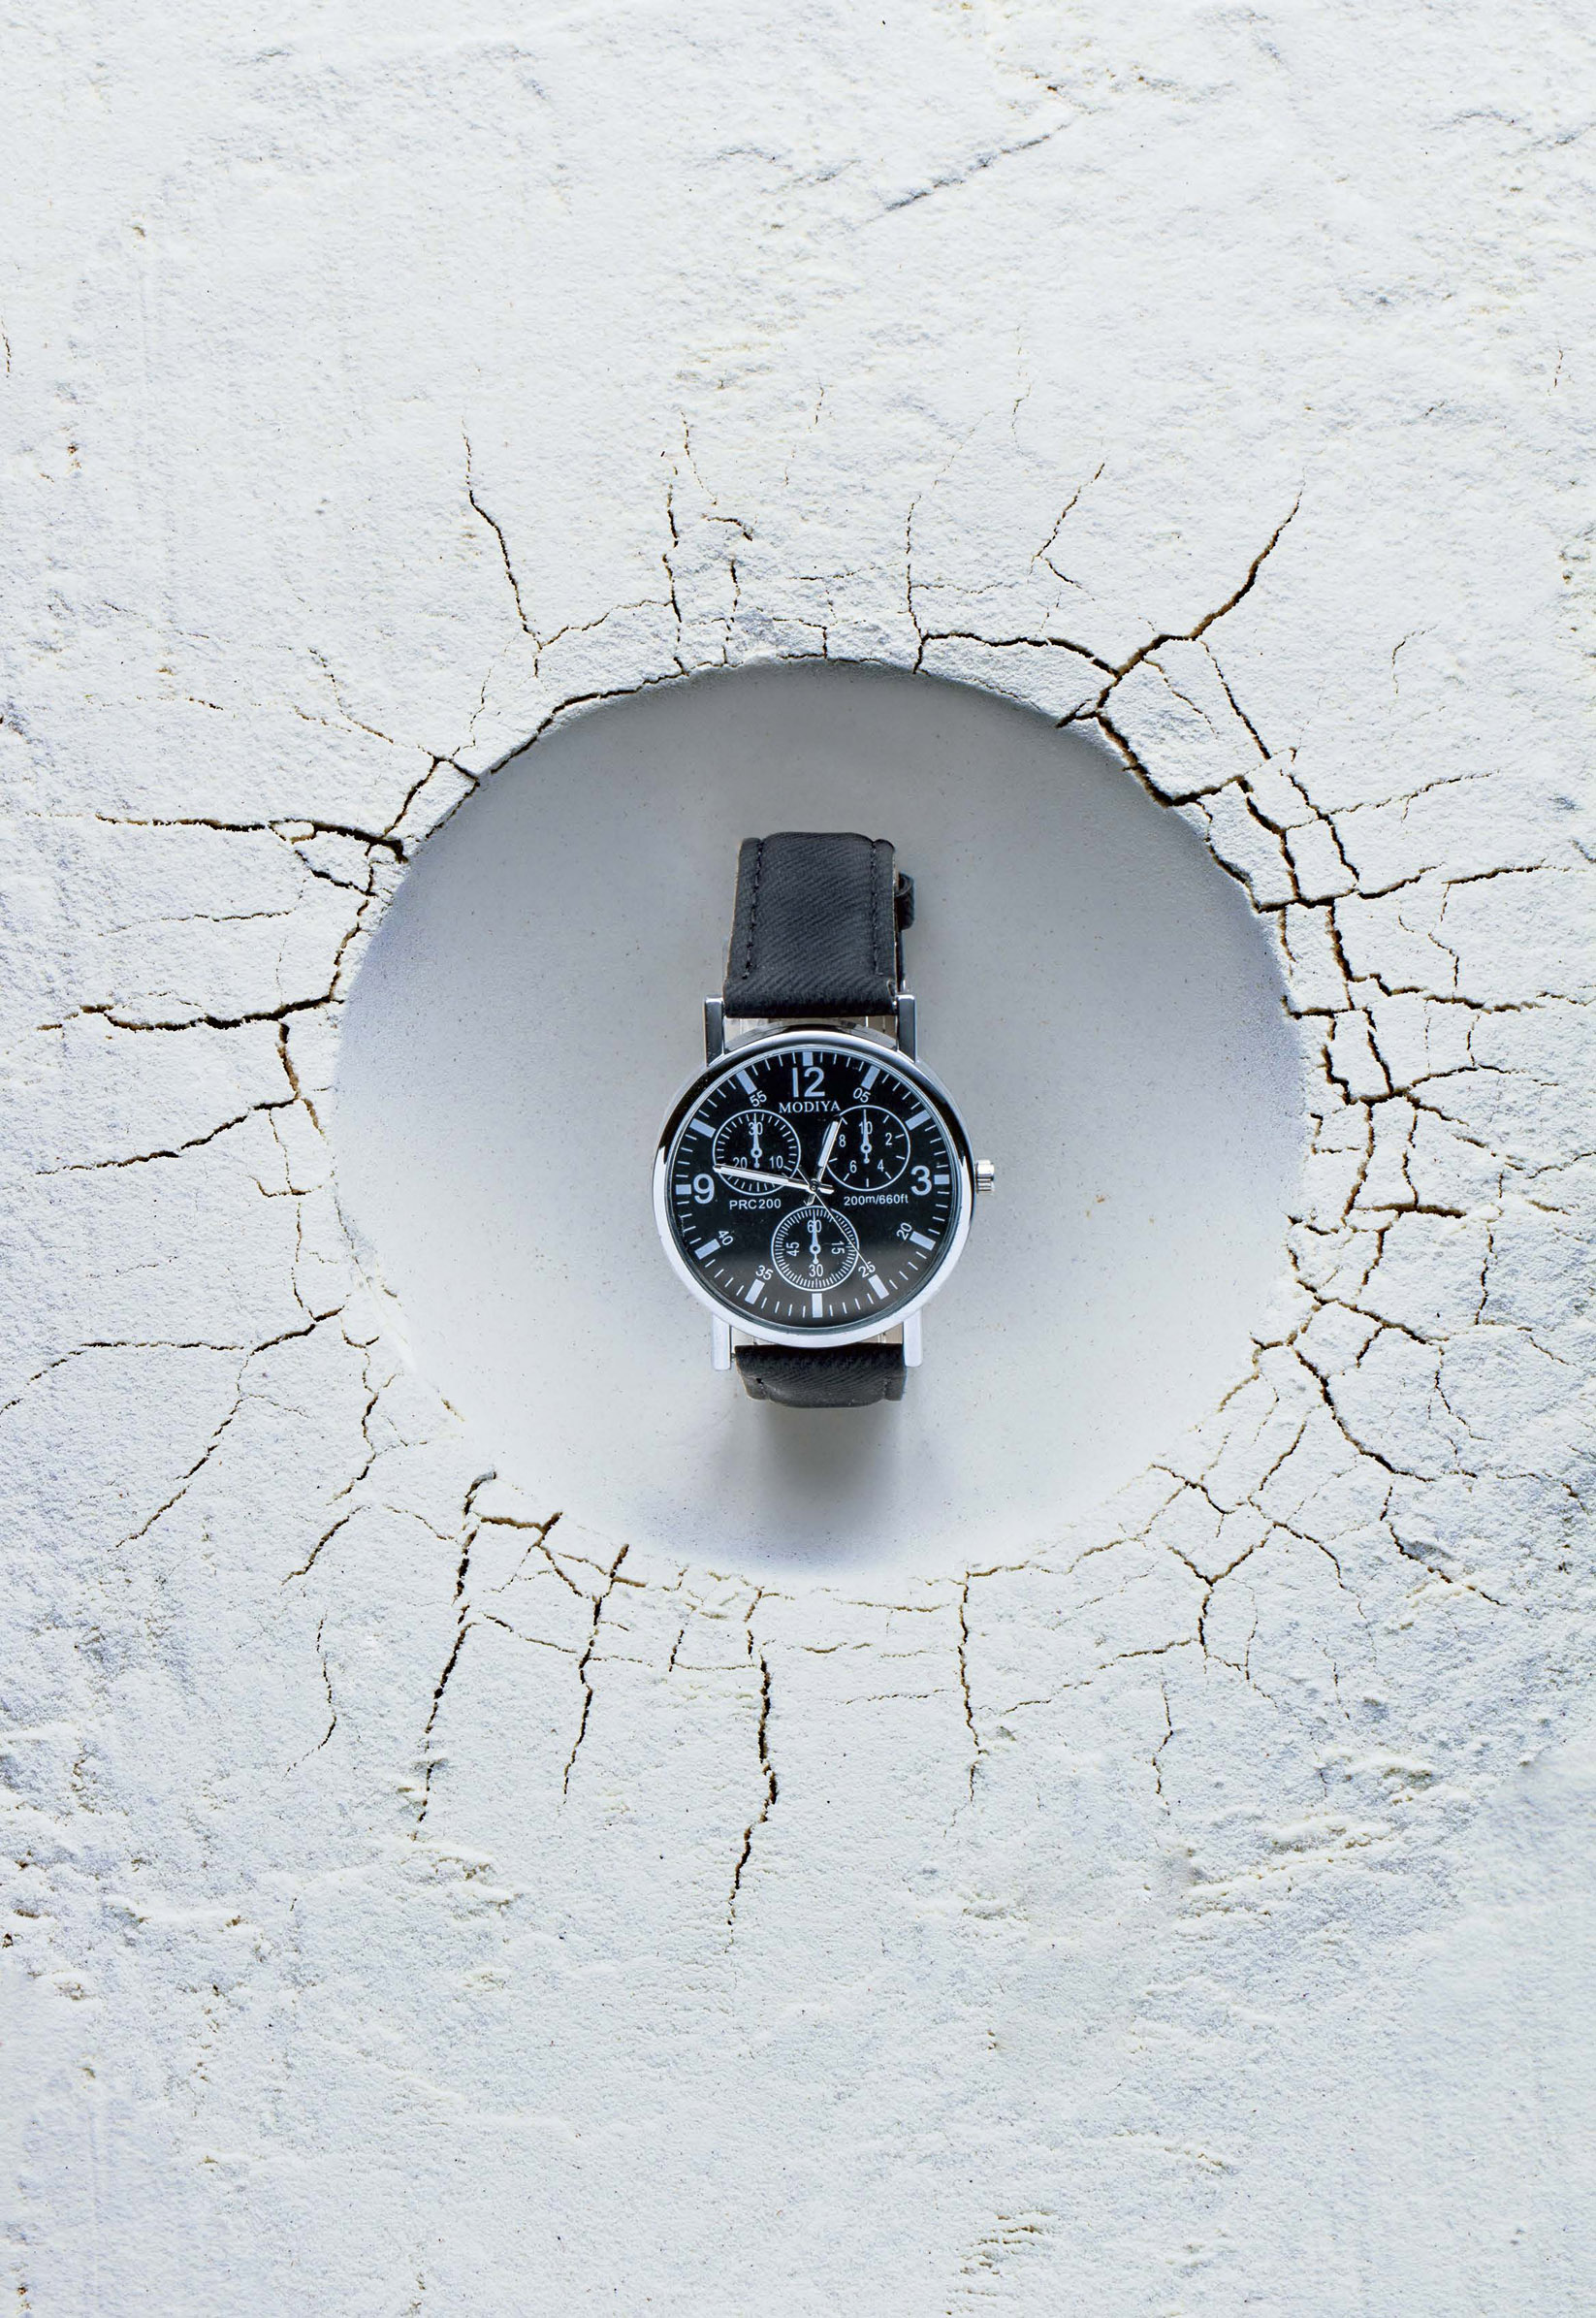
In advertising, visual impact is the most important goal. So why not suggest an actual physical impact, like that of a meteorite, or any object heavy enough to dig a crater and crack the ground? To get this effect, sixteen cups of white flour are poured into a Pyrex dish, then tamped down using a board the size of the dish. To dig the crater, a round bowl is placed in the center of the dish and pressed down on: the flour cracks all around the crater, as we see in the image below and the one on the following page. Then the bowl is carefully removed. Next, the watch is placed in the center of the crater, with the wristband already rounded with the help of a transparent plastic support bracelet. In terms of lighting, the usual backlighting is used, which is perfect for very glossy objects like watches: a flash equipped with a 24 x 36-inch light box is placed about 8 inches behind a large 78 x 60-inch diffusing panel, which in turn is positioned about 24 inches behind the dish. A rounded reflector in is positioned in front of the dish to redirect the backlighting to light the watch dial. Note that these two lighting arrangements, both at grazing angles with respect to the surface of the flour, allow us to accentuate the textural effect, especially on the cracks. In this shot, we have replaced the watch with a glass jar of moisturizing cream, which gives us a better view of the effect of the light. TECHNICAL DATA SHEET Camera: Canon 5DS R Lens: EF 100mm f/2.8L Macro IS USM Focal distance: 100mm Aperture: f/8 Speed: 1/160 s Sensitivity: ISO 100 A behind-the-scenes view of the production of the shot on the following page. LIGHTING DIAGRAM
Over the last few years, we have seen thousands of examples of this kind of shot, created with Photoshop, on social media. The idea here was to show that we could obtain a similar result in the shoot without later editing. We operate the same way here as we did for the waffles with honey on pages 238 and 239, stretching paired sets of “invisible” nylon thread between two tripods. Two lateral flashes equipped with small light boxes (12 x 16 inches) and honeycombs are set up so that the light will only illuminate the food and allow us to get an unlit background, which will look black in the shot. The flash on the right is placed higher than the top half of the bun, so that the main light is descending. The difference between the light on the top and bottom halves of the bun should be no more than 0.4 EV (+1.33 EV on the top half and no less than +0.9 EV on the bottom half, in other words), with the angle of the flash corrected if necessary to make sure that happens. The second flash only serves as a fill light, and is set to approximately +0.4 EV. Then, taking care to make sure that none of the objects knocks over any of the ones below it, each of the elements that is supposed to make up the burger is suspended from the nylon threads: the sesame buns, the tomatoes, the onions, the cheddar cheese, the leaves of lettuce (first dipped in ice water to bring out their color), and the hamburger patties (cooked only on the surface). A behind-the-scenes view of the production of the shot on the following page. TECHNICAL DATA SHEET Camera: Canon 5DS R Lens: EF 16–35mm f/4L Macro IS USM Focal distance: 35mm Aperture: f/8 Speed: 1/160 s Sensitivity: ISO 100 A little sauce is poured on one of the patties—here, we used barbecue sauce diluted with water so that it would be more liquid. And then the camera shutter is released. Depending on the angle of incidence of the flashes, the nylon threads might appear in places: this is something we can easily erase in Photoshop. But if the flashes are pointing in the right directions, and are placed so that their beams go in the same direction as the threads and the background is black, the threads disappear. LIGHTING DIAGRAM
For this exercise, what we want is coherent lighting for the glass and its contents, a harmony of complementary colors, and a dynamic composition. A sheet of blue plexiglass is arranged on the table so that it extends beyond the edge of the table (a piece of gaffer tape is used to keep it in place). A glass filled with whiskey and acrylic glass ice cubes are balanced on the edge of the sheet of plexiglass. Nylon threads are hot-glued to some other acrylic glass ice cubes, which are then suspended from a bar above the glass so that they seem to be levitating around it. Detail of the lighting on the glass and the arrangement of the trick. A behind-the-scenes view of the production of the shot on the following page. TECHNICAL DATA SHEET Camera: Canon 5DS R Lens: EF 100mm f/2.8L Macro IS USM Focal distance: 100mm Aperture: f/7.1 Speed: 1/160 s Sensitivity: ISO 100 For the lighting, a large 78 x 60-inch diffuser is placed behind the table, and a flash equipped with a 12 x 16-inch light box is placed behind that. They are positioned so that the glass is lit from behind, without direct reflections. A second flash, equipped with a blue gel that matches the blue of the plexiglass is directed toward the white wall behind the composition. Then we lie on the ground and photograph the glass from below. Note that given the angle of flash no. 1 and the fact that the background is light-colored, a small touch-up in Photoshop will be necessary to erase some of the threads that become visible. LIGHTING DIAGRAM
I produced this shot during a master class on product photography at Studio B612 in Lavérune in 2020. I wanted to show what we can do to obtain shots that are theoretically impossible to create without digital editing. Because my purpose here is to show that the laws of optics, along with a little bit of ingenuity, are usually enough to resolve photographic problems, this is the method that I suggested to my trainees there. A saucepan containing cold water, agar, and grenadine syrup is brought to a boil for 30 seconds, and then while the mixture is still hot, it is poured into a wine glass (which has been preheated to avoid thermal shock, which could shatter the glass). This is allowed to cool until the preparation is sufficiently gelled that it will not move when the glass is turned upside down. (We can reclaim the glass later by reversing the procedure: agar becomes liquid at approximately 185°F.) The glass full of agar and grenadine is hung upside down with a nylon thread attached to a bar. Finally, a second glass, identical to the first one but empty and right-side up, is placed on a sheet of white plexiglass. A behind-the-scenes view of the production of the shot on the following page. Now the setup is ready, we just have to proceed with the lighting. Here, we use the standard method, which involves setting up a large diffuser behind the glasses and a flash, equipped with a strip box, behind the diffuser. Lighted outside the family of angles, the glasses will be devoid of reflections, while the shadow caused by the proximity of the strip box and the diffuser will cause lovely dark lines to appear all along the the silhouettes of the glasses. TECHNICAL DATA SHEET Camera: Canon 5DS R Lens: EF 70–200mm f/2.8L USM Focal distance: 200mm Aperture: f/5.6 Speed: 1/160 s Sensitivity: ISO 100 LIGHTING DIAGRAMPRACTICAL EXERCISES
Harmony
Concrete Applications

Application
Practicing
4 LIGHT SOURCES + 3 ROUNDED DIFFUSERS + 2 BARN DOORS
A STUDY OF RINGS
Diffusion and Direction
![]() Flash: Profoto D1 equipped with a snoot and a honeycomb, directed toward the interior of the ring through diffuser no. 5. Set to +1 EV.
Flash: Profoto D1 equipped with a snoot and a honeycomb, directed toward the interior of the ring through diffuser no. 5. Set to +1 EV.![]() Flash: Profoto D1 equipped with a Spot Small directed toward the rear of the ring. Its flux is constricted by the barn doors (no. 8). Set to +0.8 EV.
Flash: Profoto D1 equipped with a Spot Small directed toward the rear of the ring. Its flux is constricted by the barn doors (no. 8). Set to +0.8 EV.![]() Flash: Profoto D1 equipped with a honeycomb, directed laterally toward the diamonds through diffuser no. 6. Set to +0.4 EV.
Flash: Profoto D1 equipped with a honeycomb, directed laterally toward the diamonds through diffuser no. 6. Set to +0.4 EV.![]() Flash: Profoto D1 equipped with a snoot and honeycomb, directed toward the base of the ring through diffuser no. 7. Set to +1.33 EV.
Flash: Profoto D1 equipped with a snoot and honeycomb, directed toward the base of the ring through diffuser no. 7. Set to +1.33 EV.![]() ,
, ![]() ,
, ![]() Rounded diffusers
Rounded diffusers![]() Barn doors: Two small black barn doors for directing the light of flash no. 2.
Barn doors: Two small black barn doors for directing the light of flash no. 2.Staging


3 LIGHT SOURCES + 1 REFLECTOR
SNEAKERS ROCK
Implementation
Artistic Choice
![]() Flash: Profoto D1 equipped with a honeycomb, directed toward the front of the sneakers. Set to +0.3 EV.
Flash: Profoto D1 equipped with a honeycomb, directed toward the front of the sneakers. Set to +0.3 EV.![]() Flash: Profoto D1 equipped with a snoot, directed toward the side of the sneakers. Set to +0.4 EV.
Flash: Profoto D1 equipped with a snoot, directed toward the side of the sneakers. Set to +0.4 EV.![]() Flash: Profoto D1 equipped with a snoot, directed toward the back of the sneakers to light the slab below. Set to +1.33 EV.
Flash: Profoto D1 equipped with a snoot, directed toward the back of the sneakers to light the slab below. Set to +1.33 EV.![]() Reflector: Placed laterally to eliminate the shadows created by flashes 2 and 3.
Reflector: Placed laterally to eliminate the shadows created by flashes 2 and 3.

2 LIGHT SOURCES + 1 REFLECTOR
FRAGRANCE DIFFUSER
Setup and Reflected Light

![]() Flash: Profoto D1 equipped with a 24 x 36-inch light box, directed toward the edge of the family of angles of the bottle, in a feathered position. Set to +1.33 EV.
Flash: Profoto D1 equipped with a 24 x 36-inch light box, directed toward the edge of the family of angles of the bottle, in a feathered position. Set to +1.33 EV.![]() Flash: Profoto D1 equipped with a zoom bowl, placed at on the ground and directed toward the reflector positioned behind the flask. Set to +0.1 EV.
Flash: Profoto D1 equipped with a zoom bowl, placed at on the ground and directed toward the reflector positioned behind the flask. Set to +0.1 EV.![]() Reflector
ReflectorOrganization of the Objects

2 LIGHT SOURCES + 1 DIFFUSER + 1 SHEET OF GLASS
FLYING TEACUP
Implementation

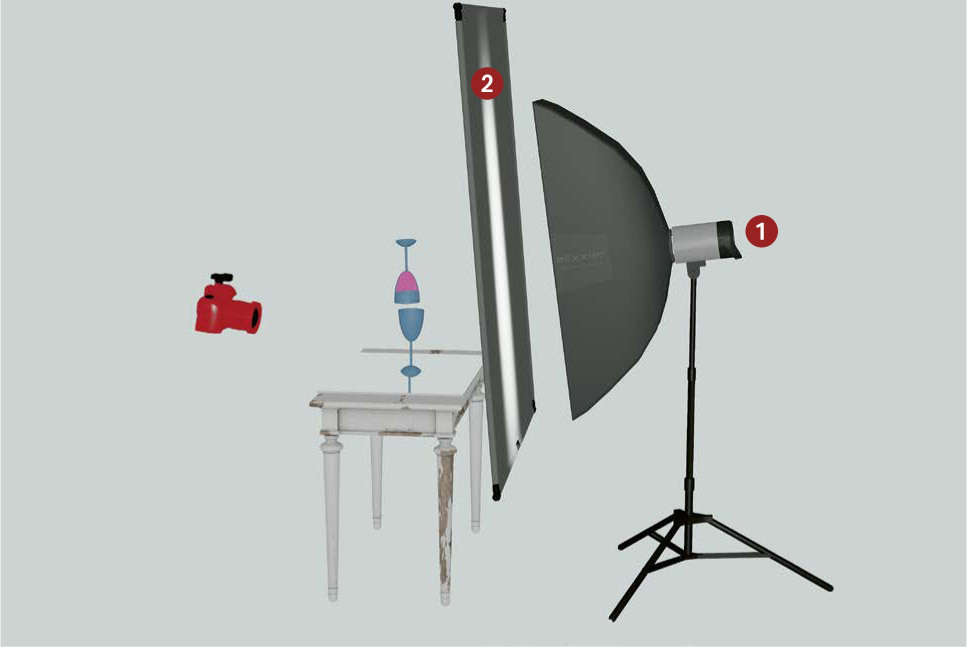
![]() Flash: Profoto D1 equipped with a 60-inch octabox, placed at a showerhead angle above the cup at about 32 inches. Set to +1.33 EV.
Flash: Profoto D1 equipped with a 60-inch octabox, placed at a showerhead angle above the cup at about 32 inches. Set to +1.33 EV.![]() Flash: Profoto D1 equipped with a zoom bowl, placed on the ground to light the diffuser positioned below the saucer. Set to +0.4 EV.
Flash: Profoto D1 equipped with a zoom bowl, placed on the ground to light the diffuser positioned below the saucer. Set to +0.4 EV.![]() Sheet of glass: To hold the cup about four inches above the diffuser.
Sheet of glass: To hold the cup about four inches above the diffuser.![]() Diffuser: To hold the saucer and to spread the light of flash no. 2.
Diffuser: To hold the saucer and to spread the light of flash no. 2.
3 LIGHT SOURCES + 1 SHEET OF GLASS
WAFFLES WITH HONEY
Implementation


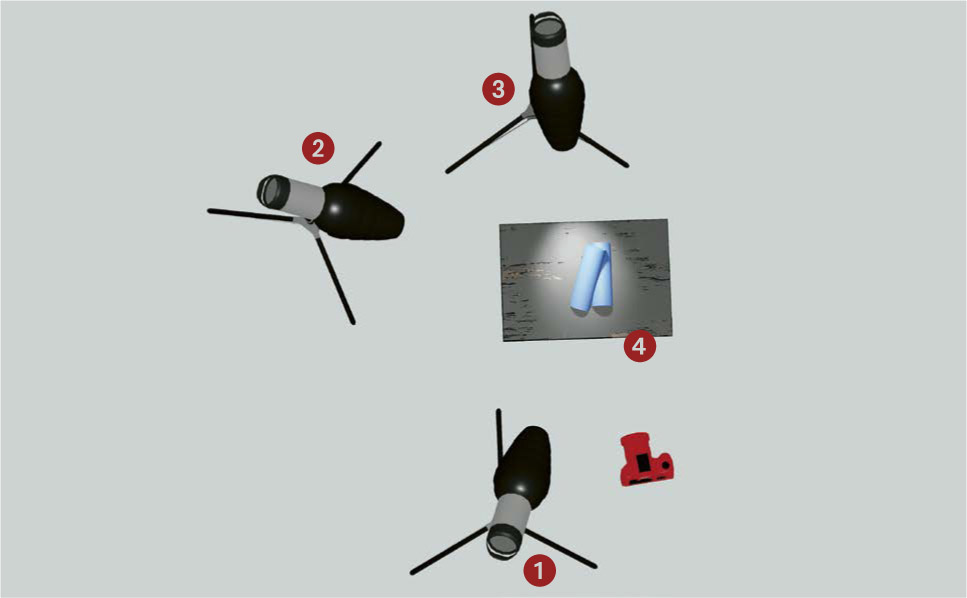
![]() [and]
[and] ![]() Flashes: Profoto D1s, each equipped with a 12 x 48-inch strip box with a honeycomb, directed in backlight toward the waffles. Set to +1.33 EV (measured with the lumisphere open).
Flashes: Profoto D1s, each equipped with a 12 x 48-inch strip box with a honeycomb, directed in backlight toward the waffles. Set to +1.33 EV (measured with the lumisphere open).![]() Flash: Profoto D1 equipped with a honeycomb, to light the underside of the waffles. Set to +0.4 EV (measured underneath the lowest waffle).
Flash: Profoto D1 equipped with a honeycomb, to light the underside of the waffles. Set to +0.4 EV (measured underneath the lowest waffle).![]() Sheet of glass: To protect flash no. 3 from the dripping honey, while still letting its light pass through.
Sheet of glass: To protect flash no. 3 from the dripping honey, while still letting its light pass through.
1 LIGHT SOURCE + 1 REFLECTOR
BLUE ORANGE
Art Direction
Setup

![]() Flash: Profoto D1 equipped with a 60-inch octabox, directed toward the orange and tilted down at an angle. Set to +1.33 EV.
Flash: Profoto D1 equipped with a 60-inch octabox, directed toward the orange and tilted down at an angle. Set to +1.33 EV.![]() Reflector: Placed opposite flash no. 1 in passive fill light.
Reflector: Placed opposite flash no. 1 in passive fill light.

3 LIGHT SOURCES + 1 BARN DOOR + 1 SHEET OF GLASS + 1 REFLECTOR
INTO ORBIT
Implementation
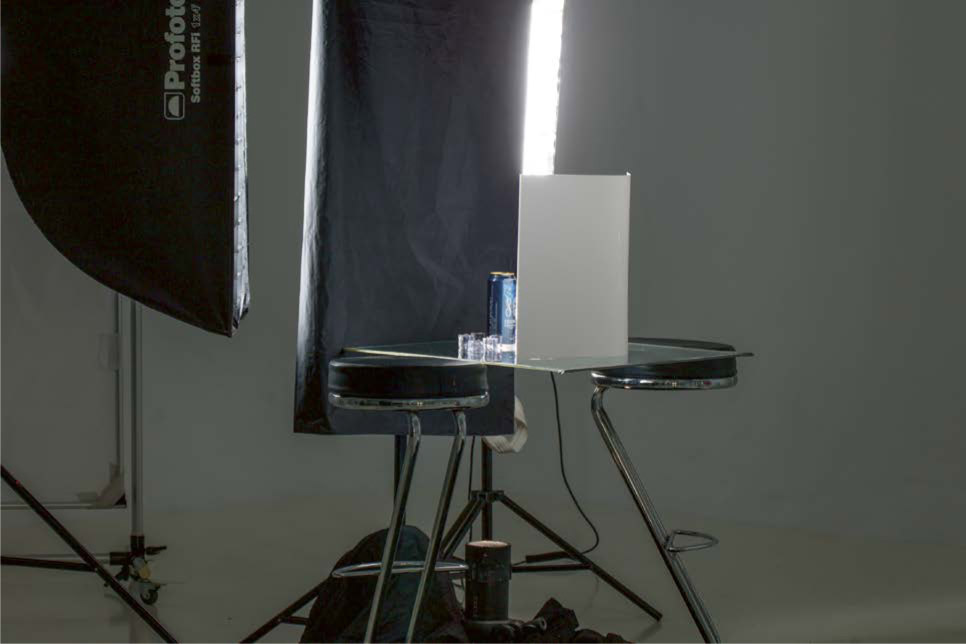
![]() [and]
[and] ![]() Flashes: Profoto D1, each equipped with a 12 x 48-inch strip box, directed in backlight to the edge of the can’s family of angles. Set to +1.33 EV.
Flashes: Profoto D1, each equipped with a 12 x 48-inch strip box, directed in backlight to the edge of the can’s family of angles. Set to +1.33 EV.![]() Flash: Profoto D1 equipped with a honeycomb and placed on the ground, directed toward the back of the can and the ice cubes. Set to +0.5 EV.
Flash: Profoto D1 equipped with a honeycomb and placed on the ground, directed toward the back of the can and the ice cubes. Set to +0.5 EV.![]() Barn doors
Barn doors![]() Sheet of glass: To hold up the can and the ice cubes and allow us to shoot from below.
Sheet of glass: To hold up the can and the ice cubes and allow us to shoot from below.![]() Reflector: To redirect the light of flashes no. 1 and no. 2 toward the front of the can.
Reflector: To redirect the light of flashes no. 1 and no. 2 toward the front of the can.

1 SOURCE + 1 DIFFUSER + 1 TRAY OF WATER
FLOATING PERFUME
Implementation and Lighting

![]() Flash: Profoto D1 equipped with a 24 x 36-inch light box, directed down at an angle through a diffuser. Set to +1.33 EV.
Flash: Profoto D1 equipped with a 24 x 36-inch light box, directed down at an angle through a diffuser. Set to +1.33 EV.![]() Diffuser
Diffuser![]() Tray of water: To produce small waves under the influence of an electric blower.
Tray of water: To produce small waves under the influence of an electric blower.

2 LIGHT SOURCES + 2 DIFFUSERS + 1 MIRROR
ANTS WITH WATCH
Staging and Lighting

![]() Flash: Profoto D1 equipped with a 12 x 16-inch light box, placed in backlight to light the rear part of the wristband through diffusing fabric no. 4. Set to +1.33 EV.
Flash: Profoto D1 equipped with a 12 x 16-inch light box, placed in backlight to light the rear part of the wristband through diffusing fabric no. 4. Set to +1.33 EV.![]() Flash: Profoto D1 equipped with a 24 x 36-inch light box, placed laterally to light the ants, the left edge, and the interior of the wristband, through diffusing fabric no. 3. Set to +0.5 EV.
Flash: Profoto D1 equipped with a 24 x 36-inch light box, placed laterally to light the ants, the left edge, and the interior of the wristband, through diffusing fabric no. 3. Set to +0.5 EV.![]() [and]
[and] ![]() Diffusing fabrics
Diffusing fabrics![]() Mirror: Positioned to reflect the light of flash no. 1 toward the front of the watch and dial.
Mirror: Positioned to reflect the light of flash no. 1 toward the front of the watch and dial.

3 LIGHT SOURCES + 1 DIFFUSER
OLD PORT
Implementation and Lighting

![]() Flash: Profoto D1 equipped with a snoot, directed toward the front of the bottle through a sheet of translucent paper. Set to +1.33 EV.
Flash: Profoto D1 equipped with a snoot, directed toward the front of the bottle through a sheet of translucent paper. Set to +1.33 EV.![]() Flash: Profoto D1 equipped with an optic shaper and a gobo projecting the shadow of a window blind in backlight. Set to +0.5 EV.
Flash: Profoto D1 equipped with an optic shaper and a gobo projecting the shadow of a window blind in backlight. Set to +0.5 EV.![]() Flash: Profoto D1 equipped with a 24 x 36-inch light box, placed in backlight at the edge of the bottle’s family of angles. Set to +0.6 EV.
Flash: Profoto D1 equipped with a 24 x 36-inch light box, placed in backlight at the edge of the bottle’s family of angles. Set to +0.6 EV.![]() Translucent paper
Translucent paper
3 LIGHT SOURCES
FRESHNESS AND FRUIT
Implementation and Lighting
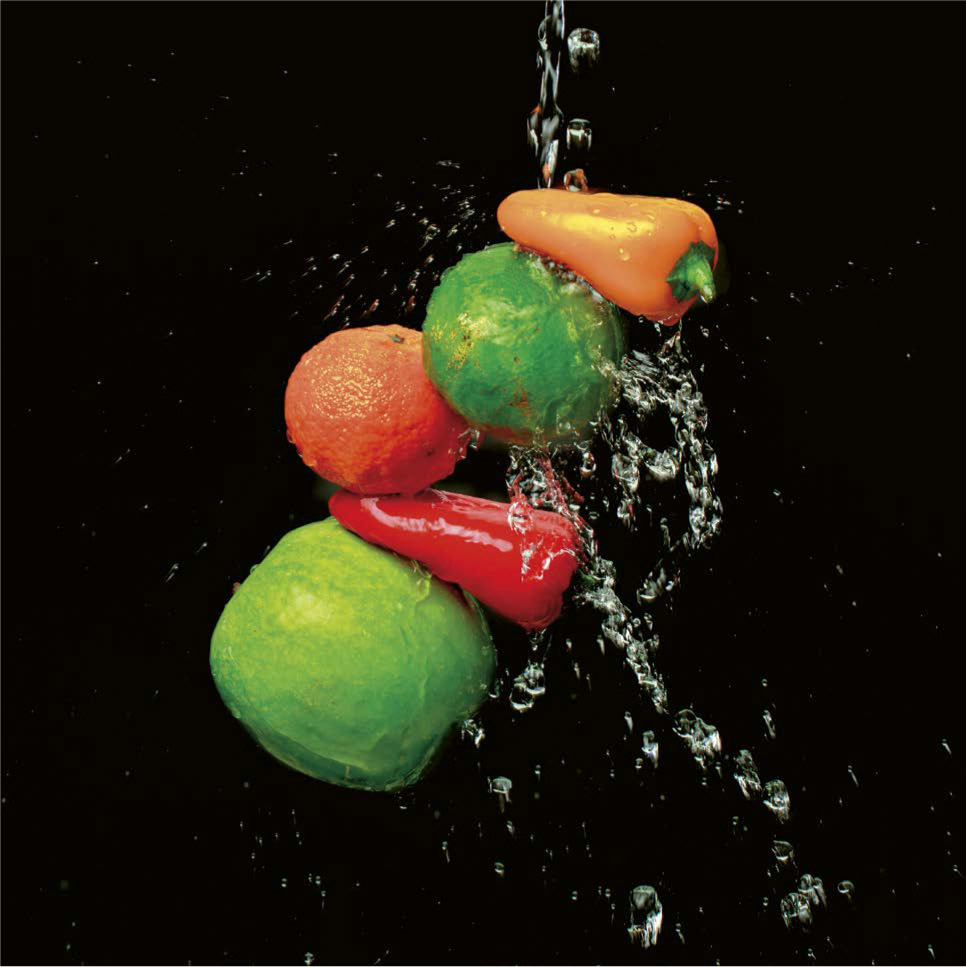
![]() Flash: Profoto D1 equipped with a 60-inch octabox, placed in backlight. Set to +1 EV.
Flash: Profoto D1 equipped with a 60-inch octabox, placed in backlight. Set to +1 EV.![]() Flash: Profoto D1 equipped with a 12 x 16-inch light box, placed at about 45° to the lens and tilted forward by about 30°, to light the fruit. Set to +1.33 EV.
Flash: Profoto D1 equipped with a 12 x 16-inch light box, placed at about 45° to the lens and tilted forward by about 30°, to light the fruit. Set to +1.33 EV.![]() Flash: Profoto D1 equipped with a 12 x 16-inch light box, directed toward the white wall behind the scene. Set to +3.33 EV.
Flash: Profoto D1 equipped with a 12 x 16-inch light box, directed toward the white wall behind the scene. Set to +3.33 EV.

3 LIGHT SOURCES + 1 AQUARIUM
JAR OF MOISTURIZING CREAM WITH SPLASHES
Implementation

![]() [and]
[and] ![]() Flash: Profoto D1s, each equipped with a 24 x 36-inch light box, placed in backlight at the edge of the jar’s family of angles. Set to +1.33 EV.
Flash: Profoto D1s, each equipped with a 24 x 36-inch light box, placed in backlight at the edge of the jar’s family of angles. Set to +1.33 EV.![]() Flash: Profoto D1, bare head and equipped with a blue gel, directed toward the wall behind the aquarium. Set to -0.3 EV.
Flash: Profoto D1, bare head and equipped with a blue gel, directed toward the wall behind the aquarium. Set to -0.3 EV.![]() Aquarium: One-third filled with water.
Aquarium: One-third filled with water.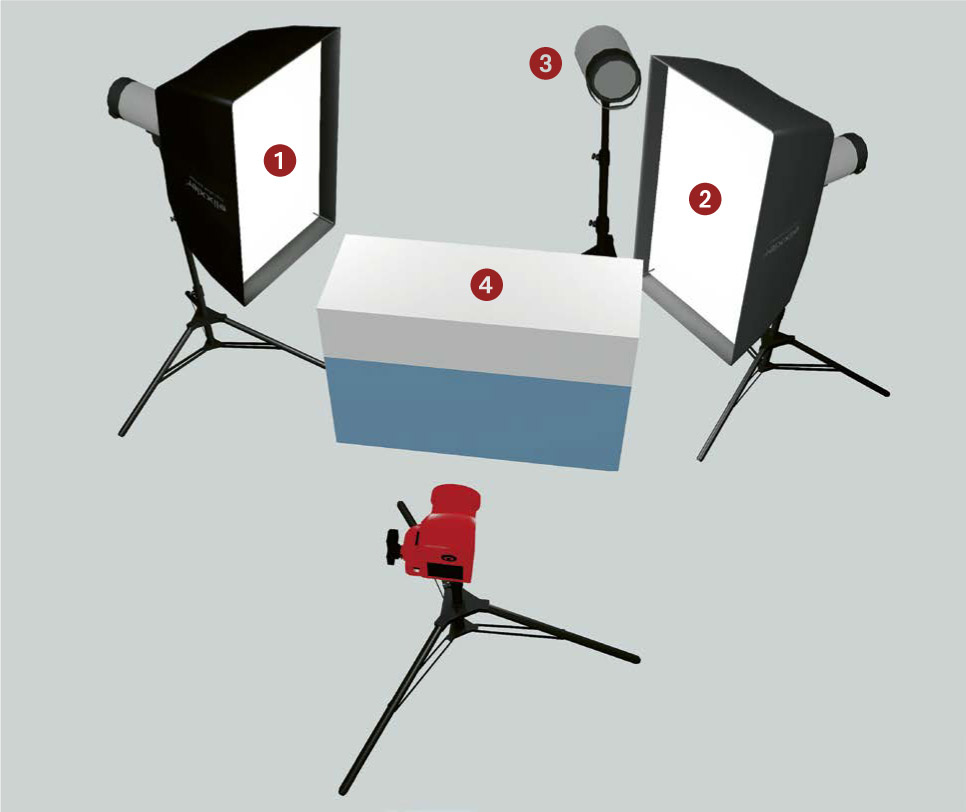

1 LIGHT SOURCE + 1 REFLECTOR
RED CHILI PEPPERS
Art Direction

![]() Flash: Profoto D1 equipped with a 24 x 36-inch light box, placed in backlight and directed toward the peppers. Set to +1.33 EV.
Flash: Profoto D1 equipped with a 24 x 36-inch light box, placed in backlight and directed toward the peppers. Set to +1.33 EV.![]() Reflector: Placed in fill light to clear the shadows produced by the flash.
Reflector: Placed in fill light to clear the shadows produced by the flash.

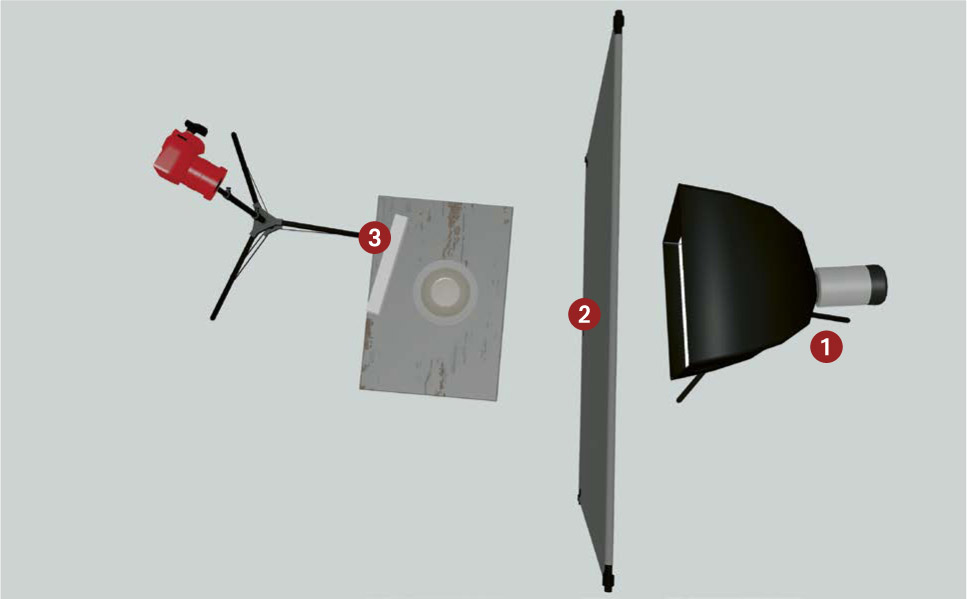
1 LIGHT SOURCE + 1 DIFFUSER + 1 REFLECTOR
A WATCH AND ITS IMPACT
Art Direction and Implementation

![]() Flash: Profoto D1 equipped with a 24 x 36-inch light box, placed behind the diffuser. Set to +1.33 EV.
Flash: Profoto D1 equipped with a 24 x 36-inch light box, placed behind the diffuser. Set to +1.33 EV.![]() Diffuser
Diffuser![]() Reflector: Placed in fill light to clear the shadows produced by the flash.
Reflector: Placed in fill light to clear the shadows produced by the flash.
2 LIGHT SOURCES
ANATOMY OF A HAMBURGER
Setup and Lighting

![]() Flash: Profoto D1 equipped with a 12 x 16-inch light box equipped with a honeycomb, placed in backlight. Set to +1.33 EV.
Flash: Profoto D1 equipped with a 12 x 16-inch light box equipped with a honeycomb, placed in backlight. Set to +1.33 EV.![]() Flash: Profoto D1 equipped with a 12 x 16-inch light box equipped with a honeycomb, placed laterally at 80° to the camera. Set to +0.4 EV.
Flash: Profoto D1 equipped with a 12 x 16-inch light box equipped with a honeycomb, placed laterally at 80° to the camera. Set to +0.4 EV.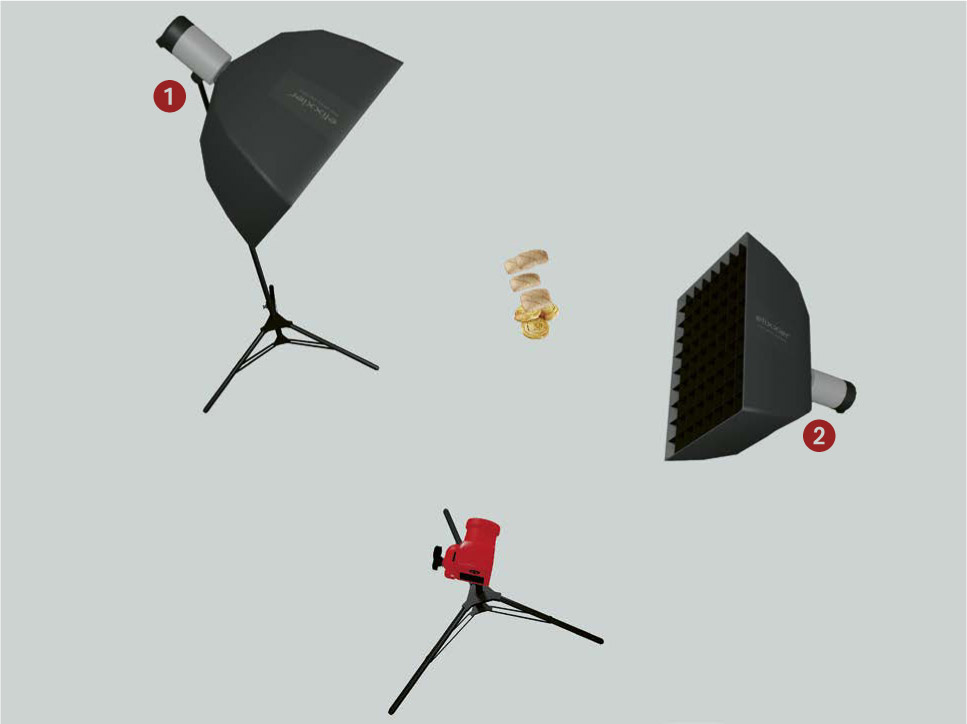

2 LIGHT SOURCES + 1 DIFFUSER
EXPLODING WHISKEY
Implementation and Art Direction


![]() Flash: Profoto D1 equipped with a 12 x 16-inch light box and a blue gel, directed toward the wall behind the glass. Set to +0.1 EV.
Flash: Profoto D1 equipped with a 12 x 16-inch light box and a blue gel, directed toward the wall behind the glass. Set to +0.1 EV.![]() Flash: Profoto D1 equipped with a 12 x 16-inch light box, placed in backlight behind the diffuser. Set to +1.33 EV.
Flash: Profoto D1 equipped with a 12 x 16-inch light box, placed in backlight behind the diffuser. Set to +1.33 EV.![]() Diffuser
Diffuser

1 LIGHT SOURCE + 1 DIFFUSER
UPSIDE-DOWN LEVITATION
Trickery and Lighting

![]() Flash: Profoto D1 equipped with a 12 x 48-inch strip box, placed in rim light behind a diffuser. Set to +0.33 EV.
Flash: Profoto D1 equipped with a 12 x 48-inch strip box, placed in rim light behind a diffuser. Set to +0.33 EV.![]() Diffuser
Diffuser