
This chapter provides information on programming with the data management features that are part of ADO.NET, a key component of the .NET Framework and of your ASP.NET development. The discussion begins with the basics of ADO.NET and later dives into the ways you can use various features that make up ADO.NET to manage data contained in a relational database.
ADO.NET, first introduced in version 1.0 of the .NET Framework, provided an extensive array of features to handle live data in a connected mode or data that is disconnected from its underlying data store. ADO.NET 1.0 was primarily developed to address two specific problems in getting at data. The first had to do with the user's need to access data once and to iterate through a collection of data in a single instance. This need often arose in Web application development.
ADO.NET addresses a couple of the most common data-access strategies that are used for applications today. When classic ADO was developed, many applications could be connected to the data store almost indefinitely. Today, with the explosion of the Internet as the means of data communication, a new data technology is required to make data accessible and updateable in a disconnected architecture.
The first of these common data-access scenarios is one in which a user must locate a collection of data and iterate through this data a single time. This is a popular scenario for Web pages. When a request for data from a Web page that you have created is received, you can simply fill a table with data from a data store. In this case, you go to the data store, grab the data that you want, send the data across the wire, and then populate the table. In this scenario, the goal is to get the data in place as fast as possible.
The second way to work with data in this disconnected architecture is to grab a collection of data and use this data separately from the data store itself. This could be on the server or even on the client. Although the data is disconnected, you want the ability to keep the data (with all of its tables and relations in place) on the client side. Classic ADO data was represented by a single table that you could iterate through. ADO.NET, however, can be a reflection of the data store itself, with tables, columns, rows, and relations all in place. When you are done with the client-side copy of the data, you can persist the changes that you made in the local copy of data directly back into the data store. The technology that gives you this capability is the DataSet, which will be covered shortly.
Although classic ADO was geared for a two-tiered environment (client-server), ADO.NET addresses a multi-tiered environment. ADO.NET is easy to work with because it has a unified programming model. This unified programming model makes working with data on the server the same as working with data on the client. Because the models are the same, you find yourself more productive when working with ADO.NET.
This chapter begins with a quick look at the basics of ADO.NET and then provides an overview of basic ADO.NET capabilities, namespaces, and classes. It also reviews how to work with the Connection, Command, DataAdapter, DataSet, and DataReader objects.
Before jumping into the depths of ADO.NET, step back and make sure that you understand some of the common tasks you might perform programmatically within ADO.NET. This next section looks at the process of selecting, inserting, updating, and deleting data.
The following example makes use of the
Northwind.mdfSQL Server Express Database file. To get this database, please search for "Northwind and pubs Sample Databases for SQL Server 2000". You can find this link atwww.microsoft.com/downloads/details.aspx?familyid=06616212-0356-46a0-8da2-eebc53a68034&displaylang=en. Once installed, you will find the Northwind.mdf file in the C: SQL Server 2000 Sample Databases directory. To add this database to your ASP.NET application, create anApp_Datafolder within your project (if it isn't already there) and right-click on the folder and select Add Existing Item. From the provided dialog box, you are then able to browse to the location of theNorthwind.mdffile that you just installed. If you are having trouble getting permissions to work with the database, make a data connection to the file from the Visual Studio Server Explorer by right-clicking on the Data Connections node and selecting Add New Connection from the provided menu. You will be asked to be made the appropriate user of the database. ThenVS will make the appropriate changes on your behalf for this to occur.
After the connection to the data source is open and ready to use, you probably want to read the data from the data source. If you do not want to manipulate the data, but simply to read it or transfer it from one spot to another, you use the DataReader class.
In the following example (Listing 8-1), you use the GetCompanyNameData() function to provide a list of company names from the SQL Northwind database.
Example 8.1. Reading the data from a SQL database using the DataReader class
VB
Imports Microsoft.VisualBasic
Imports System.Collections.Generic
Imports System.Data
Imports System.Data.SqlClient
Public Class SelectingData
Public Function GetCompanyNameData() As List(Of String)
Dim conn As SqlConnection
Dim cmd As SqlCommand
Dim cmdString As String = "Select CompanyName from Customers"
conn = New SqlConnection("Data Source=.SQLEXPRESS;AttachDbFilename=
|DataDirectory|NORTHWND.MDF;Integrated Security=True;
User Instance=True")' Put this string on one line in your code
cmd = New SqlCommand(cmdString, conn)
conn.Open()
Dim myReader As SqlDataReader
Dim returnData As List(Of String) = New List(Of String)
myReader = cmd.ExecuteReader(CommandBehavior.CloseConnection)
While myReader.Read()
returnData.Add(myReader("CompanyName").ToString())
End While
Return returnData
End Function
End Class
C#
using System.Data;
using System.Data.SqlClient;
using System.Collections.Generic;
public class SelectingData
{
public List<string> GetCompanyNameData()
{
SqlConnection conn;
SqlCommand cmd;
string cmdString = "Select CompanyName from Customers";
conn = new
SqlConnection(@"Data Source=.SQLEXPRESS;AttachDbFilename=
|DataDirectory|NORTHWND.MDF;Integrated Security=True;
User Instance=True"); // Put this string on one line in your code
cmd = new SqlCommand(cmdString, conn);
conn.Open();
SqlDataReader myReader;
List<string> returnData = new List<string>();
myReader = cmd.ExecuteReader(CommandBehavior.CloseConnection);
while (myReader.Read())
{
returnData.Add(myReader["CompanyName"].ToString());}
return returnData;
}
}In this example, you create an instance of both the SqlConnection and the SqlCommand classes. Then, before you open the connection, you simply pass the SqlCommand class a SQL command selecting specific data from the Northwind database. After your connection is opened (based upon the commands passed in), you create a DataReader. To read the data from the database, you iterate through the data with the DataReader by using the myReader.Read() method. After the List(Of String) object is built, the connection is closed, and the object is returned from the function.
When working with data, you often insert the data into the data source. Listing 8-2 shows you how to do this. This data may have been passed to you by the end user through the XML Web Service, or it may be data that you generated within the logic of your class.
Example 8.2. Inserting data into SQL Server
VBPublic Sub InsertData() Dim conn As SqlConnection Dim cmd As SqlCommand Dim cmdString As String = "Insert Customers (CustomerID, _ CompanyName, ContactName) Values ('BILLE', 'XYZ Company', 'Bill Evjen')" conn = New SqlConnection("Data Source=.SQLEXPRESS;AttachDbFilename= |DataDirectory|NORTHWND.MDF;Integrated Security=True; User Instance=True")' Put this string on one line in your code cmd = New SqlCommand(cmdString, conn) conn.Open() cmd.ExecuteNonQuery() conn.Close() End SubC#public void InsertData() { SqlConnection conn; SqlCommand cmd; string cmdString = "Insert Customers (CustomerID, CompanyName, ContactName) Values ('BILLE', 'XYZ Company', 'Bill Evjen')"; conn = new SqlConnection(@"Data Source=.SQLEXPRESS;AttachDbFilename= |DataDirectory|NORTHWND.MDF;Integrated Security=True; User Instance=True"); // Put this string on one line in your code cmd = new SqlCommand(cmdString, conn); conn.Open(); cmd.ExecuteNonQuery(); conn.Close(); }
Inserting data into SQL is pretty straightforward and simple. Using the SQL command string, you insert specific values for specific columns. The actual insertion is initiated using the cmd.ExecuteNonQuery() command. This executes a command on the data when you don't want anything in return.
In addition to inserting new records into a database, you frequently update existing rows of data in a table. Imagine a table in which you can update multiple records at once. In the example in Listing 8-3, you want to update an employee table by putting a particular value in the emp_bonus column if the employee has been at the company for five years or longer.
Example 8.3. Updating data in SQL Server
VBPublic Function UpdateEmployeeBonus() As Integer Dim conn As SqlConnection Dim cmd As SqlCommand Dim RecordsAffected as Integer Dim cmdString As String = "UPDATE Employees SET emp_bonus=1000 WHERE " & _ "yrs_duty>=5" conn = New SqlConnection("Data Source=.SQLEXPRESS;AttachDbFilename= |DataDirectory|NORTHWND.MDF;Integrated Security=True; User Instance=True")' Put this string on one line in your code cmd = New SqlCommand(cmdString, conn) conn.Open() RecordsAffected = cmd.ExecuteNonQuery() conn.Close() Return RecordsAffected End FunctionC#public int UpdateEmployeeBonus() { SqlConnection conn; SqlCommand cmd; int RecordsAffected; string cmdString = "UPDATE Employees SET emp_bonus=1000 WHERE yrs_duty>=5"; conn = new SqlConnection(@"Data Source=.SQLEXPRESS;AttachDbFilename= |DataDirectory|NORTHWND.MDF;Integrated Security=True; User Instance=True"); // Put this string on one line in your code cmd = new SqlCommand(cmdString, conn); conn.Open(); RecordsAffected = cmd.ExecuteNonQuery(); conn.Close(); return RecordsAffected; }
This update function iterates through all the employees in the table and changes the value of the emp_bonus field to 1000 if an employee has been with the company for more than five years. This is done with the SQL command string. The great thing about these update capabilities is that you can capture the number of records that were updated by assigning the ExecuteNonQuery() command to the RecordsAffected variable. The total number of affected records is then returned by the function.
Along with reading, inserting, and updating data, you sometimes need to delete data from the data source. Deleting data is a simple process of using the SQL command string and then the ExecuteNonQuery() command as you did in the update example. See Listing 8-4 for an illustration of this.
Example 8.4. Deleting data from SQL Server
VBPublic Function DeleteEmployee() As Integer Dim conn As SqlConnection Dim cmd As SqlCommand Dim RecordsAffected as Integer Dim cmdString As String = "DELETE Employees WHERE LastName='Evjen'" conn = New SqlConnection("Data Source=.SQLEXPRESS;AttachDbFilename= |DataDirectory|NORTHWND.MDF;Integrated Security=True; User Instance=True")' Put this string on one line in your code cmd = New SqlCommand(cmdString, conn) conn.Open() RecordsAffected = cmd.ExecuteNonQuery() conn.Close() Return RecordsAffected End FunctionC#public int DeleteEmployee() { SqlConnection conn; SqlCommand cmd; int RecordsAffected; string cmdString = "DELETE Employees WHERE LastName='Evjen'"; conn = new SqlConnection(@"Data Source=.SQLEXPRESS;AttachDbFilename= |DataDirectory|NORTHWND.MDF;Integrated Security=True; User Instance=True"); // Put this string on one line in your code cmd = new SqlCommand(cmdString, conn); conn.Open(); RecordsAffected = cmd.ExecuteNonQuery(); conn.Close(); return RecordsAffected; }
You can assign the ExecuteNonQuery() command to an Integer variable (just as you did for the update function) to return the number of records deleted.
The six core ADO.NET namespaces are shown in the following table. In addition to these namespaces, each new data provider can have its own namespace. As an example, the Oracle .NET data provider adds a namespace of System.Data.OracleClient (for the Microsoft-built Oracle data provider).
Namespace | Description |
|---|---|
| This namespace is the core of ADO.NET. It contains classes used by all data providers. It contains classes to represent tables, columns, rows, and the |
| This namespace defines common classes that are used as base classes for data providers. All data providers share these classes. A few examples are |
| This namespace defines classes that work with OLE-DB data sources using the .NET OleDb data provider. It contains classes such as |
| This namespace defines classes that work with the ODBC data sources using the .NET ODBC data provider. It contains classes such as |
| This namespace defines a data provider for the SQL Server 7.0 or higher database. It contains classes such as |
| This namespace defines a few classes that represent specific data types for the SQL Server database. |
ADO.NET has three distinct types of classes commonly referred to as Disconnected, Shared, and Data Providers. The Disconnected classes provide the basic structure for the ADO.NET framework. A good example of this type of class is the DataTable class. The objects of this class are capable of storing data without any dependency on a specific data provider. The Shared classes form the base classes for data providers and are shared among all data providers. The Data Provider classes are meant to work with different kinds of data sources. They are used to perform all data-management operations on specific databases. The SqlClient data provider, for example, works only with the SQL Server database.
A data provider contains Connection, Command, DataAdapter, and DataReader objects. Typically, in programming ADO.NET, you first create the Connection object and provide it with the necessary information, such as the connection string. You then create a Command object and provide it with the details of the SQL command that is to be executed. This command can be an inline SQL text command, a stored procedure, or direct table access. You can also provide parameters to these commands if needed. After you create the Connection and the Command objects, you must decide whether the command returns a result set. If the command doesn't return a result set, you can simply execute the command by calling one of its several Execute methods. On the other hand, if the command returns a result set, you must make a decision about whether you want to retain the result set for future uses without maintaining the connection to the database. If you want to retain the result set, you must create a DataAdapter object and use it to fill a DataSet or a DataTable object. These objects are capable of maintaining their information in a disconnected mode. However, if you don't want to retain the result set, but rather to simply process the command in a swift fashion, you can use the Command object to create a DataReader object. The DataReader object needs a live connection to the database, and it works as a forward-only, read-only cursor.
The Connection object creates a link (or connection) to a specified data source. This object must contain the necessary information to discover the specified data source and to log in to it properly using a defined username and password combination. This information is provided via a single string called a connection string. You can also store this connection string in the web.config file of your application.
Every type of data provider has a connection object of some kind. The data provider for working with a SQL data store includes a SqlConnection class that performs this type of operation. The SqlConnection object is a class that is specific to the SqlClient provider. As discussed earlier in this chapter, the SqlClient provider is built for working with the SQL Server 7.0 and higher databases. The properties for the SqlConnection class are shown in the following table.
Property | Description |
|---|---|
| This property allows you to read or provide the connection string that should be used by the |
| This read-only property returns the name of the database to use after the connection is opened. |
| This read-only property returns the name of the instance of the SQL Server database used by the |
| This read-only property returns the current state of the connection. The possible values are |
Connecting to a data source is probably the most common task when you are working with data. This example and the ones that follow assume that you have a SQL Server database. In order to connect to your SQL Server database, you use the SqlConnection class. This is shown in Listing 8-5.
Example 8.5. Connecting to a SQL database
VBDim conn as SqlConnection conn = New SqlConnection("Data Source=.SQLEXPRESS;AttachDbFilename= |DataDirectory|NORTHWND.MDF;Integrated Security=True; User Instance=True")' Put this string on one line in your code conn.Open()C#SqlConnection conn; conn = new SqlConnection(@"Data Source=.SQLEXPRESS;AttachDbFilename=
|DataDirectory|NORTHWND.MDF;Integrated Security=True;
            User Instance=True");  // Put this string on one line in your code

conn.Open();
To make this connection work, be sure that the proper namespaces are imported before you start using any of the classes that work with SQL. The first step in making a connection is to create an instance of the SqlConnection class and assign it to the conn instance. This SqlConnection class is initialized after you pass in the connection string as a parameter to the class. In this case, you are connecting to the Northwind database that resides on your local machine using the system administrator's login credentials.
Another means of making a connection is to put the connection string within the application's web.config file and then to make a reference to the web.config file. With ASP.NET 3.5, you will find that there is an easy way to manage the storage of your connection strings through the use of the web.config file. This is actually a better way to store your connection strings rather than hard-coding them within the code of the application itself. In addition to having a single point in the application where the credentials for database access can be managed, storing credentials in the web.config also gives you the ability to encrypt the credentials.
To define your connection string within the web.config file, you are going to make use of the <connectionStrings> section. From this section, you can place an <add> element within it to define your connection. An example of this is illustrated in Listing 8-6.
Example 8.6. Providing your connection string within the web.config file
<connectionStrings>
  <add name="DSN_Northwind" connectionString="Data
   Source=.SQLEXPRESS;AttachDbFilename=|DataDirectory|NORTHWND.MDF;Integrated
   Security=True;User Instance=True"
   providerName="System.Data.SqlClient" />
 </connectionStrings>
In many places of this chapter, you will see that the actual connection string is broken up on multiple lines. This connection string will need to be on a single line within your code or broken up with string concatenation.
Now that you have a connection string within the web.config file, you can then make use of that connection string directly in your code by using the ConnectionManager object as illustrated here in Listing 8-7.
Example 8.7. Using the connection string found in the web.config file
VBconn = New _ SqlConnection( _ ConfigurationManager.ConnectionStrings("DSN_Northwind").ConnectionString)C#conn = new SqlConnection( ConfigurationManager.ConnectionStrings["DSN_Northwind"].ConnectionString);
For this line of code to work, you are going to have to make a reference to the System.Configuration namespace.
When you complete your connection to the data source, be sure that you close the connection by using conn.Close(). The .NET Framework does not implicitly release the connections when they fall out of scope.
The Command object uses the Connection object to execute SQL queries. These queries can be in the form of inline text, stored procedures, or direct table access. If the SQL query uses a SELECT clause, the result set it returns is usually stored in either a DataSet or a DataReader object. The Command object provides a number of Execute methods that can be used to perform various types of SQL queries.
Next, take a look at some of the more useful properties of the SqlCommand class, as shown in the following table.
Property | Description |
|---|---|
| This read/write property allows you to set or retrieve either the T-SQL statement or the name of the stored procedure. |
| This read/write property gets or sets the number of seconds to wait while attempting to execute a particular command. The command is aborted after it times out and an exception is thrown. The default time allotted for this operation is 30 seconds. |
| This read/write property indicates the way the |
| This read/write property gets or sets the |
Next, take a look at the various Execute methods that can be called from a Command object.
Property | Description |
|---|---|
| This method executes the command specified and returns the number of rows affected. |
| This method executes the command specified and returns an instance of the |
| This method executes the command and returns an instance of the |
This method executes the command specified and returns the first column of the first row in the form of a generic object. The remaining rows and columns are ignored. | |
| This method executes the command specified and returns an instance of the |
The DataReader object is a simple forward-only and read-only cursor. It requires a live connection with the data source and provides a very efficient way of looping and consuming all or part of the result set. This object cannot be directly instantiated. Instead, you must call the ExecuteReader method of the Command object to obtain a valid DataReader object.
When using a DataReader object, be sure to close the connection when you are done using the data reader. If not, then the connection stays alive. The connection utilized stays alive until it is explicitly closed using the Close() method or until you have enabled your Command object to close the connection. You can close the connection after using the data reader in one of two ways. One way is to provide the CommandBehavior.CloseConnection enumeration while calling the ExecuteMethod of the Command object. This approach works only if you loop through the data reader until you reach the end of the result set, at which point the reader object automatically closes the connection for you. However, if you don't want to keep reading the data reader until the end of the result set, you can call the Close() method of the Connection object yourself.
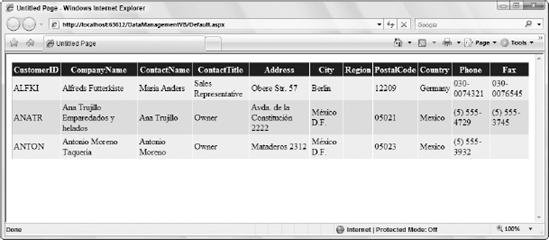
Listing 8-8 shows the Connection, Command, and DataReader objects in action. It shows how to connect to the Northwind database (an example database found in the Microsoft's SQL Server 7.0, 2000, 2005, or 2008 database servers), read the Customers table within this database, and display the results in a GridView server control.
Example 8.8. The SqlConnection, SqlCommand, and SqlDataReader objects in action
VB
<%@ Page Language="VB" %>
<%@ Import Namespace="System.Data" %>
<%@ Import Namespace="System.Data.SqlClient" %>
<%@ Import Namespace="System.Configuration" %>

<script runat="server">
    Protected Sub Page_Load(ByVal sender As Object, _
            ByVal e As System.EventArgs)

        If Not Page.IsPostBack Then
            Dim MyReader As SqlDataReader

        Dim MyConnection As SqlConnection = New SqlConnection()
MyConnection.ConnectionString = _
ConfigurationManager.ConnectionStrings("DSN_Northwind").ConnectionString
Dim MyCommand As SqlCommand = New SqlCommand()
MyCommand.CommandText = "SELECT TOP 3 * FROM CUSTOMERS"
MyCommand.CommandType = CommandType.Text
MyCommand.Connection = MyConnection
MyCommand.Connection.Open()
MyReader = MyCommand.ExecuteReader(CommandBehavior.CloseConnection)
gvCustomers.DataSource = MyReader
gvCustomers.DataBind()
MyCommand.Dispose()
MyConnection.Dispose()
End If
End Sub
</script>
<html>
<body>
<form id="form1" runat="server">
<div>
<asp:GridView ID="gvCustomers" runat="server">
</asp:GridView>
</div>
</form>
</body>
</html>
C#
<%@ Page Language="C#" %>
<%@ Import Namespace="System.Data" %>
<%@ Import Namespace="System.Data.SqlClient" %>
<%@ Import Namespace="System.Configuration" %>
<script runat="server">
protected void Page_Load(object sender, EventArgs e)
{
if (!Page.IsPostBack)
{
SqlDataReader MyReader;
SqlConnection MyConnection = new SqlConnection();
MyConnection.ConnectionString =
ConfigurationManager.ConnectionStrings["DSN_Northwind"].ConnectionString;
SqlCommand MyCommand = new SqlCommand();
MyCommand.CommandText = "SELECT TOP 3 * FROM CUSTOMERS";
MyCommand.CommandType = CommandType.Text;
MyCommand.Connection = MyConnection;
MyCommand.Connection.Open();MyReader = MyCommand.ExecuteReader(CommandBehavior.CloseConnection);
gvCustomers.DataSource = MyReader;
gvCustomers.DataBind();
MyCommand.Dispose();
MyConnection.Dispose();
}
}
</script>The code shown in Listing 8-8 uses the SqlConnection class to create a connection with the Northwind database using the connection string stored in the web.config file. This connection string is then retrieved using the ConfigurationManager class. It is always best to store your connection strings inside the web.config and to reference them in this manner. If you have a single place to work with your connection strings, any task is a lot more manageable than if you place all your connection strings in the actual code of your application.
After working with the connection string, this bit of code from Listing 8-8 creates a Command object using the SqlCommand class because you are interested in working with a SQL database. Next, the code provides the command text, command type, and connection properties. After the command and the connection are created, the code opens the connection and executes the command by calling the ExecuteReader method of the MyCommand object. After receiving the data reader from the Command object, you simply bind the retrieved results to an instance of the GridView control. The results are shown in Figure 8-1.
The SqlDataAdapter is a special class whose purpose is to bridge the gap between the disconnected DataTable objects and the physical data source. The SqlDataAdapter provides a two-way data transfer mechanism. It is capable of executing a SELECT statement on a data source and transferring the result set into a DataTable object. It is also capable of executing the standard INSERT, UPDATE, and DELETE statements and extracting the input data from a DataTable object.
The commonly used properties offered by the SqlDataAdapter class are shown in the following table.
Property | Description |
|---|---|
| This read/write property sets or gets an object of type |
| This read/write property sets or gets an object of type |
| This read/write property sets or gets an object of type |
| This read/write property sets or gets an object of type |
The SqlDataAdapter class also provides a method called Fill(). Calling the Fill() method automatically executes the command provided by the SelectCommand property, receives the result set, and copies it to a DataTable object.
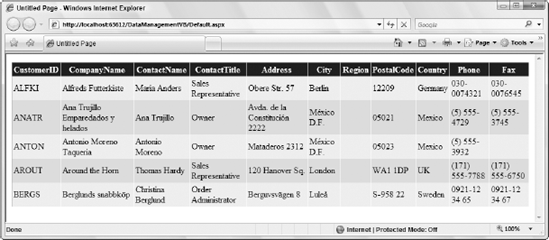
The code example in Listing 8-9 illustrates how to use an object of SqlDataAdapter class to fill a DataTable object.
Example 8.9. Using an object of SqlDataAdapter to fill a DataTable
VB
<%@ Page Language="VB" %>
<%@ Import Namespace="System.Data" %>
<%@ Import Namespace="System.Data.SqlClient" %>
<%@ Import Namespace="System.Configuration" %>

<script runat="server">
    Protected Sub Page_Load(ByVal sender As Object, _
            ByVal e As System.EventArgs)

        If Not Page.IsPostBack Then
           Dim MyTable As DataTable = New DataTable()

           Dim MyConnection As SqlConnection = New SqlConnection()
           MyConnection.ConnectionString = _
           ConfigurationManager.ConnectionStrings("DSN_Northwind").ConnectionString

           Dim MyCommand As SqlCommand = New SqlCommand()
           MyCommand.CommandText = "SELECT TOP 5 * FROM CUSTOMERS"
           MyCommand.CommandType = CommandType.Text
           MyCommand.Connection = MyConnection

           Dim MyAdapter As SqlDataAdapter = New SqlDataAdapter()
           MyAdapter.SelectCommand = MyCommand
MyAdapter.Fill(MyTable)
gvCustomers.DataSource = MyTable.DefaultView
gvCustomers.DataBind()
MyAdapter.Dispose()
MyCommand.Dispose()
MyConnection.Dispose()
End If
End Sub
</script>
C#
<%@ Page Language="C#" %>
<%@ Import Namespace="System.Data" %>
<%@ Import Namespace="System.Data.SqlClient" %>
<%@ Import Namespace="System.Configuration" %>
<script runat="server">
protected void Page_Load(object sender, EventArgs e)
{
if (!Page.IsPostBack)
{
DataTable MyTable = new DataTable();
SqlConnection MyConnection = new SqlConnection();
MyConnection.ConnectionString =
ConfigurationManager.
ConnectionStrings["DSN_Northwind"].ConnectionString;
SqlCommand MyCommand = new SqlCommand();
MyCommand.CommandText = "SELECT TOP 5 * FROM CUSTOMERS";
MyCommand.CommandType = CommandType.Text;
MyCommand.Connection = MyConnection;
SqlDataAdapter MyAdapter = new SqlDataAdapter();
MyAdapter.SelectCommand = MyCommand;
MyAdapter.Fill(MyTable);
gvCustomers.DataSource = MyTable.DefaultView;
gvCustomers.DataBind();
MyAdapter.Dispose();
MyCommand.Dispose();
MyConnection.Dispose(); }
}
</script>The code shown in Listing 8-9 creates a Connection and Command object and then proceeds to create an instance of the SqlDataAdapter class. It then sets the SelectCommand property of the DataAdapter object to the Command object it had previously created. After the DataAdapter object is ready for executing, the code executes the Fill() method, passing it an instance of the DataTable class. The Fill() method populates the DataTable object. Figure 8-2 shows the result of executing this code.
Most serious database programming, regardless of how simple it might be, requires you to configure SQL statements using parameters. Using parameters helps guard against possible SQL injection attacks. Obviously, a discussion on the basics of ADO.NET programming is not complete without covering the use of parameterized SQL statements.
Creating a parameter is as simple as declaring an instance of the SqlParameter class and providing it the necessary information, such as parameter name, value, type, size, direction, and so on. The following table shows the properties of the SqlParameter class.
Property | Description |
|---|---|
| This read/write property gets or sets the name of the parameter. |
| This read/write property gets or sets the SQL Server database type of the parameter value. |
| This read/write property sets or gets the size of the parameter value. |
| This read/write property sets or gets the direction of the parameter, such as |
| This read/write property maps a column from a |
| This read/write property sets or gets the value provided to the parameter object. This value is passed to the parameter defined in the command during runtime. |
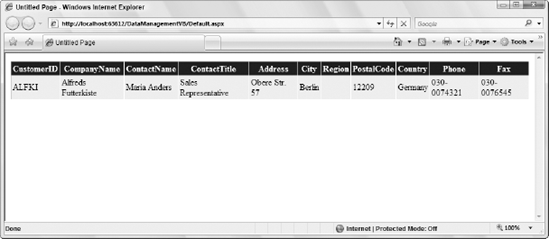
Listing 8-10 modifies the code shown in Listing 8-5 to use two parameters while retrieving the list of customers from the database.
Example 8.10. The use of a parameterized SQL statement
VB
<%@ Page Language="VB" %>
<%@ Import Namespace="System.Data" %>
<%@ Import Namespace="System.Data.SqlClient" %>
<%@ Import Namespace="System.Configuration" %>

<script runat="server">
    Protected Sub Page_Load(ByVal sender As Object, _
            ByVal e As System.EventArgs)
        If Not Page.IsPostBack Then
            Dim MyReader As SqlDataReader
            Dim CityParam As SqlParameter
            Dim ContactParam As SqlParameter

            Dim MyConnection As SqlConnection = New SqlConnection()
            MyConnection.ConnectionString = _
         ConfigurationManager.ConnectionStrings("DSN_Northwind").ConnectionString

            Dim MyCommand As SqlCommand = New SqlCommand()
            MyCommand.CommandText = _
         "SELECT * FROM CUSTOMERS WHERE CITY = @CITY AND CONTACTNAME = @CONTACT"
            MyCommand.CommandType = CommandType.Text
            MyCommand.Connection = MyConnection

            CityParam = New SqlParameter()
            CityParam.ParameterName = "@CITY"
            CityParam.SqlDbType = SqlDbType.VarChar
            CityParam.Size = 15
            CityParam.Direction = ParameterDirection.Input
            CityParam.Value = "Berlin"

            ContactParam = New SqlParameter()
            ContactParam.ParameterName = "@CONTACT"
            ContactParam.SqlDbType = SqlDbType.VarChar
            ContactParam.Size = 15
            ContactParam.Direction = ParameterDirection.Input
            ContactParam.Value = "Maria Anders"

            MyCommand.Parameters.Add(CityParam)
            MyCommand.Parameters.Add(ContactParam)

            MyCommand.Connection.Open()
            MyReader = MyCommand.ExecuteReader(CommandBehavior.CloseConnection)

            gvCustomers.DataSource = MyReader
            gvCustomers.DataBind()

            MyCommand.Dispose()
            MyConnection.Dispose()
        End If
End Sub
</script>
C#
<%@ Page Language="C#" %>
<%@ Import Namespace="System.Data" %>
<%@ Import Namespace="System.Data.SqlClient" %>
<%@ Import Namespace="System.Configuration" %>
<script runat="server">
protected void Page_Load(object sender, EventArgs e)
{
if (!Page.IsPostBack)
{
SqlDataReader MyReader;
SqlParameter CityParam;
SqlParameter ContactParam;
SqlConnection MyConnection = new SqlConnection();
MyConnection.ConnectionString =
ConfigurationManager.ConnectionStrings["DSN_Northwind"].ConnectionString;
SqlCommand MyCommand = new SqlCommand();
MyCommand.CommandText =
"SELECT * FROM CUSTOMERS WHERE CITY = @CITY AND CONTACTNAME = @CONTACT";
MyCommand.CommandType = CommandType.Text;
MyCommand.Connection = MyConnection;
CityParam = new SqlParameter();
CityParam.ParameterName = "@CITY";
CityParam.SqlDbType = SqlDbType.VarChar;
CityParam.Size = 15;
CityParam.Direction = ParameterDirection.Input;
CityParam.Value = "Berlin";
ContactParam = new SqlParameter();
ContactParam.ParameterName = "@CONTACT";
ContactParam.SqlDbType = SqlDbType.VarChar;
ContactParam.Size = 15;
ContactParam.Direction = ParameterDirection.Input;
ContactParam.Value = "Maria Anders";
MyCommand.Parameters.Add(CityParam);
MyCommand.Parameters.Add(ContactParam);
MyCommand.Connection.Open();
MyReader = MyCommand.ExecuteReader(CommandBehavior.CloseConnection);
gvCustomers.DataSource = MyReader;
gvCustomers.DataBind();
MyCommand.Dispose();MyConnection.Dispose();
}
}
</script>The code shown in Listing 8-8 uses a parameterized SQL statement that receives the name of the city and the contact person to narrow the result set. These parameters are provided by instantiating a couple of instances of the SqlParameter class and filling in the appropriate name, type, size, direction, and value properties for each object of SqlParameter class. From there, you add the populated parameters to the Command object by invoking the Add() method of the Parameters collection. The result of executing this code is shown in Figure 8-3.
Most programmers agree that the DataSet class is the most commonly used part of ADO.NET in real- world, database-driven applications. This class provides mechanisms for managing data when it is disconnected from the data source. This capability to handle data in a disconnected state was first introduced in .NET during the 1.0 version of ADO.NET. The current 3.5 version of ADO.NET retains all the features of its predecessors and provides a few newer, much needed features.
An object created from the DataSet class works as a container for other objects that are created from the DataTable class. The DataTable object represents a logical table in memory. It contains rows, columns, primary keys, constraints, and relations with other DataTable objects. Therefore, you could have a DataSet that is made up of two distinct tables such as a Customers and an Orders table. Then you could use the DataSet, just as you would any other relational data source, to make a relation between the two tables in order to show all the orders for a particular customer.
Most of the disconnected data-driven programming is actually done using one or more DataTable objects within the DataSet. However, the previous versions of ADO.NET didn't allow you to work directly with the DataTable object for some very important tasks, such as reading and writing data to and from an XML file. It didn't even allow you to serialize the DataTable object independently of the larger and encompassing DataSet object. This limitation required you to always use the DataSet object to perform any operation on a DataTable. The current version of ADO.NET removes this limitation and enables you to work directly with the DataTable for all your needs. In fact, we recommend that you don't use the DataSet object unless you need to work with multiple DataTable objects and need a container object to manage them. If you end up working with only a single table of information, then it is best to work with an instance of the DataTable object rather than a DataSet that contains only a single DataTable.
The current version of ADO.NET provides the capability to load a DataTable in memory by consuming a data source using a DataReader. In the past, you were sometimes restricted to creating multiple overloads of the same method just to work with both the DataReader and the DataTable objects. Now you have the flexibility to write the data access code one time and reuse the DataReader — either directly or to fill a DataTable, as shown in Listing 8-11.
Example 8.11. How to load a DataTable from a DataReader
VB
<%@ Page Language="VB" %>
<%@ Import Namespace="System.Data" %>
<%@ Import Namespace="System.Data.SqlClient" %>
<%@ Import Namespace="System.Configuration" %>
<script runat="server">
Protected Sub Page_Load(ByVal sender As Object, _
ByVal e As System.EventArgs)
If Not Page.IsPostBack Then
Dim MyDataTable As DataTable
Dim MyReader As SqlDataReader
Dim CityParam As SqlParameter
Dim MyConnection As SqlConnection = New SqlConnection()
MyConnection.ConnectionString = _
ConfigurationManager.ConnectionStrings("DSN_Northwind").ConnectionString
Dim MyCommand As SqlCommand = New SqlCommand()
MyCommand.CommandText = _
"SELECT * FROM CUSTOMERS WHERE CITY = @CITY"
MyCommand.CommandType = CommandType.Text
MyCommand.Connection = MyConnection
CityParam = New SqlParameter()
CityParam.ParameterName = "@CITY"
CityParam.SqlDbType = SqlDbType.VarChar
CityParam.Size = 15
CityParam.Direction = ParameterDirection.Input
CityParam.Value = "London"
MyCommand.Parameters.Add(CityParam)
MyCommand.Connection.Open()
MyReader = MyCommand.ExecuteReader(CommandBehavior.CloseConnection)MyDataTable = New DataTable()
' Loading DataTable using a DataReader
MyDataTable.Load(MyReader)
gvCustomers.DataSource = MyDataTable
gvCustomers.DataBind()
MyDataTable.Dispose()
MyCommand.Dispose()
MyConnection.Dispose()
End If
End Sub
</script>
C#
<%@ Page Language="C#" %>
<%@ Import Namespace="System.Data" %>
<%@ Import Namespace="System.Data.SqlClient" %>
<%@ Import Namespace="System.Configuration" %>
<script runat="server">
protected void Page_Load(object sender, EventArgs e)
{
if (!Page.IsPostBack )
{
DataTable MyDataTable;
SqlDataReader MyReader;
SqlParameter CityParam;
SqlConnection MyConnection = new SqlConnection();
MyConnection.ConnectionString =
ConfigurationManager.ConnectionStrings["DSN_Northwind"].ConnectionString;
SqlCommand MyCommand = new SqlCommand();
MyCommand.CommandText =
"SELECT * FROM CUSTOMERS WHERE CITY = @CITY";
MyCommand.CommandType = CommandType.Text;
MyCommand.Connection = MyConnection;
CityParam = new SqlParameter();
CityParam.ParameterName = "@CITY";
CityParam.SqlDbType = SqlDbType.VarChar;
CityParam.Size = 15;
CityParam.Direction = ParameterDirection.Input;
CityParam.Value = "London";
MyCommand.Parameters.Add(CityParam);
MyCommand.Connection.Open();
MyReader = MyCommand.ExecuteReader(CommandBehavior.CloseConnection);MyDataTable = new DataTable();
// Loading DataTable using a DataReader
MyDataTable.Load(MyReader);
gvCustomers.DataSource = MyDataTable;
gvCustomers.DataBind();
MyDataTable.Dispose();
MyCommand.Dispose();
MyConnection.Dispose();
       }
    }
</script>Not only can you load a DataTable object from a DataReader object, you can also retrieve a DataTableReader from an existing DataTable object. This is accomplished by calling the CreateDataReader method of the DataTable class. This method returns an instance of the DataTableReader object that can be passed to any method that expects to receive a DataReader.
As revolutionary as a DataSet might be, it is not the best choice in every situation. Often, it may not be appropriate to use a DataSet; instead it might be better to use a DataReader.
With ADO 2.6, it was possible to perform a command upon a data store and get back a single collection of data made up of any number of rows. You could then iterate through this collection of data and use it in some fashion. Now ADO.NET can use the DataSet to return a collection of data that actually keeps its structure when removed from the data store. In some situations, you benefit greatly from keeping this copy in its original format. By doing so, you can keep the data disconnected in an in-memory cache in its separate tables and work with the tables individually or apply relationships between the tables. You can work with the tables in much the same manner as you do with other relational data sources — using a parent/child relationship. If it is to your advantage to work with certain data with all its relationships in place (in order to enforce a parent/child relationship upon the data); in this case, of course, it is better to use a DataSet as opposed to a DataReader.
Because the DataSet is a disconnected copy of the data, you can work with the same records repeatedly without having to go back to the data store. This capability can greatly increase performance and lessen the load upon the server. Having a copy of the data separate from the data store also enables you to continuously handle and shape the data locally. For instance, you might need to repeatedly filter or sort through a collection of data. In this case, it would be of great advantage to work with a DataSet rather than going back and forth to the data store itself.
Probably one of the greatest uses of the DataSet is to work with multiple data stores and come away with a single collection of data. So for instance, if you have your Customers table within SQL and the orders information for those particular customers within an Oracle database, you can very easily query each data store and create a single DataSet with a Customers and an Orders table in place that you can use in any fashion you choose. The DataSet is just a means of storage for data and doesn't concern itself with where the data came from. So, if you are working with data that is coming from multiple data stores, it is to your benefit to use the DataSet.
Because the DataSet is based upon XML and XML Schemas, it is quite easy to move the DataSet around — whether you are transporting it across tiers, processes or between disparate systems or applications. If the application or system to which you are transferring the DataSet doesn't understand DataSets, the DataSet represents itself as an XML file. So basically, any system or application that can interpret and understand XML can work with the DataSet. This makes it a very popular transport vehicle, and you see an example of it when you transport the DataSet from an XML Web service.
Last but not least, the DataSet enables you to program data with ease. It is much simpler than anything that has been provided before the .NET Framework came to the scene. Putting the data within a class object allows you to programmatically access the DataSet. The code example in Listing 8-12 shows you just how easy it can be.
Example 8.12. An example of working with the DataSet object
VBDim conn As SqlConnection = New SqlConnection _ (ConfigurationManager.ConnectionStrings("DSN_Northwind").ConnectionString) conn.Open() Dim da As SqlDataAdapter = New SqlDataAdapter("Select * from Customers", conn) Dim ds As DataSet = New DataSet() da.Fill(ds, "CustomersTable")C#SqlConnection conn = new SqlConnection (ConfigurationManager.ConnectionStrings["DSN_Northwind"].ConnectionString); conn.Open(); SqlDataAdapter da = new SqlDataAdapter("Select * from Customers", conn); DataSet ds = new DataSet(); da.Fill(ds, "CustomersTable");
Basically, when you work with data, you have to weigh when to use the DataSet. In some cases, you get extreme benefits from using this piece of technology that is provided with ADO.NET. Sometimes, however, you may find it is not in your best interests to use the DataSet. Instead, it is best to use the DataReader.
The DataSet can be used whenever you choose, but sometimes you would rather use the DataReader and work directly against the data store. By using the command objects, such as the SqlCommand and the OleDbCommand objects, you have a little more direct control over what is executed and what you get back as a result set. In situations where this is vital, it is to your advantage not to use the DataSet.
When you don't use the DataSet, you don't incur the cost of extra overhead because you are reading and writing directly to the data source. Performing operations in this manner means you don't have to instantiate any additional objects — avoiding unnecessary steps.
This is especially true in a situation when you work with Web Forms in ASP.NET. If you are dealing with Web Forms, the Web pages are re-created each and every time. When this happens, not only is the page re-created by the call to the data source, the DataSet is also re-created unless you are caching the DataSet in some fashion. This can be an expensive process; so, in situations such as this, you might find it to your benefit to work directly off the data source using the DataReader. In most situations when you are working with Web Forms, you want to work with the DataReader instead of creating a DataSet.
As powerful as the DataSet is, it still has some limitations. The DataSet is created at runtime. It accesses particular pieces of data by making certain assumptions. Take a look at how you normally access a specific field in a DataSet that is not strongly typed (Listing 8-13).
Example 8.13. Accessing a field in a DataSet
VBds.Tables("Customers").Rows(0).Columns("CompanyName") = "XYZ Company"C#ds.Tables["Customers"].Rows[0].Columns["CompanyName"] = "XYZ Company";
The preceding code looks at the Customers table, the first row (remember, everything is zero-based) in the column CompanyName, and assigns the value of XYZ Company to the field. This is pretty simple and straightforward, but it is based upon certain assumptions and is generated at runtime. The "Customers" and "CompanyName" words are string literals in this line of code. If they are spelled wrong or if these items aren't in the table, an error occurs at runtime.
Listing 8-14 shows you how to assign the same value to the same field by using a typed DataSet.
Example 8.14. Accessing a field in a typed DataSet
VBds.Customers(0).CompanyName = "XYZ Company"C#ds.Customers[0].CompanyName = "XYZ Company";
Now the table name and the field to be accessed are not treated as string literals but, instead, are encased in an XML Schema and a class that is generated from the DataSet class. When you create a typed DataSet, you are creating a class that implements the tables and fields based upon the schema used to generate the class. Basically, the schema is coded into the class.
As you compare the two examples, you see that a typed DataSet is easier to read and understand. It is less error-prone, and errors are realized at compile time as opposed to runtime.
In the end, typed DataSets are optional, and you are free to use either style as you code.
If you work in the enterprise space, in many cases you must work with an Oracle backend database. ADO.NET 2.0 has a built-in capability to work with Oracle using the System.Data.OracleClient namespace.
First, in order to connect ASP.NET to your Oracle database, you install the Oracle 10g Client on your Web server. You can get this piece of software from the Oracle Web site found at oracle.com. If you are able to connect to your Oracle database from your Web server using SQL*Plus (an Oracle IDE for working with an Oracle database), can use the Microsoft-built Oracle data provider, System.Data.OracleClient.
If you are still having trouble connecting to your Oracle database, you also may try to make sure that the database connection is properly defined in your server's .ora file found at
C:Oracleproduct10.1.0Client_1NETWORKADMIN. Note that the version number might be different.
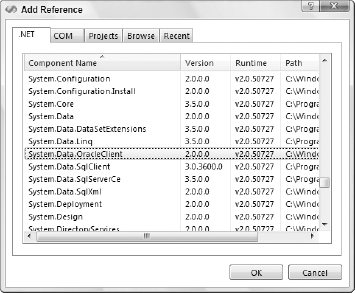
After you know you can connect to Oracle, you can make use of the Microsoft-built Oracle data provider. To utilize the built-in capabilities to connect to Oracle, your ASP.NET application must reference this DLL. To do this, right-click your project in the Visual Studio Solution Explorer and select Add Reference from the list of options presented. This gives you a long list of available .NET components. Select the System.Data.OracleClient component. Notice the two versions of this component (as illustrated in Figure 8-4). You select the one that is built for the .NET Framework 2.0.
After this is added, you find the reference to this component in the web.config file of your ASP.NET application (as presented in Listing 8-15).
Example 8.15. The reference to the System.Data.OracleClient DLL in the web.config
<configuration>
   <system.web>
      <compilation debug="true">
         <assemblies>
            <add assembly="System.Data.OracleClient,
                Version=2.0.0.0, Culture=neutral,
                PublicKeyToken=B77A5C561934E089"/>
</assemblies>
</compilation>
</system.web>
</configuration>With this reference in place, you also reference this available DLL in your page along with System.Data. This is demonstrated in Listing 8-16.
Example 8.16. Referencing the System.Data.OracleClient DLL
VBImports System.Data Imports System.Data.OracleClientC#using System.Data; using System.Data.OracleClient;
With all the references in place, you are able to work with an Oracle backend in pretty much the same manner as you work with a SQL Server backend. Listing 8-17 shows you just how similar it is.
Example 8.17. Using the OracleClient object to connect to an Oracle database
VBDim conn As OracleConnection Dim cmd As OracleCommand Dim cmdString As String = "Select CompanyName from Customers" conn = New _ OracleConnection("User Id=bevjen;Password=bevjen01;Data Source=myOracleDB") cmd = New OracleCommand(cmdString, conn) cmd.CommandType = CommandType.Text conn.Open()C#OracleConnection conn; OracleCommand cmd; string cmdString = "Select CompanyName from Customers"; conn = new OracleConnection("User Id=bevjen;Password=bevjen01;Data Source=myOracleDB"); cmd = new OracleCommand(cmdString, conn); cmd.CommandType = CommandType.Text; conn.Open();
After you are connected and performing the PL-SQL commands you want, you can use the OracleDataReader object just as you would use the SqlDataReader object.
Notice that, in this section, I have made reference to the Microsoft-built Oracle data provider. Another option, and many developers consider this the better option, is to use the Oracle-built ODP.NET data provider instead. This data provider can be freely downloaded from the Oracle download page at
oracle.com. You can then reference this new DLL in your project. It is now simply a matter of importing and working withSystem.DataAccess.OracleClientin your applications. The Oracle-built data provider contains the capability to work with the more advanced feature provided from the Oracle 10g database.
The DataList control has been around since the beginning of ASP.NET. It is part of a series of controls that enable you to display your data (especially repeated types of data) using templates. Templates enable you to create more sophisticated layouts for your data and perform functionss that controls such as the GridView server control cannot.
Template-based controls like the DataList control require more work on your part. For instance, you have to build common tasks for yourself. You cannot rely on other data controls, which you might be used to, such as paging.
The idea, when using template-based controls such as the DataList control, is that you put together specific templates to create your desired detailed layout. The DataList control has a number of templates that you can use to build your display. The available templates are defined here in the following table:
Template | Description |
|---|---|
| Works in conjunction with the |
| Allows for a row or item to be defined on how it looks and behaves when editing. |
| Allows the last item in the template to be defined. If this is not defined, then no footer will be used. |
| Allows the first item in the template to be defined. If this is not defined, then no header will be used. |
| The core template that is used to define a row or layout for each item in the display. |
| Allows for a row or item to be defined on how it looks and behaves when selected. |
| The layout of any separator that is used between the items in the display. |
Although you have seven templates available to you for use with the DataList control, at a minimum, you are going to need the ItemTemplate. The following example, shown here in Listing 8-18, shows the company names from the Northwind database.
Example 8.18. Showing the company names from the Northwind database using DataList
<%@ Page Language="VB" AutoEventWireup="false" CodeFile="DataListControl.aspx.vb"
Inherits="DataListControl" %>
<html xmlns="http://www.w3.org/1999/xhtml">
<head runat="server">
<title>DataList Control</title>
</head>
<body>
<form id="form1" runat="server">
<div>
<asp:DataList ID="DataList1" runat="server" DataSourceID="SqlDataSource1">
<ItemTemplate>
Company Name:
<asp:Label ID="CompanyNameLabel" runat="server"
Text='<%# Eval("CompanyName") %>' />
<br />
<br />
</ItemTemplate>
</asp:DataList>
<asp:SqlDataSource ID="SqlDataSource1" runat="server"
ConnectionString="<%$ ConnectionStrings:DSN_Northwind %>"
SelectCommand="SELECT [CompanyName] FROM [Customers]">
</asp:SqlDataSource>
</div>
</form>
</body>
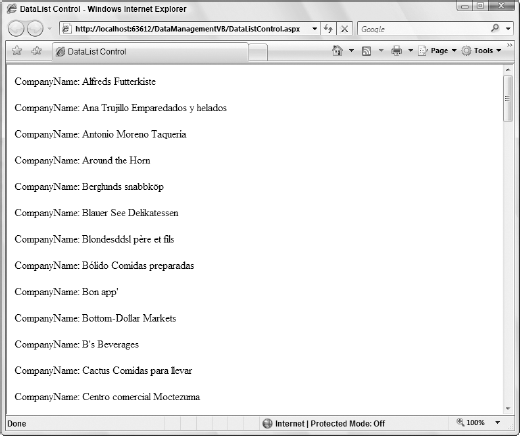
</html>As stated, the DataList control requires, at a minimum, an ItemTemplate element where you define the page layout for each item that is encountered from the data source. In this case, all the data is pulled from the Northwind database sample using the SqlDataSource control. The SqlDataSource control pulls only the CompanyName column from the Customers table. From there, the ItemTemplate section of the DataList control defines two items within it. The first item is a static item, "Company Name:" followed by a single ASP.NET server control, the Label server control. Second, the item is then followed by a couple of standard HTML elements. The Text property of the Label control uses inline data binding (as shown in the previous chapter of this book) to bind the values that are coming out of the SqlDataSource control. If there were more than one data point coming out of the SqlDataSource control, you can still specifically grab the data point that you are interested in using by specifying the item in the Eval statement.
<asp:Label ID="CompanyNameLabel" runat="server"
 Text='<%# Eval("CompanyName") %>' />
Using the code from Listing 8-18 gives you the following results as illustrated in Figure 8-5.
If you then look at the source of the page, you can see that the DataList control uses tables by default to lay out the elements.
<table id="DataList1" cellspacing="0" border="0" style="border-collapse:collapse;">
   <tr>
      <td>
         CompanyName:
         <span id="DataList1_ctl00_CompanyNameLabel">Alfreds Futterkiste</span>
         <br />
         <br />
      </td>
   </tr><tr>
      <td>
         CompanyName:
         <span id="DataList1_ctl01_CompanyNameLabel">
          Ana Trujillo Emparedados y helados</span>
         <br />
         <br />
      </td>
   </tr>

   <!-- Code removed for clarity -->

</table>
Although this table layout is the default, you can change this so that the DataList control outputs <span> tags instead. This is done through the use of the RepeatLayout property of the DataList control. You will need to rework your DataList, as is shown in Listing 8-19.
Example 8.19. Changing the output style using RepeatLayout
<asp:DataList ID="DataList1" runat="server" DataSourceID="SqlDataSource1"
 RepeatLayout="Flow">
   <ItemTemplate>
    Company Name:
    <asp:Label ID="CompanyNameLabel" runat="server"
     Text='<%# Eval("CompanyName") %>' />
    <br />
    <br />
   </ItemTemplate>
</asp:DataList>
The possible options for the RepeatLayout property are either Table or Flow. Table is the default setting. The output you will get when looking at the source of the page when using the Flow setting is presented here:
<span id="DataList1">
   <span>
      CompanyName:
      <span id="DataList1_ctl00_CompanyNameLabel">Alfreds Futterkiste</span>
         <br />
         <br />
      </span><br />
   <span>
       CompanyName:
       <span id="DataList1_ctl01_CompanyNameLabel">
        Ana Trujillo Emparedados y helados</span>
       <br />
       <br />
   </span>

   <!-- Code removed for clarity -->

</span>You will find that the other templates are just as easy to work with as the ItemTemplate. Listing 8-20 shows you how to add the AlternatingItemTemplate and the SeparatorTemplate to the company name display.
Example 8.20. Using both the AlternatingItemTemplate and the SeparatorTemplate
<%@ Page Language="VB" AutoEventWireup="false" CodeFile="DataListControl.aspx.vb"
    Inherits="DataListControl" %>

<html xmlns="http://www.w3.org/1999/xhtml">
<head runat="server">
<title>DataList Control</title>
</head>
<body>
<form id="form1" runat="server">
<div>
<asp:DataList ID="DataList1" runat="server" DataSourceID="SqlDataSource1">
<ItemTemplate>
Company Name:
<asp:Label ID="CompanyNameLabel" runat="server"
Text='<%# Eval("CompanyName") %>' />
<br />
<br />
</ItemTemplate>
<AlternatingItemTemplate>
CompanyName:
<asp:Label ID="CompanyNameLabel" runat="server"
BackColor="LightGray"
Text='<%# Eval("CompanyName") %>' />
<br />
<br />
</AlternatingItemTemplate>
<SeparatorTemplate>
<hr />
</SeparatorTemplate>
</asp:DataList>
<asp:SqlDataSource ID="SqlDataSource1" runat="server"
ConnectionString="<%$ ConnectionStrings:DSN_Northwind %>"
SelectCommand="SELECT [CompanyName] FROM [Customers]">
</asp:SqlDataSource>
</div>
</form>
</body>
</html>In this case, the AlternatingItemTemplate is a repeat of the ItemTemplate, but the addition of the BackColor property to the Label control is contained within the item. The SeparatorTemplate is used between each item, whether it is from the ItemTemplate or the AlternatingItemTemplate. In this case, a simple <hr /> element is used to draw a line between each item. The output of this is shown here in Figure 8-6.
This process allows you to change how items are defined within the alternating rows and to put a separator between the elements. If you wanted just alternating row colors or an alternating style, it might not always be the best approach to use the <AlternatingItemTemplate> element, but you will find that it is better to use the <AlternatingItemStyle> element instead. This approach is presented here in Listing 8-21.
Example 8.21. Using template styles
<asp:DataList ID="DataList1" runat="server" DataSourceID="SqlDataSource1"
 BackColor="White" BorderColor="#999999" BorderStyle="Solid" BorderWidth="1px"
 CellPadding="3" ForeColor="Black" GridLines="Vertical">
   <FooterStyle BackColor="#CCCCCC" />
<AlternatingItemStyle BackColor="#CCCCCC" />
   <SelectedItemStyle BackColor="#000099" Font-Bold="True" ForeColor="White" />
   <HeaderStyle BackColor="Black" Font-Bold="True" ForeColor="White" />
   <ItemTemplate>
      CompanyName:
      <asp:Label ID="CompanyNameLabel" runat="server"
       Text='<%# Eval("CompanyName") %>' />
      <br />
      <br />
   </ItemTemplate>
</asp:DataList>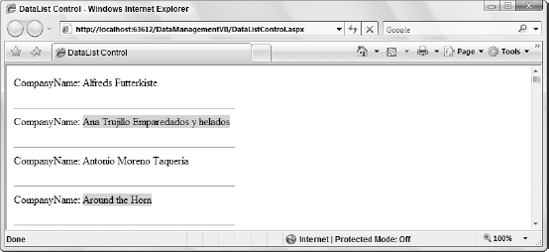
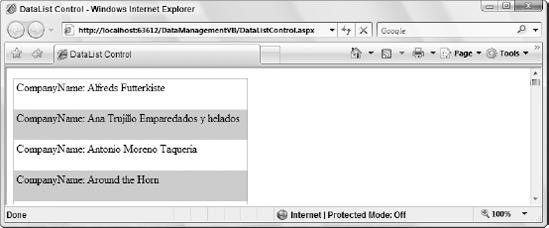
You will notice that each of the available templates also have an associated style element. Figure 8-7 shows the use of these styles.
Template-based controls are better at displaying items in multiple columns than other controls, such as the GridView control. The RepeatColumns property takes care of this. The code to make use of this property is shown in Listing 8-22.
Example 8.22. Creating multiple columns using the RepeatColumns property
<asp:DataList ID="DataList1" runat="server" DataSourceID="SqlDataSource1"
 CellPadding="2" RepeatColumns="3" RepeatDirection="Horizontal">
   <ItemTemplate>
    Company Name:
    <asp:Label ID="CompanyNameLabel" runat="server"
     Text='<%# Eval("CompanyName") %>' />
    <br />
    <br />
   </ItemTemplate>
</asp:DataList>
Running this bit of code in your page produces the results shown in Figure 8-8.
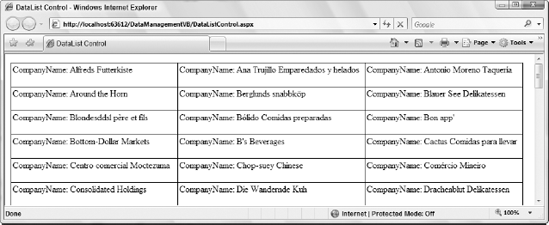
The RepeatDirection property instructs the DataList control about how to lay out the items bound to the control on the Web page. Possible values include Vertical and Horizontal. The default value is Vertical. Setting it to Vertical with a RepeatColumn setting of 3 gives the following results:
Item1    Item5   Item9
Item2    Item6   Item10
Item3    Item7   Item11
Item4    Item8   Item12
When the RepeatDirection property is set to Horizontal, you get the items laid out in a horizontal fashion:
Item1    Item2   Item3
Item4    Item5   Item6
Item7    Item8   Item9
Item10   Item11  Item12
One of the newest template-based controls is the ListView control. This is a control that is only available in the 3.5 version of the .NET Framework. This control is considered a better alternative to the DataList control. You will find that this control gives you more control over the layout and works quite nicely in Visual Studio because it provides a set of wizards to easily set up your layout with the most common options.
As with the DataList control, the ListView control has a series of available templates at your disposal. Each one of these templates controls a specific aspect of the layout. The following table defines the layout options available to this control.
Next, the following sections look at using some of these in your ASP.NET page.
In creating a page that makes use of the ListView control, the first step will be to create a basic page with a ListView control on it, as illustrated here in Listing 8-23.
Example 8.23. Creating the base page
<%@ Page Language="VB" AutoEventWireup="false" CodeFile="ListViewControl.aspx.vb"
    Inherits="ListViewControl" %>

<html xmlns="http://www.w3.org/1999/xhtml">
<head runat="server">
    <title>ListView Control</title>
</head>
<body>
    <form id="form1" runat="server">
    <div>

        <asp:ListView ID="ListView1" runat="server" DataKeyNames="CustomerID"
            DataSourceID="SqlDataSource1">
        </asp:ListView>

        <asp:SqlDataSource ID="SqlDataSource1" runat="server"
            ConnectionString="<%$ ConnectionStrings:DSN_Northwind %>"
            SelectCommand="SELECT * FROM [Customers] ORDER BY [CompanyName]"
            InsertCommand="INSERT INTO [Customers] ([CustomerID], [CompanyName],
               [ContactName], [ContactTitle], [Address], [City], [Region],
               [PostalCode], [Country], [Phone], [Fax]) VALUES (@CustomerID,
               @CompanyName, @ContactName, @ContactTitle, @Address, @City, @Region,
               @PostalCode, @Country, @Phone, @Fax)"
            UpdateCommand="UPDATE [Customers] SET [CompanyName] = @CompanyName,
               [ContactName] = @ContactName, [ContactTitle] = @ContactTitle,
               [Address] = @Address, [City] = @City, [Region] = @Region,
               [PostalCode] = @PostalCode, [Country] = @Country, [Phone] = @Phone,
               [Fax] = @Fax WHERE [CustomerID] = @CustomerID">
            <UpdateParameters>
                <asp:Parameter Name="CompanyName" Type="String" />
                <asp:Parameter Name="ContactName" Type="String" />
                <asp:Parameter Name="ContactTitle" Type="String" />
                <asp:Parameter Name="Address" Type="String" />
                <asp:Parameter Name="City" Type="String" />
                <asp:Parameter Name="Region" Type="String" />
                <asp:Parameter Name="PostalCode" Type="String" />
                <asp:Parameter Name="Country" Type="String" />
                <asp:Parameter Name="Phone" Type="String" />
                <asp:Parameter Name="Fax" Type="String" />
                <asp:Parameter Name="CustomerID" Type="String" />
            </UpdateParameters>
            <InsertParameters>
                <asp:Parameter Name="CustomerID" Type="String" />
                <asp:Parameter Name="CompanyName" Type="String" />
                <asp:Parameter Name="ContactName" Type="String" />
                <asp:Parameter Name="ContactTitle" Type="String" />
                <asp:Parameter Name="Address" Type="String" />
                <asp:Parameter Name="City" Type="String" />
                <asp:Parameter Name="Region" Type="String" />
                <asp:Parameter Name="PostalCode" Type="String" />
                <asp:Parameter Name="Country" Type="String" />
<asp:Parameter Name="Phone" Type="String" />
<asp:Parameter Name="Fax" Type="String" />
</InsertParameters>
</asp:SqlDataSource>
</div>
</form>
</body>
</html>In this case, you have a base ListView control and a SqlDataSource control that has been wired up to the Northwind sample database and provided Select, Update, and Insert methods. The ListView control itself is then bound to the SqlDataSource control. It provides the primary key of the table for working with the various queries through the use of the DataKeyNames property.
The next step is to create the layout of the overall control using the LayoutTemplate. The use of this template is illustrated in Listing 8-24.
Example 8.24. Using the LayoutTemplate element
<LayoutTemplate>
   <table runat="server">
      <tr runat="server">
         <td runat="server">
            <table ID="itemPlaceholderContainer" runat="server" border="1"
             style="background-color: #FFFFFF;border-collapse: collapse;
                    border-color: #999999;border-style:none;border-width:1px;
                    font-family: Verdana, Arial, Helvetica, sans-serif;">
              <tr runat="server" style="background-color:#DCDCDC;color: #000000;">
                 <th runat="server"></th>
                 <th runat="server">Customer ID</th>
                 <th runat="server">Company Name</th>
                 <th runat="server">Contact Name</th>
              </tr>
              <tr ID="itemPlaceholder" runat="server"></tr>
            </table>
         </td>
      </tr>
      <tr runat="server">
         <td runat="server" style="text-align: center;background-color: #CCCCCC;
          font-family: Verdana, Arial, Helvetica, sans-serif;color: #000000;">
            <asp:DataPager ID="DataPager1" runat="server">
               <Fields>
                  <asp:NextPreviousPagerField ButtonType="Button"
                   ShowFirstPageButton="True" ShowNextPageButton="False"
                   ShowPreviousPageButton="False" />
                  <asp:NumericPagerField />
                  <asp:NextPreviousPagerField ButtonType="Button"
                   ShowLastPageButton="True" ShowNextPageButton="False"
                   ShowPreviousPageButton="False" />
               </Fields>
</asp:DataPager>
</td>
</tr>
</table>
</LayoutTemplate>This layout template constructs the layout as a grid using tables to layout the items. A styled table is defined with a header in place. The most important part of laying out the template is that the container itself is defined using a control with the ID value of itemPlaceholderContainer. The element will also need to be made a server control by adding the runat property.
<table ID="itemPlaceholderContainer" runat="server" border="1"
 style="background-color: #FFFFFF;border-collapse: collapse;
 border-color: #999999;border-style:none;border-width:1px;
 font-family: Verdana, Arial, Helvetica, sans-serif;">

</table>
The placeholder for each data item needs to take the same form, but the ID of the server control you make needs to have a value of itemPlaceholder.
<table ID="itemPlaceholderContainer" runat="server" border="1"
 style="background-color: #FFFFFF;border-collapse: collapse;
 border-color: #999999;border-style:none;border-width:1px;
 font-family: Verdana, Arial, Helvetica, sans-serif;">
   <tr runat="server" style="background-color:#DCDCDC;color: #000000;">
      <th runat="server"></th>
      <th runat="server">Customer ID</th>
      <th runat="server">Company Name</th>
      <th runat="server">Contact Name</th>
   </tr>
   <tr ID="itemPlaceholder" runat="server"></tr>
</table>
It is important to keep the itemPlaceholder element within the itemPlaceholderContainer control, within the layout template. It cannot sit outside of the container.
The final part of this layout is the new DataPager server control. This new server control is part of ASP.NET 3.5.
<asp:DataPager ID="DataPager1" runat="server">
   <Fields>
      <asp:NextPreviousPagerField ButtonType="Button"
       ShowFirstPageButton="True" ShowNextPageButton="False"
       ShowPreviousPageButton="False" />
      <asp:NumericPagerField />
      <asp:NextPreviousPagerField ButtonType="Button"
       ShowLastPageButton="True" ShowNextPageButton="False"
       ShowPreviousPageButton="False" />
   </Fields>
</asp:DataPager>
The DataPager works with template-based data in allowing you to control how end users move across the pages of the data collection.
Now that the LayoutTemplate is in place, the next step is to create the ItemTemplate.
The ItemTemplate that you create is quite similar to the ItemTemplate that is part of the DataList control that was discussed earlier. In this case, however, the ItemTemplate is placed in the specific spot within the layout of the page where you defined the itemPlaceholder control to be. Listing 8-25 shows the ItemTemplate for this example.
Example 8.25. Building the ItemTemplate
<ItemTemplate>
   <tr style="background-color:#DCDCDC;color: #000000;">
      <td>
         <asp:Button ID="EditButton" runat="server"
          CommandName="Edit" Text="Edit" />
      </td>
      <td>
         <asp:Label ID="CustomerIDLabel" runat="server"
          Text='<%# Eval("CustomerID") %>' />
      </td>
      <td>
         <asp:Label ID="CompanyNameLabel" runat="server"
          Text='<%# Eval("CompanyName") %>' />
      </td>
      <td>
         <asp:Label ID="ContactNameLabel" runat="server"
          Text='<%# Eval("ContactName") %>' />
      </td>
   </tr>
</ItemTemplate>The EditItemTemplate is the area that shows up when you decide to edit the data item (in this case, a row of data). Listing 8-26 shows the EditItemTemplate in use.
Example 8.26. Building the EditItemTemplate
<EditItemTemplate>
   <tr style="background-color:#008A8C;color: #FFFFFF;">
      <td>
         <asp:Button ID="UpdateButton" runat="server"
          CommandName="Update" Text="Update" />
         <asp:Button ID="CancelButton" runat="server"
          CommandName="Cancel" Text="Cancel" />
      </td>
      <td>
         <asp:Label ID="CustomerIDLabel1" runat="server"
          Text='<%# Eval("CustomerID") %>' />
      </td>
<td>
<asp:TextBox ID="CompanyNameTextBox" runat="server"
Text='<%# Bind("CompanyName") %>' />
</td>
<td>
<asp:TextBox ID="ContactNameTextBox" runat="server"
Text='<%# Bind("ContactName") %>' />
</td>
</tr>
</EditItemTemplate>In this case, the EditItemTemplate, when shown, displays an Update and Cancel button to manipulate the editing options. When editing, the values are placed within text boxes and the values are then updated into the database through the Updatecommand.
If there are no values in the database, then you should prepare to gracefully show something in your layout. The EmptyItemTemplate is used in Listing 8-27 to perform that operation.
The last section looked at here is the InsertItemTemplate. This section allows you to define how a form should be laid out for inserting data, similar to that used in the ItemTemplate, into the data store.
Listing 8-28 shows an example of the InsertItemTemplate.
Example 8.28. Building the InsertItemTemplate
<InsertItemTemplate>
   <tr style="">
      <td>
         <asp:Button ID="InsertButton" runat="server" CommandName="Insert"
          Text="Insert" />
         <asp:Button ID="CancelButton" runat="server" CommandName="Cancel"
          Text="Clear" />
      </td>
      <td>
         <asp:TextBox ID="CustomerIDTextBox" runat="server"
          Text='<%# Bind("CustomerID") %>' />
      </td>
<td>
<asp:TextBox ID="CompanyNameTextBox" runat="server"
Text='<%# Bind("CompanyName") %>' />
</td>
<td>
<asp:TextBox ID="ContactNameTextBox" runat="server"
Text='<%# Bind("ContactName") %>' />
</td>
</tr>
</InsertItemTemplate>After you have created an additional AlternatingItemTemplate that is the same as the ItemTemplate (but styled differently), you can then run the page. Then you will be presented with your own custom grid. An example is presented in Figure 8-9.
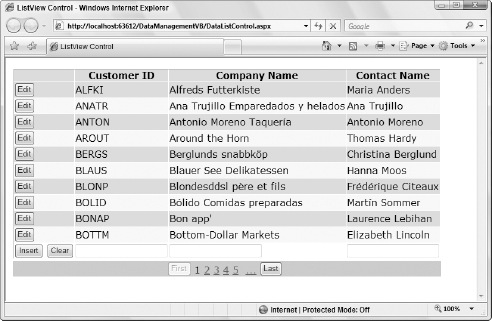
From this figure, you can see that all your defined elements are in place. The header is defined through the use of the LayoutTemplate. The items in the grid are defined through the use of the ItemTemplate. The AlternatingItemTemplate, the insert form, is defined through the use of the InsertTemplate. The page navigation is defined by the new DataPager server control. Again, the DataPager control is defined within the LayoutTemplate itself.
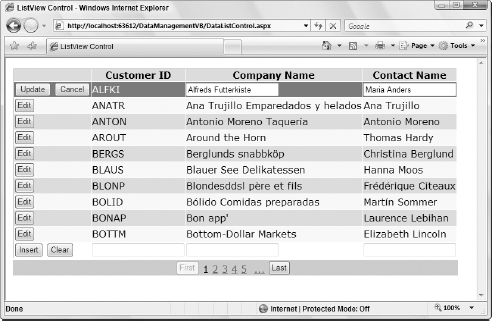
Editing items in this template is as simple as clicking on the Edit button. This will change the view to the EditTemplate for the selected item, as illustrated in Figure 8-10.
Once you enter the edit mode here, you can change any of the values within the text boxes and then click the Update button to update the data to the new values. You can also cancel out of the operation by clicking the Cancel button.
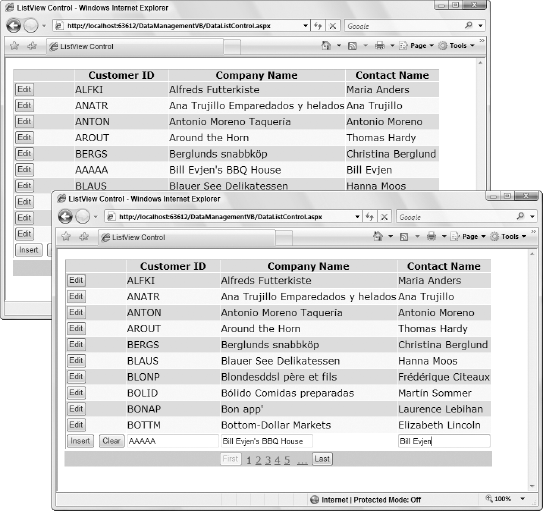
Inserting data is as simple as filling out the form and clicking on the Insert button, as illustrated in Figure 8-11.
Although this example shows a grid as the output of the new ListView control, you can also structure it so that your data items are presented in any fashion you want (such as bulleted lists).
Earlier, this chapter covered how to construct a DataSet and how to fill it with data using the DataAdapter. Although you can always build this construction yourself, you also have the option of building data access into your ASP.NET applications using some of the wizards available from Visual Studio 2008.
The following example, which is a little bit of a lengthy one, shows you how to build an ASP.NET page that displays the results from a DataSet that gets its data from two separate tables. You will discover several different wizards in Visual Studio that you can work with when using ADO.NET.
As in code, one of the first things you do when working with data is make a connection to the data source. Visual Studio provides a visual way to make connections to your data stores. In this case, you will want to make a connection to the Northwind database in SQL Server.
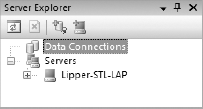
When you open the Server Explorer, you will notice a section for data connections (see Figure 8-12).
The steps to create a data connection to the Northwind database in SQL Server are straightforward. Right-click on Data Connections and choose Add Connection. You are presented with the Data Link Properties dialog box. This dialog box, by default, asks for a connection to SQL Server. If you are going to connect to a different source, such as Microsoft Access, simply click on the Provider tab and change the provider.
Figure 8-13 shows the Add Connection dialog box and the settings that you need in order to connect to your local SQL Server Express Edition.
If you are connecting to a SQL Server that resides on your local host, you want to put a period (.) in the box that asks you to select or enter a server name. If you are working from a local SQL Server Express Edition file in your project (such as what is shown here in Figure 8-13), then you are going to want to use your server name with SQLEXPRESS. Put in your login credentials for SQL Server and then select the database that you wish to make the connection to by using the drop-down list. The other option, if you are using a SQL Server Express Edition file, is to select the physical database file by using the Attach a Database File option.
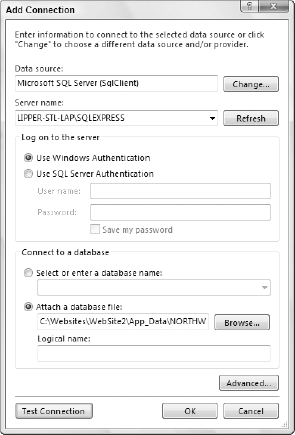
From this dialog box, you can also test the connection to ensure that everything works properly. If everything is in place, you get a confirmation stating such. Clicking OK will then cause a connection to appear in the Solution Explorer.
Expanding this connection, you find a way to access the data source just as you would by using the SQL Server Enterprise Manager (see Figure 8-14).
From here, you can work with the database and view information about all the tables and fields that are contained within the database. More specifically, you can view and work with Database Diagrams, Tables, Views, Stored Procedures, and Functions.
After you have run through this wizard, you have a connection to the Northwind database that can be used by any components that you place on any component designer that you might be working with in your application.
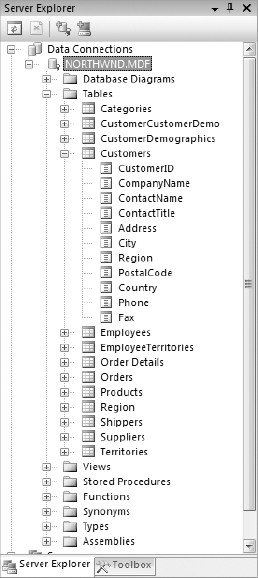
The next step is to create a typed DataSet object in your project that pulls its data from the Northwind database. First you need to make sure that your application has an App_Code folder within the solution. Right-clicking on the folder will allow you to add a new item to the folder. From the provided dialog box, add a DataSet called CustomerOrders.xsd. You will then be presented with the message shown in Figure 8-15.
This page is referred to as the Dataset Designer. This is the design surface for any nonvisual components that you incorporate within your DataSet object. Just as you can drag and drop controls onto a design surface for any Windows Forms or Web Forms application, the Dataset Designer enables you to drag and drop components onto this surface.
A component does not appear visually in your applications, but a visual representation of the component sits on the design surface. Highlighting the component allows you to modify its settings and properties in the Properties window.
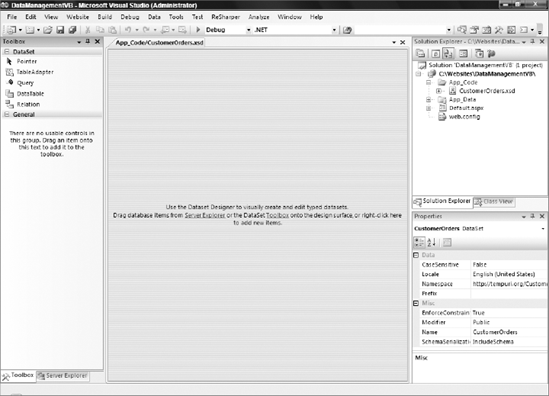
What can you drag and drop onto this surface? In the following examples, you see how to work with TableAdapter and DataTable objects on this design surface. If you open up the Toolbox window, and click the DataSet tab, you see some additional components that can be used on this design surface.
The goal of this example is to return a DataSet to the end user through an XML Web service. To accomplish this, you have to incorporate a DataAdapter to extract the data from the data source and to populate the DataSet before passing it on.
This example uses the Northwind database, and the first step you need to take is to drag and drop a TableAdapter onto the Dataset design surface. Dragging and dropping a TableAdapter onto your design surface causes a wizard to appear, as shown in Figure 8-16.
Because you want this DataSet to contain two DataTables — one for the Customers table and another for the Orders table — you have to go through this process twice.
It is important to note that the job of the TableAdapter object is to make the connection to the specified table as well as to perform all the select, update, insert, and delete commands that are required. For this example, you simply want the TableAdapter to make the select call and then later to update any changes that are made back to the SQL Server.
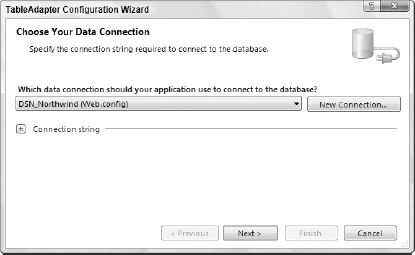
As you work through the wizard, you come to a screen that asks how you want to query the database (see Figure 8-17). You have three options: using SQL statements, using stored procedures that have already been created, or building brand-new stored procedures directly from this wizard.
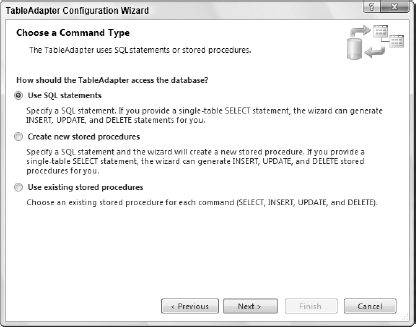
For this example, choose Use SQL statements. Selecting this option brings you to a text box where you can write your own SQL statement if you wish.
The great thing about this process is that, after you create a SQL select command, the TableAdapter wizard also creates the associated insert, update, and delete commands for you. You also have the option of building your queries using the Query Builder. This enables you to graphically design the query yourself. If this option is selected, you can choose from a list of tables in the Northwind database. For the first TableAdapter, choose Customers. For the second TableAdapter choose Orders. You make your selection by clicking the Add button and then closing the dialog box (see Figure 8-18).
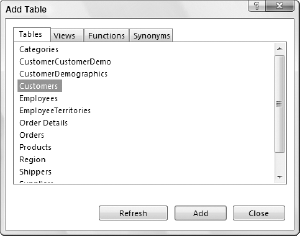
After you close the Add Table dialog box, you see a visual representation of the table that you selected in the Query Builder dialog box (see Figure 8-19). You can then select some or all the fields to be returned from the query. For this example, you want everything returned from both the Customers and the Orders table, so select the first check box with the asterisk (*). Notice that the query listed in this dialog box now says SELECT * FROM Customers. After the word "Customers," add text to the query so that it looks like the following:
SELECT Customers.* FROM Customers WHERE (CustomerID LIKE @Customer)
With this query, you specify that you want to return the customer information when the CustomerID fits the parameter that you pass into the query from your code (using @Customer).
After your query is in place, simply click OK and then click the Next button to have not only the select query, but also the insert, update, and delete queries generated for you.
Figure 8-20 shows you the final page after all the queries have been generated.
After you reach this point, you can either click the Previous button to return to one of the prior steps in order to change a setting or the query itself, or you can click the Finish button to apply everything to your TableAdapter. After you are finished using the wizard, notice there is a visual representation of the CustomersTableAdapter that you just created (see Figure 8-21). Along with that is a DataTable object for the Customers table. The TableAdapter and the DataTable objects that are shown on the design surface are also labeled with their IDs. Therefore, in your code, you can address this TableAdapter that you just built by referring to it as CustomerOrdersTableAdapters.CustomersTableAdapter. The second TableAdapter that queries the Orders table is then shown and referred to as CustomerOrdersTableAdapters.OrdersTableAdapter.
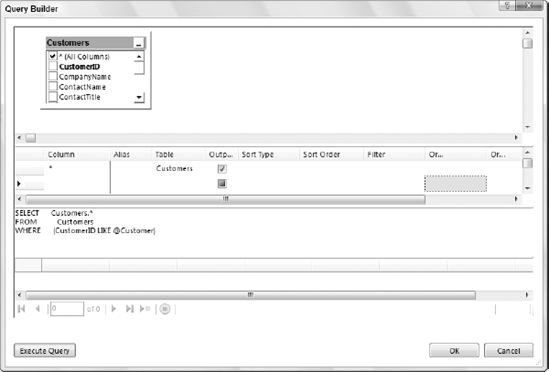
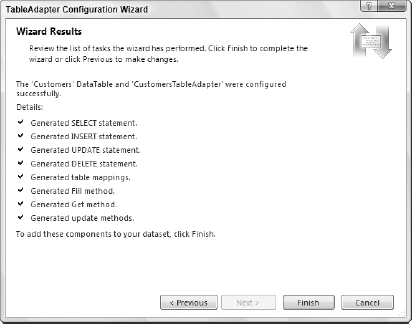
After you have the two DataAdapters in place, you will also notice that there is an automatic relation put into place for you. This is represented by the line between the two items on the page. Right-clicking on the relation, you can edit the relation with the Relation dialog box (see Figure 8-22).
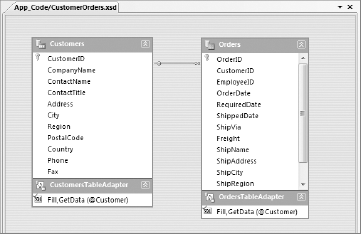
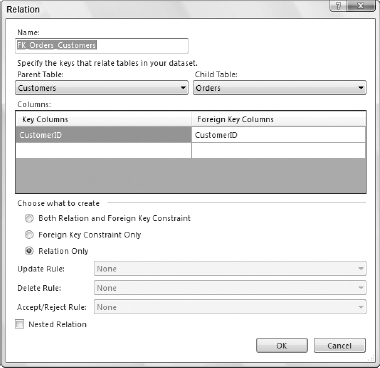
In the end, Visual Studio has taken care of a lot for you. Again, this is not the only way to complete all these tasks.
Now comes the fun part — building the ASP.NET that will use all the items that were just created! The goal is to allow the end user to send in a request that contains just the CustomerID. In return, he will get back a complete DataSet containing not only the customer information, but also all the relevant order information. Listing 8-29 shows you the code to build all this functionality. You need only a single method in addition to the Page_Load: the GetCustomerOrders() method. The page should be laid out as is shown here in Figure 8-23.
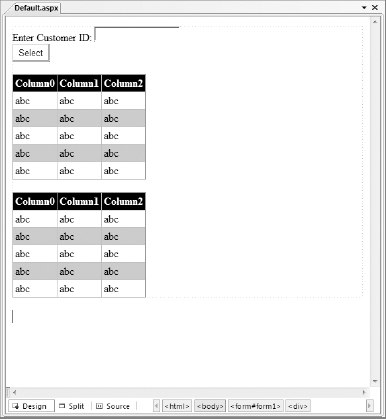
The page that you create should contain a single TextBox control, a Button control, and two GridView controls (GridView1 and GridView2). The code for the page is shown in Listing 8-29.
Example 8.29. The .aspx page
<%@ Page Language="VB" AutoEventWireup="false" CodeFile="Default.aspx.vb"
    Inherits="_Default" %>

<html xmlns="http://www.w3.org/1999/xhtml">
<head runat="server">
    <title>CustomerOrders</title>
</head>
<body>
    <form id="form1" runat="server">
    <div>
Enter Customer ID:
<asp:TextBox ID="TextBox1" runat="server"></asp:TextBox>
<br />
<asp:Button ID="Button1" runat="server" Text="Select" />
<br />
<br />
<asp:GridView ID="GridView1" runat="server" BackColor="White"
BorderColor="#999999" BorderStyle="Solid" BorderWidth="1px"
CellPadding="3" ForeColor="Black" GridLines="Vertical">
<FooterStyle BackColor="#CCCCCC" />
<PagerStyle BackColor="#999999" ForeColor="Black"
HorizontalAlign="Center" />
<SelectedRowStyle BackColor="#000099" Font-Bold="True"
ForeColor="White" />
<HeaderStyle BackColor="Black" Font-Bold="True" ForeColor="White" />
<AlternatingRowStyle BackColor="#CCCCCC" />
</asp:GridView>
<br />
<asp:GridView ID="GridView2" runat="server" BackColor="White"
BorderColor="#999999" BorderStyle="Solid" BorderWidth="1px"
CellPadding="3" ForeColor="Black" GridLines="Vertical">
<FooterStyle BackColor="#CCCCCC" />
<PagerStyle BackColor="#999999" ForeColor="Black"
HorizontalAlign="Center" />
<SelectedRowStyle BackColor="#000099" Font-Bold="True"
ForeColor="White" />
<HeaderStyle BackColor="Black" Font-Bold="True" ForeColor="White" />
<AlternatingRowStyle BackColor="#CCCCCC" />
</asp:GridView>
</div>
</form>
</body>
</html>The code-behind for the page is presented in Listing 8-30.
Example 8.30. The code-behind for the CustomerOrders page
VB
Imports System

Partial Class _Default
    Inherits System.Web.UI.Page

    Protected Sub Page_Load(ByVal sender As Object, ByVal e As System.EventArgs) _
     Handles Me.Load
If Page.IsPostBack Then
GetCustomerOrders(TextBox1.Text)
End If
End Sub
Protected Sub GetCustomerOrders(ByVal custId As String)
Dim myDataSet As New CustomerOrders
Dim custDA As New CustomerOrdersTableAdapters.CustomersTableAdapter
Dim ordersDA As New CustomerOrdersTableAdapters.OrdersTableAdapter
custDA.Fill(myDataSet.Customers, custId)
ordersDA.Fill(myDataSet.Orders, custId)
myDataSet.Customers(0).Phone = "NOT AVAILABLE"
myDataSet.Customers(0).Fax = "NOT AVAILABLE"
GridView1.DataSource = myDataSet.Tables("Customers")
GridView1.DataBind()
GridView2.DataSource = myDataSet.Tables("Orders")
GridView2.DataBind()
End Sub
End Class
C#
using System;
using CustomerOrdersTableAdapters;
public partial class _Default : System.Web.UI.Page
{
protected void Page_Load(object sender, EventArgs e)
{
if (Page.IsPostBack)
{
GetCustomerOrders(TextBox1.Text);
}
}
protected void GetCustomerOrders(string custId)
{
CustomerOrders myDataSet = new CustomerOrders();
CustomersTableAdapter custDA = new CustomersTableAdapter();
OrdersTableAdapter ordersDA = new OrdersTableAdapter();
custDA.Fill(myDataSet.Customers, custId);
ordersDA.Fill(myDataSet.Orders, custId);
myDataSet.Customers[0].Phone = "NOT AVAILABLE";
myDataSet.Customers[0].Fax = "NOT AVAILABLE";
GridView1.DataSource = myDataSet.Tables["Customers"];GridView1.DataBind();
GridView2.DataSource = myDataSet.Tables["Orders"];
GridView2.DataBind();
}
}Now there is not much code here. One of the first things done in the method is to create an instance of the typed DataSet. In the next two lines of code, the custDA and the ordersDA objects are used. In this case, the only accepted parameter, custId, is being set for both the DataAdapters. After this parameter is passed to the TableAdapter, this TableAdapter queries the database based upon the select query that you programmed into it earlier using the TableAdapter wizard.
After the query, the TableAdapter is instructed to fill the instance of the DataSet. Before the DataSet is returned to the consumer, you can change how the result is output to the client. If you are passing customer information, you may want to exclude some of the information. Because the DataSet is a typed DataSet, you have programmatic access to the tables. In this example, the code specifies that in the DataSet, in the Customers table, in the first row (remember it is zero-based), make the value of the Phone and Fax fields equal to NOT AVAILABLE.
By compiling and running the ASP.NET page, you are able to test it from the test page using the CustomerID of ALFKI (the first record of the Customers table in the Northwind database). The results are returned to you in the browser (see Figure 8-24).
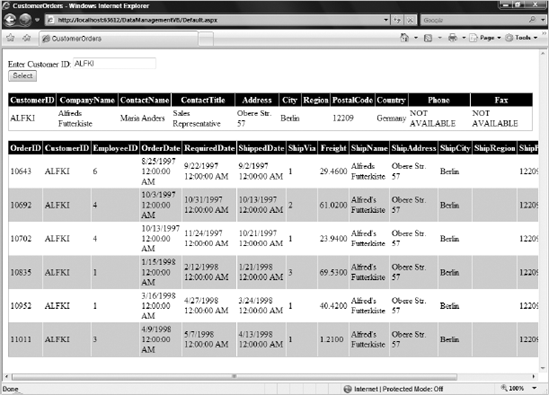
When you process data using ADO or previous versions of ADO.NET, each command is executed sequentially. The code waits for each command to complete before the next one is processed. When you use a single database, the sequential processing enables you to reuse the same connection object for all commands. However, with the introduction of MARS, you can now use a single connection for multiple, concurrent database access. Since the introduction of ADO.NET 2.0, ADO.NET has enabled users to process database commands asynchronously. This enables you to not only use the same connection, but also to use it in a parallel manner. The real advantage of asynchronous processing becomes apparent when you are accessing multiple data sources — especially when the data access queries across these databases aren't dependent on each other. You can now open a connection to the database in an asynchronous manner. When you are working with multiple databases, you can now open connections to them in a parallel fashion as well.
To make this work, be sure to add
Asynchronous Processing = true;to your connection string.
The SqlCommand class provides a few additional methods that facilitate executing commands asynchronously. These new methods are summarized in the following table.
Method | Description |
|---|---|
| This method expects a query that doesn't return any results and starts it asynchronously. The return value is a reference to an object of the |
| This overloaded method also starts the process asynchronously, and it expects to receive an object of the |
| This method is used to access the results from the |
| This method expects a query that returns a result set and starts it asynchronously. The return value is a reference to an object of |
This overloaded method works the same way as the one described previously. It also takes a parameter containing a command behavior enumeration just like the synchronous | |
| This overloaded method starts the asynchronous process and it expects to receive an object of |
| This overloaded method takes an instance of the |
| This method is used to access the results from the |
| This method expects a query that returns the result set as XML. The return value is a reference to an object of |
| This overloaded method starts the asynchronous process, and it expects to receive an object of |
| This method is used to access the results from the |
All the asynchronous methods for the SqlCommand class return a reference to an object that exposes the IAsyncResult interface. The properties of this interface are shown in the following table.
Description | |
|---|---|
| This read-only property returns an object that describes the state of the process. |
| This read-only property returns an instance of |
| This read-only property returns a Boolean value that indicates whether the process was executed synchronously. |
| This read-only property returns a Boolean value indicating whether the process has completed. |
Some of the asynchronous methods of the SqlCommand class receive an instance of the AsyncCallback class. This class is not specific to ADO.NET and is used by many objects in the .NET Framework. It is used to specify those methods that you want to execute after the asynchronous process has finished running. This class uses its constructor to receive the address of the method that you want to use for callback purposes.
This class is an abstract class used for multiple purposes such as causing the execution to wait for any or all asynchronous processes to finish. To process more than one database command asynchronously, you can simply create an array containing wait handles for each asynchronous process. Using the static methods of the WaitHandle class, you can cause the execution to wait for either any or all wait handles in the array to finish processing.
The WaitHandle class exposes a few methods, as shown in the following table.
Method | Description |
|---|---|
| This method waits for a single asynchronous process to complete or time out. It returns a Boolean value containing |
| This overloaded method receives an integer value as the first parameter. This value represents the time out in milliseconds. The second parameter receives a Boolean value specifying whether the method requires asynchronous context and should be set to |
| This overloaded method receives a |
This is a static method used if you are managing more than one | |
| This overloaded method receives the time-out value in the form of milliseconds and a Boolean value specifying whether the method requires asynchronous context. It should be set to |
| This overloaded method receives the time-out value in the form of a |
| This is a static method and is used to wait for all asynchronous processes to finish running. |
| This overloaded method receives the time-out value in the form of milliseconds and a Boolean value specifying whether the method requires asynchronous context. It should be set to |
| This overloaded method receives the time-out value in the form of |
| This method releases all wait handles and reclaims their resources. |
Now that you understand asynchronous methods added to the SqlCommand and how to properly interact with them, you can write some code to see the asynchronous processing in action.
You can process asynchronous commands in three distinct ways. One approach is to start the asynchronous process and start polling the IAsyncResult object to see when the process has finished. The second approach is to provide a callback method while starting the asynchronous process. This approach enables you to perform other tasks in parallel. When the asynchronous process finishes, it fires the callback method that cleans up after the process and notifies other parts of the program that the asynchronous process has finished. The third and most elegant method is to associate a wait handle with the asynchronous process. Using this approach, you can start all the asynchronous processing you want and then wait for all or any of them to finish so that you can process them accordingly.
The code shown in Listing 8-31 creates an inline SQL statement to retrieve the top five records from the Orders table from the Northwind database. It starts the asynchronous process by calling the BeginExecuteReader. After the asynchronous process has started, it uses a while loop to wait for the process to finish. While waiting, the main thread sleeps for 10 milliseconds after checking the status of the asynchronous process. After the process has finished, it retrieves the result using the EndExecuteReader method.
Example 8.31. The Poll approach to working with asynchronous commands
VB
<%@ Page Language="VB" %>
<%@ Import Namespace="System.Data" %>
<%@ Import Namespace="System.Data.SqlClient" %>
<%@ Import Namespace="System.Configuration" %>

<script runat="server">
    Protected Sub Page_Load(ByVal sender As Object, ByVal e As System.EventArgs)
        Dim DBCon As SqlConnection
        Dim Command As SqlCommand = New SqlCommand()
        Dim OrdersReader As SqlDataReader
        Dim ASyncResult As IAsyncResult

        DBCon = New SqlConnection()
        DBCon.ConnectionString = _
           ConfigurationManager.ConnectionStrings("DSN_NorthWind").ConnectionString

        Command.CommandText = _
                "SELECT TOP 5 Customers.CompanyName, Customers.ContactName, " & _
                "Orders.OrderID, Orders.OrderDate, " & _
                "Orders.RequiredDate, Orders.ShippedDate " & _
                "FROM Orders, Customers " & _
                "WHERE Orders.CustomerID = Customers.CustomerID " & _
                "ORDER BY Customers.CompanyName, Customers.ContactName"
        Command.CommandType = CommandType.Text
        Command.Connection = DBCon

        DBCon.Open()

       ' Starting the asynchronous processing
        ASyncResult = Command.BeginExecuteReader()

       ' This loop with keep the main thread waiting until the
       ' asynchronous process is finished
       While Not ASyncResult.IsCompleted
           ' Sleeping current thread for 10 milliseconds
            System.Threading.Thread.Sleep(10)
       End While

       ' Retrieving result from the asynchronous process
       OrdersReader = Command.EndExecuteReader(ASyncResult)

       ' Displaying result on the screen
       gvOrders.DataSource = OrdersReader
       gvOrders.DataBind()
' Closing connection
DBCon.Close()
End Sub
</script>
<html xmlns="http://www.w3.org/1999/xhtml" >
<head id="Head1" runat="server">
<title>The Poll Approach</title>
</head>
<body>
<form id="form1" runat="server">
<div>
<asp:GridView ID="gvOrders" runat="server"
AutoGenerateColumns="False" Width="100%">
<Columns>
<asp:BoundField HeaderText="Company Name"
DataField="CompanyName"></asp:BoundField>
<asp:BoundField HeaderText="Contact Name"
DataField="ContactName"></asp:BoundField>
<asp:BoundField HeaderText="Order Date"
DataField="orderdate" DataFormatString="{0:d}"></asp:BoundField>
<asp:BoundField HeaderText="Required Date" DataField="requireddate"
DataFormatString="{0:d}"></asp:BoundField>
<asp:BoundField HeaderText="Shipped Date" DataField="shippeddate"
DataFormatString="{0:d}"></asp:BoundField>
</Columns>
</asp:GridView>
</div>
</form>
</body>
</html>
C#
<%@ Page Language="C#" %>
<%@ Import Namespace="System.Data" %>
<%@ Import Namespace="System.Data.SqlClient" %>
<%@ Import Namespace="System.Configuration" %>
<script runat="server">
protected void Page_Load(object sender, EventArgs e)
{
SqlConnection DBCon;
SqlCommand Command = new SqlCommand();
SqlDataReader OrdersReader;
IAsyncResult ASyncResult;
DBCon = new SqlConnection();
DBCon.ConnectionString =
ConfigurationManager.ConnectionStrings["DSN_NorthWind"].ConnectionString;
Command.CommandText =
"SELECT TOP 5 Customers.CompanyName, Customers.ContactName, " +
"Orders.OrderID, Orders.OrderDate, " +
"Orders.RequiredDate, Orders.ShippedDate " +"FROM Orders, Customers " +
"WHERE Orders.CustomerID = Customers.CustomerID " +
"ORDER BY Customers.CompanyName, Customers.ContactName";
Command.CommandType = CommandType.Text;
Command.Connection = DBCon;
DBCon.Open();
// Starting the asynchronous processing
ASyncResult = Command.BeginExecuteReader();
// This loop with keep the main thread waiting until the
// asynchronous process is finished
while (!ASyncResult.IsCompleted)
{
// Sleeping current thread for 10 milliseconds
System.Threading.Thread.Sleep(10);
}
// Retrieving result from the asynchronous process
OrdersReader = Command.EndExecuteReader(ASyncResult);
// Displaying result on the screen
gvOrders.DataSource = OrdersReader;
gvOrders.DataBind();
// Closing connection
DBCon.Close();
}
</script>If you set a break point at the while loop, you will be able to see that the code execution continues after calling the BeginExecuteReader method. The code then continues to loop until the asynchronous execution has finished.
The most elegant of the three approaches is neither the poll approach nor the callback approach. The approach that provides the highest level of flexibility, efficiency, and (admittedly) a bit more complexity is the wait approach. Using this approach, you can write code that starts multiple asynchronous processes and waits for any or all the processes to finish running. This approach allows you to wait for only those processes that are dependent on each other and to proceed with the ones that don't. This approach, by its design, requires you to think about asynchronous processes in great detail. You must pick a good candidate for running in parallel and, most importantly, determine how different processes depend on each other. The complexity of this approach requires you to understand its details and design the code accordingly. The end result is, typically, a very elegant code design that makes the best use of synchronous and asynchronous processing models.
The code shown in Listing 8-32 uses the WaitOne method of the WaitHandle class. This method causes the program execution to wait until the asynchronous process has finished running.
Example 8.32. The wait approach to handling a single asynchronous process
VB
<%@ Page Language="VB" %>
<%@ Import Namespace="System.Data" %>
<%@ Import Namespace="System.Data.SqlClient" %>
<%@ Import Namespace="System.Configuration" %>

<script runat="server">
    Protected Sub Page_Load(ByVal sender As Object, ByVal e As System.EventArgs)
        Dim DBCon As SqlConnection
        Dim Command As SqlCommand = New SqlCommand()
        Dim OrdersReader As SqlDataReader
        Dim ASyncResult As IAsyncResult
        Dim WHandle As Threading.WaitHandle

        DBCon = New SqlConnection()
        DBCon.ConnectionString = _
           ConfigurationManager.ConnectionStrings("DSN_NorthWind").ConnectionString


        Command.CommandText = _
                "SELECT TOP 5 Customers.CompanyName, Customers.ContactName, " & _
                "Orders.OrderID, Orders.OrderDate, " & _
                "Orders.RequiredDate, Orders.ShippedDate " & _
                "FROM Orders, Customers " & _
                "WHERE Orders.CustomerID = Customers.CustomerID " & _
                "ORDER BY Customers.CompanyName, Customers.ContactName"

        Command.CommandType = CommandType.Text
        Command.Connection = DBCon

        DBCon.Open()

       ' Starting the asynchronous processing
       ASyncResult = Command.BeginExecuteReader()

       WHandle = ASyncResult.AsyncWaitHandle

       If WHandle.WaitOne = True Then
           ' Retrieving result from the asynchronous process
           OrdersReader = Command.EndExecuteReader(ASyncResult)

           ' Displaying result on the screen
           gvOrders.DataSource = OrdersReader
           gvOrders.DataBind()

           ' Closing connection
           DBCon.Close()
       Else
           ' Asynchronous process has timed out. Handle this
           ' situation here.
       End If
End Sub
</script>
<html xmlns="http://www.w3.org/1999/xhtml" >
<head id="Head1" runat="server">
<title>The Wait Approach</title>
</head>
<body>
<form id="form1" runat="server">
<div>
<asp:GridView ID="gvOrders" runat="server"
AutoGenerateColumns="False" Width="100%">
<Columns>
<asp:BoundField HeaderText="Company Name"
DataField="CompanyName"></asp:BoundField>
<asp:BoundField HeaderText="Contact Name"
DataField="ContactName"></asp:BoundField>
<asp:BoundField HeaderText="Order Date"
DataField="orderdate" DataFormatString="{0:d}"></asp:BoundField>
<asp:BoundField HeaderText="Required Date" DataField="requireddate"
DataFormatString="{0:d}"></asp:BoundField>
<asp:BoundField HeaderText="Shipped Date" DataField="shippeddate"
DataFormatString="{0:d}"></asp:BoundField>
</Columns>
</asp:GridView>
</div>
</form>
</body>
</html>
C#
<%@ Page Language="C#" %>
<%@ Import Namespace="System.Data" %>
<%@ Import Namespace="System.Data.SqlClient" %>
<%@ Import Namespace="System.Configuration" %>
<script runat="server">
protected void Page_Load(object sender, EventArgs e)
{
SqlConnection DBCon;
SqlCommand Command = new SqlCommand();
SqlDataReader OrdersReader;
IAsyncResult ASyncResult;
System.Threading.WaitHandle WHandle;
DBCon = new SqlConnection();
DBCon.ConnectionString =
ConfigurationManager.ConnectionStrings["DSN_NorthWind"].ConnectionString;
Command.CommandText =
"SELECT TOP 5 Customers.CompanyName, Customers.ContactName, " +
"Orders.OrderID, Orders.OrderDate, " +
"Orders.RequiredDate, Orders.ShippedDate " +
"FROM Orders, Customers " +"WHERE Orders.CustomerID = Customers.CustomerID " +
"ORDER BY Customers.CompanyName, Customers.ContactName";
Command.CommandType = CommandType.Text;
Command.Connection = DBCon;
DBCon.Open();
// Starting the asynchronous processing
ASyncResult = Command.BeginExecuteReader();
WHandle = ASyncResult.AsyncWaitHandle;
if (WHandle.WaitOne() == true)
{
// Retrieving result from the asynchronous process
OrdersReader = Command.EndExecuteReader(ASyncResult);
// Displaying result on the screen
gvOrders.DataSource = OrdersReader;
gvOrders.DataBind();
// Closing connection
DBCon.Close();
}
else
{
// Asynchronous process has timed out. Handle this
// situation here.
}
}
</script>If you set a break point and step through this code, you will notice that the program execution stops at the WHandle.WaitOne method call. The program automatically resumes when the asynchronous commands finishes its execution.
The real power of the wait approach doesn't become apparent until you start multiple asynchronous processes. The code shown in Listing 8-33 starts two asynchronous processes. One process queries a database to get information about a specific customer and runs another query to retrieve all orders submitted by that the same customer. The code example shown in this listing creates two separate Command objects, Data Reader objects, and wait handles. However, it uses the same connection object for both queries to demonstrate how well Multiple Active Result Set (MARS) supports work in conjunction with the asynchronous processing. For this to work, you are going to have to add MultipleActiveResultSets=True to your connection string.
Example 8.33. Use of multiple wait handles in conjunction with MARS
VB
<%@ Page Language="VB" %>
<%@ Import Namespace="System.Data" %>
<%@ Import Namespace="System.Data.SqlClient" %>
<%@ Import Namespace="System.Configuration" %>
<script runat="server">
Protected Sub Page_Load(ByVal sender As Object, ByVal e As System.EventArgs)
Dim DBCon As SqlConnection
Dim OrdersCommand As SqlCommand = New SqlCommand()
Dim CustCommand As SqlCommand = New SqlCommand()
Dim OrdersReader As SqlDataReader
Dim CustReader As SqlDataReader
Dim OrdersASyncResult As IAsyncResult
Dim CustAsyncResult As IAsyncResult
Dim WHandles(1) As System.Threading.WaitHandle
Dim OrdersWHandle As System.Threading.WaitHandle
Dim CustWHandle As System.Threading.WaitHandle
DBCon = New SqlConnection()
DBCon.ConnectionString = _
ConfigurationManager.ConnectionStrings("DSN_NorthWind").ConnectionString
CustCommand.CommandText = _
"SELECT * FROM Customers WHERE CompanyName = 'Alfreds Futterkiste'"
CustCommand.CommandType = CommandType.Text
CustCommand.Connection = DBCon
' Selecting all orders for a specific customer
OrdersCommand.CommandText = _
"SELECT Customers.CompanyName, Customers.ContactName, " & _
"Orders.OrderID, Orders.OrderDate, " & _
"Orders.RequiredDate, Orders.ShippedDate " & _
"FROM Orders, Customers " & _
"WHERE Orders.CustomerID = Customers.CustomerID " & _
"AND Customers.CompanyName = 'Alfreds Futterkiste' " & _
"ORDER BY Customers.CompanyName, Customers.ContactName"
OrdersCommand.CommandType = CommandType.Text
OrdersCommand.Connection = DBCon
DBCon.Open()
' Retrieving customer information asynchronously
CustAsyncResult = CustCommand.BeginExecuteReader()
' Retrieving orders list asynchronously
OrdersASyncResult = OrdersCommand.BeginExecuteReader()
CustWHandle = CustAsyncResult.AsyncWaitHandle
OrdersWHandle = OrdersASyncResult.AsyncWaitHandle
' Filling Wait Handles array with the two wait handles we
' are going to use in this code
WHandles(0) = CustWHandleWHandles(1) = OrdersWHandle
System.Threading.WaitHandle.WaitAll(WHandles)
CustReader = CustCommand.EndExecuteReader(CustAsyncResult)
OrdersReader = OrdersCommand.EndExecuteReader(OrdersASyncResult)
gvCustomers.DataSource = CustReader
gvCustomers.DataBind()
gvOrders.DataSource = OrdersReader
gvOrders.DataBind()
DBCon.Close()
End Sub
</script>
<html xmlns="http://www.w3.org/1999/xhtml" >
<head id="Head1" runat="server">
<title>Wait All Approach</title>
</head>
<body>
<form id="form1" runat="server">
<div>
<asp:GridView ID="gvCustomers" Width="100%" runat="server"></asp:GridView>
<br /><br />
<asp:GridView ID="gvOrders" Width="100%" AutoGenerateColumns="False"
runat="server">
<Columns>
<asp:BoundField HeaderText="Company Name"
DataField="CompanyName"></asp:BoundField>
<asp:BoundField HeaderText="Contact Name"
DataField="ContactName"></asp:BoundField>
<asp:BoundField HeaderText="Order Date" DataField="orderdate"
DataFormatString="{0:d}"></asp:BoundField>
<asp:BoundField HeaderText="Required Date" DataField="requireddate"
DataFormatString="{0:d}"></asp:BoundField>
<asp:BoundField HeaderText="Shipped Date" DataField="shippeddate"
DataFormatString="{0:d}"></asp:BoundField>
</Columns>
</asp:GridView>
</div>
</form>
</body>
</html>
C#
<%@ Page Language="C#" %>
<%@ Import Namespace="System.Data" %>
<%@ Import Namespace="System.Data.SqlClient" %>
<%@ Import Namespace="System.Configuration" %>
<script runat="server">protected void Page_Load(object sender, EventArgs e)
{
SqlConnection DBCon;
SqlCommand OrdersCommand = new SqlCommand();
SqlCommand CustCommand = new SqlCommand();
SqlDataReader OrdersReader;
SqlDataReader CustReader;
IAsyncResult OrdersASyncResult;
IAsyncResult CustAsyncResult;
System.Threading.WaitHandle[] WHandles = new
System.Threading.WaitHandle[2];
System.Threading.WaitHandle OrdersWHandle;
System.Threading.WaitHandle CustWHandle;
DBCon = new SqlConnection();
DBCon.ConnectionString =
ConfigurationManager.ConnectionStrings["DSN_NorthWind"].ConnectionString;
CustCommand.CommandText =
"SELECT * FROM Customers WHERE CompanyName = 'Alfreds Futterkiste'";
CustCommand.CommandType = CommandType.Text;
CustCommand.Connection = DBCon;
// Selecting all orders for a specific customer
OrdersCommand.CommandText =
"SELECT Customers.CompanyName, Customers.ContactName, " +
"Orders.OrderID, Orders.OrderDate, " +
"Orders.RequiredDate, Orders.ShippedDate " +
"FROM Orders, Customers " +
"WHERE Orders.CustomerID = Customers.CustomerID " +
"AND Customers.CompanyName = 'Alfreds Futterkiste' " +
"ORDER BY Customers.CompanyName, Customers.ContactName";
OrdersCommand.CommandType = CommandType.Text;
OrdersCommand.Connection = DBCon;
DBCon.Open();
// Retrieving customer information asynchronously
CustAsyncResult = CustCommand.BeginExecuteReader();
// Retrieving orders list asynchronously
OrdersASyncResult = OrdersCommand.BeginExecuteReader();
CustWHandle = CustAsyncResult.AsyncWaitHandle;
OrdersWHandle = OrdersASyncResult.AsyncWaitHandle;
// Filling Wait Handles array with the two wait handles we
// are going to use in this code
WHandles[0] = CustWHandle;
WHandles[1] = OrdersWHandle;System.Threading.WaitHandle.WaitAll(WHandles);
CustReader = CustCommand.EndExecuteReader(CustAsyncResult);
OrdersReader = OrdersCommand.EndExecuteReader(OrdersASyncResult);
gvCustomers.DataSource = CustReader;
gvCustomers.DataBind();
gvOrders.DataSource = OrdersReader;
gvOrders.DataBind();
DBCon.Close();
}
</script>When you compile and execute the code shown in Listing 8-33, you see the result on the screen, as shown in Figure 8-25. This figure clearly shows two GridView controls that were used in the code example. The GridView control on the top shows the result of executing a query that retrieved all information related to a specific customer. The GridView control on the bottom shows the results of executing the second query that retrieved a list of all orders submitted by a specific customer.
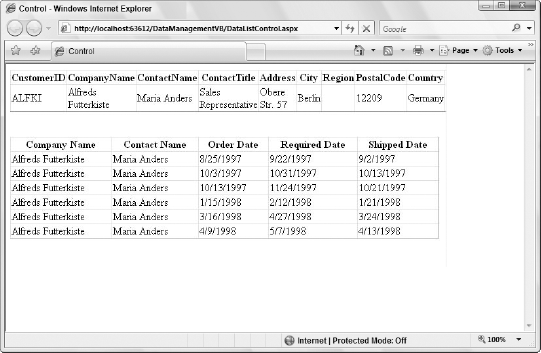
The code shown in Listing 8-33 reveals some of the elegance of using the wait approach. However, it is still not the most efficient code you can write with ADO.NET 2.0. The code should allow for a wait until both asynchronous processes finish running before the data binds the result sets to the respective GridView controls.
You can change the code shown in Listing 8-33 just a little to gain even more efficiency. Replace the WaitAll method with the WaitAny method. The WaitAny method enables you to handle the results of each of the asynchronous processes as soon as each is completed without waiting for other processing to finish. To use the WaitAny method and still manage the execution of all asynchronous processes, you can also add a loop that enables you to make sure that all asynchronous processes are handled after they are completed.
The WaitAny method returns an Integer value that indicates an array index of the wait handle that has finished running. Using this return value, you can easily find the correct wait handle and process the result set retrieved from the query that was executed in that particular process, as shown in Listing 8-34.
Example 8.34. Use of the WaitAny method to process multiple asynchronous processes
VB
<%@ Page Language="VB" %>
<%@ Import Namespace="System.Data" %>
<%@ Import Namespace="System.Data.SqlClient" %>
<%@ Import Namespace="System.Configuration" %>

<script runat="server">
    Protected Sub Page_Load(ByVal sender As Object, ByVal e As System.EventArgs)
        Dim DBCon As SqlConnection
        Dim OrdersCommand As SqlCommand = New SqlCommand()
        Dim CustCommand As SqlCommand = New SqlCommand()
        Dim OrdersReader As SqlDataReader
        Dim CustReader As SqlDataReader
        Dim OrdersASyncResult As IAsyncResult
        Dim CustAsyncResult As IAsyncResult

        Dim WHIndex As Integer
        Dim WHandles(1) As Threading.WaitHandle
        Dim OrdersWHandle As Threading.WaitHandle
        Dim CustWHandle As Threading.WaitHandle

        DBCon = New SqlConnection()
        DBCon.ConnectionString = _
           ConfigurationManager.ConnectionStrings("DSN_NorthWind").ConnectionString

        CustCommand.CommandText = _
           "SELECT * FROM Customers WHERE CompanyName = 'Alfreds Futterkiste'"

        CustCommand.CommandType = CommandType.Text
        CustCommand.Connection = DBCon

        OrdersCommand.CommandText = _
                "SELECT Customers.CompanyName, Customers.ContactName, " & _
                "Orders.OrderID, Orders.OrderDate, " & _
                "Orders.RequiredDate, Orders.ShippedDate " & _
                "FROM Orders, Customers " & _
                "WHERE Orders.CustomerID = Customers.CustomerID " & _
                "AND Customers.CompanyName = 'Alfreds Futterkiste' " & _
                "ORDER BY Customers.CompanyName, Customers.ContactName"
OrdersCommand.CommandType = CommandType.Text
OrdersCommand.Connection = DBCon
' Opening the database connection
DBCon.Open ()
' Retrieving customer information asynchronously
CustAsyncResult = CustCommand.BeginExecuteReader()
' Retrieving orders list asynchronously
OrdersASyncResult = OrdersCommand.BeginExecuteReader()
CustWHandle = CustAsyncResult.AsyncWaitHandle
OrdersWHandle = OrdersASyncResult.AsyncWaitHandle
' Filling Wait Handles array with the two wait handles we
' are going to use in this code
WHandles(0) = CustWHandle
WHandles(1) = OrdersWHandle
' Looping 2 times because there are 2 wait handles
' in the array
For Index As Integer = 0 To 1
' We are only waiting for any of the two
' asynchronous process to finish running
WHIndex = Threading.WaitHandle.WaitAny(WHandles)
' The return value from the WaitAny method is
' the array index of the Wait Handle that just
' finsihed running
Select Case WHIndex
Case 0
CustReader = CustCommand.EndExecuteReader(CustAsyncResult)
gvCustomers.DataSource = CustReader
gvCustomers.DataBind()
Case 1
OrdersReader = _
OrdersCommand.EndExecuteReader(OrdersASyncResult)
gvOrders.DataSource = OrdersReader
gvOrders.DataBind()
End Select
Next
' Closing connection
DBCon.Close()
End Sub
</script>
<html xmlns="http://www.w3.org/1999/xhtml" >
<head id="Head1" runat="server"><title>The Wait Any Approach</title>
</head>
<body>
<form id="form1" runat="server">
<div>
<asp:GridView ID="gvCustomers" Width="100%" runat="server"></asp:GridView>
<br /><br />
<asp:GridView ID="gvOrders" Width="100%" AutoGenerateColumns="False"
runat="server">
<Columns>
<asp:BoundField HeaderText="Company Name"
DataField="CompanyName"></asp:BoundField>
<asp:BoundField HeaderText="Contact Name"
DataField="ContactName"></asp:BoundField>
<asp:BoundField HeaderText="Order Date" DataField="orderdate"
DataFormatString="{0:d}"></asp:BoundField>
<asp:BoundField HeaderText="Required Date" DataField="requireddate"
DataFormatString="{0:d}"></asp:BoundField>
<asp:BoundField HeaderText="Shipped Date" DataField="shippeddate"
DataFormatString="{0:d}"></asp:BoundField>
</Columns>
</asp:GridView>
</div>
</form>
</body>
</html>
C#
<%@ Page Language="C#" %>
<%@ Import Namespace="System.Data" %>
<%@ Import Namespace="System.Data.SqlClient" %>
<%@ Import Namespace="System.Configuration" %>
<script runat="server">
protected void Page_Load(object sender, EventArgs e)
{
SqlConnection DBCon;
SqlCommand OrdersCommand = new SqlCommand();
SqlCommand CustCommand = new SqlCommand();
SqlDataReader OrdersReader;
SqlDataReader CustReader;
IAsyncResult OrdersASyncResult;
IAsyncResult CustAsyncResult;
int WHIndex;
System.Threading.WaitHandle[] WHandles =
new System.Threading.WaitHandle[1];
System.Threading.WaitHandle OrdersWHandle;
System.Threading.WaitHandle CustWHandle;
DBCon = new SqlConnection();
DBCon.ConnectionString =
ConfigurationManager.ConnectionStrings["DSN_NorthWind"].ConnectionString;CustCommand.CommandText =
"SELECT * FROM Customers WHERE CompanyName = 'Alfreds Futterkiste'";
CustCommand.CommandType = CommandType.Text;
CustCommand.Connection = DBCon;
OrdersCommand.CommandText =
"SELECT Customers.CompanyName, Customers.ContactName, " +
"Orders.OrderID, Orders.OrderDate, " +
"Orders.RequiredDate, Orders.ShippedDate " +
"FROM Orders, Customers " +
"WHERE Orders.CustomerID = Customers.CustomerID " +
"AND Customers.CompanyName = 'Alfreds Futterkiste' " +
"ORDER BY Customers.CompanyName, Customers.ContactName";
OrdersCommand.CommandType = CommandType.Text;
OrdersCommand.Connection = DBCon;
// Opening the database connection
DBCon.Open();
// Retrieving customer information asynchronously
CustAsyncResult = CustCommand.BeginExecuteReader();
// Retrieving orders list asynchronously
OrdersASyncResult = OrdersCommand.BeginExecuteReader();
CustWHandle = CustAsyncResult.AsyncWaitHandle;
OrdersWHandle = OrdersASyncResult.AsyncWaitHandle;
// Filling Wait Handles array with the two wait handles we
// are going to use in this code
WHandles[0] = CustWHandle;
WHandles[1] = OrdersWHandle;
// Looping 2 times because there are 2 wait handles
// in the array
for (int Index = 0; Index < 2; Index++ )
{
// We are only waiting for any of the two
// asynchronous process to finish running
WHIndex = System.Threading.WaitHandle.WaitAny(WHandles);
// The return value from the WaitAny method is
// the array index of the Wait Handle that just
// finsihed running
switch (WHIndex)
{
case 0:
CustReader = CustCommand.EndExecuteReader(CustAsyncResult);
gvCustomers.DataSource = CustReader;
gvCustomers.DataBind();break;
case 1:
OrdersReader =
OrdersCommand.EndExecuteReader(OrdersASyncResult);
gvOrders.DataSource = OrdersReader;
gvOrders.DataBind();
break;
}
}
// Closing connection
DBCon.Close();
}
</script>Next, look at the callback approach. Using this approach, you assign a callback method to the asynchronous process and use it to display the result returned by executing the SQL query.
Listing 8-35 creates an inline SQL statement that retrieves the top five records from the database. It starts the asynchronous process by calling the BeginExecuteReader method and passing it the callback delegate. No further processing is needed, and the method ends after the asynchronous process has started. After the callback method is fired, it retrieves the result and displays it on the screen.
Example 8.35. Asynchronous command processing using the callback approach
VB
<%@ Page Language="VB" %>
<%@ Import Namespace="System.Data" %>
<%@ Import Namespace="System.Data.SqlClient" %>
<%@ Import Namespace="System.Configuration" %>

<script runat="server">
    Private Sub Page_Load(ByVal sender As Object, ByVal e As System.EventArgs)
        Dim DBCon As SqlConnection
        Dim Command As SqlCommand = New SqlCommand()
        Dim ASyncResult As SqlAsyncResult

        DBCon = New SqlConnection()
        Command = New SqlCommand()
        DBCon.ConnectionString = _
          ConfigurationManager.ConnectionStrings("DSN_NorthWind").ConnectionString

        ' Selecting top 5 records from the Orders table
        Command.CommandText = _
                "SELECT TOP 5 Customers.CompanyName, Customers.ContactName, " & _
                "Orders.OrderID, Orders.OrderDate, " & _
                "Orders.RequiredDate, Orders.ShippedDate " & _
                "FROM Orders, Customers " & _
                "WHERE Orders.CustomerID = Customers.CustomerID " & _
                "ORDER BY Customers.CompanyName, Customers.ContactName"
Command.CommandType = CommandType.Text
Command.Connection = DBCon
DBCon.Open()
' Starting the asynchronous processing
AsyncResult = Command.BeginExecuteReader(New _
AsyncCallback(AddressOf CBMethod), CommandBehavior.CloseConnection)
End Sub
Public Sub CBMethod(ByVal ar As SQLAsyncResult)
Dim OrdersReader As SqlDataReader
' Retrieving result from the asynchronous process
OrdersReader = ar.EndExecuteReader(ar)
' Displaying result on the screen
gvOrders.DataSource = OrdersReader
gvOrders.DataBind()
End Sub
</script>
<html xmlns="http://www.w3.org/1999/xhtml" >
<head id="Head1" runat="server">
<title>The Call Back Approach</title>
</head>
<body>
<form id="form1" runat="server">
<div>
<asp:GridView ID="gvOrders" Width="100%" AutoGenerateColumns="False"
runat="server">
<Columns>
<asp:BoundField HeaderText="Company Name"
DataField="CompanyName"></asp:BoundField>
<asp:BoundField HeaderText="Contact Name"
DataField="ContactName"></asp:BoundField>
<asp:BoundField HeaderText="Order Date" DataField="orderdate"
DataFormatString="{0:d}"></asp:BoundField>
<asp:BoundField HeaderText="Required Date" DataField="requireddate"
DataFormatString="{0:d}"></asp:BoundField>
<asp:BoundField HeaderText="Shipped Date" DataField="shippeddate"
DataFormatString="{0:d}"></asp:BoundField>
</Columns>
</asp:GridView>
</div>
</form>
</body>
</html>
C#
<%@ Page Language="C#" %>
<%@ Import Namespace="System.Data" %>
<%@ Import Namespace="System.Data.SqlClient" %>
<%@ Import Namespace="System.Configuration" %><script runat="server">
protected void Page_Load(object sender, EventArgs e)
{
SqlConnection DBCon;
SqlCommand Command = new SqlCommand();
SqlAsyncResult ASyncResult;
DBCon = new SqlConnection();
Command = new SqlCommand();
DBCon.ConnectionString =
ConfigurationManager.ConnectionStrings["DSN_NorthWind"].ConnectionString;
// Selecting top 5 records from the Orders table
Command.CommandText =
"SELECT TOP 5 Customers.CompanyName, Customers.ContactName, " +
"Orders.OrderID, Orders.OrderDate, " +
"Orders.RequiredDate, Orders.ShippedDate " +
"FROM Orders, Customers " +
"WHERE Orders.CustomerID = Customers.CustomerID " +
"ORDER BY Customers.CompanyName, Customers.ContactName";
Command.CommandType = CommandType.Text;
Command.Connection = DBCon;
DBCon.Open();
// Starting the asynchronous processing
AsyncResult = Command.BeginExecuteReader(new AsyncCallback(CBMethod),
CommandBehavior.CloseConnection);
}
public void CBMethod(SQLAsyncResult ar)
{
SqlDataReader OrdersReader;
// Retrieving result from the asynchronous process
OrdersReader = ar.EndExecuteReader(ar);
// Displaying result on the screen
gvOrders.DataSource = OrdersReader;
gvOrders.DataBind();
}
</script>The callback approach enables you to handle the result of a command execution at a different part of your code. This feature is useful in cases where the command execution takes longer than usual and you want to respond to the user without waiting for the command execution to finish.
The asynchronous process often takes longer than expected. To alleviate this problem, you can provide an option to the user to cancel the process without waiting for the result. Canceling an asynchronous process is as easy as calling the Cancel method on the appropriate Command object. This method doesn't return any value. To roll back the work that was already completed by the Command object, you must provide a custom transaction to the Command object before executing the query. You can also handle the rollback or the commit process yourself.
Now that you understand how to execute multiple database queries asynchronously using the Command object, take a quick look at how you can open database connections asynchronously, as well. The principles of working with asynchronous connections are the same as when you work with asynchronous commands. You can still use any of the three approaches you learned previously.
In ADO.NET, the SqlConnection class exposes a couple of new properties needed when working asynchronously. These properties are shown in the following table.
Property | Description |
|---|---|
| This read-only property returns a Boolean value indicating whether the connection has been opened asynchronously. |
| This property returns a value from
|
In summary, ADO.NET is a powerful tool to incorporate within your ASP.NET applications. ADO.NET has a number of new technologies that provide you with data solutions that you could only dream of in the past.
Visual Studio also makes ADO.NET programming quick and easy when you use the wizards that are available. In this chapter, you saw a number of the wizards. You do not have to use these wizards in order to work with ADO.NET. On the contrary, you can use some of the wizards and create the rest of the code yourself, or you can use none of the wizards. In any case, you have complete and full access to everything that ADO.NET provides.
This chapter covered a range of advanced features of ADO.NET as well. These features are designed to give you the flexibility to handle database processing in a manner never before possible with either of the previous versions of ADO.NET or ADO.
This chapter also covered the features of Multiple Active Result Sets (MARS), which enables you to reuse a single open connection for multiple accesses to the database, even if the connection is currently processing a result set. This feature becomes even more powerful when it is used in conjunction with the asynchronous command processing.