Azure SQL Database has two deployment options, a single database and an elastic pool. A single SQL database is an isolated, standalone database with dedicated resources (DTU or vCore). In all of our previous chapters, we have talked about Azure SQL Database single-database deployments.
An SQL elastic database pool is a group of two or more SQL databases with shared resources (eDTU and vCore) at a specific price.
In a multi-tenant scenario where there's one database for each customer, each database has a varying access pattern with different peak times and low average utilization. We'll see later in the chapter how grouping different customer databases in an SQL Database elastic pool saves costs without affecting performance.
This chapter will teach you how to manage and scale multiple SQL databases by using elastic database pools. You'll also learn how to implement elastic database jobs to manage and maintain databases in an elastic database pool.
We will also look at the new SQL Managed Instance deployment option for instance pools. We will discuss the architecture of instance pools and look at the key differences between instance pools and a single SQL Managed Instance deployment. You will learn how to deploy and manage instance pools using PowerShell commands.
By the end of this chapter, you will be able to:
- Explain the purpose of elastic database pools and identify when to use them.
- Select the size of an elastic database pool.
- Configure elastic database jobs.
- Explain the purpose of instance pools and how they differ from single instances.
- Deploy an SQL Managed Instance pool.
Introducing elastic database pools in SQL Database
The SQL Database elastic pool is a cost-effective solution for managing and scaling a group or a pool of SQL databases, with a utilization pattern characterized by low average utilization and infrequent spikes.
All databases in an elastic database pool:
- Belong to one Azure SQL server.
- Share a set amount of compute resources indexed by eDTUs (Elastic DTUs) in the DTU purchasing model and vCores in the vCore purchasing model.
- Share a set amount of elastic database pool storage.
- Have a price based on the amount of elastic database pool resources and not individual databases.
- Can scale up to the given maximum amount of eDTUs or vCores.
- Optionally, have a guaranteed minimum number of eDTUs or vCores.
Let's look at a scenario that highlights when we should think about using an SQL Database elastic pool.
When should you consider elastic database pools?
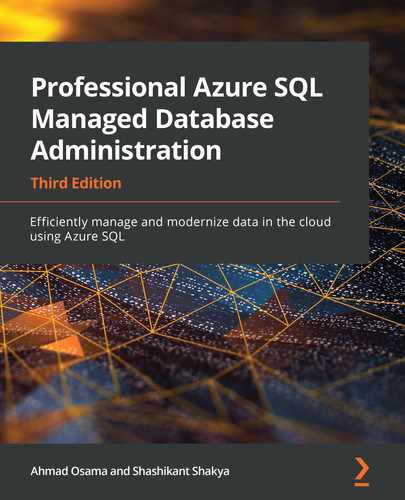
In Chapter 7, Scalability, we worked on sharding the toystore database into four individual shards. Each shard had 50 pieces of a customer's/tenant's data. Let's say that each individual database is sized to a Standard S3 service tier—for example, 100 DTUs—and has the DTU utilization levels shown in Figure 8.1:
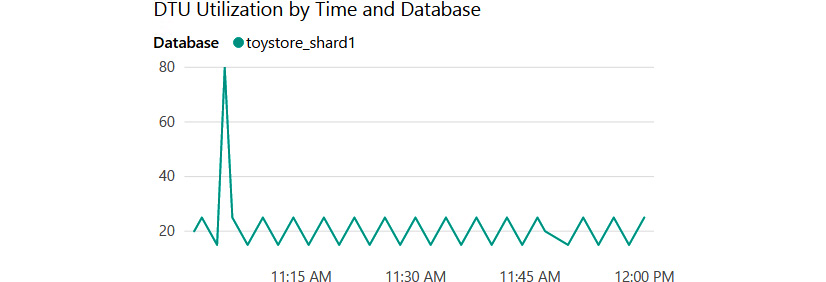
Figure 8.1: DTU utilization by time and database for toystore_shard1
The preceding graph shows the DTU utilization by time for the toystore_shard1 database. It is evident from the graph that toystore_shard1 has an average DTU utilization of around 30 DTUs and a spike of 80 DTUs around 11:00 AM. Let's say that the other three shards have similar graphs; however, they peak at different times, as shown in Figure 8.2:

Figure 8.2: DTU utilization graph of multiple shards
The preceding graph shows the four shards in a combined graph. The average utilization is under 40 DTUs and the peak utilization is 90 DTUs. The database peaks at different points in time.
At this point, you might argue that you should use the Standard S2 service tier, which offers 50 DTUs and costs less than S3. This would suffice for most of the database's workload, which is below 50 DTUs. However, this would result in performance degradation for peak hours when the utilization is 90 DTUs, which is much greater than 50 DTUs.
You have two options here:
- Over-provision (Standard S3) to provide optimum performance for peak hours at a higher cost.
- Under-provision (Standard S2) to save costs at the expense of lower performance and bad customer experience during peak hours.
Elastic database pools provide you with a third option, which provides optimum performance at a lower cost.
The four shards are grouped together in an elastic database pool with an eDTU count of 100, as shown in Figure 8.3:

Figure 8.3: Grouping of shards in an elastic database pool
This means that a database:
- In peak hours, can consume a maximum of 100 eDTUs to meet the performance demand.
- In off-peak hours (under light loads), can consume fewer eDTUs.
- Under no load, consumes 0 (zero) eDTUs.
This not only solves the problem of over- and under-provisioning but also saves costs, as you only have to pay for eDTUs and not individual databases' DTUs.
A Standard S3 service tier that has a DTU provision of 100 is priced at $147/month. Four such databases would cost $588/month.
An elastic database pool that has an eDTU provision of 100 is priced at $221/month, which means that you save $367/month (a 62% cost reduction) if you have the database in an elastic database pool.
Let's say that as the number of customers increases, you plan to further shard the databases into eight shards. This means that you would have eight databases in an elastic database pool. This would result in an 85% monthly cost reduction.
This is where elastic database pools are very beneficial.
Sizing an elastic database pool
Elastic database pools have great benefits, but only if they are sized properly. Otherwise, you might end up spending more than expected if they're oversized or risk a poor performance experience if they're undersized.
The ideal utilization pattern of a database to be considered for an elastic database pool should be low average utilization and short, infrequent high utilization. This utilization pattern is best for sharing eDTUs. If a database has high average utilization, then it will take most of the eDTUs. This means that the other databases won't get the required eDTUs and will have lower performance.
To estimate whether or not an elastic database pool would be more cost-effective than having individual databases, these steps can be followed:
- Find the estimated eDTU provision using the following formula:
MAX(<Total number of DBs X Average DTU utilization per DB>, Number of concurrently peaking DBs X Peak DTU utilization per DB)
Note:
For a vCore-based purchasing model instead, the formula is:
MAX(<Total number of DBs X average vCore utilization per DB>, <Number of concurrently peaking DBs X Peak vCore utilization per DB>)
- Find the estimated elastic database pool storage provision by adding the individual database storage. Find the eDTU that provides the estimated necessary storage using this link: https://azure.microsoft.com/pricing/details/sql-database/managed/.
- Using the link given in step 2, find the smallest eDTU that is greater than the largest eDTU from steps 1 and 2.
- Compare the costs of the elastic database pool and the individual databases to evaluate the pricing benefits.
- Estimated eDTU as per step 1:
Total Number of DBs= 4
Average DTU utilization per DB = 30
Number of concurrently peaking DBs = 1
Peak utilization per DB = 90
Estimated eDTUs as per Step 1 = MAX (4 * 30,1*90) => MAX (120, 90) =120
The estimated eDTU as per step 1 is 120.
- Estimate eDTU as per step 2.
Let's say that each shard has a maximum storage of 100 GB. This means that the maximum storage for all four shards would be 4 * 100 = 400 GB.
As per the pricing details link, the 100 eDTUs per elastic database pool satisfies the preceding storage need:

Figure 8.4: Elastic database pool pricing for the Standard service tier
Therefore, the estimated eDTU as per step 2 is 100.
The eDTU as per step 1 is 120 and as per step 2 is 100. Therefore, we can choose an eDTU of 100 because an eDTU of 120 is closer to an eDTU of 100 than the next available eDTU of 200.
Having four databases in an elastic database pool of 100 eDTU saves 62% on costs compared to having four individual SQL databases.
Creating an elastic database pool and adding toystore shards to the elastic database pool
In this section, we will create an elastic database pool and add toystore SQL Database shards to it. Let's go back to our example of ToyStore Ltd. Mike analyzes the report of DTUs and thinks of switching to the Standard service tier 3. Switching all four shards to the Standard service tier S3 will increase the database cost. Therefore, he plans to use an elastic database pool. He must create an elastic database pool and add the toystore shards to it by performing the following steps:
- Open a browser and log in to the Azure portal (https://portal.azure.com/) using your Microsoft Azure credentials.
- From the left-hand navigation menu, select All resources. Under All Resources, click the toyfactory SQL server to open the toyfactory Overview pane.
- In the toyfactory Overview pane, select New elastic pool from the top menu:

Figure 8.5: Creating a new elastic pool
- In the Create SQL Elastic pool pane, provide the elastic database pool name in the Elastic pool details section and set the pricing tier as Standard:

Figure 8.6: Providing details for creating the SQL Elastic pool
- Click Review + create and then click Create to create the elastic database pool. It'll take 2-5 minutes for the elastic database pool to be provisioned.
When the elastic database pool is provisioned, navigate to the All resources page in the Azure portal and type toyfactorypool in the search box. Click toyfactorypool to configure it:

Figure 8.7: Selecting toyfactorypool
- On the toyfactorypool page, select Configure:

Figure 8.8: Configuring toyfactorypool
The Configure pool page allows you to configure pool settings, add or remove databases, and configure per-database settings.
- To add databases to toyfactorypool, select the Databases tab on the Configure page.
On the Databases tab, click Add databases:

Figure 8.9: Adding databases to toyfactorypool
- On the Add databases page, select toystore_shard_1_50, toystore_50_100, toystore_100_150, and toystore_150_200:
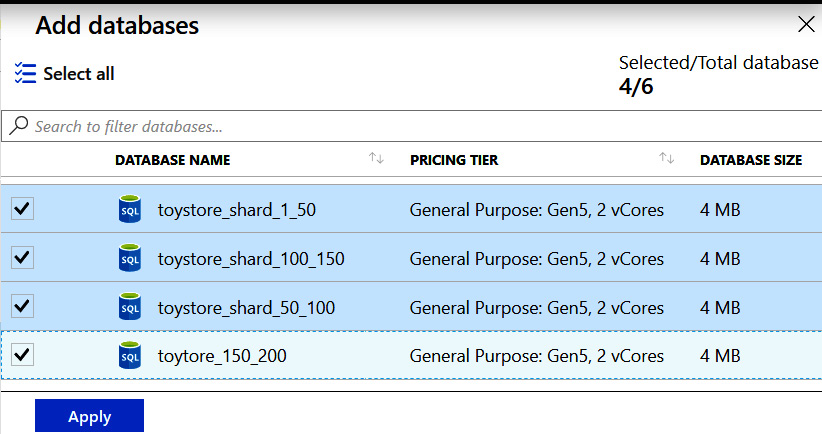
Figure 8.10: Adding databases
Click Apply to select the databases and go back to the Configure tab.
- On the Configure tab, click Save to add the databases:
Figure 8.11: Saving the added databases
In this exercise, we created an elastic database pool, toyfactorypool, and added SQL databases to the elastic database pool.
Before starting the next activity, we're briefly going to discuss some geo-replication and auto-failover group considerations for elastic database pools. Readers should refer to the next chapter, Chapter 9, High availability and disaster recovery, for an in-depth introduction to geo-replication and auto-failover groups.
Geo-replication considerations for elastic database pools
In active geo-replication, a secondary replica may or may not be a part of an elastic database pool. It's not mandatory for a secondary database to be in an elastic database pool if the primary database is part of an elastic database pool. Multiple secondary databases across different regions cannot be in the same elastic database pool, as an elastic database pool is limited to a single region.
Auto-failover group considerations for elastic database pools
In an auto-failover group, unlike geo-replication, the secondary replica inherits the elastic database pool settings from the primary replica. If a primary database is in an elastic database pool, the secondary database is created in an elastic database pool with the same name. We can add all or selected databases from an elastic database pool in the primary replica to an auto-failover group.
Now, let's explore elastic database pools a little further.
Activity: Exploring elastic database pools
Let's go back to our example of ToyStore Ltd. Mike finds out that the toystore sharded databases can be put into an elastic database pool to save costs and get the benefits of vertical stability. In order to do a proof of concept, he uses PowerShell to create an elastic database pool and add databases to that elastic database pool. He also writes a PowerShell script to delete the elastic database pool after he is done with the proof of concept.
In this activity, we will create a new elastic database pool, add databases to the elastic database pool, and delete the elastic database pool using PowerShell using the following steps:
Note
If you are short of time, you can execute the C:CodeChapter08ElasticPool Manage-ElasticPool.ps1 file, providing the appropriate parameters.
- Press Windows + R to open the Run command window. Type PowerShell_ISE.exe in the Run command window and hit Enter. This will open a new PowerShell ISE editor window. This is where you'll write the PowerShell commands:
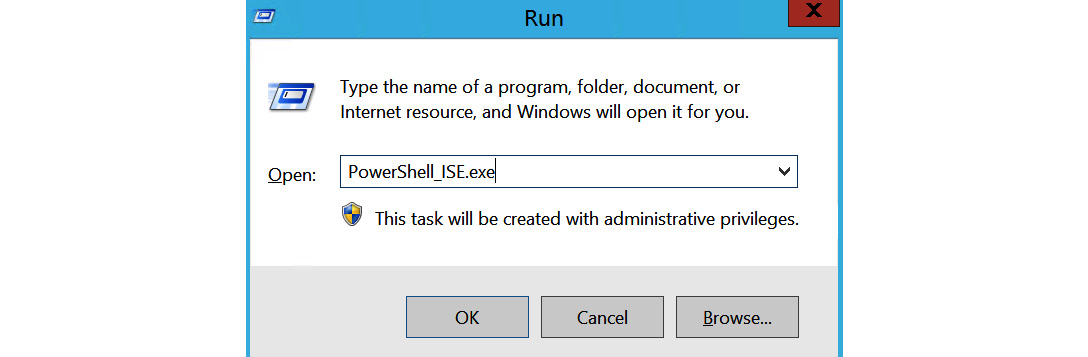
Figure 8.12: Executing PowerShell_ISE.exe
In the PowerShell ISE, select File from the top menu and click Save. Alternatively, you can press Ctrl + S to save the file. In the Save As dialog box, browse to the C: CodeChapter08 directory. In the File name textbox, type Manage-ElasticPool and click Save to save the file:

Figure 8.13: Saving the PowerShell file
- Copy and paste the following code snippets (from step 2 to step 6) into the Manage-ElasticPool.ps1 file, one after another. The code's explanation, wherever required, is given in the steps and in the comments within the code snippet.
Copy and paste the following code to define the script parameters:
param
(
[parameter(Mandatory=$true)] [String] $ResourceGroup,
[parameter(Mandatory=$true)] [String] $SqlServer,
[parameter(Mandatory=$true)] [String] $UserName,
[parameter(Mandatory=$true)] [String] $Password,
[parameter(Mandatory=$true)] [String] $ElasticPoolName,
[parameter(Mandatory=$false)] [String] $ElasticPoolEdition,
[parameter(Mandatory=$false)] [int] $eDTU,
[parameter(Mandatory=$false)] [int] $MaxeDTU,
[parameter(Mandatory=$false)] [int] $MineDTU=0,
[parameter(Mandatory=$false)]
[String] $AzureProfileFilePath,
[parameter(Mandatory=$false)]
# Create/Remove an elastic Pool [String] $Operation = "Create",
# Comma delimited list of databases to be added to the pool [parameter(Mandatory=$false)]
[String] $DatabasesToAdd
)
The parameter descriptions are as follows:
- ResourceGroup: The name of the resource group in which the elastic database pool will be created. It should be the same as that of the SQL server.
- SqlServer: The SQL server name in which the elastic database pool has to be created.
- UserName: The SQL Server database admin username.
- Password: The SQL Server database admin password.
- ElasticPoolName: The name of the elastic database pool to be created or deleted.
- eDTU: The elastic database pool eDTU.
- MaxeDTU: The maximum eDTUs available per database in the pool.
- MineDTU: The minimum eDTUs available per database in the pool.
- AzureProfileFilePath: The full path of the JSON file that has your Azure profile information.
- Operation: The operation to be performed. Accepts two values: Create and Remove.
- DatabasesToAdd: A comma-delimited list of the databases to be added to the elastic database pool.
- Copy and paste the following code to log in to Microsoft Azure and set the Azure context to your subscription:
# log the execution of the script
Start-Transcript -Path ".LogManage-ElasticPool.txt" -Append
# Set AzureProfileFilePath relative to the script directory if it's not
provided as parameter
if([string]::IsNullOrEmpty($AzureProfileFilePath))
{
$AzureProfileFilePath="....MyAzureProfile.json"
}
#Login to Azure Account
if((Test-Path -Path $AzureProfileFilePath))
{
$profile = Select-AzProfile -Path $AzureProfileFilePath
$SubscriptionID = $profile.Context.Subscription.SubscriptionId
}
else
{
Write-Host "File Not Found $AzureProfileFilePath"
-ForegroundColor Red
# Provide your Azure Credentials in the login dialog box
$profile = Login-AzAccount
$SubscriptionID =
$profile.Context.Subscription.SubscriptionId
}
#Set the Azure Context
Set-AzContext -SubscriptionId $SubscriptionID | Out-Null
The preceding code starts by logging in to the Manage-ElasticPool.txt file created in the Log directory within the parent directory of the Manage-ElasticPool.ps1 script.
It then checks for the profile information in the json file provided by the AzureProfileFilePath variable. If found, then it sets the PowerShell context to the subscription ID, as specified in the profile file. Otherwise, it asks the user to manually log in to the Azure account to set the context.
- Create the elastic database pool using the following script, if it doesn't already exist:
#Check if the pool exists
Get-AzSqlElasticPool -ElasticPoolName $ElasticPoolName
-ServerName $SqlServer -ResourceGroupName $ResourceGroup
-ErrorVariable notexists -ErrorAction SilentlyContinue
if($Operation -eq "Create")
{
if([string]::IsNullOrEmpty($ElasticPoolEdition))
{
Write-Host "Please provide a valid value for Elastic Pool Edition (Basic/Standard/Premium)" -ForegroundColor yellow
Write-Host "Exiting...." -ForegroundColor Yellow break;
}
Write-Host "Creating elastic pool $ElasticPoolName "
-ForegroundColor Green
# Create elastic pool if it doesn't exists if($notexists)
{
$CreateElasticPool = @{
ElasticPoolName = $ElasticPoolName; Edition = $ElasticPoolEdition; Dtu = $eDTU; DatabaseDtuMin = $MineDTU; DatabaseDtuMax = $MaxeDTU; ServerName = $SqlServer;
ResourceGroupName = $ResourceGroup;
};
New-AzSqlElasticPool @CreateElasticPool;
}
else
{
Write-Host "Elastic pool $ElasticPoolName already exists!!!"
-ForegroundColor Green
}
if([string]::IsNullOrEmpty($DatabasesToAdd) -and $Operation -eq "Create")
{
Write-Host "Please provide a valid value for DatabasesToAdd parameter" -ForegroundColor yellow
Write-Host "Exiting...." -ForegroundColor Yellow break;
}}
The preceding code uses the Get-AzSqlElasticPool cmdlet to get the details of the given elastic database pool name. If the elastic database pool with the specified name is found in the given resource group, it succeeds; otherwise, it returns an error: "Get-AzSqlElasticPool ResourceNotFound: The Resource 'Microsoft.Sql/ servers/ toyfactory/elasticpools/adasdas' under resource group 'toystore' was not found".
The error is recorded in the notexists variable specified in the ErrorVariable parameter.
The code then uses New-AzSqlElasticPool to create the elastic database pool if the specified operation is Create (the $operation parameter) and the $notexists variable isn't empty.
- Copy and paste the following code to add the databases to the elastic database pool:
# Add databases to the pool if([string]::IsNullOrEmpty($DatabasesToAdd)
-and $Operation -eq "Create")
{
Write-Host "Please provide a valid value for DatabasesToAdd parameter"
-ForegroundColor yellow
Write-Host "Exiting...." -ForegroundColor Yellow break;
}
$Databases = $DatabasesToAdd.Split(',');
foreach($db in $Databases)
{
Write-Host "Adding database $db to elastic pool $ElasticPoolName "
-ForegroundColor Green
Set-AzSqlDatabase -ResourceGroupName $ResourceGroup
-ServerName $SqlServer -DatabaseName $db -ElasticPoolName
$ElasticPoolName
}
}
The preceding code splits the comma-delimited values, as specified in $DatabasesToAdd. It adds the separate string values (database names) into an array variable database. It then iterates through each of the databases in the array and sets the elastic database pool using the Set-AzSqlDatabase cmdlet.
- Copy and paste the following code to remove or delete an existing elastic database pool:
#remove an elastic pool
if($Operation -eq "Remove")
{
#Get all databases in the elastic pool
$epdbs = Get-AzSqlElasticPoolDatabase -ElasticPoolName
$ElasticPoolName -ServerName $SqlServer -ResourceGroupName
$ResourceGroup
# iterate through the databases and take them out of the pool. foreach($item in $epdbs)
{
$db = $item.DatabaseName;
#Take database out of pool
Write-Host "Taking database $db out of elastic pool $ElasticPoolName "
-ForegroundColor Green
$RemoveDbsFromPool = @{ ResourceGroupName = $ResourceGroup; ServerName = $SqlServer; DatabaseName = $db;
Edition = 'Basic'; RequestedServiceObjectiveName = 'Basic';
};
Set-AzSqlDatabase @RemoveDbsFromPool;
}
#Remove elastic pool
Write-Host "Removing Elastic Pool $ElasticPoolName "
-ForegroundColor Green
$RemovePool = @{
ResourceGroupName = $ResourceGroup; ServerName = $SqlServer; ElasticPoolName = $ElasticPoolName;
};
Remove-AzSqlElasticPool @RemovePool -Force;
}
The preceding code only works when the $operation parameter is set to Remove. An elastic database pool can't be removed or deleted if it has databases assigned to it. First, the code gets all the databases in an elastic database pool using the Get-AzSqlElasticPoolDatabase cmdlet.
It then iterates through each database and takes them out of the elastic database pool using Set-AzSqlDatabase. It then removes the elastic database pool using the Remove-AzSqlElasticPool cmdlet.
This completes the script. Click Save from the File menu or press Ctrl + S to save the script. We'll now look at executing the PowerShell script we've just created:
- Press the Windows + R keys to open the Run command window. Type PowerShell and hit Enter to open a new PowerShell console window.
Change the directory to the folder that has the Manage-ElasticPool.ps1 script in it. For example, if the script is in the C:CodeChapter08 directory, then run the following command to switch to this directory:
cd C:CodeChapter08
- To delete an existing elastic database pool, execute the following command. You will have to change the parameter values as per your environment:
.Manage-ElasticPool.ps1 -ResourceGroup toystore
-SqlServer toyfactory -UserName sqladmin -Password Packt@
pub2 -ElasticPoolName toyfactorypool -Operation Remove
-AzureProfileFilePath C:CodeMyAzureProfile. Json
Note
If you created toyfactorypool earlier in the chapter, then run this command to delete the elastic database pool. If you don't have an existing elastic database pool, then proceed to the next step, which is creating an elastic database pool. If you have an existing pool and you don't want to remove it, then you will have to create an elastic database pool and a separate set of databases for it.
- To create a new elastic database pool and add databases to it, execute the following command. You will have to change the parameter values as per your environment:
.Manage-ElasticPool.ps1 -ResourceGroup toystore -SqlServer toyfactory
-UserName sqladmin -Password Packt@pub2
-ElasticPoolName toyfactorypool -ElasticPoolEdition Standard
-eDTU 100 -MaxeDTU 100 -MineDTU 10 -AzureProfileFilePath C:Code MyAzureProfile.json -Operation Create -DatabasesToAdd "toystore_ Shard_1_50,toystore_Shard_50_100,toystore_Shard_100_150,toystore_ Shard_150_200"
The preceding command will create toyfactoryelasticpool with 100 eDTUs and the databases specified by the DatabasesToAdd parameter.
In this activity, we created and executed a PowerShell script to create an elastic database pool and add databases to the elastic database pool. As an elastic database pool consists of multiple databases, there may be a scenario or a requirement to execute T-SQL scripts across all databases in an elastic database pool. This is done using elastic database jobs. Let's now learn about and implement elastic database jobs in the next section.
Elastic database jobs
Elastic database jobs or Azure-hosted elastic database jobs can be used to schedule a T-SQL task such as index maintenance against an SQL database, a group of SQL Database elastic database pools or an SQL Database shard, all databases in an elastic database pool, a shard map, or a server across different Azure subscriptions.
An elastic database job can span multiple databases in the same subscription or in different subscriptions.
Figure 8.14 illustrates the different components of an elastic database job:
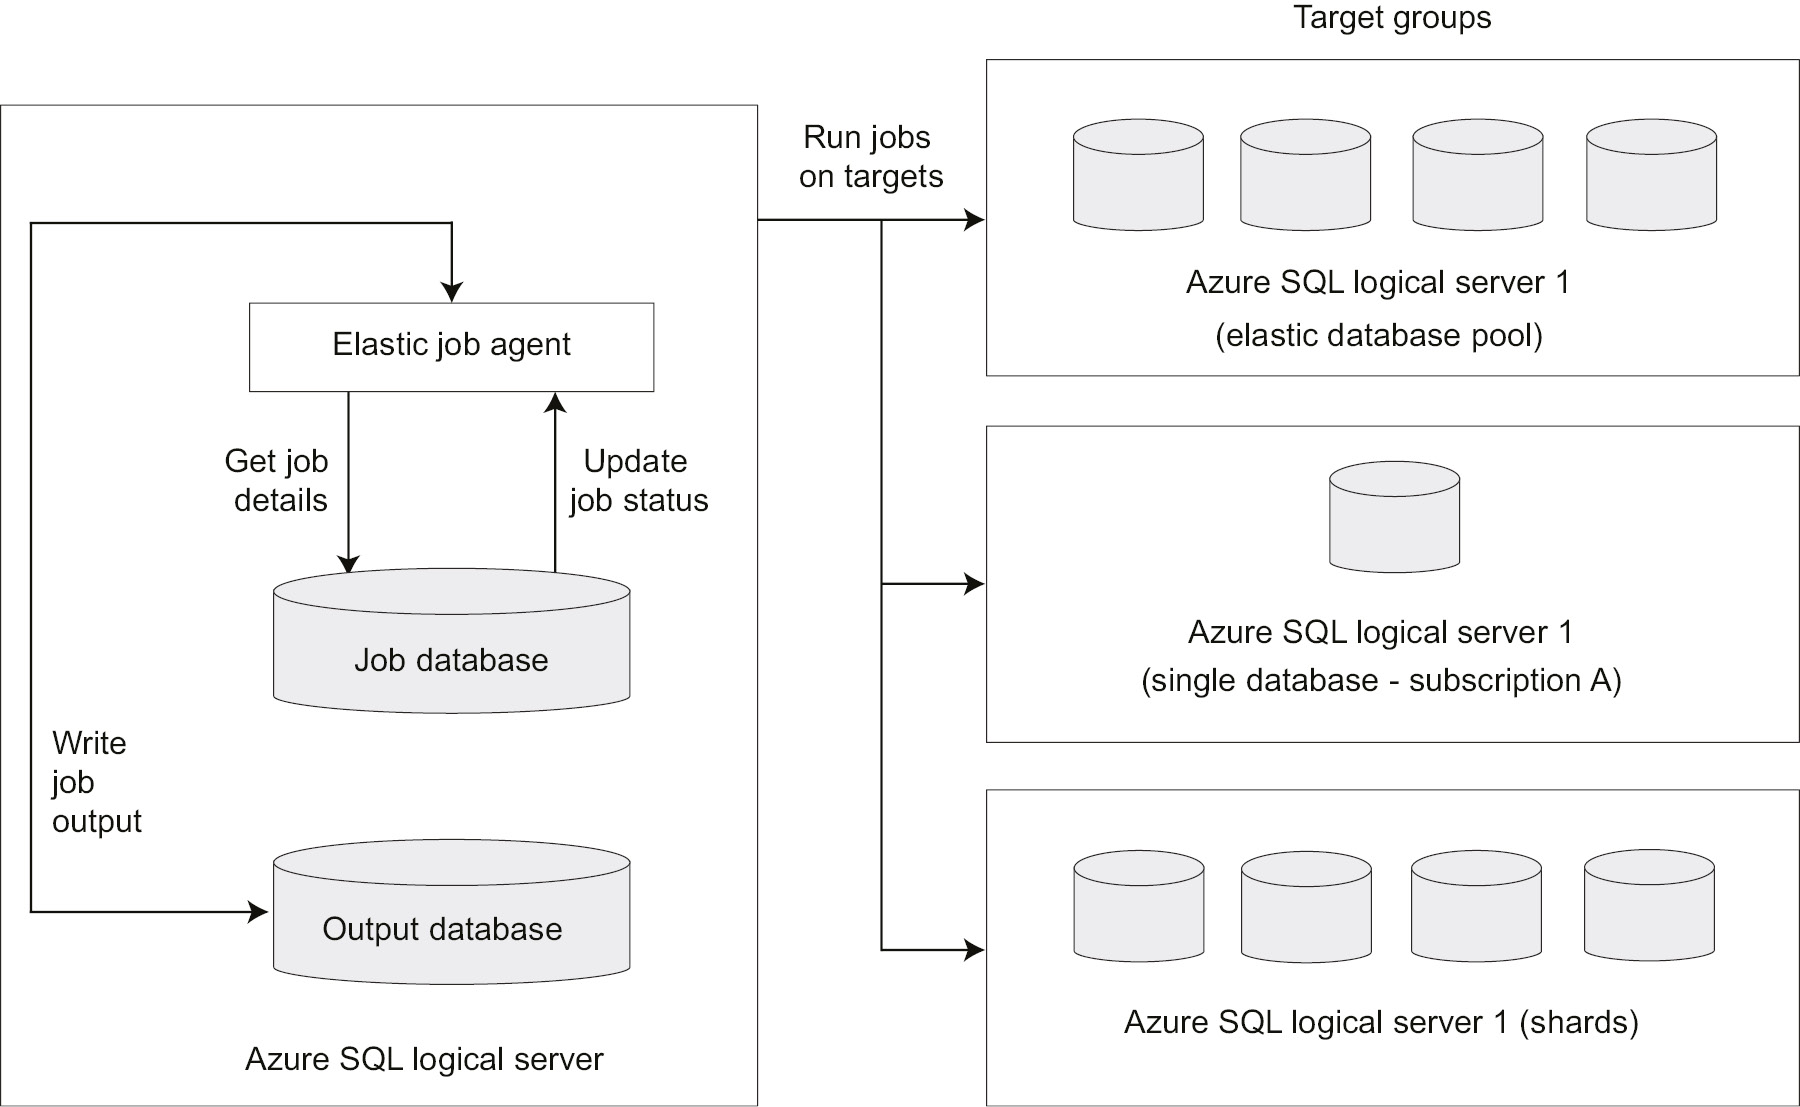
Figure 8.14: Different components of an elastic database job
Let's discuss some of the components in the diagram.
Elastic job agent
An elastic job agent is an Azure resource that's responsible for creating, executing, and managing jobs.
Job database
An existing clean (blank) SQL database of the Standard (S0) or a higher-performance tier is used to store the job definitions, job status, elastic job agent metadata, and stored procedures to create and manage elastic database jobs using T-SQL.
The database job performance tier can be increased based on the number of jobs scheduled and the frequency of the job scheduler; however, a minimum of the General Purpose or S1 pricing tier is recommended.
Target group
A target group defines one or more SQL databases that a job is executed on. A target group can be:
- A single SQL database.
- An Azure SQL logical server. All databases in the server at the time of job creation are considered for job execution.
- An elastic database pool. All databases in an elastic database pool at the time of job creation are considered for job execution.
- A shardmap. All databases in a shardmap.
Note
Particular databases can be included or excluded individually when defining an SQL logical server or an elastic database pool as the target group.
Jobs
A job is a task that can either be scheduled or executed on demand against one or more target groups. A job can have one or more job steps. A job step requires a T-SQL script to be executed and the credentials to connect to the database(s) defined by the target group. The job output can optionally be stored in a specified output database (an SQL Database) in detail.
The job database stores the job execution history in detail. The job history is purged every 45 days by a system clean-up job. The job history can be manually purged using the sp_purge_history stored procedure against the job database. The elastic database jobs preview is limited to 100 concurrent jobs at any given time.
Use cases
Elastic database jobs are commonly used for:
- Database management and maintenance: Elastic database jobs can be used for deploying schema changes across multiple shards by running database maintenance jobs, such as index rebuilds, collecting database performance data, and updating reference data in a shard set.
- Reporting: Elastic database jobs can be used to aggregate data from a shard set and into a single reporting table. The reporting table can then be fed to Power BI, SSRS, or any of the reporting or visualization tools for creating reports.
Normally, you would have to connect to each shard in a shard set to run the report query and insert the data into a single reporting table. Elastic database jobs make it easier to do this, wherein you only have to schedule the T-SQL and it is automatically executed on the shards.
Exercise: Configuring an elastic database job using T-SQL
In this exercise, we'll talk about configuring an elastic database job using T-SQL. An elastic database job can also be configured using PowerShell. When configuring elastic database jobs using T-SQL, the elastic database job agent needs to be provisioned either using PowerShell or the Azure portal.
Follow these steps to create an elastic database job:
- Provision a blank SQL database to be used as the job database by executing the following script in a PowerShell console window:
C:CodeChapter01Provision-AzureSQLDatabase.ps1 -ResourceGroup Packt
-Location "East US 2" -SQLServer packtdbserver
-SQLDatabase jobdatabase -Edition Standard -UserName dbadmin -Password Awesome@1234 -ServiceObjective S0
The preceding command creates a Standard S0 blank SQL database, jobdatabase, to be used for the elastic database job.
You may have to change the database name as you may get an error if jobdatabase already exists in Microsoft Azure.
- We now need to create an Elastic Job agent.
Log in to the Azure portal and search for Elastic job agent:

Figure 8.15: Creating an Elastic Job agent
On the Elastic Job agents page, click Add:

Figure 8.16: Adding a new Elastic Job agent
In the Elastic Job agent window, provide the elastic job agent name, accept the preview terms, and select the jobdatabase instance provisioned in step 1 as the elastic job agent database.
- Click the Create button to provision the elastic job agent:

Figure 8.17: Provisioning the Elastic Job agent
- Once an elastic job agent is provisioned, it'll be listed on the Elastic Job agents page:
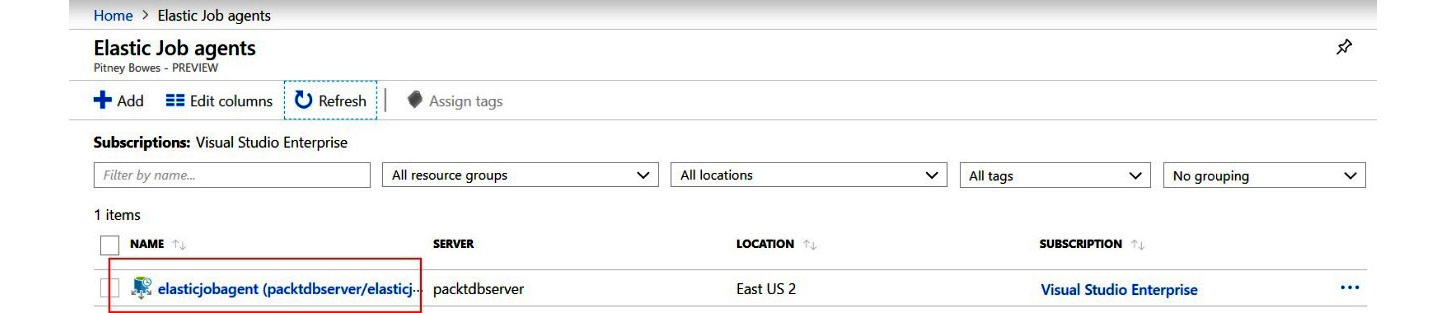
Figure 8.18: The Elastic Job agents page
Note
As the feature is still in preview, you may not see the elastic job agent listed here. For details, please visit https://social.msdn.microsoft.com/Forums/69043053-5de3-40da-8e81-cbfa0ac8363a/elastic-job-agent-exists-but-not-showing-in-azure-portal?forum=ssdsgetstarted.
- The next step is to create the credentials for the job to connect to the target database and execute the T-SQL queries. To create credentials for the job, follow these steps.
Create a database-scoped credential in jobdatabase to connect to the target master database:
CREATE MASTER KEY ENCRYPTION BY PASSWORD = 'Very$trongpass123';
GO
CREATE DATABASE SCOPED CREDENTIAL jobmastercred
WITH IDENTITY = 'masteruser' , SECRET = 'myPassword@123'
Create a database-scoped credential for jobdatabase to connect to the individual target database in a given target group:
CREATE DATABASE SCOPED CREDENTIAL jobusercred
WITH IDENTITY = 'jobuser', SECRET = 'myPassword@123'
Create a login in the target master database with the same identity and password as that of the jobmastercred credential in the job database:
CREATE LOGIN masteruser WITH PASSWORD='myPassword@123'
Create a user in the target master database for the masteruser login created previously:
CREATE USER masteruser FROM LOGIN masteruser
Create a login in the target master database with the same identity as the jobusercred credentials in the job database:
CREATE LOGIN jobuser WITH PASSWORD='myPassword@123'
Create a user in the target user database for the jobcred login. Grant the user relevant permission to run the T-SQL script, which is to be run as part of the elastic database job:
--Execute against toystore (or user) database.
CREATE USER jobuser FROM LOGIN jobuser
GO
GRANT ALTER ON SCHEMA::dbo to jobuser
GO
GRANT CREATE TABLE TO jobuser
The preceding scripts create a jobuser user for the jobuser login and grant the user permission to create tables against the toystore database.
- The next step is to add the target group. To add an SQL logical server as a target group, execute the following scripts in jobdatabase (the elastic job agent database).
Add a target group:
EXEC jobs.sp_add_target_group 'packtdbserver'
GO
Add a server target member:
EXEC jobs.sp_add_target_group_member 'packtdbserver'
,@target_type = 'SqlServer'
,@refresh_credential_name = 'jobmastercred'
,@server_name = 'packtdbserver.database.windows.net'
referesh_credential_name is the name of the credential created in jobdatabase to connect to the target group master database to refresh the list of databases in the target group SQL logical server.
packtdbserver also contains jobdatabase. However, we would not like the job to run against jobdatabase. To exclude jobdatabase from the target group, execute the following:
EXEC [jobs].sp_add_target_group_member @target_group_name = N'packtdbserver'
,@membership_type = N'Exclude'
,@target_type = N'SqlDatabase'
,@server_name = N'packtdbserver.database.windows.net'
,@database_name = N'jobdatabase'
GO
The membership_type value Exclude tells the job that the given database is to be excluded from the job execution.
To see the existing target group and target group members, run the following query:
SELECT *
FROM jobs.target_groups
WHERE target_group_name = 'packtdbserver';
SELECT target_group_name,membership_type,target_type,refresh_credential_ name,server_name,database_name
FROM jobs.target_group_members
WHERE target_group_name = 'packtdbserver';
You should get an output similar to this:

Figure 8.19: Existing target group and target group members
The jobdatabase SQL database is excluded from the target group members.
- The next step is to create an elastic database job that creates a customer table on the target members.
To create a job, execute the following:
EXEC jobs.sp_add_job @job_name = 'CreateCustomerTable'
,@description = 'Create new customer table'
--The query creates a job name, CreateCustomerTable. Let's now add a ---job step to create the customer table.
EXEC jobs.sp_add_jobstep @job_name = 'CreateCustomerTable'
,@step_name = 'CreateTable'
,@command = N'IF OBJECT_ID(''Customer'') IS NULL
CREATE TABLE [dbo].[Customer] (ID int identity(1,1),FirstName NVARCHAR(100),LastName NVARCHAR(100))'
,@credential_name = 'jobusercred'
,@target_group_name = 'packtdbserver'
The query adds a CreateTable job step to the CreateCustomerTable job. The command parameter specifies the T-SQL to create the customer table. The T-SQL first checks that a customer table exists; if not, it creates a new one. The T-SQL query will therefore not error out if a customer table already exists in any of the user databases in the target group.
Observe that the jobusercred credential, mapped to jobuser, is used to run the job.
- The next step is to execute and schedule the job. Run the following query to execute the job on demand:
Note
Step 8 and step 9 should be executed as a single code block.
DECLARE @jeid UNIQUEIDENTIFIER
,@lifecycle VARCHAR(100) = 'Created'
-- start job execution
EXEC jobs.sp_start_job 'CreateCustomerTable'
,@job_execution_id = @jeid OUTPUT
SELECT @jeid
- Get the job execution status:
SELECT *
FROM jobs.job_executions
WHERE job_execution_id = @jeid
/*
Make sure Allow access to Azure services firewall rule is On
*/
WHILE (@lifecycle != 'Succeeded') BEGIN
SELECT *
FROM jobs.job_executions
WHERE job_execution_id = @jeid
-- check job status until it succeeds SELECT @lifecycle = lifecycle
FROM jobs.job_executions
WHERE job_execution_id = @jeid ORDER BY start_time DESC
WAITFOR DELAY '00:00:02'
END
The jobs.sp_start_job procedure is used to start an ad hoc run of a job. When a job starts, a unique job execution ID is assigned for that particular job run.
The job status is saved in the jobs.job_execution table. The while loop gets the job status until it succeeds. You should get the following output:
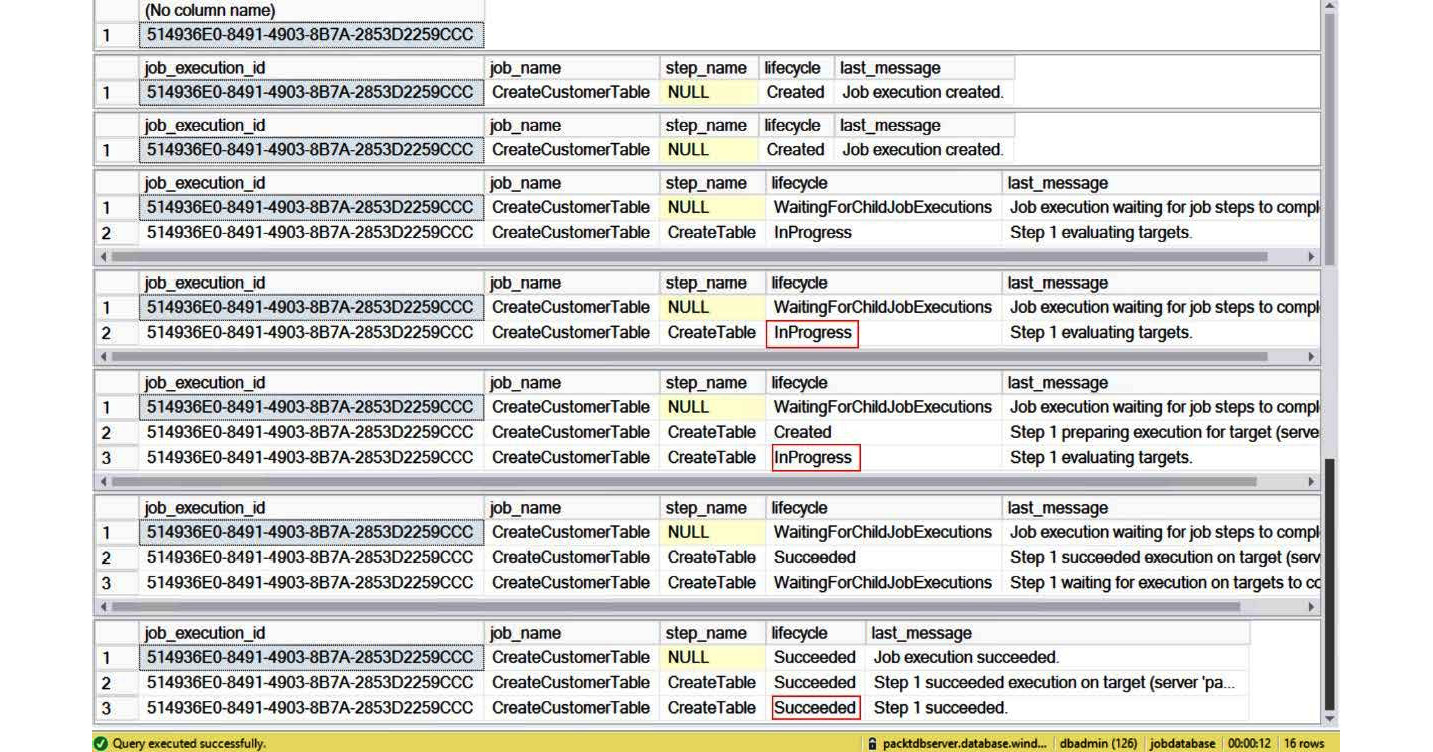
Figure 8.20: Job execution status
Figure 8.20 shows the job status at different stages of the job execution. The next step is to schedule the job.
- Schedule the job by executing the following query:
EXEC jobs.sp_update_job @job_name = 'CreateCustomerTable'
,@enabled = 1
,@schedule_interval_type = 'Minutes'
,@schedule_interval_count = 15
- The query uses the sp_update_job stored procedure to schedule the job to run every 15 minutes. To get the job details, execute the following queries.
Get the job and job step details:
SELECT job_name,enabled,schedule_interval_type,schedule_interval_count FROM jobs.jobs
WHERE job_name = 'CreateCustomerTable';
GO
SELECT js.job_name,js.step_name,js.command_type,js.command,js.credential_
name,js.target_group_name FROM jobs.jobsteps js
JOIN jobs.jobs j ON j.job_id = js.job_id
AND j.job_version = js.job_version
GO

Figure 8.21: Job and job step details
You can also monitor the jobs from the Azure portal. Log in to the portal and open the elasticjobagent page:

Figure 8.22: Monitoring latest 100 job executions
The Overview section lists the last 100 job executions. You can also check the Credentials, Target groups, and Jobs sections. However, the Azure portal doesn't allow the editing of any of the job objects.
Elastic database jobs provide similar functionality for SQL Database as SQL Server Agent does for the on-premises SQL Server.
Elastic database jobs are optimized and designed for SQL databases. Elastic databases, therefore, support the running of T-SQL queries against databases in the specified target group.
The other job types supported by SQL Server Agent, such as PowerShell, WMI, batch file, Integration Services, and Analysis Services, are not supported by elastic database jobs. This goes along with the PaaS model of SQL Database, wherein customers don't manage the underlying infrastructure.
SQL Server Agent, on the other hand, is designed to run on-premises and can therefore be used for job types other than T-SQL. An example is to schedule a PowerShell script to automate database backups of the on-premises databases. This, however, isn't required in SQL Database as the backups are automated.
SQL Server Agent doesn't support a target group. An SQL Server Agent job step can be run against only one database. The T-SQL script scheduled can, however, access other databases in the instance. Elastic database jobs can dynamically enumerate through databases in a server or a pool at runtime and run scripts against them. This particularly helps SaaS customers where databases are added/deleted at various times. Elastic jobs can span databases or pools across servers and subscriptions.
Elastic database jobs make it easy to schedule jobs such as schema deployment or database maintenance. For example, to run index maintenance on two or more databases, schedule an elastic database job with the index maintenance T-SQL script to run against the target group. The elastic database job runs the job asynchronously against the specified target databases. However, when scheduling the index maintenance job with SQL Server Agent, the database iteration logic is to be written as part of the script itself. SQL Server Agent doesn't support the target group concept.
Introducing instance pools in SQL Managed Instance
Instance pools in SQL Managed Instance is a new deployment option and it's currently in the public preview phase. Instance pools allow you to run small compute managed instances in a pre-provisioned compute pool. This is a more cost-effective and convenient way of migrating small SQL Server instances to a managed instance.
Instance pools allow you to provision 2 vCore instances inside a pre-provisioned pool. If you have provisioned an 8 vCore instance pool, you can deploy four 2 vCore SQL managed instances in that pool. Prior to instance pools being available, smaller instance databases needed to be consolidated during migration to the cloud, which required careful capacity planning, resource governance, and security considerations.
Figure 8.23 shows a high-level overview of an instance pool and a managed instance deployed within a virtual network subnet:
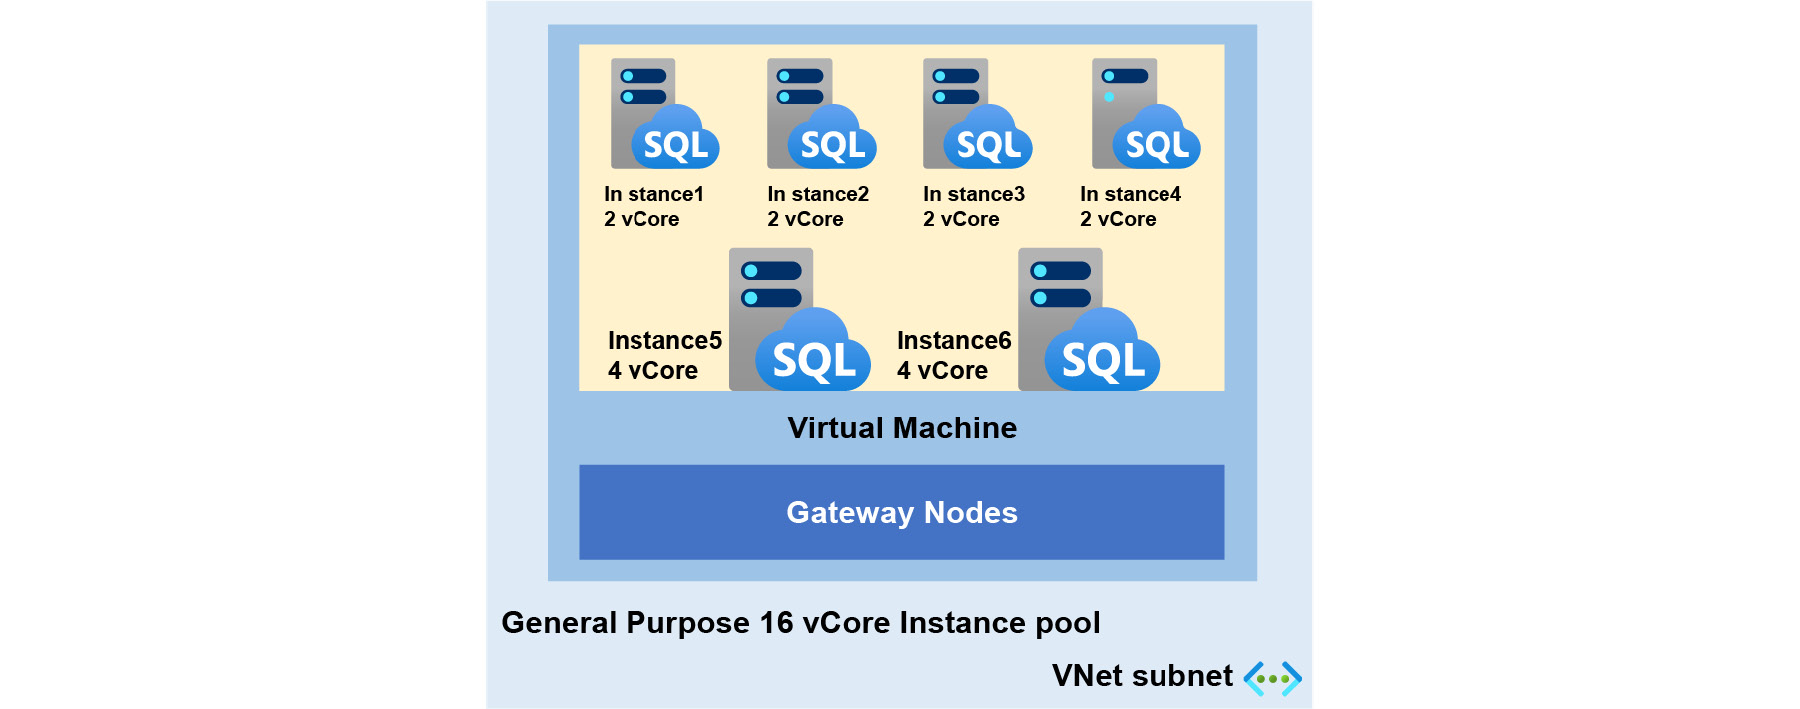
Figure 8.23: High-level overview of an instance pool
Figure 8.23 shows a 16 vCore pre-provisioned instance pool that comprises four 2 vCore instances and two 4 vCore instances that are deployed in the same virtual machine, subnet, and virtual cluster.
Key differences between an instance pool and a single managed instance
Instance pools provide a lot of flexibility in deploying managed instances. Instances can be deployed with independent compute and storage layers.
The following are some of the key differences between an instance pool and a single SQL managed instance:
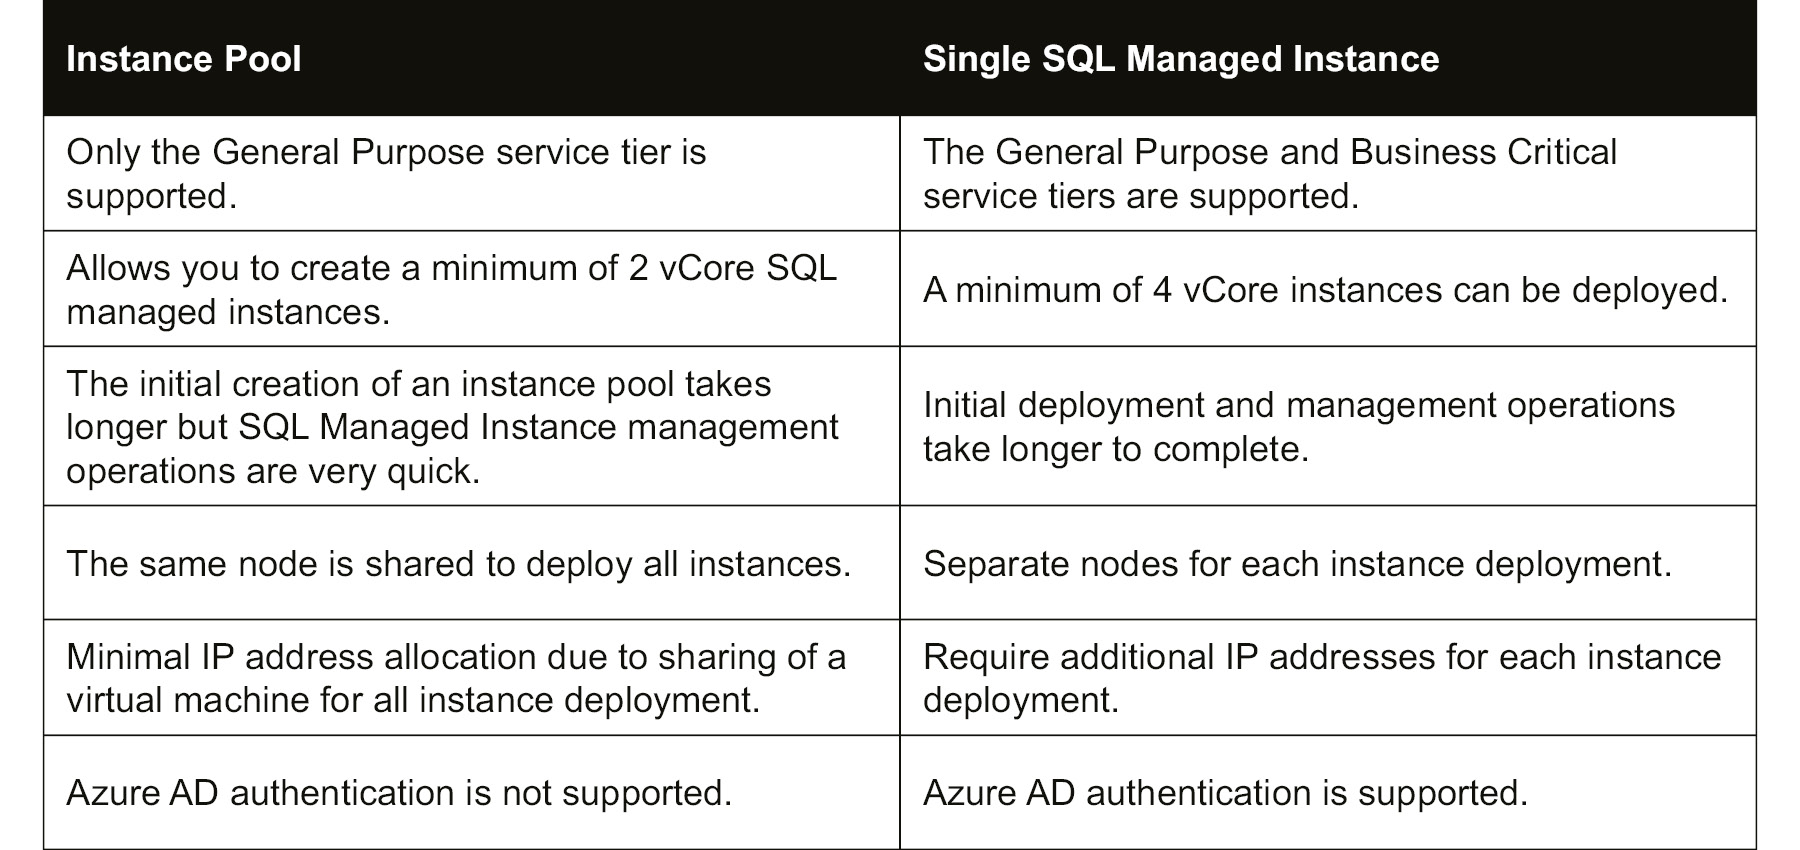
Table 8.1: Differences between an instance pool and a single SQL managed instance
As we saw in Table 8.1, all the managed instances are deployed in the same virtual machine node. This node was pre-provisioned with a specified vCore capacity during instance pool creation. After the initial pool deployment, management operations (instance creation and vCore scaling) on instances are much faster than a single SQL managed instance. Since all the instances are deployed in the same virtual machine, an instance pool requires less IP address allocation compared to a single instance.
Architecture differences between an instance pool and a single SQL managed instance
Instance pool architecture is similar to that of a single SQL managed instance. The main difference between the two deployment models is that an instance pool allows you to create multiple instances on the same virtual machine node, which are resources governed by Windows job objects. Job objects allow groups of multiple processes to be managed as a unit, while single managed instances always run in a separate virtual machine node:
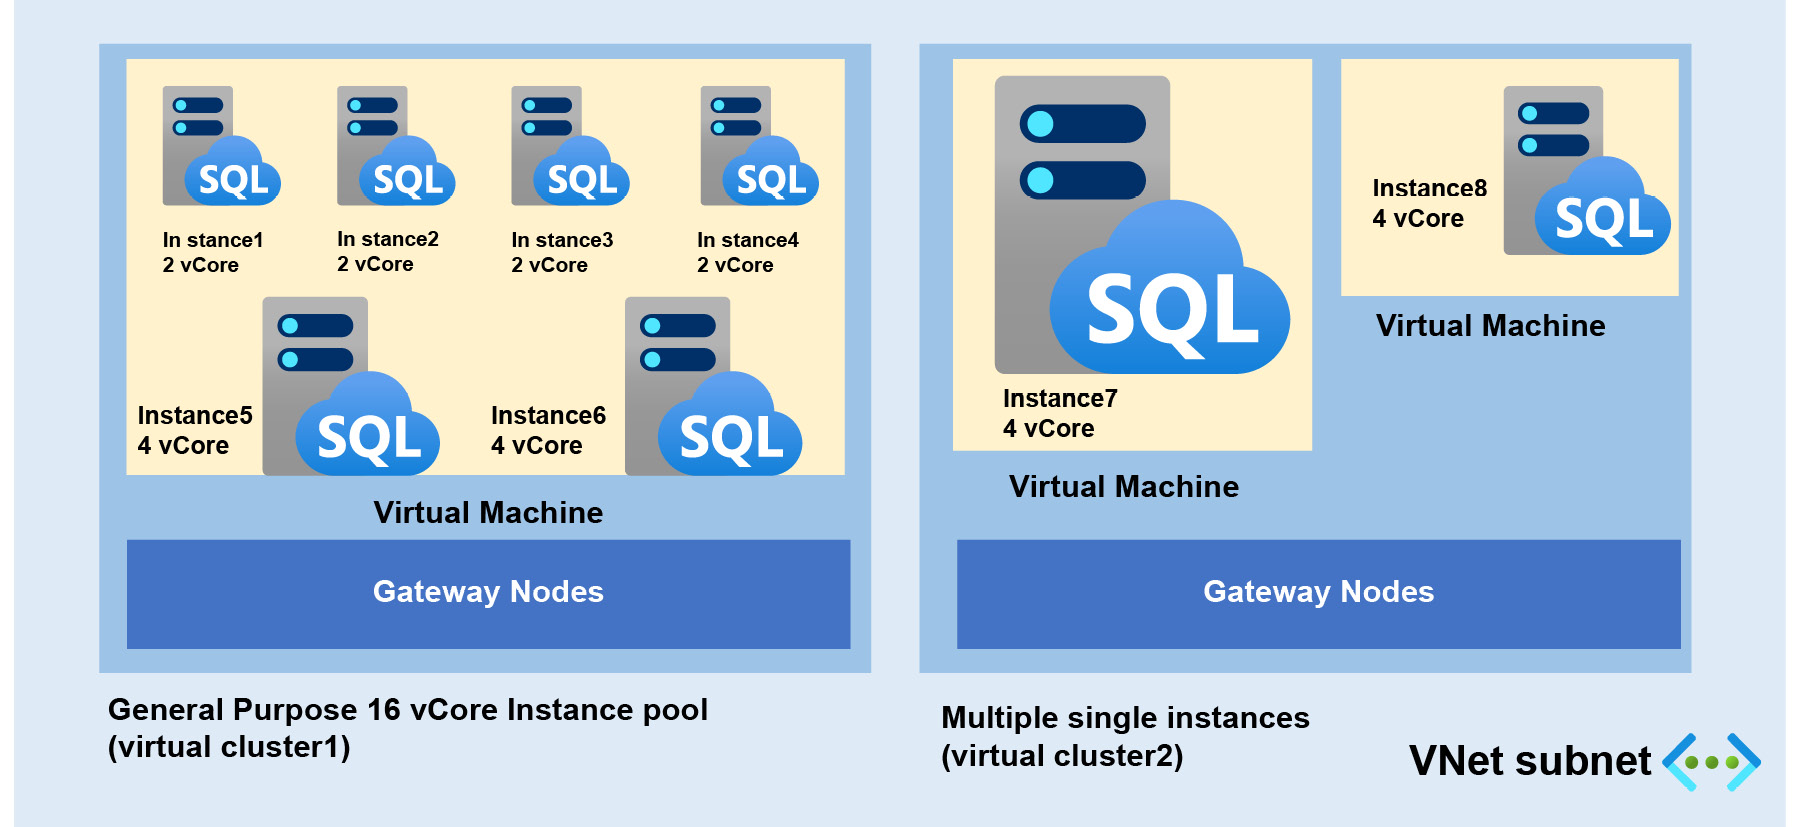
Figure 8.24: Architecture of instance pools versus a single instance
Resource limits
Instance pools have the following resource limitations:
- Instance pools support 8, 16, 24, 32, 40, 64, and 80 vCores.
- Managed instances inside pools support 2, 4, 8, 16, 24, 32, 40, 64, and 80 vCores.
- Managed instances inside pools support storage sizes between 32 GB and 8 TB, except:
- 2 vCore instances support sizes between 32 GB and 640 GB.
- 4 vCore instances support sizes between 32 GB and 2 TB.
- All instances in instance pools follow all the limitations that apply to a single SQL managed instance.
- You can have up to 500 user databases per instance pool. However, this limit depends on the pool vCore value:
- 8 vCore pool supports up to 200 databases
- 16 vCore pool supports up to 400 databases
- 24 vCore pool and larger supports up to 500 databases
- Managed instances inside pools have a limit of up to 100 user databases per instance, except 2 vCore instances, which support up to 50 user databases per instance.
- The total storage for instance pools can be increased to up to 8 TB.
Public preview limitations
Instance pools are a newly added deployment option for SQL Managed Instance in the SQL family and have the following limitations during the preview period:
- Instance pools are only available in the General Purpose service tier.
- You cannot resize instance pools, so be careful when selecting the vCore capacity.
- You cannot move a single managed instance into a pool and you cannot move instances out of a pool.
- Instance pools have limited Azure portal support and most operations are managed by PowerShell commands.
- Azure AD authentication is not supported.
Microsoft might remove some of the limitations once they announce the instance pools offering for General Availability.
Performance and security considerations for instance pools
Managed instances are deployed in the same virtual machine inside an instance pool, and you need to consider the following performance and security considerations:
- Instances are deployed with dedicated vCPU and RAM, but all instances have a shared local disk for the tempdb database and network resources, so there could be a chance of facing a noisy neighbor situation.
- You might have to consider disabling certain features that might have higher security risks such as CLR, native backup/restore, and database mail.
In the event of performance challenges with instance pools, consider deploying the instances to a bigger pool, or move to a single managed instance.
Deploying an instance pool using PowerShell commands
In this activity, we will learn how to deploy an instance pool for ToyStore Ltd. This instance pool deployment is used to manage low-compute managed instances. Since there is no Azure portal support for instance pools during the public preview phase, we will deploy these resources using PowerShell cmdlets.
You will learn how to deploy an instance pool with 8 vCore capacity with a new virtual network and subnet configuration. Follow these steps to perform this activity.
Before deploying an instance pool, first, we need to prepare a virtual network and subnet. If you are deploying an instance pool in an existing SQL Managed Instance subnet, then this step can be skipped:
- Prepare a virtual network for the instance pool.
To set up a new virtual network, you might need help from network admins in your organization. Alternatively, you can use an in-built ARM template to create a virtual network resource with all the pre-requisites needed to deploy a managed instance or instance pool. Please visit the following link to read more about ARM template deployment and see the steps to create a virtual network using an ARM template: https://docs.microsoft.com/azure/azure-sql/managed-instance/virtual-network-subnet-create-arm-template.
When you visit the preceding link, it will redirect you to the Azure portal and you will see the following template deployment screen:
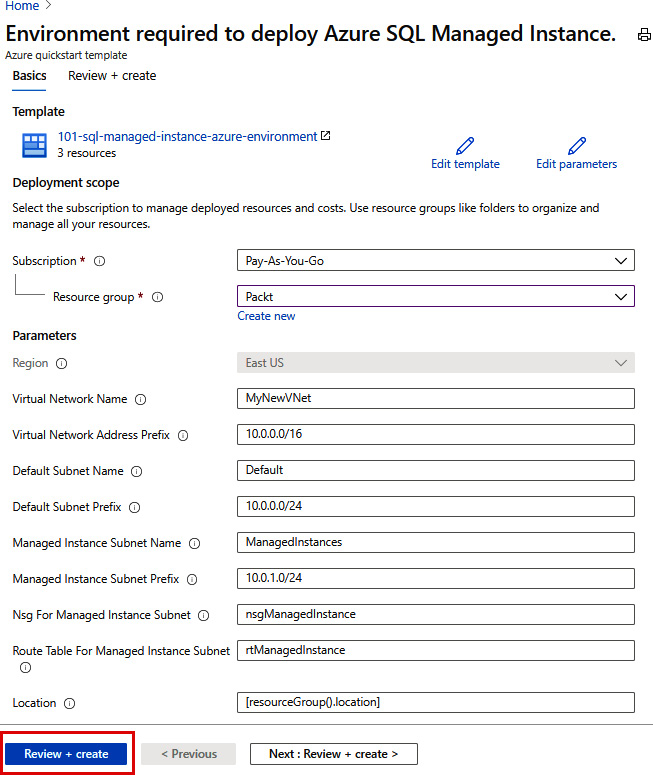
Figure 8.25: Creating a new virtual network using an ARM template
In Figure 8.25, most of the details are pre-populated and you need to just select the subscription and enter the resource group name. These details can be modified as per your environment. Click Review + create after completing the form.
This ARM template will deploy a virtual network with two subnets. One subnet, called ManagedInstances, is reserved for managed instance and instance pool deployment and has a pre-configured route table and network security group. The other subnet, with the name Default, is used to deploy other resources (such as a virtual machine).
- With the virtual network ready, let's deploy the instance pool using PowerShell commands. Open SQLMI_InstancePoolDeployment.ps1 from the Chapter08 source code and read through the PowerShell statements.
- Set up the script parameters by running the following PowerShell commands:
##Instance pool deployment script
##Setting up parameters
param(
[Parameter(Mandatory=$true)]
[string]$resourceGroup,
[Parameter(Mandatory=$true)]
[string]$subscription,
[Parameter(Mandatory=$true)]
[string]$instancePoolName,
[Parameter(Mandatory=$true)]
[string]$vnetName,
[Parameter(Mandatory=$true)]
[string]$subnetName,
[Parameter(Mandatory=$true)]
[string]$LicenseType,
[Parameter(Mandatory=$true)]
[string]$Edition,
[Parameter(Mandatory=$true)]
[string]$ComputeGeneration,
[Parameter(Mandatory=$true)]
[string]$Location
)
- Log in to your Azure account:
Write-Host "Login to Azure account" -ForegroundColor Green
##Login to Azure
#Set Azure subscription for deployment
Login-AzAccount
Select-AzSubscription -SubscriptionId $subscription
- Get the subnet resource ID for instance pool deployment:
Write-Host "Get virtual network and subnet configuration" -ForegroundColor Green
###Get virtual network and subnet configuration
$virtualNetwork = Get-AzVirtualNetwork -Name $vnetName -ResourceGroupName $resourceGroup
$subnet = Get-AzVirtualNetworkSubnetConfig -Name $subnetName -VirtualNetwork $virtualNetwork
- Use the New-AzSqlInstancePool cmdlet to deploy the instance pool with the specified vCore capacity:
Write-Host "Deploying instance pool " $instancePoolName -ForegroundColor Green
#Creating new instance pool with 8-vCore
$instancePool = New-AzSqlInstancePool -ResourceGroupName $resourceGroup -Name $instancePoolName -SubnetId $subnet.Id -LicenseType $LicenseType -VCore 8 -Edition $Edition -ComputeGeneration $ComputeGeneration -Location $Location
- Run the SQLMI_InstancePoolDeployment.ps1 file from any client of your choice:
.SQLMI_InstancePoolDeployment.ps1 -resourceGroup Packt -subscription xxxxxxxx-xxxx-xxxx-xxxx-xxxxxxxxxxxx -instancePoolName mi-toyfactory-pool -vnetName MyNewVNet -subnetName ManagedInstances -LicenseType LicenseIncluded -Edition GeneralPurpose -ComputeGeneration Gen5 -Location eastus

Figure 8.26: PowerShell commands output
Note
The creation of an instance pool is a long-running operation and generally needs 4.5 hours.
- Let's check the Azure portal after deployment. The Azure portal shows the empty instance pool with its used capacity:

Figure 8.27: An empty instance pool in the Azure portal
In this activity, we created a virtual network using ARM templates to deploy an instance pool. Finally, we checked the pool utilization statistics through the Azure portal.
Activity: Deploying and managing a managed instance in an instance pool
In the previous activity, we deployed an empty instance pool with an 8 vCore capacity. Here, we will see how to provision a managed instance in that pool. We will be deploying a 2 vCore instance and later will scale up to 8 vCores, taking note of how much time it takes to deploy and scale up a new instance in a pre-provisioned pool.
We will be using PowerShell commands since there is no Azure portal support during preview. Let's look at the steps.
Follow these steps to create a managed instance inside an instance pool and scale up instance resources using PowerShell cmdlets:
- Open Azure Cloud Shell from the Azure portal by clicking the Cloud Shell icon:

Figure 8.28: Cloud Shell icon
- Switch to the PowerShell terminal to run PowerShell code:

Figure 8.29: Switching to the PowerShell terminal
- Run the following commands to create a managed instance with a 2 vCore capacity in an instance pool and monitor the deployment time:
##Deploying new SQL Managed Instance in pool.
##Get the instance pool properties.
$instancePool = Get-AzSqlInstancePool -ResourceGroupName Packt -Name mi-toyfactory-pool
#Using measure-command cmdlet to calculate time for new instance deployment in pool.
Measure-Command {$toystoreInstance = $instancePool | New-AzSqlInstance -Name mi-toystore-1 -AdministratorCredential (Get-Credential) -StorageSizeInGB 32 -VCore 2}
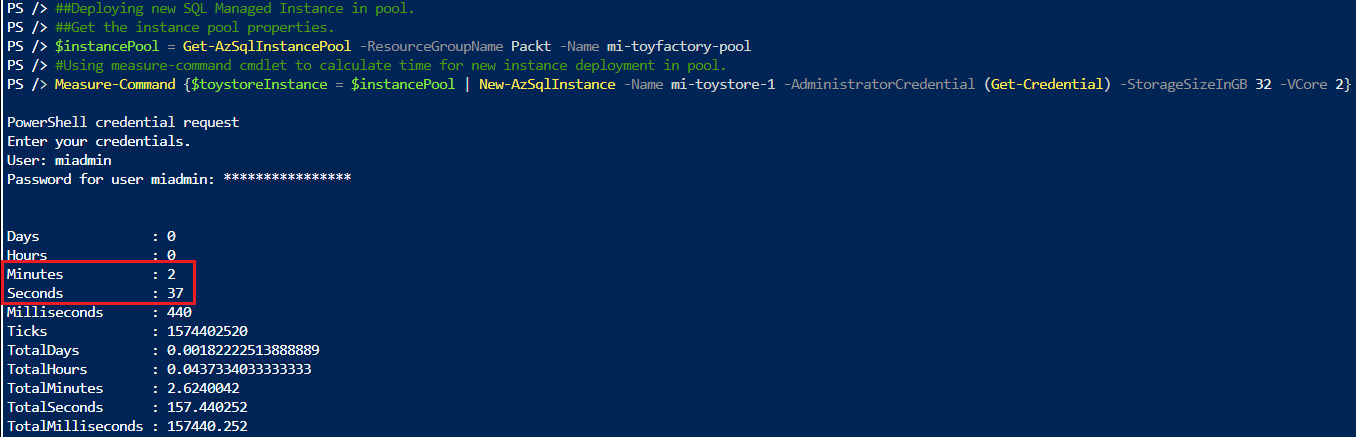
Figure 8.30: New instance deployment in an instance pool
In Figure 8.30, we see that the new instance deployment only took 2 minutes and 37 seconds.
- Let's look at the Azure portal and see what the new instance pool looks like after the managed instance deployment. Go to the Azure portal, and in the Overview tab of the instance pool, click on the managed instance to see its properties:

Figure 8.31: Instance pool-Overview
In Figure 8.31, you can see that the mi-toystore-1 managed instance with a 2 vCore capacity is deployed in the instance pool mi-toyfactory-pool.
- Once you click on the managed instance (mi-toystore-1), it will redirect you to the managed instance Overview tab, which displays the host, admin account, and instance pool information. Also, you can use the New database option to create a managed database using the Azure portal:

Figure 8.32: Managed instance Overview
- After adding/migrating multiple databases on the same instance, you might hit the resource limits or face performance challenges. You can scale up instance resources if you have available capacity in the instance pool. Scaling pooled managed instance resources takes only a few minutes.
Run the following command using the same Cloud Shell session:
#Scaling SQL Managed Instance resources
Measure-Command {$toystoreInstance | Set-AzSqlInstance -VCore 8 -StorageSizeInGB 512 -InstancePoolName "mi-toyfactory-pool"}
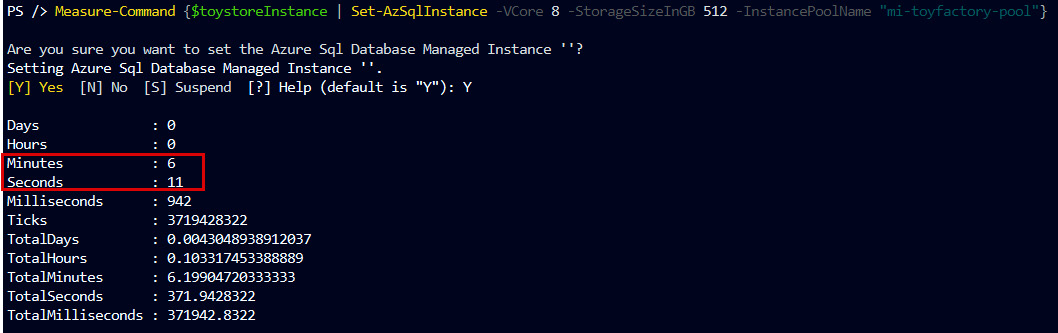
Figure 8.33: Scaling a managed instance in a pool
As we can see, the scaling operation took 6 minutes and 11 seconds to complete. This is much faster than single managed instance scaling, which takes hours.
- Let's check the instance pool resource usage after the scaling operation using the Azure portal:

Figure 8.34: Instance pool resource usage after scaling
After the scaling operation, we have exhausted the CPU capacity, but storage and database capacity is still available. If more CPU is required, then the instance needs to be migrated to a bigger instance pool. For the migration of databases from one pooled instance to another pooled instance, the cross-instance point-in-time restore method can be used, which we discussed in Chapter 5, Restoration. This method is only supported for the same region and subscription.
In this activity, we learned about the creation of a managed instance in an instance pool. We up-scaled the instance resources within the pool and noted the completion times for deployment and scaling operations in the pre-provisioned pool.
An instance pool gives you the flexibility to manage resources in an easier way, since management operations such as creation and scaling only require a couple of minutes. Scaling a single managed instance takes longer since it must resize the virtual cluster for new capacity, and here, we had already provisioned resources in advance at the time of instance pool creation.
Summary
In this chapter, we learned a simple and cost-effective way of managing multiple SQL databases using an elastic database pool and also learned a convenient way of consolidating low-compute managed instances inside an instance pool. We discussed when and how to use an elastic database pool and an instance pool to be cost-effective without affecting database performance. We also learned how to use elastic database jobs to manage and maintain the databases in an elastic database pool.
In the next chapter, we will be discussing high availability and business continuity solutions for SQL Database and SQL Managed Instance. You will learn how to implement standard geo-replication, active geo-recovery, and failover groups for disaster recovery solutions.