High availability and disaster recovery planning is essential to any database service or application deployment. In an on-premises SQL Server, database administrators have multiple options to configure high availability and disaster recovery solutions.
In this chapter, we will talk about high availability and disaster recovery options available for Azure SQL Database and SQL Managed Instance. Azure SQL Database and SQL Managed Instance come with built-in high availability and easily configurable disaster recovery solutions.
By the end of this chapter, you will be able to do the following:
- Describe the built-in high availability features in Azure SQL Database and Azure SQL Managed Instance
- Implement standard and active geo-recovery for Disaster Recovery (DR) solutions
- Implement standard and active geo-replication
- Implement the Accelerated Database Recovery feature
- Implement a failover group for Azure SQL Database and SQL Managed Instance
This chapter will teach you about the built-in high availability features in Azure SQL Database and SQL Managed Instance. It'll also teach you how to implement a DR solution using geo-replication and failover groups.
High availability
High availability refers to providing service availability in case of any hardware, software, or network failure. Azure SQL guarantees up to 99.995% availability of service. Although Azure SQL Database and SQL Managed Instance are resilient to transitive infrastructure failures, such events might impact application connectivity. Applications can handle these failures by employing retry logic in code.
Azure SQL Database and SQL Managed Instance can quickly recover in the most critical situations, ensuring that your data is always available.
The availability of SQL Database and SQL Managed Instance depends on the service tier and underlying architecture model. Let's take a look at the high availability architecture models based on service tier configuration.
The basic, standard, and general-purpose service tier locally redundant availability model
This architecture is based on the separation of the compute and storage layers to ensure data availability; it is similar to failover cluster instances (FCIs). The architecture depends on Azure premium storage high availability and reliability.
Note
This is similar to an SQL Server (on-premises or SQL on Azure Virtual Machine) failover cluster installation.
Let's look at the high-level architecture diagram:
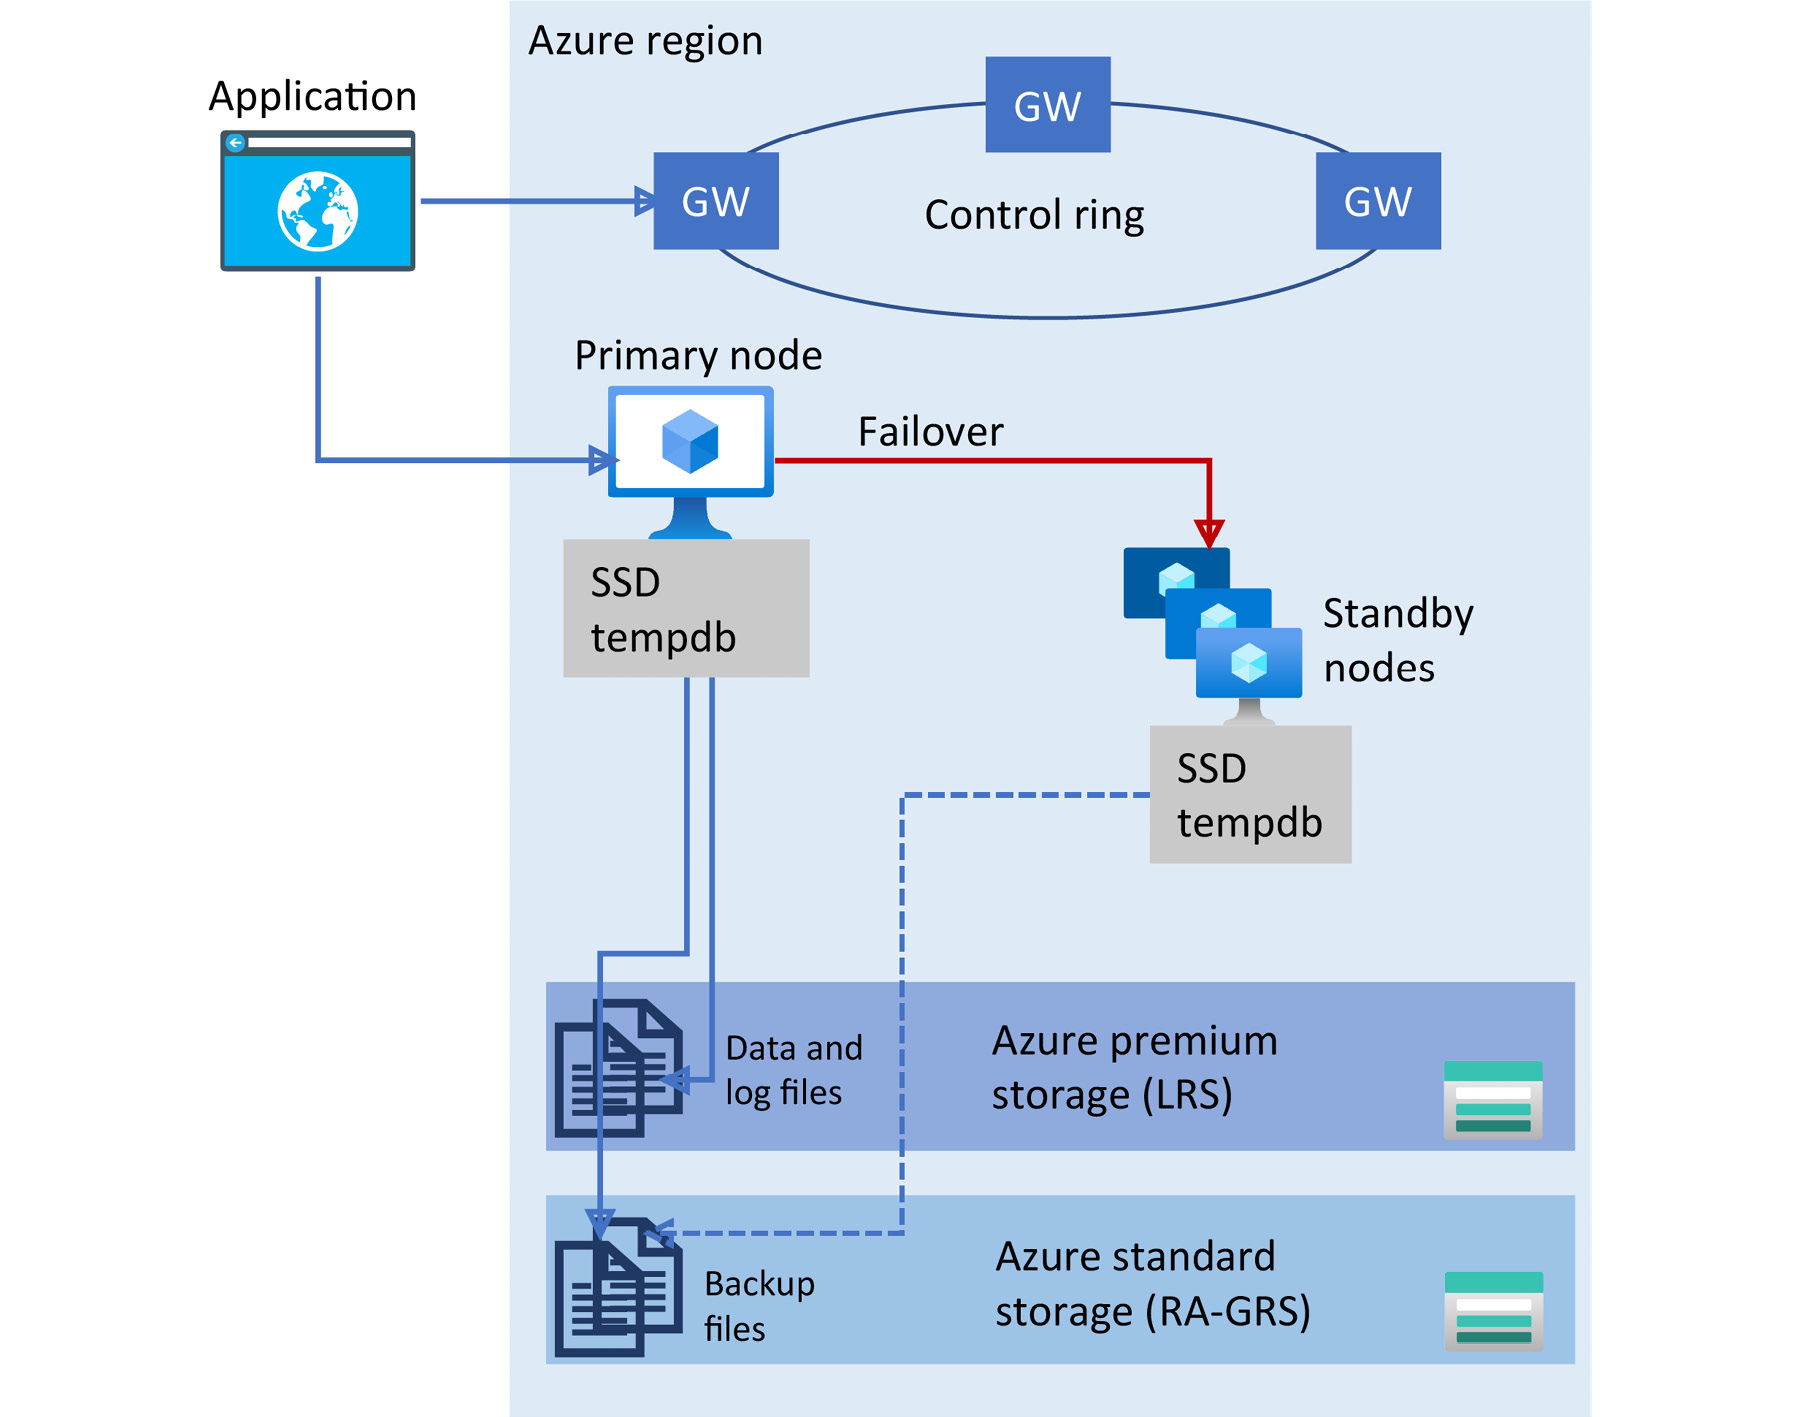
Figure 9.1: High availability architecture for the basic, standard, and general-purpose service tiers
In Figure 9.1, there are two layers:
- A stateless compute layer, which runs the sqlserver.exe process. Compute nodes have a local SSD that hosts the tempdb, a model system database. The primary node can perform failover to another stateless compute node with sufficient free capacity if necessary.
- A stateful data layer with the database files (.mdf/.ldf); these files are stored in Azure Storage and copied synchronously three times within a single physical location in the Azure region. This guarantees no data loss even when the sqlserver.exe process crashes.
This architecture model is applicable to a provisioned and serverless compute tier.
General-purpose service tier zone-redundant configuration
The general-purpose service tier zone-redundant configuration uses Azure Availability Zones to replicate a database across multiple physical locations within the same Azure region. Each Availability Zone in a region is physically separate, and made up of one or more datacenters equipped with independent power, cooling, and networking. This architecture model can tolerate zone-level failures.
This architecture model is like the previous architecture model, with a separation of the compute and data layers. Here, the difference is in the storage layer, where database files (.mdf/.ldf) are now stored in zone-redundant Azure Storage instead of locally redundant storage. Utilizing zone-redundant storage ensure that the data will be copied synchronously three times across three Availability Zones in the same region.
Additionally, nodes with spare capacity are readily available in other Availability Zones for failover. This allows the compute node to automatically failover to another Availability Zone in the case of a zone-level outage.
The zone-redundant configuration is currently not available in SQL Managed Instance.
The zone-redundant architecture model for the general-purpose tier is illustrated in Figure 9.2:

Figure 9.2: Zone-redundant high availability architecture for the general-purpose service tier
The zone-redundant configuration can be enabled for both new and existing general-purpose databases and elastic pools. Once the zone-redundant option is enabled, Azure SQL Database will automatically reconfigure the database or pool. You can configure this setting by using the Azure portal, the Azure CLI, PowerShell, or the ARM API. Figure 9.3 illustrates how to use the Azure portal to configure an existing general-purpose elastic pool to be zone redundant:

Figure 9.3: Using the Azure portal to enable zone-redundant high availability architecture for the general-purpose service tier
The premium/business-critical tier locally redundant availability model
This high availability architecture model is dependent on clusters of nodes replicating both compute and storage. The cluster has a primary replica that constantly pushes changes to the secondary nodes and ensures that the data is synchronized to at least one secondary replica before committing each transaction. This guarantees that there is always a quorum of available database nodes for automatic failover. This architecture model relies on the Always On availability group setup:

Figure 9.4: High availability architecture for the premium/business-critical service tier
In Figure 9.4, there is a cluster of four replicas with high availability implemented using technology similar to SQL Server Always On availability groups. Each replica has a local attached SSD for higher I/O throughput.
This architecture model is designed for mission-critical applications. It also provides access to one internal secondary replica to offload the read workload.
The premium/business critical service tier zone-redundant configuration
This architecture model ensures the highest uptime percentage SLA that Azure SQL offers. The premium/business-critical service tier with zone-redundant configuration offers 99.995% SLA availability:
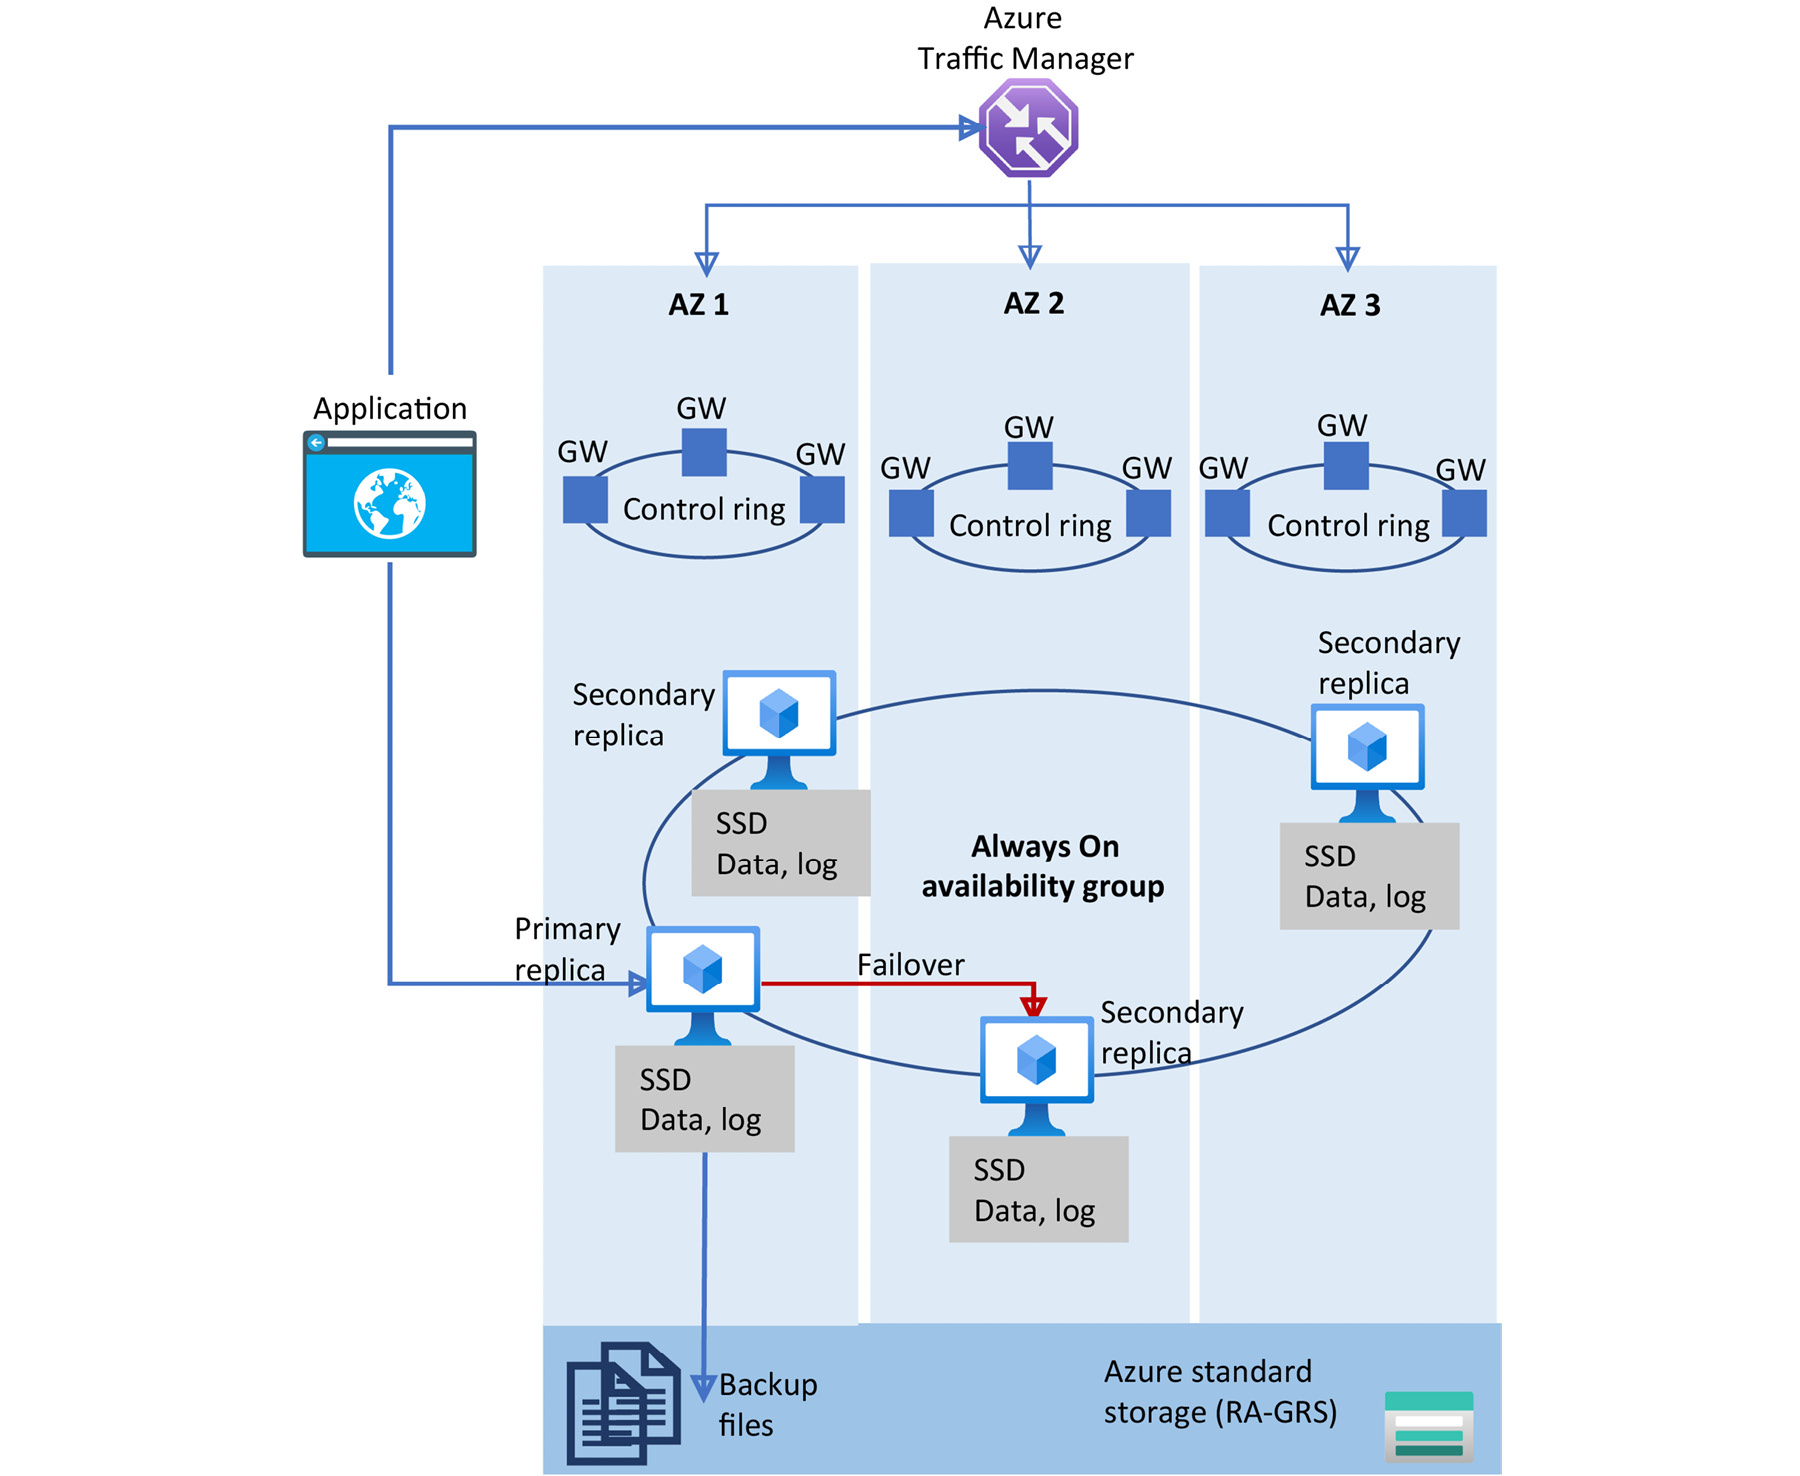
Figure 9.5: Zone-redundant high availability architecture for the Premium/Business-Critical service tier
This architecture model is like the previous architecture model, except the replicas are placed across different Availability Zones within the same region. This allows a replica to automatically fail over to another Availability Zone in the case of a zone-level outage. The zone-redundant configuration can be enabled for both new and existing Business-Critical and Premium databases and elastic pools. Once the zone-redundant option is enabled, Azure SQL Database will automatically reconfigure the database or pool. You can configure this setting by using the Azure portal, the Azure CLI, PowerShell, or the ARM API. The following figure illustrates how to use the Azure portal to configure a new business-critical single database to be zone redundant:

Figure 9.6: Using the Azure portal to enable zone-redundant high availability architecture for the Business-Critical service tier
Because zone-redundant databases have replicas in different datacenters with some distance between them, the increased network latency may increase the commit time and thus impact the performance of some OLTP workloads. You can always return to the single-zone configuration by disabling the zone redundancy setting.
Built-in high availability
Azure SQL Database and SQL Managed Instance have built-in high availability solutions that are deeply integrated with Azure infrastructure. They depend on a service fabric layer for fault detection and recovery and Azure Storage for data protection. Azure Availability Zones can be used for higher fault tolerance (only applies to Azure SQL Database). You would have to configure, manage, and maintain Always On in an on-premises environment. In SQL Database and SQL Managed Instance, it's configured, managed, and maintained by Microsoft.
Up to now, we have discussed multiple built-in high availability options for SQL Database and SQL Managed Instance. In the next section, we will discuss the Accelerated Database Recovery feature, which helps Azure SQL Databases and Managed Instances recover more quickly.
Accelerated database recovery (ADR)
Accelerated database recovery, or ADR, is a new database recovery process that greatly increases availability and decreases database recovery time in scenarios such as crash recovery (database recovery in the event of a server/database crash) and long-running transaction rollback (for example, a large bulk insert or an index rebuild rollback).
An SQL database consists of data and a transaction log file. A data file contains the table data. A transaction log file keeps track of all the changes made to the data and the schema; for example, if there is an insert in a table, the transaction log file contains the insert statement and whether the insert statement was committed or not.
The standard database recovery process
To better understand ADR, let's first get an understanding of the standard database recovery process:
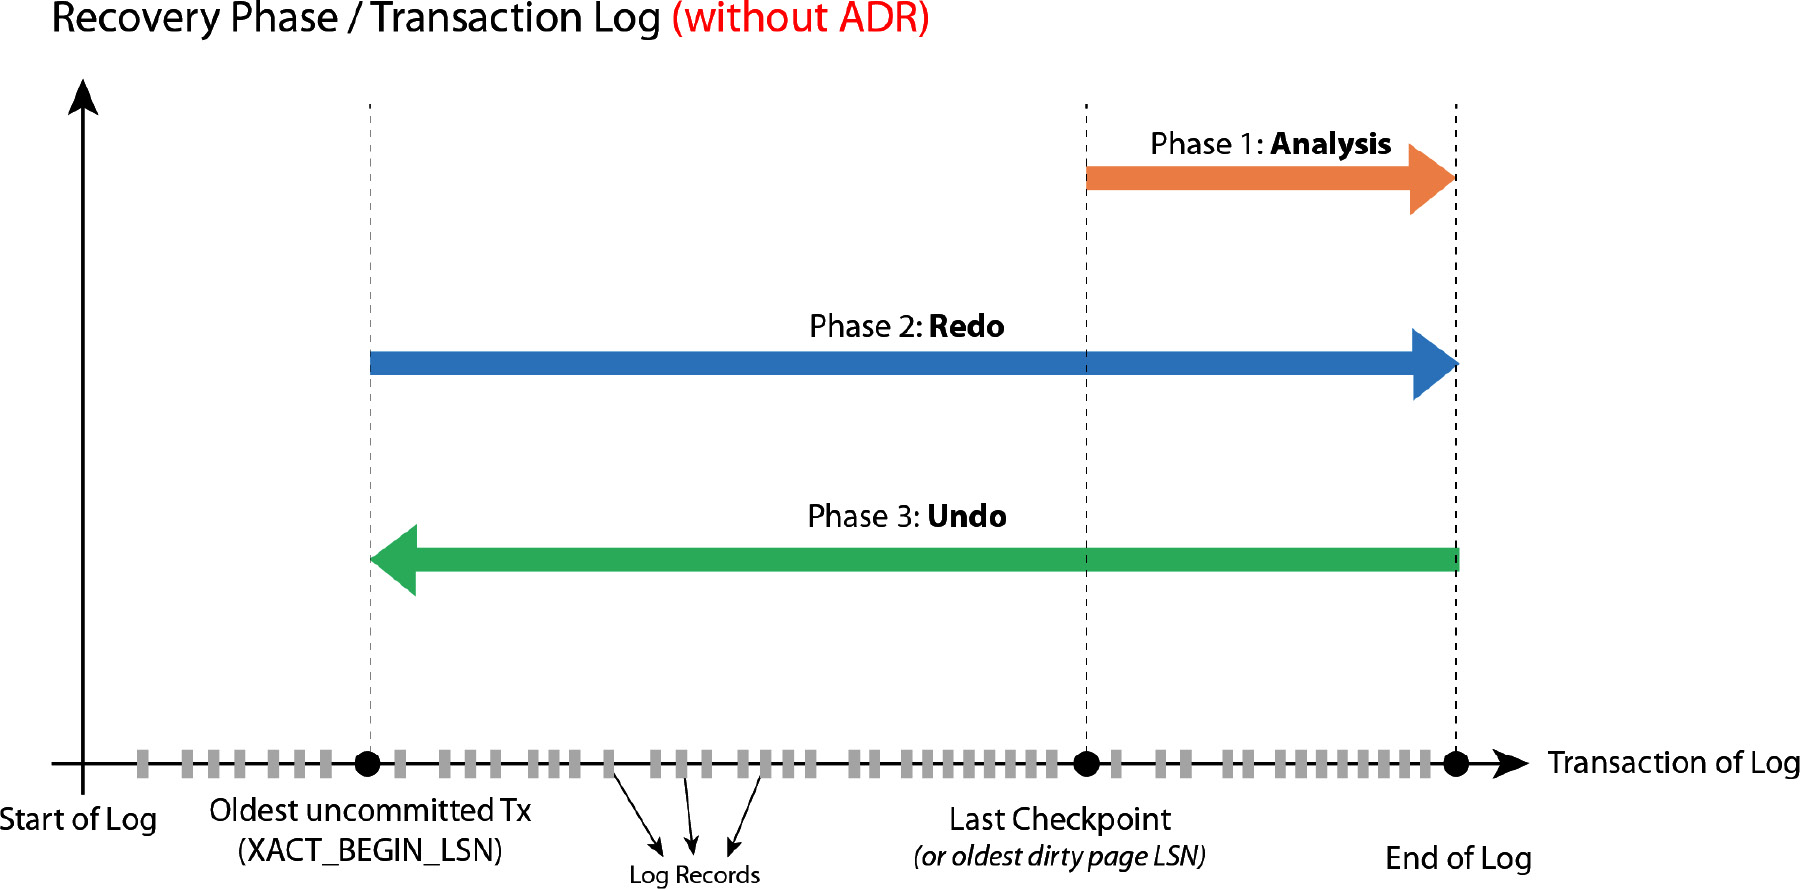
Figure 9.7: The recovery phase without ADR
Note
Image taken from https://docs.microsoft.com/azure/sql-database/sql-database-accelerated-database-recovery.
As shown in the preceding figure, the standard recovery process consists of three phases: Analysis, Redo, and Undo. Let's look at what happens in each of these phases.
Analysis
In the analysis phase, a forward scan of the transaction log is performed from the last checkpoint or the oldest dirty page's log sequence number (LSN).
Note
A dirty page is a page in memory with data modifications. A checkpoint is the process of writing dirty pages from the memory to the physical disk. A checkpoint is therefore a point at which a database is in a consistent state.
An LSN is a number assigned to each entry made on the transaction log.
The output of the analysis phase is a list of transactions:
- These are written to the log and committed but are not written to the physical database file.
- They are in the log file, but they don't have a commit or rollback, or they are already in the rollback state (active transactions).
Note
The transaction log is scanned from the last successful checkpoint, because all the dirty pages before the checkpoint will have already been written to the physical data file.
Redo
In this phase, the log is read forward from the oldest uncommitted transaction, and the transactions that were committed to the log but not to the database are redone. In other words, you flush or harden all the dirty pages to disk, from the oldest uncommitted transaction to the end of the log, to restore the system to the state it was in at the time of the crash.
Undo
In this phase, the log is read backward from the end of the log to the oldest uncommitted transaction and all the active transactions at the time of the crash are rolled back or undone.
This process is good for recovering a database to a consistent state after a crash; however, it takes a long time and is proportional to the longest-running transaction.
The older the longest uncommitted transaction, the more log records there are to be scanned, thereby increasing the recovery time.
Moreover, the recovery time also depends on the amount of work the longest-running transaction has performed. The more work it performs, the more time it takes to roll back and recover the database.
The ADR process
ADR improves database availability from the standard database recovery process and provides faster database recovery.
ADR has the following new components, which are used to redesign the standard recovery process:
- Persistent Version Store (PVS): Whenever a data row is modified, the previous version of the row is kept in PVS.
PVS is similar to the version store used in the Snapshot and Read committed isolation levels; however, PVS is stored in the user database instead of tempdb.
- Logical revert: Logical revert is an asynchronous process to perform undo/rollback operations using PVS.
In the standard database recovery process, if a transaction aborts or rolls back, all other transactions have to wait for the first transaction to roll back to access the rows. However, in ADR, logical revert allows the other transactions to access the previous version of the rows from PVS instead of waiting for the first transaction to roll back.
- sLog: sLog is a low-volume, in-memory log stream to store log records for non-versioned operations such as lock acquisitions and Data Definition Language (DDL) commands. In other words, it stores the operations that don't go into PVS.
sLog is written to disk during the checkpoint operation and is kept low-volume by periodically removing entries for committed transactions.
- Cleaner: This is an asynchronous process that cleans obsolete row versions from PVS. The cleaner process runs every minute and can also be run manually using the sys.sp_persistent_version_cleanup system stored procedure.
The database recovery process with ADR is shown in Figure 9.8:
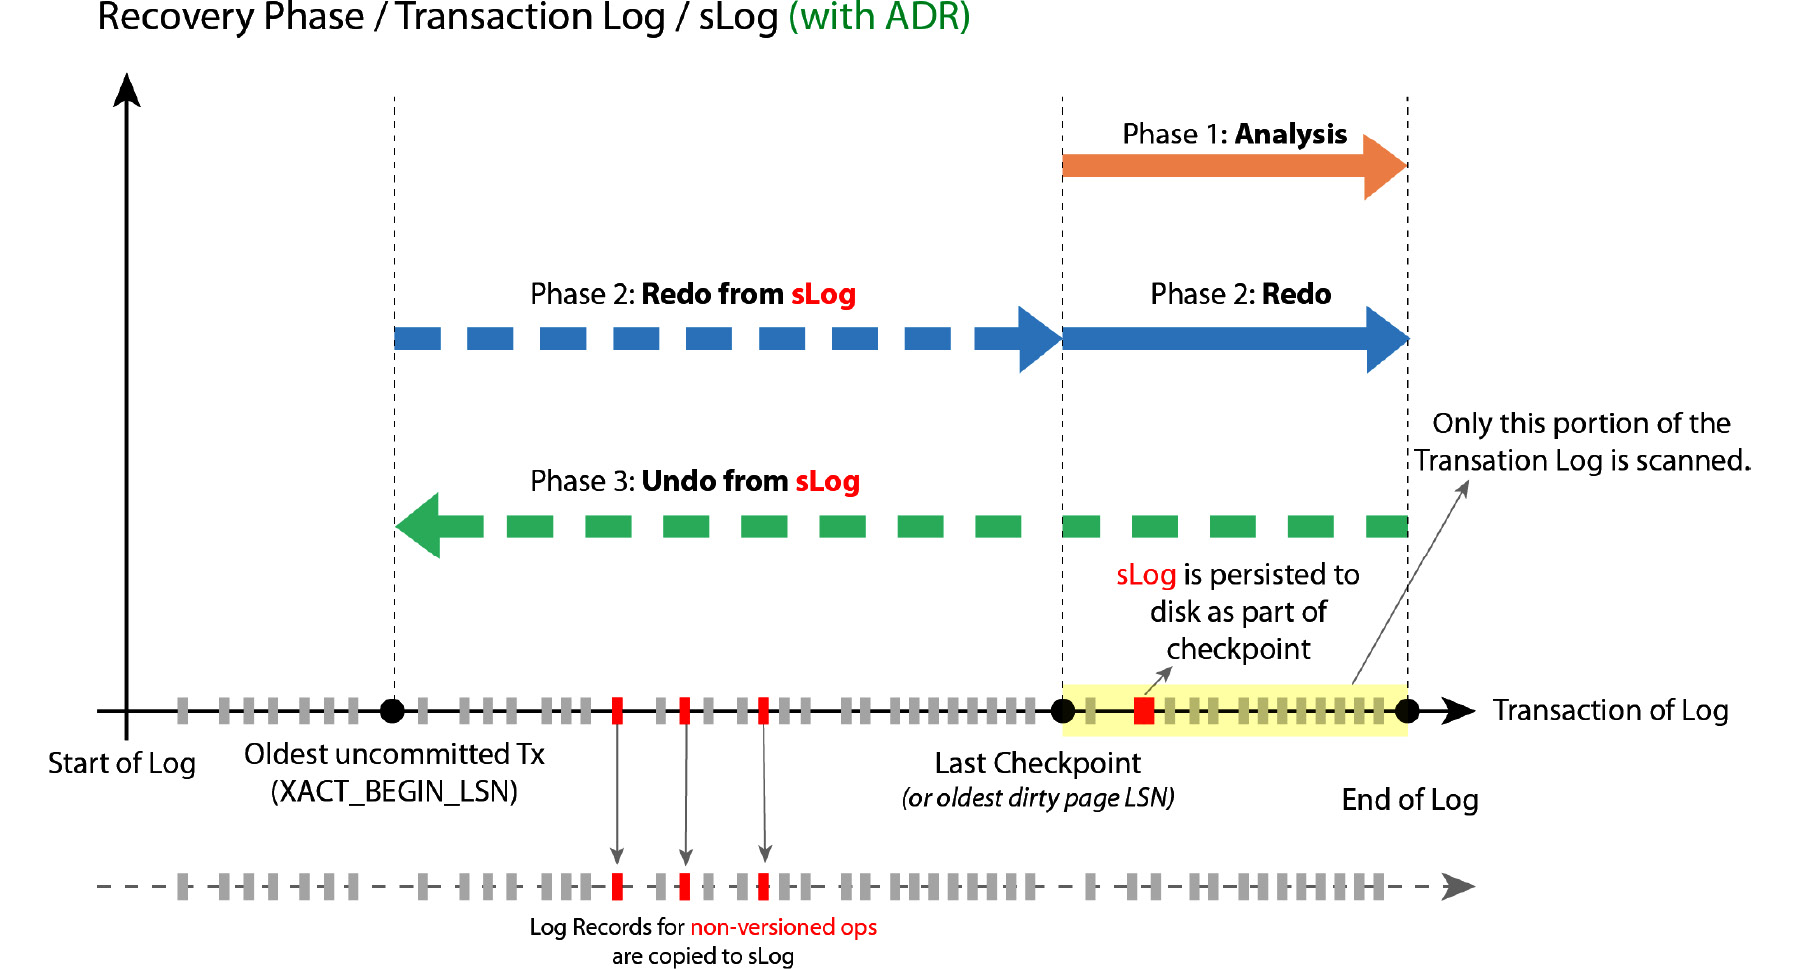
Figure 9.8: The recovery phase with ADR
Note
Image taken from https://docs.microsoft.com/azure/sql-database/sql-database-accelerated-database-recovery.
The ADR process consists of the same three phases as the standard recovery process; however, the work performed by each phase differs from the standard recovery process.
Analysis
The log is read forward from the last checkpoint to the end of the log.
sLog is rebuilt (read from disk into memory) and the log records for non-versioned operations are written into sLog from the transaction log.
Redo
The redo is done in two phases:
- Phase 1: The sLog is read from the oldest uncommitted transaction to the last checkpoint and non-versioned log records are redone.
- Phase 2: The transaction is redone in the transaction log from the last checkpoint to the end of the log.
Undo
The undo phase consists of the following:
- Undoing all of the non-versioned operations from sLog by reading it backward from the end of the log to the oldest uncommitted transaction
- Using logical revert to perform a row-level, version-based undo, as explained earlier, in the Logical revert section
ADR is fast as it doesn't depend on the work or the duration of the oldest active transaction. The transaction log is scanned only from the last checkpoint to the end of the log.
Active transactions at the time of the crash are marked as aborted and the row versions for aborted transactions are ignored during the recovery process.
Other than fast database recovery, with ADR, the transaction log can be truncated aggressively during checkpoint and backup. This is because the log records for the oldest uncommitted transactions are not required for the database recovery.
ADR is enabled by default for Azure SQL Database and SQL Managed Instance. Disabling ADR is not supported for either.
Activity: Evaluating ADR
In this activity, we'll evaluate the ADR performance of a transaction rollback.
It's advised to perform this activity on SQL Server 2019 Developer Edition since ADR was introduced in the SQL Server 2019 release.
Note
If you would like to perform the activity on Azure SQL Database, write an email to [email protected] to disable ADR on Azure SQL Server.
The toystore_ADR database used in the activity is similar to toystore, but toystore has ADR turned off. Perform the following steps to complete the activity:
- Connect to a database with SSMS and execute the following query to verify that ADR is off:
SELECT
[Name], is_accelerated_database_recovery_on
FROM sys.databases WHERE [Name]='toystore'
You should get an output similar to the following:

Figure 9.9: The result of the query denoting that ADR is turned off
Note
The database name may differ in your case.
The value 0 for is_accelerated_database_recovery_on confirms that ADR is turned off.
- Execute the following query to simulate a long-running transaction:
CREATE TABLE Orders (
OrderId INT IDENTITY,
Quantity INT, Amount MONEY, OrderDate DATETIME2
)
GO
BEGIN TRANSACTION DECLARE @i INT=1
WHILE (@i <= 10000000) BEGIN
INSERT INTO Orders VALUES(@i*2,@i*0.5,DATEADD(MINUTE,@i,getdate())) Set @i = @i + 1
END
The query creates an Orders table and inserts sample records into the Orders table in an explicit transaction. Observe that BEGIN TRANSACTION has no corresponding rollback or commit transaction.
Note the session ID of the query. The session ID of the query is in the bottom-right corner of the query window:

Figure 9.10: The session ID of the query
Let the query run for around five minutes or so.
- While the query is running, open a new query window and execute the following query to start the query rollback:
KILL 112
GO
KILL 112 with statusonly
GO
SELECT session_id,status from sys.dm_exec_requests where session_id=112
Note
The session ID will be different in your case.
In the Results tab, observe that the query status is rollback:

Figure 9.11: The Results tab denoting that the query status is set to rollback
In the Messages tab, observe the estimated time remaining to roll back the transaction. In this example, the estimated time was approximately 30 seconds:

Figure 9.12: The Messages tab denoting the estimated time of the query
Note
The estimated time remaining may be different in your case.
Let's perform the preceding steps against a database with ADR turned on and measure the time taken for transaction rollback.
- Open a new query window and connect to the toystore_ADR database:
Note
If you are performing the activity on SQL Server 2019, you can run the following command to enable ADR on an existing database:
ALTER DATABASE Toystore_ADR SET ACCELERATED_DATABASE_RECOVERY = ON;
- Execute the following query to verify whether ADR is turned on or not:
SELECT
[Name], is_accelerated_database_recovery_on
FROM sys.databases
WHERE [Name]='toystore_ADR'

Figure 9.13: The result of the query denoting that ADR is turned on
The is_accelerated_database_recovery_on bit is 1, which means that ADR is turned on.
- Execute the following query to simulate a long-running transaction:
CREATE TABLE Orders (
OrderId INT IDENTITY,
Quantity INT, Amount MONEY, OrderDate DATETIME2
)
GO
BEGIN TRANSACTION DECLARE @i INT=1
WHILE (@i <= 10000000) BEGIN
INSERT INTO Orders VALUES(@i*2,@i*0.5,DATEADD(MINUTE,@i,getdate())) Set @i = @i + 1
END
The query creates an Orders table and inserts sample records into the Orders table in an explicit transaction. Observe that BEGIN TRANSACTION has no corresponding rollback or commit transaction.
Note the session ID of the query. The session ID of the query is in the bottom-right corner of the query window:

Figure 9.14: The session ID of the query is 131
The query session ID or the SPID is 131.
Let the query run for around five minutes.
- While the query is running, open a new query window and execute the following query to start the query rollback:
KILL 131
GO
KILL 131 with statusonly
GO
SELECT session_id,status from sys.dm_exec_requests where session_id=131
In the Results tab, notice that the query status is rollback:

Figure 9.15: The Results tab denoting that the query status is set as rollback
In the Messages tab, notice that the estimated time remaining to roll back the transaction is 0 seconds:

Figure 9.16: The Messages tab denoting the estimated time of the query (0 seconds)
ADR provides an instant rollback, compared to non-ADR, where the estimated time remaining to roll back was 30 seconds.
Disaster recovery
Disaster recovery (DR) refers to having business continuity during and after events that impact an Azure region, such as a natural disaster or hacking incident that terminates an entire Azure region.
DR for Azure SQL Database can be implemented through active geo-replication. An auto-failover group can be configured for Azure SQL Database and SQL Managed Instance as a business continuity solution. A failover group is designed to ease out the deployment and management of geo-replication databases at scale.
Active geo-replication
Active geo-replication uses Always On technology to asynchronously replicate data to a maximum of four readable secondaries in the same or any other Azure region. Active geo-replication is available across all performance tiers except Hyperscale. A typical active geo-replication environment is shown in Figure 9.17:
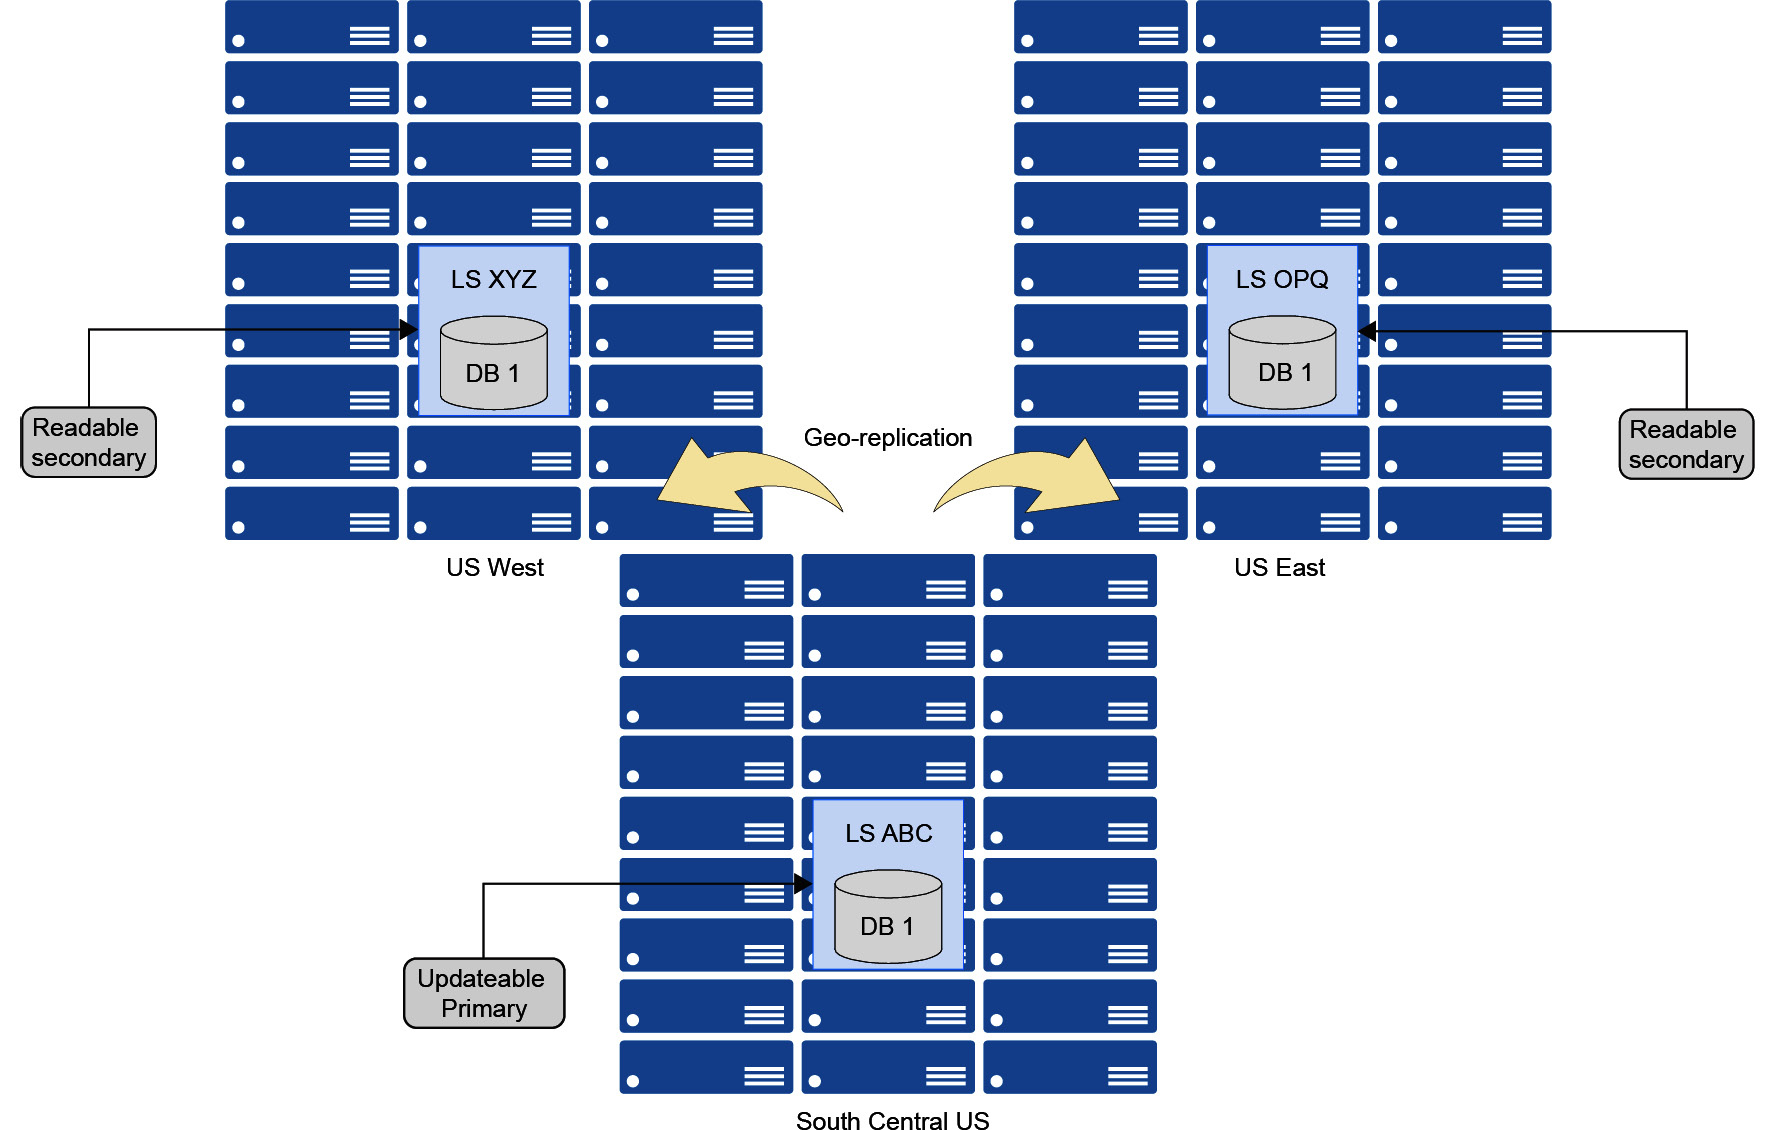
Figure 9.17: A typical active geo-replication environment
The DB 1 database is primarily stored in the South-Central US region, with two readable secondaries in the US West and US East regions.
When you fail over to the secondary database, the endpoint or the connection string is changed and you will have to make changes to the application so that you can connect to the new primary.
Once the failover is complete, all secondary databases will automatically point to the new primary. In addition to manual failover, active geo-replication also supports automatic failover using auto-failover groups.
The default replication type in active geo-replication is asynchronous. However, if the application needs to have synchronous replication, then you can do so by calling sp_wait_for_database_copy_sync immediately after committing a transaction. This will block the calling thread until all of the committed transactions have been replicated to the secondary.
The procedure can add significant delay to the calling thread if the size of the transaction log is being replicated is large. It's advised to use this procedure to prevent the loss of critical data only, not all data.
Auto-failover groups represent another high availability and DR option available with Azure SQL Database. Let's take a look at them now.
Auto-failover groups
Auto-failover groups allow you to automatically recover one or more groups of SQL databases or all the databases in an SQL Managed Instance in the event of a region failure. All databases in an auto-failover group should belong to a single server, and they will fail over to a single server as well.
Auto-failover group terms
- Failover group: A group of databases or all the instance databases between the primary server and the secondary server that are to be recovered as a unit if there is an outage in the primary region. A failover group in SQL Managed Instance replicates all user databases in the instance and therefore only one failover group can be configured on an SQL Managed Instance.
Note
The primary server is the one that hosts the primary database. The application can read and write on the primary database. The secondary server is the one that hosts the secondary database. The application can only read from the secondary databases. The data is asynchronously replicated from the primary database to the secondary databases. Primary and secondary servers can't be in the same region.
- Adding single and elastic databases to a failover group: When a database within a server or an elastic pool is added to the failover group, a secondary database with a performance level similar to that of the primary database is automatically created on the secondary server (see Figure 9.18). If the primary database is in an elastic pool, then an elastic pool with the same name is automatically created on the secondary server.
When adding a database that already exists in the secondary database server, however, it's not part of the failover group, and so a new secondary database is created in the secondary server.
- Read-write listener: This is a DNS CNAME record that points to the primary server URL. It allows the application to transparently connect to the available primary server in the event of a failover. This is similar to an availability group listener in an on-premises Always On configuration. The application doesn't connect to the primary or the secondary server URL. Instead, it connects to the read-write listener. In the event of a failover, the read-write listener will automatically point to the new primary (secondary) server. Therefore, unlike manual failover, the user doesn't have to change the application connection string in the event of a failover.
- Read-only listener: This is a DNS CNAME record that points to the secondary server. It allows the application to transparently connect to the secondary server for read-only queries. However, the read workload should be tolerant of a certain staleness of data. This is because the replication is asynchronous, and the secondary database will be some data behind the primary database.
- Failover group initial seeding: When the failover group is configured for single, elastic, or instance databases, there is an initial seeding (streaming existing data from the primary database to the secondary database using the failover group endpoint) that takes place before the data replication starts. Initial seeding is the longest and most expensive operation. The seeding speed depends on the size of your database, the number of databases, and the speed of the network link between failover group entities. For SQL Managed Instance, now you can take advantage of a low-latency, high-bandwidth, global virtual network peering setup.
- DNS zone: A unique DNS zone ID is automatically created when SQL Managed Instance is deployed. A secondary instance in the failover group should share the same DNS zone ID. A DNS zone is not required for Azure SQL databases.
- Failover policy: The default failover policy is set to automatic; however, this can be turned off if the failover process is controlled by the application.
Manual failover is required if automatic failover is turned off and the failover process isn't controlled by the application.
Manual failover can also be initiated at any time it is required, independent of the automatic failover policy. An example of manual failover is switching back to the primary region once the region recovers from the outage and is available to host resources.
- Planned failover: Users can initiate a planned failover to perform DR drills, moving databases to different regions, or return (fail back) to the primary region after an outage. There is no data loss during a planned failover. A planned failover performs a full synchronization between the primary and secondary databases before switching the roles.
- Unplanned failover: Unplanned failover or forced failover needs to be a trigger during an outage when the primary server is not accessible. There is no data synchronization between the primary and secondary servers during the switching of the roles, hence it results in data loss. When the original primary server comes up, it automatically reconnects with the new primary server without synchronization and becomes the secondary server.
- Manual failover: You can initiate a manual failover at any point as per your requirements. You can initiate a friendly failover (with full data synchronization) or a forced failover with data loss. Manual failover is required to recover the databases when an auto-failover policy is not configured.
- Grace period with data loss hours: This setting controls the duration the system fails for before initiating an automatic failover. For example, if the grace period with data loss hours is set to 2 hours, then in the event of an outage in the primary region, failover will take place after 2 hours. However, if the outage is resolved before the grace period expires, failover isn't performed.
- Upgrading the primary database service tier: The service tier and performance level of the primary database can be modified as and when required. The performance level within the same service tier can be modified without disconnecting the secondary database. In other words, you can upgrade the primary database from Standard S0 to Standard S1 without disconnecting the corresponding secondary database connection.
However, if you are switching between service tiers, then it's recommended (and enforced) to first upgrade the secondary database and then the primary database to avoid the termination of the secondary database connection.
If the secondary database is part of an auto-failover group, then it's advised not to downgrade the secondary database service tier. This is to avoid performance degradation in the event of a failover.
A high-level overview of an auto-failover group in Azure SQL Database
An auto-failover group must be configured with servers in different regions. You can include all or some of the databases of a server in a failover group.
Figure 9.18 illustrates a typical configuration of a geo-redundant cloud application using multiple databases in an auto-failover group:
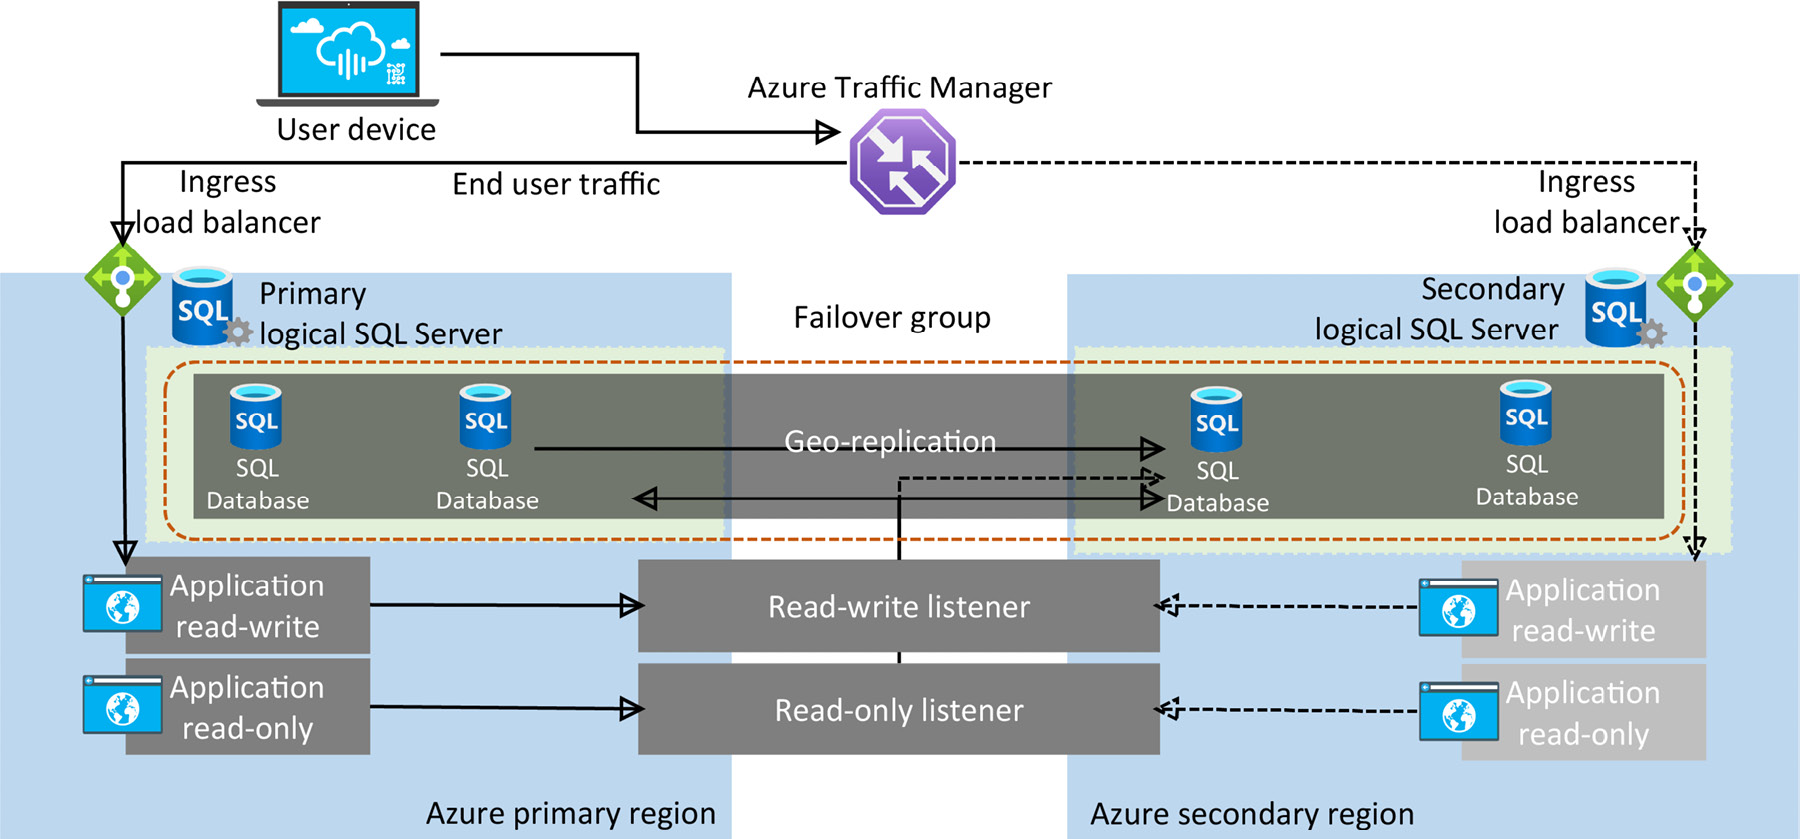
Figure 9.18: Failover group data traffic flow for Azure SQL Database
In Figure 9.18, you can see that there are two logical Azure SQL Servers configured in an auto-failover group with a geo-redundant application. This application accesses multiple databases within Azure SQL Server.
A high-level overview of an auto-failover group in Azure SQL Managed Instance
In SQL Managed Instance, a failover group must be configured with a primary instance that connects to a secondary instance in a different Azure region. The failover group replicates all user databases to the secondary instance. Figure 9.19 shows a typical overview of failover group data traffic:
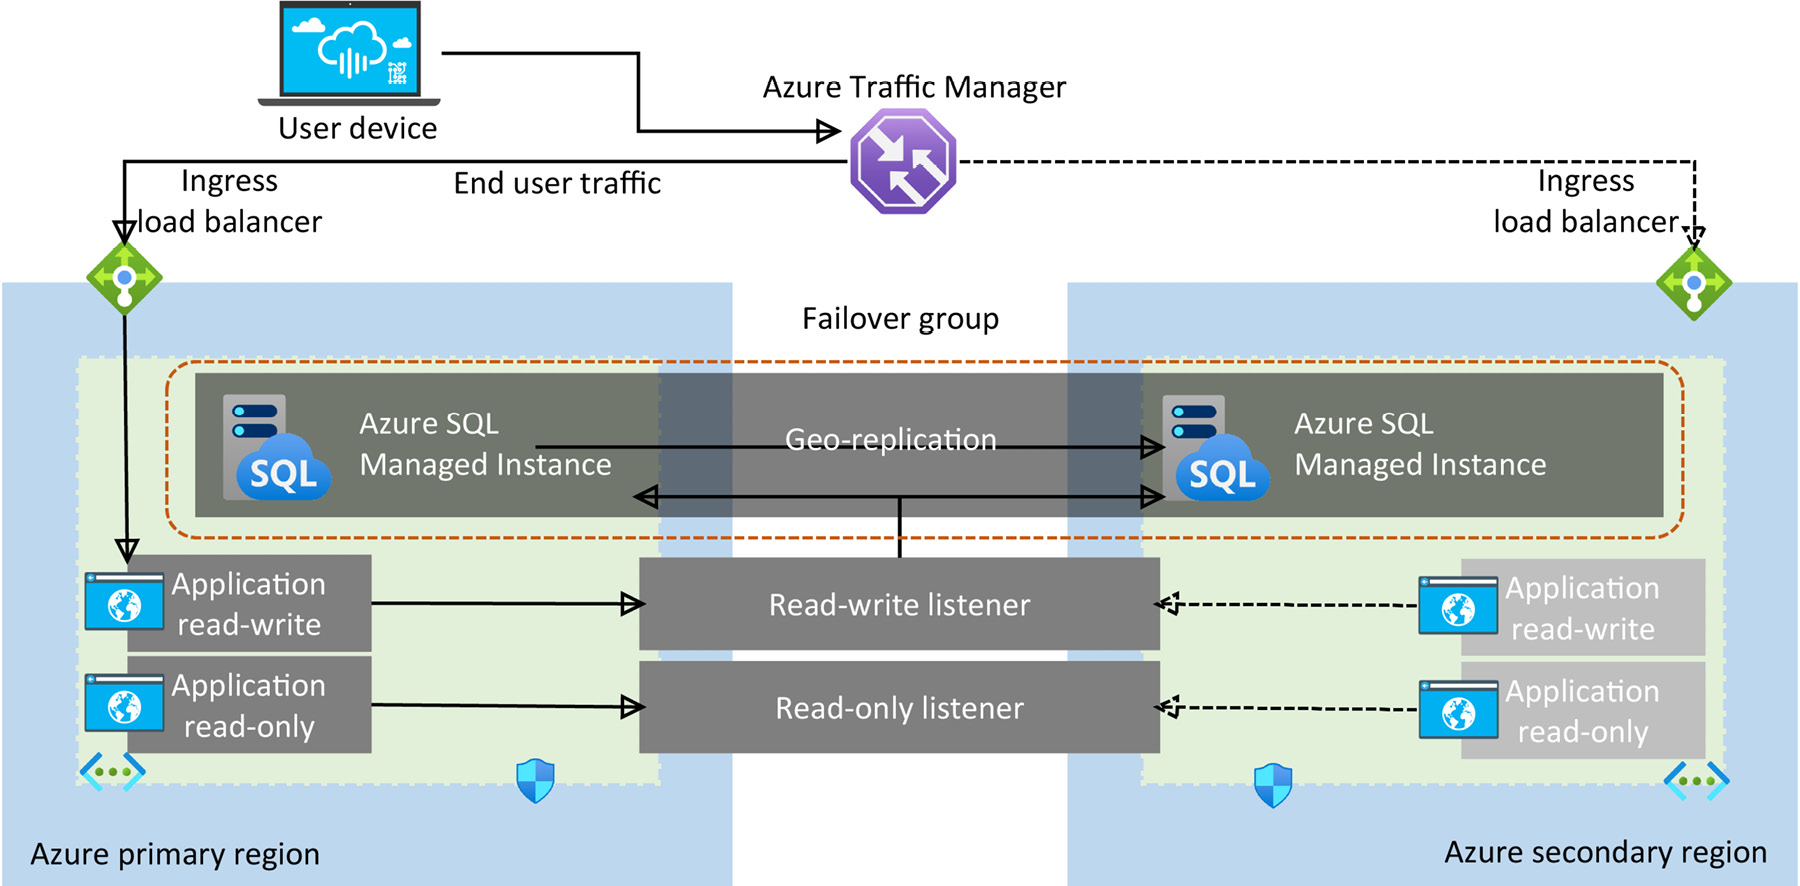
Figure 9.19: Failover group data traffic flow for SQL Managed Instance
In Figure 9.19, you can see two SQL managed instances configured in the auto- failover group with the same DNS zone. These instances are accessed by a geo-redundant application. This application uses read-write and read-only listeners to connect to databases.
Activity: Configuring active geo-replication and performing manual failover using the Azure portal
Consider a scenario: Mike needs to ensure that the data of Toystore Ltd. is shielded from disaster or the failure of an entire region. To do this, Mike can configure active geo-replication using the Azure portal to recover data and maintain business continuity. He can also take precautions by performing manual failover from the primary server to the secondary server. This activity has the following aims:
- To configure active geo-replication using the Azure portal for the toyfactory database
- To perform manual failover from the primary server to the secondary server
Configuring active geo-replication
The following section explains how to configure active geo-replication for a standalone Azure SQL Database:
- Open the Azure portal in a web browser (https://portal.azure.com) and navigate to the toyfactory database Overview pane.
- Under the SETTINGS menu, find and select the Geo-Replication option:
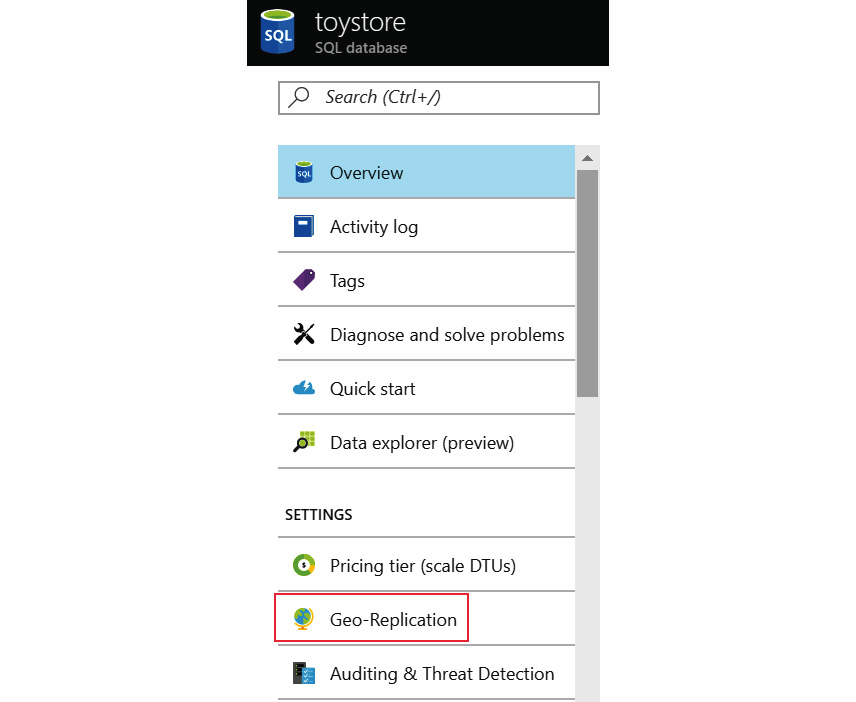
Figure 9.20: The Geo-Replication option in the SETTINGS menu
In the Geo-Replication pane, you will see a list of target Azure regions:

Figure 9.21: The Geo-Replication pane displaying the target regions
The Primary regions for the database is East US and there aren't any secondary replicas for the database.
- Select the region name from the target region list to create a secondary replica:
Region: This shows you the region you selected to create the secondary server.
Database name: The name of the database that is to be replicated.
Secondary type: The type of the secondary database—readable or offline.
Elastic database pool: The elastic pool the database is part of. It displays none if the database is not part of an elastic pool.
Pricing tier: The secondary database pricing tier. This is inherited from the primary database.
Note
The lock icon in front of an option indicates that the option is locked and can't be configured.
- Click the Target server option to create a new target server in the secondary region.
In the New server pane, provide Server name, Server admin login, and Password details, as shown in Figure 9.22:
Note
The server admin name and password should be the same as those of the primary server. This is to prevent login issues resulting from orphaned users.
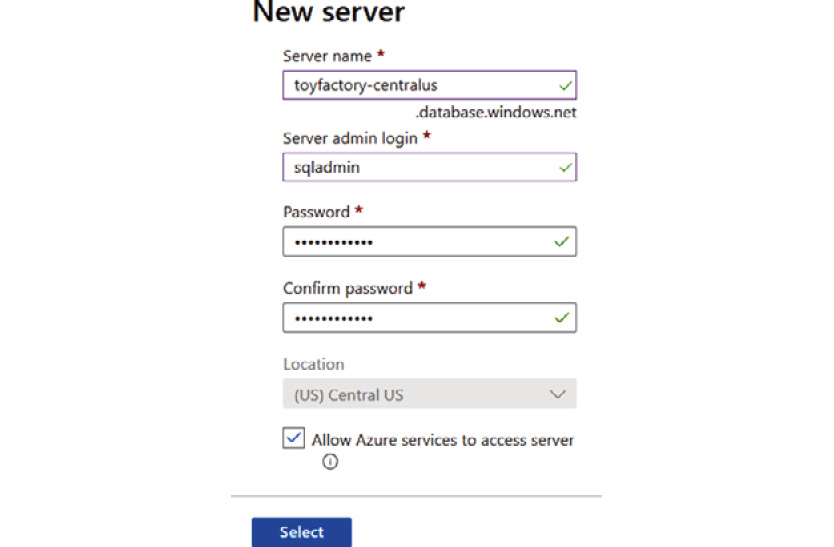
Figure 9.22: Creating a new target server
Click the Select button to continue.
- You'll be taken back to the Create secondary pane:

Figure 9.23: The Create secondary pane
Click OK to create the secondary server and start the geo-replication.
As the geo-replication is being configured, you'll see the status on the Geo-Replication pane:
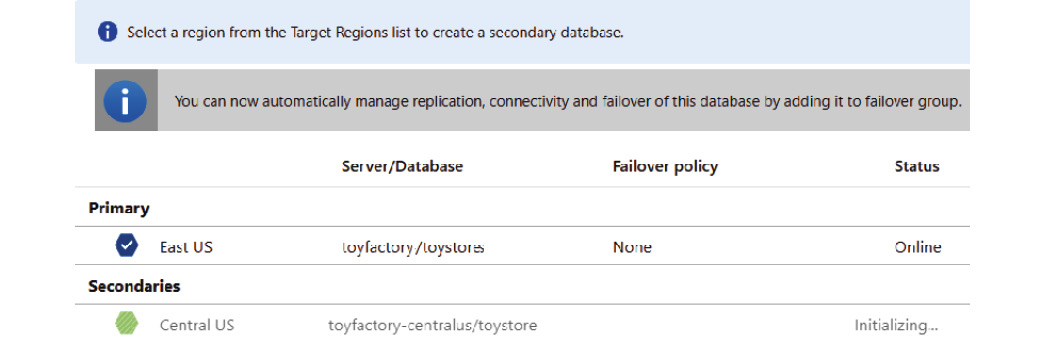
Figure 9.24: The Geo-Replication pane displaying the status of the replication—Initializing…
The Initializing… status means that the secondary server is being provisioned and the replication link is being established:
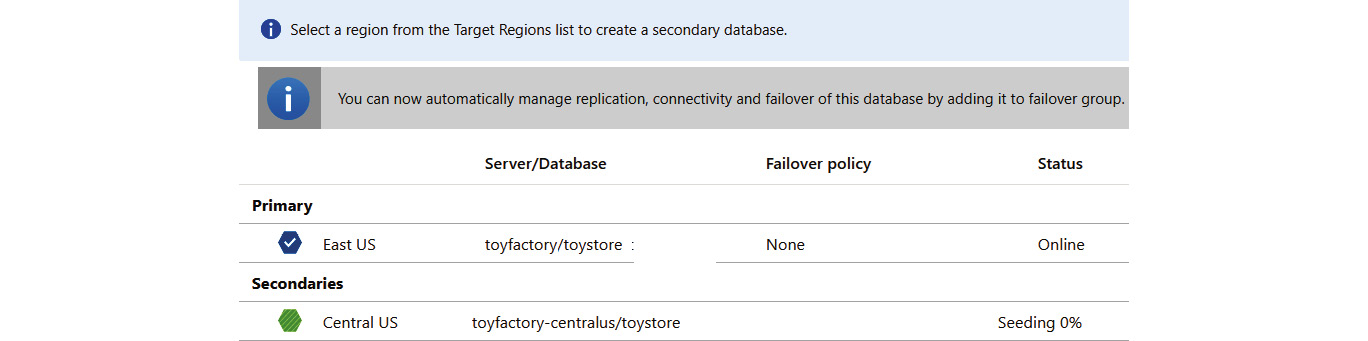
Figure 9.25: The Geo-Replication pane displaying the status of the replication—Seeding
The seeding process copies the existing data to the secondary server and it is the most time-consuming and costly process. The seeding time depends on the size of the database.
When the seeding is done, the data is replicated to the secondary database as and when it arrives at the primary database:

Figure 9.26: The Geo-Replication pane displaying the completion of the replication
- To verify this, open SQL Server Management Studio (SSMS) and sign in to the new secondary server.
Note
When connecting to the secondary server, you'll have to add the firewall rule. It is therefore advised to use the database-level firewall on the primary server.
This makes sure that the firewall rules are also copied to the secondary database during the active geo-replication setup so that you can log in easily.
It's also advised to use contained users so that you don't have to move server logins to the secondary server. Chapter 6, Security, covers firewall rules and contained users in detail.
- In the Object Explorer window, expand the server, and then expand Databases. You should see the toystore database. Expand the toystore database. You should see all the objects in the toystore database:

Figure 9.27: The Object Explorer pane of SSMS
- Press Ctrl + N to open a new query window. Execute the following query in the new query window:
SELECT COUNT(*) FROM Sales.Customers GO INSERT INTO Warehouse.Colors
VALUES(100,'Light Green',1,getdate(),getdate()+10);
The select query will return as a success; however, the insert query will fail with the following error:

Figure 9.28: The error displayed while inserting values
This is because the secondary database is read-only in an active geo-replication configuration. The secondary database is therefore only available for read transactions and now write transactions.
- In the same SSMS session, connect to the primary server and execute the following query against the toystore database in the primary server. Do not close the secondary server query window:
INSERT INTO Warehouse.Colors VALUES(100,'Magenta',1,getdate(),getdate()+10);
One row will be inserted into the Colors table.
Switch over to the query window with the secondary database connection. Execute the following query to verify whether the newly inserted value has been properly replicated to the secondary database or not:
SELECT @@ServerName As SecondaryServerName,* FROM Warehouse.Colors WHERE ColorName='Magenta'
You should get the following output:
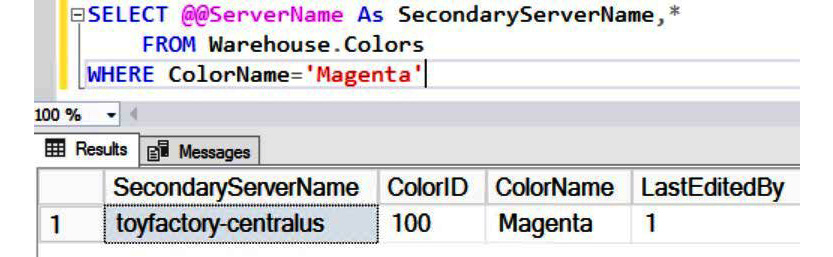
Figure 9.29: Confirming whether the inserted data is replicated in the secondary database
The data has indeed been correctly replicated to the secondary database. Now for the second part of the activity, performing a manual failover.
Performing a manual failover
To perform a manual failover, the following steps need to be taken:
- In the toystore Geo-Replication pane, scroll down and locate the PRIMARY and SECONDARIES databases:

Figure 9.30: The toystore Geo-Replication pane denoting the primary and the secondary databases
- Select the three dots (highlighted in the red rectangle) as shown in Figure 9.30. In the context menu, select Forced Failover:
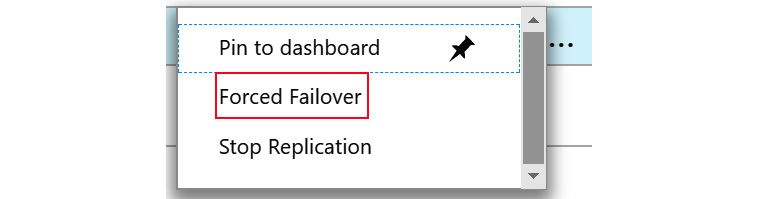
Figure 9.31: The Forced Failover option in the context menu
- Click Yes on the Failover message pop-up window to start the failover:

Figure 9.32: The Failover message pop-up window
The failover request will be submitted, and the failover will be initiated.
- The failover status is displayed as shown in the following figure. The primary status changes to Pending and the secondary replica status changes to Failover…:
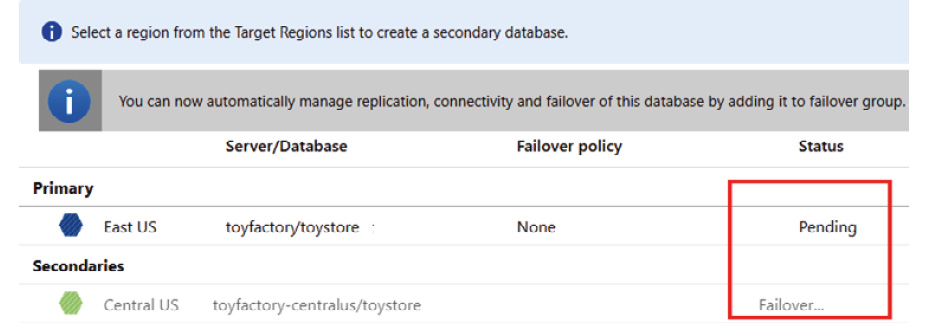
Figure 9.33: The Geo-Replication pane denoting that the failover is in progress
Once the failover is complete, observe that the primary and secondary replica roles have been reversed:
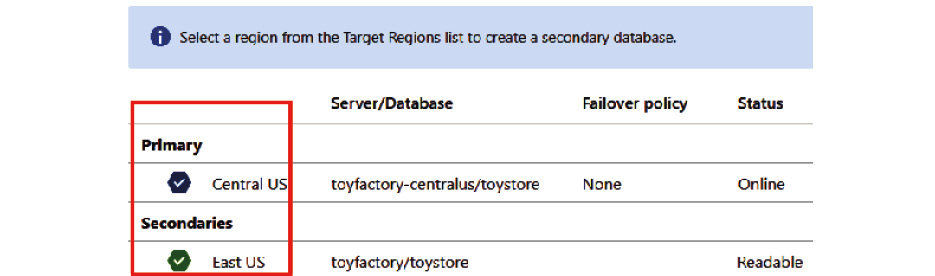
Figure 9.34: The Geo-Replication pane denoting that the failover is complete
Observe that the region color has also been reversed. The blue hexagon now denotes that the primary region is the Central US region, and the green hexagon denotes that the secondary region is now East US.
This completes the activity. In this activity, we configured active geo-replication and performed a manual failover from a primary Azure SQL Server to a secondary Azure SQL Server.
Activity: Configuring an Azure SQL Database auto-failover group using Azure portal
This activity covers the configuration of auto-failover groups for a standalone Azure SQL Database. Consider the following scenario, again involving ToyStore Ltd..
Mike wants to ensure that whenever there is a disaster or an entire region fails, there is no effect on the business of ToyStore Ltd., so he configures auto-failover groups that allow him to automatically recover one or more groups of SQL databases. To configure an auto-failover group for a standalone Azure SQL Database, the following steps need to be taken.
- Log in to the Azure portal (https://portal.azure.com) and open the packtdbserver Azure SQL Server overview page. In the overview page, select Failover groups in the Settings section and then select + Add group:

Figure 9.35: The toystore_Shard_1_50 Geo-Replication pane
- In the Failover group pane, configure the following settings:
Secondary Server: The Azure SQL server on another region that will host the secondary databases. You'll have to create a new server if you don't have one already.
Failover group name: The name of the failover group.
Read/Write failover policy: The default value is Automatic. Leave it as it is.
Read/Write grace period (hours): The default value is 1 hours. Leave it as it is.
Database within the group: Select the databases to add to the group:
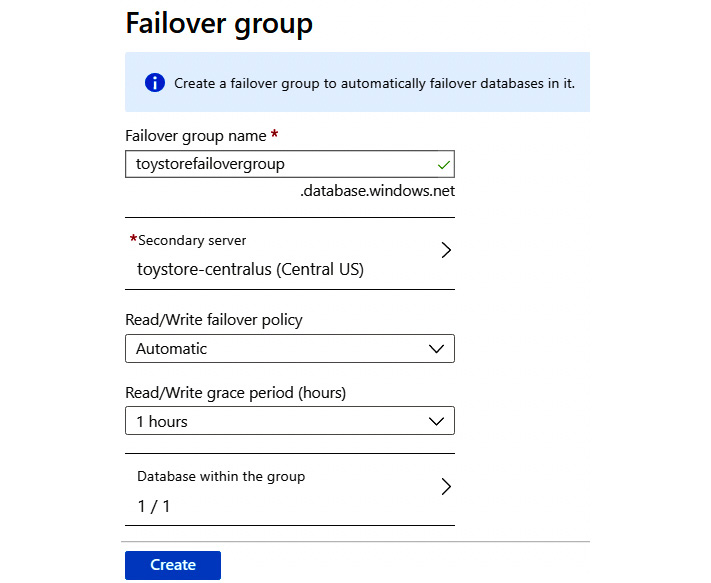
Figure 9.36: The Failover group pane
To add databases, click on Database within the group and then select the databases from the Databases page as shown in Figure 9.37:
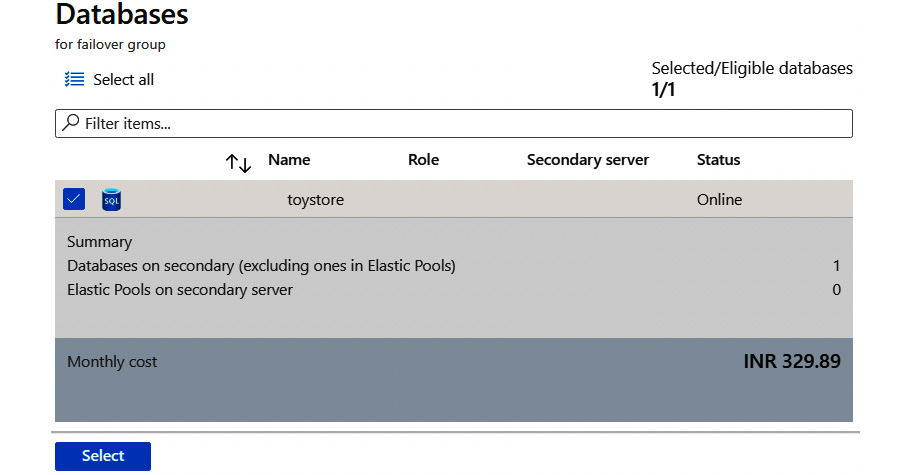
Figure 9.37: The Database page
Click Select to choose the selected databases and go back to the Failover groups page as shown in Figure 9.38.
Click Create to provision the secondary server and the failover group. The failover group shows the failover group details as shown in Figure 9.38:
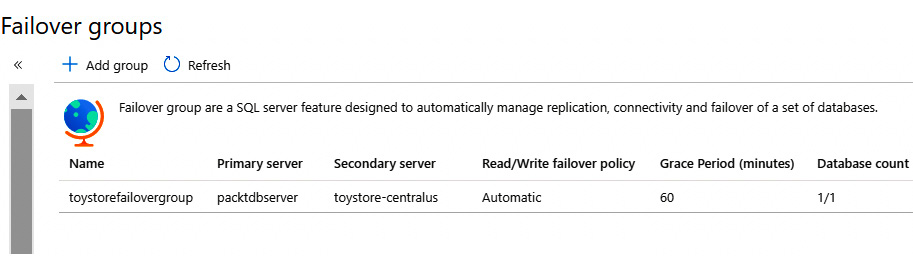
Figure 9.38: Failover group page with the failover group name
Click on the failover group name to check the failover group progress:
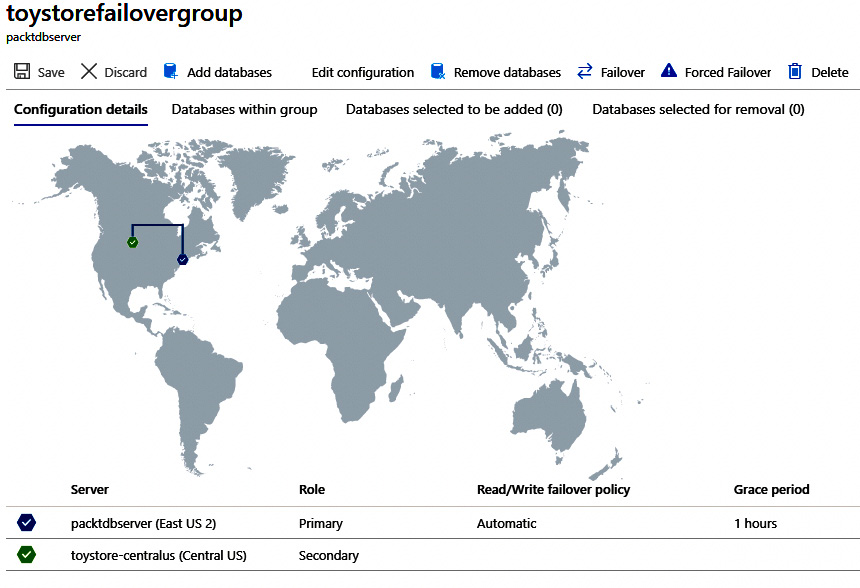
Figure 9.39: Failover group detail
Figure 9.39 shows that the failover group has been created. The primary Azure SQL Server packtdbserver is in East US 2 (shown in blue) and the secondary Azure SQL Server toystore-centralus is in Central US.
The solid line from blue to green means that the failover group is created, and a dotted line means that the failover group is being created.
You can also add/remove Azure SQL Databases, edit/remove failover groups, and perform a forced failover from the failover group detailed view as shown in the preceding figure.
Once created, you can follow the steps from the previous section to fail over and verify the replication.
Creating an auto-failover group is as simple as shown here. The time it takes to provision and replicate the database to a secondary Azure SQL Server depends on the number of databases in the failover group and the size of the databases.
Activity: Configuring active geo-replication for Azure SQL Database using PowerShell
Mike ensures that the data of the Toystore Ltd. is shielded from the disaster. In the case of a disaster or an entire region failure, he can recover or maintain his business continuity by configuring the active geo-replication toystore database using PowerShell.
Note
If you are short of time, you can execute the C:CodeChapter09 ActiveGeoReplicationManage-ActiveGeoReplication.ps1 file, providing the appropriate parameters.
To configure active geo-replication for the toystore database using PowerShell, perform the following steps:
- Press the Windows + R keys to open the Run command window. Type PowerShell_ISE.exe in the Run command window and hit Enter. This will open a new PowerShell ISE editor window, where you'll write the PowerShell commands:
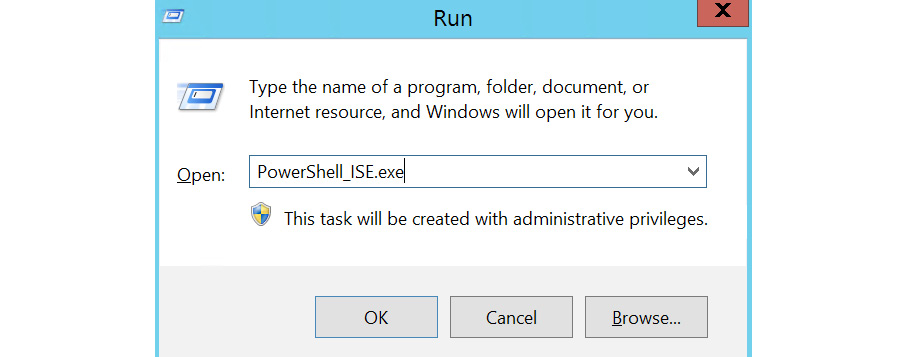
Figure 9.40: Opening PowerShell
- In the PowerShell ISE window, select File from the top menu and click Save. Alternatively, you can press Ctrl + S to save the file. In the Save As dialog box, browse to C:CodeChapter09. In the File name textbox, type Manage-ActiveGeoReplication and click Save to save the file:

Figure 9.41: Creating the Manage-ActiveGeoReplication.ps1 file
- Copy and paste the following code into Manage-ActiveGeoReplication.ps1 to define script parameters:
param
(
[parameter(Mandatory=$true)] [String] $ResourceGroup, [parameter(Mandatory=$true)] [String] $PrimarySqlServer, [parameter(Mandatory=$true)] [String] $UserName, [parameter(Mandatory=$true)] [String] $Password, [parameter(Mandatory=$true)] [String] $SecondarySqlServer, [parameter(Mandatory=$true)] [String] $SecondaryServerLocation, [parameter(Mandatory=$false)] [bool] $Failover = $false, [parameter(Mandatory=$false)] [String] $DatabasesToReplicate,
[parameter(Mandatory=$false)]
# Add/Remove database to/from secondary server [String] $Operation = "none", [parameter(Mandatory=$false)]
[String] $AzureProfileFilePath
)
The parameter descriptions are as follows:
ResourceGroup: The resource group that hosts the primary Azure SQL server and databases.
PrimarySqlServer: The name of the primary Azure SQL server.
UserName: The primary and secondary Azure SQL server admin username.
Password: The primary and secondary Azure SQL server admin password.
SecondarySqlServer: The secondary Azure SQL server name.
SecondaryServerLocation: The secondary Azure SQL server location.
Failover: A Boolean value set to false by default. When true, the script does the failover from the primary Azure SQL server to the secondary SQL server.
DatabasesToReplicate: A comma-delimited list of Azure SQL Databases to be replicated.
Operation: Accepts two values: Add and Remove; it is none by default. When set to Add, the active geo-replication link is established for the databases. When set to Remove, the active geo-replication link is removed for the databases.
AzureProfileFilePath: The full path of the Azure profile JSON file used for logging in to an Azure subscription.
- Copy and paste the following code to log in to Microsoft Azure, and set the Azure context to your subscription:
# log the execution of the script
Start-Transcript -Path ".LogManage-ActiveGeoReplication.txt" -Append
# Set AzureProfileFilePath relative to the script directory if it's not
provided as parameter
if([string]::IsNullOrEmpty($AzureProfileFilePath))
{
$AzureProfileFilePath="....MyAzureProfile.json"
}
#Login to Azure Account
if((Test-Path -Path $AzureProfileFilePath))
{
$profile = Select-AzProfile -Path $AzureProfileFilePath
$SubscriptionID = $profile.Context.Subscription.SubscriptionId
}
else
{
Write-Host "File Not Found $AzureProfileFilePath" -ForegroundColor
Red
# Provide your Azure Credentials in the login dialog box
$profile = Login-AzAccount
$SubscriptionID = $profile.Context.Subscription.SubscriptionId
}
#Set the Azure Context
Set-AzContext -SubscriptionId $SubscriptionID | Out-Null
The preceding code starts by logging in to the Manage-ActiveGeoReplication.txt file created under the log directory within the parent directory of the Manage-ActiveGeoReplication.ps1 script.
It then checks for the profile information in the JSON file provided by the AzureProfileFilePath variable. If found, it then sets the PowerShell context to the subscription ID, as specified in the profile file; otherwise, it asks the user to annually log in to the Azure account to set the context.
- Copy and paste the following code to provision the secondary Azure SQL server if it doesn't already exist:
if($Operation -eq "Add")
{
# Check if Azure SQL Server Exists
# An error is returned and stored in notexists variable if resource group exists
Get-AzSqlServer -ServerName $SecondarySqlServer
-ResourceGroupName $ResourceGroup -ErrorVariable notexists
-ErrorAction SilentlyContinue
# provision the secondary server if it doesn't exist
if($notexists)
{
Write-Host "Provisioning Azure SQL Server
$SecondarySqlServer" -ForegroundColor Green
$credentials = New-Object -TypeName System.Management.
Automation.PSCredential -ArgumentList $UserName, $(ConvertTo- SecureString
-String $Password -AsPlainText -Force)
$_SecondarySqlServer = @{ ResourceGroupName = $ResourceGroup; ServerName =
$SecondarySqlServer; Location = $SecondaryServerLocation; SqlAdministratorCredentials = $credentials; ServerVersion = '12.0';
}
New-AzSqlServer @_SecondarySqlServer;
}
}
else
{
Write-Host $notexists -ForegroundColor Yellow
}
The preceding code will provision a new secondary Azure SQL server if the $Operation parameter is set to Add. The SQL server creation code is similar to what was used in Chapter 1, Introduction to Azure SQL managed databases.
- Copy and paste the following code to configure active geo-replication for the individual databases:
# Configure Active Geo-Replication for individual databases
if(![string]::IsNullOrEmpty($DatabasesToReplicate.Replace(',',''))
-and $Operation -eq "Add")
{
$dbname = $DatabasesToReplicate.Split(',');
foreach($db in $dbname)
{
Write-Host "Replicating database $db to
$SecondarySqlServer " -ForegroundColor Green
#Get the database object for the given database name
$database = Get-AzSqlDatabase -DatabaseName $db
-ResourceGroupName $ResourceGroup -ServerName $PrimarySqlServer #pipe the
database object to New-
AzSqlDatabaseSecondary cmdlet
$database | New-AzSqlDatabaseSecondary
-PartnerResourceGroupName $ResourceGroup -PartnerServerName
$SecondarySqlServer -AllowConnections "No"
}
}
The preceding code first checks whether the $DatabaseToReplicate parameter is empty. If it's not and the $operation parameter is set to Add, it splits the comma-delimited list of the databases and configures active geo-replication for each one of them using the New-AzSqlDatabaseSecondary cmdlet.
New-AzSqlDatabaseSecondary takes three parameters:
- PartnerResourceGroupName: The resource group name that contains the secondary SQL Server. The primary and secondary resource groups are assumed to be the same in this script.
- PartnerServerName: The name of the secondary Azure SQL server.
- AllowConnections: This specifies the read intent of the secondary database. It's set to No.
- Copy and paste the following code to remove active geo-replication for the individual Azure SQL Databases:
if($Operation -eq "Remove")
{
$dbname = $DatabasesToReplicate.Split(','); foreach($db in $dbname)
{
Write-Host "Removing replication for database $db "
-ForegroundColor Green
$database = Get-AzSqlDatabase -DatabaseName $db
-ResourceGroupName $ResourceGroup -ServerName $PrimarySqlServer
$database | Remove-AzSqlDatabaseSecondary
-PartnerResourceGroupName $ResourceGroup -ServerName
$PrimarySqlServer -PartnerServerName $SecondarySqlServer
}
}
The preceding code runs when $Operation is set to Remove. It first splits the comma-separated database list in the $DatabaseToReplicate parameter. It then removes the replication link for each database using the Remove- AzSqlDatabaseSecondary cmdlet.
Remove-AzSqlDatabaseSecondary accepts three parameters:
- PartnerResourceGroupName: The resource group of the secondary SQL server. The script assumes that it's the same as the primary SQL server.
- ServerName: The primary SQL server's name.
- PartnerServerName: The secondary SQL server's name.
This only stops the replication between the primary and the secondary databases; it doesn't delete the secondary databases. The database and server can be removed separately if required.
- Copy and paste the following code to fail over individual databases to the secondary SQL server:
# failover individual databases from primary to secondary
if($Failover -eq
$true)
{
$dbname = $DatabasesToReplicate.Split(','); foreach($db in $dbname)
{
Write-Host "Failover $db to $SecondarySqlServer..."
-ForegroundColor Green
$database = Get-AzSqlDatabase -DatabaseName $db
-ResourceGroupName $ResourceGroup -ServerName $SecondarySqlServer
$database | Set-AzSqlDatabaseSecondary
-PartnerResourceGroupName $ResourceGroup -Failover
}
}
The preceding code executes if the $Failover parameter is set to true. It first splits the comma-delimited list of the databases in $DatabaseToReplicate and then performs manual failover from the primary server to the secondary server using Set-AzSqlDatabaseSecondary.
Set-AzSqlDatabaseSecondary accepts two parameters:
- PartnerResourceGroupName: The resource group of the secondary SQL server. The script assumes that it's the same as the primary SQL server.
- Failover: Initiates the failover.
The database to fail over is piped to the Set-AzSqlDatabaseSecondary cmdlet. This completes the script. Press Ctrl + S to save the file.
Executing the PowerShell script
- Press Windows + R to open the Run command window. Type PowerShell and hit Enter to open a new PowerShell console window.
- Change the directory to the folder that has the Manage-ActiveGeoReplication.ps1 script inside of it. For example, if the script is in the C:CodeChapter09ActiveGeoReplication directory, then run the following command to switch to that directory:
cd C:CodeChapter09ActiveGeoReplication
- In the PowerShell console, execute the following command to establish active geo-replication for the toystore_Shard_1_50 and toystore_ Shard_50_100 databases:
.Manage-ActiveGeoReplication.ps1 -ResourceGroup toystore
-PrimarySqlServer toyfactory -UserName sqladmin -Password Packt@pub2
-SecondarySqlServer toyfactory-centralus
-SecondaryServerLocation "Central US" -DatabasesToReplicate "toystore_ Shard_1_50,toystore_Shard_50_100" -Operation "Add"
-AzureProfileFilePath C:CodeMyAzureProfile.json
The preceding command will call Manage-ActiveGeoReplication.ps1 to start active geo-replication for the toystore_Shard_1_50 and toystore_Shard_50_100 databases on the toyfactory primary server to the toyfactory-centralus secondary Azure SQL server.
- You will have to modify the command to provide the relevant parameter values. In the PowerShell console window, run the following command to fail over the databases to the secondary SQL server:
.Manage-ActiveGeoReplication.ps1 -ResourceGroup toystore
-PrimarySqlServer toyfactory -UserName sqladmin -Password Packt@pub2
-SecondarySqlServer toyfactory-centralus
-SecondaryServerLocation "Central US" -DatabasesToReplicate "toystore_ Shard_1_50,toystore_Shard_50_100" -failover $true
-AzureProfileFilePath C:CodeMyAzureProfile.json
The preceding command will fail over the databases from the primary server to the secondary server. In other words, the primary becomes the secondary and vice versa.
- In the PowerShell console window, execute the following command to remove active geo-replication:
.Manage-ActiveGeoReplication.ps1 -ResourceGroup toystore
-PrimarySqlServer toyfactory -UserName sqladmin -Password Packt@pub2
-SecondarySqlServer toyfactory-centralus
-SecondaryServerLocation "Central US" -DatabasesToReplicate "toystore_ Shard_1_50,toystore_Shard_50_100" -Operation "Remove"
-AzureProfileFilePath C:CodeMyAzureProfile.json
The preceding command will remove the replication link between the primary and the secondary servers, though please note that the secondary server and the databases will not be removed.
In this activity, we used PowerShell commands to create a secondary Azure SQL Server, create active geo-replication between primary and secondary Azure SQL Servers, add/remove databases to active geo-replication, and remove active geo-replication.
Activity: Configuring auto-failover groups for Azure SQL Database using PowerShell
In this activity, we will configure auto-failover groups using PowerShell for ToyStore Ltd.:
Note
If you are short of time, you can execute the C:CodeChapter09ActiveGeoReplicationManage-FailoverGroup.ps1 file, providing the appropriate parameters.
- Press Windows + R to open the Run command window. Type PowerShell_ ISE.exe in the Run command window and hit Enter. This will open a new PowerShell ISE editor window. This is where you'll write the PowerShell commands:
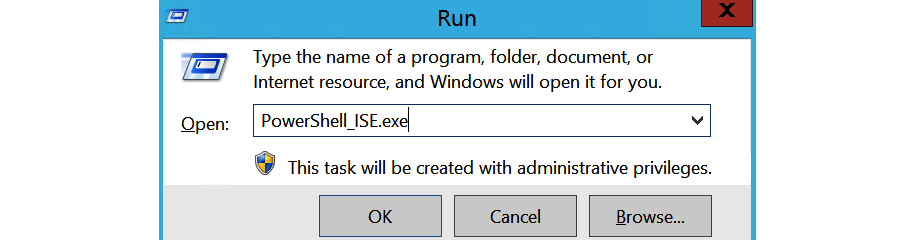
Figure 9.42: Opening PowerShell
In the PowerShell ISE, select File from the top menu and click Save. Alternatively, you can press Ctrl + S to save the file. In the Save as dialog box, browse to the C:CodeChapter09 directory. In the File name textbox, type Manage-FailoverGroup.ps1 and click Save to save the file:

Figure 9.43: Creating the Manage-FailoverGroup.ps1 file
- In the Manage-FailoverGroup.ps1 file, copy and paste the following code to define the script parameters:
param (
[parameter(Mandatory=$true)] [String] $ResourceGroup, [parameter(Mandatory=$true)] [String] $PrimarySqlServer, [parameter(Mandatory=$false)] [String] $UserName, [parameter(Mandatory=$false)] [String] $Password, [parameter(Mandatory=$true)] [String] $SecondarySqlServer, [parameter(Mandatory=$false)]
[String] $SecondaryServerLocation, [parameter(Mandatory=$false)] [bool] $Failover = $false, [parameter(Mandatory=$false)] [String]
$DatabasesToReplicate, [parameter(Mandatory=$true)] [String]
$FailoverGroupName, [parameter(Mandatory=$false)] [String] $Operation =
"none", [parameter(Mandatory=$false)] [String] $AzureProfileFilePath
)
Most of the parameters are similar to what was explained in the previous activity, except FailoverGroupName. This is the name of the failover group that is going to be created.
- Copy and paste the following code to log in to Microsoft Azure and set the Azure context to your subscription:
# log the execution of the script
Start-Transcript -Path ".LogManage-FailoverGroup.txt" -Append # Set AzureProfileFilePath relative to the script directory if it's not provided as parameter if([string]::IsNullOrEmpty($AzureProfileFilePath))
{
$AzureProfileFilePath="....MyAzureProfile.json"
}
#Login to Azure Account
if((Test-Path -Path $AzureProfileFilePath))
{
$profile = Import-AzContext -Path $AzureProfileFilePath
$SubscriptionID = $profile.Context.Subscription.SubscriptionId
}
else
{
Write-Host "File Not Found $AzureProfileFilePath" -ForegroundColor
Red
# Provide your Azure Credentials in the login dialog box
$profile = Login-AzAccount
$SubscriptionID = $profile.Context.Subscription.SubscriptionId
}
#Set the Azure Context
Set-AzContext -SubscriptionId $SubscriptionID | Out-Null
The preceding code starts by logging in to the Manage-FailoverGroup.txt file, created in the log directory within the parent directory of the Manage-FailoverGroup.ps1 script.
It then checks for the profile information in the JSON file provided by the AzureProfileFilePath variable. If found, it sets the PowerShell context to the subscription ID, as specified in the profile file; otherwise, it asks the user to manually log in to the Azure account to set the context.
- Copy and paste the following code to provision a new secondary SQL server, if one doesn't already exist:
IF($Operation -eq "Create")
{
# An error is returned and stored in notexists variable if resource group exists
Get-AzSqlServer -ServerName $SecondarySqlServer
-ResourceGroupName $ResourceGroup -ErrorVariable notexists
-ErrorAction SilentlyContinue
# provision the secondary server if it doesn't exist if($notexists)
{
Write-Host "Provisioning Azure SQL Server $SecondarySqlServer"
-ForegroundColor Green
$credentials = New-Object -TypeName System.Management.Automation.
PSCredential -ArgumentList $UserName, $(ConvertTo-SecureString -String
$Password -AsPlainText -Force)
$_SecondarySqlServer = @{ ResourceGroupName = $ResourceGroup; ServerName = $SecondarySqlServer; Location = $SecondaryServerLocation;
SqlAdministratorCredentials = $credentials; ServerVersion = '12.0';
}
New-AzSqlServer @_SecondarySqlServer;
}
else
{
Write-Host $notexists -ForegroundColor Yellow
}
The preceding code is the same as what was explained in Chapter 1, Introduction to Azure SQL managed databases, to provision a new SQL server. The new server is provisioned only when $Operation is set to Create.
- Copy and paste the following code to create the failover group:
# Create the failover group
Write-Host "Creating the failover group $FailoverGroupName "
-ForegroundColor Green
$failovergroup = New-AzSqlDatabaseFailoverGroup '
–ResourceGroupName $ResourceGroup '
-ServerName $PrimarySqlServer '
-PartnerServerName $SecondarySqlServer '
–FailoverGroupName $FailoverGroupName '
–FailoverPolicy Automatic '
-GracePeriodWithDataLossHours 1
}
The preceding code creates a new failover group if the $Operation parameter is set to Create. The New-AzSqlDatabaseFailoverGroup cmdlet accepts the following parameters:
- ResourceGroupName: The name of the resource group that contains the primary SQL server
- ServerName: The primary SQL server name
- PartnerServerName: The secondary SQL server name FailoverGroupName: The name of the failover group to be created
- FailoverPolicy: The failover policy, Automatic or Manual
- GracePeriodWithDataLossHours: The value for the duration the automatic failover should wait after a region outage, in hours
The failover group is created at the primary server location.
- Copy and paste the following code to add the databases to the failover group:
# Add databases to the failover group if(![string]::IsNullOrEmpty($DatabasesToReplicate.Replace(',',''))
-and $Failover -eq $false -and $Operation -eq "Create")
{
$dbname = $DatabasesToReplicate.Split(','); foreach($db in $dbname)
{
Write-Host "Adding database $db to failover group
$FailoverGroupName " -ForegroundColor Green
$database = Get-AzSqlDatabase -DatabaseName $db
-ResourceGroupName $ResourceGroup -ServerName $PrimarySqlServer Add-AzSqlDatabaseToFailoverGroup -ResourceGroupName
$ResourceGroup -ServerName $PrimarySqlServer -FailoverGroupName
$FailoverGroupName -Database $database
}
}
The preceding code splits the comma-delimited database names in the $DatabasesToReplicate parameter and adds them to the group.
The Add-AzSqlDatabaseToFailoverGroup cmdlet adds the databases to the group and accepts the following parameter values:
- ResourceGroupName: The name of the primary SQL Server resource group.
- ServerName: The primary SQL server's name.
- FailoverGroupName: The name of the failover group the databases are to be added to.
- Database: The database object of the database to be added. This is set by calling the Get-AzSqlDatabase cmdlet.
The databases are added to the failover group and replication sync is started.
- Copy and paste the following code to manually fail over all the failover groups to the secondary server:
# failover to secondary
if($Failover)
{
Write-Host "Failover to secondary server $SecondarySqlServer "
-ForegroundColor Green
Switch-AzSqlDatabaseFailoverGroup -ResourceGroupName
$ResourceGroup -ServerName $SecondarySqlServer -FailoverGroupName
$FailoverGroupName
}
The Switch-AzSqlDatabaseFailoverGroup cmdlet does the manual failover. It accepts the following parameters:
- ResourceGroupName: The failover group that includes the SQL Server resource group name
- ServerName: The primary SQL server name
- FailoverGroupName: The failover group name
- Copy and paste the following code to remove the failover group and stop active geo-replication between the primary and secondary servers:
if($Operation -eq "Remove")
{
Write-Host "Deleting the failover group $FailoverGroupName "
-ForegroundColor Green
Remove-AzSqlDatabaseFailoverGroup -ResourceGroupName
$ResourceGroup -ServerName $PrimarySqlServer -FailoverGroupName
$FailoverGroupName
# remove the replication link
$dbname = $DatabasesToReplicate.Split(','); foreach($db in $dbname)
{
Write-Host "Removing replication for database $db "
-ForegroundColor Green
$database = Get-AzSqlDatabase -DatabaseName $db
-ResourceGroupName $ResourceGroup -ServerName $PrimarySqlServer
$database | Remove-AzSqlDatabaseSecondary
-PartnerResourceGroupName $ResourceGroup -ServerName
$PrimarySqlServer -PartnerServerName $SecondarySqlServer
}
}
The preceding code is executed when the $Operation parameter is set to Remove. Now, Remove-AzSqlDatabaseFailoverGroup deletes the failover group. It accepts the following parameters:
- ResourceGroupName: The failover group resource group name
- ServerName: The primary SQL server name
- FailoverGroupName: The name of the failover group that is to be deleted. Removing the failover group doesn't stop replication sync.
The databases are still being replicated and are not part of a failover group. The databases can still fail to the secondary server individually, as shown in the previous activity.
Remove-AzSqlDatabaseSecondary removes or stops the replication, as explained in the previous activity.
This completes the script. Press Ctrl + S to save the script.
Executing the PowerShell script
To execute the PowerShell script, perform the following steps:
- Press Windows + R to open the Run command window. Type PowerShell and hit Enter to open a new PowerShell console window.
- Change the directory to the folder that has the Manage- FailoverGroup.ps1 script in it. For example, if the script is in the C:CodeChapter09 directory, run the following command to switch to that directory:
cd C:CodeChapter09
- In the PowerShell console window, execute the following command to create a new failover group and add databases to it:
.Manage-FailoverGroup.ps1 -ResourceGroup toystore
-PrimarySqlServer toyfactory -UserName sqladmin -Password Packt@pub2
-SecondarySqlServer toyfactory-centralus
-SecondaryServerLocation "Central US" -DatabasesToReplicate "toystore_Shard_100_150,toystore_Shard_150_200" -Operation "Create"
-FailoverGroupName toyfactoryfailovergroup
-AzureProfileFilePath c:CodeMyAzureProfile.json
The preceding command will create a new failover group, toyfactoryfailovergroup, and add the toystore_Shard_100_150 and toystore_150_200 databases to the newly created failover group.
The failover group name is the new endpoint to be used by the application to connect to the failover group. In other words, the application connects to toyfactoryfailovergroup.database.windows.net and not individual primary or secondary database endpoints.
Note
The toystore_Shard_100_150 and toystore_150_200 databases were created in Chapter 7, Scalability.
This is similar to the availability group listener in an Always On configuration.
The Azure SQL server that the failover group points to is transparent to the user. In the case of a failover, the failover group endpoint points to the new primary.
Therefore, unlike active geo-replication, you don't need to manage the database connection string (endpoint) within the application when the failover occurs.
- In the PowerShell console window, execute the following code to perform the manual failover:
.Manage-FailoverGroup.ps1 -PrimarySqlServer toyfactory -ResourceGroup toystore
-SecondarySqlServer toyfactory-centralus -FailoverGroupName toyfactoryfailovergroup -Failover $true -AzureProfileFilePath c:Code MyAzureProfile.json
The preceding command will fail over all the databases in the toyfactoryfailovergroup failover group to the secondary server and make it the new primary server.
You can verify this from the Azure portal.
- Copy and paste the following command to remove the failover group and stop the replication between the primary and secondary servers:
# delete failover group and stop the replication
.Manage-FailoverGroup.ps1 -ResourceGroup toystore
-PrimarySqlServer toyfactory-centralus -UserName sqladmin -Password Packt@
pub2 -SecondarySqlServer toyfactory -SecondaryServerLocation "Central US"
-DatabasesToReplicate "toystore_Shard_100_150,toystore_Shard_150_200"
-Operation "Remove" -FailoverGroupName toyfactoryfailovergroup
-AzureProfileFilePath c:CodeMyAzureProfile.json
The preceding command will remove the toyfactoryfailovergroup failover group and break the replication link between the primary and secondary databases.
However, the secondary server and the databases won't be deleted.
Notice that the PrimarySqlServer parameter value is toyfactory-centralus and that the SecondarySqlServer parameter value is toyfactory, which is the reverse of what we provided in Step 2 of Executing the PowerShell script when creating the failover group. This is because, when we did a manual failover, the primary and secondary server roles were reversed. As mentioned earlier, the failover group is maintained by the primary database, so, to delete the failover group, the primary is now the secondary and the secondary is the new primary.
Up to now, we have seen steps to configure an auto-failover group for Azure SQL Database. Now let's see the steps for configuring an auto-failover group in SQL Managed Instance.
Activity: Configuring an auto-failover group for SQL Managed Instance
In this activity, we will learn to set up a failover group between SQL managed instances.
We will cover the following:
- Deploying a secondary virtual network
- Deploying secondary SQL managed instances for failover group setup
- Setting up global virtual network peering between a primary and secondary virtual network
- Creating and testing a failover group
You need to have a primary SQL managed instance before deploying the secondary SQL managed instance. We are using the same SQL managed instance as the primary one that we deployed in Chapter 1, Introduction to Azure SQL managed databases.
Deploying a secondary virtual network
You need to manually prepare a virtual network before deploying a secondary SQL managed instance using the Azure portal. This step is essential since it is a requirement of having different IP ranges for the SQL Managed Instance subnet.
To verify the primary virtual network subnet IP ranges, follow these steps:
- Go to the Azure portal and navigate to SQL Managed Instance resource group and select the primary virtual network.
- Select Subnets under Settings and keep a note of IP ranges for the SQL Managed Instance subnet:

Figure 9.44: Primary SQL Managed Instance subnet range
To create a secondary virtual network, follow these steps:
- Go to the Azure portal and select Create a resource:

Figure 9.45: Creating a resource
- Search for Virtual Network:
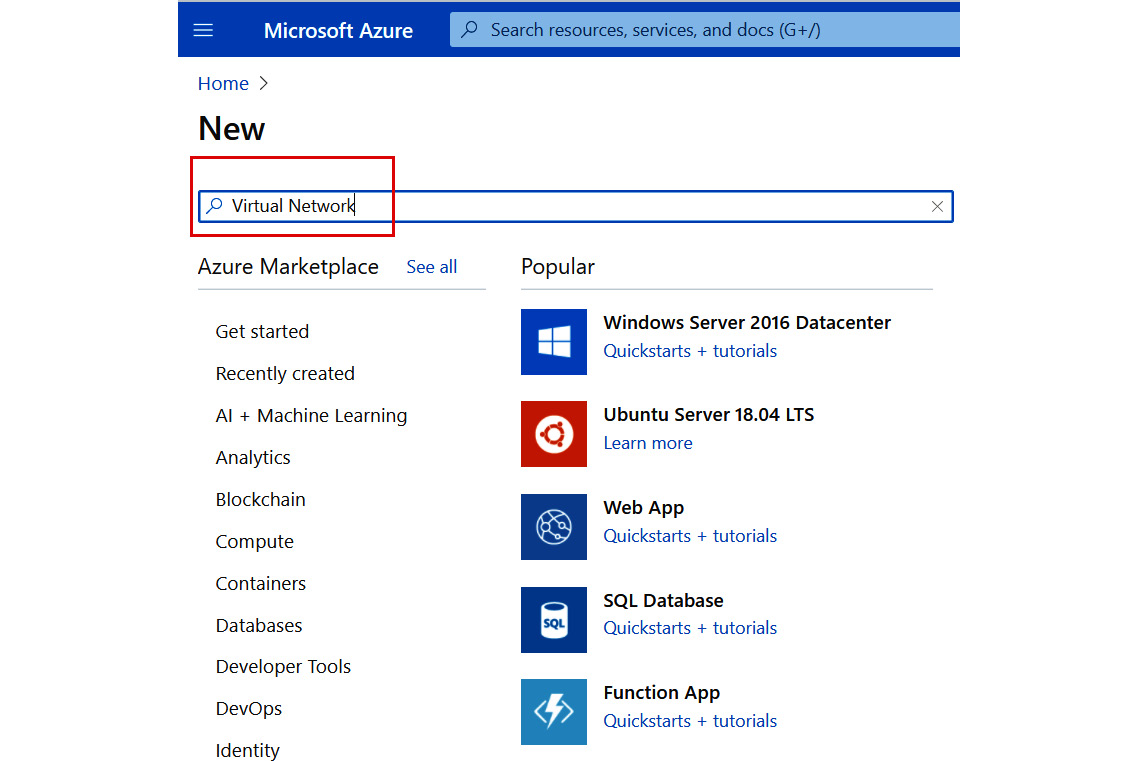
Figure 9.46: Searching for Virtual Network
- Click on Create to deploy the virtual network resource:

Figure 9.47: Creating a virtual network resource
- Fill the required details on the form, including the Subscription, Resource group, Name, and Region fields, then move to the IP Addresses tab:

Figure 9.48: The Basics tab
- Make sure that you choose different IP ranges for the SQL Managed Instance subnet than for the primary instance and click on the Review + create button to deploy this virtual network. To read more about virtual networks and CIDR, please visit https://devblogs.microsoft.com/premier-developer/understanding-cidr-notation-when-designing-azure-virtual-networks-and-subnets/:

Figure 9.49: Virtual network IP Addresses tab
Deploying a secondary SQL managed instance
Deployment steps for secondary SQL managed instance deployment are mostly the same as those we followed in Chapter 1, Introduction to Azure SQL managed databases, for deploying an SQL managed instance. We will quickly recap some steps and look at the steps that are essential to set up a secondary instance with a primary instance DNS zone.
Follow these steps to create a secondary SQL managed instance:
- Go to the Azure portal and select the single SQL Managed Instance deployment option and fill the necessary details in the Basics form, then move to the Networking tab:

Figure 9.50: SQL Managed Instance Basics tab
- Select the virtual network and subnet that we created in the previous virtual network activity and move to the Additional settings tab:

Figure 9.51: SQL Managed Instance Networking tab
- Select the geo-replication settings, such as deploying this instance as a failover secondary and specifying the primary DNS zone, and make sure that the collation and time zone settings match the primary instance. Finally, click on Review + create to deploy the secondary SQL managed instance:
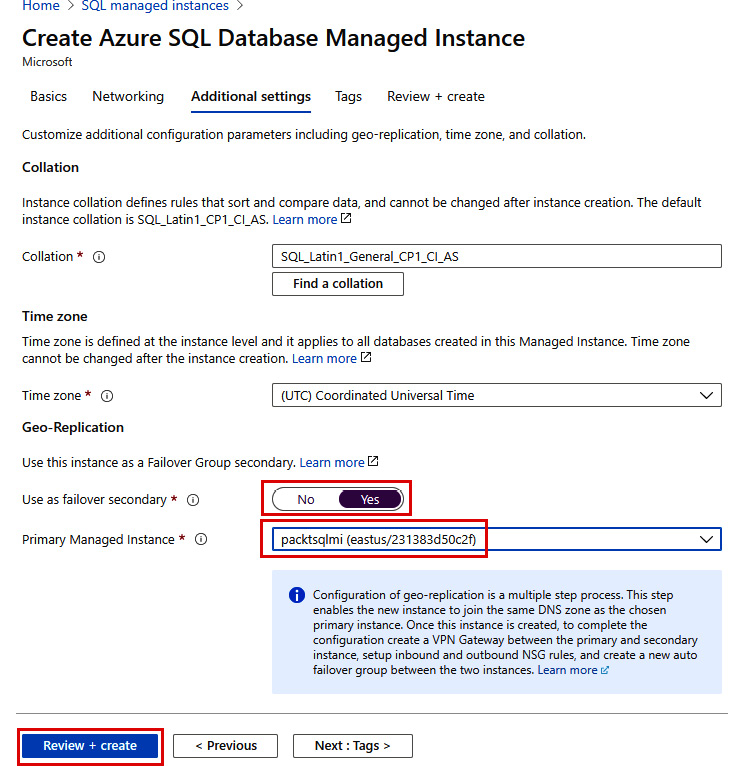
Figure 9.52: SQL Managed Instance Additional settings tab
Configuring global virtual network peering between primary and secondary virtual networks
This step is required to allow traffic between two SQL managed instances to transfer data. You can use ExpressRoute or a virtual network–to–virtual network VPN tunnel to set up this traffic, but here we are using an easy, low-latency, high-bandwidth global VNet peering setup.
Please follow these steps to configure global VNet peering between cross-region virtual networks:
- Go to the Azure portal, navigate to the primary instance resource group, and select the virtual network.
- Select the Peerings option under Settings and click on Add:
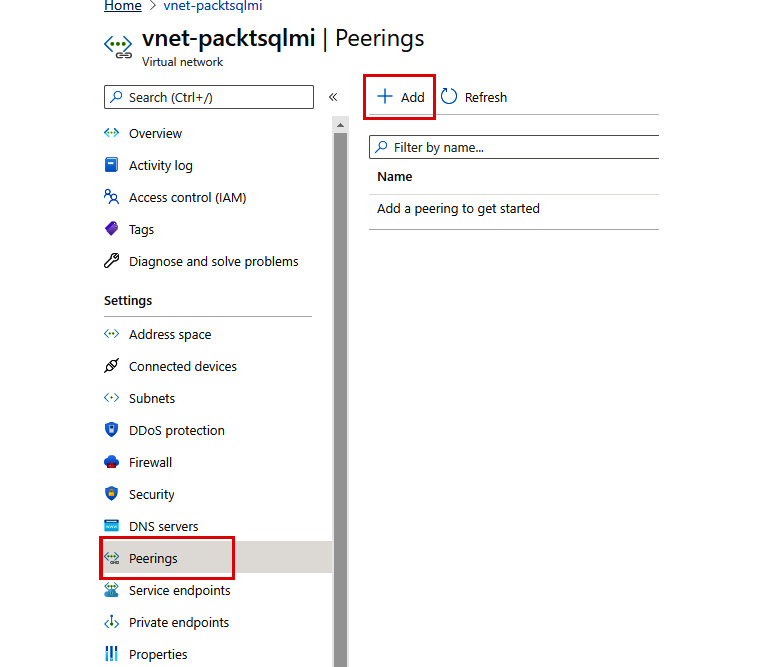
Figure 9.53: The Peerings pane
- Input the primary and secondary link names, choose the remote virtual network for the secondary server, and click on Add:

Figure 9.54: The Add peering form
- You can monitor the notification bell icon for an indication of the successful deployment of peering connections:
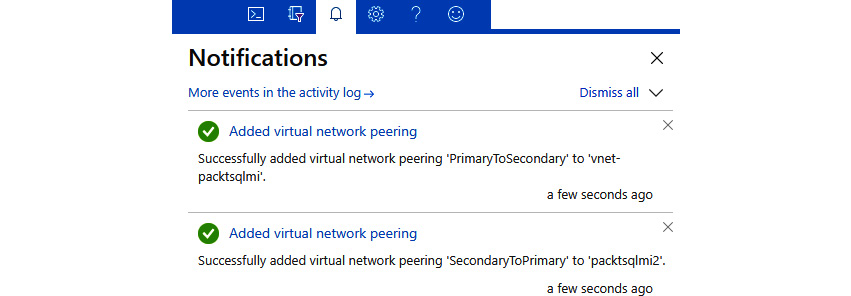
Figure 9.55: Notification for peering connections
Creating and testing the failover group
So far, we have deployed a secondary SQL managed instance and set up the data traffic between the primary and secondary virtual network using global virtual network peering. Now let's create a failover group to start the geo-replication. The secondary instance should be empty before adding it to the failover group.
To create and test the failover group, follow these steps:
- Go to the Azure portal, navigate to the primary SQL managed instance and select Failover groups under Data management. Click on Add group:
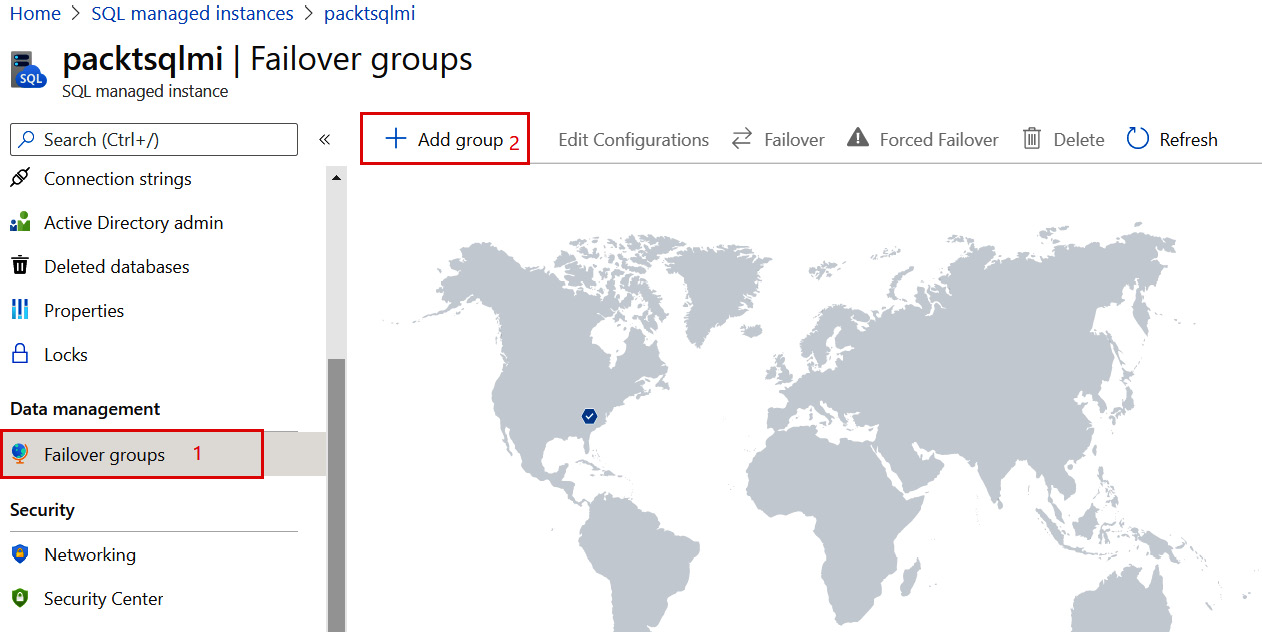
Figure 9.56: Failover groups pane
- Fill in Failover group name and select the secondary SQL managed instance. Click on Create to deploy:
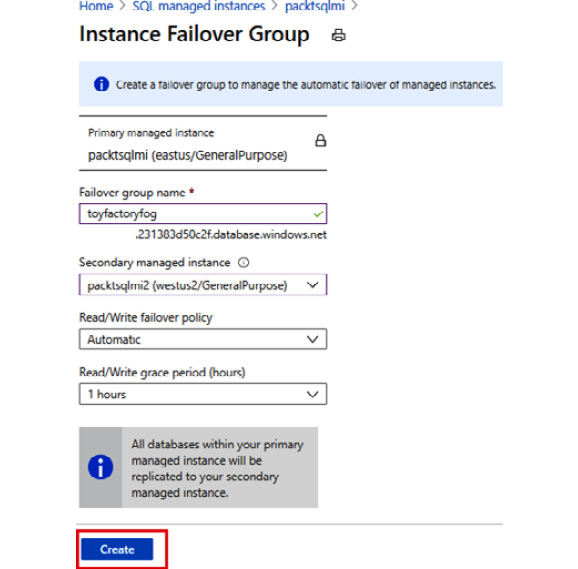
Figure 9.57: Instance Failover Group pane
- After successful deployment, you will see the status of the failover group using the Failover groups pane in SQL Managed Instance:
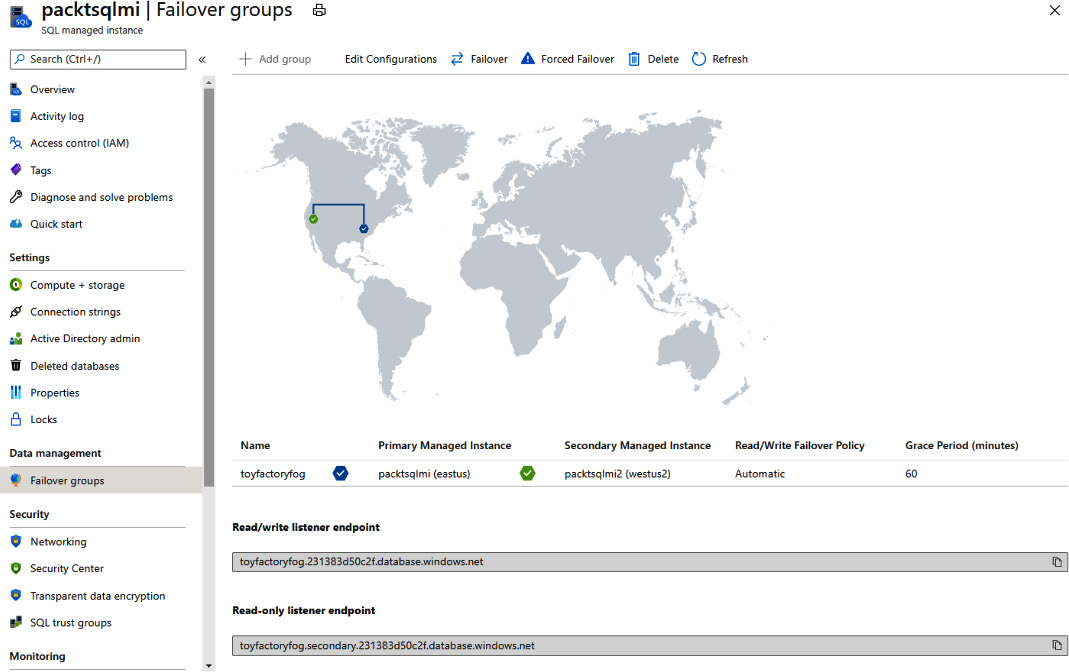
Figure 9.58: Failover groups pane after deployment
Testing the failover
In this step, you will fail your failover group over to the secondary server, and then fail back using the Azure portal:
- Go to the Azure portal and navigate to your secondary SQL managed instance. Select Failover groups under Data management.
- Review which SQL managed instance is the primary, and which instance is the secondary:

Figure 9.59: Secondary SQL Managed Instance failover group
- Select Failover and then select Yes on the warning about TDS sessions being disconnected:

Figure 9.60: TDS warning notification
- Review the failover group state; the two SQL managed instances should have switched roles:

Figure 9.61: Verifying the role change after failover
- Go to the new secondary SQL managed instance and select Failover once again to failback to the primary instance.
In this activity, we have learned to create a failover group for an SQL Managed Instance for a business continuity solution. We have seen steps to deploy a secondary SQL managed instance and global virtual network peering. At the end of the activity, we created and tested the failover group.
Summary
In this chapter, you learned about the high availability and DR features of Azure SQL Database and SQL Managed Instance. High availability is built into Azure SQL Database and SQL Managed Instance and is managed by Microsoft, whereas DR can be achieved by configuring active geo-replication and failover groups as and when required.
You also learned about ADR, a new feature introduced with Azure SQL Database, SQL Managed Instance, and SQL Server 2019, which provides instant database recovery, transaction rollbacks, and aggressive log truncation.
Furthermore, you saw how zone-redundant configuration provides additional high availability by replicating the database in multiple Availability Zones within the same region.
In the next chapter, you will learn about how to monitor an Azure SQL Database and SQL Managed Instance using the Azure portal, dynamic management views, and extended events to help improve the performance of your application.