
13
Tips and Outlook
This chapter is divided into two parts. In the first part, I collected the most useful tips on how to make your React Native project a success. These tips come the things I have learned through a lot of different React Native projects I have worked on as a developer, consultant, software architect, or product owner. I also use React Native as a tech stack in my own companies, where I’m responsible for the business side, so I also know the requirements and pain points of this side.
The second part is an outlook on how I think React Native, its community, and its ecosystem will develop in the future. This is based on its technical development as well as the commitment from different big players in the community.
This means you will learn the following things in this chapter:
- Understanding the most important things to make your React Native project a success
- Understanding the bright future of React Native
Technical requirements
Since this is a completely theoretical chapter, there are no technical requirements.
Understanding the most important things to make your React Native project a success
In this book, you learned a lot about the technical basics of how to ensure a successful React Native project. But if you already worked on production projects, you know that a software project never works as described in the books. There are always obstacles and problems that occur out of the blue and deadlines that seem impossible to meet.
These tips will ensure that you are able to overcome these obstacles, solve these problems, and finally succeed in a real-world software project. So, let’s start right away with the tips.
Tip 1 – Find a process you never have to work around
A lot of projects I worked on had clearly defined processes from the beginning, but often, there occurred scenarios where someone worked around the process. A very common example of that is the following:
The business side needs a feature or bugfix to be included in today’s release, leading to reduced testing, less detailed reviews, or even direct commits to release branches.
This is something I have experienced in a lot of projects. The problem with this is that in nearly all cases I experienced, it led to a lot more work in the end. The testing has to be done later, bugs that are found have to be fixed anyway, direct commits have to be merged or cherry-picked later, most of the time the code has to be refactored, and in the worst case, a bug can lead to corrupt data that has to be fixed later. So, the work you have with this behavior can easily multiply the work you would have when sticking by the process by 10 times or more.
So, the simple answer would be to say no to the business side, but that’s not always possible, because the business side may have a valid concern. Imagine the chief executive officer (CEO) promised a feature to an important customer and fears not being able to deliver in time because the next release is only in 2 weeks.
This is an example where you have to adapt your process to be able to have faster release cycles or allow urgent releases, to take away the CEO’s fears.
This is just an example and a concrete solution for exactly this example. There are multiple other scenarios where team members can lose faith in the process and try to work around it.
Sometimes, it’s enough to explain the why behind the process; at other times, adaption is needed. But the key takeaway of this subsection is this: Find a process you trust in and never work around it.
Tip 2 – Plan to be as flexible as possible with strategies to update without store releases
The bigger the project team is, the more likely it is that something happens that messes up your release planning. Again, I want to start this tip with an example. One application I was working on was translated into 36 languages. This meant that before every release, all texts that were introduced to the user interface (UI) were passed to translators.
They had 36 hours to translate and verify these texts and upload them to our translation service. After these 36 hours, we ran the release pipeline and released the app with the translations bundled into the binary.
This led to two problems. First, we had to wait 36 hours to be able to pass the release to Apple/Google for review. Second, most of the time, at least one translator was late, resulting in the new texts not being available in that language until the next release.
We solved this problem by adding an update feature for all translations to our application. This feature is illustrated in the following diagram:
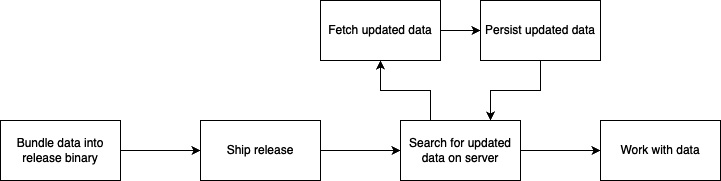
Figure 13.1 – Updating without store release
We still bundle the translation files into the binary and ship the release with these translations, but on app start, we search for updated translations on our server. If we find any, we fetch and persist them locally, to always have the latest version available on the user’s device. A more detailed explanation can be found here: https://bit.ly/prn-update-translations.
This process not only works for translations but also for any type of data that should be locally available and changes very frequently.
You could even go one step further by using over-the-air update tools such as Microsoft CodePush or Expo Updates. These tools leverage the fact that a React Native app is a native app containing a JavaScript bundle by providing a solution to update the whole JavaScript bundle over the air.
Basically, your application connects to the tool’s server and searches for an updated JavaScript bundle. If an updated bundle is found, it gets downloaded and your app will start/restart.
While these tools can be very helpful to fix bugs or even improve functionality, it is not allowed to use them to introduce new features due to App Store and Google Play guidelines. Also, you have to keep in mind that they are limited to the JavaScript bundle.
As soon as you introduce new native functionality, assets, or other things, it is not possible to provide such an update with these tools. Even worse, if you try to provide such an update with these tools, you can break your app on the users’ devices, because you try to access native functionality that doesn’t exist.
So, if you use these tools, be careful. Here, you can read more on CodePush (https://bit.ly/prn-ms-code-push), and here, you can find further details of Expo Updates (https://bit.ly/prn-expo-updates).
All these ideas have only one goal: to be as flexible as possible to be able to react to any requirements that may occur. Although native releases to App Store or Google Play are no longer a big problem today with Apple and Google getting reviews done in less than 1 day most of the time, it is good to know to be able to deliver updates even if Apple or Google delay the review process.
So, the takeaway of this subsection is this: Implement a strategy to be able to update your application as fast and flexible as possible.
Tip 3 – Always be aware of what’s happening in your app with stability monitoring tools
There is only one thing that’s for sure in software development, and that is that there is no software without bugs. So, your application will contain bugs and users will experience problems with it. The only question is: When will you notice it?
One of the most important things I learned during the last years is that the better you know what’s happening in your application, the faster you can respond. The worst case is when you realize a bug only because users write bad reviews about your application.
There are a lot of different stability monitoring tools available as software-as-a-service (SaaS) products. The most widely used when it comes to React Native apps are Bugsnag and Sentry. Both have excellent support for React Native by providing React Native software development kits (SDKs).
These SDKs collect native crashes as well as JavaScript errors, add useful information about device type and state, and send them to a server. The server consolidates the data, and the tools provide a web dashboard where you can get information about the stability of your app.
You can have a look at every crash and error and even trace the error back to specific lines in your code by providing source maps.
You can also connect these tools to automatically create issues in your project management tool when a previously unseen bug occurs.
There are other solutions available as well, and you could even write your own, but you should definitely implement any solution to track the stability of your app. So, the takeaway of this tip is this: Use a stability monitoring tool.
Tip 4 – Let the user test with A/B testing
A/B testing is something that is used in many areas of mobile app development nowadays, and you should definitely use it too. It means that you divide your users into two groups and provide them with slightly different parts of your application. Then, you wait for a certain time and look at the metrics to see which user group behaves better in the metrics that are important for you.
The most common use case for A/B testing in mobile development is testing new features. If you are not sure if a new feature helps you improve your goal metrics (such as improving retention), you will provide the new feature only to half of your users.
You would tag these users as group A. The other users, who have no access to the new feature, would be tagged as group B. Then, you would wait and collect data. After some time, you can compare which user group performed better regarding your goal metrics.
This can be done with features, designs, wording, images, and much more. But A/B testing can also be used in completely different cases.
One other example of using A/B testing is releasing an app update to only a group of people. This can be a beta test group, or on Google Play, you can even decide to only roll out your update to a certain percent of your users. You can then compare the stability metrics of the old release and the new release to roll it out to all users.
So, A/B testing can help you get the answers you need in a real-world environment, which is the only environment that counts. So, the key takeaway of this tip is this: Use A/B testing to collect information to be able to make better decisions.
Tip 5 – Use TypeScript as a single language stack
TypeScript is a typed language that works on mobile, web, and backend. This is a huge advantage when you set up your project with this single language stack. Your whole team is at least able to read and understand the code of the whole project.
Talented software developers can also transfer from backend to frontend or the other way round if needed, and you can even share code between client and server. This is especially interesting when you have shared data types or business logic that runs on the client for mobile and on the server for web.
Having one shared base for this code guarantees that data types and business logic behavior won’t differ between mobile, web, and server.
I experienced the best results, fastest time to market (TTM), and best teamwork in projects with this single language stack. So, the takeaway from this tip is this: Use TypeScript as a single language stack.
Tip 6 – Keep your code simple and clean
This tip seems to be obvious but let me explain what I mean. There are some simple ideas that keep your code simple and clean.
When working with React and React Native, you often have a lot of different options as to how to solve a specific problem. The first choice you have to make is between functional components or class components.
But there are a lot of other choices to make. Which state management solution do you use? How will you connect your backend? Do you write your own native solutions? If so, which language do you use?
If you make these choices, you should stick to your chosen option. It makes the application more complex if you use functional components and class components for your stateful components. The same applies to all the other options. Make a choice and stick to it.
Next, you should always extract code into components, if you can reuse it anywhere else. Most of the time, it’s much easier to create a component with some configuration options instead of writing nearly the same code multiple times.
And most importantly, never duplicate code. This will not only increase the risk of introducing bugs or inconsistencies, but it also will take more time in the long run. Maintaining a lean code base where everything is extracted into components is much easier.
Last, try to write readable code. When completing a feature, always have a look at your code and ask yourself if another developer can understand what you have written without reading any documentation or running the app. If not, try to rename and refactor your code until it’s understandable. Write comments if the code doesn’t work without these.
The goal is that a new member of your development team can start to be productive as fast as possible. So, the key takeaway here is this: Write simple, clean, and understandable code with as few different libraries as possible.
With these tips, you should be able to not only survive but also succeed in your next React Native project.
As the last part of this book, I want to take a brief glimpse into the future of React Native.
Understanding the bright future of React Native
When deciding which technology to use, it always plays an important role in how future-proof this technology is. This is especially important in long-running large-scale enterprise projects. So, I decided to end this book with some arguments as to why you can be absolutely sure that React Native is a good choice.
This is particularly interesting because the last years haven’t always been easy for React Native developers. With Flutter, which is based on the very performant two-dimensional (2D) graphics engine Skia, a new solution for cross-platform development emerged and created a huge hype.
Native development got more and more comfortable with the rise of Kotlin and Swift. React Native in the meantime didn’t evolve much. The long-promised refactoring (new architecture), first announced for 2020, took much more time than expected. Some developers started losing faith in React Native.
But this changed in 2022. Now, the future of React Native couldn’t be brighter. This is for multiple reasons, which I want to explain in this last section of the book.
Reason 1 – The new architecture has finally landed
As described in Chapter 3, Hello React Native, the new architecture brings a huge boost to React Native applications and the React Native community. These are the most important improvements that come with the new architecture:
- General performance: The replacement of the old React Native bridge with JavaScript Interface (JSI) eliminates the biggest performance bottleneck of React Native. There is no more serialization/deserialization needed when passing data between JavaScript and the native part of your application. This and a lot of other optimizations allow closing the performance gap to Flutter apps or native applications.
- Startup time: The new architecture allows lazy loading of the native modules of an application, which improves startup time a lot.
- Synchronous communication: With the new architecture, it is now possible to make synchronous calls to native functions from within the JavaScript thread. This can lead to easier and cleaner code.
- Writing native modules: CodeGen and the new architecture in general make writing native modules a lot easier. With built-in type safety, it also supports one of the most important features in development.
I expect that the full rollout of the new architecture will be completed by the beginning of 2023. This means that most of the community libraries will be adapted, and you can benefit from all the improvements with your app in a stable environment.
Again, this new architecture is a really big thing because it refutes most of the arguments against using React Native.
The next reason is that there is a new architectural approach to React Native. A community project makes it possible to use Skia in React Native, which is also a huge step forward.
Reason 2 – React Native Skia
As I explained before, Skia is the graphics engine that not only powers Flutter but also Google Chrome, Android, Firefox, and a lot more. Skia is one of the reasons these products have become so popular because it is an extremely powerful and highly performant graphics engine.
There have been some attempts in the past to leverage the power of Skia in React Native, but only with the new architecture was it possible to create a working React Native Skia library. This is another huge boost for React Native because it opens a whole new world when it comes to drawing on your screen.
To understand the extent of the new opportunities with React Native Skia, you have to take a look at how rendering elements in React Native works. As explained in Chapter 3, Hello React Native, every component used in the JavaScript code will be mapped to a native component. This also means you can only use the elements and properties that are available on the native side and that have been mapped to React Native components.
React Native Skia uses the same concept but creates a native canvas that can be drawn on with the Skia graphics engine. It then doesn’t make native components available in React Native but instead in the Skia application programming interface (API).
This means in the future, you don’t have to go with Flutter anymore if you prefer to draw your UI to the screen using your own graphics engine instead of using native components. This is also possible using React Native. You can even use both concepts in the same application.
You should definitely have a look at the project. It is hosted on GitHub; you can find all information here: https://bit.ly/prn-rn-skia.
The next reason why React Native has a bright future is as simple as it is important. The community behind the framework is still growing and includes a lot of huge companies that bet big on React Native.
Reason 3 – The community
Even if React Native was initially created by Facebook, React Native is no longer only Meta (formerly Facebook). It is also Microsoft, Shopify, Tesla, Salesforce, Bloomberg, Discord, Coinbase, Pinterest, and a lot more companies.
And these companies are betting big on React Native. Meta is using it in more than 1,000 screens in the Facebook app, which still is one of the most widely used apps in the world. Microsoft uses React Native in some of their most well-known products such as Microsoft Office or Microsoft Teams. The Shopify team rewrote all of their apps in React Native.
And even better, most of these companies not only use React Native, but they are also actively contributing. For example, Microsoft created and maintains React Native for Windows and macOS. Shopify sponsors React Native Skia and supports multiple other community projects such as React Native FlashList.
And it’s not only these companies. It is tens of thousands of contributors worldwide. This results in one of the most active developer communities in the world, creating useful, high-quality open source libraries and solutions every day.
Reason 4 – TypeScript and React
While it may not be the right choice for high-performance computing tasks, using TypeScript as the language for your mobile application is absolutely the right choice. You can run it on mobile, web, and server, to share code between these platforms. It is easy to learn and start with, and new developers can get productive very fast.
With TypeScript as your single language stack, you have access to one of the largest talent markets around, much larger than the talent market for Dart (Flutter), Kotlin (native Android), or Swift (native iOS) developers. This is especially important in these times, where information technology (IT) talents are very rare.
The same is true for React. It is by far the most used web framework. Every React developer is able to work on React Native projects and can be very productive even after only some days of training. This means you have a really huge talent pool from which you can hire your developing team.
So, you can see that there is nothing to fear when deciding to use React Native in your project. There is a huge commitment to further develop the framework, and you can be absolutely sure that it will be actively maintained for a very long time. Many huge companies are depending on React Native, and they do it for good reasons. So, in my opinion, it is the best choice available to write mobile apps.
Summary
After this outlook, it’s time for a short conclusion to this chapter. In the first part of this chapter, you learned how important a good development process is, tips to be as flexible as possible with your releases, how to monitor your apps’ stability, how to leverage A/B testing, how to use TypeScript in your mobile application, and how to keep your code simple and clean. In the second part, you got to know the most important reasons why React Native has a bright future and discovered that you can be absolutely sure that it is a good choice for your mobile application.
Now, it’s time for final congratulations. You are at the end of this book, and I hope you learned a lot of new and useful things. You should now understand how React Native works and how to use it in large-scale projects to build high-performance apps for multiple platforms, helping you save both time and money.