
The term "social computing" can be defined as the use of technology to allow people to connect with each other, usually online. Examples include blogs with responses, wikis, and social networks like Twitter, Facebook, and LinkedIn. In addition, there are new rating applications, web applications, and social technologies being developed, allowing users to connect to and benefit from the strength and knowledge of a community.
Today, your business users are more socially aware, and social applications can be easily adopted. One of the reasons for the quick adoption of SharePoint Portal Server 2003 and Microsoft Office SharePoint Server 2007 was that people needed to connect as a group to collaborate efficiently. When the 2003 version of the product was released, users had fast PCs, quick Internet connections and the software tools needed to be productive as individuals. The next logical step was learning to use software and creating new applications, which facilitated being productive as groups and organizations instead of as individuals.
Microsoft has been experimenting with social technology since before the term "social computing" was adopted to define the online efforts to bring social concepts to the Internet. Several releases of Internet Explorer contained electronic Post-it-style notes, which could be left on websites. As other users who shared the same note server browsed the sites, your notes would be visible and those users could respond with comments of their own.
A decade ago, when team sites were first introduced, the technology allowed users to connect online via a website and collaborate on documents, enter into discussions forums, and communicate with team members. Microsoft Office SharePoint Portal Server 2003 is a collaborative portal solution that connected people, teams, and information.
Enhanced online communication features, including blogs and wiki technology, were introduced in SharePoint 2007. The marriage of wiki and blog technology with an enterprise content management system was ahead of its time. Since the initial release of SharePoint Server 2007, the use of social computing technology has grown significantly, in part because of the popularity of Internet sites like Facebook, Twitter, and LinkedIn. Concepts like micro-blogging and tagging have proven to be effective ways to stay connected and find information.
The new release of SharePoint Server 2010 is designed from the ground up to support a user-centric model, and brings forth new ways to collaborate using both social and enterprise computing tenets. Traditionally, enterprise software defines a user as an identity, which can be assigned access and privileges to data and applications. This is not the case with SharePoint 2010. The product aligns software and services in such a way that the user is at the center of the experience, allowing a mix of social and enterprise computing.
Social networking tools are now "first-class citizens" in SharePoint; an example is the enhanced Content tab in My Sites. Having the ability to add many types of enterprise content to your My Site allows navigation of content based on a person and social properties, rather than a folder or site hierarchy. Other examples include social tagging, ratings, networks, activity feeds, and the new organization browser. But the main feature is the improvement in the My Site. The My Site is now a personal portal for users to consume information from colleagues and those with the same interests.
The people-centric model in SharePoint 2010 begins with the user profile store and the User Profile Service Application. The core of any social application is the user profile. User profiles allow searching for and connecting to colleagues, in addition to leveraging existing organizational relationships and knowledge. The more you know about your users, the more (cool) things you can do with your software. Of course, today this includes enabling the types of social computing features and social connections users have embraced using the Internet.
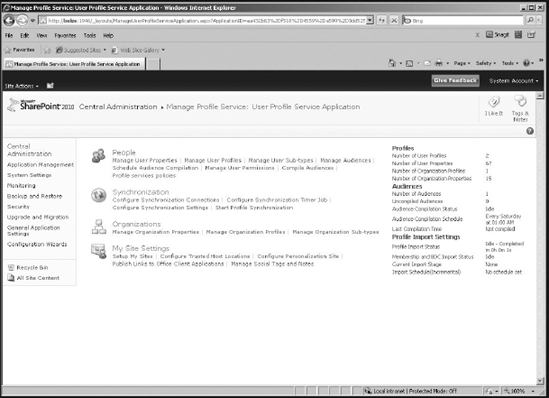
You manage user profiles, connections to directories, imports, and settings using the new User Profiles Service Application (UPA) shown in Figure 5-1. Like many of the services available in SharePoint, the architecture uses a service model. A farm administrator must grant you permissions before you can access the UPA through Central Administration (CA).
As a developer, it is important to understand how user profiles are created, modified, and managed using CA, as well as the object model. All the information SharePoint stores to track users, tags, ratings, and other social data is stored in the user profile and social database. This information is managed using UPA and is exposed to you through the Microsoft.Office.Server.UserProfiles namespace.
Using the PowerShell command prompt, enter the following:
$app_UPA = New-SPProfileServiceApplication -Name UPA -PartitionMode
-ApplicationPool $appPool
To provision the UPA on your development server, you need to have the required permission levels. Use the following list to avoid issues with services not starting or synchronization failures. These account settings should not be used in a production environment.
Your account is a member of Farm Administrator group within Central Administration.
Your account is added to local administrator group.
Your account is added to the Sysadmin role on SQL server.
Your account is allowed by policy to log on locally to the server where profile synchronization will be deployed.
Your account is at least a member of the domain's Pre–Windows 2000 Compatible Access group.
If your user is a domain administrator, membership in this group isn't required.
The user account specified to perform a profile import requires Replicate Directory Changes permission.
Once the UPA is created, you can use the object model to create profiles. Listing 5-1 illustrates using the UserProfileManager class to create a new profile.
Example 5-1. Create a User Profile Using the Object Model
public void CreateUserProfile()
{
//We have to get current context of the service application
strUrl = "http://site";
SPSite site = new SPSite(strUrl);
SPServiceContext serviceContext = SPServiceContext.GetContext(site);

//UserProfileManager class contains members for profiles
UserProfileManager upmanager = new UserProfileManager(serviceContext);

//create a new user profile
string strAccount = "domain\user";
if (!upmanager.UserExists(strAccount))
upmanager.CreateUserProfile(strAccount);
}

The UPA administration screen in CA is divided into four sections. The functionality found in each section is outlined below.
People
Manage User Properties: Existing properties can be viewed and new properties added. You can map properties to existing Active Directory attributes.
Mange User Profiles: Existing user profiles can be viewed and managed. New profiles can be added manually without importing from a directory.
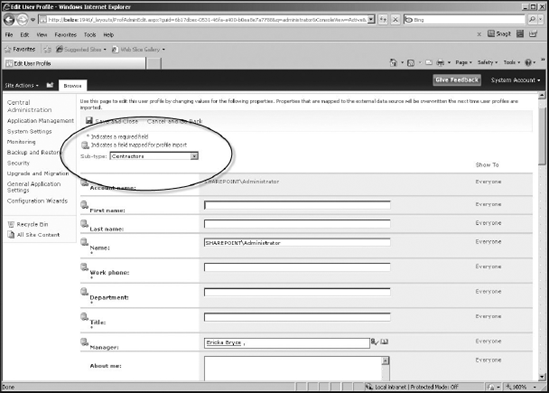
Manage User Sub-types: Create subtypes of user profiles. Examples of subtypes include contractors and students. Subtypes allow you to track different profile properties based on a type of user. You can create and manage subtypes using this link.
Manage Audiences: Audiences can be created and managed using this link. Audiences are created using properties and group-based rules. Audience features allow you to provide in-context information to users.
Compile Audiences: When an audience is compiled, the rules are processed to determine what users belong in the audience. This compiling needs to happen on a regular basis for your audience to be up to date.
Schedule Audience Compilation: Using this link you, can schedule when an audience is compiled.
Manage User Permissions: Permissions can be set to control which users can create My Sites, and use personal features and social features. Removing the Create Personal Site permission eliminates the My Site link for that user.
Profile services policies: Use this link to manage the policy for Profile Services. There are settings that control how individual properties will be displayed in My Site, as well as who can view the properties. You can control colleagues, memberships, and Links and their visibility in My Site.
Synchronization
Configure Synchronization Settings: Create a connection to import user information from Active Directory, IBM Directory, Novell eDirectory, or Sun ONE Directory Server. Imports can also be created using Business Connectivity Service applications.
Configure Synchronization Time Job: Use this section to modify the schedule specifying when the timer job will run. Daily, weekly, and monthly schedules also include a window of execution. The timer service will pick a random time within this interval to begin executing the job on each applicable server.
Configure Synchronization Settings: Use this page to manage the settings for profile synchronization of users and groups. You can use an external identity manager for Profile Synchronization; to do this, select Enable External Identity Manager.
Start Profile Synchronization: Use this link to start a full or incremental Synchronization.
Manage Organization Properties: Use this page to add, edit, organize, delete, or map organization profile properties. Organizations are a new feature, managed much like user profiles; however, they allow you to treat organizations you work with as individuals with profiles and social data.
Manage Organization Profiles: Just like you can manage profiles for users, you can also manage profiles for organizations. Using this screen, you can create Organization Profiles, Organization Sub-types, and filters based on the Sub-types. The options are the same ones you use for user profiles; however, they are in the context of an organization rather than a user.
Manage Organization Sub-types: Using this section, you can create and manage the Sub-types described previously.
Setup My Sites: Use this link to manage My Site settings. You can set a My Site host, personal site location, and other My Site options.
Configure Trusted Host Locations: You can specify trusted My Site locations, which can exist in other UPAs. You will have to apply audiences to identify users with sites hosted in the trusted location.
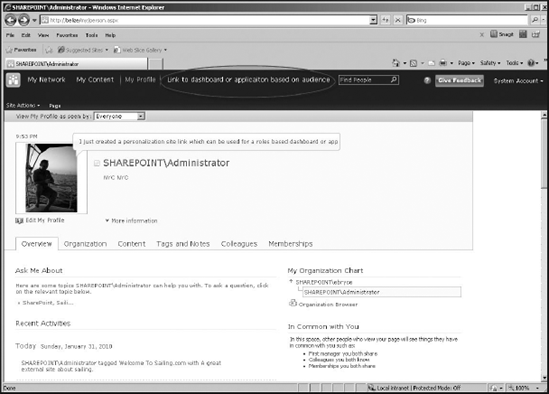
Configure Personalization Site: This feature is very useful for developers wishing to create role-based dashboards. You can configure links to applications and dashboards and publish based on audience membership. You can see in Figure 5-2 the dashboards and application links will appear in the My Site on the navigation bar after the My Personal Content link.
Published Links to Office Applications: These settings allow you to publish links that will show up in your users' Office applications when you select the option to save files. Office will retrieve a list of published locations once a day from the server. Links can be published to users based on audience membership.
Manage Social Tags and Notes: You can use this page to manage users' social items such as tags and notes. You can find and delete tags.
After your farm administrator has created a User Profile Service Application, a designated administrator of the User Profile Service Application can manage the following (the synchronization process). Once the synchronization process occurs, you can begin to use the user profile and social data from your applications with the object model and web services.
As a developer, you should note that properties can be configured to write back to the import source. This is a big change from previous versions, where the profile synchronization was a one-way import and never updated the source directory. The user profile store has properties that, by default, are mapped to Active Directory and imported during synchronization. You can create custom properties in SharePoint and then map the properties to attributes that exist in Active Directory. Table 5-1 lists the properties that are mapped to Active Directory attributes by default.
Table 5.1. The Default Profile Properties and Mappings
ACTIVE DIRECTORY ATTRIBUTE | USER PROFILE STORE PROPERTY |
|---|---|
Microsoft TechNet | |
|
|
|
|
|
|
|
|
|
|
|
|
|
|
|
|
|
|
|
|
|
|
|
|
|
|
|
|
|
|
|
|
|
|
A subtype is a type of user. SharePoint 2010 allows you to define different types of users. Examples include contractors and consultants. These different types of users may have different properties associated with them. Subtypes help you resolve the issues that arise because you need to identify different profiles for different types of users. After a subtype is created, you can create new profile properties that are targeted at these types of users. User profiles can be filtered based on subtypes. These subtype features are new in SharePoint 2010.
Developers can use the object model to create, modify, and delete user profiles. Using the object model, properties can be added and modified as well. When you use the object model from Visual Studio, you must add references to a new assembly found in the ISAPI directory under the SharePoint root. The name of the new assembly is Microsoft.Office.Server.UserProfiles; Table 5-2 lists the commonly used namespaces.
Once the reference is added, you will have access to the following namespaces from your code:
Microsoft.Office.Server.UserProfilesMicrosoft.Office.Server.AudienceMicrosoft.Office.Server.ActivityFeedMicrosoft.Office.Server.SocialData
Table 5.2. Namespace Definitions and Descriptions Defined in the SharePoint SDK
DESCRIPTION | |
|---|---|
SharePoint Server SDK, MSDN | |
| Contains classes that create, gather, and publish newsfeeds. Some of the most commonly used types in this namespace are |
| Contains classes that create audiences and target data to a specific audience. A commonly used type in this namespace is |
| Contains classes that create and manipulate pieces of social data. Some of the most commonly used types in this namespace are |
| Contains classes that create and manipulate user profiles. Some of the most commonly used types in this namespace are |
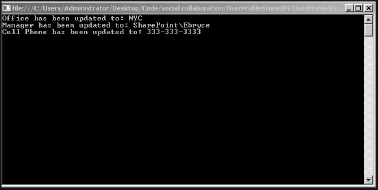
The following code demonstrates how you can use the object model and namespaces in Table 5-2 to update properties of an existing profile. You will set references defined above. The output is depicted in Figure 5-4.
using System;
using System.Collections.Generic;
using System.Linq;
using System.Text;
using Microsoft.SharePoint;
using Microsoft.Office.Server.UserProfiles;
using Microsoft.Office.Server;

namespace UserProfileStoreOM
{
    class Program
    {
        static void Main(string[] args)
        {
            using (SPSite site = new SPSite("http://belize:777"))
            {
//Get service context
               SPServiceContext context = SPServiceContext.GetContext(site);
                UserProfileManager
//Get profile
uprofileManager =
newUserProfileManager(context);
string strAccount = "sharepoint\administrator";
UserProfile up = uprofileManager.GetUserProfile(strAccount);
//Update values up[PropertyConstants.Office].Value = "NYC";
up[PropertyConstants.Manager].Value = "SharePoint\Ebryce";
up[PropertyConstants.CellPhone].Value = "333-333-3333";
up.Commit();
Console.WriteLine("Office has been updated to: " +
up[PropertyConstants.Office].Value);
Console.WriteLine("Manager has been updated to: " +
up[PropertyConstants.Manager].Value);
Console.WriteLine("Cell Phone has been updated to: " +
up[PropertyConstants.CellPhone].Value);
site.Dispose();
}
Console.Read();
}
}
}

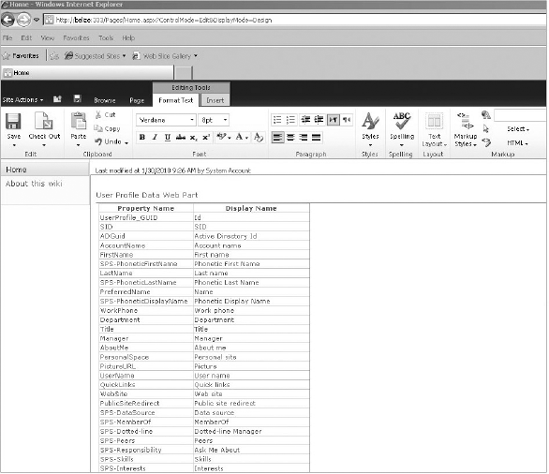
The following section illustrates how you can begin to leverage the user profile store using web parts and web services. A web part project will be created using Visual Studio. The web part will use the object model to retrieve user profile property names and display names. This technique can be used to update or control user properties. To get detailed information regarding web part development and deployment, refer to the section on web parts in Chapter 2.
To set up the project, you need to create a blank team site that can be used for debugging. Next, create a blank SharePoint 2010 project using C# and name the project SocialWebParts. When starting Visual Studio, run the application as administrator by right-clicking on the start menu shortcut and select the Run as Administrator option. When the SharePoint Customization Wizard prompts you for a debugging site, enter the URL of the blank debugging site created above. Be sure to select the .NET Framework 3.5 and the Deploy as a full-trust solution option when prompted.
Using the following steps, you will create a visual web part project that consumes the user profile web service.
Right-click on the SocialWebParts project and add a new Visual Web Part project template. Name the new web part UserProfileData.
Open the file named
UserProfileData.webpart, and change the title and description as shown in the code.<?xml version="1.0" encoding="utf-8"?> <webParts> <webPart xmlns="http://schemas.microsoft.com/WebPart/v3"> <metaData> <type name="SocialWebParts.UserProfileData.UserProfileData, $SharePoint.Project.AssemblyFullName$" /> <importErrorMessage>$Resources:core,ImportErrorMessage;</ importErrorMessage> </metaData> <data> <properties> <property name="Title" type="string">User Profile Data Web Part</ property> <property name="Description" type="string"> This web part demonstrates consuming data from userprofile.asmx</property> </properties> </data> </webPart> </webParts>
Open the
elements.xmlfile and change the URL attribute by appendingSocialWebParts_to the beginning of the property. While the file is open, change the group name to Social Web Parts as shown below.<?xml version="1.0" encoding="utf-8"?> <Elements xmlns="http://schemas.microsoft.com/sharepoint/" > <Module Name="UserProfileData" List="113" Url="_catalogs/wp"> <File Path="UserProfileDataUserProfileData.webpart" Url="SocialWebParts_UserProfileData.webpart" Type="GhostableInLibrary" > <Property Name="Social web Parts" Value="Custom" /> </File> </Module> </Elements>
Drag a data grid from the toolbox to the design surface of the visual web part.
<%@ Assembly Name="$SharePoint.Project.AssemblyFullName$" %>
<%@ Assembly Name="Microsoft.Web.CommandUI, Version=14.0.0.0,
Culture=neutral, PublicKeyToken=71e9bce111e9429c" %>
<%@ Register Tagprefix="SharePoint" Namespace="Microsoft.SharePoint.
WebControls" Assembly="Microsoft.SharePoint, Version=14.0.0.0,
Culture=neutral, PublicKeyToken=71e9bce111e9429c" %>
<%@ Register Tagprefix="Utilities" Namespace="Microsoft.SharePoint.Utilities" Assembly="Microsoft.SharePoint, Version=14.0.0.0,
Culture=neutral, PublicKeyToken=71e9bce111e9429c" %>
<%@ Register Tagprefix="asp" Namespace="System.Web.UI"
Assembly="System.Web.Extensions, Version=3.5.0.0,
Culture=neutral, PublicKeyToken=31bf3856ad364e35" %>
<%@ Import Namespace="Microsoft.SharePoint" %>
<%@ Register Tagprefix="WebPartPages"
Namespace="Microsoft.SharePoint.WebPartPages"
Assembly="Microsoft.SharePoint, Version=14.0.0.0, Culture=neutral,
PublicKeyToken=71e9bce111e9429c" %>
<%@ Control Language="C#" AutoEventWireup="true" CodeBehind=
"UserProfileDataUserControl.ascx.cs" Inherits=
"SocialWebParts.UserProfileData.UserProfileDataUserControl" %>

<asp:GridView ID="GridView1" runat="server" AutoGenerateColumns="false">
<Columns>
<asp:BoundField DataField="Key"/>
<asp:BoundField DataField="Value"/>
</Columns>
</asp:GridView>

Open the
UserProfileDataUserControl.asx.csfile, and add anOnPreRendermethod.using System; using System.Collections.Generic; using System.Web.UI; using System.Web.UI.WebControls; using System.Web.UI.WebControls.WebParts; using Microsoft.Office.Server; using Microsoft.Office.Server.Administration; using Microsoft.Office.Server.UserProfiles; using Microsoft.SharePoint; namespace SocialWebParts.UserProfileData { public partial class UserProfileDataUserControl : UserControl { protected void Page_Load(object sender, EventArgs e) { } protected override void OnPreRender(EventArgs e) { using (SPSite site = new SPSite("http://BELIZE:333")) { SPServiceContext context = SPServiceContext.GetContext(site); UserProfileManager m_mngr = new UserProfileManager(context); //Get the properties PropertyCollection props = m_mngr.Properties; //Create a Dictionary to store property data. Dictionary<string, string> UserProps = new Dictionary<string, string>(); foreach (Property prop in props){ UserProps.Add(prop.Name, prop.DisplayName); } //Bind the Dictionary to a GridView control. GridView1.DataSource = UserProps; GridView1.Columns[0].HeaderText = "Property Name"; GridView1.Columns[1].HeaderText = "Display Name"; GridView1.DataBind(); } } } }
Now it is time to add an instance of the web part to the debugging site you created earlier. Navigate to the home page,
default.aspx, of the debugging site. Click on the Edit tab on the ribbon at the top of the page and then select the command from the edit Page button. Make sure that a Web Part zone is selected so that the contextual Page Tools ribbon tab is displayed. Click the Insert tab on the ribbon and click on the Web Part button. Add the User Profile Web Part instance to the page. The web part should look the one shown in Figure 5-5.In addition to using the object model to create and modify user profiles, you can use the
userprofile.asmxweb service. Listing 5-2 shows how to retrieve memberships for a user.Example 5-2. Program.cs
using System;
using System.Collections.Generic;
using System.Linq;
using System.Text;
using GetMembershipData.WSUserProf;

namespace GetMembershipData
{
    class Program
    {
        static void Main(string[] args)
        {
            WSUserProf.UserProfileService myUserProfServ = new
WSUserProf.UserProfileService();
            myUserProfServ.Credentials =
System.Net.CredentialCache.DefaultCredentials;

            GetMembershipData.WSUserProf.MembershipData[]
                memberships =
 myUserProfServ.GetUserMemberships("domainname\username");
            for (int i = 0; i < memberships.Length; i++)
            {
                Console.WriteLine(memberships[i].DisplayName);
            }
            Console.Read();

        }
    }
}
Many of the social computing features in SharePoint are accessed and managed using My Sites. Since its introduction in SharePoint Portal 2003, My Sites have been enhanced to become the social networking hub for individuals in organizations. A My Site is a personal site that provides users in your organization with a comprehensive set of social computing features. In addition, My Sites contain personal information about your users as well as personal and public views of information, documents, and other content. My Sites host personal blogs, lists, and web parts. You can add colleagues and organize them into logical groupings. By using activity feeds, you can keep track of the activities that you or your colleagues create.
There are several significant additions to My Sites in the new release of SharePoint. These additions include a My Networks page for managing colleagues, interests, and newsfeed settings; a My Content page for managing documents and photos; and a My Profile page for managing things like user profile information and social tags and notes.
Other enhancements you will notice in the new My Sites include the new Fluent UI and user profile. My Sites have been designed to give you quick access to your content, profile, and social network. You can still customize, target, and personalize pages to the needs of different roles and users in your organization. The activity feed infrastructure helps track interests and colleagues.
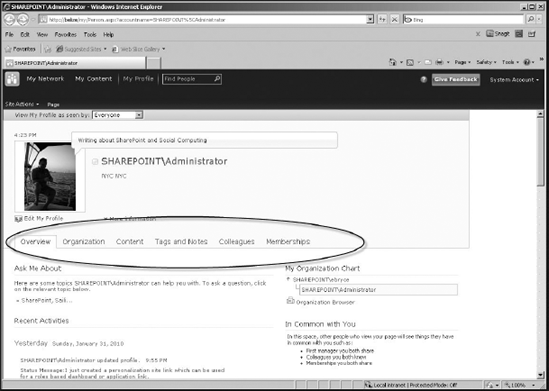
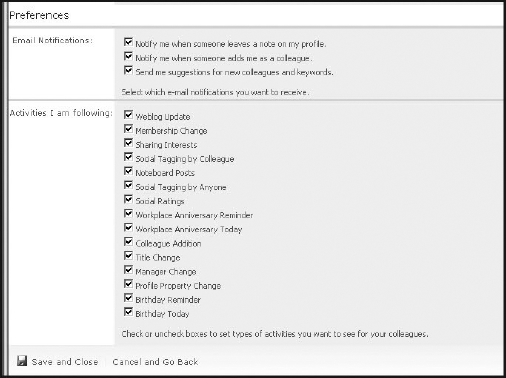
A My Site is divided into three sections using tabs, My Network, My Content, and My Profile. A My Site with tabs, newsfeed, and activity preferences is illustrated in Figure 5-6 and Figure 5-7.
My Network: Displays a list of recent updates from your colleagues. Your settings for interests and newsfeeds (see Figure 5-7) can be managed.
My Content: Contains the default views of Shared Document and Personal Documents.
My Profile: The default view of My Site. You can modify properties stored in the user profile database as well as view the activity feed.
In addition to the three tabs at the top of My Site, the following six tabs are used to navigate personal and social data:
Overview: Contains web parts for Organization Chart and In Common with You. Also displays the activity feed, which helps keep track of your recent activities.
Organization: Displays the Silverlight Organizational Browser, which contains your organization hierarchy.
Content: Displays blog posts, documents, and pictures. Blogs and lists can be secured or shared openly.
Tags and Notes: Displays all the tags and notes you create throughout SharePoint.
Colleagues: Displays all the people added as colleagues.
Memberships: Displays details about the sites of you are a member of.
A My Site can be provisioned using the object model, as shown in Listing 5-3.
Example 5-3. Using the Object Model to Create a My Site
public void CreateMYSite()
{
SPServiceContext serviceContext = SPServiceContext.Current;

UserProfileManager up = new UserProfileManager(serviceContext);
string sAccount = "domain\user";
UserProfile uprof = up.GetUserProfile(sAccount);
uprof.CreatePersonalSite();
SPSite newmysite = uprof.PersonalSite;
}

The Microsoft.Office.server.SocialData namespace contains classes that are used to access social data. The following classes are defined in the SharePoint developers SDK, and updated members and descriptions can be found on the MSDN website.
Table 5.3. Classes in the SocialData Namespace
CLASS | DESCRIPTION |
|---|---|
MSDN SharePoint SDK | |
| Represents a social comment whose information has been deleted from the database |
| Abstract base class representing a piece of social data whose information has been deleted from the database |
| Represents a social rating whose information has been deleted from the database |
| Represents a social tag whose information has been deleted from the database |
| Contains a set of properties that are logged as analysis data whenever a |
| Instantiates registered security trimmers for social data |
| Contains properties that represent a social comment |
| Contains methods and properties that allow you to add, delete, retrieve, and manage social comments |
Represents an abstract class that contains properties composing a piece of social data | |
| Represents an abstract base class that contains methods and properties that enable you to add, delete, retrieve, and manage social data |
| Contains properties representing a social rating, which is a specific piece of social data that ranks an entity on a scale of 0–5 |
| Represents the average rating for a specific URL |
| Contains methods and properties used to manipulate social rating data |
| Represents a social tag, consisting of a URI and a term from the taxonomy term store |
| Contains methods and properties used to manipulate social tag data |
| Represents a term that has been made available for social tagging |
| Represents a URL that has been tagged at least one time with a |
SharePoint has several web services that can be used to access data in the user profile and social database. The web services provide a convenient way to integrate existing applications with SharePoint, as your code does not need to execute on the SharePoint server. The web services are located in the ISAPI directory found in the SharePoint root. References can be added using the _vti_bin mapped path from Visual Studio.
For example, if you had an existing web application on a server named Belize using port 777, the URL used to locate the service would be http://belize:777/_vti_bin/socialdataservice.asmx. You can enter the URL into your browser and see the members of the web service as shown in Figure 5-8.
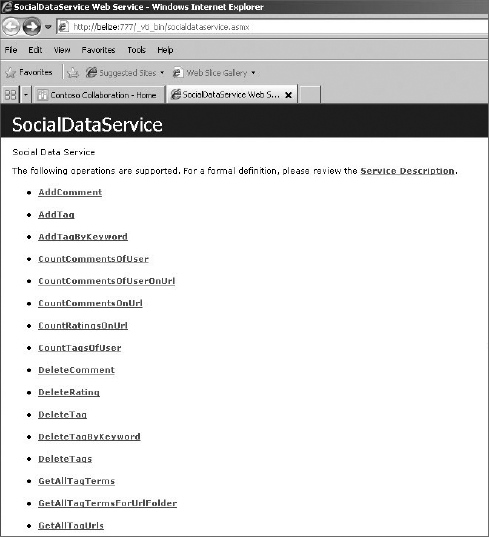
The Social Data web service can be used to access social data stored in SharePoint. As you explore all the methods available in the web service, you will see there is a lot of functionality exposed. An example of this functionality is shown in the following code listing. In Listing 5-4, the web service is used to retrieve ratings for a URL, which can represent a page or a document.
Example 5-4. Using SocialdataService.asmx to Retrieve Ratings
using System;
using System.Collections.Generic;
using System.ComponentModel;
using System.Data;
using System.Linq;
using SocialWebService.ServiceReference1;

namespace SocialWebService
{
class Program
{
static void Main(string[] args)
{
string GetRatingForThisURL = "http://belize:333/Pages/Home.aspx";
ServiceReference1.SocialDataService mySocialDataService =
new ServiceReference1.SocialDataService();
mySocialDataService.Credentials =
System.Net.CredentialCache.DefaultCredentials;
mySocialDataService.Url =
"http://localhost:777/_vti_bin/socialdataservice.asmx";
SocialRatingDetail details =
mySocialDataService.GetRatingOnUrl(GetRatingForThisURL);
Console.Write("The rating for " + GetRatingForThisURL + " is " +
details.Rating.ToString());
Console.Read();
}
}
}Twitter and the status updates on Facebook have made the concept of microblogging popular with Internet users. SharePoint implements this capability using status updates, which can be updated by your users. As you browse content and apply tags and notes, your activity feed can be updated with the tag and note data. One business use of the activity feed is to allow other community members to keep track of work in progress, presence awareness, and progress. Presence awareness technology allows you to determine where your colleagues are at any given time. An example is an instant message application that signals when users are online, offline, or available via mobile device or other communication device. You can build a vast array of applications using social computing technologies with the classes defined in Table 5-3. The documentation and samples in the SDK will be extended when SharePoint is released.
The act of tagging content is the assignment of metadata or categories to that content. There are two types of tagging: social tagging and structured tagging. Structured tagging refers to content and adds metadata to content to describe what it is, what it contains, or what it does. Social tagging is related to a person and describes the person, such as what they do, which projects they work on, or what skills they have.
You can also tag and create notes on external sites. All of the tag, notes, and rating data is stored in the social database and can be accessed from your My Site or programmatically using the object model. A farm administrator can manage tags using the UPA as shown in Figure 5-9. The aggregation of tags and notes in the activity feed might prove useful when your users are working with many pages, lists, and documents throughout many sites.
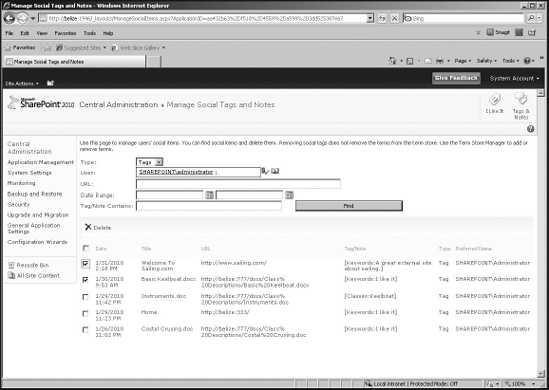
Table 5.4. Artifacts That Can Be Tagged, Noted, and Rated
DESCRIPTION | TAGS | NOTES | |
|---|---|---|---|
SharePoint Product Team Slide | |||
Web part/control | No | Yes | Yes |
Discover content by colleague or keyword | Both | Colleagues | Colleagues |
Web pages, list items, documents | Yes | Yes | Yes |
Doc library/list sort and filter | Yes (doc authors only, requires enterprise keywords field) | No | Yes |
Indexed by Search | Yes | No | Yes |
Bookmark-let for external or non-SharePoint pages | Yes | Yes | No |
Enterprise taxonomy management | Yes | No | No |
In Office 2010 client | Yes (doc authors only, requires enterprise keywords field) | Yes | No? |
In Office web apps | Yes | Yes | No |
Each user within your organization can have a personal blog linked to his or her My Site, making it easy for other people to find. New blog posts are added to the Recent Activity section of the user's My Site home page. You can create blog sites as standalone sites. When a blog site is provisioned, the configuration used is determined by the underlying site definition. The default site definition can be found in the SharePoint root under the Site Templates folder.
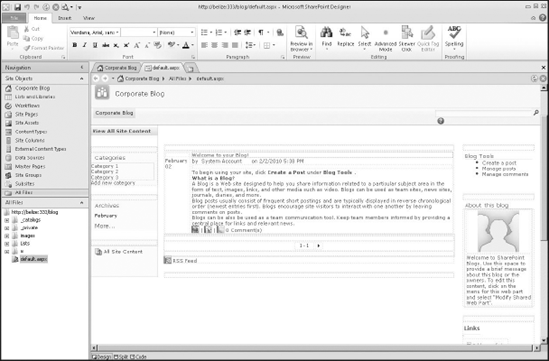
You will find it refreshing to develop and extend the functionality of your blog using SharePoint Designer. Simply browse to your blog site and select Edit with SharePoint Designer from the Site Actions menu. Working with the blog, lists, and web parts in SharePoint Designer is simple (see Figure 5-10).
Like any other SharePoint site, a blog site can be branded using Master Pages, style sheets, and SharePoint Designer. In addition, you can save an existing blog site as a web template, import it into Visual Studio, and customize the site definition. The customized site definition can be deployed to the SharePoint root as a new site definition and used when your blog sites are provisioned. As with any other site definition, you can staple features to the custom blog definition to add functionality. The onet.xml file shown in Listing 5-5 can be customized to change the configuration of blog sites created using the custom site definition.
Example 5-5. Adding Lists and Web Parts to the onet.xml file Using Visual Studio
<View List="303" BaseViewID="0" WebPartZoneID="BlogNavigator" WebPartOrder="1">
<![CDATA[
                        <webParts>
                            <webPart
xmlsn="http://schemas.microsoft.com/WebPart/v3">
                                <metaData>
                                    <type name=
"Microsoft.SharePoint.WebPartPages.XsltListViewWebPart,Microsoft.SharePoint,Version
=14.0.0.0,Culture=neutral,PublicKeyToken=71e9bce111e9429c" />
              <importErrorMessage>Cannot import this Web Part.</importErrorMessage>
                                </metaData>
                                <data>
                                    <properties>
<property name="AllowConnect" type="bool">True</property>
<property name="ChromeType" type="chrometype">None</property>
                                    </properties>
                                </data>
                            </webPart>
                        </webParts>
                    ]]></View>
        <AllUsersWebPart List="301" WebPartZoneID="BlogNavigator" WebPartOrder="2">
<![CDATA[
                   <WebPart xmlns="http://schemas.microsoft.com/WebPart/v2">

      <Assembly>Microsoft.SharePoint, Version=14.0.0.0, Culture=neutral,
PublicKeyToken=71e9bce111e9429c</Assembly>
                      <TypeName>Microsoft.SharePoint.WebPartPages.
BlogMonthQuickLaunch
</TypeName>
                      <Title>$Resources:core,months_schema_blg_title;</Title>
                      <Description>$Resources:core,blog_month_quick_launch;
</Description>
                      <FrameType>None</FrameType>
                      <FrameState>Normal</FrameState>
                      <IsVisible>true</IsVisible>
                      </WebPart>
                   ]]></AllUsersWebPart>
        <AllUsersWebPart List="301" WebPartZoneID="Right" WebPartOrder="1">
<![CDATA[
                   <WebPart xmlns="http://schemas.microsoft.com/WebPart/v2">
                      <Assembly>Microsoft.SharePoint, Version=14.0.0.0, Culture=
neutral,
PublicKeyToken=71e9bce111e9429c</Assembly>

<TypeName>Microsoft.SharePoint.WebPartPages.BlogAdminWebPart
</TypeName>

<Title>$Resources:core,adminlinks_schema_blg_title;</Title>

<Description>$Resources:core,blog_admin_links;</Description>
                      <FrameType>Default</FrameType>
<FrameState>Normal</FrameState>
<IsVisible>true</IsVisible>
</WebPart>
]]></AllUsersWebPart>
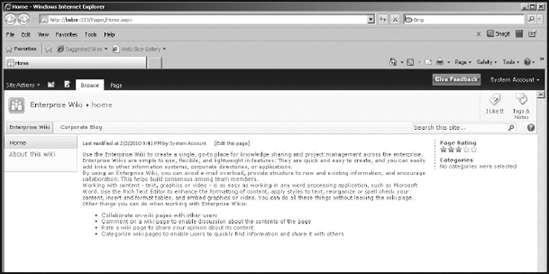
</File>The Collaboration Portal in SharePoint 2007 has been deprecated and the functionality replaced with the Enterprise Wiki (EW) site definition, shown in Figure 5-11. The EW is a publishing site with all of the publishing features enabled at the site collection level. Wiki pages are stored in a pages library and can benefit from output caching and other Web Content Management features enabled for the page library.
When you create an EW you must first create and configure the following:
Managed Metadata Service Application
User Profiles Service (required for My Site)
Publishing features
The Wiki page content type has a Wiki Category column, which you use to categorize individual wiki pages. The category column is a managed metadata field that allows the categories to be managed using a term set in the term store. When you edit a wiki page, you have the option to select a category for the page based on the defined term set linked to the category column.
When editing a wiki page, you can add web parts. Unlike web parts added to web part pages, the wiki web parts do not have to be added to a Web Part zone. Web parts are added to wiki pages using the same Ribbon you use when adding them to any other page. The wiki page has a hidden Web Part zone named WP Zone, which allows for the inline adding of web parts. Another nice feature is that, when a wiki page version is restored, the web part properties are also restored.
Note
The WikiEditPage class can be found in the Microsoft.SharePoint.WebPartPages namespace. The class includes a method InsertWebPartIntoWikiPage, which handles adding your web parts to the wiki pages. Additional members can be used to extend the wiki page publishing infrastructure.
This chapter covered the new people-centric features available to you as you deploy and develop solutions using SharePoint. Microsoft is investing a lot in the social and community capabilities of SharePoint. SharePoint has a vast object model, which can be used by developers to track and modify social data. Understanding the differences between business-centric, enterprise computing, and social computing is important as you deploy people-centric solutions using SharePoint. Tags, ratings, and notes are ubiquitous in SharePoint and allow you to share tacit and structured social information with your organization. The keystone to any social application is the user profile store; remember, the more you know about your users the more cool things you can do with your software.