
New Enterprise Content Management document management features
Managing a taxonomy for your organization and publishing content types for site collections or SharePoint farms with the managed metadata store
New features of the Document Center and document library
Implementing the members of Microsoft.SharePoint.Taxonomy that allow developers to create custom solutions and extend the ECM framework
SharePoint Server 2010 provides many rich features that allow organizations to define an information architecture that is flexible yet powerful. With proper planning of content types, libraries, and managed metadata, you can secure manageability that will pay dividends as you accumulate content of all types, both structured and unstructured. Developers can make use of an extensive object model to then extend this capability to our existing applications, as well as create custom solutions hosted on SharePoint.
There is an explosion in the types of content that exist in organizations today. Examples include documents, digital assets, reports, web content, and social content. Enterprise Content Management (ECM) is the process of making sense of and bringing compliance to the massive amount of this electronic content that is stored on internal networks, external networks, the cloud, and SharePoint Server. In this chapter, the focus will be on managing documents; however, to do so, you will explore technologies and programming interfaces that can be used to manage other types of content as well.
In the past, the types of content developers managed have been relatively small. Examples of content include Microsoft Office documents, PDF files, AutoCAD Files, and the like. Today, there are many more types of content you are tasked to manage in an ECM system. Document management is a core part of the ECM features in SharePoint Server. Traditional document management can be defined as a subset of ECM, and it specifically deals with the technologies and features that allow us to control and manage documents from the beginning of the content creation process to the end.
Much has changed with the user interface experience expected by consumers of content. Today, users access content on many types of devices, including PCs, tablets, netbooks, and mobile devices. To enhance the user experience, there is a need for rich search and contextual navigation. Allowing users to filter and navigate based on common terms and taxonomy provides an interface that is much more suitable to hosting large numbers of libraries and items.
Companies are being tasked with managing more content than ever before. Security, rules, and accountability requirements are getting more complex. This pattern will continue over the months and years ahead. As you prepare for an explosion of content, the new developer tools and features in SharePoint Server should ease this transition.
SharePoint Server has a very rich set of features to support document management. However, in addition to managing traditional document artifacts, you can manage social content, including tacit updates from users, microblogging, wikis, blogs, and discussion forums. What makes SharePoint different than most other ECM systems is how it layers social technologies on top of the ECM features, while at the same time allowing us to manage this social content.
The new version of SharePoint Server provides additional features to make managing large numbers of complex content types easier. Some of these features include unique document IDs, document sets, and a global taxonomy. In this chapter, you will cover these welcome additions, while exploring how you can use new collaboration features in the context of document management.
Table 10-1 identifies the existing baseline document management features which were introduced in SharePoint 2007. Table 10-2 contains a list of the new features that are introduced in SharePoint Server 2010.
Table 10.1. Baseline ECM Features
FEATURE | DESCRIPTION |
|---|---|
These features have been carried over from Microsoft Office SharePoint Server 2007. | |
Document libraries | List definitions with features added to support document management. |
Document Center | Site definition with structures in place to manage large amounts of documents. |
Recycle Bin | Two-stage recycle bin allows for recovery of deleted documents without using backups. |
Versioning | Once versioning is enabled, drafts and major versions are stored as separate items in a library. The versions can be restored at any point in time. |
Information policies | Farm-, site-collection-, site-, content-type-, and library-level information management policies. Built-in policy features include labels, bar codes, expiration, and auditing. |
Records Center | Site definition used for retention and document routing. |
Item-level permissions | Individual documents can be secured. |
Content types | An abstraction layer fostering manageability of content and metadata. Settings, properties, and functionality can be defined for types of content rather than individual items. |
Table 10.2. New ECM Features in SharePoint Server 2010
FEATURE | DESCRIPTION |
|---|---|
Managed Metadata Service application | Features that enable global metadata to be shared and managed across farms, site collections, sites, and libraries |
Content type syndication | A subset of the Managed Metadata Service that allows content types to be published to and then disseminated from a hub |
Unique Document ID Service | Creates a static URL for items |
Content Organizer | Provides document routing within any site |
Document sets | Provide compound document support |
Metadata navigation and filtering | Filter and navigate based on predefined tags and taxonomy |
The ECM programming model can be used to extend the functionality of the new ECM features and create custom solutions. The programming model includes support for three types of programming: the server-side object model for server-side programming, a client object model, and web services for client-side programming. The number of namespaces and types is vast; however, Table 10-3 illustrates some of the primary namespaces and some prominent types that are commonly used. In this chapter, there is sample code showing how some of the members might be used. The actual assembly files are located in the SharePoint root in the ISAPI folder.
Table 10.3. The ECM Object Model
The Document Center in SharePoint Server is a site definition that can be used in combination with a content type hub to manage hundreds of millions of documents and act as a large archive. Of course, in a large system with hundreds of millions of items, many instances of a Document Center are provisioned, each with its own content database. When managing millions of documents, you store most of them in a finished state. Scale is achieved by using a distributed architecture.
While the constructs included in a Document Center are useful for large repositories, smaller teams can use a single Document Center instance to serve as a starting point for document management for smaller deployments. Typically, the documents stored in the Document Center are still being authored and consumed.
By design, the Document Center is meant to be easy to use, while also being easy to administer. Everyone can have access to its features, and everyone can see as much as they need to within the security defined by administrators and content stewards. It is worth noting that, while the Document Center is easy to use since it is preconfigured with the constructs needed to manage large sets of documents, you can also turn these features on in any team site.
The new Document Center in SharePoint 2010 is illustrated in Figure 10-1 and has been enhanced to include:
Metadata navigation features and taxonomy capabilities
A Document ID Service
Integration with Office ClientNew, Open, and Save functions
Multi-stage retention policies
Folder-based information policies
Location-based metadata defaults and metadata-driven navigation
Integration with the Records Center site definition
A configuration to act as a template that enables organizations to quickly start managing documents
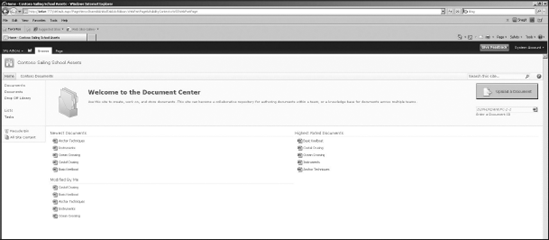
Note the Document ID search web part. Documents can be located using the unique ID assigned when they were created. In SharePoint 2010, all documents in site collection can automatically receive a unique ID. This feature can be enabled or disabled by the site administrator. This feature will be detailed later in the chapter.
When designing a document management strategy using SharePoint 2010, it is helpful to acknowledge that users will generally fall into three roles.
Visitors are individuals who have read-only access to documents. Common tasks for visitors include browsing documents, searching, and reading documents.
Contributors are individuals responsible for creating documents or document sets and participating in workflows.
Content Stewards maintain document libraries and Document Centers and may be responsible for creating libraries, views, and subsites. They configure metadata, navigation, and security, and act as nontechnical administrators.
Developers can use the SetupDocSiteFeatureReceiver class found in the Microsoft.Office .DocumentManagement.DocSite namespace and customize how the Document Center is created (see Table 10-4). The feature receiver is used like any other feature receiver. The feature events can make use of the object model to customize new Document Centers as they are created.
Table 10.4. SetupDocSiteFeatureReceiver Events
EVENT | DESCRIPTION |
|---|---|
| Overrides |
| Overrides |
| Overrides |
| Overrides |
| Inherited from |
Developers can "round trip" site templates from SharePoint to Visual Studio and back to SharePoint. A custom site can be created using the browser or SharePoint Designer, then, saved as a template. The resulting template is a web solution package (.wsp file) stored in the site collection Solution gallery. Once the template is saved, developers can import the .wsp file into Visual Studio. Modifications can be made, list definitions and columns added, and so forth. The resulting source code can be saved under source control, and represents a version of the Document Center and libraries. In addition, the .wsp file can be used to create additional subsites, or development or test environments.
In this next section, there is a step-by-step example of performing this "round trip" from SharePoint to Visual Studio and then back to SharePoint. In addition, there are details on adding document library list definitions and custom event handlers to assist with validation and business logic.
You will start by creating a Document Center with four document libraries. Later, you will export the template, import into Visual Studio, make changes, and then redeploy the changes. All of the source code is included with this book.
The Document Center is created with a configuration of lists, pages, and web parts that provide a starting point for content management. You may find the need to customize the site to meet your specific needs as you plan for managing your own content. The following steps demonstrate making a few simple changes to a Document Center.
Using Central Administration, create a site collection titled Contoso Sailing Schools Assets based on the enterprise Document Center site template.
Browse to the new Document Center, and create a Document Center titled Contoso Documents.
Open the new Document Center in the browser, and create a document library using the Site Actions menu of the new site. Name the document library Class Descriptions.
Create a second document library using the Site Actions menu of the new site. Name the document library Instructor Resumes.
Create a third document library using the Site Actions menu of the new site. Name the document library Sail Plans.
Create an asset library using the Site Actions menu of the new site. Name the asset library Training Videos.
Next, create a SharePoint solution package that contains all of the elements contained in the Document Center. Once the site is saved as a solution in the Solution gallery, you can export the file and customize it in Visual Studio.
Using the
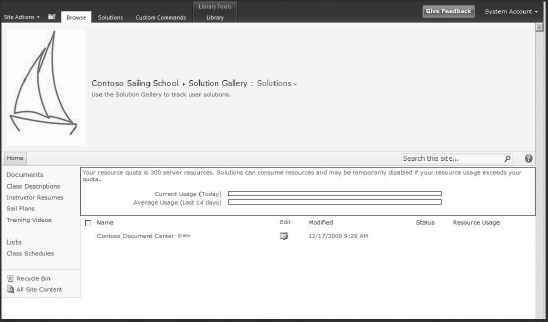
Contoso DocumentsDocument Center site created in the previous steps, navigate to the Site Actions and then Site Settings. Under the Site Actions column, select Save Site as a Template.THE NEW SITE TEMPLATE FEATURE IN SHAREPOINT 2010
In the previous version of SharePoint, saving a site as a template created an
.stptemplate file that was stored in the template gallery. SharePoint 2010 creates template files as solutions packages, which are stored in the Solution gallery as shown in Figure 10-2.The files are in the standard
.wspformat. Once these files are saved to the solution gallery, they can be saved locally to your developer machine and imported into Visual Studio 2010!Name the site template file contoso document center template.
Name the site template name Contoso Document Center Solution.
For the description, enter Contoso Document Center Solution.
Click OK to create the template. Once the operation is completed, click on the link to the Solution gallery in the resulting dialog box to view the saved solution.
In the Solution gallery, click the Contoso Document Center link to display the File Download dialog box.
Click the Save button in the File Download dialog box and save the file on your desktop.
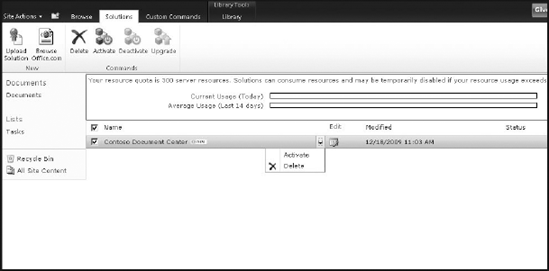
It is worth noting that, once the site is saved as a template in the Solution gallery, it can be activated and then used to create sites in the site collection. To activate the template, simply browse to the Solution gallery and select Activate while the Contoso Document Center solution is highlighted. You can see in Figure 10-3, when the template is activated, you will have the option of creating a new site based on the saved template.
Once a .wsp file is saved, it can be imported into Visual Studio. It is best to create a site you can use for debugging before performing the import.
Using Central Administration, create a new web application.
Create a new top-level site using a blank site template. A blank site is created and used for debugging the site definition, as the template will reduce the likelihood of conflicts with existing libraries.
Now you need to import the Web Template from within Visual Studio.
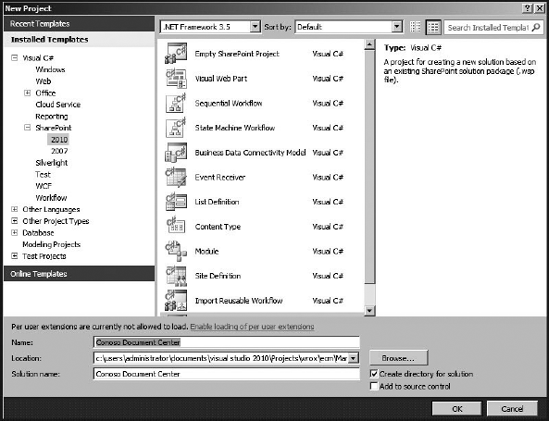
Open Visual Studio 2010 and select New Project from the File menu. Under the Visual C# or Visual Basic node, select SharePoint and then click 2010. You can see the New Project types in Figure 10-4.
Select the Import SharePoint Solution Package project template on the right.
Name the project and directory Contoso Document Center, and click OK.
The next screen is the SharePoint Customization Wizard (see Figure 10-5). On the Specify the Site and Security Level for Debugging page, make sure to enter the URL for the debugging site you created above.
In the trust level section, change the default value from Deploy as a Sandboxed Solution to Deploy as a Farm Level Solution.
In the Specify a New Project source page, browse to the location where you saved the downloaded
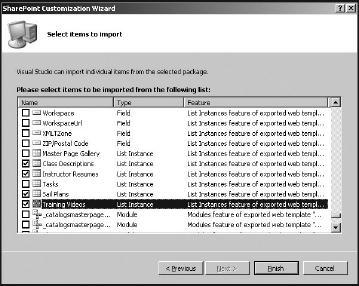
.wspfile, and then click Next.Using the following dialog box, you can select which artifacts contained in the
.wspfile you want to import. There are hundreds of items you can select. Use Ctrl+A to select all the items, and then click one of the checkboxes to deselect all the items.Once the checkboxes are cleared, scroll down to the list instance section and select the three document libraries and the asset library you created earlier.
Click Finish to import the solution package and view the new site definition in Visual studio.
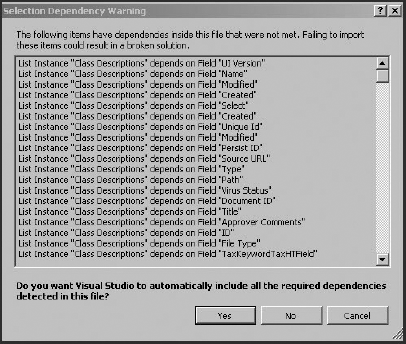
Note the following dialog box, shown in Figure 10-6, which lists the dependencies of the lists you selected. Visual Studio will cycle through each list instance and make sure that you have the required dependencies in your site definition!
Once you have the .wsp file imported, it can be customized and redeployed. First, the site definition should be deployed and debugged in your test environment. Using the following steps, the site definition can be deployed and debugged.
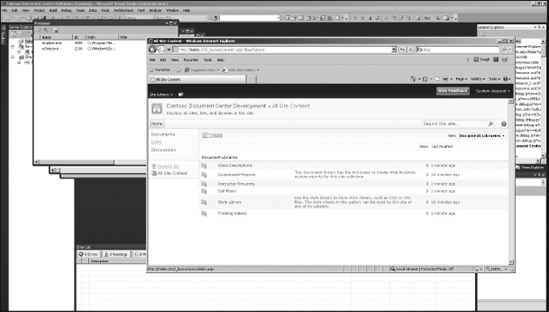
In Visual Studio, press F5 to deploy and run the
.wspimport project.Click the Documents link in the Quick Launch toolbar when the debugging site appears. You should see the libraries you created earlier. Your site should look like the one shown in Figure 10-7.
When you run your SharePoint project in debug mode, the SharePoint deployment process performs the following tasks:
Creates a web solution package (
.wsp) file by using MSBuild commands. The.wspfile includes all of the necessary files and features for your site definition.Since the SharePoint solution is a farm solution, the IIS application pool is recycled.
If a previous version of the package already exists, it will be removed. This step deactivates the features, uninstalls the solution package, and then deletes the solution package on the SharePoint server.
Installs the current version of the features and files in the
.wspfile. This step installs the solution on the SharePoint server.The Contoso Document Center and libraries are displayed in the web browser.
In this sample, a Document Center was created, libraries were created, and then the site was saved as a template. The saving process created a web solution package (.wsp file), which was then imported into Visual Studio. Once the file is imported into Visual Studio, you can add additional functionality and debug your new site definition.
Architecting large repositories of documents requires advanced planning and possibly a team of content stewards. Uploading, navigation, and finding content becomes tricky when there is the potential for millions of items. SharePoint 2010 provides new features to assist content stewards in managing large repositories, as well as making repositories easier to use. One of these site-level features is the Content Organizer (CO).
Often, when users are adding content to a large repository, there is this sense that they are handing the content off to the content stewards. Much of the time, the content found in these larger repositories is in a finished state and ready for storage and consumption. One use of the Content Organizer is to route documents to specific site collections or folders based on rules and metadata.
The CO is activated using the Site Features list. Once a feature is activated, you configure the Content Organizer using the Content Organizer Setting and Content Organizer Rules links found under Site Administration. The CO is the evolution of the Routing Table web part and document routing features found in the SharePoint 2007 Document Repositories site definition.
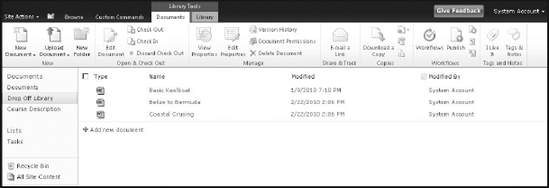
When the Content Organizer (CO) feature is activated, a special document library, the Drop Off Library (see Figure 10-8), is created and added to the Quick Launch toolbar. Any content that derives from the document content type and is received by the Drop Off Library can be routed to alternate locations without user intervention. The location that the content is routed to is determined by rules that the content stewards create. Content can be routed to other site collections, libraries, or folders within libraries. The CO can be configured to force all content to be uploaded to the Drop Off Library. Once this is configured, it can act as a holding area for documents that do not have the required metadata needed for rule processing.
There are several different useful scenarios for using the Content Organizer, including:
Mask upload complexities from contributors
Deliver content flagged as confidential to secure locations
Submit content to very large repositories
Move content to folders with specific Document Information Policies
Create new folders as needed and then move content to them
Documents may be sent to document libraries via different pipes. For example, you can use the context menu Send To pipe, manual uploads, workflows, and the object model. Since the Drop Off Library is a standard library, all of these submission pipes are supported.
Typically, the content stewards are responsible for adding rules that will be used to route content around the organization. Before creating rules, the CO should be configured using Site Settings. There are several useful options available during configuration:
The Redirect Users to the Drop Off library option redirects users' content to the Drop Off Library, if they try to upload content to a library that is associated with rules.
When the Sending to Another Site option is enabled, content can be routed to other site collections. This is useful when the content stewards are responsible for lots of content that needs to be distributed across many site collections.
Folder provisioning settings allow new folders to be created when certain thresholds are reached. This is another useful feature in repositories that contain a large number of documents. Folders can be provisioned, allowing you to maintain fewer than 5000 items in a given folder.
Note
The List View Threshold is a new setting in SharePoint which represents the maximum number of items that can be retrieved in one request. The default value is 5000 and the minimum is 2000.
The Duplicate Submissions setting allows you to enable versioning or provide unique file names so that files are not overwritten.
Role managers will be notified if files have been submitted to the Drop Off Library but have not been routed for various reasons.
The content stewards add rules using the Content Organizer Rules link (see Figure 10-9), which can be accessed using the Site Settings. When content is received by the CO, rules are processed by priority and can assist the content stewards in making sure that content is stored in the appropriate place.
To create a new rule, you must provide the following information:
Rule name: A user-friendly name, which may be exposed in the File Plan report.
Rule Status and Priority: Set a value between 1 and 9 with 1 having the highest priority. Having a higher priority means the rule will execute before rules with a lower priority.
Submission's Content Type: The selected content type properties will be exposed to condition logic. If the rules are met, the content will assume this content type.
Conditions: Allows configuration of up to six logical comparisons of content type properties.
Target Location: The location the content will be moved to if it matches all of the conditions defined. This location can be another site or site collection.
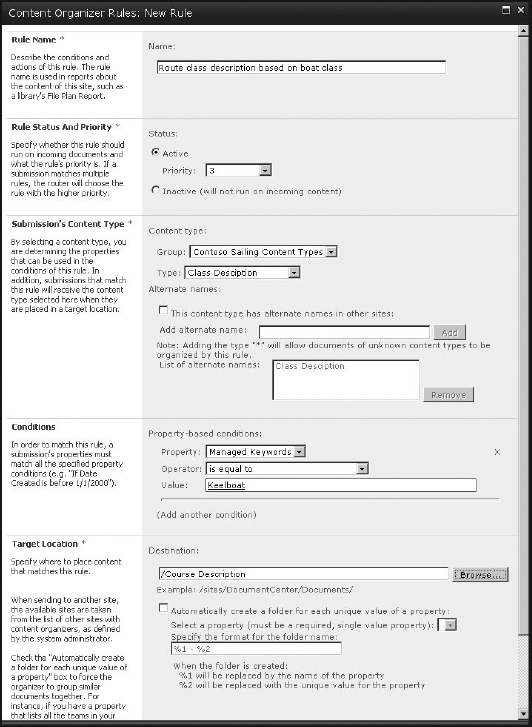
In summary, the Content Organizer is like the previous Record Router. You create rules that help the CO decide where the various types of content should be stored. This enables you to enforce security and information policies. The CO can route content based on properties as well as content type.
Like the previous version of the Document Center, there is one document library contained in newly provisioned Document Center sites. Of course, you can add additional libraries as needed. Many of the features explored in this chapter are managed at the document library level. While large organizations may require many site collections and Document Centers to manage hundreds of millions of documents, smaller teams may be able to achieve their document management goals using a single document library. A single library can contain large numbers of documents. However, generally speaking, if you need to manage many items, you are better off distributing the items across multiple libraries or sites for various reasons.
Folders in a document library can be based on business needs. With the release of SharePoint 2010, it is important to understand that the folders contained in libraries serve many purposes outside the traditional use, assisting with categorization. Since you can manage information policies at the folder level and these policies are inherited similarly to security policies, you can use folders as a means of maintaining and organizing retention policies. Document metadata can be automatically populated according to the location of the document, allowing folders to play a role in metadata as well. Table 10-5 is a list of the default settings for the document libraries provisioned using the Document Center site definition.
Table 10.5. Default Document Library Settings for the Document Center
LIST SETTING | DOCUMENT LIBRARY DEFAULT | MOSS 2007 DOCUMENT CENTER SETTING | SHAREPOINT SERVER "14" DOCUMENT CENTER SETTING |
|---|---|---|---|
Content Approval | No | No | No |
Version History | No versioning | Create major and minor versions | Create major and minor versions |
Draft Item Security | Not available | Read Permissions (Minimum) | Read Permissions (Minimum) |
Require Check Out | No | Yes | Yes |
Content Types | No | Yes | Yes |
Document Template | Template.doc | Template.doc | Template.doc |
Browser-enabled Documents | Open in the client application | Open in the client application | Open in the client application |
Folders | Yes | Yes | Yes |
Big List | No | Not available | No |
Search | Yes | Yes | Yes |
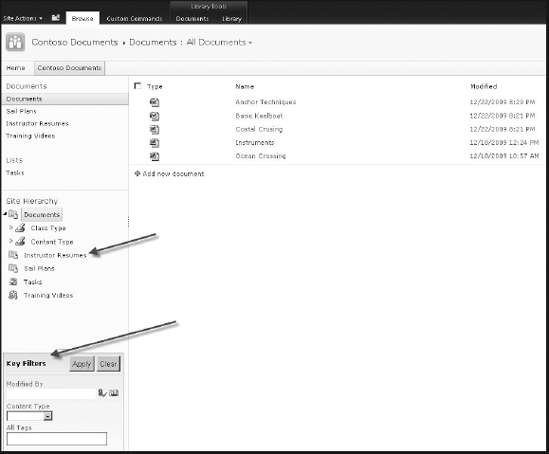
Since the Document Center is designed to manage a large number of documents, the ability to quickly sort and filter, as well as navigate to, content is very important. SharePoint 2010 provides three different ways to quickly find the content needed: column-level filters, metadata navigation, and key filters.
Metadata-based navigation helps users find documents quickly and explore unstructured content that might span many folders in a library. Content stewards define navigation hierarchies based on content types, single-value choice fields, or managed metadata fields. The selected fields will appear on the Quick Launch toolbar and can be used to assist in navigating large amounts of documents.
Key filters can be defined (see Figure 10-10), allowing users to filter documents by terms entered in the Key Filters section of the Quick Launch toolbar. Both the navigation hierarchy and key filters are defined at the library level using Library Settings.
Field types that are available for key filters include:
Content type
Choice fields
Managed Metadata fields
Date and time fields
Number fields
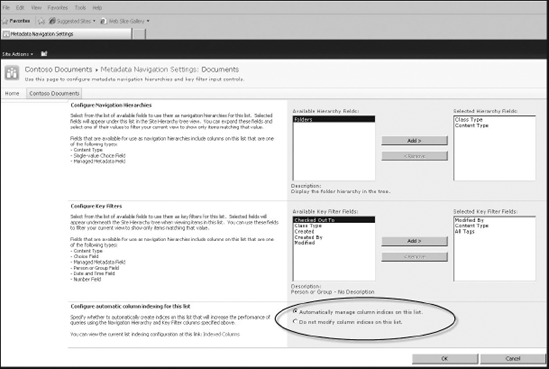
When defining columns used for navigation, SharePoint defaults to automatically creating and managing the column indices on the list. The indices are created using the data that will be used in queries, as the tree is navigated and nodes are selected. As new nodes are selected, SharePoint decides if it can reuse an index from the last query. If the previous index can't be used, a new query will be created using another available index. If the query fails because of too many results being returned, then a fallback query will be used to return top items from the list.
You manage metadata navigation and filtering using the Metadata Navigation Settings found under Site Settings (see Figure 10-11). Notice the default setting at the bottom, which allows SharePoint to automatically manage the column indices.
Much of what developers learned about document library definitions and Visual Studio in the previous version of SharePoint is still relevant today. Custom document libraries can be created using list definition templates found in Visual Studio 2010. You can use the various flavors of the object model to send and retrieve items to and from the document library. Custom fields and views can be added as part of any list definition. Listing 10-1 uses the object model to set options such as list throttling and synchronization properties.
Example 10-1. Document Library Manipulation Using the SharePoint Object Model
using System;
using System.Collections.Generic;
using System.Linq;
using System.Text;
using Microsoft.SharePoint;
namespace DocumentLibraryManipulation
{
class Program
{
static void Main(string[] args)
{
using (SPSite site = new SPSite("http://servername/docs"))
{
using (SPWeb spw = site.RootWeb)
{
Guid ListId = spw.Lists.Add("Class Description", "Sailing Class
Descrition Documents", SPListTemplateType.DocumentLibrary);
SPList spdClassDesc = spw.Lists[ListId];
//indicate throttling status
spdClassDesc.EnableThrottling = false;
//indicates whether the list should be downloaded to the client
during offline synchronization
spdClassDesc.ExcludeFromOfflineClient = true;
// indicates whether the content of the list is included when
the list is saved as a list template
Boolean blCanbeSaved = spdClassDesc.ExcludeFromTemplate;
//Get related fields for the list as a collection
SPRelatedFieldCollection colRelated =
spdClassDesc.GetRelatedFields();
spdClassDesc.OnQuickLaunch = true;
spdClassDesc.Update();
Console.WriteLine("Library added...");
Console.ReadLine();
}
}
}
}
}You can create a list definition and list instance using the templates that are included in Visual Studio 2010. The list definitions are created using project templates included in Visual Studio.
To create a list definition and list instance:
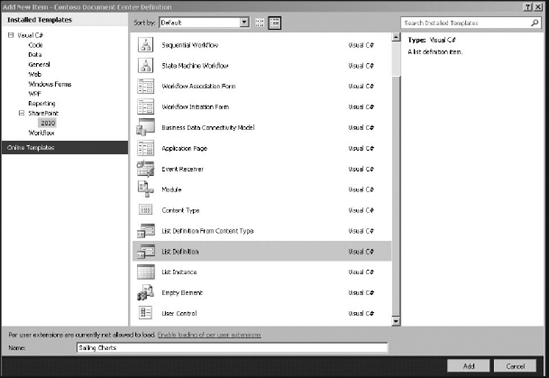
To add a list definition to the Document Center site definition project created earlier, click the Project node in Solution Explorer and click Add New Item.
Expand the SharePoint node under Visual C#, and click 2010.
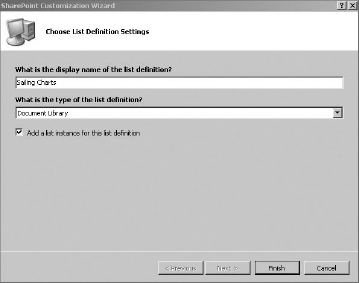
In the templates window, select List Definition and rename the default name from ListDefinition1 to Sailing Charts, as shown in Figure 10-12.
As shown in Figure 10-13, using the SharePoint Customization Wizard:
The display name can be set.
The base template for the list definition can be selected.
A list instance can be generated.
After you click the Finished button, the new definition will be generated and a new folder will be created under the Solution Explorer. Once the list definition is generated, you can define custom fields as needed.
Metadata is structured information that describes or otherwise makes it easier to locate and manage content in the context that was intended. Metadata is often called data about data, or information about information.
An important reason for supplying an easy-to-use framework for creating descriptive metadata is to facilitate the discovery of relevant information. In addition to resource discovery, metadata can help organize social content and facilitate interoperability with external social networks. Administrative metadata about people objects can be used to create claims during authentication and then be forwarded to other systems.
There are several different types of metadata to consider here:
Descriptive metadata describes an item for purposes such as search and identification. It can include basics such as title, subject, author, and keywords.
Structural metadata indicates how compound items are put together; for example, what documents make up a contract or a proposal.
Administrative metadata provides information to help manage a item, such as when and how it was created, file type and other technical information, and who can access it.
Social metadata is data added to content by people other than the content creator, such as tags, ratings, votes, and comments. Examples include ratings on Amazon.com, comments on Expedia.com, and tagging in Dig.com. In the past, how we found content was defined by search tools. Social metadata provides a more personalized way of organizing and finding content, where our network of colleagues and peers become our preferred source of information. You can use SharePoint Server to query ratings, comments, and other social metadata provided by our colleagues to determine what content is most relevant.
Tagging is the act of associating metadata with an item. You can separate tagging into two different categories. The first is authoritative tagging, and the second is social tagging. In authoritative tagging, the author of the item associates metadata with it, typically during the content creation process. In social tagging, other users add social metadata to content, usually after the content has been authored. Using SharePoint metadata, users can tag items in a web browser, office clients, or custom applications using the SharePoint metadata object model.
Taxonomy is formally defined as the practice of classification according to natural relationships. This chapter defines taxonomy as being a hierarchy of terms that includes synonyms, translations, and descriptions. The taxonomy can be thought of as a system of classification such as the Kingdom Phylum Class Order Genus Species you learned about in high school biology. When you associate authoritative tags with content, you use keywords. Keywords are stored throughout SharePoint in sites, lists, and libraries.
Terms are managed in the managed metadata store and represent a node in the taxonomy. Terms have a unique ID and contain text labels, which represent a keyword, synonym, abbreviation, or phrase.
The new metadata infrastructure in SharePoint Server consists of three major components:
Managed Metadata Services application
Term sets
Managed metadata column
The Managed Metadata Service application allows you to define content types and metadata and share them across lists, sites, site collections, web applications, and SharePoint farms. Content types are addressed later in this chapter. When an administrator configures the managed metadata store, a database is created to host the term store. There is one term store per shared service application. The term store consists of groups. Most often there will be many groups of terms, and the groups can be used as a security boundary. The groups contain term sets. There can be many term sets per group; however, there is a maximum of 1000 term sets per term store. Each term set can have 30k terms with a maximum of a million terms total. The terms contain synonyms, descriptions, translations, and custom properties. For example, you may track language of choice as a custom property.
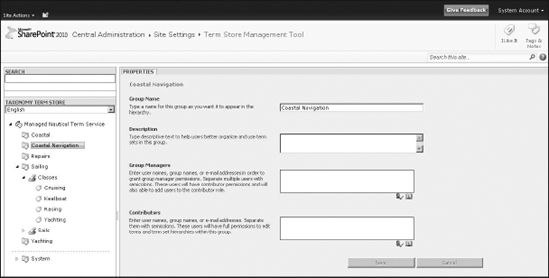
When you click Term Store Management from the Site Settings page, you are taken to the Central Administration site. This is the global administration page for the term store. Changes made here affect the entire farm, as well as any farms that are consuming terms from the managed metadata store.
The following steps can be used to create a new term set manually. Use the Document Center site you created earlier in the chapter.
From Site Settings, click Term Store Management.
Hover over the Managed Term Service in the pane on the left of the Term Management tool, and select New Group.
Name the group Sailing.
Using the resulting screen on the right, assign a Group Manager.
Click Save and refresh the page.
Hover over the new Sailing group, and select New Term Set.
Name the term set Classes; enter a description, owner, contact; and click Save.
Hover over the new Classes term set, and add the following terms:
Cruising
Keelboat
Racing
Yachting
You should see something like what is shown in Figure 10-14.
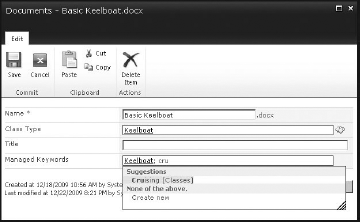
Once created, the new terms can be referenced by managed metadata columns and applied as metadata to documents. Users will be able to pick a term, type in a partial name, and see the type-ahead features.
Managed metadata columns are single- or multi-value fields that map to an open or closed term set stored in the managed metadata store. The keyword and managed metadata controls both use a managed metadata column (see how one is populated in Figure 10-15).
The managed metadata columns support:
Type-ahead
Tree Picker
Disambiguation
Mutli-language support
Synonyms
If the column is associated with an open term set, users will have the ability to create new terms as well. An open term set will most likely have less structure and governance associated with it. Generally, an open term set supports users by providing a means to create a folksonomy. A folksonomy is a collection of terms created by users to tag content. Think of it as a user driven approach to organizing content, as opposed to the taxonomy, which is more structured and defined ahead of time. The easiest way to learn how the managed metadata columns work is simply to create one. From any document library, you can create a new column and specify the column type as managed metadata. When creating a new column, if you select managed metadata as the type of information the column will hold, you will be presented with additional selection options to pick the term set used for the column.
Enterprise Metadata Management (EMM) encompasses many new features in SharePoint Server that allow the management of metadata. The types used when creating applications to manage metadata are contained in the Microsoft.SharePoint.Taxonomy namespace. The namespace can be used to create sessions and connect to the MMS (see Listing 10-2). Once a session is established, groups, term sets, and terms can be managed programmatically.
Example 10-2. Creating Terms and Term Sets Using the Taxonomy Object Model
using System;
using System.Collections.Generic;
using System.Linq;
using System.Text;
using System.Web;
using Microsoft.SharePoint;
using Microsoft.SharePoint.Taxonomy;
namespace ManagedMetadataConnection
{
class Program
{
static void Main(string[] args)
{
using (SPSite site = new SPSite("http://belize:777"))
{
//instantiate a new session to a site
TaxonomySession sesssion = new TaxonomySession(site);
//Get the term store
TermStore NauticalStore = sesssion.TermStores["Managed Nautical
Term Service"];
//Create a new term group
Group Costal = NauticalStore.CreateGroup("Costal Sailing");
//Create a new term setTermSet termSetClasses = Costal.CreateTermSet("Class Types");
//Add terms
Term term1 = termSetClasses.CreateTerm("Sail Trimming", 1033);
Term term2 = termSetClasses.CreateTerm("Anchoring", 1033);
Term term3 = termSetClasses.CreateTerm("Cruising", 1033);
Term term4 = termSetClasses.CreateTerm("Deep Water", 1033);
Term term5 = termSetClasses.CreateTerm("Navigation", 1033);
Term term6 = termSetClasses.CreateTerm("GPS", 1033);
Term term7 = termSetClasses.CreateTerm("Sail Repairs", 1033);
//Commit changes to the store
NauticalStore.CommitAll();
//Delete a term
term1.Delete();
//set descriptions and labels
term2.SetDescription("Learn to Anchor Class", 1033);
term2.CreateLabel("Anchoring", 1033, false);
NauticalStore.CommitAll();
Console.WriteLine("Group added...");
Console.ReadLine();
}
}
}
}When implementing ECM solutions, the ability to manage content types across site collections is perhaps one of the most important new features in SharePoint. Certainly this release can be thought of as the release where SharePoint broke site collection and silo boundaries while facilitating manageability. The ability to create global content types that can be syndicated across SharePoint Farms and Site Collections eliminates boundaries you may have experienced in SharePoint 2007. No longer will you have to recreate the same content types for each site collection you manage.
Content types that can be shared ensure that users are using consistent templates and metadata. Since content types can have individual information policies, you have the ability to insist that content adhere to a policy, regardless of where it lives in the system. The ability to create, publish, and consume content types using a services-based model has many advantages. Companies with a global deployment can share content types across multiple farms spanning geographical locations.
Since metadata follows content type, companies can ensure consistent metadata across teams. When users create new content, you can ensure that they are using current templates and workflows to automate approval processes. In short, an organization truly purchases itself manageability of content by taking time to plan and publish content types.
Content type syndication allows the publishing, consuming, and distributing of one or many content types to other farms, web applications, and site collections. Content type syndication requires a hub from which to publish. You create the content types the same way you did in the previous version, but now they can be syndicated through the hub to other site collections.
Hub: A site collection designated as a source from which content types are shared throughout the enterprise
Content type syndication: Publishing, sharing, or pushing one or more content types across site collections, web apps, and farm boundaries
Published content types are no different from the standard content types you work with in SharePoint. The only difference is they are disseminated across the organization from the centralized hub. There is only one hub for each Metadata Shared Application Service. It is worth noting that you don't have to syndicate content types, even if you are using the Metadata Shared Application Service for term management and keywords. If a site collection is consuming metadata from a service application, it does not have to consume content types as well.
When a content type is selected to be published, the following components are published as well:
Content type and all columns
Column settings and defaults
Information management policies
Workflow associations
Document Information panels
Conceptually, a document set can be thought of as a folder with enhanced functionality. From a technical standpoint, the document set is implemented as a folder content type inheriting from the folder parent content type. This allows for a compound document affect and the ability to attach multiple items to the set.
Often, there is a need to manage documents that should be treated as an interconnected unit but still allow individual settings and metadata for the documents that make up the set. To create and manage books using SharePoint, you might have to manage many files that make up a title. The text from various authors might be in several documents, one per chapter. Figures and code may be separate files. Document sets would allow you to manage the book as one unit, with workflows, metadata, and so forth. Each of the files that make up the various chapters could still have separate metadata and approval workflows.
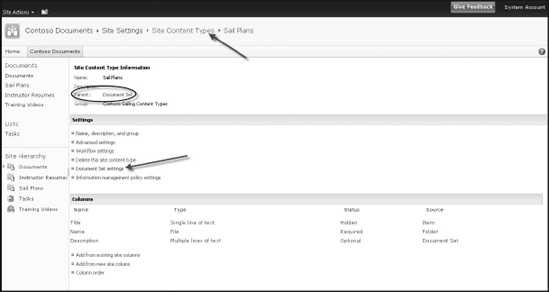
To create a document set, select Create in the Content Type gallery page. Provide a descriptive name for the new content type, select Document Set Content Type as the parent content type, choose a group, and click OK. Creating the document set is that easy (see Figure 10-16). It truly is like creating any other content type.
Examples of using document sets include automating content creation, providing process guidance, and assisting in managing related content. A document set can have a custom welcome page. The welcome page can contain verbiage describing the document set, as well as web parts and images.
Some features of a document set include:
Welcome page
Shared metadata
Prepopulated templates or documents
Versions
Workflows
Security boundary
Unique document ID
A content steward or administrator can activate the Document ID Service at the site collection level. Once the Document ID feature is activated, it can be managed using the Site Collection Settings page.
Document IDs will only be generated for the document and document set content type. Of course, your custom content types created using the Document content type or Document Set content type will generate IDs as well. Other content types will be ignored. Essentially what happens is that, as new documents are added to the list, the item added event is triggered and used to set the Document ID. The event receiver will generate Document IDs every time an item is added.
The default behavior is, if an existing ID is associated with the item, the ID is overwritten. When documents are moved, the Document ID is retained, and during an item copy there is a new Document ID assigned; however, this can be changed by setting the value of the PersistID column.
When a new document or document set is added, SharePoint Server checks to see whether the item has a document ID. If the item has a Document ID, the server checks to see whether the PreserveID attribute is set to True or False, and then sets it to False if it is currently set to True. If the item does not already have a Document ID, the server gets a Document ID for the item from the specified provider, writes it to metadata, and sets the PreserveID attribute to False.
Once a Document ID is generated, it can be used like any other piece of metadata. When configuring searches, a search scope can be used to search Document ID metadata. Finally, when the feature is deactivated, the setting links are removed and searching using Document ID scopes will no longer work.
A custom provider can be used to assign Document IDs to documents and document sets. In some organizations, business rules and metadata drive how IDs are created and assigned. Using a custom-generated Document ID gives you the ability to identify documents using existing numbering schemes that may already be present.
SharePoint Server supports the use of custom code to create Document IDs. Custom providers can be created by implementing a class that derives from the IIDProvider interface and then registering the provider in each site collection. Once the custom provider is deployed and registered, as new documents and document sets are added, the new custom provider will be used to assign the Document ID.
Listing 10-3 illustrates how you can implement your own custom provider to generate unique IDs. This is useful in scenarios where you already have a document numbering system in place. First, execute the following steps:
Open Visual Studio 2010 and select New Project from the File menu. Under the Visual C# or Visual Basic node, select SharePoint, and then click 2010.
Select the Empty SharePoint Project template on the right.
Name the project name and the directory name Custom Document ID Provider, and click OK.
In the Solution Explorer right-click on the new project, and select Add New Item.
Select the Visual C# node and create a new Class item.
In the Solution Explorer right-click on the new Class.cs file, and rename it CustomDocumentIDProvider.cs. When prompted, make sure that you select Yes to rename the references.
Browse to the SharePoint root folder, and set a reference to the
Microsoft.Office .DocumentManagementassembly.Replace the code in
CustomDocumentIDProvider.cswith the code in Listing 10-3.
Example 10-3. Implementing a Class that Derives from the IIDProvider Interface
using System;
using System.Collections.Generic;
using System.Linq;
using System.Text;
using Microsoft.Office.DocumentManagement;

namespace CustomDocumentIDProvider
{
    class CustomDocumentIDProvider :
Microsoft.Office.DocumentManagement.DocumentIdProvider
    {
        public override bool DoCustomSearchBeforeDefaultSearch
        {
           //property used to trigger our custom search first.
           //If false then we will use the SharePoint search when retreiving
            Document IDs
            get
            {
                return false;
            }
        }

        //We implement our logic to generate an ID returned as a string
        public override string GenerateDocumentId(Microsoft.SharePoint.SPListItem
        listItem)
        {
            DateTime CurrTime = DateTime.Now;
            return CurrTime.ToString();
        }

        //Implement our own finder method.
        //Return empty if no results
        public override string[] GetDocumentUrlsById(Microsoft.SharePoint.SPSite
        site, string documentId)
        {
            string[] searchhits = new string[0];
            return new string[0];
        }

        //Sample text used in web parts and UI
        public override string GetSampleDocumentIdText(Microsoft.SharePoint.SPSite
        site)
        {

            return "Todays date please...";
        }
    }
}
Once the custom document ID provider has been created, it needs to be deployed and registered at the site collection level. Best practice is to use a feature and a feature event receiver to register the custom provider. During testing and development, you can do this using a console application or PowerShell (see Listing 10-4).
Example 10-4. Code to Deploy and Register Custom Document ID Provider within a Feature
using System;
using System.Runtime.InteropServices;
using System.Security.Permissions;
using Microsoft.SharePoint;
using Microsoft.SharePoint.Security;
using Microsoft.Office.DocumentManagement;

namespace CustomDocumentIDProvider.Features.Feature1
{
   /// <summary>
   /// This class handles events raised during feature activation, deactivation,
    installation, uninstallation, and upgrade.
   /// </summary>
   /// <remarks>
   /// The GUID attached to this class may be used during packaging and should not
    be modified.
   /// </remarks>

   [Guid("07168ca9-ead3-427c-a1e6-939669a148fa")]
   public class Feature1EventReceiver : SPFeatureReceiver
   {

      public override void FeatureActivated(SPFeatureReceiverProperties properties)
        {
           SPSite sitecollection = (SPSite)properties.Feature.Parent;
           DocumentId.SetProvider(sitecollection,
           typeof(CustomDocumentIDProvider.CustomDocumentID));
        }

    }
}In this chapter, you learned how SharePoint can be used to manage documents and artifacts for small teams, as well as hundreds of millions of documents for large organizations. You discovered the importance of the Managed Metadata Service application that contains content type syndication features. Using the service application model, SharePoint helps you eliminate information silos by using constant metadata and terms across site collections and farms. Certainly there will be entire books written on this subject over time. As a developer, your next steps include regular visits to the online SDK to explore new developer documentation as it becomes available.