
Many real-world applications need to interact with a database. The .NET Framework provides a rich set of objects to manage database interaction; these classes are collectively referred to as ADO.NET.
ADO.NET looks very similar to ADO, its predecessor. The key differences are that ADO.NET is native to .NET (and isn’t just a wrapper on OLEDB) and that it is primarily a disconnected data architecture. In a disconnected architecture, data is retrieved from a database and cached on your local machine. You manipulate the data on your local computer and connect to the database only when you wish to alter records or acquire new data.
There are significant advantages to disconnecting your data architecture from your database. The biggest advantage is that your application, whether running on the Web or on a local machine, will create a reduced burden on the database server which may help your application to scale well. Database connections are resource-intensive, and it is difficult to have thousands (or hundreds of thousands) of simultaneous continuous connections. A disconnected architecture is resource-frugal.
ADO.NET typically connects to the database to retrieve data, and connects again to update data when you’ve made changes. Most applications spend most of their time simply reading through data and displaying it; ADO.NET provides a disconnected subset of the data for your use, while reading and displaying.
Although one can certainly write an entire book on relational databases, and another on SQL, the essentials of these technologies aren’t hard to understand. A database is a repository of data. A relational database organizes your data into tables. Consider the Northwind database provided with Microsoft SQL Server and Microsoft Access.
The Northwind database describes a fictional company buying and selling food products. The data for Northwind is divided into 13 tables, including Customers, Employees, Orders, Order Details, Products, and so forth.
Every table in a relational database is organized into rows, where
each row represents a single record. The rows are organized into
columns. All the rows in a table have the same column structure. For
example, the Orders table has these columns:
OrderID, CustomerID,
EmployeeID, OrderDate, etc.
For any given order, you need to know the customer’s
name, address, contact name, and so forth. You could store that
information with each order, but that would be very inefficient.
Instead, you use a second table called Customers, in which each row
represents a single customer. In the Customers table is a column for
the CustomerID. Each customer has a unique ID, and
that field is marked as the
primary
key for that table. A primary key is the column
or combination of columns that uniquely identifies a record in a
given table.
The Orders table uses the CustomerID as
a
foreign
key. A foreign key
is a column (or combination of columns) that is a primary (or
otherwise unique) key from a different table. The Orders table uses
the CustomerID (the primary key used in the
Customers table) to identify which customer has placed the order. To
determine the address for the order, you can use the
CustomerID to look up the customer record in the
Customers table.
This use of foreign keys is particularly helpful in representing one-to-many or many- to-one relationships between tables. By separating information into tables that are linked by foreign keys, you avoid having to repeat information in records. A single customer, for example, can have multiple orders, but it is inefficient to place the same customer information (name, phone number, credit limit, and so on) in every order record. The process of removing redundant information from your records and shifting it to separate tables is called normalization .
Normalization not only makes your use of the database more efficient,
but also it reduces the likelihood of data corruption. If you kept
the customer’s name in both the Customers table and
the Orders table, you would run the risk that a change in one table
might not be reflected in the other. Thus, if you changed the
customer’s address in the Customers table, that
change might not be reflected in every row in the Orders table (and a
lot of work would be necessary to make sure that it was reflected).
By keeping only the CustomerID in Orders, you are
free to change the address in Customers, and the change is
automatically reflected for each order.
Just as C# programmers want the compiler to catch bugs at compile
time rather than at runtime, database programmers want the database
to help them avoid data corruption. The
compiler helps avoid bugs in C# by
enforcing the rules of the language (for example, you
can’t use a variable you’ve not
defined). SQL Server and other modern relational databases avoid bugs
by enforcing constraints that you request. For example, the Customers
database marks the CustomerID as a primary key.
This creates a primary key constraint in the database, which ensures
that each CustomerID is unique. If you were to
enter a customer named Liberty Associates, Inc. with the
CustomerID of LIBE, and then tried to add Liberty
Mutual Funds with a CustomerID of LIBE, the
database would reject the second record because of the primary key
constraint.
Relational databases use
Declarative
Referential
Integrity
(DRI) to establish
constraints on the relationships among
the various tables. For example, you might declare a
constraint on the Orders table that dictates that no order can have a
CustomerID unless that
CustomerID represents a valid record in Customers.
This helps avoid two types of mistakes. First, you
can’t enter a record with an invalid
CustomerID. Second, you can’t
delete a Customer record if that CustomerID is
used in any order. The integrity of your data and its relationships
is thus protected.
The most popular language for querying and manipulating databases is SQL, usually pronounced “sequel.” SQL is a declarative language, as opposed to a procedural language, and it can take a while to get used to working with a declarative language when you are used to languages such as C#.
The heart of SQL is the query . A query is a statement that returns a set of records from the database.
For example, you might like to see all the
CompanyNames and CustomerIDs of
every record in the Customers table in which the
customer’s address is in London. To do so, write:
Select CustomerID, CompanyName from Customers where city = 'London'
This returns the following six records as output:
CustomerID CompanyName
---------- ----------------------------------------
AROUT      Around the Horn
BSBEV      B's Beverages
CONSH      Consolidated Holdings
EASTC      Eastern Connection
NORTS      North/South
SEVES      Seven Seas Imports
SQL is capable of much more powerful queries. For example, suppose
the Northwind manager would like to know what products were purchased
in July of 1996 by the customer “Vins et alcools
Chevalier.” This turns out to be somewhat
complicated. The Order Details table knows the
ProductID for all the products in any given order.
The Orders table knows which CustomerIDs are
associated with an order. The Customers table knows the
CustomerID for a customer, and the Products table
knows the product name for the ProductID. How do
you tie all this together? Here’s the query:
select  o.OrderID, productName
from [Order Details] od
join orders o on o.OrderID = od.OrderID
join products p on p.ProductID = od.ProductID
join customers c on o.CustomerID = c.CustomerID
where c.CompanyName = 'Vins et alcools Chevalier'
and orderDate >= '7/1/1996' and orderDate <= '7/31/1996'
This asks the database to get the OrderID and the
product name from the relevant tables. First, look at Order Details
(which we’ve called od for
short), then join that with the Orders table for every record in
which the OrderID in the Order Details table is
the same as the OrderID in the Orders table.
When you join two
tables, you can say either “Get every record that
exists in either table” (this is called an
outer
join), or as
I’ve done here, “Get only those
records that exist in both tables” (called an
inner
join). That is, an
inner join states to get only the records in Orders that match the
records in Order Details by having the same value in the
OrderID field (on
o.Orderid
=
od.Orderid).
Tip
SQL joins are inner joins by default. Writing join orders is the same as writing inner join orders.
The SQL statement goes on to ask the database to create an inner join
with Products, getting every row in which the
ProductID in the Products table is the same as the
ProductID in the Order Details table.
Then create an inner join with customers for those rows where the
CustomerID is the same in both the Orders table
and the Customers table.
Finally, tell the database to constrain the results to only those
rows in which the CompanyName is the one you want,
and the dates are in July.
The collection of constraints finds only three records that match:
OrderID     ProductName
----------- ----------------------------------------
10248       Queso Cabrales
10248       Singaporean Hokkien Fried Mee
10248       Mozzarella di Giovanni
This output shows that there was only one order (10248) in which the customer had the right ID and in which the date of the order was July 1996. That order produced three records in the Order Details table, and using the product IDs in these three records, you got the product names from the Products table.
You can use SQL not only for searching for and retrieving data, but also for creating, updating, and deleting tables, and generally managing and manipulating both the content and the structure of the database.
For a full explanation of SQL and tips on how to put it to best use, I recommend Transact SQL Programming (O’Reilly). If you are using a SQL database that is not SQL Server, you’ll want to consult O’Reilly’s SQL Pocket Guide because each provider may use a slightly different “dialect” of SQL.
The ADO.NET
object model is rich, but at its heart
it is a fairly straightforward set of classes.
The
most important of these is the
DataSet
. The DataSet
represents a subset of the entire database, cached on your machine
without a continuous connection to the database.
Periodically, you’ll reconnect the
DataSet to its parent database, update the
database with changes you’ve made to the
DataSet, and update the DataSet
with changes in the database made by other processes.
This is highly efficient, but to be effective the
DataSet must be a robust subset of the database,
capturing not just a few rows from a single table, but also a set of
tables with all the metadata necessary to represent the relationships
and constraints of the original database. This is, not surprisingly,
what ADO.NET provides.
The DataSet is composed of
DataTable
objects as well as
DataRelation
objects. These are accessed as
properties of the DataSet object. The
Tables property returns a
DataTableCollection
,
which in turn contains all the DataTable objects.
The
DataTable can be
created programmatically or as a result of a query against the
database. The DataTable has a number of public
properties, including the
Columns
collection, which returns the
DataColumnCollection
object, which in turn consists of
DataColumn objects. Each
DataColumn object
represents a column in a table.
In addition
to the Tables collection, the
DataSet has a
Relations
property, which returns a DataRelationCollection
consisting of DataRelation objects. Each
DataRelation represents a relationship between two
tables through DataColumn objects. For example, in
the Northwind database the Customers table is in a relationship with
the Orders table through the CustomerID column.
The nature of the relationship is one-to-many, or parent-to-child. For any given order, there will be exactly one customer, but any given customer might be represented in any number of orders.
DataTable
’s
Rows
collection returns a set of rows for that table. Use this collection
to examine the results of queries against the database, iterating
through the rows to examine each record in turn. Programmers
experienced with ADO are often confused by the absence of the
RecordSet with its moveNext and
movePrevious commands. With ADO.NET, you
don’t iterate through the
DataSet; instead, access the table you need, and
then you can iterate through the Rows collection,
typically with a foreach loop.
You’ll see this in the first example in this
chapter.
The DataSet is an
abstraction
of a relational database. ADO.NET uses
a
DataAdapter as a bridge between the
DataSet and the data source, which is the
underlying database. DataAdapter provides the
Fill()
method to retrieve data from the
database and populate the DataSet.
The
DBConnection
object represents a connection to a data
source. This connection can be shared among different command
objects. The
DBCommand
object allows you to send a command
(typically a SQL statement or a stored procedure) to the database.
Often these objects are implicitly created when you create a
DataAdapter, but you can explicitly access these
objects, as you’ll see in a subsequent example.
Instead of tying the DataSet object
too closely to your database architecture, ADO. NET uses a
DataAdapter object to mediate between the
DataSet object and the database. This decouples
the DataSet from the database and allows a single
DataSet to represent more than one database or
other data source.
An alternative
to creating a DataSet (and
DataAdapter) is to create a
DataReader
. The DataReader
provides connected, forward-only, read-only access to a collection of
tables, by executing either a SQL statement or stored procedures.
DataReaders are lightweight objects that are
ideally suited for filling controls with data and then breaking the
connection to the backend database.
Enough theory! Let’s write some code and see how this works. Working with ADO. NET can be complex, but for many queries, the model is surprisingly simple.
In this example, create a simple Windows Form, with a single listbox
in it called lbCustomers. Populate this listbox
with bits of information from the Customers table in the Northwind
database.
Begin by creating a DataAdapter object:
SqlDataAdapter DataAdapter =
new SqlDataAdapter(
commandString, connectionString);
The two parameters are commandString
and
connectionString. The
commandString is the SQL statement that will
generate the data you want in your DataSet:
string commandString =
    "Select CompanyName, ContactName from Customers";
The connectionString is whatever string is needed
to connect to the database. In my case, I’m running
SQL Server on my development machine where I have a trusted
connection to the database:
string connectionString =
    "server=localhost; trusted_connection=true; database=northwind";
If you don’t have SQL Server installed, select Quickstart Tutorials from the Microsoft .NET Framework SDK program group (you must have selected this option when you installed Visual Studio or the .NET Framework SDK). A web page appears, giving you the option to install the Microsoft SQL Server Desktop Engine (MSDE). After you install MSDE, set up the QuickStarts (this will create the Northwind sample database). To use this database, you need this connection string:
"server=(local)\NetSDK; Trusted_Connection=yes; database=northwind"
With the DataAdapter in
hand, you’re ready to create the
DataSet and fill it with the data that you obtain
from the SQL select statement:
DataSet DataSet = new DataSet();
DataAdapter.Fill(DataSet,"Customers");
That’s it. You now have a
DataSet, and you can query, manipulate, and
otherwise manage the data. The DataSet has a
collection of tables; you care only about the first one because
you’ve retrieved only a single table:
DataTable dataTable = DataSet.Tables[0];
You can extract the rows you’ve retrieved with the SQL statement and add the data to the listbox:
foreach (DataRow dataRow in dataTable.Rows)
{
    lbCustomers.Items.Add(
        dataRow["CompanyName"] +
        " (" + dataRow["ContactName"] + ")" );
}
The listbox is filled with the company name and contact name from the table in the database, according to the SQL statement we passed in. Example 14-1 contains the complete source code for this example.
Example 14-1. Working with ADO.NET
#region Using directives
using System;
using System.Collections.Generic;
using System.ComponentModel;
using System.Data;
using System.Data.SqlClient;
using System.Drawing;
using System.Windows.Forms;
#endregion
namespace WorkingWithADONET
{
partial classADONetForm1 : Form
{
public ADONetForm1( )
{
InitializeComponent( );
// connect to my local server, northwind db
string connectionString = "server=localhost;" +
"Trusted_Connection=yes; database=northwind";
// get records from the customers table
string commandString =
"Select CompanyName, ContactName from Customers";
// create the data set command object
// and the DataSet
SqlDataAdapter DataAdapter =
new SqlDataAdapter(
commandString, connectionString );
DataSet DataSet = new DataSet( );
// fill the data set object
DataAdapter.Fill( DataSet, "Customers" );
// Get the one table from the DataSet
DataTable dataTable = DataSet.Tables[0];
// for each row in the table, display the info
foreach ( DataRow dataRow in dataTable.Rows )
{
lbCustomers.Items.Add(
dataRow["CompanyName"] +
" (" + dataRow["ContactName"] + ")" );
}
}
}
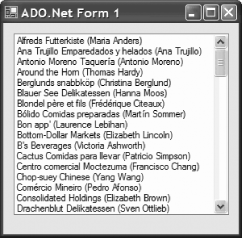
}With just a few lines of code, you have extracted a set of data from the database and displayed it in the listbox, as shown in Figure 14-1.

The eight lines of code accomplish the following tasks:
Four managed providers are currently available with ADO.NET: the SQL Server Managed Provider, the OLE DB Managed Provider, the ODBC Managed Provider, and a managed provider for Oracle. The previous example used the SQL Server Managed Provider, which is optimized for SQL Server and is restricted to working with SQL Server databases. The more general solution is the OLE DB Managed Provider, which will connect to any OLE DB provider, including Access.
You can rewrite Example 14-1 to work with the Northwind database using Access rather than SQL Server with just a few small changes. First, you need to change the connection string:
string connectionString =
"provider=Microsoft.JET.OLEDB.4.0; "
+ "data source = c:\nwind.mdb";This query connects to the Northwind database on the C: drive. (Your exact path might be different.)
Next, change the DataAdapter object to an
OLEDBDataAdapter rather than a
SqlDataAdapter:
OleDbDataAdapter DataAdapter =
new OleDbDataAdapter (commandString, connectionString);Also be sure to add a using statement for the
OleDb namespace:
using System.Data.OleDb;
This design pattern continues throughout the two Managed Providers; for every object whose class name begins with “Sql,” there is a corresponding class beginning with “OleDb.” Example 14-2 illustrates the complete OLE DB version of Example 14-1.
Example 14-2. Using the ADO Managed Provider
#region Using directives
using System;
using System.Collections.Generic;
using System.ComponentModel;
using System.Data;
using System.Data.OleDb;
using System.Drawing;
using System.Windows.Forms;
#endregion
namespace UsingADOManagedProvider
{
partial classADONetForm1 : Form
{
public ADONetForm1( )
{
InitializeComponent( );
// connect to Northwind Access database
string connectionString =
"provider=Microsoft.JET.OLEDB.4.0; "
+ "data source = c:\nwind.mdb";
// get records from the customers table
string commandString =
"Select CompanyName, ContactName from Customers";
// create the data set command object
// and the DataSet
OleDbDataAdapter DataAdapter =
new OleDbDataAdapter(
commandString, connectionString );
DataSet DataSet = new DataSet( );
// fill the data set object
DataAdapter.Fill( DataSet, "Customers" );
// Get the one table from the DataSet
DataTable dataTable = DataSet.Tables[0];
// for each row in the table, display the info
foreach ( DataRow dataRow in dataTable.Rows )
{
lbCustomers.Items.Add(
dataRow["CompanyName"] +
" (" + dataRow["ContactName"] + ")" );
}
}
}
}The output from this is identical to that from the previous example, as shown in Figure 14-2.
The OLE DB Managed Provider is more general than the SQL Managed Provider and can, in fact, be used to connect to SQL Server as well as to any other OLE DB object. Because the SQL Server Provider is optimized for SQL Server, it is more efficient to use the SQL Server-specific provider when working with SQL Server. In time, any number of specialized managed providers will be available.
Let’s
try a different, somewhat more declarative approach. Create a new
Windows Forms Solution (call it
DeclarativeDataDisplay). Begin by enlarging the
form, and renaming it to
DeclarativeDB.cs and
retitling it to Declarative Data Base. Drag a
DataGridView onto the form.
Once it is in place, an Action menu will appear. Click the drop down to choose a data source. Click Add Project Data Source to open the Data Source Configuration Wizard. Click Next to choose your datatype, as shown in Figure 14-3.

Click Database and click Next. This brings you to the Data Source Configuration Wizard, where you can click New Connection, as shown in Figure 14-4.

Fill in the appropriate information for the Connection Properties, as shown in Figure 14-5.
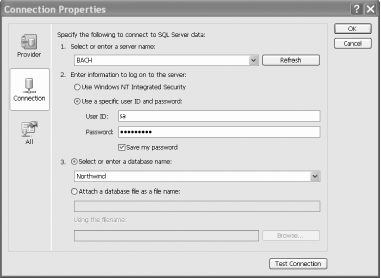
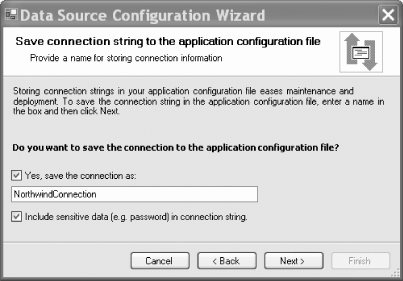
Be sure to click the Test Connection button before clicking OK. On the next tab, click both “Yes, save the connection as” and “Include sensitive data,” as shown in Figure 14-6.
You will be presented with the contents of your chosen
DataSet. In this case, expand the tables, and
expand the Customers table. Select every column except Region (to
demonstrate that your query need not return every column) and click
Finish.
Click the smart tab for the data grid, and choose Edit Columns. Edit the column headers to meaningful header text, as shown in Figure 14-7.

Run the program. You have bound data, as shown in Figure 14-8.

Examine the tray below the grid, where you will find three objects:
northwindDataSet,
CustomerDataConnector, and
customersTableAdapter, as shown in Figure 14-9.
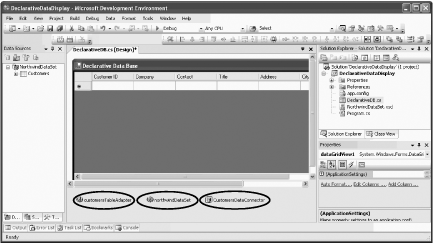
Each represents an object whose properties you can set by clicking the object and then setting properties in the Properties window.
If you absolutely, positively insist on creating these connection objects by hand, you can certainly do so, and you can manually wire them up to your data grid as well.
Create a new project called
ProgrammaticDataDisplay. Rename the
.cs file and the form and set the title
appropriately. Drag a DataGridView in place, but
ignore the action menu.
Right-click the form and choose View Code. Add these lines to the constructor:
string connectionString = "server=localhost;" +
"Trusted_Connection=yes; database=northwind";
string commandString =
"Select CompanyName, ContactName, ContactTitle, "
+ "Phone, Fax from Customers";
// create a data set and fill itSqlDataAdapter DataAdapter =
new SqlDataAdapter( commandString, connectionString );
DataSet DataSet = new DataSet( );
DataAdapter.Fill( DataSet, "Customers" );
// bind the DataSet to the grid
dataGridView1.DataSource =
DataSet.Tables["Customers"].DefaultView;In this case, you are setting the connection string and command
string by hand, and then creating a SqlDataAdapter
and DataSet to retrieve the data. You then bind
the dataGridView’s
DataSource property to the Default view of the
Customers table you retrieved.
You are free to set the
DataGridView’s properties
programmatically or declaratively, and you can mix and match
approaches. But clearly, Microsoft has gone a long way to allowing
you to just drag and drop database connection controls onto your form
to make interacting with ADO.NET much simpler.
It is possible
to
control precisely every aspect of creating the
DataSet, instead of using the default settings.
You may do so declaratively or programmatically.
In the previous example, when you created the
DataSet, you passed in a
commandString and a
connectionString:
SqlDataAdapter DataAdapter =
   new SqlDataAdapter(commandString, connectionString);
These were assigned internally to a
SqlCommand object and
a
SqlConnection object,
respectively. You can instead explicitly create these objects.
In this next example, you’ll give the class four new members:
private System.Data.SqlClient.SqlConnection myConnection;
private System.Data.DataSet myDataSet;
private System.Data.SqlClient.SqlCommand myCommand;
private System.Data.SqlClient.SqlDataAdapter DataAdapter;
The connection is created by instantiating a
SqlConnection
object with the connection string:
string connectionString = "server=(local)\NetSDK;" +
    "Trusted_Connection=yes; database=northwind";
myConnection = new System.Data.SqlClient.SqlConnection(connectionString);
and then it is opened explicitly:
myConnection.Open();
By hanging on to this connection, you can reuse it (as you’ll see in a subsequent example) and you can also use its transaction support if needed.
Tip
You can also allow the DataAdapter to create your
connection, and then explicitly open it or even maintain a reference
to it by using code such as:
SqlConnection myConnection = myAdapter.Connection
Next, explicitly create the DataSet object and set
one of its properties:
myDataSet = new System.Data.DataSet();
myDataSet.CaseSensitive=true;
Setting CaseSensitive
to
true indicates that string comparisons within
DataTable objects are case-sensitive.
Next, explicitly create the
SqlCommand
object and give that new command object
the connection object and the text for the command:
myCommand = new System.Data.SqlClient.SqlCommand()
myCommand.Connection=myConnection;
myCommand.CommandText = "Select * from Customers";
Finally, create the
SqlDataAdapter object
and assign to it the SqlCommand object you just
established. Then tell the DataAdapter how to map
the table columns, using the table you’re searching,
and instruct the SqlDataAdapter to fill the
DataSet object:
DataAdapter = new System.Data.SqlClient.SqlDataAdapter();
DataAdapter.SelectCommand= myCommand;
DataAdapter.TableMappings.Add("Table","Customers");
DataAdapter.Fill(myDataSet);
With that done, you’re ready to fill the
DataGridView (note that this time
I’ve used the default name for the
DataGrid):
dataGrid1.DataSource=
    myDataSet.Tables["Customers"].DefaultView;
Example 14-3 provides the complete source code.
Example 14-3. Customizing a DataSet
#region Using directives

using System;
using System.Collections.Generic;
using System.ComponentModel;
using System.Data;
using System.Data.SqlClient;
using System.Drawing;
using System.Windows.Forms;

#endregion

namespace CustomizedDataSet
{
   partial class CustomizedDataSet : Form
   {
      private System.Data.SqlClient.SqlConnection myConnection;
      private System.Data.DataSet myDataSet;
      private System.Data.SqlClient.SqlCommand myCommand;
      private System.Data.SqlClient.SqlDataAdapter DataAdapter;

      public CustomizedDataSet( )
      {
         InitializeComponent( );
         string connectionString = "server=localhost;" +
            "Trusted_Connection=yes; database=northwind";
         myConnection = new
            System.Data.SqlClient.SqlConnection( connectionString );
         myConnection.Open( );

         // create the DataSet and set a property
         myDataSet = new System.Data.DataSet( );
         myDataSet.CaseSensitive = true;

         // create the SqlCommand  object and assign the
         // connection and the select statement
         myCommand = new System.Data.SqlClient.SqlCommand( );
         myCommand.Connection = myConnection;
         myCommand.CommandText = "Select * from Customers";

         // create the DataAdapter object and pass in the
         // SQL Command object and establish the table mappings
         DataAdapter = new System.Data.SqlClient.SqlDataAdapter( );
         DataAdapter.SelectCommand = myCommand;
         DataAdapter.TableMappings.Add( "Table", "Customers" );

         // Tell the DataAdapter object to fill the DataSet
         DataAdapter.Fill( myDataSet );

         // display it in the grid
         dataGridView1.DataSource =
            myDataSet.Tables["Customers"].DefaultView;
      }
   }
}