
Programmers love a clean slate. Although it would be nice if we could throw away all the code we’ve ever written and start over, this typically isn’t a viable option for most companies. Over the past decade, many development organizations have made a substantial investment in developing and purchasing COM components and ActiveX controls. Microsoft has made a commitment to ensure that these legacy components are usable from within .NET applications, and (perhaps less important) .NET components are easily callable from COM.
This chapter describes the support .NET provides for importing ActiveX controls and COM components into your application, for exposing .NET classes to COM-based applications, and for making direct calls to Win32 APIs. You will also learn about C# pointers and keywords for accessing memory directly, a technique that may be crucial in some applications.
ActiveX controls are COM components typically dropped into a form, which might or might not have a user interface. When Microsoft developed the OCX standard, which allowed developers to build ActiveX controls in VB and use them with C++ (and vice versa), the ActiveX control revolution began. Over the past few years, thousands of such controls have been developed, sold, and used. They are small, easy to work with, and an effective example of binary reuse.
Importing ActiveX controls into .NET is surprisingly easy,
considering how different COM objects are from .NET objects.
Visual Studio 2005 is able
to import ActiveX controls automagically. As an alternative to using
Visual Studio, Microsoft has developed a command-line utility,
AxImp
, that will create the assemblies
necessary for the control to be used in a .NET application.
To demonstrate the ability to use classic ActiveX controls in a .NET application, first develop a simple four-function calculator as an ActiveX control and then invoke that ActiveX control from within a C# application. Build the control in VB6, and test it in a VB6 application. If you don’t have VB6 or don’t want to bother creating the control, you can download the control from my web site (http://www.LibertyAssociates.com).
Once the control is working in the standard Windows environment, you’ll import it into your Windows Forms application.
To create the control, open VB6 and choose ActiveX Control as the new project type. Make the project form as small as possible because this control will not have a user interface. Right-click UserControl1 and choose Properties. Rename it Calculator in the Properties window. Click the Project in the Project Explorer, and in the Properties window, rename it CalcControl. Immediately save the project and name both the file and the project CalcControl, as shown in Figure 22-1.

Now you can add the four calculator functions by right-clicking the CalcControl form, selecting View Code from the pop-up menu, and typing in the VB code shown in Example 22-1.
Example 22-1. Implementing the CalcControl ActiveX control
Public Function _
Add(left As Double, right As Double) _
As Double
    Add = left + right
End Function

Public Function _
Subtract(left As Double, right As Double) _
As Double
    Subtract = left - right
End Function

Public Function _
Multiply(left As Double, right As Double) _
As Double
    Multiply = left * right
End Function

Public Function _
Divide(left As Double, right As Double) _
As Double
    Divide = left / right
End Function
This is the entire code for the control. Compile this to the CalcControl.ocx file by choosing File→ Make CalcControl.ocx on the VB6 menu bar.
Next, open a second project in VB as a standard executable (EXE). Name the form TestForm and name the project CalcTest. Save the file and project as CalcTest.
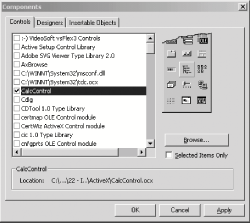
Add the ActiveX control as a component by pressing Ctrl-T and choosing CalcControl from the Controls tab, as shown in Figure 22-2.
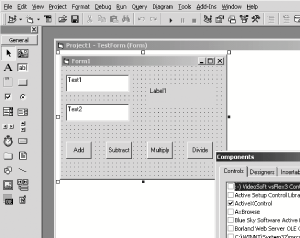
This action puts a new control on the toolbox, as shown circled in Figure 22-3.
Drag the new control onto the form TestForm and
name it CalcControl. Note that the new control will not be visible;
this control has no user interface. Add two text boxes, four buttons,
and one label, as shown in Figure 22-4.
Name the buttons btnAdd,
btnSubtract, btnMultiply, and
btnDivide. All that is left is for you to
implement methods for handling the button-click events of the
calculator buttons. Each time a button is clicked, you want to get
the values in the two text boxes, cast them to
double (as required by CalcControl) using the
VB6
CDbl function, invoke a
CalcControl function, and print the result in the
label control. Example 22-2 provides the complete
source code.
Example 22-2. Using the CalcControl ActiveX control in a VB program (TestForm)
Private Sub btnAdd_Click()
    Label1.Caption = _
        calcControl.Add(CDbl(Text1.Text), _
            CDbl(Text2.Text))
End Sub

Private Sub btnDivide_Click( )
    Label1.Caption = _
       calcControl.Divide(CDbl(Text1.Text), _
            CDbl(Text2.Text))
End Sub

Private Sub btnMultiply_Click( )
    Label1.Caption = _
       calcControl.Multiply(CDbl(Text1.Text), _
            CDbl(Text2.Text))
End Sub

Private Sub btnSubtract_Click( )
    Label1.Caption = _
       calcControl.Subtract(CDbl(Text1.Text), _
            CDbl(Text2.Text))
End SubNow
that you’ve shown
that the CalcControl ActiveX control is working, you can copy the
CalcControl.ocx file to your .NET development
environment. Once you have copied it, remember that the
CalcControl.ocx file requires that you register
it using Regsvr32. You’re now
ready to build a test program in .NET to use the calculator:
Regsvr32 CalcControl.ocx
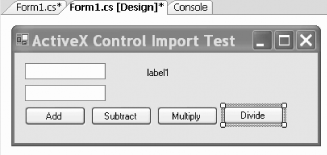
To get started, create a Visual C# Windows application in
Visual Studio 2005 (see
Chapter 13), name the application
InteropTest, and design a form (such as the
TestForm form you created in VB in the preceding
section) by dragging and dropping controls onto it. Name the form
TestForm. A complete sample form is shown in Figure 22-5.
There are two ways to import an ActiveX control into the
Visual Studio 2005
development environment: you can use the Visual Studio 2005 tools
themselves, or you can import the control manually using the
aximp utility that ships with the .NET SDK
Framework. To use Visual Studio 2005, choose Tools
→ Choose Toolbox Items from
the menu. This opens a dialog box. On the COM Components tab, find
the CalcControl.Calculator object you just
registered, as shown in Figure 22-6.
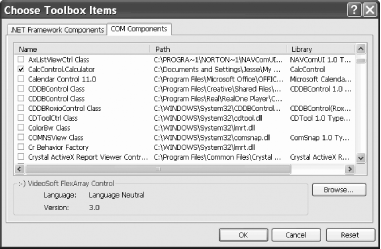
Because CalcControl is registered on your .NET
machine, the Visual Studio 2005 Choose Toolbox Items dialog (on the
Tools menu) is able to find it. When you select the control from this
dialog box, it is imported into your application; Visual Studio takes
care of the details, including adding it to your toolbar.
Alternatively, you can open a command box and import the control
manually using the aximp.exe
utility, as shown in Figure 22-7.
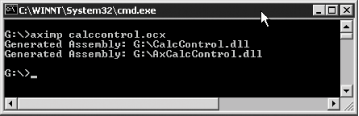
aximp.exe takes one argument, the ActiveX control
you want to import (CalcControl.ocx). It
produces three files:
- AxCalcControl.dll
A .NET Windows control
- CalcControl.dll
A proxy .NET class library
- AxCalcControl.pdb
A debug file
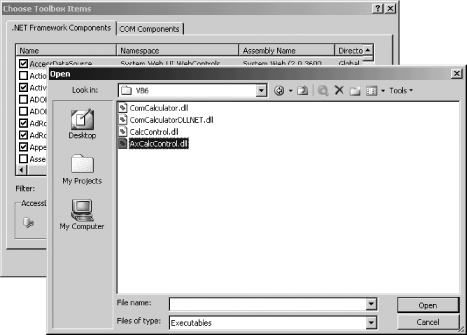
Once this is done, you can return to the Choose Toolbox Items window, but this time select .NET Framework Components. You can now browse to the location at which the .NET Windows control AxCalcControl.dll was generated and import that file into the toolbox, as shown in Figure 22-8.
Once imported, the control appears on the toolbox menu, as shown in Figure 22-9. Note that the control may appear at the bottom of the toolbox.
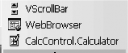
Now you can drag this control onto your Windows Form and make use of its functions, just as you did in the VB6 example.
Add event handlers for each of the four buttons. The event handlers will delegate their work to the ActiveX control you wrote in VB6 and imported into .NET.
The source code for the event handlers is shown in Example 22-3.
Example 22-3. Implementing event handlers for the test Windows Form
private void btnAdd_Click(object sender, System.EventArgs e)
{
double left = double.Parse(textBox1.Text);
double right = double.Parse(textBox2.Text);
label1.Text = axCalculator1.Add( ref left, ref right).ToString( );
}
private void btnDivide_Click(object sender, System.EventArgs e)
{
double left = double.Parse(textBox1.Text);
double right = double.Parse(textBox2.Text);
label1.Text = axCalculator1.Divide(ref left, ref right).ToString( );
}
private void btnMultiply_Click(object sender, System.EventArgs e)
{
double left = double.Parse(textBox1.Text);
double right = double.Parse(textBox2.Text);
label1.Text = axCalculator1.Multiply(ref left, ref right).ToString( );
}
private void btnSubtract_Click(object sender, System.EventArgs e)
{
double left = double.Parse(textBox1.Text);
double right = double.Parse(textBox2.Text);
label1.Text = axCalculator1.Subtract(ref left, ref right).ToString( );
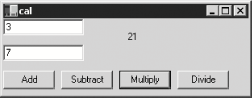
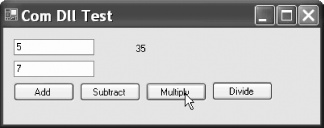
}Each implementing method obtains the values in the text fields,
converts them to double using the static method
double.Parse( ), and passes those values to the
calculator’s methods. The results are cast back to a
string and inserted in the label, as shown in Figure 22-10.
Importing ActiveX controls turns out to be fairly straightforward. Many of the COM components that companies develop aren’t ActiveX controls, however: they are standard COM DLL files. To see how to use these with .NET, return to VB6 and create a COM business object that will act exactly as the component from the previous section did.
The first step is to create a new ActiveX DLL project. This is how VB6 creates standard COM DLLs. Name the class ComCalc and name the project ComCalculator. Save the file and project. Copy the methods from Example 22-4 into the code window.
Example 22-4. Implementing the methods for ComCalc
Public Function _
Add(left As Double, right As Double) _
As Double
    Add = left + right
End Function

Public Function _
Subtract(left As Double, right As Double) _
As Double
    Subtract = left - right
End Function

Public Function _
Multiply(left As Double, right As Double) _
As Double
    Multiply = left * right
End Function

Public Function _
Divide(left As Double, right As Double) _
As Double
    Divide = left / right
End Function
Build the DLL by using the menu sequence
File→ Make
ComCalculator.dll. You can test this by returning to your earlier
test program and removing the Calculator control
from the form. Add the new DLL by opening the project reference
window and navigating to the ComCalculator, as
shown in Figure 22-11.
The
code to exercise the COM component is
very similar to the earlier example. This time, however, you
instantiate a ComCalc object and call its methods,
as shown in Example 22-5.
Example 22-5. The driver program for ComCalc.dll
Private Sub btnAdd_Click()
    Dim theCalc As New ComCalc
    Label1.Caption = _
        theCalc.Add(CDbl(Text1.Text), _
            CDbl(Text2.Text))
End Sub

Private Sub btnDivide_Click( )
    Dim theCalc As New ComCalc
    Label1.Caption = _
       theCalc.Divide(CDbl(Text1.Text), _
            CDbl(Text2.Text))
End Sub

Private Sub btnMultiply_Click( )
    Dim theCalc As New ComCalc
    Label1.Caption = _
       theCalc.Multiply(CDbl(Text1.Text), _
            CDbl(Text2.Text))
End Sub

Private Sub btnSubtract_Click( )
   Dim theCalc As New ComCalc
   Label1.Caption = _
       theCalc.Subtract(CDbl(Text1.Text), _
            CDbl(Text2.Text))
End SubNow that you have a working ComCalc DLL, you can import it to .NET. Before you can import it, however, you must choose between early and late binding. When the client calls a method on the server, the address of the server’s method in memory must be resolved. That process is called binding .
With early binding, the resolution of the address of a method on the server occurs when the client project is compiled and metadata is added to the client .NET module. With late binding, the resolution doesn’t happen until runtime, when COM explores the server to see if it supports the method.
Early binding has many advantages. The most significant is performance. Early- bound methods are invoked more quickly than late-bound methods. For the compiler to perform early binding, it must interrogate the COM object. If the compiler is going to interrogate the server’s type library, it must first be imported into .NET.
The VB6-created COM DLL has a type library within it, but the format of a COM type library can’t be used by a .NET application. To solve this problem, you must import the COM type library into an assembly. Once again, you have two ways of doing this: you can allow the IDE to import the class by registering the component, as shown in the following section, or you can import the type library manually by using the standalone program TlbImp.exe .
TlbImp.exe will produce an interop assembly. The .NET object that wraps the COM object is called a Runtime Callable Wrapper (RCW). The .NET client will use the RCW to bind to the methods in the COM object, as shown in the following section.
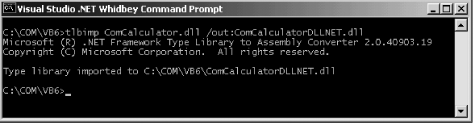
Start by copying the ComCalculator.dll file to
your .NET environment and registering it with
Regsvr32. Then you’re ready to
import the COM object into .NET, by running
TlbImp.exe. The syntax is to enter the name of
the COM component, followed by an optional name for the filename
produced, as shown in Figure 22-12.
Now
it’s time to create a
driver program to test the COM object, which you’ll
name COMDllTest.
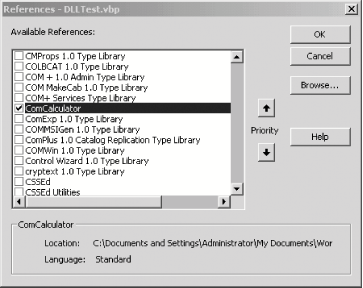
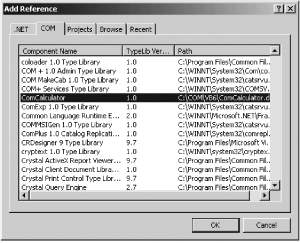
If you decide not to import the library manually, you import it through the IDE. To do so, select the COM tab on the Add Reference dialog box and select the registered COM object, as shown in Figure 22-13.
This will invoke TlbImp for you and will copy the resulting RCW to C:Documents and SettingsAdministratorApplication DataMicrosoftVisualStudioRCW.
You’ll have to be careful, however, because the DLL it produces has the same name as the COM DLL.
If you do use TlbImp.exe, you can add the reference from the Projects tab. Browse to the directory in which ComCalculatorDLLNET.dll was created, and add it to the references.
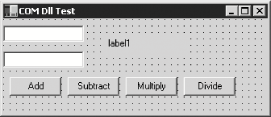
In either case, you can now create the user interface, which is, again, similar to that used for testing the ActiveX control, as shown in Figure 22-14.
All that is left is to write the event handlers for the four buttons, as shown in Example 22-6.
Example 22-6. Implementing event handlers for the VB6 COM DLL test form
#region Using directives

using System;
using System.Collections.Generic;
using System.ComponentModel;
using System.Data;
using System.Drawing;
using System.Windows.Forms;

#endregion

namespace ComDLLTest
{
   partial classForm1 : Form
   {
      public Form1( )
      {
         InitializeComponent( );
      }

      private void btnAdd_Click(
         object sender, System.EventArgs e )
      {
         Double left, right, result;
         left = Double.Parse( textBox1.Text );
         right = Double.Parse( textBox2.Text );

         ComCalculatorDLLNET.ComCalc theCalc =
           new ComCalculatorDLLNET.ComCalc( );
         result = theCalc.Add( ref left, ref right );
         label1.Text = result.ToString( );
      }

      private void btnSubtract_Click(
         object sender, System.EventArgs e )
      {
         Double left, right, result;
         left = Double.Parse(textBox1.Text);
         right = Double.Parse(textBox2.Text);
         ComCalculatorDLLNET.ComCalc theCalc =
           new ComCalculatorDLLNET.ComCalc( );
         result = theCalc.Subtract(ref left, ref right);
         label1.Text = result.ToString( );
      }

      private void btnMultiply_Click(
         object sender, System.EventArgs e )
      {
         Double left, right, result;
         left = Double.Parse( textBox1.Text );
         right = Double.Parse( textBox2.Text );
         ComCalculatorDLLNET.ComCalc theCalc =
            new ComCalculatorDLLNET.ComCalc( );
         result = theCalc.Multiply( ref left, ref right );
         label1.Text = result.ToString( );
      }

      private void btnDivide_Click(
         object sender, System.EventArgs e )
      {
         Double left, right, result;
         left = Double.Parse( textBox1.Text );
         right = Double.Parse( textBox2.Text );
         ComCalculatorDLLNET.ComCalc theCalc =
           new ComCalculatorDLLNET.ComCalc( );
         result = theCalc.Divide( ref left, ref right );
         label1.Text = result.ToString( );
      }
   }
}
Instead of referring to an ActiveX control that is on the form, you
must instantiate the ComCalculator.ComCalc object.
The COM object is then available for use as if it had been created in
a .NET assembly, and the running program works as expected, as
shown
in Figure 22-15.
If you don’t have a type library file for your third-party COM object, you must use late binding with reflection. In Chapter 18, you saw how to invoke methods dynamically in .NET assemblies; the process with COM objects isn’t terribly different.
To see how to do this, start with the application shown in Example 22-6, but remove the reference to the imported
library. The four button handlers must now be rewritten. You can no
longer instantiate a ComCalculator.comCalc object,
so instead you must invoke its methods dynamically.
Just as you saw in Chapter 18, you begin by
creating a Type object to hold information about
the comCalc type:
Type comCalcType;
comCalcType = Type.GetTypeFromProgID("ComCalculator.ComCalc");
The call to GetTypeFromProgID instructs the .NET
Framework to open the registered COM DLL and retrieve the necessary
type information for the specified object. This is the equivalent to
calling GetType, as you did in Chapter 18:
Type theMathType = Type.GetType("System.Math");You can now proceed exactly as you would if you were invoking this
method on a class described in a .NET assembly. Start by calling
CreateInstance to get back an instance of the
comCalc object:
object comCalcObject = Activator.CreateInstance(comCalcType);
Next create an array to hold the arguments, and then invoke the
method using InvokeMember, passing in the method
you want to invoke as a string, a binder flag, a null binder, the
object returned by CreateInstance, and the input
argument array:
object[] inputArguments = {left, right };
result = (Double) comCalcType.InvokeMember(
"Subtract", // the method to invoke
BindingFlags.InvokeMethod, // how to bind
null, // binder
comCalcObject, // the COM object
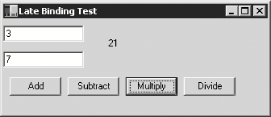
inputArguments); // the method argumentsThe results of this invocation are cast to Double
and stored in the local variable result. You can
then display this result in the user interface, as shown in Figure 22-16.
Because all four event handlers must replicate this work, differing
only in the method they call, you’ll factor the
common code to a private helper method named
Invoke, as shown in Example 22-7.
You also need to add a using statement for
System.Reflection in the source code.
Example 22-7. Late binding of COM objects
#region Using directives

using System;
using System.Collections.Generic;
using System.ComponentModel;
using System.Data;
using System.Drawing;
using System.Reflection;
using System.Windows.Forms;

#endregion

namespace LateBinding
{
   partial classForm1 : Form
   {
      public Form1( )
      {
         InitializeComponent( );
      }

      private void btnAdd_Click(
         object sender, System.EventArgs e )
      {
         Invoke( "Add" );
      }

      private void btnSubtract_Click(
         object sender, System.EventArgs e )
      {
         Invoke( "Subtract" );
      }

      private void btnMultiply_Click(
         object sender, System.EventArgs e )
      {
         Invoke( "Multiply" );
      }

      private void btnDivide_Click(
         object sender, System.EventArgs e )
      {
         Invoke( "Divide" );
      }

      private void Invoke( string whichMethod )
      {
         Double left, right, result;
         left = Double.Parse( textBox1.Text );
         right = Double.Parse( textBox2.Text );

         // create a Type object to hold type information
         Type comCalcType;

         // an array for the arguments
         object[] inputArguments =
      { left, right };

         // get the type info from the COM object
         comCalcType =
            Type.GetTypeFromProgID(
               "ComCalculator.ComCalc" );

         // create an instance
         object comCalcObject =
            Activator.CreateInstance( comCalcType );

         // invoke the method dynamically and
         // cast the result to Double
         result = ( Double ) comCalcType.InvokeMember(
            whichMethod,                // the method to invoke
            BindingFlags.InvokeMethod,  // how to bind
            null,                       // binder
            comCalcObject,              // the COM object
            inputArguments );           // the method arguments

         label1.Text = result.ToString( );
      }
   }
}You can export your .NET class for use with existing
COM components. The
Regasm
tool will register the metadata
from your component in the System Registry.
Invoke Regasm with the name of the DLL, which must
be installed in the GAC (see Chapter 17). For
example:
Regasm myAssembly.dll
This will export your component’s metadata to the Registry. For example, you can create a new C# DLL project in which you recreate your four-function calculator, as shown in Example 22-8.
Example 22-8. The four-function calculator in a DLL
using System;
using System.Reflection;
[assembly: AssemblyKeyFile("test.key")]
namespace Programming_CSharp
{
public class Calculator
{
public Calculator( )
{
}
public Double Add (Double left, Double right)
{
return left + right;
}
public Double Subtract (Double left, Double right)
{
return left - right;
}
public Double Multiply (Double left, Double right)
{
return left * right;
}
public Double Divide (Double left, Double right)
{
return left / right;
}
}
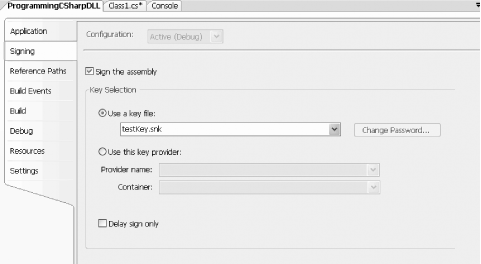
}Save this to a file named Calculator.cs in a project named ProgrammingCSharpDLL. To create a strong name, click Project → ProgrammingCSharpDLL Properties. Choose the Signing tab and sign the assembly, as shown in Figure 22-17.
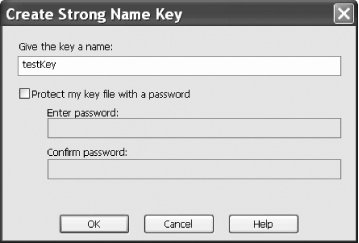
This will open the Create Key dialog, as shown in Figure 22-18.
Add your program to the GAC, and register it:
gacutil /i ProgrammingCSharpDLL.dll
Regasm ProgrammingCSharpDLL.dll
You can now invoke the four-function calculator as a COM object using standard VBScript. For example, you can create a tiny Windows-script host file, as shown in Example 22-9.
Example 22-9. Invoking the calculator COM object with a Windows-scripting host file
dim calc
dim msg
dim result
set calc = CreateObject("Programming_CSharp.Calculator")
result = calc.Multiply(7,3)
msg = "7 * 3 =" & result & "."
Call MsgBox(msg)
When this is run, a dialog box pops up to verify that the object was created and invoked, as shown in Figure 22-19.

If you wish to use
early binding with your .NET DLL,
you’ll typically create a type library. You can do
so with the TlbExp (Type Library Export) utility,
by writing:
TlbExp ProgrammingCSharpDLL.dll /out:Calc.tlb
The result is a type library that you can browse and view in the OLE/COM object viewer, as shown in Figure 22-20.

With this type library in hand, you can import the calculator class into any COM environment.
It is possible to invoke unmanaged code from within C#. Typically you would do this if you needed to accomplish something you couldn’t accomplish through the FCL. With the 2.0 version of .NET, the use of P/Invoke will become relatively rare.
The .NET platform invoke facility (P/Invoke) was originally intended only to provide access to the Windows API, but you can use it to call functions in any DLL.
To see how this works, let’s revisit Example 21-3. You will recall that you used
the
FileInfo class to rename files by invoking the
MoveTo()
method:
file.MoveTo(fullName + ".bak");
You can accomplish the same thing by using Windows’
kernel32.dll and invoking the
MoveFile method.[1] To do so, you need to declare the method as a
static
extern and use the
DllImport attribute:
[DllImport("kernel32.dll", EntryPoint="MoveFile",
    ExactSpelling=false, CharSet=CharSet.Unicode,
     SetLastError=true)]
static extern bool MoveFile(
  string sourceFile, string destinationFile);
The DllImport
attribute class is used to indicate that an
unmanaged method will be invoked through P/Invoke. The parameters are
as follows:
- DLL name
The name of the DLL you are invoking.
-
EntryPoint Indicates the name of the DLL entry point (the method) to call.
-
ExactSpelling Allows the CLR to match methods with slightly different names based on the CLR’s knowledge of naming conventions.
-
CharSet Indicates how the string arguments to the method should be marshaled.
-
SetLastError Setting this to
trueallows you to callMarshal.GetLastWin32Error, and check whether an error occurred when invoking this method.
The rest of the code is virtually unchanged, except for the
invocation of the
MoveFile( )
method itself. Notice that
MoveFile( ) is declared to be a static method of
the class, so use static method semantics:
Tester.MoveFile(file.FullName,file.FullName + ".bak");
Pass in the original filename and the new name and the file is moved,
just as it was when calling file.MoveTo( ). In this
example, there is no advantage—and actually considerable
disadvantage—to using P/Invoke. You have left managed code, and
the result is that you’ve abandoned type safety and
your code will no longer run in
“partial-trusted” scenarios. Example 22-10 shows the complete source code for using
P/Invoke to move the files.
Example 22-10. Using P/Invoke to call a Win32 API method
#region Using directives

using System;
using System.Collections.Generic;
using System.IO;
using System.Runtime.InteropServices;
using System.Text;

#endregion

namespace UsingPInvoke
{
   classTester
   {

      // declare the WinAPI method you wish to P/Invoke
      [DllImport( "kernel32.dll", EntryPoint = "MoveFile",
          ExactSpelling = false, CharSet = CharSet.Unicode,
          SetLastError = true )]
      static extern bool MoveFile(
         string sourceFile, string destinationFile );

      public static void Main( )
      {
         // make an instance and run it
         Tester t = new Tester( );
         string theDirectory = @"c:	estmedia";
         DirectoryInfo dir =
            new DirectoryInfo( theDirectory );
         t.ExploreDirectory( dir );
      }

      // Set it running with a directory name
      private void ExploreDirectory( DirectoryInfo dir )
      {

         // make a new subdirectory
         string newDirectory = "newTest";
         DirectoryInfo newSubDir =
            dir.CreateSubdirectory( newDirectory );

         // get all the files in the directory and
         // copy them to the new directory
         FileInfo[] filesInDir = dir.GetFiles( );
         foreach ( FileInfo file in filesInDir )
         {
            string fullName = newSubDir.FullName +
               "\" + file.Name;
            file.CopyTo( fullName );
            Console.WriteLine( "{0} copied to newTest",
               file.FullName );
         }

         // get a collection of the files copied in
         filesInDir = newSubDir.GetFiles( );

         // delete some and rename others
         int counter = 0;
         foreach ( FileInfo file in filesInDir )
         {
            string fullName = file.FullName;

            if ( counter++ % 2 == 0 )
            {
               // P/Invoke the Win API
               Tester.MoveFile( fullName, fullName + ".bak" );

               Console.WriteLine( "{0} renamed to {1}",
                  fullName, file.FullName );
            }
            else
            {
               file.Delete( );
               Console.WriteLine( "{0} deleted.",
                  fullName );
            }
         }
         // delete the subdirectory
         newSubDir.Delete( true );
      }
   }
}

Output (excerpt):
c:	estmedia
ewTest
ecycle.wav renamed to
    c:	estmedia
ewTest
ecycle.wav
c:	estmedia
ewTest
ingin.wav renamed to
   c:	estmedia
ewTest
ingin.wavUntil now you’ve seen no code using C/C++ style pointers. Only here, in the final paragraphs of the final pages of the book, does this topic arise, even though pointers are central to the C family of languages. In C#, pointers are relegated to unusual and advanced programming; typically they are used only with P/Invoke.
C# supports the usual C pointer operators, listed in Table 22-1.
The use of pointers is almost never required, and is nearly always
discouraged. When you do use pointers, you must mark your code with
the C# unsafe
modifier. The code is marked unsafe
because you can manipulate memory locations directly with pointers.
This is a feat that is otherwise impossible within a C# program. In
unsafe code you can directly access memory, perform conversions
between pointers and integral types, take the address of variables,
and so forth. In exchange, you give up garbage collection and
protection against uninitialized variables, dangling pointers, and
accessing memory beyond the bounds of an array. In essence, unsafe
code creates an island of C++ code within your otherwise safe C#
application, and your code will not work in partial-trust scenarios.
As an example of when this might be useful, read a file to the
console by invoking two Win32 API calls:
CreateFile
and
ReadFile
. ReadFile takes, as
its second parameter, a pointer to a buffer. The declaration of the
two imported methods isn’t unlike those shown in
Example 22-11.
Example 22-11. Declaring Win32 API methods for import into a C# program
[DllImport("kernel32", SetLastError=true)]
static extern unsafe int CreateFile(
   string filename,
   uint desiredAccess,
   uint shareMode,
   uint attributes,
   uint creationDisposition,
   uint flagsAndAttributes,
   uint templateFile);

[DllImport("kernel32", SetLastError=true)]
static extern unsafe bool ReadFile(
   int hFile,
   void* lpBuffer,
   int nBytesToRead,
   int* nBytesRead,
   int overlapped);
You will create a new class, APIFileReader, whose
constructor will invoke the CreateFile() method.
The constructor takes a filename as a parameter, and passes that
filename to the CreateFile( ) method:
public APIFileReader(stringfilename)
{
   fileHandle = CreateFile(
      filename,      // filename
      GenericRead,   // desiredAccess
      UseDefault,    // shareMode
      UseDefault,    // attributes
      OpenExisting,  // creationDisposition
      UseDefault,    // flagsAndAttributes
      UseDefault);   // templateFile
}
The APIFileReader class implements only one other
method, Read(), which invokes
ReadFile( ). It passes in the file handle created
in the class constructor, along with a pointer into a buffer, a count
of bytes to retrieve, and a reference to a variable that will hold
the number of bytes read. It is the pointer to the buffer that is of
interest to us here. To invoke this API call, you must use a pointer.
Because you will access it with a pointer, the buffer needs to be
pinned
in memory; the .NET Framework
can’t be allowed to move the buffer during garbage
collection. To accomplish this, use the C#
fixed
keyword. fixed
allows you to get a pointer to the memory used by the buffer, and
also to mark that instance so that the garbage collector
won’t move it.
The block of statements following the fixed
keyword creates a scope, within which the memory will be pinned. At
the end of the fixed block, the instance will be un-marked so that it
can be moved. This is known as declarative
pinning
:
public unsafe int Read(byte[] buffer, int index, int count)
{
int bytesRead = 0;
fixed (byte* bytePointer = buffer)
{
ReadFile(
fileHandle,
bytePointer + index,
count,
&bytesRead, 0);
}
return bytesRead;
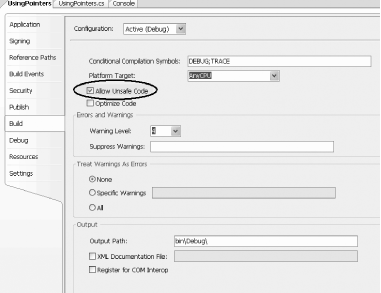
}Notice that the method must be marked with the
unsafe
keyword. This creates an unsafe context
and allows you to create pointers. To compile this you must use the
/unsafe compiler option. The easiest way to do so
is to open the project properties, click the Build tab, and check the
Allow Unsafe Code checkbox, as shown in Figure 22-21.
The test program instantiates the APIFileReader
and an ASCIIEncoding object. It passes the
filename to the constructor of the APIFileReader
and then creates a loop to repeatedly fill its buffer by calling the
Read( )
method, which invokes the
ReadFile API call. An array of bytes is returned,
which is converted to a string using the ASCIIEncoding
object’s
GetString( )
method. That string is passed to the
Console.Write( )
method, to be displayed on the console. The complete source is
shown in Example 22-12.
Example 22-12. Using pointers in a C# program
#region Using directives

using System;
using System.Collections.Generic;
using System.Runtime.InteropServices;
using System.Text;

#endregion

namespace UsingPointers
{
   class APIFileReader
   {
      const uint GenericRead = 0x80000000;
      const uint OpenExisting = 3;
      const uint UseDefault = 0;
      int fileHandle;

      [DllImport( "kernel32", SetLastError = true )]
      static extern unsafe int CreateFile(
         string filename,
         uint desiredAccess,
         uint shareMode,
         uint attributes,
         uint creationDisposition,
         uint flagsAndAttributes,
         uint templateFile );

      [DllImport( "kernel32", SetLastError = true )]
      static extern unsafe bool ReadFile(
         int hFile,
         void* lpBuffer,
         int nBytesToRead,
         int* nBytesRead,
         int overlapped );

      // constructor opens an existing file
      // and sets the file handle member
      public APIFileReader( string filename )
      {
         fileHandle = CreateFile(
            filename,      // filename
            GenericRead,   // desiredAccess
            UseDefault,    // shareMode
            UseDefault,    // attributes
            OpenExisting,  // creationDisposition
            UseDefault,    // flagsAndAttributes
            UseDefault );   // templateFile
      }

      public unsafe int Read( byte[] buffer, int index, int count )
      {
         int bytesRead = 0;
         fixed ( byte* bytePointer = buffer )
         {
            ReadFile(
               fileHandle,             // hfile
               bytePointer + index,    // lpBuffer
               count,                  // nBytesToRead
               &bytesRead,             // nBytesRead
               0 );                     // overlapped
         }
         return bytesRead;
      }
   }

   class Test
   {
      public static void Main( )
      {
         // create an instance of the APIFileReader,
         // pass in the name of an existing file
         APIFileReader fileReader =
           new APIFileReader( "myTestFile.txt" );

         // create a buffer and an ASCII coder
         const int BuffSize = 128;
         byte[] buffer = new byte[BuffSize];
         ASCIIEncoding asciiEncoder = new ASCIIEncoding( );

         // read the file into the buffer and display to console
         while ( fileReader.Read( buffer, 0, BuffSize ) != 0 )
         {
            Console.Write( "{0}", asciiEncoder.GetString( buffer ) );
         }
      }
   }
}
The key section of code where you create a pointer to the
buffer and fix that buffer in memory
using the
fixed keyword is
shown in bold. You need to use a pointer here because the API call
demands
it.