
A web application is an application that responds to requests over the Web. Typically, these requests come from a user’s web browser, when the user types the URL of your app or visits a link or bookmark, or when your app’s JavaScript client code makes requests of its own. Requests could also come from other clients on the network, such as mobile or desktop applications, or systems accessing your app as a service.
To build an App Engine application, you write code for one or more request handlers, and describe to App Engine which requests go to which handlers, using configuration. The life of a request handler begins when a single request arrives, and ends when the handler has done the necessary work and calculated the response.
App Engine does all the heavy lifting of accepting incoming TCP/IP connections, reading HTTP request data, ensuring that an instance of your app is running on an application server, routing the request to an available instance, calling the appropriate request handler code in your app, and collecting the response from the handler and sending it back over the connection to the client.
The system that manages and routes requests is known generally as the frontend. You can configure the frontend to handle different requests in different ways. For instance, you can tell the frontend to route requests for some URLs to App Engine’s static file servers instead of the application servers, for efficient delivery of your app’s images, CSS, or JavaScript code. If your app takes advantage of Google Accounts for its users, you can tell the frontend to route requests from signed-in users to your application’s request handlers, and to redirect all other requests to the Google Accounts sign-in screen. The frontend is also responsible for handling requests over secure connections, using HTTP over SSL (sometimes called “HTTPS,” the URL scheme for such requests). Your app code only sees the request after it has been decoded, and the frontend takes care of encoding the response.
In this chapter, we take a look at App Engine’s request handling architecture, and follow the path of a web request through the system. We discuss how to configure the system to handle different kinds of requests, including requests for static content, requests for the application to perform work, and requests over secure connections. We also cover other frontend features such as custom error pages, and application features you can activate called “built-ins.”
The architecture of App Engine—and therefore an App Engine application—can be summarized as shown in Figure 3-1. (There are some lines missing from this simplified diagram. For instance, frontends have direct access to the Blobstore. We’ll take a closer look at these in later chapters.)
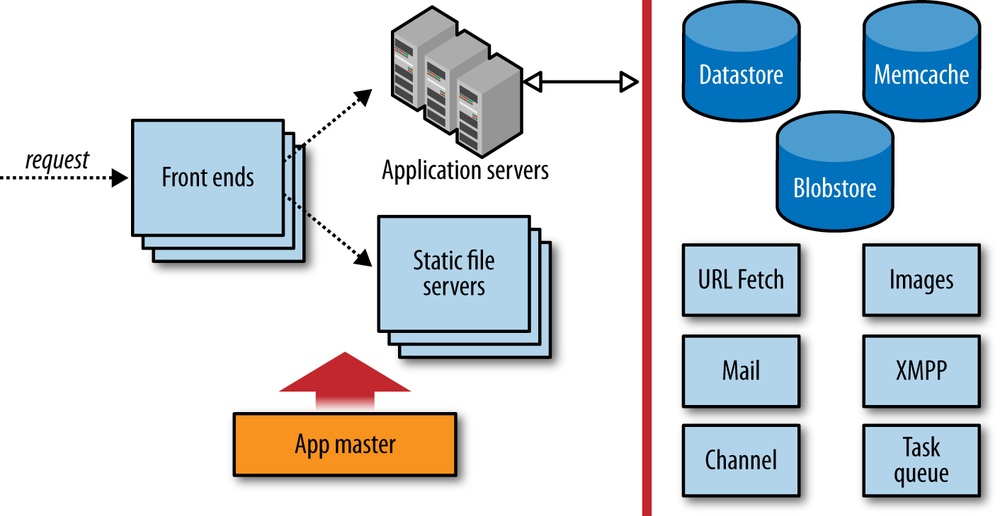
The first stop for an incoming request is the App Engine frontend. A load balancer, a dedicated system for distributing requests optimally across multiple machines, routes the request to one of many frontend servers. The frontend determines the app for which the request is intended from the request’s domain name, either the Google Apps domain and subdomain or the appspot.com subdomain. It then consults the app’s configuration to determine the next step.
The app’s configuration describes how the frontends should treat requests based on their URL paths. A URL path may map to a static file that should be served to the client directly, such as an image or a file of JavaScript code. Or, a URL path may map to a request handler, application code that is invoked to determine the response for the request. You upload this configuration data along with the rest of your application.
If the URL path for a request does not match anything in the app’s configuration, the frontends return an HTTP 404 Not Found error response to the client. By default, the frontends return a generic error response. If you want clients to receive a custom response when accessing your app (such as a friendly HTML message along with the error code), you can configure the frontend to serve a static HTML file. (In the case of Not Found errors, you can also just map all unmatched URL paths to an application handler, and respond any way you like.)
If the URL path of the request matches the path of one of the app’s static files, the frontend routes the request to the static file servers. These servers are dedicated to the task of serving static files, with network topology and caching behavior optimized for fast delivery of resources that do not change often. You tell App Engine about your app’s static files in the app’s configuration. When you upload the app, these files are pushed to the static file servers.
If the URL path of the request matches a pattern mapped to one of the application’s request handlers, the frontend sends the request to the app servers. The app server pool starts up an instance of the application on a server, or reuses an existing instance if there is one already running. The server invokes the app by calling the request handler that corresponds with the URL path of the request, according to the app configuration.
A request handler runs in an application instance, a copy of your application in the memory of an application server. The instance is in a portion of the server isolated from whatever else is on the machine, set up to perform equivalently to a dedicated machine with certain hardware characteristics. The code itself executes in a runtime environment prepared with everything the request handler needs to inspect the request data, call services, and evaluate the app’s code. There’s enough to say about instances and the runtime environment that we’ll give the subject its own chapter (Chapter 4).
You can configure the frontend to authenticate the user with Google Accounts. The frontend can restrict access to URL paths with several levels of authorization: all users, users who have signed in, and users who are application administrators. With a Google Apps domain, you can also set your application to allow only users on the domain to access URLs, such as for an employee-only website or school campus. The frontend checks whether the user is signed in, and redirects the user to the Google Accounts sign-in screen if needed.
The frontend takes the opportunity to tailor the response to the client. Most notably, the frontend compresses the response data, using the gzip format, if the client gives some indication that it supports compressed responses. This applies to both app responses and static file responses, and is done automatically. The frontend uses several techniques to determine when it is appropriate to compress responses, based on web standards and known browser behaviors. If you are using a custom client that does not support compressed content, simply omit the “Accept-Encoding” request header to disable the automatic gzip behavior.
The frontends, app servers, and static file servers are governed by an “app master.” Among other things, the app master is responsible for deploying new versions of application software and configuration, and updating the “default” version served on an app’s user-facing domain. Updates to an app propagate quickly, but are not atomic in the sense that only code from one version of an app is running at any one time. If you switch the default version to new software, all requests that started before the switch are allowed to complete using their version of the software. (An app that makes an HTTP request to itself might find itself in a situation where an older version is calling a newer version or vice versa, but you can manage that situation in your own code, if you really need to.)
The files for a Python application include Python code for request handlers and libraries, static files, and configuration files. On your computer, these files reside in the application root directory. Static files and application code may reside in the root directory or in subdirectories. Configuration files always reside in fixed locations in the root directory.
You configure the frontend for a Python application, using a file named app.yaml in the application root directory. This file is in a format called YAML, a concise human-readable data format with support for nested structures like sequences and mappings.
Example 3-1 shows an example of a simple app.yaml file. We’ll discuss these features in the following sections. For now, notice a few things about the structure of the file:
The file is a mapping of values to names. For instance, the value
pythonis associated with the nameruntime.Values can be scalars (
python,1), sequences of other values, or mappings of values to names. The value ofhandlersin Example 3-1 is a sequence of two values, each of which is a mapping containing two name-value pairs.Order is significant in sequences, but not mappings.
YAML uses indentation to indicate scope.
YAML supports all characters in the Unicode character set. The encoding is assumed to be UTF-8 unless the file uses a byte order mark signifying UTF-16.
A YAML file can contain comments. All characters on a line after a
#character are ignored, unless the#is in a quoted string value.
Example 3-1. An example of an app.yaml configuration file
application: ae-book
version: 1
runtime: python27
api_version: 1
threadsafe: true

handlers:
- url: /css
  static_dir: css

- url: /.*
  script: main.application

libraries:
- name: webapp2
  version: "2.5.1"
Among other things, this configuration file declares that
this application (or, specifically, this version of this application)
uses the Python 2.7 runtime environment. It also declares which version
of the Python 2.7 runtime environment to use. Currently, there is only
one version of this environment, so api_version is always 1. If
Google ever makes changes to the runtime environment that may be
incompatible with existing applications, the changes may be released
using a new version number. Your app will continue to use the version of
the runtime environment specified in your configuration file, giving you
a chance to test your code with the new runtime version before upgrading
your live application.
You specify the name and version of the runtime environment in
app.yaml, using the runtime and api_version
elements, like so:
runtime: python27
api_version: 1
Google originally launched App Engine with a runtime environment
based on Python 2.5. You can use this older environment by specifying a
runtime of python. Note that
this book mostly covers the newer Python 2.7 environment. You’ll want to
use Python 2.7 for new apps, as many recent features only work with the
newer environment.
A Java application consists of files bundled in a standard format called WAR (short for “web application archive”). The WAR standard specifies the layout of a directory structure for a Java web application, including the locations of several standard configuration files, compiled Java classes, JAR files, static files, and other auxiliary files. Some tools that manipulate WARs support compressing the directory structure into a single file similar to a JAR. App Engine’s tools generally expect the WAR to be a directory on your computer’s filesystem.
Java servlet applications use a file called a “deployment descriptor” to specify how the server invokes the application. This file uses an XML format, and is part of the servlet standard specification. In a WAR, the deployment descriptor is a file named web.xml that resides in a directory named WEB-INF/, which itself is in the WAR’s root directory. Example 3-2 shows a very simple deployment descriptor.
Example 3-2. An example of a web.xml deployment descriptor file
<?xml version="1.0" encoding="utf-8"?>
<web-app xmlns="http://java.sun.com/xml/ns/javaee" version="2.5">
  <servlet>
    <servlet-name>ae-book</servlet-name>
    <servlet-class>aebook.MainServlet</servlet-class>
  </servlet>
  <servlet-mapping>
    <servlet-name>ae-book</servlet-name>
    <url-pattern>/*</url-pattern>
  </servlet-mapping>
</web-app>
The deployment descriptor tells the App Engine frontend most of what it needs to know, but not all. For the rest, App Engine uses a file named appengine-web.xml, also in the WEB-INF/ directory and also using XML syntax. If your code editor supports XML validation, you can find the schema definition for this file in the App Engine Java SDK. Example 3-3 shows a brief example.
Example 3-3. An example of an appengine-web.xml configuration file
<?xml version="1.0" encoding="utf-8"?>
<appengine-web-app xmlns="http://appengine.google.com/ns/1.0">
  <application>ae-book</application>
  <version>1</version>
  <threadsafe>true</threadsafe>
</appengine-web-app>
The development server may add elements to this file with some default values the first time it is run.
When Google releases major new features for the Java API, the release includes a new version of the SDK with an updated appengine-api-... .jar file. App Engine knows which version of the API the app is expecting by examining the API JAR included in the app’s WAR. The server may replace the JAR with a different but compatible implementation when the app is run.
Every app gets a free domain name on appspot.com, based on the application ID:
app-id.appspot.comRequests for URLs that use your domain name are routed to your app by the frontend:
http://app-id.appspot.com/url/path...
You can register your own domain name (such as
example.com) and set it up with Google Apps to
point to your app. Once your domain is set up with Google Apps, you assign
a subdomain of your top-level domain to point to the app. For instance, if
your registered domain is example.com and you
assign the www subdomain, the domain name for the app
is:
www.example.com
To set up a domain name, visit the App Engine Administration Console and select your app, then select Application Settings. Scroll down to Domain Setup. If you’ve already registered a domain and set up Google Apps, enter your domain name and click the button. Otherwise, click the “Sign up for Google Apps” link to go through the sign-up process. You can sign up for Google Apps with a domain you’ve already registered, or you can register a new domain at that time. (Google Apps is free, but domain registration costs money.)
Google Apps does not support routing requests for the top-level
domain without a subdomain. If you want users to see something when they
visit http://example.com/, you must use your
own domain name service (DNS) and web server to handle traffic to that
domain name, and point subdomains to Google Apps in the DNS record. If you
use the Google Apps DNS service for the domain, Google Apps will
automatically redirect web requests for the bare domain to the
www subdomain.
The appspot.com domain has a couple of useful features.
One such feature is the ability to accept an additional domain name
part:
anything.app-id.appspot.com
Requests for domain names of this form, where
anything is any valid single domain name part
(that cannot contain a dot, .), are routed to the
application. This is useful for accepting different kinds of traffic on
different domain names, such as for allowing your users to serve content
from their own subdomains. Only appspot.com domains support
the additional part. Google Apps domains do not.
You can determine which domain name was used for the request in your
application code by checking the Host header on the request.
Here’s how you check this header using Python and webapp:
class MainHandler(webapp2.RequestHandler):
    def get(self):
        host = self.request.headers['Host']

self.response.out.write('Host: %s' % host)Every App Engine application has an application ID that uniquely
distinguishes the app from all other applications. As described in Chapter 2, you can register an ID for a new
application using the Administration Console. Once you have an ID, you add
it to the app’s configuration so the developer tools know that the files
in the app root directory belong to the app with that ID. This ID appears
in the appspot.com domain name.
The app’s configuration also includes a version identifier. Like the app ID, the version identifier is associated with the app’s files when the app is uploaded. App Engine retains one set of files and frontend configuration for each distinct version identifier used during an upload. If you do not change the app version in the configuration before you upload files, the upload replaces the existing files for that version.
Each distinct version of the app is accessible at its own domain name, of the following form:
version-id.app-id.appspot.com
When you have multiple versions of an app uploaded to App Engine,
you can use the Administration Console to select which version is the one
you want the public to access. The Console calls this the “default”
version. When a user visits your Google Apps domain (and configured
subdomain), or the appspot.com domain without the version ID,
she sees the default version.
The appspot.com domain containing the version ID
supports an additional domain part, just like the default
appspot.com domain:
anything.version-id.app-id.appspot.com
Note
Unless you explicitly prevent it, anyone who knows your
application ID and version identifiers can access any uploaded version
of your application using the appspot.com URLs. You can
restrict access to nondefault versions of the application by using code
that checks the domain of the request and only allows authorized users
to access the versioned domains. You can’t restrict access to static
files this way.
Another way to restrict access to nondefault versions is to use Google Accounts authorization, described later in this chapter. You can restrict access to app administrators while a version is in development, then replace the configuration to remove the restriction just before making that version the default version.
All versions of an app access the same datastore, memcache, and other services, and all versions share the same set of resources. Later on, we’ll discuss other configuration files that control these backend services. These files are separate from the configuration files that control the frontend because they are not specific to each app version.
There are several ways to use app versions. For instance, you can have just one version, and always update it in place. Or you can have a “dev” version for testing and a “live” version that is always the public version, and do separate uploads for each. Some developers generate a new app version identifier for each upload based on the version numbers used by a source code revision control system.
You can have up to 10 active versions. You can delete previous versions, using the Administration Console.
Application IDs and version identifiers can contain numbers, lowercase letters, and hyphens.
For a Python app, the application ID and version
identifier appear in the app.yaml
file. The app ID is specified with the name application.
The version ID is specified as version.
Here is an example of app.yaml using dev as the
version identifier:
application: ae-book
version: dev
This would be accessible using this domain name:
http://dev.ae-book.appspot.com
The app ID and version identifier of a Java app appear in
the appengine-web.xml file. The app
ID is specified with the XML element <application>,
and the version identifier is specified with
<version>. For example:
<?xml version="1.0" encoding="utf-8"?>
<appengine-web-app xmlns="http://appengine.google.com/ns/1.0">
  <application>ae-book</application>
  <version>dev</version>
</appengine-web-app>
As in the Python example, this version of this app would be accessible using this domain name:
http://dev.ae-book.appspot.com
The Python 2.7 and Java runtime environments support handling multiple requests concurrently within each instance. This is a significant way to make the most of your instances, and is recommended. However, your code must be written with the knowledge that it will be run concurrently, and take the appropriate precautions with shared data. You must declare whether your code is “threadsafe” in your application configuration.
In Python, you specify the threadsafe value in
app.yaml, either true or
false:
threadsafe: true
In Java, you specify the <threadsafe> element in
appengine-web.xml:
<threadsafe>true</threadsafe>
The app configuration tells the frontend what to do with
each request, routing it to either the application servers or the static
file servers. The destination is determined by the URL path of the
request. For instance, an app might send all requests whose URL paths
start with /images/ to the static file server, and all
requests for the site’s home page (the path /) to the app
servers. The configuration specifies a list of patterns that match URL
paths, with instructions for each pattern.
For requests intended for the app servers, the configuration also specifies the request handler responsible for specific URL paths. A request handler is an entry point into the application code. In Python, a request handler is a script of Python code. In Java, a request handler is a servlet class. Each runtime environment has its own interface for invoking the application.
Note
The URL /form is reserved by App Engine and cannot be
used by the app. The explanation for this is historical and internal to
App Engine, and unfortunately this is easy to stumble upon by accident.
This URL will always return a 404 Not Found error.
All URL paths under /_ah/ are reserved for use by App
Engine libraries and tools.
All URL paths for Python apps are described in the
app.yaml file, using the handlers element. The value of this element
is a sequence of mappings, where each item includes a pattern that
matches a set of URL paths and instructions on how to handle requests
for those paths. Here is an example with four URL patterns:
handlers:
- url: /profile/.*
  script: userprofile.application

- url: /css
  static_dir: css

- url: /info/(.*.xml)
  static_files: datafiles/1
  upload: datafiles/.*.xml

- url: /.*
  script: main.application
The url element in a handler description is a
regular expression that matches URL paths. Every path begins with a
forward slash (/), so a pattern can match the beginning of
a path by also starting with this character. This URL pattern matches
all paths:
url: /.*
If you are new to regular expressions, here is the briefest of
tutorials: the . character matches any single character, and
the * character says the previous symbol, in this
case any character, can occur zero or more times. There are several
other characters with special status in regular expressions. All other
characters, like /, match literally. So this pattern matches
any URL that begins with a / followed by zero or more of any
character.
If a special character is preceded by a backslash
(), it is treated as a literal character in the pattern.
Here is a pattern that matches the exact path
/home.html:
- url: /home.html
See the Python documentation for the re module for an excellent introduction to
regular expressions. The actual regular expression engine used for URL
patterns is not Python’s, but it’s similar.
App Engine attempts to match the URL path of a request to each
handler pattern in the order the handlers appear in the configuration
file. The first pattern that matches determines the handler to use. If
you use the catchall pattern /.*, make sure it’s the last one in the list,
since a later pattern will never match.
To map a URL path pattern to application code, you provide a
script element. The value is the Python
import path (with dots) to a global variable containing a WSGI
application instance. The application root directory is in the lookup
path, so in the example above, main.application could refer
to the application variable in a Python source file named
main.py:
import webapp2

class MainPage(webapp2.RequestHandler):
    def get(self):
        # ...

application = webapp2.WSGIApplication([('/', MainPage)], debug=True)
The script value can also be a filesystem path (with
slashes) from the application root directory to a Python source file
whose name ends in .py. The script
must conform to the Common Gateway Interface standard, which describes
how the request data is available on the standard input stream and
environment variables, and how the code should emit the response headers
and body to the standard output stream. This kind of script is supported
for backward compatibility with components designed for the older Python
2.5 App Engine runtime environment, which didn’t have the option of a
WSGI import path.
If the frontend gets a request whose path matches a script handler, it routes the request to an application server to invoke the script and produce the response.
In the previous example, the following handler definition routes
all URL paths that begin with /profile/ to the
application defined in a source file named userprofile.py:
- url: /profile/.*
  script: userprofile.application
The URL pattern can use regular expression groups to determine
other values, such as the script path. A group is a portion of a regular
expression inside parentheses, and the group’s value is the portion of
the request URL that matches the characters within (not including the
parentheses). Groups are numbered starting with 1 from left
to right in the pattern. You can insert the value of a matched group
into a script path or other values with a backslash
followed by the group number (1). For example:
- url: /project/(.*?)/home
  script: apps.project_code.1.app
With this pattern, a request for
/project/registration/home would be handled by the WSGI
application at
apps.project_code.registration.app.
A Java web application maps URL patterns to servlets in the deployment descriptor (web.xml). You set up a servlet in two steps: the servlet declaration, and the servlet mapping.
The <servlet> element declares a servlet. It
includes a <servlet-name>, a name for the purposes of
referring to the servlet elsewhere in the file, and the
<servlet-class>, the name of the class that
implements the servlet. Here’s a simple example:
  <servlet>
    <servlet-name>ae-book</servlet-name>
    <servlet-class>aebook.MainServlet</servlet-class>
  </servlet>
The servlet declaration can also define initialization parameters for the servlet. This is useful if you want to use the same servlet class in multiple servlet declarations, with different parameters for each one. For example:
  <servlet>
    <servlet-name>ae-book</servlet-name>
    <servlet-class>aebook.MainServlet</servlet-class>
    <init-param>
      <param-name>colorscheme</param-name>
      <param-value>monochrome</param-value>
    </init-param>
    <init-param>
      <param-name>background</param-name>
      <param-value>dark</param-value>
    </init-param>
  </servlet>
To map a servlet to a URL path pattern, you use the
<servlet-mapping> element. A mapping includes the
<servlet-name> that matches a servlet declaration,
and a <url-pattern>:
  <servlet-mapping>
    <servlet-name>ae-book</servlet-name>
    <url-mapping>/home/*</url-mapping>
  </servlet-mapping>
The URL pattern matches the URL path. It can use a * character at the beginning or end of the
pattern to represent zero or more of any character. Note that this
wildcard can only appear at the beginning or end of the pattern, and you
can only use one wildcard per pattern.
The order in which URL mappings appear is not significant. The
“most specific” matching pattern wins, determined by the number of
nonwildcard characters in the pattern. The pattern /*
matches all URLs, but will only match if none of the other patterns in
the deployment descriptor match the URL.
JSPs are supported, as servlets invoked from other servlets, as servlets named explicitly in the descriptor, and as standalone servlets mapped to URL paths that resemble their file paths. If a request path does not match an explicit URL pattern in the deployment descriptor but does match the path to a .jsp file from the root of the WAR (and the .jsp file is not under WEB-INF/), the JSP servlet will be compiled and invoked.
Most web applications have a set of files that are served verbatim to all users, and do not change as the application is used. These can be media assets like images used for site decoration, CSS stylesheets that describe how the site should be drawn to the screen, JavaScript code to be downloaded and executed by a web browser, or HTML for full pages with no dynamic content. To speed up the delivery of these files and improve page rendering time, App Engine uses dedicated servers for static content. Using dedicated servers also means the app servers don’t have to spend resources on requests for static files.
Both the deployment process and the frontend must be told which of the application’s files are static files. The deployment process delivers static files to the dedicated servers. The frontend remembers which URL paths refer to static files, so it can route requests for those paths to the appropriate servers.
The static file configuration can also include a recommendation for a cache expiration interval. App Engine returns the cache instructions to the client in the HTTP header along with the file. If the client chooses to heed the recommendation (and most web browsers do), it will retain the file for up to that amount of time, and use its local copy instead of asking for it again. This reduces the amount of bandwidth used, but at the expense of clients retaining old copies of files that may have changed.
To save space and reduce the amount of data involved when setting up new app instances, static files are not pushed to the application servers. This means application code cannot access the contents of static files by using the filesystem.
The files that do get pushed to the application servers are known as “resource files.” These can include app-specific configuration files, web page templates, or other static data that is read by the app but not served directly to clients. Application code can access these files by reading them from the filesystem. The code itself is also accessible this way.
There are ways to specify that a file is both a resource file and a static file, depending on which runtime environment you are using.
We’ve seen how request handlers defined in the app.yaml file can direct requests to scripts that run on the app servers. Handler definitions can also direct requests to the static file servers.
There are two ways to specify static file handlers. The easiest is
to declare a directory of files as static, and map the entire directory
to a URL path. You do this with the static_dir element, as follows:
handlers:
- url: /images
  static_dir: myimgs
This says that all the files in the directory myimgs/ are static files, and the URL path
for each of these files is /images/ followed by the
directory path and filename of the file. If the app has a file at the
path myimgs/people/frank.jpg, App
Engine pushes this file to the static file servers, and serves it
whenever someone requests the URL path /images/people/frank.jpg.
Notice that with static_dir handlers, the url pattern does not include a regular
expression to match the subpath or filename. The subpath is implied:
whatever appears in the URL path after the URL pattern becomes the
subpath to the file in the directory.
The other way to specify static files is with the static_files element. With
static_files, you use a full regular expression for the
url. The URL pattern can use regular
expression groups to match pieces of the path, then use those matched
pieces in the path to the file. The following is equivalent to the
static_dir handler above:
- url: /images/(.*)
  static_files: myimgs/1
  upload: myimgs/.*
The parentheses in the regular expression identify which
characters are members of the group. The 1 in the file
path is replaced with the contents of the group when looking for the
file. You can have multiple groups in a pattern, and refer to each group
by number in the file path. Groups are numbered in the order they appear
in the pattern from left to right, where 1 is the leftmost
pattern, 2 is the next, and so on.
When using static_files, you must also specify an
upload element. This is a regular expression that matches
paths to files in the application directory on your computer. App Engine
needs this pattern to know which files to upload as static files, since
it cannot determine this from the static_files pattern
alone (as it can with static_dir).
While developing a Python app, you keep the app’s static files in the application directory along with the code and configuration files. When you upload the app, App Engine determines which files are static files from the handler definitions in app.yaml. Files mentioned in static file handler definitions are pushed to the static file servers. All other files in the application directory are considered resource files, and are pushed to the application servers. As such, static files are not accessible to the application code via the filesystem.
The Python SDK treats every file as either a resource file or a static file. If you have a file that you want treated as both a resource file (available to the app via the filesystem) and a static file (served verbatim from the static file servers), you can create a symbolic link in the project directory to make the file appear twice to the deployment tool under two separate names. The file will be uploaded twice, and count as two files toward the file count limit.
When the data of an HTTP response is of a particular type, such as a JPEG image, and the web server knows the type of the data, the server can tell the client the type of the data by using an HTTP header in the response. The type can be any from a long list of standard type names, known as MIME types. If the server doesn’t say what the type of the data is, the client has to guess, and may guess incorrectly.
By default, for static files, App Engine makes its own guess of
the file type based on the last few characters of the filename (such
as .jpeg). If the filename does
not end in one of several known extensions, App Engine serves the file
as the MIME type application/octet-stream, a
generic type most web browsers treat as generic binary data.
If this is not sufficient, you can specify the MIME type of a set of static files by using the
mime_type element in the static file
handler configuration. For example:
- url: docs/(.*).ps
  static_files: psoutput/1.dat
  upload: psoutput/.*.dat
  mime_type: application/postscript
This says that the application has a set of datafiles in a
directory named psoutput/ whose
filenames end in .dat, and these should be served
using URL paths that consist of docs/, followed by the
filename with the .dat replaced with
.ps. When App Engine serves one of these files,
it declares that the file is a PostScript document.
You can also specify mime_type with a static_dir handler. All files in the
directory are served with the declared type.
It’s common for a static file to be used on multiple web pages of a site. Since static files seldom change, it would be wasteful for a web browser to download the file every time the user visits a page. Instead, browsers can retain static files in a cache on the user’s hard drive, and reuse the files when they are needed.
To do this, the browser needs to know how long it can safely retain the file. The server can suggest a maximum cache expiration in the HTTP response. You can configure the cache expiration period App Engine suggests to the client.
To set a default cache expiration period for all static files
for an app, you specify a default_expiration value. This
value applies to all static file handlers, and belongs at the top
level of the app.yaml file, like
so:
application: ae-book
version: 1
runtime: python
api_version: 1

default_expiration: "5d 12h"

handlers:
  # ...
The value is a string that specifies a number of days, hours,
minutes, and seconds. As shown here, each number is followed by a unit
(d, h, m, or s),
and values are separated by spaces.
You can also specify an expiration value for static_dir and static_files handlers
individually, using an expiration element in the handler
definition. This value overrides the default_expiration
value, if any. For example:
handlers:
- url: /docs/latest
  static_dir: /docs
  expiration: "12h"
If the configuration does not suggest a cache expiration period for a set of static files, App Engine does not give an expiration period when serving the files. Browsers will use their own caching behavior in this case, and may not cache the files at all.
Sometimes you want a static file to be cached in the browser as long as possible, but then replaced immediately when the static file changes. A common technique is to add a version number for the file to the URL, then use a new version number from the app’s HTML when the file changes. The browser sees a new URL, assumes it is a new resource, and fetches the new version.
You can put the version number of the resource in a fake URL
parameter, such as /js/code.js?v=19,
which gets ignored by the static file server. Alternatively, in
Python, you can use regular expression matching to match all versions
of the URL and route them to the same file in the static file server,
like so:
- handlers:
  url: /js/(.*)/code.js
  static_files: js/code.js
  expiration: "90d"
This handler serves the static file js/code.js for
all URLs such as /js/v19/code.js, using a cache
expiration of 90 days.
Tip
If you’d like browsers to reload a static file resource
automatically every time you launch a new major version of the app,
you can use the multiversion URL handler just discussed, then use
the CURRENT_VERSION_ID environment variable
as the “version” in the static file URLs:
self.response.out('<script src="/js/' +
                  os.environ['CURRENT_VERSION_ID'] +
'/code.js" />')As we saw earlier, the WAR directory structure for a Java web application keeps all application code, JARs, and configuration in a subdirectory named WEB-INF/. Typically, files outside of WEB-INF/ represent resources that the user can access directly, including static files and JSPs. The URL paths to these resources are equivalent to the paths to these files within the WAR.
Say an app’s WAR has the following files:
main.jsp
forum/home.jsp
images/logo.png
images/cancelbutton.png
images/okbutton.png
terms.html
WEB-INF/classes/com/example/Forum.class
WEB-INF/classes/com/example/MainServlet.class
WEB-INF/classes/com/example/Message.class
WEB-INF/classes/com/example/UserPrefs.class
WEB-INF/lib/appengine-api.jar
This app has four static files: three PNG images and an HTML file named terms.html. When the app is uploaded, these
four files are pushed to the static file servers. The frontends know to
route requests for URL paths equivalent to these file paths (such as
/images/logo.png) to the static file
servers.
The two .jsp files are assumed to be JSPs, and are compiled to servlet classes and mapped to the URL paths equivalent to their file paths. Since these are application code, they are handled by the application servers. The JSP source files themselves are not pushed to the static file servers.
By default, all files in the WAR are pushed to the application servers, and are accessible by the application code via the filesystem. This includes the files that are identified as static files and pushed to the static file servers. In other words, all files are considered resource files, and all files except for JSPs and the WEB-INF/ directory are considered static files.
You can change which files are considered resource files and which
are considered static files by using the appengine-web.xml file, with the
<resource-files> and
<static-files> elements, respectively. These elements
can contain an <include> element and an
<exclude> element that modify the default behavior of
including all files. For example:
  <resource-files>
    <exclude path="/images/**" />
  </resource-files>
This example excludes the contents of the images/ directory and all subdirectories from
the set of resource files. This reduces the amount of data that is
pushed to the application servers when starting up a new application
instance, at the expense of not being able to access those files from
within the application (probably fine for site images). The
** pattern matches any number of characters in file and
directory names, including subdirectories.
Another example:
  <static-files>
    <exclude path="/**.xml" />
    <include path="/sitemap.xml" />
  </static-files>
This excludes all files with names ending in .xml from the set of static files, except for sitemap.xml. Perhaps the XML files are intended for the application’s eyes only, but we want to make sure search engines can see the site map.
Files in the WEB-INF/ directory are always considered resource files. They cannot be included as static files or excluded from the set of resource files.
Browsers rely on the web server to tell them the type of the file
being served. The static file server determines the MIME content type of
a file from the extension on the filename. For instance, a file whose
name ends in .jpeg is served with a
MIME type of image/jpeg. The server has a
built-in set of mappings from filename extensions to MIME types. You can specify additional mappings using
<mime-mapping> elements in the deployment descriptor
(web.xml). See a web.xml reference or the App Engine
documentation for more information.
Browsers also need to know if a file is safe to cache, and for how
long. The static file server can suggest a cache expiration duration
when it serves a file (although a browser is not obligated to honor it).
You can specify that a set of static files should be cached for a
particular duration by including an expiration attribute on
the <include> element in appengine-web.xml:
  <static-files>
    <include path="images/**" expiration="30d" />
  </static-files>
The value of expiration is a duration specified as numbers
and units, where d is days, h is hours,
m is minutes, and s is seconds. You can add
values of multiple units by specifying them separated with spaces:
3d 12h.
When a client requests and retrieves a web page over an HTTP connection, every aspect of the interaction is transmitted over the network in its final intended form, including the URL path, request parameters, uploaded data, and the complete content of the server’s response. For web pages, this usually means human-readable text is flying across the wire, or through the air if the user is using a wireless connection. Anyone else privy to the network traffic can capture and analyze this data, and possibly glean sensitive information about the user and the service.
Websites that deal in sensitive information, such as banks and online retailers, can use a secure alternative for web traffic. With servers that support it, the client can make an HTTPS connection (HTTP over the Secure Socket Layer, or SSL). All data sent in either direction over the connection is encrypted by the sender and decrypted by the recipient, so only the participants can understand what is being transmitted even if the encrypted messages are intercepted. Web browsers usually have an indicator that tells the user when a connection is secure.
App Engine supports secure connections for incoming web requests. By default, App Engine accepts HTTPS connections for all URLs, and otherwise treats them like HTTP requests. You can configure the frontend to reject or redirect HTTP or HTTPS requests for some or all URL paths, such as to ensure that all requests not using a secure connection are redirected to their HTTPS equivalents. The application code itself doesn’t need to know the difference between a secure connection and a standard connection: it just consumes the decrypted request and provides a response that is encrypted by App Engine.
All URL paths can be configured to use secure connections, including those mapped to application code and those mapped to static files. The frontend takes care of the secure connection on behalf of the app servers and static file servers.
App Engine only supports secure connections over TCP port 443, the
standard port used by browsers for https:// URLs. Similarly,
App Engine only supports standard connections over port 80. The App Engine
frontend returns an error for URLs that specify a port other than the
standard port for the given connection method.
The development server does not support secure connections, and ignores the security settings in the configuration. You can test these URLs during development by using the nonsecure equivalent URLs.
Because HTTPS uses the domain name to validate the secure
connection, requests to versioned appspot.com URLs, such as
https://3.ae-book.appspot.com/, will display a security
warning in the browser saying that the domain does not match the security
certificate. To prevent this, App Engine has a trick up its sleeve:
replace the dots (.) between the version and app IDs with
-dot- (that’s hyphen, the word “dot,” and another hyphen),
like this:
https://3-dot-ae-book.appspot.com/
A request to this domain uses the certificate for
appspot.com, and avoids the security warning.
To configure secure connections for a URL handler in a
Python application, add a secure element to the handler’s
properties in the app.yaml
file:
handler:
- url: /profile/.*
  script: userprofile.py
  secure: always
The value of the secure element can be
always, never, or
optional:
alwayssays that requests to this URL path should always use a secure connection. If a user attempts to request the URL path over a nonsecure connection, the App Engine frontend issues an HTTP redirect code telling it to try again using a secure HTTP connection. Browsers follow this redirect automatically.neversays that requests to this URL path should never use a secure connection, and requests for an HTTPS URL should be redirected to the HTTP equivalent. Note that browsers often display a warning when a user follows a link from a secure page to a nonsecure page.optionalallows either connection method for the URL path, without redirects. The app can use theHTTPSenvironment variable to determine which method was used for the request, and produce a custom response.
If you don’t specify a secure element for a URL path,
the default is optional.
With a Java application, you can use the deployment descriptor to require secure connections for certain URL paths. In the web.xml file, you declare a security constraint for a URL path or set of URL paths as follows:
  <security-constraint>
    <web-resource-collection>
      <web-resource-name>home</web-resource-name>
      <url-pattern>/home/*</url-pattern>
    </web-resource-collection>
    <user-data-constraint>
      <transport-guarantee>CONFIDENTIAL</transport-guarantee>
    </user-data-constraint>
  </security-constraint>
A security constraint, indicated by the
<security-constraint> element, describes the minimum
security requirements a request must meet to access a resource. You
identify the resource by using a URL pattern in a
<web-resource-collection> element containing a
<url-pattern> element. (According to the spec,
<web-resource-collection> must have a
<web-resource-name>, although this name is not used
for anything.) As with URL patterns in servlet mappings, the URL pattern
can be a single URL path, or a partial URL path with a * wildcard at the beginning or at the
end.
You specify a security constraint requiring a secure connection
with a <user-data-constraint>
element containing a <transport-guarantee> element,
itself containing the value CONFIDENTIAL. (The transport
guarantee INTEGRAL is also supported as a synonym for
CONFIDENTIAL.) App Engine does not support other transport
guarantee constraints.
If you do not want users accessing your app with HTTPS, you can disable secure connections by adding this to your appengine-web.xml configuration file:
<ssl-enabled>false</ssl-enabled>
Note
Using the deployment descriptor and appengine-web.xml, you can only enable or disable SSL for the entire application. The deployment descriptor standard does not have a concept of accepting secure connections for some URL paths and not others. You can configure SSL for specific URL paths using YAML configuration files with the Java runtime environment. See Configuring a Java App with YAML Files.
Back in Chapter 2, we discussed how an App Engine application can integrate with Google Accounts to identify and authenticate users. We saw how an app can use library calls to check whether the user making a request is signed in, access the user’s email address, and calculate the sign-in and sign-out URLs of the Google Accounts system. With this API, application code can perform fine-grained access control and customize displays.
Another way to do access control is to leave it to the frontend. With just a little configuration, you can instruct the frontend to protect access to specific URL handlers such that only signed-in users can request them. If a user who is not signed in requests such a URL, the frontend redirects the user to the Google Accounts sign-in and registration screen. Upon successfully signing in or registering a new account, the user is redirected back to the URL.
You can also tell the frontend that only the registered developers of the application can access certain URL handlers. This makes it easy to build administrator-only sections of your website, with no need for code that confirms the user is an administrator. You can manage which accounts have developer status in the Administration Console, in the “Developers” section. If you revoke an account’s developer status, that user is no longer able to access administrator-only resources, effective immediately.
Later on, we will discuss App Engine services that call your application in response to events. For example, the scheduled tasks service (the “cron” service) can be configured to trigger a request to a URL at certain times of the day. Typically, you want to restrict access to these URLs so not just anybody can call them. For the purposes of access control enforced by the frontend, these services act as app administrators, so restricting these URLs to administrators effectively locks out meddling outsiders while allowing the services to call the app.
If your app runs on a Google Apps domain for the purposes of serving your organization’s members, you can set an access policy for the app such that only Google Apps accounts on the domain can sign in to the app. You set this policy when you register the application ID; it cannot be changed after the app ID has been registered.
This coarse-grained access control is easy to set up in the frontend configuration. And unlike access control in the application code, frontend authentication can restrict access to static files as well as application request handlers.
For a Python app, you establish frontend access control
for a URL handler with the login element in app.yaml, like so:
handlers:
- url: /myaccount/.*
  script: account.py
  login: required
The login element has two possible values:
required and admin.
If login is required, then the user
must be signed in to access URLs for this handler. If the user is not
signed in, the frontend returns an HTTP redirect code to send the user
to the Google Accounts sign-in and registration form.
If login is admin, then the user must be
signed in and must be a registered developer for
the application.
If no login is provided, the default policy is to
allow anyone to access the resource, whether or not the client
represents a signed-in user, and whether or not the app is set to use a
members-only access policy.
You can use the login element with both script handlers and
static file handlers.
For Java, you establish a frontend access control policy, using a security constraint in the deployment descriptor. We introduced security constraints earlier when we discussed secure connections. Authentication constraints are similar: they specify the minimum level of a condition required to access a resource.
Here’s what an authentication constraint looks like in web.xml:
  <security-constraint>
    <web-resource-collection>
      <web-resource-name>myaccount</web-resource-name>
      <url-pattern>/myaccount/*</url-pattern>
    </web-resource-collection>
    <auth-constraint>
      <role-name>*</role-name>
    </auth-constraint>
  </security-constraint>
As before, the security constraint identifies a resource with a
URL pattern, then specifies the constraint to apply. An
<auth-constraint> element contains a
<role-name> element that specifies the minimum level
of authentication.
<role-name> can be one of two values:
* (a single asterisk) or admin.
If the role name is *, then any user that has signed in can
access the resource. If the user is not signed in, the frontend sends an
HTTP redirect code with the Google Accounts sign-in and registration
page as the destination. If the role name is admin, then
only a user who is both signed in and a registered developer for the
application can access the resource.
If a URL does not have an authentication constraint, then anyone can access the URL, whether or not the client represents a signed-in user, and whether or not the app is set to use a members-only access policy.
You can use app configuration to specify a list of environment variables to be set prior to calling any request handlers. This is useful to control components that depend on environment variables, without having to resort to hacks in your code to set them.
In Python, you set env_variables in app.yaml to a mapping value:
env_variables:
  DJANGO_SETTINGS_MODULE: 'gnero.prod.settings'
In Java, you can set both environment variables and system
properties in appengine-web.xml. You
set environment variables with a <env-variables>
element containing one or more <env-var> elements, each
with a name and a value. You set system
properties with a <system-properties> element
containing one or more <property> elements. Like
so:
  <system-properties>
    <property name="com.gnero.new-player-strength" value="1000" />
    <property name="com.gnero.beta-shield" value="true" />
  </system-properties>

  <env-variables>
    <env-var name="ZOMBIE_APOCALYPSE" value="false" />
</env-variables>Some App Engine services call an application’s request handlers in response to external events. For example, the Mail service can call a request handler at a fixed URL when it receives an email message at an email address associated with the app. This is a common design theme in App Engine: all application code is in the form of request handlers, and services that need the app to respond to an event invoke request handlers to do it.
Each service capable of creating inbound traffic must be enabled in
app configuration, to confirm that the app is expecting traffic from those
services on the corresponding URL paths. For a Python app, you enable
these services with the inbound_services element in app.yaml:
inbound_services:
- mail
- warmup
For a Java app, you enable inbound services with the
<inbound-services> element in appengine-web.xml:
  <inbound-services>
    <service>mail</service>
    <service>warmup</service>
  </inbound-services>
Table 3-1 lists the services that can be enabled this way, and where to find more information about each service.
Table 3-1. Services that create in-bound traffic for an app, which must be enabled in service configuration
| Service | Description | Name | Handler URLs |
|---|---|---|---|
| Channel Presence | Receive channel connection notifications. | channel_presence | /_ah/channel/.* |
| Receive email at a set of addresses. See Chapter 14. | mail | /_ah/mail/.* | |
| XMPP Messages | Receive XMPP chat messages. For all XMPP services, see Chapter 15. | xmpp_message | /_ah/xmpp/message/chat/ |
| XMPP Presence | Receive XMPP presence notifications. | xmpp_presence | /_ah/xmpp/presence/.* |
| XMPP Subscribe | Receive XMPP subscription notifications. | xmpp_subscribe | /_ah/xmpp/subscription/.* |
| XMPP Error | Receive XMPP error messages. | xmpp_error | /_ah/xmpp/error/ |
| Warm-up Requests | Initialize an instance, with warm-up requests enabled. See Warm-up Requests. | warmup | /_ah/warmup |
When your application serves an status code that represents an error (such as 403 Forbidden or 500 Internal Server Error) in a response to a browser, it can also include an HTML page in the body of the response. The browser typically shows this HTML to the user if the browser expected to render a full page for the request. Serving an error page can help prevent the user from being disoriented by a generic error message—or no message at all.
There are cases when an error condition occurs before App Engine can invoke your application code, and must return an error response. For example, if none of the request handler mappings in the app’s configuration match the request URL, App Engine has no request handler to call and must return a 404 Not Found message. By default, App Engine adds its own generic HTML page to its error responses.
You can configure custom error content to be used instead of App Engine’s error page. You provide the response body in a file included with your app, and mention the file in your application configuration.
In Python, add an error_handlers element to your app.yaml. Its value is a list of mappings, one
per error file:
error_handlers:
- file: error.html
- error_code: over_quota
  file: busy_error.html
- error_code: dos_api_denial
  file: dos_denial.txt
  mime_type: text/plain
In Java, add a <static-error-handler> element to
your appengine-web.xml. The element
contains a <handler> element for each error
file:
<static-error-handlers>
  <handler file="error.html" />
  <handler error-code="over_quota" file="busy_error.html" />
  <handler error-code="dos_api_denial" file="dos_denial.txt" mime-type="text/plain" />
</static-error-handlers>
The file value specifies the path from the application
root directory to the error file. The optional mime_type (or
mime-type) specifies the MIME content type for the file,
which defaults to text/html.
The error_code (or error-code) value
associates the error file with a specific error condition. If omitted, the
file is associated with every error condition that doesn’t have a specific
error file of its own. Error codes include the following:
over_quota: the request cannot be fulfilled because the app has temporarily exceeded a resource quota or limit.dos_api_denial: the origin of the request is blocked by the app’s denial of service protection configuration. See the App Engine documentation for more information about this feature.timeout: the request handler did not return a response before the request deadline.
As an application administrator, you’re likely to spend a lot of time in the Administration Console. You’re also likely to build your own administrative functionality into your app, for performing special maintenance tasks or datastore inspections. You can add your own administration pages to the Administration Console interface with application configuration. Links to your administrative pages appear in the Administrative Console sidebar. When you click a link, the page is rendered in an iframe, with the Console header, sidebar, and footer around it.
In Python, you use the admin_console element in app.yaml. This element value is a mapping to
leave room for future Administration Console configuration; for now,
pages is the only key. The value of pages is a
list of your administration pages, each with a name and a
url, like so:
admin_console:
  pages:
  - name: Title
    url: /url
In Java, you use the <admin-console> element in
appengine-web.xml, containing one or
more <page> elements. Each <page>
has a name attribute and a url attribute:
  <admin-console>
    <page name="Title" url="/url" />
  </admin-console>
You are responsible for providing the administration features themselves, at request handlers mapped to their URLs. Don’t forget to restrict access to these URLs to administrators only, such as with authorization configuration; see Authorization with Google Accounts.
Tip
Because administrative pages are configured in app.yaml or appengine-web.xml, they are specific to the application version described in the file. The sidebar links for an app version only appear in the Console when the app version is selected in the Console’s version drop-down menu. Naturally, the link will render the administrative page from the corresponding version of the app, even if that version is not the default.
To complete this discussion of configuring Python applications, we must mention several additional features specific to app.yaml and the Python runtime environment: using Python libraries, using built-in features with request handlers, and including app configuration from other files.
On your own computer, Python programs run in an
environment with access to many libraries of modules. Some of these
modules—quite a few, actually—come with Python itself, in the Python
standard library. Others you may have installed separately, such as with
pip install or easy_install. Perhaps you use
virtualenv to create multiple isolated Python environments,
each with its own set of available libraries. A Python program can
import any module within its environment, and a module must be available
in this environment (or elsewhere on the Python library load path) to be
importable.
On App Engine, a Python app also runs in an environment with
access to libraries. This environment includes a slightly modified
version of the Python 2.7 standard library. (The modifications account
for restrictions of the App Engine runtime environment, which we’ll
discuss in Chapter 4.) App
Engine adds to this the libraries and tools included with the App Engine
SDK, such as APIs for accessing the services (such as
google.appengine.api.urlfetch), and utilities such as the
data modeling libraries (google.appengine.ext.ndb).
Naturally, the environment also includes any Python modules you provide in your application directory. In addition to your own code, you might add a copy of a third-party library your app uses to your app directory, where it is uploaded as part of your app. Note that this method only works for “pure Python” libraries, and not libraries that have portions written in C.
For convenience, the Python runtime environment includes several third-party libraries popular for web development. We’ve already seen Jinja, the templating library. The Django web application framework is also included. You can use NumPy for data processing and numerical analysis. The Python Cryptography Toolkit (PyCrypto) provides strong encryption capabilities.
To use one of the provided third-party libraries, you must declare it in the app.yaml file for the app, like so:
libraries:
- name: django
  version: "1.3"
This declaration is necessary to select the version of the library
your app will use. When a new version of a third-party library becomes
available, your app will continue to use the declared version until you
change it. You’ll want to test your app to make sure it’s compatible
with the new version before making the switch with your live app. With
this declaration in place, import django will load the
requested version of the library. (Without it, the import will fail with
an ImportError.)
Tip
For more information about using Django with App Engine, see Chapter 18.
You can specify a version of latest to
always request the latest major version of the library. This may be
desired for small libraries, where new versions are typically backward compatible. For larger packages
like Django, you almost certainly want to select a specific version, and
upgrade carefully when a new version is added:
libraries:
- name: jinja2
  version: latest
- name: markupsafe
  version: latest
While the App Engine runtime environment provides these libraries, the Python SDK does not. You must install third-party libraries in your local Python environment yourself, and make sure your version matches the one requested in your app.yaml. Installation instructions are specific to each library.
Table 3-2 lists third-party libraries available as of SDK version 1.6.6. Check the official documentation for an up-to-date list.
Table 3-2. Third-party Python libraries available by request in the runtime environment
| Library | Description | Name | Versions |
|---|---|---|---|
| Django | A web application framework. See the Django website for installation. | django | 1.3, 1.2 |
| Jinja2 | A templating library. MarkupSafe is recommended
with Jinja2. To install: | jinja2 | 2.6 |
| lxml | An XML parsing and production toolkit. See the lxml website for installation,
including the | lxml | 2.3 |
| MarkupSafe | Fast HTML-aware string handler. To install:
| markupsafe | 0.15 |
| NumPy | Data processing and numerical analysis. See the SciPy website for installation. | numpy | 1.6.1 |
| Python Imaging Library (PIL) | Image manipulation toolkit. See the PIL website for installation. | pil | 1.1.7 |
| Python Cryptography Toolkit (PyCrypto) | Cryptographic routines. See the PyCrypto website for installation. Export restrictions may apply. | pycrypto | 2.3 |
| WebOb | An object-oriented interface to HTTP requests and responses. Used by (and included automatically with) the webapp framework. Included in the SDK. | webob | 1.1.1 |
| YAML | Library for parsing the YAML message serialization format. Used by the SDK for the config files. Included in the SDK. | yaml | 3.10 |
Some of the utilities included with the Python runtime
environment use their own request handlers to provide functionality,
such as a web-based administrative UI or web service endpoints.
Typically, these handlers map to URLs with paths beginning with
/_ah/, which are reserved for App Engine use. Because this
code runs within your application, you must enable this functionality by
setting up these request handlers.
To make it easy to do (and difficult to do incorrectly), many of
these tools are available as “built-ins.” You enable a built-in feature
by naming it in your app.yaml file,
in a mapping named builtins:
builtins:
- appstats: on
- remote_api: on
Table 3-3 lists the built-ins available as of SDK version 1.6.6. As usual, check the official documentation for an up-to-date list.
Table 3-3. Built-in features that must be enabled using the built-ins directive in app.yaml
| Feature | Description | Name |
|---|---|---|
| Admin console redirect | Redirects all requests for /_ah/admin to the
app’s Administration Console if it is live, or the development
console if it is running in the development server, so you can
link to /_ah/admin from your own administrative
pages. | admin_redirect |
| AppStats | Sets up the AppStats control panel at
/_ah/stats. See Visualizing Calls with AppStats. | appstats |
| Deferred work | Sets up the task queue handler for the deferred library. See Deferring Work. | deferred |
| Remote API | Establishes the web service endpoint for remote API access. See Remote Controls. | remote_api |
An app.yaml file can
get rather large, especially if you use it to route your app’s URLs to
multiple handlers. You can organize your app’s configuration into
separate component files by using the includes directive.
This also makes it easy to write App Engine components that can be
installed in other apps, regardless of which frameworks the apps are
using.
The includes value is a list of file or directory
paths, like so:
includes:
- lib/component/ae_config.yaml
The path can be an absolute path, a path relative to the app root
directory, or a path relative to the file that contains the
includes. If the path is to a file, the file is parsed as a
YAML file. If the path is to a directory, the filename is
assumed to be include.yaml in the given
directory.
An included file can contain builtins,
includes, handlers, and
admin_console values. These list values are
prepended to the list that appears in the current
file.
For handlers, this means that handler URL patterns
from includes are tested before those in the current file. If your main
app.yaml file has a handler mapped
to the URL pattern /.*, handlers from includes will be
tested first, and only those that don’t match will fall to the catch-all
handler. Notice that if an included file maps a handler to
/.*, none of the handlers in the current file (or any file
that includes the current file) will ever match a request! So don’t do
that.
Includes are aggregated in the order they appear in the list. For example, given this app.yaml:
handlers:
- url: /.*
  script: main.app

includes:
- lib/component_one
- lib/component_two
A request URL will try to match each of the handlers
in lib/component_one/include.yaml
in the order they appear in that file, followed by each of the
handlers in lib/componenttwo/include.yaml, followed by
the /.* handler in app.yaml.
The Java runtime environment includes an implementation of the J2EE HTTP session interface. With sessions enabled, a new visitor to your application is issued a session ID, which is stored in a cookie in the visitor’s browser and recalled on all subsequent requests. You can set attributes on the user’s session, and these attributes are available during subsequent requests from the same user. The App Engine implementation uses the datastore and memcache to provide this functionality.
To use sessions, you must first enable this functionality in
application configuration. In your appengine-web.xml, add the
<sessions-enabled> element:
<sessions-enabled>true</sessions-enabled>
Session data is written to both the memcache and the datastore, and read from the memcache whenever possible. By default, if session attributes are modified during a request, the request handler updates both the memcache and the datastore before returning the response. You can configure this behavior so the (slower) datastore update is deferred out of the request handler using a task queue. This improves the response time of your request handlers in exchange for a modest risk of temporary session data inconsistency. (We’ll discuss the datastore, memcache, and task queues in great detail later in this book, so you may want to refer to those chapters, then reread this paragraph.) In general, it’s a good idea to enable this feature.
To enable asynchronous writing of session data to durable storage, add the following element to appengine-web.xml:
<async-session-persistence enabled="true" />
By default, the asynchronous write feature uses the default queue.
To use a specific named queue (for example, to configure a more aggressive
queue-processing rate), add the queue-name="..." attribute to
<async-session-persistence>.
You access the HttpSession object by calling the
getSession() method on the HttpServletRequest.
This object has getAttribute() and
setAttribute() methods for manipulating session attributes.
With App Engine’s implementation, all attribute values must be
serializable, so they can be stored in the memcache and datastore.
Here’s a simple example of using a session attribute. It prints the value of a session attribute on every request, along with a form that updates the value. When you update the value, it changes. When you reload the page, the previous value persists:
import java.io.IOException;
import javax.servlet.http.*;

@SuppressWarnings("serial")
public class TestServlet extends HttpServlet {
    public void doGet(HttpServletRequest req, HttpServletResponse resp)
            throws IOException {
        resp.setContentType("text/html");

        String v = (String) req.getSession().getAttribute("v");
        if (v != null) {
            // Normally you would HTML-escape this.
            resp.getWriter().println(
                    "<p>v is: " + v + "</p>");
        } else {
            resp.getWriter().println(
                    "<p>v is not set.</p>");
        }

        resp.getWriter().println(
                "<form action="/" method="post">" +
                "<input type="text" name="v" />" +
                "<input type="submit" />" +
                "</form>");
    }

    public void doPost(HttpServletRequest req, HttpServletResponse resp)
            throws IOException {
        String newV = req.getParameter("v");
        if (newV != null) {
            req.getSession().setAttribute("v", newV);
        }
        resp.sendRedirect("/");
    }
}