
Chapter 2. Programming with MapPoint 2004
MapPoint 2004 provides a rich set of APIs and an ActiveX Control that lets you build powerful location-based business applications. Originally, the MapPoint APIs and ActiveX Control were designed for use with COM technologies, but thanks to .NET interoperability with COM, you can use those COM APIs to build applications using .NET programming languages such as C# and VB.NET.
Tip
Keep in mind that it is sometimes tricky to make the COM interfaces work with your .NET code, but I will discuss the tips, tricks, and workarounds in detail.
This chapter explores using the MapPoint 2004 APIs and MapPoint 2004 ActiveX Control to accomplish basic location-oriented tasks, such as finding places, addresses, and points of interest, routing between places, and other lightweight business-oriented tasks, such as optimizing a route. To follow the examples in this chapter, you’ll need Microsoft MapPoint 2004 North America/Europe Edition installed on the development computer, and the Microsoft .NET Framework, Version 1.1 or later.
The MapPoint 2004 Object Model
The MapPoint 2004 APIs and MapPoint 2004 ActiveX Control are designed for building disconnected Windows applications. Since all map data is installed locally on your hard drive, you can build Windows applications that don’t need any network connectivity. However, if you need to build a connected web-based mapping application to keep your application footprint to a minimum size, consider instead the MapPoint Web Service, which is discussed later in this book in detail. Building a web-based application using the MapPoint 2004 APIs (or ActiveX Control) not only results in a poorly-performing web application but also violates the MapPoint license model! So, MapPoint 2004 can be used only for building Windows applications.
Tip
For a more detailed discussion on which platform to choose for your application development, refer to Chapter 1.
You can develop three kinds of applications using MapPoint 2004:
- Location data-processing applications
Use MapPoint 2004 automation internally but don’t create maps.
- Location visual applications (with map display)
Display location and thematic maps embedded into applications using MapPoint2004.
- MapPoint 2004 Add-Ins
Extend the capabilities of MapPoint 2004.
Location data-processing applications are typically used in the business intelligence part of an enterprise application. For example, a goods-delivery company must optimize the stops in a delivery route to save on fuel costs and drivers’ time. These applications are developed using the MapPoint 2004 APIs .
The visual application category applies when you want to display a map to represent business data thematically. For example, a map displaying sales across the country based on zip code gives an immediate understanding of whether location plays a crucial role in sales. For applications that embed maps, it is ideal to use the MapPoint 2004 ActiveX Control; however, you can also use MapPoint APIs to display maps without using the ActiveX Control, as discussed in Chapter 3.
MapPoint 2004 Add-Ins extend MapPoint functionality to include your specific business needs. For example, you might want to use MapPoint 2004 application as a mapping tool in your enterprise but need an additional feature to display sales data that is available as an internal web service. In this case, MapPoint 2004 Add-Ins are ideal for adding features to the MapPoint 2004 application. There are also some specific scenarios where you need to implement your application logic as an Add-In for performance reasons, which we will discuss in Chapter 4.
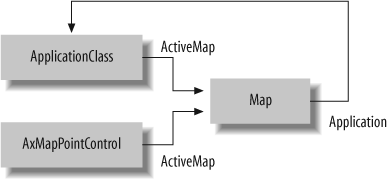
Whether you are developing with the APIs or with the ActiveX
Control, the core concepts behind MapPoint 2004 programming are still
the same. The only difference is that the ApplicationClass is the root class if you are programming using the APIs, and the AxMapPointControl class is the root class if
you are programming using the ActiveX Control. However, both these
classes expose the MapClass (via
the ActiveMap property), which is
the centerpiece of the MapPoint 2004 programming. MapClass offers an extensive set of
functions, properties, and collections, including a reference to the
parent ApplicationClass via the
Application property, which can be
used in developing a wide variety of location-based
applications.
Figure 2-1 shows the relation of these classes, while Table 2-1 gives you a selective list of the methods exposed on the MapClass object.
Method name | Description |
| Finds addresses and returns |
| Finds places (by name) and returns
|
| Combines the functionality of
|
| Takes the x and y coordinates on the
map and returns a collection of |
| Converts any given location into x and y coordinates on the screen |
| Converts any given x and y
coordinates on the screen to a MapPoint |
| Adds a pushpin at a specified location |
The Map class exposes a set
of methods that does basic methods to find, mark (by adding pushpins),
and convert screen coordinates to loctation objects and vice
versa.
Apart from the Map object,
the other two important and most frequently used objects are the
FindResults and Location objects. The FindResults object represents a collection
of Location and/or Pushpin objects. You can access the
individual collection items using the FindResults.get_Item method (discussed in
more detail later in this chapter). The Location object, on the other hand,
represents a real location in MapPoint 2004. The Location object exposes methods such as
FindNearby to find nearby points of
interest and DistanceTo to find the
distance between two points (locations).
Programming with MapPoint 2004 API
The MapPoint 2004 APIs were originally designed for use with the COM programming model. In order to build applications using the Microsoft .NET Framework, you need the interoperable assemblies for the MapPoint COM library. Let’s look at how to add the MapPoint 2004 APIs as references for use in your project.
Adding MapPoint 2004 References Using Visual Studio .NET
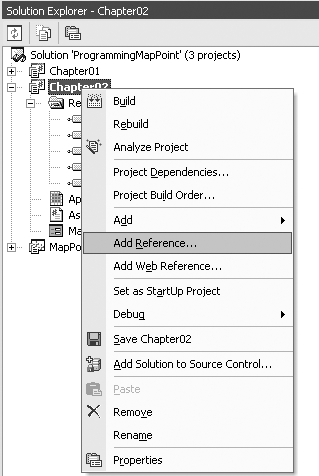
If you are using Visual Studio .NET Version 2003 or later, it is easy to add a reference to the MapPoint 2004 APIs using the Add Reference option from the project context menu, as shown in Figure 2-2.
Tip
If you are using MapPoint ActiveX Control, you don’t need to add this reference manually, since Visual Studio .NET adds it automatically when you drag-and-drop the control on your Windows Form.
When you see the Add Reference dialog window, select the COM tab and select the Microsoft MapPoint 11.0 Object Library (North America) to add the MapPoint 2004 type library as a reference to your project, as shown in Figure 2-3.
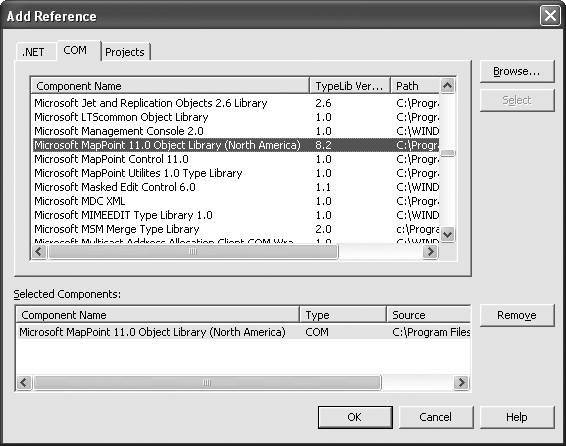
Tip
If you are using the MapPoint 2004 European Edition, select the Microsoft MapPoint 11.0 Object Library (Europe) to add the reference. Also, note that if you have both MapPoint North America and MapPoint Europe installed on the same computer, you can develop an interop assembly for either product for use with both applications.
In this process, Visual Studio .NET automatically creates an
interoperable assembly and adds it as a reference to your project.
By default, the namespace of the newly created assembly is set to
MapPoint.
Adding MapPoint 2004 References Using TlbImp.EXE
If you do not have Visual Studio .NET, or if you chose
to do the hard work of creating the interoperable assembly yourself,
you can use the TlbImp.EXE tool (located in the
Microsoft Visual Studio .NET 2003SDKv1.1Bin
directory) that ships with the .NET framework. For example, to
generate the interoperable assembly for MapPoint 2004 type library with the
namespace Interop.MapPoint, use
the following command-line command:
    C:>tlbimp.exe "C:Program FilesMicrosoft MapPoint
    MPNA82.tlb" /out:"C:Interop.MapPoint.dll" /namespace:Interop.MapPoint /sysarray/
    transform:dispret
This command generates the interoperable assembly Interop.MapPoint.dll in the C: directory; add it to your project as a reference as you would do with any other .NET assembly.
Now that you have added the MapPoint 2004 object library to your project as a reference, let’s get started with a simple application.
Finding a Place
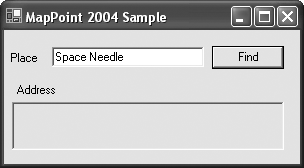
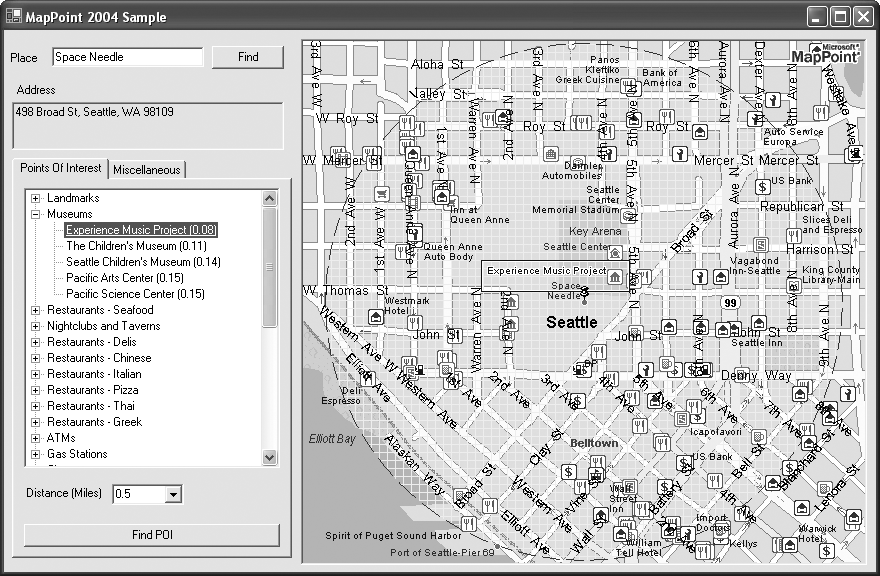
When you think of mapping in general, the first thing that comes to mind is finding a location—whether it is a place or an address. A place is a general location referred by its commonly known name; an address is a more detailed specification of a location. For example, one of the best-known places in Seattle is the Space Needle, but the actual address of the Space Needle is 498 Broad St, Seattle, WA 98109. Using MapPoint 2004, you can find both places and addresses, as well as other elements that I discuss later.
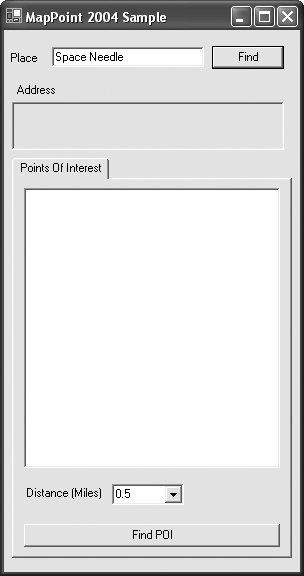
Let’s start off by building a simple Windows application that finds a place and returns the address for that place. This application contains a text box to input a place name and a button that can be used to fire an event to find the input place. When the input place is found, the address of the place is displayed in the text box labeled Address. The Windows form layout, which you can lay out in Visual Studio, is shown in Figure 2-4.
Tip
Because the user interface code is highly repetitive and generated by Visual Studio, I won’t list it here. It is included in the sample files in the download.
Now, let’s write the code that is invoked when the Find button
is clicked. The root of MapPoint 2004 API programming is the
ApplicationClass, so let’s start
by creating an instance of ApplicationClass:
    //Create an instance of ApplicationClass
    //Important Note: You need to clean up after you are done with the
    //application class. For more informantion, see the section
    //"Cleaning Up After You're Done"
    MapPoint.ApplicationClass app = new MapPoint.ApplicationClass( );
After creating the ApplicationClass, access the Map instance via the ActiveMap property:
    //Get a reference to the Map instance via the ActiveMap property

    MapPoint.Map map = app.ActiveMap;
The MapClass exposes a
method, FindPlaceResults, that
returns all places matching the input query. This method takes the
place name string as input and returns FindResults, which is a collection of
locations found. The following code shows the FindPlaceResults method call:
    //Call FindPlaceResults on the MapClass instance
    MapPoint.FindResults findResults = map.FindPlaceResults(this.textBox1.Text);
When the method call is complete, the FindResults instance will contain all the
locations that matched the input query. The number of matches is
represented by the Count property of the FindResults instance. In our example, the
search for “Space Needle” resulted in 25 matches. Next, we need to
go through the list to figure out which instance represents the
Space Needle in Seattle. So, let’s add a modal dialog to show a
ListBox control with all found locations so that we can disambiguate
the results manually.
Each location that matched the input place is represented as
an instance of MapPoint.Location
class in the FindResults object.
Even though the FindResults class
is essentially a collection of Location objects, its behavior is quite
different from any .NET collection—you cannot directly access the
Location items in the FindResults collection using the index
number:
FindResults.Items[index]In fact, the Items indexer
is not exposed in the FindResults
class in the interoperable assembly; however, there are still two
ways to get the Location objects
from the FindResults collection,
using either the get accessor method or an enumerator.
Using the get accessor method
Collections are implemented using two special
accessor methods called get_Item and set_Item. For read-only properties, only
the get_Item method is
implemented. These special methods are generated by the .NET
compiler for every publicly exposed property. In case of FindResults instance, even though the
read-only Items property is not
exposed in the interoperable assembly, the get_Item method is still implemented
internally. The only differences from the conventional .NET
get_Item method are that this
method takes the index value as an object passed by reference (for
COM marshalling purposes) and the index starts from 1 instead of
0.
The following code shows how to use the get_Item accessor method to iterate
through the list of Location
objects in the FindResults
collection:
    //Create an object to hold index value
    object index = null;
    //Start with index 1 instead of 0
    for(int i=1; i<=findResults.Count; i++)
    {
        //Box the integer value as an object
        index = i;
        //Pass the index as a reference to the get_Item accessor method
        MapPoint.Location loc = findResults.get_Item(ref index) as MapPoint.
    Location;
        if(loc != null)
            this.listBox1.Items.Add(loc.Name);
    }
Using an enumerator
You can also access the list of Locations from FindResults instance using the
enumeration. The FindResults
instance exposes a method, GetEnumerator, to get an enumerated list
of locations. Using this enumerator instance, you can loop through
the list of locations as follows:
    //Get an enumerator using the GetEnumerator method

    IEnumerator locationEnumerator = findResults.GetEnumerator( );
    //Loop through the location instances to get the names
    while(locationEnumerator.MoveNext( ))
    {
        MapPoint.Location loc = locationEnumerator.Current as MapPoint.Location;
        if(loc != null)
            this.listBox1.Items.Add(loc.Name);
    }
The net effect is same for both methods, but the code in the
enumerator approach looks cleaner than the get_Item accessor approach. However, the
get_Item accessor approach
performs better than the enumerator approach, especially when a
large number of locations is found. The get_Item accessor method also provides a
way to access the desired item directly instead of looping through
the entire list.
We can use either method to populate the list of locations
in the ListBox of the modal
dialog, as shown in Figure
2-5.

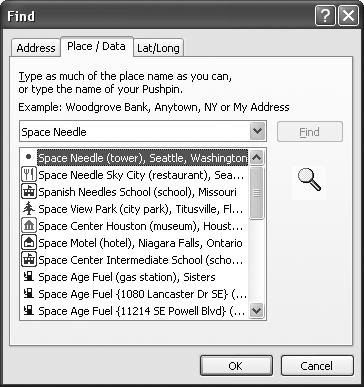
Look at the list to get the address. From the list of 25
found locations’ names from our query, the first name reads “Space
Needle [tower], Seattle, WA,” which is what we are looking for.
Since this is the very first instance in the list, you can use the
index to obtain the Location
object and the StreetAddress
property to get the actual address:
    object currentLocationIndex = findResModalDlg.SelectedIndex + 1;
    MapPoint.Location loc = this.findResults.get_Item(ref index) as MapPoint.Location;
    //Access the StreetAddress property
 for address
    if(loc != null)
    {
        if(loc.StreetAddress != null)
            this.textBox2.Text = loc.StreetAddress.Value;
        else
            this.textBox2.Text = loc.Name;
    }
There are a couple of things of note in this code:
We are adding 1 to the selected index because the items in the
ListBoxare zero-index based, but the locations inFindResultscollection start with index 1, so to offset this difference, you need to add 1 to the selected index manually.Not all locations have addresses. Although it sounds strange, what address would be returned if you searched for “Seattle” and the returned location was “Seattle, WA”? In cases like this, it is sufficient to return the name of the location.
After obtaining the desired Location object from the FindResults collection, you can access
the street address from the Location.StreetAddress property. We now
have the address for the Space Needle, which is “498 Broad St,
Seattle, WA 98109.”
You may be wondering why MapPoint 2004 can’t tell you whether there is a best location match instead of making you go through the list to disambiguate the locations each and every time. Actually, it does tell you.
Programmatically disambiguating the results
The locations in FindResults collection are always
ordered in the best match order, so the first location is always
the best possible match according to MapPoint 2004. However, the
results depend on the input received by the program; for example,
if you misspell the name “Space Needle” as “Spac Neele,” MapPoint
2004 won’t necessarily display the best possible match first; it
is up to you to disambiguate the results using the given list of
locations. How do you know as a programmer that MapPoint 2004 has
made the best possible match in the FindResults collection? It’s actually
very simple. Using the ResultsQuality property of the FindResults collection, you can tell
whether MapPoint 2004 succeeded in finding the exact match to the
input location or whether it is offering a list of possible
matches and expecting you to disambiguate. The ResultsQuality property is of GeoFindResultsQuality type, which is an
enumeration with the values shown in Table 2-2.
ResultsQuality value | Meaning | Need to disambiguate? |
| All location matches are exact matches to the input query. | Not applicable. This value is not returned for finding places or addresses; instead, it is returned for finding points of interests (discussed later in the chapter). |
| The first location is an exact match for the input query. | No. You can safely return the first location from the FindResults instance. |
| At least the first two locations are good matches. | Yes. You can safely return the
first location from the However, since at least the first two results are best possible matches, sometimes you may have to disambiguate between the two. |
| There are some location results, but none of them is really a good match according to MapPoint 2004. | Yes. In this case, you don’t know what the input query intended to find, so you have to disambiguate the location results. |
| No locations found at all. | Not applicable. |
Now, with this background, let’s extend our sample application to disambiguate the location results programmatically:
    //See if the FindResults.ResultsQuality is either
    //geoFirstResultGood or geoAmbiguousResults
    if(findResults.ResultsQuality ==
               MapPoint.GeoFindResultsQuality.geoFirstResultGood
       || findResults.ResultsQuality ==
               MapPoint.GeoFindResultsQuality.geoAmbiguousResults)
    {
        //No need to disambiguate, just return the street address
        //of the first location
        currentLocationIndex = 1;
        //Get the Location object
        MapPoint.Location loc
            = this.findResults.get_Item(ref currentLocationIndex) as MapPoint.Location;
        //Access the StreetAddress property for address
        if(loc != null)
        {
           if(loc.StreetAddress != null)
             this.textBox2.Text = loc.StreetAddress.Value;
           else
             this.textBox2.Text = loc.Name;
        }

    }
    else
    {
      //Add disambiguation process and show modal dialog
      FindResultListDlg findResModalDlg = new FindResultListDlg(ref findResults);
      if(findResModalDlg.ShowDialog( ) == DialogResult.OK)
      {
        //Process the selected location from the find results list
        . . .
      }
    }
Adding this code gets the street address of the input query “Space Needle” without requiring any manual disambiguation.
Now, does this application work if you enter an address as
input? A quick test with the address “498 Broad St, Seattle, WA,
98109” shows that this application does not work with addresses
because the FindPlaceResults
method that we are using treats every input location as a place,
so to find addresses you need to use the FindAddressResults method.
Finding an Address
MapPoint 2004 API provides a way to find addresses.
The Map class has a method,
FindAddressResults, which you can
use to find addresses. Unlike the FindPlaceResults method, this method takes
a full or partial address to find the intended location. So, in
order to use the FindAddressResults method, you have to
provide at least one of the following parts of an address:
Street address
City
Other city (used for UK addresses)
Region (or state/province)
Postal code (or Zip Code)
Country
The Country parameter is expressed as a GeoCountry enumeration, while the rest of
the parameters are strings. For example, if you want to find the
address “498 Broad St, Seattle, WA 98109” in the United States, you
have to use the GeoCountry.geoCountryUnitedStates value
for Country. The following code shows how to invoke the FindAddressResults method on a Map class:
    //Create an instance of the MapPoint application class
    MapPoint.ApplicationClass app = new MapPoint.ApplicationClass( );

    //Get the Map object from the application object
    MapPoint.Map map = app.ActiveMap;

    //Call the FindAddressResults method

    MapPoint.FindResults findResults = map.FindAddressResults(
                                            "498 Broad St",
                                            "Seattle",
                                            string.Empty,
                                            "WA",
                                            "98109",
                                MapPoint.GeoCountry.geoCountryUnitedStates);
Note that when a Country parameter is supplied, the address
provided must match that country’s address format, or the FindAddressResults method throws an
exception. For example, if you pass the above address for GeoCountry.geoCountryUnitedKingdom (UK),
the FindAddressResults method
throws an exception (since some UK addresses expect the Other City
parameter).
Tip
For a full list of the GeoCountry enumeration values, see
http://msdn.microsoft.com/library/default.asp?url=/library/en-us/mappoint2004/BIZOMMFindAddressResults.asp.
The quality of the locations returned by the method can be
determined by the ResultsQuality
property of the FindResults
object. The rules that we have discussed in the previous section to
disambiguate the locations results are applicable to this method as
well.
Do you always need to have the address in the previously
described format? Our application collects the input location into a
simple textbox as a string, so is it possible to have an address
entered as a single string so that you can programmatically parse
the address before calling the FindAddressResults method? Absolutely;
MapPoint 2004 has a method to do this.
Parsing a string into valid street address
The Map class has
a method, ParseStreetAddress,
that parses a string into a valid street address represented as
the StreetAddress class. The
StreetAddress class has the
Street, City, OtherCity, PostalCode, Region, and Country properties that represent
various parts of an address. The Value property of the StreetAddress class gives the full
address as one string. The following code shows how to parse a
string into a valid address:
    //Create an instance of the MapPoint application class
    MapPoint.ApplicationClass app = new MapPoint.ApplicationClass( );
    //Get the Map object from the application object
    MapPoint.Map map = app.ActiveMap;
    //Parse the address
    MapPoint.StreetAddress address =
        map.ParseStreetAddress("498 Broad St, Seattle, WA, 98109");

    //Now get the values from the
    //StreetAddress properties
    string streetName = address.Street;
    string city = address.City;
Tip
If you are using this method with MapPoint 2004 European Edition, it is a good idea to include the country information in the address string to ensure accurate results.
So, which method is right for your application? Is it
FindPlaceResults or FindAddressResults (along with ParseStreetAddress method)? The answer
depends on the requirements of your application. If you expect
users to type a well-formatted address all the time, then it is
safe to use the FindAddressResults method. On the other
hand, if you have an application that expects only place names as
input locations, then you should use the FindPlaceResults method. However, if you
have an application that can accept both place names and
well-formatted addresses, which method do you use, FindPlaceResults or FindAddressResults? Neither—use the
FindResults method
instead.
Finding Both Places and Addresses
The Map class has a
method, FindResults, that can
find both places and addresses. This method takes the input location
as a string and tries to parse the string into a valid address. If
the input string is successfully parsed into an address, then a
FindAddressResults method is
called to find the input location; when the input string cannot be
parsed into a valid address, the FindPlaceResults method is called. The
following code snippet shows how to use the FindPlaceResults method:
    //Create an instance of the MapPoint application class
    MapPoint.ApplicationClass app = new MapPoint.ApplicationClass( );
    //Get the Map object from the application object
    MapPoint.Map map = app.ActiveMap;
    //Works with finding addresses
    MapPoint.FindResults findAddressResults
        =  map.FindResults("498 Broad St, Seattle, WA, 98109");
    //Works with finding places
    MapPoint.FindResults findPlaceResults
        =  map.FindResults("Space Needle");
Let’s replace the FindPlaceResults method in our application
with the FindResults method call
to support both place names and addresses:
    //Call FindResults on the MapClass instance to support both places and
    //addresses
    MapPoint.FindResults findResults = map.FindResults(textBox1.Text);
You know that our application works for both places and
addresses and also handles location disambiguation well, but you may
be wondering whether you need to create a user interface (UI) to
support each method, since each find method’s input formats are so
different. You actually don’t need to—for applications like ours,
there is a method exposed by the Map class that uses the pre-built MapPoint
UI.
One UI Finds All
The Map class
exposes the ShowFindDialog method
to show the built-in find dialog, a modal dialog that implements the
FindResults and GetLocation methods along with a nice
disambiguation process with a great UI. This method returns either a
Location or a Pushpin class instance. Don’t worry about
the details of the Pushpin class
yet; I will discuss this class in detail in the next chapter. For
now, consider the Pushpin class
to be a graphical mark or shape that represents a location. You can
access the Location represented
by a Pushpin using the Pushpin.Location property.
The ShowFindDialog method
takes the input location as a string. The other parameters
include:
FindStateThis parameter is of
GeoFindStatetype, which is an enumeration. UseGeoFindState.geoFindDefaultif you don’t know what type of find (place or address versus latitude and longitude) you may be performing. If you know a specific find that you want to show as the default, set the enumeration value to begeoFindAddressorgeoFindPlace.HWndParentThis is an integer that represents the parent window handle of the find modal dialog. Set this parameter’s value to 0 if there is an active, visible MapPoint 2004 application window; if not, pass the current window’s handle as an argument.
AutoConfirmExactMatchThis is a boolean that tells the find dialog to hide when an exact match to the input location is found. The default value is
false.
The following code shows the implementation of this method for our application:
    //Get a reference to the Map instance via the ActiveMap property
    MapPoint.Map map = app.ActiveMap;

    //Call the ShowFindDialog to show the find (modal) dialog
    object result = map.ShowFindDialog(
                              this.textBox1.Text,
                              MapPoint.GeoFindState.geoFindDefault,
                              (int) this.Handle,
                              false);

    //See whether the result is null
    if(result != null)
    {
        //If the result is a Location type get the
        //Location directly
        if(result is MapPoint.Location)
        {
            currentLocation = result as MapPoint.Location;
        }
        else if(result is MapPoint.Pushpin)
        {
            //If this is a Pushpin type, first get the Pushpin
            MapPoint.Pushpin pushpin = result as MapPoint.Pushpin;
            //Then get the location
            currentLocation = pushpin.Location;
        }
    }
    else
    {
        MessageBox.Show("No locations found. Please verify the input.");
    }
You need to check for the return type after the ShowFindDialog method returns a value. If
it is a Pushpin type, access the
corresponding Location object via
the Pushpin.Location
property.
Figure 2-6 shows the MapPoint find dialog shown for the “Space Needle” search.
We know our application works for place names and well-formatted addresses. Since we also know exactly where the Space Needle is, let’s extend our application to do a bit more and find points of interest around the Space Needle.
Finding Points of Interest Around a Location
Points of Interest (POI) are places that may be of some interest; for example, to a tourist in Seattle, the POI could be the Space Needle, among other interesting things to see; for a coffee connoisseur in Seattle, the POI could be a list of coffee shops. If we take the interest out of context, the POI are simply locations. Each location has an interest attributed to it and is identified by the category of the place. These categories are defined as broad groups to fit several types of places into one category; examples of such categories are airports, restaurants, coffee shops, and museums.
Using MapPoint 2004, you can find the POI around a location (or around a route) within a specific radius or distance. The location class from the MapPoint 2004 object model exposes the FindNearby method to find the POI around a location.
Let’s extend our sample application to find the POI around a
location using the FindNearby
method. Add a tree view control to add points of interest, a combo
box to select distance, and a button to find the POI around a
selected location. The new layout is shown in Figure 2-7.
Clicking the Find POI button finds the points of interest
around a given location by calling the Location.FindNearby method.
The only parameter that the FindNearby method takes is distance, as
type System.Double. The distance
must be greater than 0 and less than or equal to 50 miles. The
default unit of measurement for distance is miles, but you can
change it by setting the appropriate value to the Units property of the ApplicationClass. The Units property is of GeoUnits type, an enumeration containing
the values of geoKm and geoMiles. If you want to treat the
distances as kilometers, set the Units property to the geoKm value as shown in the following
example:
    MapPoint.ApplicationClass app =
              new  MapPoint.ApplicationClass( );
    app.Units = MapPoint.GeoUnits.geoKm;
The following code shows the actual FindNearby call from the location found
during the FindPlaceResults
search:
//Call the find nearby on the current location
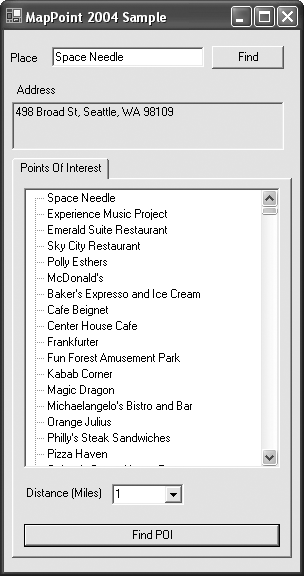
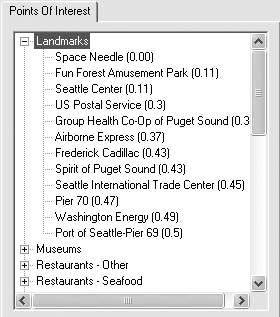
MapPoint.FindResults poiResults = location.FindNearby(distance);The POI search within a one-mile radius around the Space Needle results in 683 POI; the same search with distance unit set to kilometers results in 288 POI. Figure 2-8 shows the POI found within a one-mile radius around the Space Needle.
Going through a list of 683 (or even 288) POI would be
annoying, as well as intimidating, so we need a better way of
handing the POI to give a better view of the POI search results.
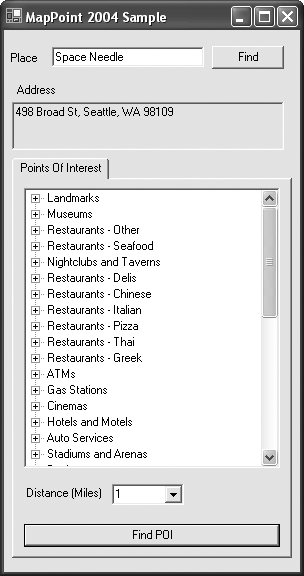
This is when the PlaceCategory
class comes to our rescue. The place categories are names that can
be used to group locations together.
Categorizing points of interest using the PlaceCategory class
The PlaceCategory
class encapsulates a category name and is exposed as the PlaceCategory property from the Location class. The Parent property of the PlaceCategory gives access to all
categories available in MapPoint 2004; there are 48 predefined
categories, such as Pharmacies, Restaurants, Theaters, and so on,
available in MapPoint 2004. In order to make the POI list more
readable by grouping them into meaningful categories, we need to
use the PlaceCategory.Name
property, which gives the name of the category that a location
belongs to. The following code shows how to group locations into
categories:
    //Create an object to hold index value
    object findResultIndex = null;
    //Create a string instance to hold category name
    TreeNode node = null;
    int nodeCount = 0;

    //Create a hashtable to hold category names
    Hashtable categoryNames = new Hashtable( );

    //Start with index 1 instead of 0
    for(int i=1;i<=findResults.Count;i++)
    {
        //Box the integer value as an object
        findResultIndex = i;
        //Pass the index as a reference to the get_Item accessor method
        MapPoint.Location loc = findResults.get_Item(ref findResultIndex) as
        MapPoint.Location;
        if(loc.PlaceCategory != null)
        {
            object nodeIndex = categoryNames[loc.PlaceCategory.Name];
            if(nodeIndex == null)
            {
                //Create a new category node
                node = new TreeNode(loc.PlaceCategory.Name);
                //Add the current location under this node
                node.Nodes.Add(new TreeNode(loc.Name));
                //Add this node to the tree
                tree.Nodes.Add(node);
                //Store the value in hashtable along with the index number
                categoryNames.Add(loc.PlaceCategory.Name, nodeCount);
                //Increment the node index
                nodeCount ++;
            }
            else
            {
                //Add the current location under this node
                tree.Nodes[Convert.ToInt32(nodeIndex)].Nodes.Add(new TreeNode(loc.Name));
            }
        }
    }
The category name is checked for each POI location; if the category name already exists in the tree view, the current location is added under that category; if that category does not exist in the tree view, a new category node is added before adding the current location. The final application layout is shown in Figure 2-9.
This POI list is easier to navigate than its predecessor in Figure 2-8, but we still have too many unrelated categories. In this case, we can programmatically hide the unwanted place categories.
Controlling place category visibility
The visibility of the point of interest categories
can be controlled using the MapPoint 2004 APIs. This
PlaceCategories class, which represents the 48 predefined place
categories in MapPoint, is exposed as a PlaceCategories property from the
Map class. The PlaceCategories class holds the
collection of PlaceCategory
classes that represent individual categories defined in the
MapPoint 2004 points of interest. Set the visibility behavior of
an individual place category using the PlaceCategory.Visible property. The
following code shows how to block the “Restaurants—Other” category
from the POI list:
    //Create an instance of ApplicationClass
    app = new MapPoint.ApplicationClass( );

    //Define the category that needs to be blocked
    string blockCategory = "Restaurants - Other";

    for(int i = 1; i<app.ActiveMap.PlaceCategories.Count+1; i++)
    {
        object index = i;
        //if the name of the category matches the block list
        //set the visible property to false
        MapPoint.PlaceCategory placeCategory =
        app.ActiveMap.PlaceCategories.get_Item(ref index) as MapPoint.PlaceCategory;
        if(placeCategory.Name == blockCategory)
        {
            placeCategory.Visible = false;
        }
        else
        {
            placeCategory.Visible = true;
        }
    }
Along similar lines, you can also block multiple categories (presented as an array of strings):
    //Create an instance of ApplicationClass
    app = new MapPoint.ApplicationClass( );

    //Define the category that needs to be blocked
    String[] blockCategoryArray = new string[]
                  { "Restaurants - Other", "Museums"};

    for(int i = 1; i<app.ActiveMap.PlaceCategories.Count+1; i++)
    {
        object index = i;
        //if the name of the category matches the block list
        //set the visible property to false
        MapPoint.PlaceCategory placeCategory =
        app.ActiveMap.PlaceCategories.get_Item(ref index) as MapPoint.PlaceCategory;
        if(Array.IndexOf(blockCategoryArray, placeCategory.Name) >= 0)
        {
            placeCategory.Visible = false;
        }
        else
        {
            placeCategory.Visible = true;
        }
    }
Warning
When changing the visibility of a PlaceCategory, keep in mind that the
visibility settings of a category persist between application
sessions. If you set a category’s visibility to false in one session, you must set it
to true to see the category
again.
But wouldn’t it be more useful to show the distance to each point of interest from the input location? In our example, that would mean showing the distance from the Space Needle to each point of interest in the list.
Calculating Distance Between Two Locations
The Location class
has a DistanceTo method that
calculates the distance to a given location. Keep in mind that the
distance calculated using this method is not the same as the driving
distance; this method only gives you the straight line (“as the crow
flies”) distance between the two locations. The DistanceTo method takes another location
as an argument; the following code shows how to calculate the
distance between two locations:
    //Get the from location
    MapPoint.Location fromLocation
            = this.findResults.get_Item(ref fromIndex) as MapPoint.Location;
    //Get the to location
    MapPoint.Location toLocation
            = poiResults.get_Item(ref poiIndex) as MapPoint.Location;
    //Calculate the distance between the from location and
    //to location using the DistanceTo methoddouble distance = fromLocation.DistanceTo(toLocation);
Figure 2-10 shows the POI list when it’s updated to show the distances from the input location.
Another way of calculating the distance between two locations
is to call the Distance method on
an active Map object:
double distance = app.ActiveMap.Distance(startLocation, endLocation);
Both startLocation and
endLocation are MapPoint.Location type objects.
Keep in mind that both these methods calculate the distance
based on the units specified at the ApplicationClass level. To change the
units of measurement for the distances (between miles and
kilometers), use the Units
property on the ApplicationClass
object.
After displaying the distances in the POI list, it looks much better with all the information needed to decide which points of interest to visit when you are around the Space Needle clearly shown. However, wouldn’t it be helpful if you could actually show the POI on a map? After all, what kind of application would MapPoint 2004 be if it didn’t actually display a map? For this next step, we need the MapPoint 2004 ActiveX control.
Programming the MapPoint ActiveX Control
The programming models of the MapPoint 2004 APIs and MapPoint 2004
ActiveX Control are exactly the same, except that you use the AxMappointControl class instead of creating
an ApplicationClass object to
access the active map instance.
Adding MapPoint 2004 ActiveX Control
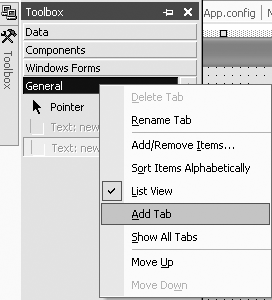
The first step towards developing with MapPoint 2004 ActiveX control starts with configuring your development environment. You need to add the ActiveX Control to your Visual Studio .NET toolbox to enable the “Drag-and-Drop” development tool. Create a new tab by selecting the Add Tab option from the toolbox context menu as shown in Figure 2-11.
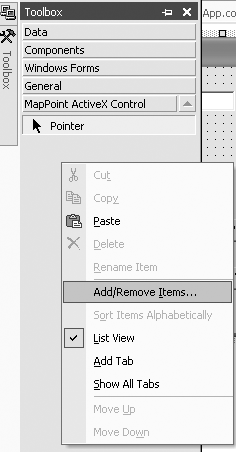
Name the newly created tab MapPoint ActiveX Control and click on it to add the MapPoint 2004 ActiveX Control reference by selecting Add/Remove Items from the context menu, as shown in Figure 2-12.
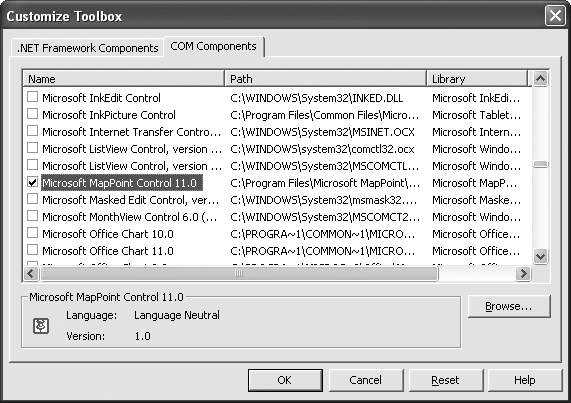
When the Customize Toolbox dialog is displayed, select the COM Components tab and Microsoft MapPoint Control 11.0 as shown in Figure 2-13.
Note that if you have MapPoint 2004 APIs already added to your project, you need to remove that reference before you add ActiveX Control; adding ActiveX Control automatically adds the MapPoint 2004 API reference to your project.
That’s it! Now you are ready to develop applications using the MapPoint 2004 object model.
Initializing the MapPoint 2004 ActiveX Control
When you drag-and-drop the MapPoint control onto your Windows form, the reference to the MapPoint interoperable assembly is automatically added to your project, along with the control. The drag-and-drop operation also creates and adds an instance of MapPoint control to your code file:
private AxMapPoint.AxMappointControl axMappointControl1;
Before you use AxMappointControl, you need to initialize
the control by creating new map coverage by calling the NewMap method on the AxMappointControl class. This method takes
the map region of type GeoMapRegion enumeration as an argument.
There are two valid region values for the map region in MapPoint
2004: GeoMapRegion.geoMapNorthAmerica for North
American maps and GeoMapRegion.geoMapEurope for European
maps. The following code shows how to initialize the control to show
the North American map:
axMappointControl1.NewMap(MapPoint.GeoMapRegion.geoMapNorthAmerica);
Tip
If you are programming with MapPoint 2004 European Edition,
you have to initialize the control with GeoMapRegion.geoMapEurope.
You can also open an existing map file using the OpenMap method to initialize the control.
The OpenMap method takes an
existing map file path as an argument:
axMappointControl1.OpenMap("C:MyMap.ptm");After initializing the map control, you can access the map
object via the ActiveMap
property:
MapPoint.Map map = axMappointControl1.ActiveMap;
Using this map object, you can perform all the location-based operations, such as finding places, addresses, and nearby places, as we did earlier in this chapter.
Controlling Toolbars and Panes
The MapPoint 2004 ActiveX map control provides the
same set of toolbars as the MapPoint 2004 application. These
toolbars are not visible by default, but you can make them appear or
disappear programmatically using the MapPoint 2004 ActiveX control’s
Toolbars property, which is a
collection of four toolbars:
- Standard toolbar
Contains common operations, such as opening a new map and printing a map along with main MapPoint features, such as finding nearby places, routing, etc.
- Navigation toolbar
Contains a find textbox to find input places and other menu items, such as zoom in, zoom out, and map style.
- Drawing toolbar
Contains standard drawing tools to draw shapes, such as lines, rectangles, and circles.
- Location and Scale toolbar
Shows the current maps’s location and scale.
These toolbars are shown in Figure 2-14.
To access a particular toolbar, use either the index or the name of the toolbar; for example, the following code shows how to show make the Location and Scale toolbar visible using the index:
     //Define toolbar indexes
    object TOOLBAR_STANDARD = 1;
    object TOOLBAR_NAVIGATION = 2;
    object TOOLBAR_DRAWING = 3;
    object TOOLBAR_LOCATIONSCALE = 4;

    //using index
    axMappointControl1.Toolbars.get_Item(ref TOOLBAR_DRAWING).Visible
                                                         = true;
    axMappointControl1.Toolbars.get_Item(ref TOOLBAR_LOCATIONSCALE).Visible
                                                         = true;
    axMappointControl1.Toolbars.get_Item(ref TOOLBAR_NAVIGATION).Visible
                                                         = true;
    axMappointControl1.Toolbars.get_Item(ref TOOLBAR_STANDARD).Visible
                                                         = true;
You get the same effect using the following code, which uses the toolbar’s name:
    object name = "Location and Scale";
    axMappointControl1.Toolbars.get_Item(ref name).Visible = true;
The Standard toolbar allows users to toggle different panes,
such as route pane, find nearby pane, and so forth. However, if you
want to control these panes in your application, don’t make the
entire Standard Toolbar visible in your application—you can control
the pane visibility programmatically using the PaneState property of
the ActiveX control. The PaneState property is of MapPoint.GeoPaneState type, which is an
enumeration. The GeoPaneState
enumeration has five values that show no panes, the Legend pane, the
Find Nearby Places pane, the Route Planner pane, and the Territory
Manager pane, as shown in Table 2-3.

For example, to let users find nearby places in your application, you can give them access to that functionality:
    //Make the route planning pane visible
    axMappointControl1.PaneState = MapPoint.GeoPaneState.geoPaneRoutePlanner;
Finally, if you want to control the Route Planner
pane that displays the detailed driving directions
visibility, use the ItineraryVisible property of the ActiveX
Control:
    //Hide itinerary pane
    axMappointControl1.ItineraryVisible = false;
This property is also available from the ApplicationClass instance.
Now that we have a map control ready to use, let’s start off with some basic actions, such as displaying a location on a map and zooming in and out of maps.
Displaying a Location on a Map
In our sample earlier this chapter, we have
implemented the find methods to find places, addresses, and nearby
locations. In all these cases, a MapPoint.Location instance represents the
locations found. To display a location on the map, call the Location object’s GoTo method:
    //Define a location instance
    MapPoint.Location currentLocation = null;

    //Get the current location from FindResults method
    MapPoint.FindResults findResults =
                     map.FindResults("your place input");

    currentLocation = findResults.get_Item(ref index);

    //Go to the current location on the map
    currentLocation.GoTo( );
Calling this method zooms in to the location with the best
possible view on the map and centers the map on that location. To
highlight the location on a map, use the Location.Select method:
    //Highlight the location on the map
    currentLocation.Select( );
After this implementation, our application looks similar to Figure 2-15.
If there is only one location, you can center the map on it
using the Location.GoTo method,
but you have to use the Map.Union
method to center the map to display multiple locations on it. This
method takes an array of locations and returns the center of the map
as a Location object for all
given locations:
    //Define an ArrayList to hold location objects
    ArrayList locList = new ArrayList( );
    //Add locations to the array list
    for(int i=0;i<findResult.Count;i++)
    {
       Object index = i+1;
       MapPoint.Location location =
                findResult.get_Item(ref index)
                as MapPoint.Location;

      locList.Add(location)
    }
    //Center the map to show all locations
    MapPoint.Location center = axMappointControl1.ActiveMap.Union(locList.ToArray( ));
    //Now zoom map to the center
    center.GoTo( );
How do you pinpoint the selected location? Is it possible to annotate that location, or better, to highlight it? Pushpins make this process easy.
Working with Pushpins
Pushpins are
visual marks on a map that contain either an annotation or data.
Each pushpin on a map is associated with a location. A pushpin in
MapPoint 2004 is represented by the Pushpin class. The Name property of a Pushpin object can be used to annotate the
pushpin. You can also add notes to the pushpin using the Pushpin.Notes property.
A pushpin is represented pictorially by a symbol. MapPoint 2004 provides a number of symbols to be used with pushpins. These symbols are indexed, and their number should be used to indicate the symbol of a given pushpin; for example, the default symbol is the black pushpin, represented by 0. The valid range for the standard symbols is 0-255. You can also add customized pushpins, but the identity must be in the range of 256-32,766.
Tip
For a full list of available symbols, see the online documentation at http://msdn.microsoft.com/library/default.asp?url=/library/en-us/mappoint2004/BIZOMPSymbol.asp.
The location represented by a pushpin can be accessed via the
Pushpin.Location property. Let’s
look at some code to implement this; to add a pushpin to a
predetermined location, call Map.AddPushpin method:
    //Get map center location
    MapPoint.Location location = axMappointControl1.ActiveMap.Location;
    //Add a pushpin at this location
    MapPoint.Pushpin pushpin = axMappointControl1.ActiveMap.AddPushpin(
                                                         location, "Center");
    //Assign a symbol
    pushpin.Symbol = 64;
    //Select and highlight the location
    pushpin.Select( );
    pushpin.Highlight = true;
    //Write annotation
    pushpin.Note = "This is my favorite place!";
This code adds a pushpin to the center of the map. However,
the pushpin on the map does not display any information. To display
the information associated with the pushpin, such as name, notes,
etc., use the Pushpin.BalloonState property. Setting
this property displays the pushpin tool tip information. The
Pushpin.BalloonState property is
of MapPoint.GeoBalloonState type,
which is an enumeration. The valid values for this property
are:
GeoBalloonState.geoDisplayNoneDoes not display any information.
GeoBalloonState.geoDisplayNameDisplays only the name of the pushpin.
GeoBalloonState.geoDisplayBalloonDisplays all information including name, notes, etc.
The following code shows how to display the full details of a given pushpin:
    //Show tooltip (Balloon State)
    pushpin.BalloonState = MapPoint.GeoBalloonState.geoDisplayBalloon;
You can remove a given pushpin by calling the Pushpin.Delete method. The Pushpin class exposes some other methods,
such as Copy and Cut, to copy the pushpin to the
clipboard.
Now that we know how to display a location on map, select a location, and add a pushpin to it, let’s look at how to interact with the MapPoint 2004 ActiveX Control maps.
Interacting with Maps
The MapPoint 2004 ActiveX Control provides you with a fully interactive map on which to perform actions such as panning , zooming, and tracking mouse clicks. All of this functionality is accessible to both the programmer and the user.
Panning maps
To pan a map, use the Map.Pan method. This method takes two
arguments:
PanDirectionIndicates the direction of the pan operation; this property is of
MapPoint.GeoPanCmdtype, which is an enumeration. This enumeration contains values that represent directional values such as east, west, north, south, and northeast.PanFactorIndicates the amount of pan. Even though there are no limits to the pan factor, keep in mind that this value is dependent on the altitude of your map. To give you an idea of what this means, at 1 mile (lower altitudes), a pan factor of 1 pans the map by 0.2 miles, but the same pan factor at 50 miles (a higher altitude) pans the map by 10 miles.
The following code shows how to call the Pan method:
axMappointControl1.ActiveMap.Pan(MapPoint.GeoPanCmd.geoWest, 1);
Given this information, you could write a smart Pan method that pans by a certain
distance at all altitudes. You would need the altitude to pan the
distance ratio to calculate the correct pan value at a given
altitude and distance. This ratio is approximately 4.88568304395
for altitudes up to 6,000 miles, above which the factor becomes
non-linear. If you want your application to pan the map only by 1
mile irrespective of map’s current altitude, you can calculate the
pan factor as follows:
    //Specify desired pan distance
    //For example, set to 1 mile in this case
    double desiredDist = 1;
    //Standard Altitude/Distance ratio
    const double ALT2DISTRATIO = 4.88568304395;
    //Calcuate the pan factor
    double panFactor = desiredDist * ALT2DISTRATIO /
                                     axMappointControl1.ActiveMap.Altitude;
    //Now pan the map to west
    axMappointControl1.ActiveMap.Pan(MapPoint.GeoPanCmd.geoWest, panFactor);
This code always pans the map the specified distance. This is very useful if you want to pan your map by a certain distance to show specific locations on the map. Finally, keep in mind that when panning at very low altitudes (say, one or two miles) where street level data is not possible, the MapPoint 2004 ActiveX Control shows a dialog asking to zoom out to higher altitudes before panning.
Zooming Maps
MapPoint 2004 ActiveX Control provides two methods to perform zoom operations on maps:
ZoomInZooms the map view closer by reducing the map altitude.
ZoomOutZooms the map view farther by increasing the map altitude.
These two methods zoom in or out in steps. There are many
levels of zoom effect that you can achieve using them. The levels
are defined based on the map altitude. Each time you call zoom
methods, the map’s altitude is modified accordingly and rerendered
to show the map at that altitude. The following code shows how to
call a ZoomIn method:
axMappointControl1.ActiveMap.ZoomIn( );
What if you want to zoom in to a particular level from your
current view? For example, if you want to zoom to street level
directly without calling the ZoomIn method multiple times, you can do
that by modifying the map altitude yourself:
    //Zoom directly into Street Level by setting 3 mile altitude
axMappointControl1.ActiveMap.Altitude = 3;Tracking mouse clicks
Along with all of its MapPoint-related functionality, the MapPoint 2004 ActiveX Control also provides events and methods to capture your interaction with maps using a mouse. Mouse interaction, in the context of maps, usually includes selecting a point on a map, selecting a pushpin location on a map, and so forth. If you want to process a user’s interaction with maps in MapPoint 2004 ActiveX Control, you need to know when and where a mouse is clicked to obtain the location corresponding to a mouse click. Let’s look at some of these methods in detail.
Point to location
This map object exposes the XYToLocation method to obtain a location
at a given point on the map view on the screen. This method
returns the location corresponding to the selected x and y
coordinates. In order to use this method, you need to trap the
mouse click and capture the x and y coordinates, which can be done
using the Map object’s BeforeClick event. This event occurs
when a user clicks on the map before MapPoint 2004 ActiveX Control
actually processes the mouse click. You would have to wire up this
event in the InitializeComponent method of your
application:
    axMappointControl1.BeforeClick +=
                new AxMapPoint._IMappointCtrlEvents_BeforeClickEventHandler(
                                             axMappointControl1_BeforeClick);
Once you have wired up the event, the axMapPointControl1_BeforeClick method
should be implemented so that you capture the mouse click
coordinates:
    private void axMappointControl1_BeforeClick(object sender,
                               AxMapPoint._IMappointCtrlEvents_BeforeClickEvent e)
    {
        int XCoord = e.x;
        int YCoord = e.y;
        MapPoint.Location location =
                   axMappointControl1.ActiveMap.XYToLocation(XCoord, YCoord);
        if(location != null)
        {
            //Do some processing with location
            . . .
        }
    }
This event captures only single clicks from the mouse. To
capture double-clicks from your mouse, you have to wire up the
BeforeDblClick event, which
occurs when a user double-clicks on the map but before the
MapPoint 2004 ActiveX Control actually processes the double
click.
Location to point
The Map object
also provides a way to convert a location on the map to a point on
the screen. Using Map object’s
LocationToX and LocationToY methods, you can obtain x
and y coordinates for any given location by making separate calls
for each coordinate:
    //Get the center of the map
    MapPoint.Location location = axMappointControl1.ActiveMap.Location;
    //Get x and y coordinates
    int x = axMappointControl1.ActiveMap.LocationToX(location);
    int y = axMappointControl1.ActiveMap.LocationToY(location);
    //Display the center coordinates
    MessageBox.Show(String.Format("Map is centered at ({0}, {1})",
                                           x.ToString( ), y.ToString( )));
The LocationToX and
LocationToY methods assume that
a particular location is on the current map screen limits; if the
location is not present in the ActiveX Control map screen limits,
these methods fail by returning invalid values (such as a maximum
value of int32). To avoid
errors in a case like this, it’s always a good idea to use the
Location.GoTo( ) method before
getting the coordinates.
Processing location selections
Sometimes you have to follow the locations or pushpins that
users are selecting on a given map; for example, you have
displayed 10 pushpins on a map, and when a user selects a pushpin,
you want to show the information by using the BalloonState property. In this case, you
need the Map object’s SelectionChange event. Wiring up this
event is no different from any other event that we have seen
previously; you have to add the following code in the
initialization method:
    this.axMappointControl1.SelectionChange +=
               new AxMapPoint._IMappointCtrlEvents_SelectionChangeEventHandler(
                                             axMappointControl1_SelectionChange);
The SelectionChangeEvent
exposes two objects: one for a current or new selection and one
for an old or previous selection. So, in the event handler method,
you have to capture these two objects to do the processing, as
follows:
    private void axMappointControl1_SelectionChange(object sender,
                         AxMapPoint._IMappointCtrlEvents_SelectionChangeEvent e)
    {
        //Get the previous selection
        MapPoint.Pushpin pPrev = e.pOldSelection as MapPoint.Pushpin;
        //Get the current selection
        MapPoint.Pushpin pCurr = e.pNewSelection as MapPoint.Pushpin;
        if(pPrev != null)
        {
            //Turn off the tool tip
            pPrev.BalloonState = MapPoint.GeoBalloonState.geoDisplayNone;
            //Turn off the highlight
            pPrev.Highlight = false;
        }
        if(pCurr != null)
        {
            //Display the information
            pCurr.BalloonState = MapPoint.GeoBalloonState.geoDisplayBalloon;
            //Highlight the pushpin
            pCurr.Highlight = true;
        }
    }
Since the SelectionChangeEvent captures both
previous and new selections as objects, it is possible that these
selections are locations if you select a location instead of a
pushpin. This event is also applicable for other objects such as
shapes, directions, and waypoints. In that case, you need to
typecast the object as a Location:
    //Get the previous selection
    MapPoint.Location lPrev = e.pOldSelection as MapPoint.Location;
    //Get the current selection
    MapPoint.Location lCurr = e.pNewSelection as MapPoint. Location;
Disabling map interaction
Now, let’s look at how to disable the map for user interaction; this may sound strange, after all the user interaction-related discussions. In some application scenarios, you have to make the map read-only so that users cannot change the information on the map. There is no straightforward way to do this other than disabling all events by overriding them.
You must take the following steps:
Turn-off the edge panning by setting
AllowEdgePantofalse:axMappointControl1.ActiveMap.AllowEdgePan = false;
Capture any mouse down event and display a message saying that this is a read-only map.
    //Wire up the mouse down event
    private void axMappointControl1_MouseDownEvent(object sender,
                        AxMapPoint._IMappointCtrlEvents_MouseDownEvent e)
    . . .
    //Implement the event handler method by displaying a message
    private void axMappointControl1_MouseDownEvent(object sender,
                        AxMapPoint._IMappointCtrlEvents_MouseDownEvent e)
    {
        return;
    }
Support pan and zoom via mouse wheel and arrow keys by overriding the
AfterViewChangeevent by restoring the original center of the map and altitude.//Obtain the original center location originalCenterLocation = axMappointControl1.ActiveMap.Location; //Obtain the original altitude originalAltitude = axMappointControl1.ActiveMap.Altitude; . . . //Wire up the AfterViewChange event this.axMappointControl1.AfterViewChange += new System.EventHandler(this.axMappointControl1_AfterViewChange); . . . //Implement AfterViewChange event handler method private void axMappointControl1_AfterViewChange(object sender, EventArgs e) { if(originalCenterLocation != null) { //Re-assign the center point axMappointControl1.ActiveMap.Location = originalCenterLocation; } //Re-assign the altitude axMappointControl1.ActiveMap.Altitude = originalAltitude; }
As you can see, the AfterViewChange event handler restores
both map center and altitude; this method takes care of both pan
clicks and zoom (via the mouse wheel scroll), but keep in mind
that performance may be affected by the mouse wheel scroll events.
Finally, if you want to disable mouse clicks, set the cancel property of the BeforeClick and BeforeDblClick events to true.
Saving a Map
There are several ways to save a map from your application. You can save the map as a standard .ptm map that can only be opened using MapPoint 2004 application, or you can save it as a web page (.htm) map that can be opened by any browser.
Saving the map as a .ptm
is very straightforward; you can use the SaveMapAs method on the MapPoint 2004
ActiveX Control:
axMappointControl1.SaveMapAs(@"C: est.ptm");
To save the map as a web page, use the SavedWebPages property of the Map object. This property is a collection
of web pages, and you call the Add method as follows to save a new map as
a web page:
    string path = @"C:	est.htm";
                axMappointControl1.ActiveMap.SavedWebPages.Add(
                       path, axMappointControl1.ActiveMap.Location, "My Map",
                       true, true, true, axMappointControl1.ActiveMap.Width,
                       axMappointControl1.ActiveMap.Height, true, true, true, true);
Using the SavedWebPages
collection also enables you to manage the saved pages from the
MapPoint 2004 application UI using the File → Manage Saved Web Pages
menu option.
Cleaning Up After You’re Done
The MapPoint 2004 object model was originally designed
and implemented using COM technologies, so even if you use the COM
Interoperable assemblies to write your code, the MapPoint 2004
Application instance will not be collected by the .NET runtime garbage
collector. Before quitting your application, you must manually quit
the MapPoint 2004 Application by calling the Quit method on the MapPoint.Application object:
    //Define MapPoint Application instance
    MapPoint.Application app = null;
    //Obtain app references either via MapPoint.ApplicationClass or
    //MapPoint.AxMapPointControl.ActiveMap.Application
    . . .

    //Clean up the MapPoint Application before you exit
    if(app != null)
    {
        app.Quit( );
        app = null;
    }
The Quit method discards the
current map and unloads all other items, such as add-ins, before
exiting the application. However, calling this method asks the user
whether she wants to save the map before discarding it. If you don’t
want users to have this choice, you can set the Saved
property to True on the
application’s active Map
object:
app.ActiveMap.Saved = true;
Setting this value means that the user will not be prompted to make a decision whether to save or discard the current map.
So far, we have covered major APIs offered by MapPoint 2004 for finding places, addresses, and nearby interests, along with some basic map operations, such as placing pushpins, zooming, and panning. A discussion of MapPoint 2004 programming is not complete if we don’t mention latitude and longitude , so before we move on to routing and driving directions, let’s look at finding addresses for latitude and longitude in MapPoint 2004.
Dealing with Latitude and Longitude
You know how to find a location using a place name or an
address, but do you know how to find a location using latitude and
longitude? Using the Map class’s
GetLocation method, you can easily
find a location that corresponds to a given latitude and longitude
measurement. This is also called geocoding in cartography terminology. This
method takes latitude and longitude as System.Double values and returns a Location instance that represents the input
latitude and longitude. This method also takes the altitude as an
argument, but it is mainly used at the time when the location is
displayed on a map, so you can freely pass one mile for the time
being. The following code shows how to find a location using latitude
and longitude:
    //Get the reference to the active map instance
    MapPoint.Map map = app.ActiveMap;
    //Call the GetLocation method

 to find location
    //using the latitude and longitude
    MapPoint.Location location =
            m.GetLocation(41.33896, -122.43433, 1);
At this point, don’t bother to get the street address for the
location returned by the GetLocation method because this method
doesn’t return the address all the time. Don’t be disappointed, as
there is still a way to find the nearest address using the current
location. The idea is to basically do a hit-detection around the found location to see if there are any
addresses available. Before we get into the details of how to find out
a location’s address, let’s look at the hit-detection in MapPoint 2004
in detail.
Hit-Detection in MapPoint 2004
What is hit-detection in MapPoint 2004, and how do you
programmatically implement it? The Map object in MapPoint has the method,
ObjectsFromPoint, which allows
you to perform a hit-detection around any given point (x and y
coordinates) on the screen. You can already get a point from any
given location, so what does this method return? As the method name
suggests, it returns an array of objects wrapped in a FindResults instance. The type of objects
returned by this method depends on the current map altitude. For
example, if you call this method at lower altitudes, it returns
locations with street addresses; if you go to higher altitudes and
call this method, it returns larger geographic areas, such as Zip
Code, county, and time zone of the point. The following snippet
shows how to call the ObjectsFromPoint method for any given
Location:
    //Get Location from latitude and longitude
    MapPoint.Location location =
           app.ActiveMap.GetLocation(mylatitude, mylongitude, altitude);

    /Now use the Map.ObjectsFromPoint method


 to get points from the
    //above location
    MapPoint.FindResults findresults =
         app.ActiveMap.ObjectsFromPoint(
                app.ActiveMap.LocationToX(location),
                app.ActiveMap.LocationToY(location));
The ObjectsFromPoint method
is very versatile and can be used for many purposes, such as
querying for address of a given location, determining time zone,
querying a territory, and so on. In the following sections, I will
show you how to use the ObjectsFromPoint method in a few of these
scenarios.
Determining Time Zone for a Given Location
Determining the time zone of any location can be done using
the ObjectsFromPoint method. When
this method is called at lower altitudes (usually around two to
three miles), it returns the time zone as one of the FindResults objects. Using this technique,
you can check whether FindResults
contains a time zone by looking for the string “GMT” in the name of
the each found result:
    string place = "Redmond, WA";
    //Find the location first
    MapPoint.FindResults findResults
        = axMappointControl1.ActiveMap.FindResults(place);
    if(findResults != null && findResults.Count > 0)
     {
      object index = 1;
      MapPoint.Location location =
      findResults.get_Item(ref index) as MapPoint.Location;
      //Zoom into it
      location.GoTo( );
      //Set low altitudes
      axMappointControl1.ActiveMap.Altitude = 2;
     //Now get points from the location
     MapPoint.FindResults points
         = axMappointControl1.ActiveMap.ObjectsFromPoint(
              axMappointControl1.ActiveMap.LocationToX(location),
              axMappointControl1.ActiveMap.LocationToY(location));
     if(points != null && points.Count > 0)
      {
        for(int i=1;i<=points.Count;i++)
        {
         object index2 = i;
         //Get location
         MapPoint.Location loc
          = points.get_Item(ref index2) as MapPoint.Location;
        //Look for GMT in the name of the location
        if(loc.Name.IndexOf("GMT") > 0)
        {
          MessageBox.Show(loc.Name);
          break;
         }
       }
     }
As an example, when this code is executed, the time zone of the New York area is displayed as “Eastern (GMT-5).”
Tip
Note that if you are using a non-North American version of MapPoint, the localized string to match may be different from GMT.
Next, let’s see how we can extend the ObjectsFromPoint method to determine the
street address of a location.
Determining the Street Address of a Given Location
One of the limitations of the GetLocation method is that you cannot
always get the address for a given set of latitude and longitude.
The workaround for this limitation is to use the
hit-detection technique around the given latitude and
longitude.
There are a few ways to do the hit-detection:
Panning around at the same altitude to see whether we find street addresses
Zooming in and out trying to find locations with street addresses
Routing to a place with a known street address (such as the Space Needle) so that the found location automatically snaps to the nearest street
Due to its efficiency and accuracy, I choose to implement the
first option, panning around to see whether there is a nearby
street. The basic approach to panning around the chosen found
location is to move in a general spiral. In this case, the center of
the spiral goes to the original location found using the GetLocation method, and I continue
increasing the radius until I find a street address. The
implementation of this approach is as follows:
    public static MapPoint.Location GetLocationEx(double latitude,
                                    double longitude, ref MapPoint.Application app)
    {
        if(app == null)
            return null;

        //Define the altitude
        double altitude = 3;
        //Flag to indicate that a street address is found
        bool found = false;
        //Original latitude and longitude
        double mylatitude = latitude;
        double mylongitude = longitude;
        //Angle to create a spiral
        double theta = 0;
        //Radius of the spiral
        double radius = 0.00003;
        //flag to indicate the original location
        bool first = true;
        //Define a location to hold end-result
        MapPoint.Location foundLocation = null;

        //Approximately corrects for latitude changing the value of longitude
        double latitudeInRadians = latitude * Math.PI / 180;
        double longMultiplier = 1 / Math.Cos(latitudeInRadians);

        //Get the location using the Map.GetLocation method
 with the given
        //latitude and longitude
        //The altitude plays an important role in getting the better accurate
        //addresses for given lat longs
        while(!found)
        {
            MapPoint.Location location =
                   app.ActiveMap.GetLocation(mylatitude, mylongitude, altitude);

            if(location == null)
                return null;

            if(first)
            {
                //Zoom map to the original location
                location.GoTo( );
                first = false;
            }


            //Now use the Map.ObjectsFromPoint method to get points from the
            //current map center
            MapPoint.FindResults findresults =
                app.ActiveMap.ObjectsFromPoint(
                            app.ActiveMap.LocationToX(location),
                            app.ActiveMap.LocationToY(location));

            //Select a point that has street address and return that location
            object index = null;
            //Now loop through the results
            for(int i = 0; i<findresults.Count; i++)
            {
                index = i+1;
                MapPoint.Location loc =
                          findresults.get_Item(ref index) as MapPoint.Location;
                //Check for the street names
                if(loc != null && loc.StreetAddress != null)
                {
                    //Found the steet name
                    foundLocation = loc;
                    found = true;
                }
            }

            //Radius increment value; if you want your
            //Street address find to be more accurate, keep this
            //value at either 0.00001 or 0.00002, but keep
            //in mind that lower values may take more time to resolve
            Double accuracy = 0.00004;
            //Increment the radius
            radius = radius + accuracy;
            //Increment the angle
            theta = theta + Math.PI/16;
            //Pan to next latitude, longitude
            mylongitude = longitude + (longMultiplier * (Math.Cos(theta) * radius));
            mylatitude = latitude + Math.Sin(theta) * radius;
        }

        return foundLocation;

    }
An example of how the above algorithm works is shown in Figure 2-16 on a map with blue and red pushpins. The center of the spiral is the original location found for a given latitude and longitude; the pushpin to its right shows the nearest street address found using the spiral method.
You could enhance this algorithm by completing the circle (with no increments to radius) and seeing whether there is more than one intersection between the circle and a street; if there is, the midpoint of that arc would be a closer point to the original location.
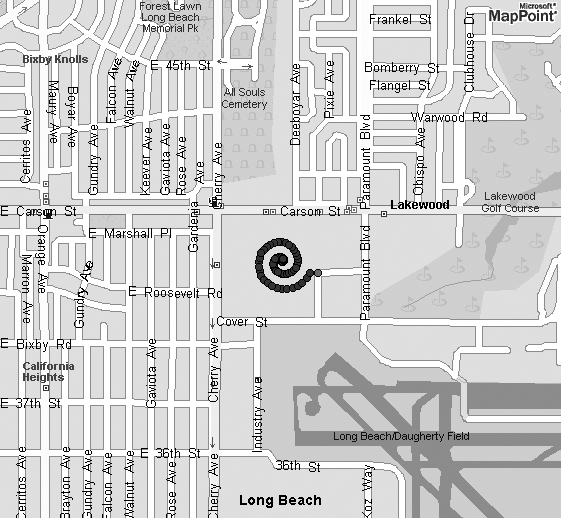
The location found using the previously described method can be used to find the nearest street address for a given latitude and longitude. You can find this method in the ProgrammingMapPointUtilities project in the Chapter 02 file included in the companion material.
Finally, if you are using the ShowFindDialog method for finding latitude
and longitude, use the GeoFindState.geoFindLatLong as FindState parameter; in this scenario, the
method looks for a comma as a delimiter to parse the values
correctly. Anything that lies to the left of the delimiter is
considered latitude, and the value that lies to the right of the
delimiter is considered longitude.
Routing in MapPoint 2004
MapPoint 2004 provides a simple but powerful API to
calculate routes between locations. A route in MapPoint 2004 is
represented as a MapPoint.Route
object. You can access a Route
object via the ActiveRoute property
of a Map object (the Map object can be obtained either via the
MapPoint.ApplicationClass object or
MapPoint.axMapPointControl object
using the ActiveMap
property):
MapPoint.Route route = axMappointControl1.ActiveMap.ActiveRoute;
After obtaining a valid route object, you can perform actions such as calculating, optimizing, and personalizing routes; let’s see each one of these features in detail.
Specifying a Route
In MapPoint 2004 terms, a route is essentially a collection of
locations connected in some way—via street, ferry, or highway. These
locations in a route are known as waypoints and are represented using the
MapPoint.Waypoint class. A valid
route always contains two or more waypoints. Waypoints in a route
are represented in the Route.Waypoints collection, so you use the
Waypoints collection to add new waypoints:
    //Get ahold of route object
    MapPoint.Route route = axMappointControl1.ActiveMap.ActiveRoute;
    //Add the location to the ActiveRoute
    route.Waypoints.Add(loc, loc.Name);
You can access the waypoints using the same collection and the corresponding index value:
    //Obtain a waypoint from a given route
    object index = 1;
    MapPoint.Waypoint waypoint = route.Waypoints.get_Item(ref index);
You can use the MapPoint.Waypoint object in many ways to
specify a new route or modify an existing route. To change the
location represented by a Waypoint object, use the Waypoint.Anchor property. This property is
of type object because it can be either a Location or a Pushpin. If you are assigning a new
location to a waypoint, you can do it like this:
    //Obtain a waypoint from a given route
    object index = 1;
    MapPoint.Waypoint waypoint = route.Waypoints.get_Item(ref index);
    //Assign a new location
    waypoint.Anchor = newlocation;
You may have noticed that a Waypoint object also exposes the Location property, which returns the
Location object that it
corresponds to; however, keep in mind that this property is a
read-only property, and you cannot change the location using
it.
Using the Waypoint object’s
SegmentPreferences property, you
can set the segment preference indicating whether you prefer a
shorter route, a quicker route, and so on. This is useful if you
have preferences for a segment in a route. This property is of
MapPoint.GeoSegmentPreferences
type, an enumeration which has the following values:
geoSegmentQuickestCalculates a route based on the quickest route available between two locations.
geoSegmentShortestCalculates a route based on shortest distance between two locations.
geoSegmentPreferredCalculates a route based on the route preferences set using the
DriverProfileobject at theRouteobject level (which I will discuss shortly).
The default value is always geoSegmentQuickest, and you can set a
different value:
    object index = 2;
    MapPoint.Waypoint waypoint = route.Waypoints.get_Item(ref index);
    waypoint.SegmentPreferences = MapPoint.GeoSegmentPreferences.geoSegmentShortest;
There is one last concept that you need to understand about
waypoints and SegementPreferences; a waypoint represents
only one location, but a route segment represents two locations. So,
what happens if you set two different segment preferences for each
location in a single segment? The answer is that the waypoint
(location) at the beginning of the segment always decides the
segment’s route preference.
Waypoints are categorized into three types:
Start point
End point
Intermediate stop
You can access this information for a given Waypoint object using the Type property. This property is of
MapPoint.GeoWayPointType
enumeration. This property is useful in determining the type of
waypoint when analyzing a route or processing driving directions.
You can set a Waypoint’s
preferred arrival and departure times using the PreferredArrival and PreferredDeparture properties,
respectively; MapPoint 2004 uses this information to adjust the
itinerary when calculating driving directions. Finally, you can
specify a stop time using the StopTime property, which is of Double type and expresses amount of hours
as a fraction of a day (24 hours); for example, if you want to stop
for 2 hours, you would assign the StopTime:
waypoint.StopTime = 2/24;
Now that we know how to specify and set waypoints for a route, let’s look at how to optimize a route.
Optimizing a Route
You can optimize a route if it has more than one
waypoint as an intermediate stop. This is useful if you want to
order waypoints (of Intermediate
type stops) so that the total distance driven in a route is
minimized. To optimize a route, call the Optimize method on the Waypoints collection:
    //Optimize the route
    route.Waypoints.Optimize( );
Note that the Optimize
method does not alter the start and end points; it reorders only the
intermediate stops. If you do not have more than three waypoints,
calling this method does not effect on the waypoint order.
You can find out whether a Waypoints collection is optimized by using
the WayPoints.IsOptimized
property. When the Optimize
method is called and a route is successfully optimized, the RouteAfterOptimize event is fired; the
following code shows how to wire up this event:
    this.axMappointControl1.RouteAfterOptimize
        +=new AxMapPoint._IMappointCtrlEvents_RouteAfterOptimizeEventHandler(
                                axMappointControl1_RouteAfterOptimize);
The following code shows how a simple implementation of this event handler:
    private void axMappointControl1_RouteAfterOptimize(object sender,
        AxMapPoint._IMappointCtrlEvents_RouteAfterOptimizeEvent e)
    {
        //Now display the waypoints in correct order
        MyMethodToDisplayCorrectRouteOrder(e.pRoute);
    }
You can use this event to record or display the new order of the waypoints.
Remember that calling the Optimize method does not calculate driving
directions; it only reorders the intermediate stop waypoints. So, in
order to get driving directions, you need to calculate the route as
a separate step.
Calculating a Route
You can calculate a route for a given set of waypoints
using the Route object’s Calculate method:
    //Calculate the route
    route.Calculate( );
As you can see, this method does not take any parameters.
However, when you call it, you need to make sure that you have at
least two waypoints added to the Route object; otherwise an exception is
thrown. Additionally, it is important to note that this method also
throws an exception when two waypoints are not connected by any
routable means. When this method is successfully completed, the
RouteAfterCalculate event is
fired; this event has several functions, including displaying
driving directions, storing route cost into a database, and so on.
The following code shows how to wire up the RouteAfterCalculate event:
    this.axMappointControl1.RouteAfterCalculate+=
             new AxMapPoint._IMappointCtrlEvents_RouteAfterCalculateEventHandler(
                                           axMappointControl1_RouteAfterCalculate);
This code snippet shows a sample implementation of the event handler method:
    private void axMappointControl1_RouteAfterCalculate(object sender,
            AxMapPoint._IMappointCtrlEvents_RouteAfterCalculateEvent e)
    {
        //Display diriving directions
        DisplayDrivingDirections(e.pRoute);
    }
After calculating driving directions, you can get the detailed
instructions from the directions using the Route object’s Directions property:
    foreach(MapPoint.Direction direction in route.Directions)
    {
         . . .
    }
The Directions property is
a collection of Direction
objects. The Direction class has
several properties , including driving instructions, starting time,
distance, and so forth. Table
2-4 shows some key properties that are exposed on the
Direction class.
Property name | Description |
| Represents the starting point for the route segment |
| Returns the total distance of the current segment |
| Returns the location that represents the best map view for the current segment |
| Returns the directions text for the current segment |
| Returns the calculated start time for the current segment |
Along with these properties, the Direction object also provides the
FindNearby method to locate
nearby points of interest; since a Direction object connects two locations,
FindNearby works as a “find along
route” method instead of a finding locations around a specific
point. This method is useful in route-planning tasks, such as
figuring out where to stop for gas and food along a route.
Personalizing Route Calculations
Personalizing a route is possible with the MapPoint
2004 API using the Route object’s
DriverProfile property. This
property is an instance of the DriverProfile class and can be used to set
a preferred start time, end time, speed, road type, and so on. Table 2-5 shows some key
properties of the DriverProfile
class.
To set preferred roads for your route, use the set_PreferredRoads method to indicate the
road type and preference setting on a scale of zero to one (least
preferred to most preferred) as follows:
    //Really hate arterial roads
    route.DriverProfile.set_PreferredRoads(
                            MapPoint.GeoRoadType.geoRoadArterial, 0);
    //Prefer Interstates
    route.DriverProfile.set_PreferredRoads(
                            MapPoint.GeoRoadType.geoRoadInterstate, 1);
Finally, keep in mind that you need to set the driver profile settings before calculating the route.
Where Are We?
In this chapter, we have discussed how to use MapPoint
2004 APIs to develop applications with basic functionalities, such as
finding places, addresses, and latitude/longitude; displaying
locations on a map; zooming into a location; and panning maps. When
you develop your applications using MapPoint 2004 ActiveX Control, try
to reuse the UI that comes with it—toolbars, panes, dialogs, etc. We
have also discussed using the MapPoint 2004 routing API to optimize,
calculate, and personalize routes. It is important to keep in mind
that you are working with a set of COM objects with a managed wrapper
around them, so be sure to call the Quit method on the MapPoint.Application object when you are
done with your tasks.
While it seems to be a lot of information, these concepts are really the core of MapPoint 2004 programming, and we will be using them more in the next chapter when we discuss dealing with business data and MapPoint 2004 data APIs.