Displays
So far we have looked at using LEDs, seven segment displays, serial character LCDs, and parallel character LCDs to relay information to users. To design modern embedded systems, users demand more. Many users, thanks to the smartphone revolution, expect to be able to interact with their devices using touch displays. In addition, OLED technology is rapidly replacing LCD technology. For these reasons, this chapter looks at going a bit further and using OLEDs and touch screen LCDs (see Figure 10-1).

Figure 10-1 Modern smartphone
OLED Displays
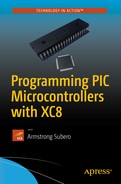
We begin the chapter by looking at the use of the Organic Light Emitting Diode (OLED) displays . OLEDs are my favorite type of displays. This is because they have high contrast, use relatively little power, and do not require extra power considerations for backlighting. We use the SSD1306 in this chapter (see Figure 10-2); it is a small LCD that is rather simple to interface. It also consumes relatively little power. In fact, using this display with a PIC16F1717, LED, and logic-level converter, I have been able to get power readings as low as 5mA! In practice, I have found it to use less power than a HD44780 LCD with backlighting. In addition, it uses less I/O because it’s a serial LCD using the I2C protocol, so it uses only two I/O lines.
In order to use the display, we need to provide a sequence of commands. This will initialize the display. The sequence in the code will enable the OLED to turn on. Enabling the charge pump is very important, and initially when I was developing the library, this caused a lot of problems. The sequence provided in the example code works.
Next, we will set the row and column coordinates of the OLED. The other functions draw characters and strings and contain functions for displaying integers and floating point numbers.
Most libraries for the SSD1306 utilize a buffer. However, the PIC16F1717 does not have the RAM, as a buffer would require 1024 bytes of RAM. The total RAM of the PIC16F1717 is 1024 bytes, so such a buffer is out of the question. This means that graphics are not available without a proper buffer. However, that is not necessary, as most applications with a small display do not require graphics. Displaying text and characters works great on the OLED.
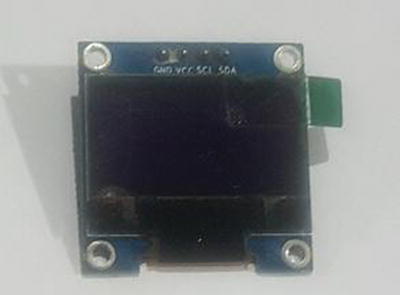
Figure 10-2 The SSD1306 OLED
Listing 10-1 provides the header file .
Listing 10-1 OLED Header File
/** File: oled.h* Author: Armstrong Subero* PIC: 16F1717 w/X OSC @ 16MHz, 5v* Program: Header file to setup PIC16F1717 I2C* Compiler: XC8 (v1.35, MPLAX X v3.10)* Program Version 1.3* Separated file into Header and C source* Replace fixed hex with macros* Added additional comments*** Program Description: This program header will allow setup of SSD 1306 OLEDs** Created on March 10th, 2017, 8:00 PM*/// Define OLED dimensions#define OLED_WIDTH 128#define OLED_HEIGHT 64// Define command macros#define OLED_SETCONTRAST 0x81#define OLED_DISPLAYALLON_RESUME 0xA4#define OLED_DISPLAYALLON 0xA5#define OLED_NORMALDISPLAY 0xA6#define OLED_INVERTDISPLAY 0xA7#define OLED_DISPLAYOFF 0xAE#define OLED_DISPLAYON 0xAF#define OLED_SETDISPLAYOFFSET 0xD3#define OLED_SETCOMPINS 0xDA#define OLED_SETVCOMDETECT 0xDB#define OLED_SETDISPLAYCLOCKDIV 0xD5#define OLED_SETPRECHARGE 0xD9#define OLED_SETMULTIPLEX 0xA8#define OLED_SETLOWCOLUMN 0x00#define OLED_SETHIGHCOLUMN 0x10#define OLED_SETSTARTLINE 0x40#define OLED_MEMORYMODE 0x20#define OLED_COLUMNADDR 0x21#define OLED_PAGEADDR 0x22#define OLED_COMSCANINC 0xC0#define OLED_COMSCANDEC 0xC8#define OLED_SEGREMAP 0xA0#define OLED_CHARGEPUMP 0x8D// Header file#include "16F1717_Internal.h"// Function declarationsvoid OLED_Command( uint8_t temp);void OLED_Data( uint8_t temp);void OLED_Init();void OLED_YX(unsigned char Row, unsigned char Column); // *warning!* max 4 rowsvoid OLED_PutChar( char ch );void OLED_Clear();void OLED_Write_String( char *s );void OLED_Write_Integer(uint8_t i);void OLED_Write_Float(float f);
Listing 10-2 provides the source for the display driver.
Listing 10-2 OLED Source
/** File: oled.c* Author: Armstrong Subero* PIC: 16F1717 w/Int OSC @ 16MHz, 5v* Program: Library file for SSD 1306 OLED* Compiler: XC8 (v1.38, MPLAX X v3.40)* Program Version: 1.1* *Added additional comments** Program Description: This Library allows you to control the SSD 1306 OLED** Created on March 10th, 2017, 8:05 PM*/#include "oled.h"#include "I2C.h"#include <string.h>/******************************************************************************** Function: const uint8_t OledFont[][8]** Returns: Nothing** Description: 2 Dimensional array containing the the ASCII characters*******************************************************************************/const uint8_t OledFont[][8] ={{0x00,0x00,0x00,0x00,0x00,0x00,0x00,0x00},{0x00,0x00,0x5F,0x00,0x00,0x00,0x00,0x00},{0x00,0x00,0x07,0x00,0x07,0x00,0x00,0x00},{0x00,0x14,0x7F,0x14,0x7F,0x14,0x00,0x00},{0x00,0x24,0x2A,0x7F,0x2A,0x12,0x00,0x00},{0x00,0x23,0x13,0x08,0x64,0x62,0x00,0x00},{0x00,0x36,0x49,0x55,0x22,0x50,0x00,0x00},{0x00,0x00,0x05,0x03,0x00,0x00,0x00,0x00},{0x00,0x1C,0x22,0x41,0x00,0x00,0x00,0x00},{0x00,0x41,0x22,0x1C,0x00,0x00,0x00,0x00},{0x00,0x08,0x2A,0x1C,0x2A,0x08,0x00,0x00},{0x00,0x08,0x08,0x3E,0x08,0x08,0x00,0x00},{0x00,0xA0,0x60,0x00,0x00,0x00,0x00,0x00},{0x00,0x08,0x08,0x08,0x08,0x08,0x00,0x00},{0x00,0x60,0x60,0x00,0x00,0x00,0x00,0x00},{0x00,0x20,0x10,0x08,0x04,0x02,0x00,0x00},{0x00,0x3E,0x51,0x49,0x45,0x3E,0x00,0x00},{0x00,0x00,0x42,0x7F,0x40,0x00,0x00,0x00},{0x00,0x62,0x51,0x49,0x49,0x46,0x00,0x00},{0x00,0x22,0x41,0x49,0x49,0x36,0x00,0x00},{0x00,0x18,0x14,0x12,0x7F,0x10,0x00,0x00},{0x00,0x27,0x45,0x45,0x45,0x39,0x00,0x00},{0x00,0x3C,0x4A,0x49,0x49,0x30,0x00,0x00},{0x00,0x01,0x71,0x09,0x05,0x03,0x00,0x00},{0x00,0x36,0x49,0x49,0x49,0x36,0x00,0x00},{0x00,0x06,0x49,0x49,0x29,0x1E,0x00,0x00},{0x00,0x00,0x36,0x36,0x00,0x00,0x00,0x00},{0x00,0x00,0xAC,0x6C,0x00,0x00,0x00,0x00},{0x00,0x08,0x14,0x22,0x41,0x00,0x00,0x00},{0x00,0x14,0x14,0x14,0x14,0x14,0x00,0x00},{0x00,0x41,0x22,0x14,0x08,0x00,0x00,0x00},{0x00,0x02,0x01,0x51,0x09,0x06,0x00,0x00},{0x00,0x32,0x49,0x79,0x41,0x3E,0x00,0x00},{0x00,0x7E,0x09,0x09,0x09,0x7E,0x00,0x00},{0x00,0x7F,0x49,0x49,0x49,0x36,0x00,0x00},{0x00,0x3E,0x41,0x41,0x41,0x22,0x00,0x00},{0x00,0x7F,0x41,0x41,0x22,0x1C,0x00,0x00},{0x00,0x7F,0x49,0x49,0x49,0x41,0x00,0x00},{0x00,0x7F,0x09,0x09,0x09,0x01,0x00,0x00},{0x00,0x3E,0x41,0x41,0x51,0x72,0x00,0x00},{0x00,0x7F,0x08,0x08,0x08,0x7F,0x00,0x00},{0x00,0x41,0x7F,0x41,0x00,0x00,0x00,0x00},{0x00,0x20,0x40,0x41,0x3F,0x01,0x00,0x00},{0x00,0x7F,0x08,0x14,0x22,0x41,0x00,0x00},{0x00,0x7F,0x40,0x40,0x40,0x40,0x00,0x00},{0x00,0x7F,0x02,0x0C,0x02,0x7F,0x00,0x00},{0x00,0x7F,0x04,0x08,0x10,0x7F,0x00,0x00},{0x00,0x3E,0x41,0x41,0x41,0x3E,0x00,0x00},{0x00,0x7F,0x09,0x09,0x09,0x06,0x00,0x00},{0x00,0x3E,0x41,0x51,0x21,0x5E,0x00,0x00},{0x00,0x7F,0x09,0x19,0x29,0x46,0x00,0x00},{0x00,0x26,0x49,0x49,0x49,0x32,0x00,0x00},{0x00,0x01,0x01,0x7F,0x01,0x01,0x00,0x00},{0x00,0x3F,0x40,0x40,0x40,0x3F,0x00,0x00},{0x00,0x1F,0x20,0x40,0x20,0x1F,0x00,0x00},{0x00,0x3F,0x40,0x38,0x40,0x3F,0x00,0x00},{0x00,0x63,0x14,0x08,0x14,0x63,0x00,0x00},{0x00,0x03,0x04,0x78,0x04,0x03,0x00,0x00},{0x00,0x61,0x51,0x49,0x45,0x43,0x00,0x00},{0x00,0x7F,0x41,0x41,0x00,0x00,0x00,0x00},{0x00,0x02,0x04,0x08,0x10,0x20,0x00,0x00},{0x00,0x41,0x41,0x7F,0x00,0x00,0x00,0x00},{0x00,0x04,0x02,0x01,0x02,0x04,0x00,0x00},{0x00,0x80,0x80,0x80,0x80,0x80,0x00,0x00},{0x00,0x01,0x02,0x04,0x00,0x00,0x00,0x00},{0x00,0x20,0x54,0x54,0x54,0x78,0x00,0x00},{0x00,0x7F,0x48,0x44,0x44,0x38,0x00,0x00},{0x00,0x38,0x44,0x44,0x28,0x00,0x00,0x00},{0x00,0x38,0x44,0x44,0x48,0x7F,0x00,0x00},{0x00,0x38,0x54,0x54,0x54,0x18,0x00,0x00},{0x00,0x08,0x7E,0x09,0x02,0x00,0x00,0x00},{0x00,0x18,0xA4,0xA4,0xA4,0x7C,0x00,0x00},{0x00,0x7F,0x08,0x04,0x04,0x78,0x00,0x00},{0x00,0x00,0x7D,0x00,0x00,0x00,0x00,0x00},{0x00,0x80,0x84,0x7D,0x00,0x00,0x00,0x00},{0x00,0x7F,0x10,0x28,0x44,0x00,0x00,0x00},{0x00,0x41,0x7F,0x40,0x00,0x00,0x00,0x00},{0x00,0x7C,0x04,0x18,0x04,0x78,0x00,0x00},{0x00,0x7C,0x08,0x04,0x7C,0x00,0x00,0x00},{0x00,0x38,0x44,0x44,0x38,0x00,0x00,0x00},{0x00,0xFC,0x24,0x24,0x18,0x00,0x00,0x00},{0x00,0x18,0x24,0x24,0xFC,0x00,0x00,0x00},{0x00,0x00,0x7C,0x08,0x04,0x00,0x00,0x00},{0x00,0x48,0x54,0x54,0x24,0x00,0x00,0x00},{0x00,0x04,0x7F,0x44,0x00,0x00,0x00,0x00},{0x00,0x3C,0x40,0x40,0x7C,0x00,0x00,0x00},{0x00,0x1C,0x20,0x40,0x20,0x1C,0x00,0x00},{0x00,0x3C,0x40,0x30,0x40,0x3C,0x00,0x00},{0x00,0x44,0x28,0x10,0x28,0x44,0x00,0x00},{0x00,0x1C,0xA0,0xA0,0x7C,0x00,0x00,0x00},{0x00,0x44,0x64,0x54,0x4C,0x44,0x00,0x00},{0x00,0x08,0x36,0x41,0x00,0x00,0x00,0x00},{0x00,0x00,0x7F,0x00,0x00,0x00,0x00,0x00},{0x00,0x41,0x36,0x08,0x00,0x00,0x00,0x00},{0x00,0x02,0x01,0x01,0x02,0x01,0x00,0x00},{0x00,0x02,0x05,0x05,0x02,0x00,0x00,0x00},};/******************************************************************************** Function: void OLED_Command( uint8_t temp)** Returns: Nothing** Description: sends commands to the OLED*******************************************************************************/void OLED_Command( uint8_t temp){Send_I2C_StartBit(); // send start bitSend_I2C_Data(0x3C << 1); // send word addressSend_I2C_Data(0x00);Send_I2C_Data(temp); // send data byteSend_I2C_StopBit(); // send stop bit}/******************************************************************************** Function: void OLED_Data ( uint8_t temp)** Returns: Nothing** Description: sends data to the OLED*******************************************************************************/void OLED_Data( uint8_t temp){Send_I2C_StartBit(); // send start bitSend_I2C_Data(0x3C << 1); // send word addressSend_I2C_Data(0x40);Send_I2C_Data(temp); // send data byteSend_I2C_StopBit(); // send stop bit}/******************************************************************************** Function: void OLED_Init ()** Returns: Nothing** Description: Initializes OLED*******************************************************************************/void OLED_Init() {OLED_Command(OLED_DISPLAYOFF); // 0xAEOLED_Command(OLED_SETDISPLAYCLOCKDIV); // 0xD5OLED_Command(0x80); // the suggested ratio 0x80OLED_Command(OLED_SETMULTIPLEX); //0xA8OLED_Command(0x1F);OLED_Command(OLED_SETDISPLAYOFFSET); // 0xD3OLED_Command(0x0); // no offsetOLED_Command(OLED_SETSTARTLINE | 0x0); // line #0OLED_Command(OLED_CHARGEPUMP); // 0x8DOLED_Command(0xAF);OLED_Command(OLED_MEMORYMODE); //0x20OLED_Command(0x00); //0x0 act like ks0108OLED_Command(OLED_SEGREMAP | 0x1);OLED_Command(OLED_COMSCANDEC);OLED_Command(OLED_SETCOMPINS); // 0xDAOLED_Command(0x02);OLED_Command(OLED_SETCONTRAST); // 0x81OLED_Command(0x8F);OLED_Command(OLED_SETPRECHARGE); // 0xd9OLED_Command(0xF1);OLED_Command(OLED_SETVCOMDETECT); // 0xDBOLED_Command(0x40);OLED_Command(OLED_DISPLAYALLON_RESUME); // 0xA4OLED_Command(OLED_NORMALDISPLAY); // 0xA6OLED_Command(OLED_DISPLAYON); //--turn on oled panel}/******************************************************************************** Function: void OLED_YX(unsigned char Row, unsigned char Column)** Returns: Nothing** Description: Sets the X and Y coordinates*******************************************************************************/void OLED_YX(unsigned char Row, unsigned char Column){OLED_Command( 0xB0 + Row);OLED_Command( 0x00 + (8*Column & 0x0F) );OLED_Command( 0x10 + ((8*Column>>4)&0x0F) );}/******************************************************************************** Function: void OLED_PutChar(char ch)** Returns: Nothing** Description: Writes a character to the OLED*******************************************************************************/void OLED_PutChar( char ch ){if ( ( ch < 32 ) || ( ch > 127 ) ){ch = ' ';}const uint8_t *base = &OledFont[ch - 32][0];uint8_t bytes[9];bytes[0] = 0x40;memmove( bytes + 1, base, 8 );Send_I2C_StartBit(); // send start bitSend_I2C_Data(0x3C << 1); // send word addressSend_I2C_Data(0x40);int i;for (i = 1; i <= 8; i++){Send_I2C_Data(bytes[i]);}Send_I2C_StopBit(); // send stop bit}/******************************************************************************** Function: void OLED_Clear()** Returns: Nothing** Description: Clears the OLED*******************************************************************************/void OLED_Clear(){for ( uint16_t row = 0; row < 8; row++ ) {for ( uint16_t col = 0; col < 16; col++ ) {}}}/******************************************************************************** Function: void OLED_Write_String( char *s )** Returns: Nothing** Description: Writes a string to the OLED*******************************************************************************/void OLED_Write_String( char *s ){while (*s) OLED_PutChar( *s++);}/******************************************************************************** Function: void OLED_Write_Integer ( uint8_t i )** Returns: Nothing** Description: Writes an integer to the OLED*******************************************************************************/void OLED_Write_Integer(uint8_t i){char s[20];itoa( s, i, 10 );OLED_Write_String( s );OLED_Write_String( "" );}/******************************************************************************** Function: void OLED_Write_Float( float f )** Returns: Nothing** Description: Writes a float to the OLED*******************************************************************************/void OLED_Write_Float(float f){char* buf11;int status;buf11 = ftoa(f, &status);OLED_Write_String(buf11);OLED_Write_String( "" );}
Finally, we have the main code , shown in Listing 10-3.
Listing 10-3 Main Code
/** File: Main.c* Author: Armstrong Subero* PIC: 16F1717 w/Int OSC @ 16MHz, 5v* Program: I08_SSD1306* Compiler: XC8 (v1.38, MPLAX X v3.40)* Program Version: 1.0** Program Description: This Program Allows PIC16F1717 to be connected to a* SSD1306 via the I2C bus. It demonstrates writing strings* together with writing integers and floating point* numbers.** Hardware Description: A SSD1306 based OLED is connected to a PIC16F1717 via* a logic level converter to a SSD1306 based OLED as* follows:** GND --> GND* VCC --> VCC* SCL --> RC5* SDA --> RC4** Created Friday 10th March, 2017, 8:05 PM*//********************************************************************************Includes and defines******************************************************************************/#include "16F1717_Internal.h"#include "I2C.h"#include "oled.h"#include <string.h>/******************************************************************************** Function: void initMain()** Returns: Nothing** Description: Contains initializations for main** Usage: initMain()******************************************************************************/void initMain(){// Run at 16 MHzinternal_16();/////////////////////// Setup I2C////////////////////// Setup pins for I2CANSELCbits.ANSC4 = 0;ANSELCbits.ANSC5 = 0;TRISCbits.TRISC4 = 1;TRISCbits.TRISC5 = 1;PPSLOCK = 0x55;PPSLOCK = 0xAA;PPSLOCKbits.PPSLOCKED = 0x00; // unlock PPSRC4PPSbits.RC4PPS = 0x0011; //RC4->MSSP:SDA;SSPDATPPSbits.SSPDATPPS = 0x0014; //RC4->MSSP:SDA;//RC5->MSSP:SCL;PPSLOCK = 0x55;PPSLOCK = 0xAA;PPSLOCKbits.PPSLOCKED = 0x01; // lock PPS}/******************************************************************************** Function: Main** Returns: Nothing** Description: Program entry point******************************************************************************/void main(void) {initMain();// Initialize I2CI2C_Init();__delay_ms(100);// Initialize OLEDOLED_Init();// clear OLEDOLED_Clear();// variables for countingint count = 0;float dec = 0.0;while ( 1 ) {/////////////////////// Strings///////////////////__delay_ms(100);}__delay_ms(100);OLED_Clear();}return;}
Touch Screen LCD
Thanks to the smartphone revolution, every user wants a screen that they can touch and interact with. It is for this very reason that I chose to include interfacing touch screens in this book. Smartphones have encouraged wide availability of touch screens. Many people think that you need a lot of processing power to use touch screens. In the past this was true, but with the advent of intelligent display modules, this is no longer the case. Intelligent displays have a processor onboard that handles drawing and updating the display. The application processor can thus interact with the display using simple commands. What this means is that even 8-bit microcontroller solutions can utilize a touch screen display.
When integrating touch-based displays into your design, it is important to consider the following factors:
The touch screen must have a GUI interface that can be developed quickly.
The touch screen must be easy to integrate into your projects.
The touch screen must be cost-effective.
In addition to these factors, we must also examine the types of touch displays that are available on the market today. There are two main types of touch displays available—resistive touch screens and capacitive touch screens. We take a look at each of these types of displays in the next sections.
Resistive Touch
The resistive touch screen essentially consists of two layers of flexible sheets, which are then placed on a piece of glass. These sheets are clad in a substance that has a certain resistance and kept apart by small dots. When a part of the screen is pressed, the two layers are pressed together and this change in resistance at that touch point is measured.
Resistive touch screens require a hard object to press them together, such as a stylus, fingernail, or a sufficiently hard object. A major advantage of a resistive touch screens is that they can be used through electrically insulating materials such as when wearing gloves. A major disadvantage is that they are not as responsive as capacitive touch screens.
Capacitive Touch
The human body is known to have electrical properties. One of these properties is the fact that the human body is a conductor. Capacitive touch screens exploit this aspect of the human body. The capacitive touch screen consist of glass covered with a conductive material. When the material is touched, it produces a change in capacitance, which is measured and used to determine where the touch took place.
A major advantage of capacitive touch screens is that they are very responsive and a major disadvantage is that, unlike resistive touch screens, they cannot be used through electrically insulating materials.
Selecting a Touch Screen LCD
Now that you have a basic understanding of the factors to be determined when selecting a touch screen and have learned about the types of touch screens, you can select a touch screen to use in your project. The Nextion series of displays (see Figure 10-3) were chosen for this example because they have an editor tool that enables you to quickly develop the GUI. They also communicate via the ubiquitous UART protocol and are some of the lowest cost displays available on the market today. They are resistive touch screens. Before you continue with this section, I highly recommend you go through the tutorials on the Nextion web site at https://nextion.itead.cc/ .
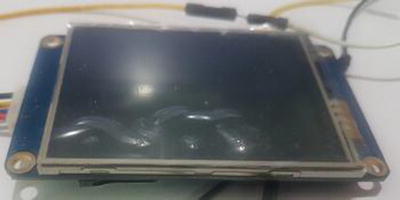
Figure 10-3 Nextion display
Using the Touch LCD
Here are the steps required to use the Nextion type displays:
Create the layout in your photo editor of choice.
Add widgets to your layout with the Nextion Editor.
Add code to those widgets via Nextion Editor.
Read information sent from the display by the microcontroller.
Creating a Layout
The first step is to create the layout of your choice (see Figure 10-4). If you want to use solid colors only in your design, you do not need to use any photo editing software to create a layout. However, if you plan on adding a decent looking background to your design, you will need images. I recommend that you purchase images from the many sites available that provide such a service. This will ensure that you are not violating any copyrights and you will have high-quality images.
Figure 10-4 Layout of the design
Adding Widgets
The next important step in working with a touch screen is adding widgets to your application (see Figure 10-5). This can be done in the editor. We will add text and use a checkbox, although other types of widgets are available. Using the editor is very straightforward, and if you need to learn how to use it, there are a lot of tutorials on the web.
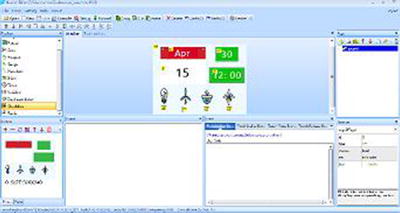
Figure 10-5 Adding widgets
Adding Code
The touch screens we are using are intelligent displays. Thus, code can be written on the display itself and sent to the microcontroller. The Nextion editor includes a section for adding code to the display. If you are unsure how to add code, you can follow along with the tutorials on the web site to learn how to do so.
The code is added to each widget (see Figure 10-6). The print command in the editor allows you to print a string of characters when a particular touch event of that particular widget is triggered. In this example they are blulbpressed, motopressed, planpressed, and connpressed. So, to add bulbpressed, for example, you would type print bulbpressed in the editor.
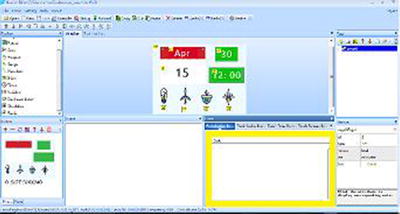
Figure 10-6 Adding code
Figure 10-7 shows the result you get after all the widgets have been added to your design.
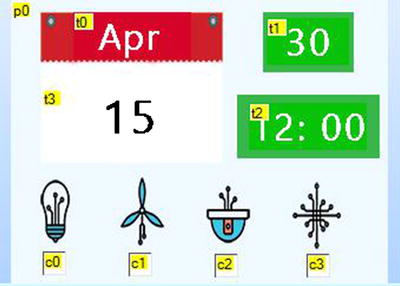
Figure 10-7 Final result
Reading on the Microcontroller
Next on the microcontroller side, we will read the code sent by the display (see Listing 10-4).
Listing 10-4 Touch Screen Code
/** File: Main.c* Author: Armstrong Subero* PIC: 16F1717 w/Int OSC @ 16MHz, 5v* Program: 31_Touchscreen* Compiler: XC8 (v1.41, MPLAX X v3.55)* Program Version: 1.0*** Program Description: This Program Allows PIC16F1717 to communicate with a* NX3224T024_0112.4 inch Nextion Display. The display* communicates with the microcontroller via UART and* sends messages to the microcontroller which is displayed* on the SSD1306 OLED** Hardware Description: A Nextion 2.4 inch touch screen and SSD1306 OLED is* connected to the microcontroller as per header file.** Created April 15th, 2017, 9:30 PM*//********************************************************************************Includes and defines******************************************************************************/#include "16F1717_Internal.h"#include "EUSART.h"#include "oled.h"#include <string.h>#include <stdbool.h>// buffer for UARTchar buf[50];// Function prototypesvoid touchscreen_command(char* string);void moto_func(char* buf);void plan_func(char* buf);void conn_func(char* buf);void bulb_func(char* buf);////////////////////////////// Bool support///////////////////////////typedef unsigned char bool;#define true 1#define false 0// boolean for current statebool on = false;/******************************************************************************** Function: void initMain()** Returns: Nothing** Description: Contains initializations for main** Usage: initMain()******************************************************************************/void initMain(){// Run at 16 MHzinternal_16();// Setup pins for EUSARTTRISBbits.TRISB2 = 0;ANSELBbits.ANSB2 = 0;TRISBbits.TRISB3 = 1;ANSELBbits.ANSB3 = 0;// Setup pins for I2CANSELCbits.ANSC4 = 0;ANSELCbits.ANSC5 = 0;TRISCbits.TRISC4 = 1;TRISCbits.TRISC5 = 1;///////////////////////// Setup Serial Comms///////////////////////PPSLOCK = 0x55;PPSLOCK = 0xAA;PPSLOCKbits.PPSLOCKED = 0x00; // unlock PPSRC4PPSbits.RC4PPS = 0x0011; //RC4->MSSP:SDA;SSPDATPPSbits.SSPDATPPS =0x0014; //RC4->MSSP:SDA;SSPCLKPPSbits.SSPCLKPPS =0x0015; //RC5->MSSP:SCL;RC5PPSbits.RC5PPS = 0x0010; //RC5->MSSP:SCL;RB2PPSbits.RB2PPS = 0x14;//RB2->EUSART:TX;RXPPSbits.RXPPS = 0x0B; //RB3->EUSART:RX;PPSLOCK = 0x55;PPSLOCK = 0xAA;PPSLOCKbits.PPSLOCKED = 0x01; // lock PPS}/******************************************************************************** Function: Main** Returns: Nothing** Description: Program entry point******************************************************************************/void main(void) {initMain();// Initialize I2CI2C_Init();__delay_ms(500);// Initialize OLEDOLED_Init();// clear OLEDOLED_Clear();__delay_ms(1000);// Initialize EUSART module with 9600 baudEUSART_Initialize(9600);__delay_ms(2000);// Dim TouchscreenOLED_YX(0, 0);OLED_Write_String("Dim Screen");touchscreen_command("dim=30");// Update TouchscreenOLED_YX(0, 0);OLED_Write_String("Update Screen");touchscreen_command("t3.txt="16"");OLED_Clear();while(1){// Read EUSARTEUSART_Read_Text(buf, 11);// Check for which checkbox triggeredbulb_func(buf);moto_func(buf);plan_func(buf);conn_func(buf);}return;}/*Send commands to Touchscreen*/void touchscreen_command(char* string){EUSART_Write_Text(string);EUSART_Write(0xFF);EUSART_Write(0xFF);EUSART_Write(0xFF);__delay_ms(1000);}/*Bulb Function Routines*/void bulb_func(char* buf){char* bulb1;bulb1 = strstr(buf, "bulb");if (bulb1 == NULL){return;}else{if (!on){OLED_YX(0, 0);OLED_Write_String("Bulb On");__delay_ms(1000);OLED_Clear();on = true;}else {OLED_YX(0, 0);OLED_Write_String("Bulb Off");__delay_ms(1000);OLED_Clear();on = false;}}}/*Motor function Routines*/void moto_func(char* buf){char* moto1;moto1 = strstr(buf, "moto");if (moto1 == NULL){return;}else{if (!on){OLED_YX(0, 0);OLED_Write_String("Motor On");__delay_ms(1000);OLED_Clear();on = true;}else {OLED_YX(0, 0);OLED_Write_String("Motor Off");__delay_ms(1000);OLED_Clear();on = false;}}}/*Plant function routines*/void plan_func(char* buf){char* plant1;plant1 = strstr(buf, "plan");if (plant1 == NULL){return;}else{if (!on){OLED_YX(0, 0);OLED_Write_String("Plant On");__delay_ms(1000);OLED_Clear();on = true;}else {OLED_YX(0, 0);OLED_Write_String("Plant Off");__delay_ms(1000);OLED_Clear();on = false;}}}/*Connection Function Routines*/void conn_func(char* buf){char* conn1;conn1 = strstr(buf, "conn");if (conn1 == NULL){return;}else{if (!on){OLED_YX(0, 0);OLED_Write_String("Connected");__delay_ms(1000);OLED_Clear();on = true;}else {OLED_YX(0, 0);OLED_Write_String("Disconnected");__delay_ms(1000);OLED_Clear();on = false;}}}
Conclusion
In this chapter, we looked at using OLED and touch screen displays. Although other types of displays are available, users now expect to be able to touch their displays to interact with them. In addition, OLED technology is rapidly taking the place of traditional LCD displays. At this point, I am confident that you can interface your microcontroller to any type of display that will be thrown at you.