Chapter 5. Classes and Interfaces
If you’re like most programmers coming from an object-oriented programming language, classes are your bread and butter. Classes are how you organize and think about your code, and they serve as your primary unit of encapsulation. You’ll be pleased to learn that TypeScript classes borrow heavily from C#, and support things like visibility modifiers, property initializers, polymorphism, decorators, and interfaces. But because TypeScript classes compile down to regular JavaScript classes, you can also express JavaScript idioms like mixins in a typesafe way.
Some of TypeScript’s class features, like property initializers and decorators, are supported by JavaScript classes too,1 and so generate runtime code. Other features, like visibility modifiers, interfaces, and generics, are TypeScript-only features that just exist at compile time, and don’t generate any code when you compile your application to JavaScript.
In this chapter I’ll guide you through an extended example of how we work with classes in TypeScript, so that you can gain some intuition not only for TypeScript’s object-oriented language features, but for how and why we use them. Try to follow along, entering the code in your code editor as we go.
Classes and Inheritance
We’re going to build a chess engine. Our engine will model a game of chess and provide an API for two players to take turns making moves.
We’ll start by sketching out the types:
// Represents a chess gameclassGame{}// A chess piececlassPiece{}// A set of coordinates for a piececlassPosition{}
There are six types of pieces:
// ...classKingextendsPiece{}classQueenextendsPiece{}classBishopextendsPiece{}classKnightextendsPiece{}classRookextendsPiece{}classPawnextendsPiece{}
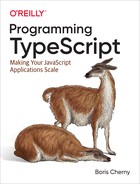
Every piece has a color and a current position. In chess, positions are modeled as (letter, number) coordinate pairs; letters run from left to right along the x-axis, numbers from bottom to top along the y-axis (Figure 5-1).
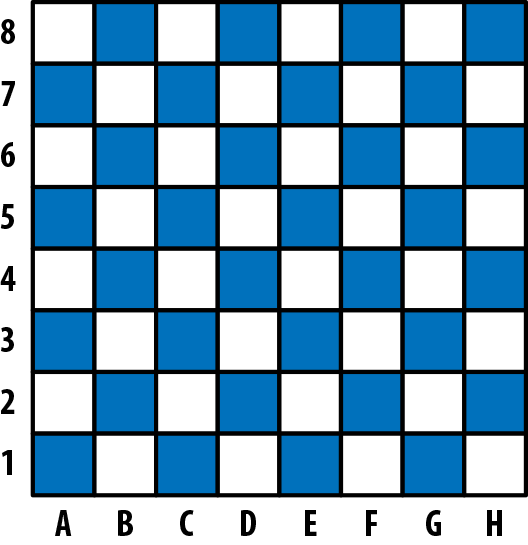
Figure 5-1. Standard algebraic notation in chess: A–H (the x-axis) are called “files” and 1–8 (the inverted y-axis) “ranks”
Let’s add color and position to our Piece class:
typeColor='Black'|'White'typeFile='A'|'B'|'C'|'D'|'E'|'F'|'G'|'H'typeRank=1|2|3|4|5|6|7|8classPosition{constructor(privatefile:File,privaterank:Rank){}}classPiece{protectedposition:Positionconstructor(privatereadonlycolor:Color,file:File,rank:Rank){this.position=newPosition(file,rank)}}

Since there are relatively few colors, ranks, and files, we can manually enumerate their possible values as type literals. This will let us squeeze out some extra safety by constraining these types’ domains from all strings and all numbers to a handful of very specific strings and numbers.

The
privateaccess modifier in the constructor automatically assigns the parameter tothis(this.fileand so on), and sets its visibility to private, meaning that code within aPieceinstance can read and write to it, but code outside of aPieceinstance can’t. Different instances ofPiececan access each other’s private members; instances of any other class—even a subclass ofPiece—can’t.
We declare the instance variable
positionasprotected. Likeprivate,protectedassigns the property tothis, but unlikeprivate,protectedmakes the property visible both to instances ofPieceand to instances of any subclass ofPiece. We didn’t assignpositiona value when declaring it, so we have to assign a value to it inPiece’s constructor function. If we hadn’t assigned it a value in the constructor, TypeScript would have told us that the variable is not definitely assigned, i.e., we said it’s of typeT, but it’s actuallyT | undefinedbecause it’s not assigned a value in a property initializer or in the constructor—so we would need to update its signature to indicate that it’s not necessarily aPosition, but it might also beundefined.
new Piecetakes three parameters:color,file, andrank. We added two modifiers tocolor:private, meaning assign it tothisand make sure it’s only accessible from an instance ofPiece, andreadonly, meaning that after this initial assignment it can only be read and can’t be written anymore.
TSC Flags: strictNullChecks and strictPropertyInitialization
To opt into definite assignment checks for class instance variables, enable strictNullChecks and strictPropertyInitialization flags in your tsconfig.json. If you’re already using the strict flag, you’re good to go.
TypeScript supports three access modifiers for properties and methods on a class:
publicprotectedprivate
Using access modifiers, you can design classes that don’t expose too much information about their implementations, and instead expose well-defined APIs for others to use.
We’ve defined a Piece class, but we don’t want users to instantiate a new Piece directly—we want them to extend it to create a Queen, a Bishop, and so on, and instantiate that. We can use the type system to enforce that for us, using the abstract keyword:
// ...abstractclassPiece{constructor(// ...
Now if you try to instantiate a Piece directly, TypeScript complains:
newPiece('White','E',1)// Error TS2511: Cannot create an instance// of an abstract class.
The abstract keyword means that you can’t instantiate the class directly, but it doesn’t mean you can’t define some methods on it:
// ...abstractclassPiece{// ...moveTo(position:Position){this.position=position}abstractcanMoveTo(position:Position):boolean}
Our Piece class now:
-
Tells its subclasses that they have to implement a method called
canMoveTothat is compatible with the given signature. If a class extendsPiecebut forgets to implement the abstractcanMoveTomethod, that’s a type error at compile time: when you implement an abstract class, you have to implement its abstract methods too. -
Comes with a default implementation for
moveTo(which its subclasses can override if they want). We didn’t put an access modifier onmoveTo, so it’spublicby default, meaning it’s readable and writable from any other code.
Let’s update King to implement canMoveTo, to satisfy this new requirement. We’ll also implement a distanceFrom function for convenience, so we can easily compute the distance between two pieces:
// ...classPosition{// ...distanceFrom(position:Position){return{rank:Math.abs(position.rank-this.rank),file:Math.abs(position.file.charCodeAt(0)-this.file.charCodeAt(0))}}}classKingextendsPiece{canMoveTo(position:Position){letdistance=this.position.distanceFrom(position)returndistance.rank<2&&distance.file<2}}
When we make a new game, we’ll automatically create a board and some pieces:
// ...classGame{privatepieces=Game.makePieces()privatestaticmakePieces() {return[// KingsnewKing('White','E',1),newKing('Black','E',8),// QueensnewQueen('White','D',1),newQueen('Black','D',8),// BishopsnewBishop('White','C',1),newBishop('White','F',1),newBishop('Black','C',8),newBishop('Black','F',8),// ...]}}
Because of how strictly we typed Rank and File, if we had entered another letter (like 'J') or an out-of-range number (like 12), TypeScript would have given us a compile-time error (Figure 5-2).

Figure 5-2. TypeScript helps us stick to valid ranks and files
This is enough to show off how TypeScript classes work—I’ll avoid getting into the nitty-gritty details like how to know when a knight can take a piece, how bishops move, and so on. If you’re ambitious, see if you can use what we’ve done so far as a starting point to implement the rest of the game yourself.
To sum up:
-
Declare classes with the
classkeyword. Extend them with theextendskeyword. -
Classes can be either concrete or
abstract. Abstract classes can haveabstractmethods andabstractproperties. -
Methods can be
private,protected, or, by default,public. They can be instance methods or static methods. -
Classes can have instance properties, which can also be
private,protected, or, by default,public. You can declare them in constructor parameters or as property initializers. -
You can mark instance properties as
readonlywhen declaring them.
super
Like JavaScript, TypeScript supports super calls. If your child class overrides a method defined on its parent class (say, if Queen and Piece both implement the take method), the child instance can make a super call to call its parent’s version of the method (e.g., super.take). There are two kinds of super calls:
-
Method calls, like
super.take. -
Constructor calls, which have the special form
super()and can only be called from a constructor function. If your child class has a constructor function, you must callsuper()from the child’s constructor to correctly wire up the class (don’t worry, TypeScript will warn you if you forget; it’s like a cool futuristic robot elephant in that way).
Note that you can only access a parent class’s methods, and not its properties, with super.
Using this as a Return Type
Just like you can use this as a value, you can also use it as a type (like we did in “Typing this”). When working with classes, the this type can be useful for annotating methods’ return types.
For example, let’s build a simplified version of ES6’s Set data structure that supports two operations: adding a number to the set, and checking whether or not a given number is in the set. You use it like this:
letset=newSetset.add(1).add(2).add(3)set.has(2)// trueset.has(4)// false
Let’s define the Set class, starting with the has method:
classSet{has(value:number):boolean{// ...}}
How about add? When you call add, you get back an instance of Set. We could type that as:
classSet{has(value:number):boolean{// ...}add(value:number):Set{// ...}}
So far, so good. What happens when we try to subclass Set?
classMutableSetextendsSet{delete(value:number):boolean{// ...}}
Of course, Set’s add method still returns a Set, which we’ll need to override with MutableSet for our subclass:
classMutableSetextendsSet{delete(value:number):boolean{// ...}add(value:number):MutableSet{// ...}}
This can get a bit tedious when working with classes that extend other classes—you have to override the signature for each method that returns this. And if you end up having to override each method to please the typechecker, what’s the point of inheriting from your base class at all?
Instead, you can use this as a return type annotation to let TypeScript do the work for you:
classSet{has(value:number):boolean{// ...}add(value:number):this{// ...}}
Now, you can remove the add override from MutableSet, since this in Set points to a Set instance, and this in MutableSet points to a MutableSet instance:
classMutableSetextendsSet{delete(value:number):boolean{// ...}}
This is a really convenient feature for working with chained APIs, like we do in “Builder Pattern”.
Interfaces
When you use classes, you will often find yourself using them with interfaces.
Like type aliases, interfaces are a way to name a type so you don’t have to define it inline. Type aliases and interfaces are mostly two syntaxes for the same thing (like function expressions and function declarations), but there are a few small differences. Let’s start with what they have in common. Consider the following type alias:
typeSushi={calories:numbersalty:booleantasty:boolean}
It’s easy to rewrite it as an interface:
interfaceSushi{calories:numbersalty:booleantasty:boolean}
Everywhere you used your Sushi type alias, you can also use your Sushi interface. Both declarations define shapes, and those shapes are assignable to one another (in fact, they’re identical!).
Things get more interesting when you start combining types. Let’s model another food in addition to Sushi:
typeCake={calories:numbersweet:booleantasty:boolean}
A lot of foods have calories and are tasty—not just Sushi and Cake. Let’s pull Food out into its own type, and redefine our foods in terms of it:
typeFood={calories:numbertasty:boolean}typeSushi=Food&{salty:boolean}typeCake=Food&{sweet:boolean}
Nearly equivalently, you can do that with interfaces too:
interfaceFood{calories:numbertasty:boolean}interfaceSushiextendsFood{salty:boolean}interfaceCakeextendsFood{sweet:boolean}
Note
Interfaces don’t have to extend other interfaces. In fact, an interface can extend any shape: an object type, a class, or another interface.
What are the differences between types and interfaces? There are three, and they’re subtle.
The first is that type aliases are more general, in that their righthand side can be any type, including a type expression (a type, and maybe some type operators like & or |); for an interface, the righthand side must be a shape. For example, there is no way to rewrite the following type aliases as interfaces:
typeA=numbertypeB=A|string
The second difference is that when you extend an interface, TypeScript will make sure that the interface you’re extending is assignable to your extension. For example:
interfaceA{good(x:number):stringbad(x:number):string}interfaceBextendsA{good(x:string|number):stringbad(x:string):string// Error TS2430: Interface 'B' incorrectly extends}// interface 'A'. Type 'number' is not assignable// to type 'string'.
This is not the case when you use intersection types: if you turn the interfaces from the last example into type aliases and the extends into an intersection (&), TypeScript will do its best to combine your extension with the type it’s extending, resulting in an overloaded signature for bad instead of a compile-time error (try it in your code editor!).
When you’re modeling inheritance for object types, the assignability check that TypeScript does for interfaces can be a helpful tool to catch errors.
The third difference is that multiple interfaces with the same name in the same scope are automatically merged; multiple type aliases with the same name in the same scope will throw a compile-time error. This is a feature called declaration merging.
Declaration Merging
Declaration merging is TypeScript’s way of automatically combining multiple declarations that share the same name. It came up when we introduced enums (“Enums”), and it also comes up when working with other features like namespace declarations (see “Namespaces”). In this section we’ll briefly introduce declaration merging in the context of interfaces. For a deeper dive, head over to “Declaration Merging”.
For example, if you declare two identically named User interfaces, then TypeScript will automatically combine them for you into a single interface:
// User has a single field, nameinterfaceUser{name:string}// User now has two fields, name and ageinterfaceUser{age:number}leta:User={name:'Ashley',age:30}
Here’s what happens if you repeat that example with type aliases:
typeUser={// Error TS2300: Duplicate identifier 'User'.name:string}typeUser={// Error TS2300: Duplicate identifier 'User'.age:number}
Note that the two interfaces can’t conflict; if one types property as a T and the other types it as a U, and T and U aren’t identical, then you’ll get an error:
interfaceUser{age:string}interfaceUser{age:number// Error TS2717: Subsequent property declarations must have}// the same type. Property 'age' must be of type 'string',// but here has type 'number'.
And if your interface declares generics (skip ahead to “Polymorphism” to learn more), those generics have to be declared the exact same way for two interfaces to be mergeable—down to the generic’s name!
interfaceUser<Ageextendsnumber>{// Error TS2428: All declarations of 'User'age:Age// must have identical type parameters.}interfaceUser<Ageextendsstring>{age:Age}
Interestingly, this is a rare place where TypeScript checks that two types are not only assignable, but identical.
Implementations
When you declare a class, you can use the implements keyword to say that it satisfies a particular interface. Like other explicit type annotations, this is a convenient way to add a type-level constraint that your class is implemented correctly as closely as possible to the implementation itself, so that the error from an incorrect implementation doesn’t show up downstream where it’s less clear why it was thrown. It’s also a familiar way to implement common design patterns like adapters, factories, and strategies (see the end of this chapter for some examples).
Here’s what that looks like:
interfaceAnimal{eat(food:string):voidsleep(hours:number):void}classCatimplementsAnimal{eat(food:string){console.info('Ate some',food,'. Mmm!')}sleep(hours:number){console.info('Slept for',hours,'hours')}}
Cat has to implement every method that Animal declares, and can implement more methods and properties on top if it wants.
Interfaces can declare instance properties, but they can’t declare visibility modifiers (private, protected, and public) and they can’t use the static keyword. You can also mark instance properties as readonly, just like we did for object types in Objects (in Chapter 3):
interfaceAnimal{readonlyname:stringeat(food:string):voidsleep(hours:number):void}
You’re not limited to implementing just one interface—you can implement as many as you want:
interfaceAnimal{readonlyname:stringeat(food:string):voidsleep(hours:number):void}interfaceFeline{meow():void}classCatimplementsAnimal,Feline{name='Whiskers'eat(food:string){console.info('Ate some',food,'. Mmm!')}sleep(hours:number){console.info('Slept for',hours,'hours')}meow() {console.info('Meow')}}
All of these features are completely typesafe. If you forget to implement a method or a property, or implement it incorrectly, TypeScript will come to the rescue (see Figure 5-3).
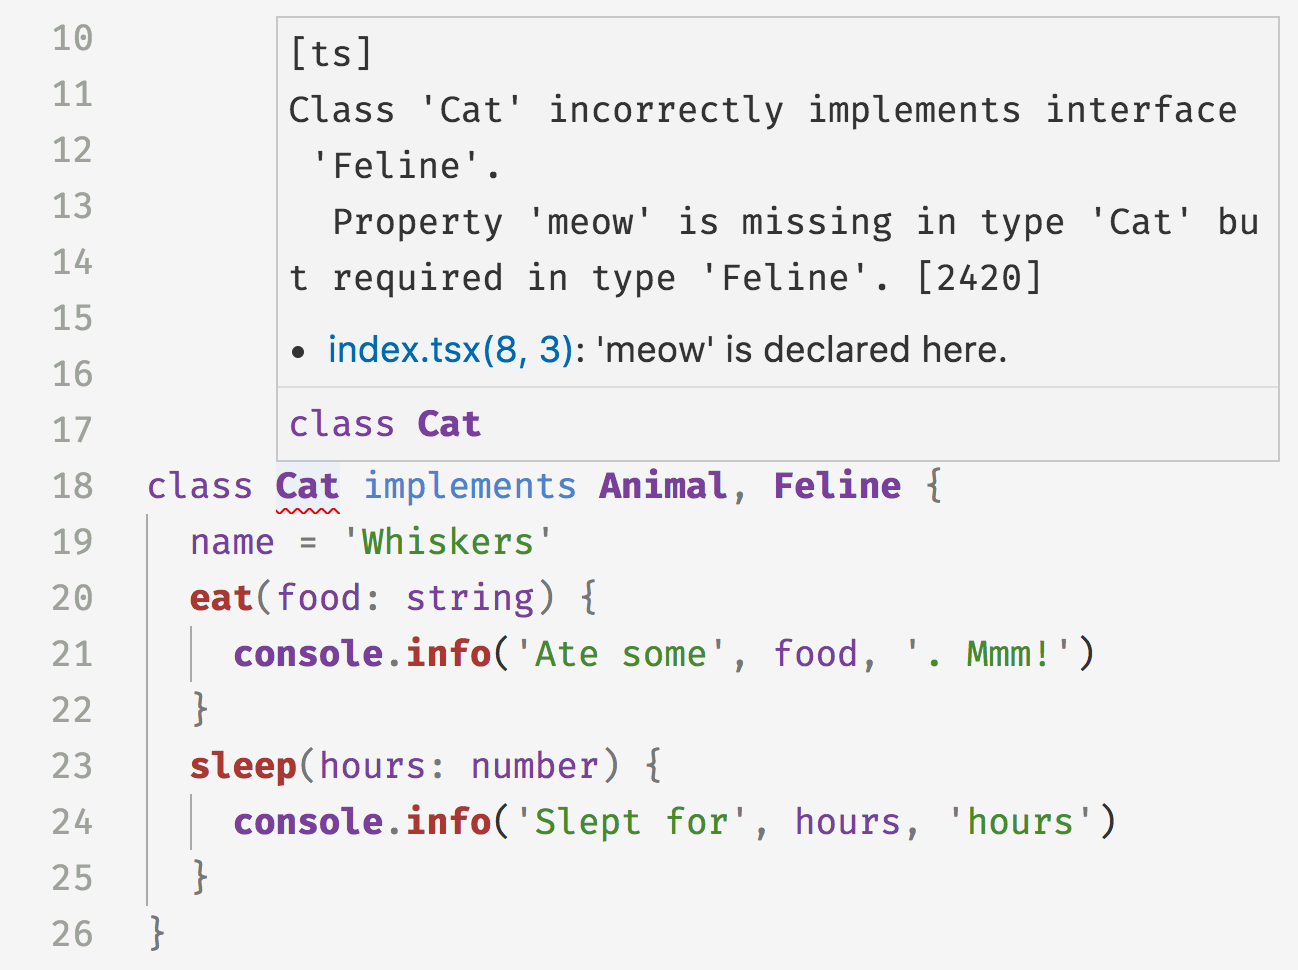
Figure 5-3. TypeScript throws an error when you forget to implement a required method
Implementing Interfaces Versus Extending Abstract Classes
Implementing an interface is really similar to extending an abstract class. The difference is that interfaces are more general and lightweight, and abstract classes are more special-purpose and feature-rich.
An interface is a way to model a shape. At the value level, that means an object, array, function, class, or class instance. Interfaces do not emit JavaScript code, and only exist at compile time.
An abstract class can only model, well, a class. It emits runtime code that is, you guessed it, a JavaScript class. Abstract classes can have constructors, provide default implementations, and set access modifiers for properties and methods. Interfaces can’t do any of those things.
Which one you use depends on your use case. When an implementation is shared among multiple classes, use an abstract class. When you need a lightweight way to say “this class is a T,” use an interface.
Classes Are Structurally Typed
Like every other type in TypeScript, TypeScript compares classes by their structure, not by their name. A class is compatible with any other type that shares its shape, including a regular old object that defines the same properties or methods as the class. This is important to keep in mind for those of you coming from C#, Java, Scala, and most other languages where classes are typed nominally. It means that if you have a function that takes a Zebra and you give it a Poodle, TypeScript might not mind:
classZebra{trot() {// ...}}classPoodle{trot() {// ...}}functionambleAround(animal:Zebra){animal.trot()}letzebra=newZebraletpoodle=newPoodleambleAround(zebra)// OKambleAround(poodle)// OK
As the phylogeneticists among you know, a zebra is no poodle—but TypeScript doesn’t mind! As long as Poodle is assignable to Zebra, TypeScript is OK with it because from our function’s point of view, the two are interchangeable; all that matters is that they implement .trot. If you were using almost any other language that types classes nominally, this code would have raised an error; but TypeScript is structurally typed through and through, so this code is perfectly acceptable.
The exception to this rule is classes with private or protected fields: when checking whether or not a shape is assignable to a class, if the class has any private or protected fields and the shape is not an instance of that class or a subclass of that class, then the shape is not assignable to the class:
classA{privatex=1}classBextendsA{}functionf(a:A){}f(newA)// OKf(newB)// OKf({x:1})// Error TS2345: Argument of type '{x: number}' is not// assignable to parameter of type 'A'. Property 'x' is// private in type 'A' but not in type '{x: number}'.
Classes Declare Both Values and Types
Most things that you can express in TypeScript are either values or types:
// valuesleta=1999functionb() {}// typestypea=numberinterfaceb{():void}
Types and values are namespaced separately in TypeScript. Depending on how you use a term (a or b in this example), TypeScript knows whether to resolve it to a type or to a value:
// ...if(a+1>3)//... // TypeScript infers from context that you mean the value aletx:a=3// TypeScript infers from context that you mean the type a
This contextual term resolution is really nice, and lets us do cool things like implement companion types (see “Companion Object Pattern”).
Classes and enums are special. They are unique because they generate both a type in the type namespace and a value in the value namespace:
classC{}letc:C=newCenumE{F,G}lete:E=E.F
In this context,
Crefers to the instance type of ourCclass.In this context,
Crefers toCthe value.In this context,
Erefers to the type of ourEenum.In this context,
Erefers toEthe value.
When we work with classes, we need a way to say “this variable should be an instance of this class” and the same goes for enums (“this variable should be a member of this enum”). Because classes and enums generate types at the type level we’re able to express this “is-a” relationship easily.2
We also need a way to represent a class at runtime, so that we can instantiate it with new, call static methods on it, do metaprogramming with it, and operate on it with instanceof—so a class needs to generate a value too.
In the previous example C refers to an instance of the class C. How do you talk about the C class itself? We use the typeof keyword (a type operator provided by TypeScript, which is like JavaScript’s value-level typeof but for types).
Let’s create a class StringDatabase—the world’s simplest database:
typeState={[key:string]:string}classStringDatabase{state:State={}get(key:string):string|null{returnkeyinthis.state?this.state[key]:null}set(key:string,value:string):void{this.state[key]=value}staticfrom(state:State){letdb=newStringDatabasefor(letkeyinstate){db.set(key,state[key])}returndb}}
What types does this class declaration generate? The instance type StringDatabase:
interfaceStringDatabase{state:Stateget(key:string):string|nullset(key:string,value:string):void}
And the constructor type typeof StringDatabase:
interfaceStringDatabaseConstructor{new():StringDatabasefrom(state:State):StringDatabase}
That is, StringDatabaseConstructor has a single method .from, and new-ing the constructor gives a StringDatabase instance. Combined, these two interfaces model both the constructor and instance sides of a class.
That new() bit is called a constructor signature, and is TypeScript’s way of saying that a given type can be instantiated with the new operator. Because TypeScript is structurally typed, that’s the best we can do to describe what a class is: a class is anything that can be new-ed.
In this case the constructor doesn’t take any arguments, but you can use it to declare constructors that take arguments too. For example, say we update StringDatabase to take an optional initial state:
classStringDatabase{constructor(publicstate:State={}){}// ...}
We could then type StringDatabase’s constructor signature as:
interfaceStringDatabaseConstructor{new(state?:State):StringDatabasefrom(state:State):StringDatabase}
So, not only does a class declaration generate terms at the value and type levels, but it generates two terms at the type level: one representing an instance of the class; one representing the class constructor itself (reachable with the typeof type operator).
Polymorphism
Like functions and types, classes and interfaces have rich support for generic type parameters, including defaults and bounds. You can scope a generic to your whole class or interface, or to a specific method:
classMyMap<K,V>{constructor(initialKey:K,initialValue:V){// ...}get(key:K):V{// ...}set(key:K,value:V):void{// ...}merge<K1,V1>(map:MyMap<K1,V1>):MyMap<K|K1,V|V1>{// ...}staticof<K,V>(k:K,v:V):MyMap<K,V>{// ...}}
Bind class-scoped generic types when you declare your
class. Here,KandVare available to every instance method and instance property onMyMap.Note that you cannot declare generic types in a
constructor. Instead, move the declaration up to yourclassdeclaration.Use class-scoped generic types anywhere inside your class.
Instance methods have access to class-level generics, and can also declare their own generics on top.
.mergemakes use of theKandVclass-level generics, and also declares two of its own generics,K1andV1.
Static methods do not have access to their class’s generics, just like at the value level they don’t have access to their class’s instance variables.
ofdoes not have access to theKandVdeclared in; instead, it declares its own KandVgenerics.
You can bind generics to interfaces too:
interfaceMyMap<K,V>{get(key:K):Vset(key:K,value:V):void}
And like with functions, you can bind concrete types to generics explicitly, or let TypeScript infer the types for you:
leta=newMyMap<string,number>('k',1)// MyMap<string, number>letb=newMyMap('k',true)// MyMap<string, boolean>a.get('k')b.set('k',false)
Mixins
JavaScript and TypeScript don’t have trait or mixin keywords, but it’s straightforward to implement them ourselves. Both are ways to simulate multiple inheritance (classes that extend more than one other class) and do role-oriented programming, a style of programming where you don’t say things like “this thing is a Shape" but instead describe properties of a thing, like “it can be measured” or “it has four sides.” Instead of “is-a” relationships, you describe “can” and “has-a” relationships.
Let’s build a mixin implementation.
Mixins are a pattern that allows us to mix behaviors and properties into a class. By convention, mixins:
-
Can have state (i.e., instance properties)
-
Can only provide concrete methods (not abstract ones)
-
Can have constructors, which are called in the same order as their classes were mixed in
TypeScript doesn’t have a built-in concept of mixins, but it’s easy to implement them ourselves. For example, let’s design a debugging library for TypeScript classes. We’ll call it EZDebug. The library works by letting you log out information about whatever classes use the library, so that you can inspect them at runtime. We’ll use it like this:
classUser{// ...}User.debug()// evaluates to 'User({"id": 3, "name": "Emma Gluzman"})'
With a standard .debug interface, our users will be able to debug anything! Let’s build it. We’ll model it with a mixin, which we’ll call withEZDebug. A mixin is just a function that takes a class constructor and returns a class constructor, so our mixin might look like this:
typeClassConstructor=new(...args:any[])=>{}functionwithEZDebug<CextendsClassConstructor>(Class:C){returnclassextendsClass{constructor(...args:any[]){super(...args)}}}
We start by declaring a type
ClassConstructor, which represents any constructor. Since TypeScript is completely structurally typed, we say that a constructor is anything that can benew-ed. We don’t know what types of parameters the constructor might have, so we say it takes any number of arguments of any type.3We declare our
withEZDebugmixin with a single type parameter,C.Chas to be at least a class constructor, which we enforce with anextendsclause. We let TypeScript inferwithEZDebug’s return type, which is the intersection ofCand our new anonymous class.Since a mixin is a function that takes a constructor and returns a constructor, we return an anonymous class constructor.
The class constructor has to take at least the arguments that the class you pass in might take. But remember, since we don’t know what class you might pass in beforehand, I have to keep it as general as possible, which means any number of parameters of any type—just like
ClassConstructor.Finally, since this anonymous class extends another class, to wire everything up correctly we need to remember to call
Class’s constructor too.
Like with regular JavaScript classes, if you don’t have any more logic in the constructor, you can omit lines ![]() and
and ![]() . We aren’t going to put any logic into the constructor for this
. We aren’t going to put any logic into the constructor for this withEZDebug example, so we can omit them.
Now that we’ve set up the boilerplate, it’s time to work some debugging magic. When we call .debug, we want to log out the class’s constructor name and the instance’s value:
typeClassConstructor=new(...args:any[])=>{}functionwithEZDebug<CextendsClassConstructor>(Class:C){returnclassextendsClass{debug() {letName=Class.constructor.nameletvalue=this.getDebugValue()returnName+'('+JSON.stringify(value)+')'}}}
But wait! How do we make sure the class implements a .getDebugValue method, so that we can call it? Think about this for a second before you move on—can you figure it out?
The answer is that instead of accepting any old class, we use a generic type to make sure the class passed into withEZDebug defines a .getDebugValue method:
typeClassConstructor<T>=new(...args:any[])=>TfunctionwithEZDebug<CextendsClassConstructor<{getDebugValue():object}>>(Class:C){// ...}
We add a generic type parameter to
ClassConstructor.We bind a shape type to
ClassConstructor,C, enforcing that the constructor we passed towithEZDebugat least defines the.getDebugValuemethod.
That’s it! So, how do you use this incredible debugging utility? Like so:
classHardToDebugUser{constructor(privateid:number,privatefirstName:string,privatelastName:string){}getDebugValue() {return{id:this.id,name:this.firstName+' '+this.lastName}}}letUser=withEZDebug(HardToDebugUser)letuser=newUser(3,'Emma','Gluzman')user.debug()// evaluates to 'User({"id": 3, "name": "Emma Gluzman"})'
Cool, right? You can apply as many mixins to a class as you want to yield a class with richer and richer behavior, all in a typesafe way. Mixins help encapsulate behavior, and are an expressive way to specify reusable behaviors.4
Decorators
Decorators are an experimental TypeScript feature that gives us a clean syntax for metaprogramming with classes, class methods, properties, and method parameters. They’re just a syntax for calling a function on the thing you’re decorating.
TSC Flag: experimentalDecorators
Because they’re still experimental—meaning they may change in a backward-incompatible way, or may even be entirely removed in future TypeScript releases—decorators are hidden behind a TSC flag. If you’re OK with that, and want to play around with the feature, set "experimentalDecorators": true in your tsconfig.json and read on.
To get a sense for how decorators work, let’s start with an example:
@serializableclassAPIPayload{getValue():Payload{// ...}}
The @serializable class decorator wraps our APIPayload class, and optionally returns a new class that replaces it. Without decorators, you might implement the same thing with:
letAPIPayload=serializable(classAPIPayload{getValue():Payload{// ...}})
For each type of decorator, TypeScript requires that you have a function in scope with the given name and the required signature for that type of decorator (see Table 5-1).
| What you’re decorating | Expected type signature |
|---|---|
Class |
|
Method |
|
Static method |
|
Method parameter |
|
Static method parameter |
|
Property |
|
Static property |
|
Property getter/setter |
|
Static property getter/setter |
|
TypeScript doesn’t come with any built-in decorators: whatever decorators you use, you have to implement yourself (or install from NPM). The implementation for each kind of decorator—for classes, methods, properties, and function parameters—is a regular function that satisfies a specific signature, depending on what it’s decorating. For example, our @serializable decorator might look like this:
typeClassConstructor<T>=new(...args:any[])=>Tfunctionserializable<TextendsClassConstructor<{getValue():Payload}>>(Constructor:T){returnclassextendsConstructor{serialize() {returnthis.getValue().toString()}}}
Remember,
new()is how we structurally type a class constructor in TypeScript. And for a class constructor that can be extended (withextends), TypeScript requires that we type its arguments with ananyspread:new(...any[]).@serializablecan decorate any class whose instances implement the method.getValue, which returns aPayload.Class decorators are functions that take a single argument—the class. If the decorator function returns a class (as in the example) it will replace the class it’s decorating at runtime; otherwise, it will return the original class.
To decorate the class, we return a class that extends it and adds a
.serializemethod along the way.
What happens when we try to call .serialize?
letpayload=newAPIPayloadletserialized=payload.serialize()// Error TS2339: Property 'serialize' does// not exist on type 'APIPayload'.
TypeScript assumes that a decorator doesn’t change the shape of the thing it’s decorating—meaning that you didn’t add or remove methods and properties. It checks at compile time that the class you returned is assignable to the class you passed in, but at the time of writing, TypeScript does not keep track of extensions you make in your decorators.
Until decorators in TypeScript become a more mature feature, I recommend you avoid using them and stick to regular functions instead:
letDecoratedAPIPayload=serializable(APIPayload)letpayload=newDecoratedAPIPayloadpayload.serialize()// string
We won’t delve more deeply into decorators in this book. For more information, head over to the official documentation.
Simulating final Classes
Though TypeScript doesn’t support the final keyword for classes or methods, it’s easy to simulate it for classes. If you haven’t worked much with object-oriented languages before, final is the keyword some languages use to mark a class as nonextensible, or a method as nonoverridable.
To simulate final classes in TypeScript, we can take advantage of private constructors:
classMessageQueue{privateconstructor(privatemessages:string[]){}}
When a constructor is marked private, you can’t new the class or extend it:
classBadQueueextendsMessageQueue{}// Error TS2675: Cannot extend a class// 'MessageQueue'. Class constructor is// marked as private.newMessageQueue([])// Error TS2673: Constructor of class// 'MessageQueue' is private and only// accessible within the class// declaration.
As well as preventing you from extending the class—which is what we want—private constructors also prevent you from directly instantiating it. But for final classes we do want the ability to instantiate a class, just not to extend it. How do we keep the first restriction but get rid of the second? Easy:
classMessageQueue{privateconstructor(privatemessages:string[]){}staticcreate(messages:string[]){returnnewMessageQueue(messages)}}
This changes MessageQueue’s API a bit, but it does a great job of preventing extensions at compile time:
classBadQueueextendsMessageQueue{}// Error TS2675: Cannot extend a class// 'MessageQueue'. Class constructor is// marked as private.MessageQueue.create([])// MessageQueue
Design Patterns
This wouldn’t be a chapter on object-oriented programming if we didn’t walk through implementing a design pattern or two in TypeScript, right?
Factory Pattern
The factory pattern is a way to create objects of some type, leaving the decision of which concrete object to create to the specific factory that creates that object.
Let’s build a shoe factory. We’ll start by defining a Shoe type, and a few kinds of shoes:
typeShoe={purpose:string}classBalletFlatimplementsShoe{purpose='dancing'}classBootimplementsShoe{purpose='woodcutting'}classSneakerimplementsShoe{purpose='walking'}
Note that this example uses a type, but we could have just as well used an interface instead.
Now, let’s make a shoe factory:
letShoe={create(type:'balletFlat'|'boot'|'sneaker'):Shoe{switch(type){case'balletFlat':returnnewBalletFlatcase'boot':returnnewBootcase'sneaker':returnnewSneaker}}}
Using a union type for
typehelps make.createas typesafe as possible, preventing consumers from passing in an invalidtypeat compile time.Switching on
typemakes it easy for TypeScript to enforce that we’ve handled every type ofShoe.
In this example we use the companion object pattern (see “Companion Object Pattern”) to declare a type Shoe and a value Shoe with the same name (remember that TypeScript has separate namespaces for values and for types), as a way to signal that the value provides methods for operating on the type. To use the factory, we can just call .create:
Shoe.create('boot')// Shoe
Voilà! We have a factory pattern. Note that we could have gone further and indicated in Shoe.create’s type signature that passing in 'boot' will give a Boot, 'sneaker' will give a Sneaker, and so on, but that would break the abstraction that the factory pattern gives us (that the consumer shouldn’t know what concrete class they’ll get back, just that the class satisfies a particular interface).
Builder Pattern
The builder pattern is a way to separate the construction of an object from the way that object is actually implemented. If you’ve used JQuery, or ES6 data structures like Map and Set, this style of API should look familiar. Here’s what it looks like:
newRequestBuilder().setURL('/users').setMethod('get').setData({firstName:'Anna'}).send()
How do we implement RequestBuilder? Easy—we’ll start with a bare class:
classRequestBuilder{}
First we’ll add the .setURL method:
classRequestBuilder{privateurl:string|null=nullsetURL(url:string):this{this.url=urlreturnthis}}
We keep track of the URL the user set in a private instance variable
url, which we initialize tonull.setURL’s return type isthis(see “Using this as a Return Type”), that is, the specific instance ofRequestBuilderthat the user calledsetURLon.
Now let’s add the other methods from our example:
classRequestBuilder{privatedata:object|null=nullprivatemethod:'get'|'post'|null=nullprivateurl:string|null=nullsetMethod(method:'get'|'post'):this{this.method=methodreturnthis}setData(data:object):this{this.data=datareturnthis}setURL(url:string):this{this.url=urlreturnthis}send() {// ...}}
That’s all there is to it.
Summary
We’ve now explored TypeScript classes from all sides: how to declare classes; how to inherit from classes and implement interfaces; how to mark classes as abstract so they can’t be instantiated; how to put a field or method on a class with static and on an instance without it; how to control access to a field or method with the private, protected, and public visibility modifiers; and how to mark a field as nonwritable using the readonly modifier. We’ve covered how to safely use this and super, explored what it means for classes to be both values and types at the same time, and talked about the differences between type aliases and interfaces, the basics of declaration merging, and using generic types in classes. Finally, we covered a few more advanced patterns for working with classes: mixins, decorators, and simulating final classes. And to cap the chapter off, we went through and derived a couple of common patterns for working with classes.
Exercises
-
What are the differences between a class and an interface?
-
When you mark a class’s constructor as
private, that means you can’t instantiate or extend the class. What happens when you mark it asprotectedinstead? Play around with this in your code editor, and see if you can figure it out. -
Extend the implementation we developed “Factory Pattern” to make it safer, at the expense of breaking the abstraction a bit. Update the implementation so that a consumer knows at compile time that calling
Shoe.create('boot')returns aBootand callingShoe.create('balletFlat')returns aBalletFlat(rather than both returning aShoe). Hint: think back to “Overloaded Function Types”. -
[Hard] As an exercise, think about how you might design a typesafe builder pattern. Extend the Builder pattern “Builder Pattern” to:
-
Guarantee at compile time that someone can’t call
.sendbefore setting at least a URL and a method. Would it be easier to make this guarantee if you also force the user to call methods in a specific order? (Hint: what can you return instead ofthis?) -
[Harder] How would you change your design if you wanted to make this guarantee, but still let people call methods in any order? (Hint: what TypeScript feature can you use to make each method’s return type “add” to the
thistype after each method call?)
-
1 Or are on track to soon be supported by JavaScript classes.
2 Because TypeScript is structurally typed, of course, the relationship for classes is more of a “looks-like”—any object that implements the same shape as your class will be assignable to the type of your class.
3 Note that TypeScript is picky here: the type of a constructor type’s arguments has to be any[] (not void, unknown[], etc.) in order for us to be able to extend it.
4 A handful of languages—Scala, PHP, Kotlin, and Rust, to name a few—implement a pared-down version of mixins, called traits. Traits are like mixins, but don’t have constructors and don’t support instance properties. This makes it easier to wire them up and prevent collisions between multiple traits accessing state that is shared between them and the base class.