In this final chapter of the book, you will learn how to track down and deal with the errors that inevitably occur when developing a new software application. Program errors can occur for any number of reasons, including typos, inappropriately applied command syntax, and faulty programming logic. This chapter is designed to teach you the fundamental steps involved in identifying and correcting these types of errors. Discussion will also include the development of error handling procedures as well as the use of Just BASIC’s debugger as a means of keeping an eye on the internal operation of your programs, allowing to you track down and spot errors that might otherwise be very difficult to locate. In addition to all this, you will get the chance develop the book’s final application, the Hangman game.
Specifically, you will learn
The differences between syntax, logical, and runtime errors
How to execute a program using a debugger
How to control program execution and to monitor variable values when debugging applications
How to set up error handlers
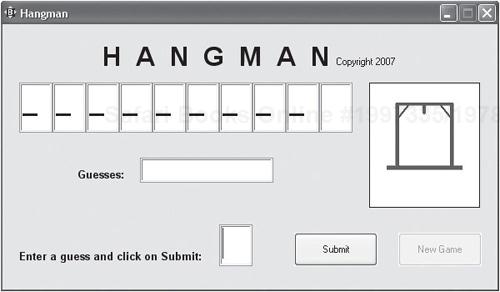
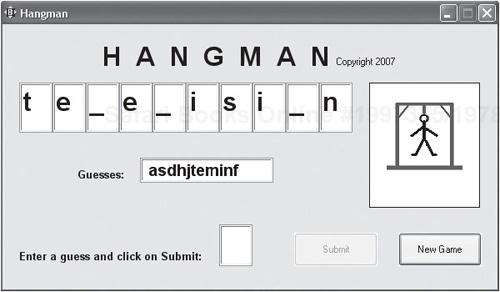
In this chapter you will learn how to develop the book’s final Just BASIC application, the Hangman game. In this game, the player is challenged to try and guess a mystery word without making more than five incorrect guesses. Figure 10.1 shows how the game looks when first started.
The player submits guesses by typing a letter into the Enter a guess and click on Submit: field and then clicking on the Submit button. If the letter that is guessed is used in the mystery word, the letter is displayed in the appropriate textbox control at the top of the window, as demonstrated in Figure 10.2.
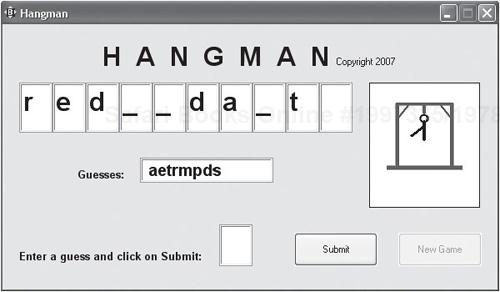
Each time the player enters a guess, whether it is right or wrong, the letter is added to the list of letters shown in the Guesses field, making it easy for the player to keep track of the guesses made so far. A graphical depiction, located on the right-hand side of the window, shows how many misses the player has made so far.
Each guess submitted by the player is validated. The game prevents the player from entering the same letter twice. It prevents the player from entering a number or a special character.
It also prevents the player from entering more than one character at a time. For example, Figure 10.3 shows an example of the message that is displayed by the game in the event that the player clicks on the Submit button without first keying in a guess.
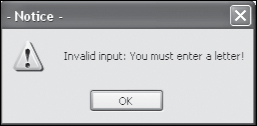
Figure 10.4 shows an example of a game that has been won by the player. As you can see from the Guesses field, it took the player several guesses to determine the game’s mystery word. However, the player only made three incorrect guesses, as depicted by the partially drawn hangman image.

Figure 10.5 shows an example of a game in which the player has lost and the hangman is complete. As the figure shows, the Submit button is disabled at the end of each game in order to stop game play. At the same time, the New Game button is enabled, providing the player with the ability to start a new game.
Every programmer, no matter how proficient and talented he may be, runs into errors when developing computer applications. The number of errors and problems thatyou run into grow based on the size and complexity of your applications. Unfortunately, there is no way around this inevitability—errors will happen. The purpose of this chapter is to provide you with an overall understanding of the types of errors thatyou will run into and offer guidance on how to go about finding, fixing, and handling them.
Computer applications are subject to different types of errors. Errors can wreak havoc on an application and result in unpredictable results. Sometimes the bugs are easy to find and eliminate. Other times, they are hidden deep within your program code and surface only on rare occasions to drive both programmers and users crazy. Many programmers refer to errors as bugs. Your job as a programmer is to seek out and exterminate or debug all the errors from your applications.
As this chapter demonstrates, there are a number of steps that you can take to reduce errors in your applications. One of the most obvious steps is to take time before you start writing your program to plan out its overall organization and design as opposed to just sitting down at the keyboard and making things up as you go along. You should also make liberal use of subroutines and functions in order to develop modular program code that can be created and tested a section at a time. Another step that you should always include is properly testing your applications. This includes testing to make sure they operate as expected as well as trying to feed your application inappropriate data to see if the program handles it correctly.
Along with these programming practices, there are additional steps you can take to ensure that your applications will operate as expected, including:
Carefully laying out a clear and easy-to-use user interface
Making sure that you provide users with access to clear instructions and help information so that they will know how to properly operate the application
Adding program code to your application that will validate all input, whether it be supplied from an external file or directly from the user
Using a consistent naming scheme for all your variables, arrays, subroutines, and functions, and ensuring that names are as descriptive as possible
In addition to following the above advice, you should determine which parts of your applications are most subject to errors and add programming logic to attempt to deal with them. As previously discussed, one way of doing this is through data validation. Another way of handling errors is to develop error-handling routines, as discussed later in this chapter.
Regardless of which programming language you are working with, you will run into three distinct types of programming errors, as listed here:
Syntax errors
Logical errors
Runtime errors
The most obvious and common type of error that you will come across is a syntax error. A syntax error is an error that occurs when the programmer fails to write a code statement that follows the syntax rules specified by the programming language. The most common cause of syntax error is typos. For example, a syntax error will occur if you misspell a command or inappropriately format a code statement, which would be the case if you left out a key parameter.
Programming languages notify programmers of errors in many different ways. A text-based scripting language like Perl, Python, or Ruby will display a text error message. RAD programming languages like REALbasic, Visual Basic, and Liberty BASIC will sometimes display error messages in the code editor’s status bar or in popup dialogs. Regardless of the programming language used, error messages generally provide the same type of information, which includes a brief description of the error and an error number. A text-based scripting language may also provide you with the line number where the error was detected, and RAD programming languages often highlight the offending programming statement in the IDE.
Syntax errors prevent an application from compiling. In Just BASIC, the compiler stops executing if it comes across a syntax error. To see an example of a syntax error, take a look at the following statement.
print "Hello world!
There is a double-quote missing from the end of the text string in this statement. In addition to halting the compile process, Just BASIC will highlight the statement that contains the syntax error in the code editor and display a text message describing the error in the status bar at the bottom of the code editor window, as demonstrated in Figure 10.6.
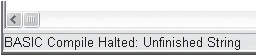
As you can see, the text message displayed in the status bar clearly identifies the problem as being an unfinished string (e.g., it’s missing its closing double-quotation mark). To fix this error, all that must be done is to add the closing quotation mark to the end of the string being displayed, as shown here:
print "Hello world!"
Upon fixing the syntax error, you can perform the compile process again. Just BASIC will either compile your program or, if it comes across another syntax error, pause and display information about the error.
An example of another common type of syntax error is shown here:
sampleString = "Hello world"
Here a type mismatch error syntax error has occurred because a string is being assigned to a numeric variable. Remember that string variable names must end with the $ character, as shown here:
sampleString$ = "Hello world!"
Because Just BASIC clearly identifies the program statement that generates a syntax error and also provides a descriptive error message, it is generally easy to identify and fix syntax errors. If after examining the statement in question you are unable to locate the source of the error, you can always using Just BASIC’s help file to look up the syntax of the command in question and double-check your syntax usage that way.
Sometimes errors occur because of a mistake on your part in the logic being applied to solve a problem or to perform a particular task. These types of errors are usually referred to as logical errors. For example, you may have meant to take two numbers provided by the user and multiply them together to create a third number. However, when you sat down and wrote the program, you may have inadvertently added these two numbers together. As a result, your application might run just fine, doing exactly what it was told to do. The problem is that this is not what you wanted it to do.
The best way to guard against logical errors is to carefully outline and review the programming logic required to develop a program before you write it and then to extensively test your application once it has been written to ensure that it is operating as expected. One way of executing your program is to use the Just BASIC debugger, covered later in this chapter, to keep an eye on the execution flow of program statements and to monitor the values being assigned to program variables and arrays.
Unfortunately, because Just BASIC does not see any problems with the programming logic, it is not able to flag logical errors. But do not fret, all hope is not lost. There are ways to track down and fix logical errors. The first step is to realize that your program is not operating as expected. You can then sit down and review your application’s source code to see if you can spot the error that way. If you cannot find the error this way then your next step might be to embed a few print statements or notice commands at different locations within your program to identify when particular parts of the program are being executed. This provides you with a rudimentary way of keeping track of the logical execution flow of your program. You could even expand the usefulness of the print statements and notice commands by also displaying the values of any variables that you think are relevant to the problem you are trying to track down. In the case of the previous example, you would want to display the value of the three variables at different locations within the application to keep an eye on them. In this manner, you’d be able to identify the problem as soon as you saw the two values were being added together instead of being multiplied.
Embedding extra print statements and noti ce commands inside your programs is a sufficient approach for debugging and finding problems in small programs. However, as your programs grow in size, this debugging technique becomes difficult to implement. This is where Just BASIC’s built-in debugger comes into to play. Using the debugger, as described later in this chapter, you can trace program execution flow and monitor variable values while also exercising detailed line-by-line control over the execution of your program.
In order to run your application, it must be free of syntax errors. However, your application is still susceptible to another type of error referred to as a runtime error. Runtime errors occur when a program statement attempts to perform an illegal action. For example, your program might attempt to access a local disk drive that has crashed or become full, in which case the access attempt will fail and the program will stop running and crash. If this happens, the application may generate an ugly error message that is sure to confound your users, or it may simply shut down without any explanation at all of what has happened.
Application compilers are not able to detect and notify you of runtime errors. In order to detect them you need to extensively test your applications. This is especially true if your application contains subroutines or functions that may not be executed except in rare occasions. Failure to test out every procedure in an application and to attempt to validate the application’s execution in every possible scenario means thatyour users will be left to discover runtime errors on their own. The result may be a loss of faith in the quality of the application, or even worse, their belief in the quality of your work.
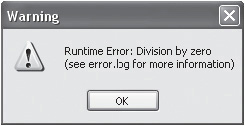
If a runtime error occurs when you are executing a program using Just BASIC’s code editor, Just BASIC will display an error message in a popup dialog informing you of the error before terminating your program’s execution. For example, the following statement is guaranteed to produce a runtime error (it is illegal in any programming language to divide a number by zero).
x = 10 / 0
As soon as it comes across this statement, Just BASIC will display the popup error message shown in Figure 10.7.
Runtime errors can occur for all sorts of reasons. The user may, for example, provide your application with invalid input. You can deal with this by adding input validation logic to your program. Your program may need to work with a specific file. Since files have a tendency to disappear for all kinds of reasons, it is a good idea to add logic to your program to check for the existence of a file prior to trying to access it. This way if the file is not found, you can take corrective action. This action might be to re-create the file or it might be to display a message informing the user of the problem and stating that until it has been fixed, your application will not be able to perform a particular task.
Nothing is ever perfect, including computer programs. Therefore, try as you might, there is no way to ever be 100-percent certain that all runtime errors have been eliminated from your applications. However, even in this worst-case scenario, you still have options. Specifically, you can add error-handling logic to your applications, as discussed later in this chapter, to recover from errors or at the very least to gracefully handle them (for example, by displaying a user-friendly error message and by closing any open files in use by the program).
As was demonstrated in Figure 10.7, sometimes error messages reference Just BASIC’s Error.log file. Just BASIC writes internal information to the file as it executes. Sometimes you can get helpful bits and pieces of information that provide insight as to why a particular error occurred by examining this file. However, more often than not, you probably will not find this file overly helpful.
Hint

If you run into a problem that you cannot figure out and you think it might be the result of a problem with Just BASIC, you can send an email to [email protected] explaining your problem in as much detail as possible. In addition, you might want to include a copy of the program in which the error is occurring, as well as a copy of the Error.log file.
Most modern-day programming languages, including Just BASIC, REALbasic, and Liberty BASIC, provide programmers with access to a built-in program debugger. A debugger is a utility program that runs an application in a special mode that allows the programmer to pause application execution in order to view variable values and to then execute line-by-line control over program statements.
Just BASIC also includes a debugger that you can use to debug your Windows application to trace its execution flow, thus validating that things are occurring in the order you expect them to. In addition, because you can see and keep an eye on the values assigned to application variables, you can also use the debugger to ensure that your program is correctly calculating and updating variable values.
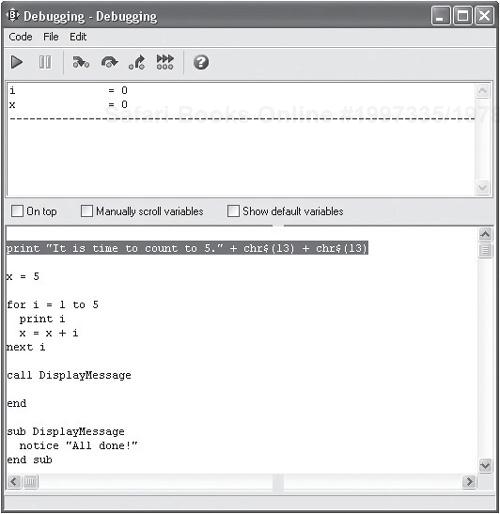
To run a program using the Just BASIC debugger, open your program in the Just BASIC editor and then click on the Run menu and select Debug or click on the Debug button (which looks like a small ladybug). In response, Just BASIC loads (but does not run) your application into the debugger and displays the debugger window, as demonstrated in Figure 10.8.
Just BASIC’s debugger consists of a toolbar and two window panes. The toolbar, shown in Figure 10.9, contains buttons that give you detailed control over how your program is executed.
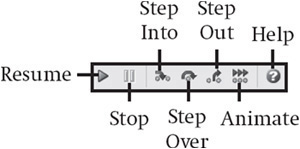
The function of each of the toolbar buttons is explained here:
Resume. Continues the normal execution of the program and does not display information about variable values while executing.
Stop. Stops program execution and highlights the line where execution has been paused.
Step Into. Executes the next statement in the program and then pauses the program. If the next statement is a subroutine or a function, execution pauses at the opening sub routine statement.
Step Over. Executes the next statement in the program and then pauses the program unless the next statement is a subroutine or a function, in which case the entire procedure is run before program execution pauses.
Step Out. Executes any statements remaining in a subroutine or function and then pauses program execution. Resumes the execution of the program allowing it to run normally.
Animate. Executes the program normally while also displaying variable values in the upper pane as the program runs.
Help. Displays information about the debugger and its operation.
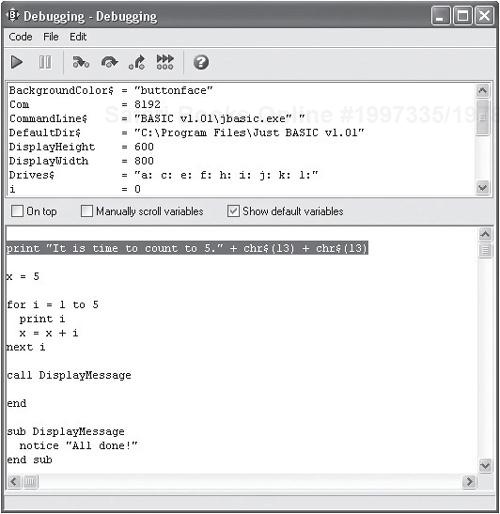
When first started, the debugger highlights the first statement in your application and waits for you to tell it what to do. By default, only the variables explicitly defined within your application are displayed in the upper window pane. However, Just BASIC automatically generates additional variables for every application. You can view these variables by selecting the Show default variables checkbox control located in the space between the upper and lower window pane. When selected, this option instructs the debugger to show all program variables, as demonstrated in Figure 10.10.
As you use the debugger to execute your application, the value of variables displayed in the upper pane is constantly updated as changes are made to them. As such, you can keep an eye on your application’s variables in order to determine if their values are being correctly modified as the application executes.
The best way to learn how to work with any programming language’s debugger is to spend some time getting comfortable with its operation. So, let’s take Just BASIC’s debugger for a quick test drive. For starters, you will need a program to execute, so begin by keying the following program into the Just BASIC code editor.
print "It is time to count to 5." + chr$(13) + chr$(13)

x = 5

for i = 1 to 5
  print i
  x = x + i
next i
call DisplayMessage

end

sub DisplayMessage
  notice "All done!"
end sub
When executed, this program will display a list of numbers from 1 to 5 and then display a popup dialog announcing the end of the program’s execution. Rather than running the program normally, click on the Debug (ladybug) button located on Just BASIC’s toolbar. In response, Just BASIC will open the debugger window, load your application, and then pause. In addition, the application’s mainwin text window will also appear. To run your program at normal speed, click on the debugger’s Resume button. When run this way, the debugger does not keep track of statement execution flow or variable values and is not much help in tracking down an error.
Now, close the debugger window and click on the Debug button again. Note that when the debugger reappears, the first statement in your program is highlighted, identifying it as the next line of code to be executed. Also note that the value of both x and i are set to zero. Click on the Step Into button. In response the debugger will process the highlighted statement and pause execution again. If you look at the mainwin text window, you will see a line of text has been printed to it. Click on the Step Into button again. Note that the value of x has been set equal to 5. If you continue to click on the Step Into button you will see that the statements that make up the program’s for...next loop are repeatedly executed five times and that the values assigned to x and i are continuously updated.
Once the loop has executed for the fifth and final time, the Call DisplayMessage statement is highlighted. If you click the Step Into button a few more times, you will step through the execution of the DisplayMessage subroutine a line at a time. Alternatively, you could click on the Step Over button, in which case the entire subroutine would execute without pausing. However, execution would pause again at the end statement. You could also Step Into the subroutine and then decide to click on the Step Out button, in which case the rest of the subroutine would be executed and would pause again at the end statement. Lastly, you can click on the Animate button at any time, in which case the debugger will execute the rest of the program at normal speed while also updating the value of x and i in the upper pane and showing in the lower pain the order in which statements are being executed. Because this example only loops five times, the animate feature is of little help. But if you were to modify the program to loop 1,000 times, you’d be able to get a better understanding of how the animate option works.
All in all the debugger can be a great tool for tracking down a particularly pesky bug because it allows you to run your program and control the pace at which things occur while easily keeping an eye on variable values.
Hint
One major feature not found in Just BASIC’s debugger is the ability to set breakpoints. A breakpoint is a marker that tells the debugger to pause execution at a specified location in a program. By setting breakpoints at different points within a program, you have an additional means of controlling and pausing program execution.
As previously discussed, runtime errors can occur for different reasons. As a programmer, it is your job to anticipate and deal with runtime errors. Your goal is to develop bug-free applications that never crash and that handle any unavoidable errors as gracefully as possible. The end result should be an application that hopefully meets user needs and minimizes potential confusion in the event of a runtime error.
Your first step in meeting this challenge is to try and anticipate the places within your applications where errors are most likely to occur and to try to programmatically deal with them. You should, for example, validate any user input and ensure that files exist before attempting to open them.
For situations that maybe out of your control, you can set up a runtime error handler to deal with errors. Examples of these types of situations include an unavailable disk drive or a missing file. Using a runtime error handler, you set up your program to gracefully handle the situation using any of the following options.
Presenting user-friendly error messages
Closing any open files and resources in use by the application
Providing the user with additional instruction on how to fix the problem
Apologizing for any inconvenience
Requesting that the user report the error
Whenever an error occurs in a Just BASIC application, the Err special variable is populated with an error number. Likewise, the Err$ special variable is populated with a string that describes the error.
Trap
Both Err and Err$ are case sensitive, so when you use them be sure to type them exactly as shown here.
Using the information provided by the Err and Err$ special variables you can capture and identify the cause of a runtime error. Using this information, you can add an error-handling routine to your program that attempts to recover from or gracefully deal with the error. To set up an error handler within your Just BASIC program, you will need to use the On Error GoTo statement.
Hint
Use of the On Error GoTo statement as a means of setting up an error handler is supported in many different programming languages. This approach to error handling is sometimes referred to as unstructured error handling. Structured error handling is an alternative approach provided by many programming languages, including C++, REALbasic, and Visual Basic .NET. In structured error handling, a Try...Catch...Finally statement is used to build error-handling routines. Specifically, Try statements are inserted into locations within the application where exceptions are most likely to occur and Catch statements are then added that are designed to handle the exception. To handle different types of exceptions, additional Catch blocks can be added. Programmers can also add an optional Finally block. If included, the Finally block always executes and runs program statements that need to be executed in response to any error.
The On Error GoTo statement instructs Just BASIC to redirect program flow to a specified label in the event an error occurs. This statement has the following syntax.
On Error GoTo [label]To better understand how the On Error GoTo statement works, take a look at the following example.
on error goto [ErrorHandler]
open "C:Sample.log" for input as #logFile
line input #logFile, variableName$
print variableName$
close #logFile
wait
[ErrorHandler]
print "The following error occurred during program execution:" _
+ chr$(13) + chr$(13)
print "------------------------------------------------------------"
print "Error Code: "; Err
print "Error Message: "; Err$
print "------------------------------------------------------------"
print
print "An error code of 0 indicates that the Sample.log file is empty."
print
print "An error code of 53 indicates that Sample.log has been removed "
print "from this computer."
print
print "Please report this error message to Technical Support."
if Err = 0 then
close #logFile
end if
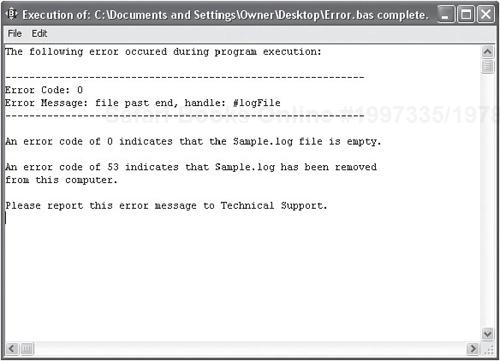
endHere, an On Error GoTo statement has been added as the first statement at the beginning of a small application. As a result, if an error occurs, execution flow will be redirected to a label named [ErrorHandler]. The code statements that follow the label will then be executed.
The code statements that make up the actual application have been inserted after the On Error GoTo statement and before the [ErrorHandler]. The first of these statements attempts to open a file named Sample.log that should be found in the root of the computer’s C: drive. If the file is found, it is opened and the first line of the file is read and then displayed. The file is then closed.
The application’s error handler has been designed to handle two possible runtime errors. First, if the file exists but is empty, leaving nothing to be retrieved and displayed, when the line input command is executed, an error occurs. In response, the execution flow is immediately passed to [ErrorHandler]. Within the handler, the value of Err and Err$ are used to display a user-friendly error message. In addition, since Err will be equal to 0, the close command is used to close the Sample.log file. Figure 10.11 shows the result that is produced when this example is executed.
If, on the other hand, the program is run and it turns out that somebody has deleted the Sample.log file, a different error occurs. In response, execution flow jumps to [ErrorHandler] where a user-friendly error message is displayed. Because the value of Err is 53 this time, there is no need to close the Sample.log file, since it was never opened.
Regardless of the type of error that occurs, once executed, the last statement following the [ErrorHandler] executes, terminating the execution of the program.
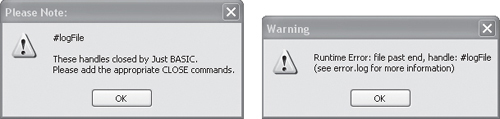
To see the benefit of including an error handler within your Just BASIC applications, consider what would happen if you were to remove the On Error GoTo statement and its corresponding error handler from the application, leaving only the statements shown here:
open "C:Sample.log" for input as #logFile

line input #logFile, variableName$
print variableName$

close #logFile

wait
This time, if you execute the application, instead of displaying a user-friendly error message and gracefully terminating the application, the two popup dialog error messages shown in Figure 10.12 are displayed and the application abruptly terminates.
Now it is time to turn your attention back to this book’s final application development project, the Hangman game. This game serves as an excellent capstone project for this book, giving you the chance to put everything you have learned together. You’ll need to work with both variables and arrays. You will use loops and conditional logic. You will also need to work with both subroutines and functions, and, of course, you’ll have to design and develop the game’s graphical user interface.
As has already been stated, the design of the Hangman game relies on subroutines and functions. In total, the game will be created in nine steps, as outlined here:
Create a new BASIC file and add initial comment statements.
Define an array, global variables, and initiate game play.
Create the
ManageGamePlaysubroutine.Create the
StartNewGamesubroutine.Create the
GetNewWord$()function.Create the
ProcessGuesssubroutine.Create the
ValidateInput$()function.Create the
PlayAgainsubroutine.Create the
ClosePlaysubroutine.
The first step in the creation of the Hangman game is to create a new BASIC file named Hangman.bas and add the following statements to it.
' *************************************************************************
'
' Script Name: Hangman.bas (The Hangman Game)
' Version:     1.0
' Author:      Jerry Lee Ford, Jr.
' Date:        March 1, 2007
'
' Description: This is a computerized version of the classic
'              Hangman game. The objective of the game is for the player to
'              try and guess mystery words one letter at a time in as
'              few guesses as possible without getting hung.
'
' *************************************************************************

nomainwin    'Suppress the display of the default text window
As you can see, there is nothing new here beyond the addition of standard opening comment statements and the execution of the nomainwin command.
The next step in the development of the Hangman game is to declare a few global variables used to store the game’s mystery word and to keep track of the total number of incorrect and correct player guesses. In addition, you will define an array named words$() and populate it with ten mystery words. Lastly, the ManageGamePlay subroutine is called. This subroutine generates the game’s user interface. To accomplish all this, add the following statements to the end of the program file.
'Define global variables
global secretWord$, totalMissed, totalCorrect

'Define an array capable of storing ten words
dim words$(9)

'Load the array with words (limit word size to a maximum of ten letters)
words$(0) = "piano"
words$(1) = "article"
words$(2) = "television"
words$(3) = "musical"
words$(4) = "redundant"
words$(5) = "remarkable"
words$(6) = "experience"
words$(7) = "adventure"
words$(8) = "discover"
words$(9) = "military"

call ManageGamePlay 'Call the subroutine responsible for managing game play

wait  'Pause the application and wait for the player's instruction
The code statements that comprise the ManageGamePlay subroutine are shown next and should be added to the end of the program file. When executed, this subroutine generates the game’s user interface and is responsible for managing overall game play.
'This subroutine displays the game board and controls interaction with the
'player
sub ManageGamePlay

  WindowWidth = 600 'Set the width of the window to 600 pixels
  WindowHeight = 350 'Set the height of the window to 350 pixels

  loadbmp "blank", "C:imageslank.bmp"       'Load the specified bitmap
                                               'file into memory
  loadbmp "head", "C:imageshead.bmp"         'Load the specified bitmap
                                               'file into memory
  loadbmp "body", "C:imagesody.bmp"         'Load the specified bitmap
                                               'file into memory
  loadbmp "leftarm", "C:imagesleftarm.bmp"   'Load the specified bitmap
                                               'file into memory
  loadbmp "rightarm", "C:images
ightarm.bmp" 'Load the specified bitmap
                                               'file into memory
  loadbmp "leftleg", "C:imagesleftleg.bmp"   'Load the specified bitmap
                                               'file into memory
  loadbmp "rightleg", "C:images
ightleg.bmp" 'Load the specified bitmap
                                               'file into memory

  'Define the format of statictext controls displayed on the window
  statictext #play.statictext1, "H  A  N  G  M  A  N", 120, 20, 440, 30
  statictext #play.statictext2, "Copyright 2007", 400, 38, 80, 20
  statictext #play.statictext3, "Enter a guess and click on Submit:", _
    20, 270, 230, 20
  statictext #play.statictext4, "Guesses:", 90, 172, 60, 20

  'Add a graphicbox control to be used to display hangman image files
  graphicbox #play.pic1, 440, 70, 133, 150

  'Add textbox controls to be used to display the letters of each word
  textbox #play.letter1 20, 70, 40, 60
  textbox #play.letter2 60, 70, 40, 60
  textbox #play.letter3 100, 70, 40, 60
  textbox #play.letter4 140, 70, 40, 60
  textbox #play.letter5 180, 70, 40, 60
  textbox #play.letter6 220, 70, 40, 60
  textbox #play.letter7 260, 70, 40, 60
  textbox #play.letter8 300, 70, 40, 60
  textbox #play.letter9 340, 70, 40, 60
  textbox #play.letter10 380, 70, 40, 60

  'Displays a list of guessed letters
  textbox #play.guesses 165, 160, 160, 30

  'Add textbox control used to collect player guesses
  textbox #play.guess 260, 240, 40, 50

  'Add button controls for submitting guesses and starting new games
  button #play.button1 "Submit", ProcessGuess, UL, 350, 250, 100, 40
  button #play.button2 "New Game", PlayAgain, UL, 475, 250, 100, 40

  'Open the window with no frame and a handle of #play
  open "Hangman" for window_nf as #play

  print #play.button1, "!enable" 'Enable the Submit button
  print #play.button2, "!disable" 'Disable the New Game button

  'Set up the trapclose event for the window
  print #play, "trapclose ClosePlay"

  'Set the font type, size, and attributes
  print #play.statictext1, "!font Arial 24 bold"
  print #play.statictext3, "!font Arial 10 bold"
  print #play.statictext4, "!font Arial 10 bold"

  print #play.guesses, "!font Arial 14 bold"
  print #play.letter1, "!font Arial 24 bold"
  print #play.letter2, "!font Arial 24 bold"
  print #play.letter3, "!font Arial 24 bold"
  print #play.letter4, "!font Arial 24 bold"
  print #play.letter5, "!font Arial 24 bold"
  print #play.letter6, "!font Arial 24 bold"
  print #play.letter7, "!font Arial 24 bold"
  print #play.letter8, "!font Arial 24 bold"
  print #play.letter9, "!font Arial 24 bold"
  print #play.letter10, "!font Arial 24 bold"
  print #play.guess, "!font Arial 24 bold"

  print #play.guess, "!setfocus";  'Set focus to the button control

  call StartNewGame  'Call on the subroutine that gets things started

  'Pause the application and wait for the player's instruction
  wait

end sub
This subroutine begins by assigning values to the WindowWidth and WindowHeight special variables to set the window’s width and height. Then a series of loadbmp commands are executed to pre-load bitmap images representing different graphical depictions of a hangman character. A series of statictext controls is defined next, displaying the name of the game, its copyright statement, and providing labels for other controls. A graphicbox control is then added to the right side of the window.
The game is designed to display mystery words that are ten letters or less in length. To display the letters that make up each word, ten textbox controls are added next, each of which is 40 pixels wide by 60 pixels tall. Two additional textbox controls are then added. The first textbox control will be used to display a list of all the letters guessed by the player, making it easy for the player to keep track of things. The second textbox control will be used to collect player guesses.
Next, two button controls are added. The first button control is labeled Submit. When clicked, it will call on a subroutine named ProcessGuess, which is responsible for ensuring that the player’s guess is valid and for displaying letters that are correctly guessed. The second button control is labeled New Game. When clicked, it will call on a subroutine named PlayAgain. This subroutine is responsible for preparing the game for a new round of play.
At this point, the user interface is complete and the open command is used to display the window and assign it a handle of #play. Next, two print statements are executed to enable the Submit button and disable the New Game button. Another print statement is used to set up the trapclose event for the window. A series of additional print statements are then executed in order to specify the font type, size, and attributes for various interface controls. A final print statement is executed to set focus to the textbox control used to collect player guesses and then the StartNewGame subroutine is called. The last statement in the ManageGamePlay subroutine executes the wait command in order to pause the game and wait for the player to make a guess.
The StartNewGame subroutine, shown next, is responsible for setting up the game window to play a new game. This subroutine starts off by clearing out the textbox control used to collect the player’s guesses. Next, a bitmap showing an empty hangman gallows is loaded into the window’s graphicbox control using the drawbmp command.
Next, the GetNewWords$() function is called. This function will return a randomly selected word from the words$() array, which is then stored in the secretWord$ variable.
To clear out anything displayed in the textbox controls representing the letters of the secret word, a series of print statements are used to display an empty string in each control. A for...next loop is then set up that loops once for each letter in the game’s mystery word and displays an underscore character in the corresponding textbox controls.
'This subroutine starts a new round of play
sub StartNewGame

  print #play.guesses, ""  'Clear out any previous guesses

  'Load a blank bitmap image into the game's graphicbox control
  print #play.pic1, "flush"  'Flush the previous image
  print #play.pic1, "drawbmp blank 1 1" 'Display the bitmap image
  print #play.pic1, "flush"  'Flush the new image

  'Call on the function responsible for selecting a new word
  secretWord$ = GetNewWord$()

  'Clear out anything displayed in the textbox controls used to
  'represent the letters of the word
  print #play.letter1, ""
  print #play.letter2, ""
  print #play.letter3, ""
  print #play.letter4, ""
  print #play.letter5, ""
  print #play.letter6, ""
  print #play.letter7, ""
  print #play.letter8, ""
  print #play.letter9, ""
  print #play.letter10, ""

  i = 1 'Define a variable to be used as a counter

  'Loop through each letter in the word and display an underscore
  'character for each letter in the appropriate textbox control
  for i = 1 to len(secretWord$)
    if i = 1 then print #play.letter1, "_"
    if i = 2 then print #play.letter2, "_"
    if i = 3 then print #play.letter3, "_"
    if i = 4 then print #play.letter4, "_"
    if i = 5 then print #play.letter5, "_"
    if i = 6 then print #play.letter6, "_"
    if i = 7 then print #play.letter7, "_"
    if i = 8 then print #play.letter8, "_"
    if i = 9 then print #play.letter9, "_"
    if i = 10 then print #play.letter10, "_"
  next i

end subThe code statements that make up the GetNewWords$() function are shown here and should be added to the end of the program file.
'This function  is  responsible for  retrieving a word for the player
'to guess
function GetNewWord$()

  RandomNumber = int(rnd(1)*10)  'Retrieve a number between 0 and 9

  'Use the random number to retrieve a word from the array and return
  'the word to the calling statement
  GetNewWord$ = words$(RandomNumber)

end function
The function begins by retrieving a random number in the range of 0–9. Next, using this number, a mystery word is selected from the words$() array and assigned to a local variable named GetNewWord$. GetNewWord$ is also the name of the function. In Just BASIC, any time you assign a value to a variable that is named after the function in which it resides, the assigned value is returned to the statement that called the function. As such, the word retrieved from the words$() array is passed back to the StartNewGame subroutine where it is assigned to the secretWord$ variable.
The code statements that make up the ProcessGuess subroutine are shown next and should be added to the end of the program file.
'This subroutine processes player guesses
sub ProcessGuess handle$

  print #play.guess, "!contents? letterGuessed$"; 'Get the player's guess
  print #play.guess, ""  'Clear out the textbox control used to collect
                         'player input

  'Call the function responsible for validating player guesses
  result$ = ValidateInput$(letterGuessed$)

  if result$ = "Invalid" then 'Exit the subroutine if the guess is invalid
     exit sub
     end if

  print #play.guesses, "!contents? guesses$"; 'Get the player's guess

  guesses$ = guesses$ + letterGuessed$ 'Add the current guess to the list
                                       'of letters already guessed

  print #play.guesses, guesses$  'Display the list of guessed letters

  'Determine if the letter that was guessed is part of the word
  if instr(secretWord$, lower$(letterGuessed$)) = 0 then

    'The letter is not part of the word so increment the variable used to
    'keep track of the total number of misses
    totalMissed = totalMissed + 1

    notice "Sorry: Your guess was wrong!"  'Inform the player

    print #play.guess, "!setfocus";  'Set focus to the button control

    'Update the display of the hangman image based on how many misses
    'the player has made so far
    if totalMissed = 1 then print #play.pic1, "drawbmp head 1 1"
    if totalMissed = 2 then print #play.pic1, "drawbmp body 1 1"
    if totalMissed = 3 then print #play.pic1, "drawbmp leftarm 1 1"
    if totalMissed = 4 then print #play.pic1, "drawbmp rightarm 1 1"
    if totalMissed = 5 then print #play.pic1, "drawbmp leftleg 1 1"
    if totalMissed = 6 then  'At 6 misses the game is over
      print #play.pic1, "drawbmp rightleg 1 1"  'The player is hung
      notice "Game over. You Lose!"  'Notify the player
      print #play.button1, "!disable" ' Disable the Submit button
      print #play.button2, "!enable"  'Enable the New Game button
      print #play.button2, "!setfocus";  'Set focus to the New Game button
    end if

    print #play.pic1, "flush"  'Make the bitmap image stick

  else 'The letter is part of the word

    'Replace the underscore character for each occurrence of the letter

    'in the word
    for i = 1 to len(secretWord$)

      'Retrieve a letter from the word
      letter$ = mid$(secretWord$, i, 1)

      'See if the letter matches the player's guess and display it if it
      'matches
       if letter$ = letterGuessed$ then
         if i = 1 then print #play.letter1, letterGuessed$
         if i = 2 then print #play.letter2, letterGuessed$
         if i = 3 then print #play.letter3, letterGuessed$
         if i = 4 then print #play.letter4, letterGuessed$
         if i = 5 then print #play.letter5, letterGuessed$
         if i = 6 then print #play.letter6, letterGuessed$
         if i = 7 then print #play.letter7, letterGuessed$
         if i = 8 then print #play.letter8, letterGuessed$
         if i = 9 then print #play.letter9, letterGuessed$
         if i = 10 then print #play.letter10, letterGuessed$

         totalCorrect = totalCorrect + 1  'Increment the variable used to
                                          'keep track of correct guesses
       end if

     next i

    print #play.guess, "!setfocus";  'Set focus to the button control

    'The player wins when the total number of correct guesses equals the
    'number of letters in the word
    if totalCorrect = len(secretWord$) then
      notice "Game Over. You have won!"  'Notify the player
      print #play.button1, "!disable"    'Disable the Submit button
      print #play.button2, "!enable"     'Enable the New Game button
      print #play.button2, "!setfocus";  'Set focus to the button control
    end if

  end if

end sub
This subroutine begins by retrieving the contents of the textbox control into which player guesses are entered and assigns this value to a variable named letterGuessed$. Once its value has been retrieved, the contents of the #play.guess textbox control are replaced with an empty string.
Next, the ValidateInput$ function is called and passed letterGuessed$ as an argument. The ValidateInput$ function analyzes the player’s guess and returns a string of “Invalid” in the event a problem is found. If this is the case, no additional tasks need to be performed in the ProcessGuess subroutine and the exit sub command is executed. If this is not the case, then a valid guess has been entered, so the next few statements retrieve the list of guesses that have been already made (from the #play.guesses textbox control), add the player’s current guess to this list, and then redisplay the updated list of guesses back in the textbox control.
Next, an if...then...else code block is set up to determine whether or not the player’s guess is part of the mystery word. This is accomplished by first using the lower$() function to convert the player’s guess to all lowercase characters and then using the instr() function to search secretWord$ and see if it contains the letter guessed by the player. If instr() returns a value of 0, then the player has guessed a letter that is not in the word. In this case, the value of totalMissedis incremented and a popup dialog is displayed informing the player of her missed guess. Focus is then placed on the textbox control used to collect player guesses.
Finally, a bitmap is loaded into the window’s graphicbox control. The game determines what bitmap image to load based on the value assigned to totalMissed. For example, if this is the first time that the player has guessed an incorrect letter, a bitmap showing a head with no body parts is loaded. If, on the other hand, this is the player’s sixth miss, a bitmap showing a complete body is displayed, notifying the player that she has lost the game. In addition, the Submit button is disabled and the New Game button is enabled.
If on the other hand, the player’s guess did match up against at least one of the letters in the mystery word, the else portion of the if...then...else code block is executed. If this is the case, a for...next loop is set up that repeats once for each letter in the mystery word. Upon each iteration of the loop, the mid$() function is used to retrieve a letter from the mystery word. Once a letter has been retrieved, an i f statement code block is set up that checks to see if the player’s guess is equal to that letter in the word. If a match is found, a print statement is executed which displays that letter. Because the for...next loop iterates through every letter in the mystery word, every matching instance of the player guess is displayed. Note also that the totalCount variable is incremented for each matching letter that is found in the mystery word.
Once the entire word has been processed, the value of totalCorrect is checked to see if it is equal to the length of the secretWord$. If this is the case, then the player has guessed every letter that makes up the game’s mystery word and the game is over. After notifying the player of this fact, the Submit button is disabled and the New Game button is enabled.
The ValidateInput$() function, shown next, is responsible for validating player guesses and notifying the player when an invalid guess has been submitted.
'This subroutine is responsible for validating player guesses
function ValidateInput$(x$)

  'Check to see if the player entered something
  if x$ = "" then  'An empty string is not allowed
    notice "Invalid input: You must enter a letter!"
    ValidateInput$ = "Invalid"  'Return a string indicating invalid input
    print #play.guess, "!setfocus";  'Set focus to the button control
    exit function  'There is no need to go further so exit the subroutine
  end if

  'Check to see if the player entered more than one character
  if len(x$) > 1 then  'Only one character may be input at a time
    notice "Invalid input: Enter only one letter at a time!"
    ValidateInput$ = "Invalid"  'Return a string indicating invalid input
    print #play.guess, "!setfocus";  'Set focus to the button control
    exit function  'There is no need to go further so exit the subroutine
  end if

  'Check to see if the player entered a letter
  if instr("abcdefghijklmnopqrstuvwxyz", lower$(x$)) = 0 then
    notice "Invalid input: Numeric and special character guesses are " _
      + "not valid!"
    ValidateInput$ = "Invalid"  'Return a string indicating invalid input
    print #play.guess, "!setfocus";  'Set focus to the button control
    exit function  'There is no need to go further so exit the subroutine
  end if

  print #play.guesses, "!contents? guesses$"; 'Get the player's guess

  'Check to see if the player has already entered this guess

   if instr(guesses$, lower$(x$)) > 0 then  'Convert the player guess to all
                                                'lowercase characters
    notice "Invalid input: This letter has already been guessed!"
    ValidateInput$ = "Invalid"  'Return a string indicating invalid input
    print #play.guess, "!setfocus";  'Set focus to the button control
    exit function  'There is no need to go further so exit the subroutine
  end if

end function
This function consists of four separate if...then code blocks. The first code block checks to see if the player clicked on the Submit button without entering a guess. The second code block checks to see if the player’s guess is more than one character long. The third code block checks to see if the guess is a letter. Lastly, the fourth code block checks to see if the player has made the guess before, which is the case if the letter the player submitted is found in the list of guessed letters stored in #play.guesses.
If any of the validation checks prove true, the function will return a value of “Invalid”. Otherwise, the function will exit without returning anything, signaling a valid guess.
The PlayAgain subroutine is called whenever the player clicks on the New Game button. The code statements that make up this subroutine are shown next and should be added to the end of the program file.
'This subroutine prepares the game for another round of play
sub PlayAgain handle$

  print #play.button1, "!enable"   'Enable the Submit button
  print #play.button2, "!disable"  'Disable the New Game button

  print #play.guess, "!setfocus";  'Set focus to the button control

  'Reset these variables back to set to get ready to play again
  totalMissed = 0
  totalCorrect = 0

  call StartNewGame  'Call this subroutine to start a new round of play

end sub
When called, the subroutine enables the Submit button and disables the New Game button. It also assigns focus to the textbox control used to collect player guesses. Next, the values assigned to the totalMissed and totalCount variables are reset to their initial default settings and the StartNewGame subroutine is called, allowing the player to play a new game.
The last procedure in this application, shown next, is a subroutine named ClosePlay. This subroutine is responsible for getting player confirmation before terminating the execution of the game.
'This subroutine is called when the player closes the #play window
'and is responsible for ending the game
sub ClosePlay handle$

  'Get confirmation before terminating program execution
  confirm "Are you sure you want to quit?"; answer$

  if answer$ = "yes" then  'The player clicked on Yes

    close #play  'Close the #play window

    end  'Terminate the game

  end if

end subOkay, this marks the end of yet another successful development project. Assuming that you followed along carefully and did not make any typos, your new game should be ready to go. If, on the other hand, you find that things are not working as expected, then it is time to put your newly developed debugging skills to work. In fact, even if the game is running just fine, you might want to go ahead and run it once using Just BASIC’s debugger, just so that you can observe and verify its proper execution.
In this chapter you learned how to track down and fix syntax, logical, and runtime errors. You learned how to work with the Just BASIC debugger in order to keep an eye on program statement execution as well as to monitor the status of variable values. You learned how to exercise step-by-step control over the execution of programming statements within your programs. You also learned how to develop error handlers. Finally, you learned how to create the Hangman game.
Now, before you put this book down and move on to other things, why don’t you take a little extra time to make a few improvements to the Hangman game by addressing the following list of challenges.