
16. Working with Files
The Foundation framework enables you to get access to the file system to perform basic operations on files and directories. This is provided by NSFileManager, whose methods include the capability to
• Create a new file
• Read from an existing file
• Write data to a file
• Rename a file
• Remove (delete) a file
• Test for the existence of a file
• Determine the size of a file as well as other attributes
• Make a copy of a file
• Test two files to see whether their contents are equal
Many of these operations can also be performed on directories. For example, you can create a directory, read its contents, or delete it. Another feature is the ability to link files. That is, the ability to have the same file exist under two different names, perhaps even in different directories.
To open a file and perform multiple read and write operations on the file, you use the methods provided by NSFileHandle. The methods in this class enable you to
• Open a file for reading, writing, or updating (reading and writing)
• Seek to a specified position within a file
• Read or write a specified number of bytes from and to a file
The methods provided by NSFileHandle can also be applied to devices or sockets. However, we will focus only on dealing with ordinary files in this chapter.
If you want to write programs that will run on different machines (or even under different operating system versions on the same machine), you should try to make your programs as independent of the underlying structure of the file system as possible. This implies that you should not make any assumptions about the existence of particular directories (for example, /tmp) or the location of particular files. Luckily, the Foundation framework provides routines that enable you to more easily write portable programs.
Managing Files and Directories: NSFileManager
A file or directory is uniquely identified to NSFileManager using a pathname to the file. A pathname is an NSString object that can either be a relative or full pathname. A relative pathname is one that is relative to the current directory. So, the filename copy1.m would mean the file copy1.m in the current directory. Slash characters separate a list of directories in a path. The filename ch16/copy1.m is also a relative pathname, identifying the file copy1.m stored in the directory ch16, which is contained in the current directory.
Full pathnames, also known as absolute pathnames, begin with a leading /. Slash is actually a directory, called the root directory. On my Mac, the full pathname to my home directory is /Users/stevekochan. This pathname specifies three directories: / (the root directory), Users, and stevekochan.1
The special tilde character (~) is used as an abbreviation for a user's home directory. ~linda would therefore be an abbreviation for the user linda's home directory. A solitary tilde character indicates the current user's home directory, meaning the pathname ~/copy1.m would reference the file copy1.m stored in the current user's home directory. Other special Unix-style pathname characters, such as . for the current directory and .. for the parent directory, should be removed from pathnames before they're used by any of the Foundation file-handling methods. An assortment of path utilities are available that you can use for this, and they're discussed later in this chapter.
You should try to avoid hard-coding pathnames into your programs. As you'll see in this chapter, methods and functions are available that enable you to obtain the pathname for the current directory, a user's home directory, and a directory that can be used for creating temporary files. You should avail yourself of these as much as possible. Foundation on Mac OS X has a function for obtaining a list of special directories, such as a user's Documents directory.
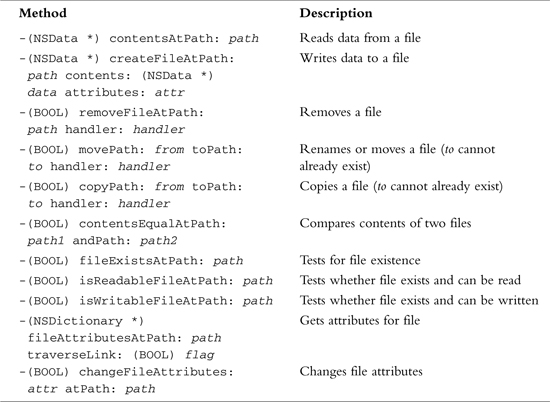
Table 16.1 summarizes some basic NSFileManager methods for working with files. In that table, path, path1, path2, from, and to are all NSString objects; attr is an NSDictionary object; and handler is a callback handler that you can provide to handle errors in your own way. If you specify nil for handler, the default action will be taken, which for methods that return a BOOL is to return YES if the operation succeeds and NO if it fails. We won't be getting into writing your own handler in this text.
Table 16.1. Common NSFileManager File Methods
Each of the file methods is invoked on an NSFileManager object that is created by sending a defaultManager message to the class, like so:
NSFileManager *NSFm;
...
NSFm = [NSFileManager defaultManager];
For example, to delete a file called todolist from the current directory, you would first create the NSFileManager object as shown previously and then invoke the removeFileAtPath: method, like so:
[NSFm removeFileAtPath: @"todolist" handler: nil];
You can test the result that is returned to ensure that the file removal succeeds:
if ([NSFm removeFileAtPath: @"todolist" handler: nil] == NO) {
NSLog (@"Couldn't remove file todolist");
return 1;
}
The attributes dictionary enables you to specify, among other things, the permissions for a file you are creating or to obtain or change information for an existing file. For file creation, if you specify nil for this parameter, the default permissions are set for the file. The getAttributesForFile:traverseLink: method returns a dictionary containing the specified file's attributes. The traverseLink: parameter is YES or NO for symbolic links. If the file is a symbolic link and YES is specified, the attributes of the linked-to file are returned; if NO is specified, the attributes of the link itself are returned.
For preexisting files, the attributes dictionary includes information such as the file's owner, its size, its creation date, and so on. Each attribute in the dictionary can be extracted based on its key, all of which are defined in <Foundation/NSFileManager.h>. For example, NSFileSize is the key for a file's size.
Program 16.1 shows some basic operations with files. This example assumes you have a file called testfile in your current directory:
$ cat testfile
This is a test file with some data in it.
Here's another line of data.
And a third.
$
// Basic file operations
// Assumes the existence of a file called "testfile"
// in the current working directory
#import <Foundation/NSObject.h>
#import <Foundation/NSString.h>
#import <Foundation/NSFileManager.h>
#import <Foundation/NSAutoreleasePool.h>
#import <Foundation/NSDictionary.h>
int main (int argc, char *argv[])
{
NSAutoreleasePool *pool = [[NSAutoreleasePool alloc] init];
NSString *fName = @"testfile";
NSFileManager *NSFm;
NSDictionary *attr;
// Need to create an instance of the file manager
NSFm = [NSFileManager defaultManager];
// Let's make sure our test file exists first
if ([NSFm fileExistsAtPath: fName] == NO) {
NSLog (@"File doesn't exist!
");
return 1;
}
// Now let's make a copy
if ([NSFm copyPath: fName toPath: @"newfile" handler: nil] == NO) {
NSLog (@"File copy failed!
");
return 2;
}
// Let's test to see if the two files are identical
if ([NSFm contentsEqualAtPath: fName andPath: @"newfile"] == NO) {
NSLog (@"Files are not equal!
");
return 3;
}
// Now let's rename the copy
if ([NSFm movePath: @"newfile" toPath: @"newfile2"
handler: nil] == NO) {
NSLog (@"File rename failed!
");
return 4;
}
// Get the size of newfile2
if ((attr = [NSFm fileAttributesAtPath: @"newfile2"
traverseLink: NO]) == nil) {
NSLog (@"Couldn't get file attributes!
");
return 5;
}
NSLog (@"File size is %i bytes
",
[[attr objectForKey: NSFileSize] intValue]);
// And finally, let's delete the original file
if ([NSFm removeFileAtPath: fName handler: nil] == NO) {
NSLog (@"File removal failed!
");
return 6;
}
NSLog (@"All operations were successful!
");
[pool release];
return 0;
}
2003-07-25 12:52:28.685 a.out[676] File size is 84 bytes
2003-07-25 12:52:28.687 a.out[676] All operations were successful!
$ cat newfile2
This is a test file with some data in it.
Here's another line of data.
And a third.
$
The program first tests whether testfile exists. If it does, it makes a copy of it and then tests the two files for equality. Experienced Unix users should note that you can't move or copy a file into a directory simply by specifying the destination directory for the copyPath:toPath: and movePath:toPath: methods; the filename within that directory must be explicitly specified.
The movePath:toPath: method can be used to move a file from one directory to another (it can also be used to move entire directories). If the two paths reference files in the same directory (as in our example), the effect is to simply rename the file. So, in Program 16.1, you use this method to rename the file newfile to newfile2.
As noted in Table 16.1, when performing copying, renaming, or moving operations, the destination file cannot already exist. If it does, the operation will fail.
The size of newfile2 is determined by using the fileAttributesAtPath:traverseLink: method. You test to make sure a non-nil dictionary is returned and then use the NSDictionary method objectForKey: to get the file's size from the dictionary using the key NSFileSize. The integer value from the dictionary is then displayed.
Finally, the program uses the removeFileAtPath:handler: method to remove your original file testfile.
Each of the file operations is tested for success in Program 16.1. If any fails, an error is logged using NSLog and the program exits by returning a nonzero exit status. Each nonzero value, which by convention indicates program failure, is unique based on the type of error. If you are writing command-line tools, this is a useful technique because the return value can be tested by another program, such as from within a shell script.
Working with the NSData Class
When working with files, you frequently need to read data into a temporary storage area, often called a buffer. When collecting data for subsequent output to a file, a storage area is also often used. Foundation's NSData class provides an easy way to set up a buffer, read the contents of file into it, or write the contents of a buffer out to a file.
As you would expect, you can define either immutable (NSData) or mutable (NSMutableData) storage areas. We'll be introducing methods from this class in this chapter and in succeeding chapters as well.
Program 16.2 shows how easily you can read the contents of a file into a buffer in memory.
The program reads the contents of your file newfile2 and writes it to a new file called newfile3. In a sense, it implements a file copy operation, although not in as straightforward a fashion as the copyPath:toPath:handler: method.
// Make a copy of a file
#import <Foundation/NSObject.h>
#import <Foundation/NSString.h>
#import <Foundation/NSFileManager.h>
#import <Foundation/NSAutoreleasePool.h>
#import <Foundation/NSData.h>
int main (int argc, char *argv[])
{
NSAutoreleasePool *pool = [[NSAutoreleasePool alloc] init];
NSFileManager *NSFm;
NSData *fileData;
NSFm = [NSFileManager defaultManager];
// Read the file newfile2
fileData = [NSFm contentsAtPath: @"newfile2"];
if (fileData == nil) {
NSLog (@"File read failed!
");
return 1;
}
// Write the data to newfile3
if ([NSFm createFileAtPath: @"newfile3" contents: fileData
attributes: nil] == NO) {
NSLog (@"Couldn't create the copy!
");
return 2;
}
NSLog (@"File copy was successful!
");
[pool release];
return 0;
}
2003-07-25 13:16:52.912 a.out[701] File copy was successful!
$ cat newfile3
This is a test file with some data in it.
Here's another line of data.
And a third.
The NSData contentsAtPath: method simply takes a pathname and reads the contents of the specified file into a storage area that it creates, returning the storage area object as the result or nil if the read fails (for example, if the file doesn't exist or can't be read by you).
The createFileAtPath:contents:attributes: method creates a file with the specified attributes (or uses the default if nil is supplied for the attributes argument). The contents of the specified NSData object are then written to the file. In our example, this data area contains the contents of the previously read file.
Working with Directories
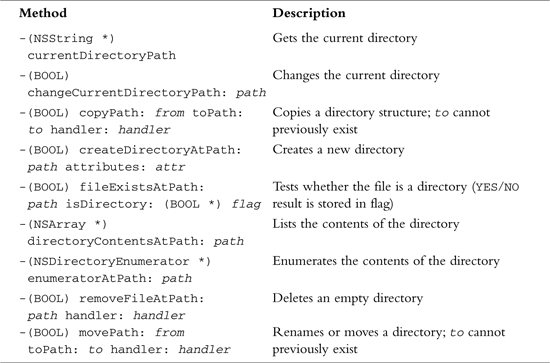
Table 16.2 summarizes some of the methods provided by NSFileManager for working with directories. Many of these methods are the same as are used for ordinary files, as listed in Table 16.1.
Table 16.2. Common NSFileManager Directory Methods
Program 16.3 shows basic operations with directories.
// Some basic directory operations
#import <Foundation/NSObject.h>
#import <Foundation/NSString.h>
#import <Foundation/NSFileManager.h>
#import <Foundation/NSAutoreleasePool.h>
int main (int argc, char *argv[])
{
NSAutoreleasePool *pool = [[NSAutoreleasePool alloc] init];
NSString *dirName = @"testdir";
NSString *path;
NSFileManager *NSFm;
// Need to create an instance of the file manager
NSFm = [NSFileManager defaultManager];
// Get current directory
path = [NSFm currentDirectoryPath];
NSLog (@"Current directory path is %@
", path);
// Create a new directory
if ([NSFm createDirectoryAtPath: dirName attributes: nil] == NO) {
NSLog (@"Couldn't create directory!
");
return 1;
}
// Rename the new directory
if ([NSFm movePath: dirName toPath: @"newdir" handler: nil] == NO) {
NSLog (@"Directory rename failed!
");
return 2;
}
// Change directory into the new directory
if ([NSFm changeCurrentDirectoryPath: @"newdir"] == NO) {
NSLog (@"Change directory failed!
");
return 3;
}
// Now get and display current working directory
path = [NSFm currentDirectoryPath];
NSLog (@"Current directory path is %@
", path);
NSLog (@"All operations were successful!
");
[pool release];
return 0;
}
2003-07-24 13:32:57.621 a.out[4539] Current directory path is
/Users/stevekochan/ch16
2003-07-24 13:32:57.660 a.out[4539] Current directory path is
/Users/stevekochan/ch16/newdir
2003-07-24 13:32:57.661 a.out[4539] All operations were successful!
Program 16.3 is relatively self-explanatory. The current directory path is first obtained for informative purposes. Next, a new directory called testdir is created in the current directory. The program then uses the movePath:toPath:handler: method to rename the new directory from testdir to newdir. Remember that this method can also be used to move an entire directory structure (that means including its contents) from one place in the file system to another.
After renaming the new directory, the program makes that new directory the current directory using the changeCurrentDirectoryPath: method. The current directory path is then displayed to verify that the change was successful.
Enumerating the Contents of a Directory
Sometimes you need to get a list of the contents of a directory. This enumeration process can be accomplished using either the enumeratorAtPath: or the directoryContentsAtPath: method. In the former case, each file in the specified directory is enumerated one at a time and, by default, if one of those files is a directory, its contents are also recursively enumerated. During this process you can dynamically prevent this recursion by sending a skipDescendants message to an enumeration object so that its contents will not be enumerated.
In the case of directoryContentsAtPath:, the contents of the specified directory are enumerated and the file list is returned in an array by the method. If any of the files contained in a directory is itself a directory, its contents are not recursively enumerated by this method.
Program 16.4 shows how you can use either method in your programs.
// Enumerate the contents of a directory
#import <Foundation/NSString.h>
#import <Foundation/NSFileManager.h>
#import <Foundation/NSAutoreleasePool.h>
#import <Foundation/NSArray.h>
int main (int argc, char *argv[])
{
NSAutoreleasePool *pool = [[NSAutoreleasePool alloc] init];
NSString *path;
NSFileManager *NSFm;
NSDirectoryEnumerator *dirEnum;
NSArray *dirArray;
int i, n;
// Need to create an instance of the file manager
NSFm = [NSFileManager defaultManager];
// Get current working directory path
path = [NSFm currentDirectoryPath];
// Enumerate the directory
dirEnum = [NSFm enumeratorAtPath: path];
printf ("Contents of %s:
", [path cString]);
while ((path = [dirEnum nextObject]) != nil)
printf ("%s
", [path cString]);
// Another way to enumerate a directory
dirArray = [NSFm directoryContentsAtPath:
[NSFm currentDirectoryPath]];
printf ("
Contents using directoryContentsAtPath:
");
n = [dirArray count];
for (i = 0; i < n; ++i)
printf ("%s
", [[dirArray objectAtIndex: i] cString]);
[pool release];
return 0;
}
Contents of /Users/stevekochan/mysrc/ch16:
a.out
dir1.m
dir2.m
file1.m
newdir
newdir/file1.m
newdir/output
path1.m
testfile
Contents using directoryContentsAtPath:
a.out
dir1.m
dir2.m
file1.m
newdir
path1.m
testfile
You can see from the output the difference between the two methods. The enumeratorAtPath: method lists the contents of the newdir directory, whereas directoryContentsAtPath: does not. If newdir had contained subdirectories, they too would have been enumerated by enumeratorAtPath:.
As noted, during execution of the while loop in Program 16.4, you could have prevented enumeration of any subdirectories by making the following change to the code:
while ((path = [dirEnum nextObject]) != nil) {
printf ("%s
", [path cString]);
[NSFm fileExistsAtPath: path isDirectory: &flag];
if (flag == YES)
[dirEnum skipDescendents];
}
Here flag is a BOOL variable. The fileExistsAtPath: stores YES in flag if the specified path is a directory; otherwise, it stores NO.
Working with Paths: NSPathUtilities.h
NSPathUtilities.h includes functions and category extensions to NSString to enable you to manipulate pathnames. You should use these whenever possible to make your program more independent of the structure of the file system and locations of particular files and directories. Program 16.5 shows how to use several of the functions and methods provided by NSPathUtilities.h.
// Some basic path operations
#import <Foundation/NSString.h>
#import <Foundation/NSArray.h>
#import <Foundation/NSFileManager.h>
#import <Foundation/NSAutoreleasePool.h>
#import <Foundation/NSPathUtilities.h>
int main (int argc, char *argv[])
{
NSAutoreleasePool *pool = [[NSAutoreleasePool alloc] init];
NSString *fName = @"path.m";
NSFileManager *NSFm;
NSString *path, *tempdir, *extension, *homedir, *fullpath;
NSString *upath = @"~stevekochan/progs/../ch16/./path.m";
NSArray *components;
int i, n;
NSFm = [NSFileManager defaultManager];
// Get the temporary working directory
tempdir = NSTemporaryDirectory ();
printf ("Temporary Directory is %s
", [tempdir cString]);
// Extract the base directory from current directory
path = [NSFm currentDirectoryPath];
printf ("Base dir is %s
", [[path lastPathComponent] cString]);
// Create a full path to the file fName in current directory
fullpath = [path stringByAppendingPathComponent: fName];
printf ("fullpath to %s is %s
", [fName cString], [fullpath cString]);
// Get the file name extension
extension = [fullpath pathExtension];
printf ("extension for %s is %s
", [fullpath cString],
[extension cString]);
// Get user's home directory
homedir = NSHomeDirectory ();
printf ("Your home directory is %s
", [homedir cString]);
// Divide a path into its components
components = [homedir pathComponents];
n = [components count];
for (i = 0; i < n; ++i)
printf (" %s
", [[components objectAtIndex: i] cString]);
// "Standardize" a path
printf ("%s => %s
", [upath cString],
[[upath stringByStandardizingPath] cString]);
[pool release];
return 0;
}
Temporary Directory is /tmp
Base dir is ch16
fullpath to path.m is /Users/stevekochan/mysrc/ch16/path.m
extension for /Users/stevekochan/mysrc/ch16/path.m is m
Your home directory is /Users/stevekochan
/
Users
stevekochan
~stevekochan/progs/../ch16/./path.m => /Users/stevekochan/ch16/path.m
The function NSTemporaryDirectory returns the pathname of a directory on the system you can use for the creation of temporary files. If you create temporary files in this directory, be sure to remove them when you're done. Also, make sure that your filenames are unique, particularly if more than one instance of your application might be running at the same time (see exercise 5 at the end of this chapter). This can easily happen if more than one user logged on to your system is running the same application.
The lastPathComponent method extracts the last file in a path. This is useful when you have an absolute pathname and just want to get the base filename from it.
The stringByAppendingPathComponent: is useful for tacking on a filename to the end of a path. If the pathname specified as the receiver doesn't end in a slash, the method inserts one in the pathname to separate it from the appended filename. By combining the currentDirectory method with the method stringByAppendingPathComponent:, you can create a full pathname to a file in the current directory. That technique is shown in Program 16.5.
The pathExtension method gives the file extension for the provided pathname. In the example, the extension for the file path.m is m, which is returned by the method. If the file does not have an extension, the method simply returns an empty string.
The NSHomeDirectory function returns the home directory for the current user. You can get the home directory for any particular user by using the NSHomeDirectoryForUser function instead, supplying the user's name as the argument to the function.
The pathComponents method returns an array containing each of the components of the specified path. Program 16.5 sequences through each element of the returned array and displays each path component on a separate line of output.
Finally, sometimes pathnames contain tilde (~) characters, as we've previously discussed. The FileManager methods accept ~ as an abbreviation for the user's home directory or ~user for a specified user's home directory. If your pathnames might contain tilde characters, you can resolve them by using the stringByStandardizingPath method. This method returns a path with these special characters eliminated, or standardized. You can also use the stringByExpandingTildeInPath method to expand just a tilde character if it appears in a pathname.
Table 16.3 summarizes many of the commonly used methods for working with paths. In this table, components is an NSArray object containing string objects for each component in a path, path is a string object specifying a path to a file, and ext is a string object indicating a path extension (for example, @"mp4").
Table 16.3. Common Path Utility Methods
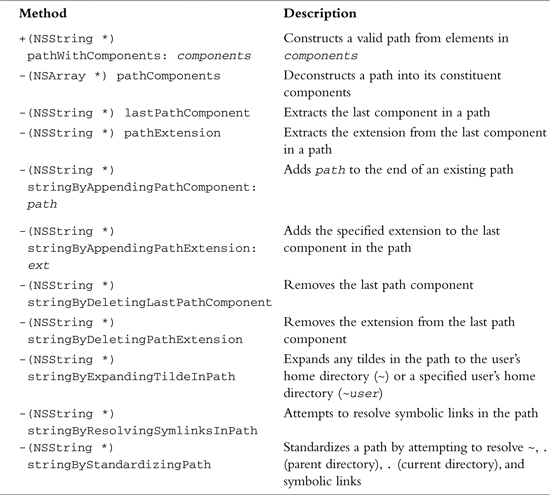
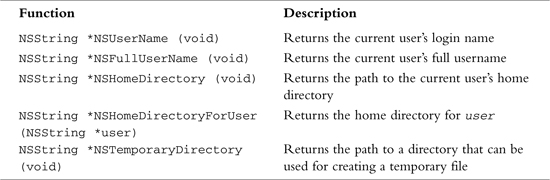
Table 16.4 presents the functions available to obtain information about a user, her home directory, and a directory for storing temporary files.
Table 16.4. Common Path Utility Functions
You also might want to look at the Foundation function NSSearchPathForDirectoriesInDomains, which you can use to locate special directories on the system, such as the Application directory.
A Program to Copy Files and the NSProcessInfo Class
Program 16.6 illustrates a command-line tool to implement a simple file copy operation. Usage of this command is as follows:
copy from-file to-file
Unlike NSFileManager's copyPath:toPath:handler: method, your command-line tool enables to-file to be a directory name. In that case, the file is copied into the to-file directory under the name from-file. Also unlike the method, if to-file already exists, you allow its contents to be overwritten. This is more in line with the standard Unix copy command cp.
You could get the filenames from the command line by using the argc and argv arguments to main. We discussed these arguments in Chapter 13, “Underlying C Language Features.”
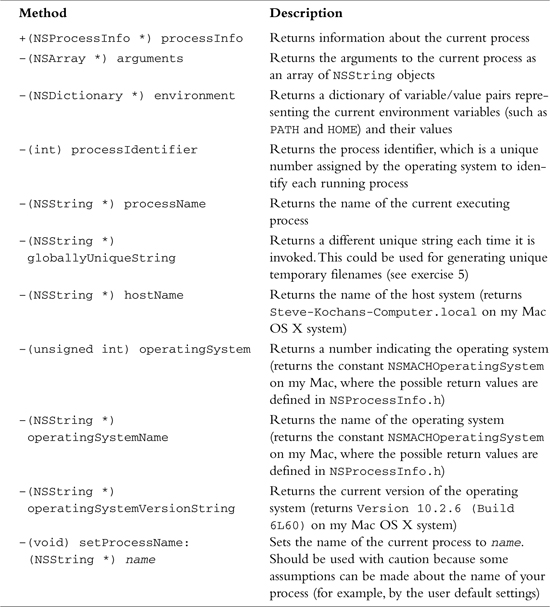
Instead of having to deal with C strings, which is what you have to do when you work with argv, you'll use a Foundation class called NSProcessInfo. NSProcessInfo contains methods that allow you to set and retrieve various types of information about your running application (that is, your process). These methods are summarized in Table 16.5.
Table 16.5. NSProcessInfo Methods
// Implement a basic copy utility
#import <Foundation/NSString.h>
#import <Foundation/NSArray.h>
#import <Foundation/NSFileManager.h>
#import <Foundation/NSAutoreleasePool.h>
#import <Foundation/NSPathUtilities.h>
#import <Foundation/NSProcessInfo.h>
int main (int argc, char *argv[])
{
NSAutoreleasePool *pool = [[NSAutoreleasePool alloc] init];
NSFileManager *NSFm;
NSString *source, *dest;
BOOL isDir;
NSProcessInfo *proc = [NSProcessInfo processInfo];
NSArray *args = [proc arguments];
NSFm = [NSFileManager defaultManager];
// Check for two arguments on the command line
if ([args count] != 3) {
printf ("Usage: %s src dest
", [[proc processName] cString]);
return 1;
}
source = [args objectAtIndex: 1];
dest = [args objectAtIndex: 2];
// Make sure the source file can be read
if ([NSFm isReadableFileAtPath: source] == NO) {
printf ("Can't read %s
", [source cString]);
return 2;
}
// See if the destination file is a directory
// if it is, add the source to the end of the destination
fileExists = [NSFm fileExistsAtPath: dest isDirectory: &isDir];
if (fileExists == YES && isDir == YES)
dest = [dest stringByAppendingPathComponent: [source lastPathComponent]];
// Remove the destination file if it already exists
[NSFm removeFileAtPath: dest handler: nil];
// Okay, time to perform the copy
if ([NSFm copyPath: source toPath: dest handler: nil] == NO) {
printf ("Copy failed!
");
return 4;
}
printf ("Copy of %s to %s succeeeded!
", [source cString],
[dest cString]);
[pool release];
return 0;
}
$ ls –l see what files we have
total 96
-rwxr-xr-x 1 stevekoc staff 19956 Jul 24 14:33 copy
-rw-r--r-- 1 stevekoc staff 1484 Jul 24 14:32 copy.m
-rw-r--r-- 1 stevekoc staff 1403 Jul 24 13:00 file1.m
drwxr-xr-x 2 stevekoc staff 68 Jul 24 14:40 newdir
-rw-r--r-- 1 stevekoc staff 1567 Jul 24 14:12 path1.m
-rw-r--r-- 1 stevekoc staff 84 Jul 24 13:22 testfile
$ copy try with no args
Usage: copy from-file to-file
$ copy foo copy2
Can't read foo
$ copy copy.m backup.m
Copy of copy.m to backup.m succeeeded!
$ diff copy.m backup.m compare the files
$ copy copy.m newdir try copy into directory
Copy of copy.m to newdir/copy.m succeeeded!
$ ls –l newdir
total 8
-rw-r--r-- 1 stevekoc staff 1484 Jul 24 14:44 copy.m
$
NSProcessInfo's arguments method returns an array of string objects. The setup of the array is similar to the argv C array discussed in Chapter 13 (except that array was a C array containing C strings, as opposed to an array object containing string objects). Like argv, the first element of the array is the name of the process and the remaining elements contain the arguments typed on the command line.
You first check to ensure that two arguments were typed on the command line. This is done by testing the size of the array args that is returned from the arguments method. If this test succeeds, the program then extracts the source and destination filenames from the args array, assigning their values to source and dest, respectively.
The program next checks to ensure that the source file can be read, issuing an error message and exiting if it can't.
The statement
[NSFm fileExistsAtPath: dest isDirectory: &isDir];
checks the file specified by dest to see whether it is a directory. As you've seen previously, the answer—YES or NO—is stored in the variable isDir.
If dest is a directory, you want to append the last path component of the source filename to the end of the directory's name. You use the path utility method stringByAppendingPathComponent: to do this. So, if the value of source is the string ch16/copy1.m and the value of dest is /Users/stevekochan/progs and the latter is a directory, you change the value of dest to /Users/stevekochan/progs/copy1.m.
The copyPath:ToPath:handler: method doesn't allow files to be overwritten. Thus, to avoid an error, the program tries to remove the destination file first by using the removeFileAtPath:handler: method. It doesn't really matter whether this method succeeds because it will fail anyway if the destination file doesn't exist.
Upon reaching the end of the program, you can assume all went well and issue a message to that effect.
Basic File Operations: NSFileHandle
The methods provided by NSFileHandle enable you to work more closely with files. At the beginning of this chapter, we listed some of the things you can do with these methods.
In general you'll follow these three steps when working with a file:
- Open the file and obtain an
NSFileHandleobject to reference the file in subsequent I/O operations. - Perform your I/O operations on the open file.
- Close the file.
Table 16.6 summarizes some commonly used NSFileHandle methods. In this table fh is an NSFileHandle object, data is an NSData object, path is an NSString object, and offset is an unsigned long long.
Table 16.6. Common NSFileHandle Methods
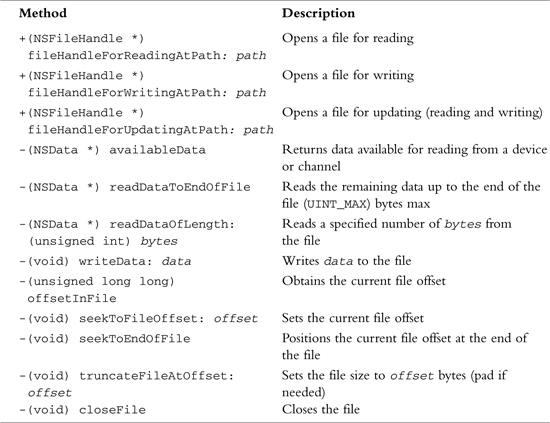
Not shown here are methods for obtaining NSFileHandles for standard input, standard output, standard error, and the null device. These are of the form fileHandleWithDevice, where Device can be StandardInput, StandardOutput, StandardError, or NullDevice.
Also not shown here are methods for reading and writing data in the background, that is, asynchronously.
You should note that the FileHandle class does not provide for the creation of files. That has to be done with FileManager methods, as we've already described. So, both fileHandleForWritingAtPath: and fileHandleForUpdatingAtPath: assume the file exists and return nil if it doesn't. In both cases, the file offset is set to the beginning of the file, so writing (or reading for update mode) begins at the start of the file. Also, if you're used to programming under Unix, you should note that opening a file for writing does not truncate the file. You have to do that yourself if that's your intention.
Program 16.7 opens the original testfile file you created at the start of this chapter, reads in its contents, and copies it to a file called testout.
// Some basic file handle operations
// Assumes the existence of a file called "testfile"
// in the current working directory
#import <Foundation/NSObject.h>
#import <Foundation/NSString.h>
#import <Foundation/NSFileHandle.h>
#import <Foundation/NSFileManager.h>
#import <Foundation/NSAutoreleasePool.h>
#import <Foundation/NSData.h>
int main (int argc, char *argv[])
{
NSAutoreleasePool *pool = [[NSAutoreleasePool alloc] init];
NSFileHandle *inFile, *outFile;
NSData *buffer;
// Open the file testfile for reading
inFile = [NSFileHandle fileHandleForReadingAtPath: @"testfile"];
if (inFile == nil) {
NSLog (@"Open of testfile for reading failed
");
return 1;
}
// Create the output file first if necessary
[[NSFileManager defaultManager] createFileAtPath: @"testout"
contents: nil attributes: nil];
// Now open outfile for writing
outFile = [NSFileHandle fileHandleForWritingAtPath: @"testout"];
if (outFile == nil) {
NSLog (@"Open of testout for writing failed
");
return 2;
}
// Truncate the output file since it may contain data
[outFile truncateFileAtOffset: 0];
// Read the data from inFile and write it to outFile
buffer = [inFile readDataToEndOfFile];
[outFile writeData: buffer];
// Close the two files
[inFile closeFile];
[outFile closeFile];
[pool release];
return 0;
}
$ cat testout
This is a test file with some data in it.
Here's another line of data.
And a third.
The method readDataToEndOfFile: reads up to UINT_MAX bytes of data at a time, which is defined in <limits.h> and equal to FFFFFFFF16 on many systems. This will be large enough for any application you'll have to write. You can also break up the operation to perform smaller-sized reads and writes. You can even set up a loop to transfer a buffer full of bytes between the files at a time, using the readDataOfLength: method. Your buffer size might be 8,192 (8kb) or 131,072 (128kb) bytes, for example. A power of 2 is normally used because the underlying operating system typically performs its I/O operations in chunks of data of such sizes. You might want to experiment with different values on your system to see what works best.
If a read method reaches the end of the file without reading any data, it returns an empty NSData object (that is, a buffer with no bytes in it). You can apply the length method to the buffer and test for equality with zero to see whether any data remains to be read from the file.
If you open a file for updating, the file offset is set to the beginning of the file. You can change that offset by seeking within a file and then perform your read or write operations on the file. So, to seek to the 10th byte in a file whose handle is databaseHandle, you could write the following message expression:
[databaseHandle seekToFileOffset: 10];
Relative file positioning is done by obtaining the current file offset and then adding to or subtracting from it. So, to skip over the next 128 bytes in the file, you'd write the following:
[databaseHandle seekToFileOffet:
[databaseHandle offsetInFile] + 128];
And to move back the equivalent of five integers in the file, you'd write this:
[databaseHandle seekToFileOffet:
[databaseHandle offsetInFile] – 5 * sizeof (int)];
Program 16.8 appends the contents of one file to another. It does this by opening the second file for writing, seeking to the end of the file, and then writing the contents of the first file to the second.
// Append the file "fileA" to the end of "fileB"
#import <Foundation/NSObject.h>
#import <Foundation/NSString.h>
#import <Foundation/NSFileHandle.h>
#import <Foundation/NSFileManager.h>
#import <Foundation/NSAutoreleasePool.h>
#import <Foundation/NSData.h>
int main (int argc, char *argv[])
{
NSAutoreleasePool *pool = [[NSAutoreleasePool alloc] init];
NSFileHandle *inFile, *outFile;
NSData *buffer;
// Open the file fileA for reading
inFile = [NSFileHandle fileHandleForReadingAtPath: @"fileA"];
if (inFile == nil) {
NSLog (@"Open of fileA for reading failed
");
return 1;
}
// Open the file fileB for updating
outFile = [NSFileHandle fileHandleForWritingAtPath: @"fileB"];
if (outFile == nil) {
NSLog (@"Open of fileB for writing failed
");
return 2;
}
// Seek to the end of outFile
[outFile seekToEndOfFile];
// Read inFile and write its contents to outFile
buffer = [inFile readDataToEndOfFile];
[outFile writeData: buffer];
// Close the two files
[inFile closeFile];
[outFile closeFile];
[pool release];
return 0;
}
You can assume that you have called your test program append. Here's a sample execution.
$ cat fileA Display contents of first file
This line 1 in the first file.
This line 2 in the first file.
$ cat fileB Display contents of second file
This is line 1 in the second file.
This is line 2 in the second file.
$ append Run our append program
$ cat fileB See if it worked
This is line 1 in the second file.
This is line 2 in the second file.
This is line 1 in the first file.
This is line 2 in the first file.
$
You can see from the output that the contents of the first file were successfully appended to the end of the second file. Incidentally, seekToEndOfFile returns the current file offset after the seek is performed. We chose to ignore that value; you can use that information to obtain the size of a file in your program if you need it.
Exercises
- Modify the copy program developed in Program 16.6 so that it can accept more than one source file to be copied into a directory, like the standard Unix
cpcommand. So, the command$ copy copy1.m file1.m file2.m progs
should copy the three files
copy1.m,file1.m, andfile2.minto the directoryprogs. Be sure that when more than one source file is specified, the last argument is in fact an existing directory. - Write a command-line tool called
myfindthat takes two arguments. The first is a starting directory to begin the search, and the second is a filename to locate. So, the command line$ myfind /Users proposal.doc
/Users/stevekochan/MyDocuments/proposals/proposal.doc
$begins searching the file system from
/Usersto locate the fileproposal.doc. Print either a full path to the file if it's found (as shown) or an appropriate message if it's not. - Write your own version of the standard Unix tools
basenameanddirname. - Using
NSProcessInfo, write a program to display all the information returned by each of its getter methods. - Given the
NSPathUtilities.hfunctionNSTemporaryDirectoryand theNSProcessInfomethodgloballyUniqueStringdescribed in this chapter, add a category calledTempFilestoNSStringand in it define a method calledtemporaryFileNamethat returns a different, unique filename every time it is invoked. - Modify Program 16.7 so that the file is read and written
kBufSizebytes at a time, wherekBufSizeis defined at the beginning of your program. Be sure to test the program on large files (that is, files larger thankBufSizebytes). - Open a file, read its contents 128 bytes at a time, and write it to the terminal. Use
FileHandle'sfileHandleWithStandardOutputmethod to obtain a handle for the terminal's output.