
The fundamental part of any GUI program is the communication between the objects. Signals and slots provide a mechanism to define this communication between the actions that happened and the result that is proposed for the respective action. Prior to Qt's modern implementation of signal or slot mechanism, older toolkits achieved this kind of communication through callbacks. A callback is a pointer to a function; so, if you want a processing function to notify about some event, you pass a pointer to another function (the callback) to the processing function. The processing function then calls the callback whenever appropriate. This mechanism does not prove useful in the later advancements due to some flaws in the callback implementation.
A signal is an observable event, or at least a notification that the event has happened. A slot is a potential observer; usually, it is a function that is called. In order to establish communication between them, we connect a signal to a slot to establish the desired action. We already saw the concept of connecting a signal to a slot in the earlier chapters while designing the text editor application. Those implementations handle and connect different signals to different objects. However, we may have different combinations, defined as follows:
- One signal can be connected to many slots
- Many signals can be connected to the same slot
- A signal can be connected to other signals
- Connections can be removed
PySide offers various predefined signals and slots such that we can connect a predefined signal to a predefined slot and do nothing else to achieve what we want. However, it is also possible to define our own signals and slots. Whenever a signal is emitted, Qt will simply throw it away. We can define the slot to catch and notice the signal that is being emitted. The first code excerpt that follows this text will be an example to connect predefined signals to predefined slots, and the latter will discuss the custom user-defined signals and slots.
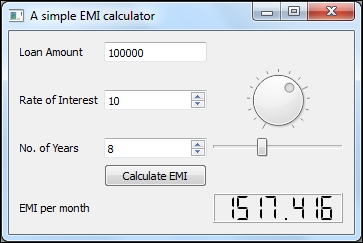
The first example is a simple EMI calculator application that takes the Loan Amount, Rate of Interest, and Number of Years as its input, and calculates the EMI per month and displays it to the user. To start with, we set the components that are required for the EMI calculator application in a layout. The Amount will be a text input from the user. The Rate of Years will be taken from a spin box input or a dial input. A spin box is a GUI component, which has its minimum and maximum value set, and the value can be modified using the up and down arrow buttons present at its side. The dial represents a clock-like widget whose values can be changed by dragging the arrow. The Number of Years value is taken by a spin box input or a slider input:
class MyWidget(QWidget):
  def __init__(self):
    QWidget.__init__(self)
    self.amtLabel = QLabel('Loan Amount')
    self.roiLabel = QLabel('Rate of Interest')
    self.yrsLabel = QLabel('No. of Years')
    self.emiLabel = QLabel('EMI per month')
    self.emiValue = QLCDNumber()

    self.emiValue.setSegmentStyle(QLCDNumber.Flat)
    self.emiValue.setFixedSize(QSize(130,30))
    self.emiValue.setDigitCount(8)

    self.amtText = QLineEdit('10000')
    self.roiSpin = QSpinBox()
    self.roiSpin.setMinimum(1)
    self.roiSpin.setMaximum(15)
    self.yrsSpin = QSpinBox()
    self.yrsSpin.setMinimum(1)
    self.yrsSpin.setMaximum(20)

    self.roiDial = QDial()
    self.roiDial.setNotchesVisible(True)
    self.roiDial.setMaximum(15)
    self.roiDial.setMinimum(1)
    self.roiDial.setValue(1)
    self.yrsSlide = QSlider(Qt.Horizontal)
    self.yrsSlide.setMaximum(20)
    self.yrsSlide.setMinimum(1)

    self.calculateButton = QPushButton('Calculate EMI')


    self.myGridLayout = QGridLayout()

    self.myGridLayout.addWidget(self.amtLabel, 0, 0)
    self.myGridLayout.addWidget(self.roiLabel, 1, 0)
    self.myGridLayout.addWidget(self.yrsLabel, 2, 0)
    self.myGridLayout.addWidget(self.amtText, 0, 1)
    self.myGridLayout.addWidget(self.roiSpin, 1, 1)
    self.myGridLayout.addWidget(self.yrsSpin, 2, 1)
    self.myGridLayout.addWidget(self.roiDial, 1, 2)
    self.myGridLayout.addWidget(self.yrsSlide, 2, 2)
    self.myGridLayout.addWidget(self.calculateButton, 3, 1)

    self.setLayout(self.myGridLayout)
    self.setWindowTitle("A simple EMI calculator")
Until now, we set the components that were required for the application. Please note that the application layout uses a grid-layout option. The next set of code is also defined in the contructor's __init__ function of the MyWidget class, which will connect the different signals to slots. There are different ways that you can use a connect function. The code explains the various options that are available:
    self.roiDial.valueChanged.connect(self.roiSpin.setValue)
    self.connect(self.roiSpin, SIGNAL("valueChanged(int)"), self.roiDial.setValue)
In the first line of the previous code, we connect the valueChanged() signal of roiDial to call the slot of roiSpin, setValue(). So, if we change the value of roiDial, it emits a signal that connects to the roiSpin's setValue() function, and it will set the value accordingly. Here, we must note that changing either the spin or dial must change the other value because both represent a single entity. Hence, we induce a second line that calls roiDial's setValue() slot on changing the roiSpin's value. However, it is to be noted that the second form of connecting signals to slots is deprecated. This is given here just for reference, and it is strongly discouraged to use this form. The following two lines of code execute the same for the Number of Years slider and spin:
    self.yrsSlide.valueChanged.connect(self.yrsSpin.setValue)
    self.connect(self.yrsSpin, SIGNAL("valueChanged(int)"), self.yrsSlide, SLOT("setValue(int)"))
In order to calculate the EMI value, we connect the clicked signal of the push button to a function (slot) that calculates the EMI and displays it to the user:
self.connect(self.calculateButton, SIGNAL("clicked()"), self.showEMI)The EMI calculation and display function is given for your reference, as follows:
  def showEMI(self):
    loanAmount = float(self.amtText.text())
    rateInterest = float( float (self.roiSpin.value() / 12) / 100)
    noMonths = int(self.yrsSpin.value() * 12)
    emi = (loanAmount * rateInterest) * ( ( ( (1 + rateInterest) ** noMonths ) / ( ( (1 + rateInterest) ** noMonths ) - 1) ))
    self.emiValue.display(emi)
    self.myGridLayout.addWidget(self.emiLabel, 4, 0)
    self.myGridLayout.addWidget(self.emiValue, 4, 2)
The sample output of the application is shown in the following screenshot:
The EMI calculator application uses the predefined signals, such as valueChanged(), clicked(), and predefined slots, such as setValue(). However, the application also uses a user-defined showEMI()slot to calculate the EMI. As with slots, it is also possible to create a user-defined signal and emit it when required. The following program is an example to create and emit user-defined signals:
import sys
from PySide.QtCore import *

# define a new slot that receives and prints a string
def printText(text):
  print(text)

class CustomSignal(QObject):
  # create a new signal
  mySignal = Signal(str)


if __name__ == '__main__':
  try:
    myObject = CustomSignal()
    # connect signal and slot
    myObject.mySignal.connect(printText)
    # emit signal
    myObject.mySignal.emit("Hello, Universe!")
  except Exception:
    print(sys.exc_info()[1])
This is a very simple example of using custom signals. In the CustomSignal class, we create a signal named mySignal, and we emit it in the main function. We also define that the printText() slot will be called on emission of the mySignal signal. Many complex signal emissions can be built this way.