
The programs we’ve written so far are straight-line programs that consist of a sequence of Python statements executed one after the other. The flow of execution is simply a straight sequence of statements, with no branching or looping back to previous statements.
In this chapter, we look at how to change the order in which statements are executed by using if-statements and loops. Both are essential in almost any nontrivial program.
For many beginners, if-statements and loops are two of the trickiest parts of learning how to program. Loops, in particular, can be confusing at first because they require a lot of little pieces of code to work correctly.
So take this chapter slowly and read through the sample programs carefully. Take the time to try them out and make your own modifications.
In Python, as in most programming languages, decisions are made using Boolean logic. In Boolean logic, there are only two Boolean values: True and False.
Just as with numbers and strings, you can label particular Boolean values with variables. For instance:
>>> front_sensor_on = True
>>> front_sensor_on
True
We combine Boolean values using four main logical operators (or logical connectives): not, and, or, and ==. All decisions that can be made by Python—or any computer language, for that matter—can be made using these logical operators.
Suppose that p and q are two Python variables each labeling Boolean values. Since each has two possible values (True or False), altogether there are four different sets of values for p and q (see the first two columns of Table 4.1). We can now define the logical operators by specifying exactly what value they return for the different truth values of p and q. These kinds of definitions are known as truth tables.
Let’s start with ==. The expression p == q is True just when p and q both have the same true value—that is, when p and q are both True or both False. The expression p != q tests if p and q are not the same, and returns True just when they have different values.
The Boolean expression p and q is True just when both p is True and q is True. In every other case it is False. The fifth column of Table 4.1 summarizes each case.
The Boolean expression p or q is True exactly when p is True or q is True, or when both are True. This is summarized in the sixth column of Table 4.1. It’s important to realize that p or q is true when both p and q are True; Python’s or is sometimes called inclusive-or, because it includes the case when both are True.
Finally, the Boolean expression not p is True when p is False, and False when p is True. It essentially flips the value of the variable.
Let’s look at a few examples:
>>> False == False
True
>>> True and False
False
>>> False or False
False
>>> not True
False
Python uses an internal version of Table 4.1 to evaluate Boolean expressions.
Since Boolean expressions are used to control both if-statements and loops, it is important to understand how they are evaluated. Just as with arithmetic expressions, Boolean expressions use both brackets and operator precedence to specify the order in which the subparts of the expression are evaluated.
To evaluate a Boolean expression with brackets:
not (True and (False or True))
Expressions in brackets are always evaluated first. Thus, we first evaluate
False or True, which isTrue, and makes the original expression equivalent to this simpler one:not (True and True).not (True and True)
To evaluate this simpler expression, we again evaluate the expression in brackets first:
True and Trueevaluates toTrue, which gives us an equivalent, but simpler, expression:not True.not True
Finally, to evaluate this expression, we simply look up the answer in the last column of Table 4.1:
not Trueevaluates toFalse. Thus, the entire expressionnot (True and (False or True))evaluates toFalse. You can easily check that this is the correct answer in Python itself:>>> not (True and (False or True)) False
To evaluate a Boolean expression without brackets:
False and not False or True
Suppose the expression you want to evaluate is this one. First evaluate the operator with the highest precedence, as listed in Table 4.2. In the expression
False and not False or True,nothas the highest precedence, and sonot Falseis evaluated first, which causes the whole expression to simplify toFalse and True or True.False and True or True
In this simplified expression from the previous step, we again evaluate the operator with the highest precedence. According to Table 4.2,
andhas higher precedence thanor, and so we evaluateFalse and Truefirst. Thus the expression simplifies toFalse or True.False or True
This final expression evaluates to
True, which is found by looking up the answer in Table 4.1. Thus the original expression,False and not False or True, evaluates toTrue.
✓ Tips
Writing complicated Boolean expressions without brackets is usually a bad idea because they are hard to read—not all programmers have the order of precedence of Boolean operators committed to memory!
One exception is when you use the same logical operator many times in a row. Then it is usually much easier to read without the brackets. For example:
>>> (True or (False or (True or False)))
True
>>> True or False or True or False
True
The definition of the logical operators given in Table 4.1 is the standard definition you would find in any logic textbook. However, like most modern programming languages, Python uses a technique called short-circuit evaluation to speed up the evaluation of some Boolean expressions.
Consider the Boolean expression False and X, where X is any Boolean expression; assume it’s a big, nasty expression that would take you a few seconds to evaluate. It turns out that no matter the value of X, no matter whether X is True or X is False, the entire expression is False. The reason is that the initial False makes the whole and-expression False. In other words, the value of the expression False and X does not depend on X—it is always False. In such cases, Python does not evaluate X at all—it simply stops and returns the value False. This can speed up the evaluation of Boolean expressions.
Similarly, Boolean expressions of the form True or X are always True, no matter the value of X. The precise rules for how Python does short-circuiting are given in Table 4.3.
Most of the time you can ignore short-circuiting and just reap its performance benefits. However, it is useful to remember that Python does this, since every once in a while it could be the source of a subtle bug.
✓ Tips
Boolean expressions of the form
not XandX == Ydo not do any short-circuiting:XandYare always evaluated.No short-circuiting occurs in expressions of the form
False or XandTrue or X. In both cases,Xmust be evaluated to determine the expression’s value.Python applies short-circuiting inside larger Boolean expressions. So, for example, even though an entire expression might not benefit from short-circuit evaluation, some sub-expressions of it might.
It’s possible to use the definitions of
andandorfrom Table 4.3 to write short and tricky code that simulates if-statements (which we will see in the next section). However, such expressions are usually quite difficult to read, so if you ever run across such expressions in other people’s Python code (you should never put anything so ugly in your programs!), you may need to refer to Table 4.3 to figure out exactly what they are doing.
If-statements let you change the flow of control in a Python program. Essentially, they let you write programs that can decide, while the programming is running, whether or not to run one block of code or another. Almost all nontrivial programs use one or more if-statements, so they are important to understand.
Suppose you are writing a password-checking program. You ask users to enter their password, and if it is correct, you log them in to their account. If it is not correct, then you tell them they’ve entered the wrong password. A simple version of that program is this:
# password1.py
pwd = input('What is the password? ')
if pwd == 'apple': # note use of ==
# instead of =
print('Logging on ...')
else:
print('Incorrect password.')
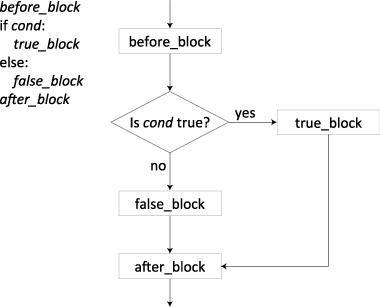
print('All done!')It’s pretty easy to read this program: If the string that pwd labels is 'apple', then a login message is printed. But if pwd is anything other than 'apple', the message incorrect password is printed.
An if-statement always begins with the keyword if. It is then (always) followed by a Boolean expression called the if-condition, or just condition for short. After the if-condition comes a colon (:). As we will see, Python uses the : token to mark the end of conditions in if-statements, loops, and functions.
Everything from the if to the : is referred to as the if-statement header. If the condition in the header evaluates to True, then the statement print('Logging on ...') is immediately executed, and print('Incorrect password.') is skipped and never executed.
If the condition in the header evaluates to False, then print('Logging on ...') is skipped, and only the statement print('Incorrect password.') is executed.
In all cases, the final print('All done!') statement is executed.
The general structure of an if/else-statement is shown in Figure 4.1.
✓ Tips
We will often refer to the entire multiline if structure as a single if-statement.
You must put at least one space after the
ifkeyword.The
ifkeyword, the condition, and the terminating:must appear all on one line without breaks.The else-block of an if-statement is optional. Depending on the problem you are solving, you may or may not need one.
Python usually doesn’t care about extra blank lines. Thus they are often added to group related statements together and to make the code easier for people to read.
One of the most distinctive features of Python is its use of indentation to mark blocks of code. Consider the if-statement from our simple password-checking program:
if pwd == 'apple':
    print('Logging on ...')
else:
    print('Incorrect password.')

print('All done!')
The lines print('Logging on ...') and print('Incorrect password.') are two separate code blocks. These ones happen to be only a single line long, but Python lets you write code blocks consisting of any number of statements.
To indicate a block of code in Python, you must indent each line of the block by the same amount. The two blocks of code in our example if-statement are both indented four spaces, which is a typical amount of indentation for Python.
In most other programming languages, indentation is used only to help make the code look pretty. But in Python, it is required for indicating what block of code a statement belongs to. For instance, the final print('All done!') is not indented, and so is not part of the else-block.
Programmers familiar with other languages often bristle at the thought that indentation matters: Many programmers like the freedom to format their code how they please. However, Python indentation rules are quite simple, and most programmers already use indentation to make their code readable. Python simply takes this idea one step further and gives meaning to the indentation.
✓ Tips
IDLE is designed to automatically indent code for you. For instance, pressing Return after typing the
:in an if-header automatically indents the cursor on the next line.The amount of indentation matters: A missing or extra space in a Python block could cause an error or unexpected behavior. Statements within the same block of code need to be indented at the same level.
An if/elif-statement is a generalized if-statement with more than one condition. It is used for making complex decisions. For example, suppose an airline has the following “child” ticket rates: Kids 2 years old or younger fly for free, kids older than 2 but younger than 13 pay a discounted child fare, and anyone 13 years or older pays a regular adult fare. The following program determines how much a passenger should pay:
# airfare.py
age = int(input('How old are you? '))
if age <= 2:
    print(' free')
elif 2 < age < 13:
    print(' child fare)
else:
    print('adult fare')
After Python gets age from the user, it enters the if/elif-statement and checks each condition one after the other in the order they are given. So first it checks if age is less than 2, and if so, it indicates that the flying is free and jumps out of the elif-condition. If age is not less than 2, then it checks the next elif-condition to see if age is between 2 and 13. If so, it prints the appropriate message and jumps out of the if/elif-statement. If neither the if-condition nor the elif-condition is True, then it executes the code in the else-block.
✓ Tips
elifis short for else if, and you can use as many elif-blocks as needed.As usual, each of the code blocks in an if/elif-statement must be consistently indented the same amount. Not only does Python require this indentation so that it can recognize the code blocks, but the consistent indentation makes it easy for people to recognize the if/elif-conditions and their corresponding code blocks.
As with a regular if-statement, the else-block is optional. In an if/elif-statement with an else-block, exactly one of the if/elif-blocks will be executed. If there is no else-block, then it is possible that none of the conditions are
True, in which case none of the if/elif-blocks are executed.An if/elif-statement must have exactly one if-block, zero or more elif-blocks, and zero or one else-blocks.
Python has one more logical operator that some programmers like (and some don’t!). It’s essentially a shorthand notation for if-statements that can be used directly within expressions. Consider this code:
food = input("What's your favorite food? ")
reply = 'yuck' if food == 'lamb' else 'yum'
The expression on the right-hand side of = in the second line is called a conditional expression, and it evaluates to either 'yuck' or 'yum'. It’s equivalent to the following:
food = input("What's your favorite food? ")
if food == 'lamb':
   reply = 'yuck'
else:
   reply = 'yum'
Conditional expressions are usually shorter than the corresponding if/else-statements, although not quite as flexible or easy to read. In general, you should use them when they make your code simpler.
Now we turn to loops, which are used to repeatedly execute blocks of code. Python has two main kinds of loops: for-loops and while-loops. For-loops are generally easier to use and less error prone than while-loops, although not quite as flexible.
The basic for-loop repeats a given block of code some specified number of times. For example, this snippet of code prints the numbers 0 to 9 on the screen:
# count10.py
for i in range(10):
    print(i)
The first line of a for-loop is called the for-loop header. A for-loop always begins with the keyword for. After that comes the loop variable, in this case i. Next is the keyword in, typically (but not always) followed by range(n) and a terminating : token. A for-loop repeats its body, the code block underneath it, exactly n times.
Each time the loop executes, the loop variable i is set to be the next value. By default, the initial value of i is 0, and it goes up to n - 1 (not n!) by ones. Starting numbering at 0 is fairly common in programming, although it is surprising at first.
If you want to change the starting value of the loop, add a starting value to range:
for i in range(5, 10):
    print(i)
This prints the numbers from 5 to 9.
Thinking about for-loops as printing a list of numbers is a good way to learn what they do. We will see many more examples of for-loops throughout this book.
✓ Tips
If you want to print the numbers from 1 to 10 (instead of 0 to 9), there are two common ways of doing so. One is to change the start and end of the range:
for i in range(1, 11):
    print(i)
Or, you can add 1 to
iinside the loop body:for i in range(10): print(i + 1)If you would like to print numbers in reverse order, there are again two standard ways of doing so. The first is to set the
rangeparameters like this:for i in range(10, 0, -1): print(i)Notice that the first value of
rangeis 10, the second value is 0, and the third value, called the step, is −1. Alternatively, you can use a simpler range and modifyiin the loop body:for i in range(10): print(10 - i)For-loops are actually more general than described in this section: They can be used with any kind of iterator, which is a special kind of programming object that returns values. For instance, we will see later that for-loops are the easiest way to read the lines of a text file.
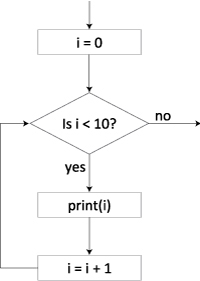
The second kind of Python loop is a while-loop. Consider this program:
# while10.py
i = 0
while i < 10:
    print(i)
    i = i + 1  # add 1 to i
This prints out the numbers from 0 to 9 on the screen. It is noticeably more complicated than a for-loop, but it is also more flexible.
The while-loop itself begins on the line beginning with the keyword while; this line is called the while-loop header, and the indented code underneath it is called the while-loop body. The header always starts with while and is followed by the while-loop condition. This condition is a Boolean expression that returns True or False.
The flow of control through a while-loop goes like this: First, Python checks if the loop condition is True or False. If it’s True, it executes the body; if it’s False, it skips over the body (that is, it jumps out of the loop) and runs whatever statements appear afterward. When the condition is True, the body is executed, and then Python checks the condition again. As long as the loop condition is True, Python keeps executing the loop. Figure 4.2 shows a flow chart for this program.
The very first line of the sample program is i = 0, and in the context of a loop it is known as an initialization statement, or an initializer. Unlike with for-loops, which automatically initialize their loop variable, it is the programmer’s responsibility to give initial values to any variables used by a while-loop.
The last line of the loop body is i = i + 1. As it says in the source code comment, this line causes i to be incremented by 1. Thus, i increases as the loop executes, which guarantees that the loop will eventually stop. In the context of a while-loop, this line is called an increment, or incrementer, since its job is to increment the loop variable.
The general form of a while-loop is shown in the flow chart of Figure 4.3.
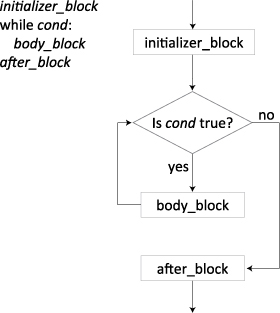
Even though almost all while-loops need an initializer and an incrementer, Python does not require that you include them. It is entirely up to you, the programmer, to remember these lines. Even experienced programmers find that while-loop initializers and incrementers are a common source of errors.
✓ Tips
While-loops are extremely flexible. You can put any code whatsoever before a while-loop to do whatever kind of initialization is necessary. The loop condition can be any Boolean expression, and the incrementer can be put anywhere within the while-loop body, and it can do whatever you like.
A loop that never ends is called an infinite loop. For instance, this runs forever:
while True:
    print('spam')
Some programmers like to use infinite loops as a quick way to write a loop. However, in practice, such loops often become complex and hard to understand. Plus, they are usually a sign of an incorrect (or missing!) initializer or incrementer.
While-loops are powerful but error prone. Thus many Python programmers try to use for-loops whenever possible and use while-loops only when absolutely necessary.
While-loops can be written with an else-block. However, this unusual feature is rarely used in practice, so we haven’t discussed it. If you are curious, you can read about it in the online Python documentation—for example, http://docs.python.org/dev/3.0/reference/compound_stmts.html.
Let’s take a look at a few examples of how for-loops and while-loops can be used to solve the same problems. Plus we’ll see a simple program that can’t be written using a for-loop.
Factorials are numbers of the form 1 × 2 × 3 × ... × n, and they tell you how many ways n objects can be arranged in a line. For example, the letters ABCD can be arranged in 1 × 2 × 3 × 4 = 24 different ways. Here’s one way to calculate factorials using a for-loop:
# forfact.py
n = int(input('Enter an integer >= 0: '))
fact = 1
for i in range(2, n + 1):
    fact = fact * i
print(str(n) + ' factorial is ' + str(fact))
Here’s another way to do it using a while-loop:
# whilefact.py
n = int(input('Enter an integer >= 0: '))
fact = 1
i = 2
while i <= n:
    fact = fact * i
    i = i + 1
print(str(n) + ' factorial is ' + str(fact))
Both of these programs behave the same from the user’s perspective, but the internals are quite different. As is usually the case, the while-loop version is a little more complicated than the for-loop version.
✓ Tips
In mathematics, the notation n! is used to indicate factorials. For example, 4! = 1 × 2 × 3 × 4 = 24. By definition, 0! = 1. Interestingly, there is no simple shortcut formula for calculating large factorials.
Python has no maximum integer, so you can use these programs to calculate very large factorials. For example, a deck of cards can be arranged in exactly 52! ways:
Enter an integer >= 0: 52
52 factorial is 80658175170943878571660636856403766975289505440883277824000000000000
The following programs ask the user to enter some numbers, and then return their sum. Here is a version using a for-loop:
# forsum.py
n = int(input('How many numbers to sum? '))
total = 0
for i in range(n):
    s = input('Enter number ' + str(i + 1) + ': ')
    total = total + int(s)
print('The sum is ' + str(total))
Here’s a program that does that same thing using a while-loop:
# whilesum.py
n = int(input('How many numbers to sum? '))
total = 0
i = 1
while i <= n:
    s = input('Enter number ' + str(i) + ': ')
    total = total + int(s)
    i = i + 1
print('The sum is ' + str(total))
Again, the while-loop version is a little more complex than the for-loop version.
Now here’s something that can’t be done with the for-loops we’ve introduced so far. Suppose we want to let users enter a list of numbers to be summed without asking them ahead of time how many numbers they have. Instead, they just type the string 'done' when they have no more numbers to add. Here’s how to do it using a while-loop:
# donesum.py
total = 0
s = input('Enter a number (or 'done'): ')
while s != 'done':
    num = int(s)
    total = total + num
    s = input('Enter a number (or "done"): ')
print('The sum is ' + str(total))
The idea here is to keep asking users to enter a number, quitting only when they enter 'done'. The program doesn’t know ahead of time how many times the loop body will be executed.
Notice a few more details:
We must call
inputin two different places: before the loop and inside the loop body. This is necessary because the loop condition decides whether or not the input is a number or'done'.The ordering of the statements in the loop body is very important. If the loop condition is
True, then we knowsis not'done', and so we assume it is an integer. Thus we can convert it to an integer, add it to the running total, and then ask the user for more input.We convert the input string
sto an integer only after we knowsis not the string'done'. If we had writtens = int(input('Enter a number (or "done"): '))as we had previously, the program would crash when the user typed
'done'.There is no need for the
icounter variable anymore. In the previous summing programs,iwas needed to track how many numbers had been entered so far. As a general rule of thumb, a program with fewer variables is easier to read, debug, and extend.
The break statement is a handy way for exiting a loop from anywhere within the loop’s body. For example, here is an alternative way to sum an unknown number of numbers:
# donesum_break.py
total = 0
while True:
    s = input('Enter a number (or "done"): ')
    if s == 'done':
        break # jump out of the loop
    num = int(s)
    total = total + num
print('The sum is ' + str(total))
The while-loop condition is simply True, which means it will loop forever unless break is executed. The only way for break to be executed is if s equals 'done'.
A major advantage of this program over donesum.py is that the input statement is not repeated. But a major disadvantage is that the reason for why the loop ends is buried in the loop body. It’s not so hard to see it in this small example, but in larger programs break statements can be tricky to see. Furthermore, you can have as many breaks as you want, which adds to the complexity of understanding the loop.
Generally, it is wise to avoid the break statement, and to use it only when it makes your code simpler or clearer.
A relative of break is the continue statement: When continue is called inside a loop body, it immediately jumps up to the loop condition—thus continuing with the next iteration of the loop. It is a little less common than break, and generally it should be avoided altogether.
Loops within loops, also known as nested loops, occur frequently in programming, so it is helpful to see a few examples. For instance, here’s a program that prints out the times tables up to 10:
# timestable.py
for row in range(1, 10):
    for col in range(1, 10):
        prod = row * col
        if prod < 10:
            print(' ', end = '')
        print(row * col, ' ', end = '')
    print()
Look carefully at the indentation of the code in this program: It’s how you tell what statements belong to what blocks. The final print() statement lines up with the second for, meaning it is part of the outer for-loop (but not the inner).
Note that the statement if prod < 10 is used to make the output look neatly formatted. Without it, the numbers won’t line up nicely.
✓ Tips
When using nested loops, be careful with loop index variables: Do not accidentally reuse the same variable for a different loop. Most of the time, every individual loop needs its own control variables.
You can nest as many loops within loops as you need, although the complexity increases greatly as you do so.
As mentioned previously, if you use
breakorcontinuewith nested loops,breakonly breaks out of the innermost loop, andcontinueonly “continues” the innermost loop.