
In this chapter, we will briefly look at object-oriented programming, or OOP for short. OOP is a methodology for organizing programs that encourages careful design and code reuse. Most modern programming languages support it, and it is has proved to be a practical way to structure and create large programs.
We’ve already been using objects in Python; numbers, strings, lists, dictionaries, files, and functions are all examples of objects.
To create new kinds of objects, you must first create a class. A class is essentially a blueprint for creating an object of a particular kind. The class specifies what data and functions the objects will contain, and how they relate to other classes. An object encapsulates both the data and functions that operate on that data.
An important OOP feature is inheritance: You can create new classes that inherit their data and functions from an existing class. When used properly, inheritance can save you from rewriting code, and it can also make your programs easier to understand.
Finally, polymorphism is a consequence of some OOP designs that can save you from writing unnecessary code. Essentially, polymorphic code does not know exactly what functions it will be calling until it receives the objects passed to it while the program is running.
Let’s jump right into OOP by creating a simple class to represent a person:
# person.py
class Person:
    """ Class to represent a person
    """
    def __init__(self):
        self.name = ''
        self.age = 0
This defines a class named Person: It defines the data and functions a Person object will contain. We’ve started simple and defined a Person to have a name and an age; we haven’t (yet) given Person any functions except for __init__, which is the standard function for initializing an object’s values. As we will see, Python automatically calls __init__ when you create a Person object.
A function defined inside a class is called a method. Just like __init__, methods must have self as their first parameter (self will be discussed in more detail shortly).
To create Person objects, we can do this:
>>> p = Person()
>>> p
<__main__.Person object at 0x00AC3370>
>>> p.age
0
>>> p.name
''
>>> p.age = 55
>>> p.age
55
>>> p.name = 'Moe'
>>> p.name
'Moe'
To create a Person object, we simply call Person(). This causes Python to run the __init__ function in the Person class and to return a new object of type Person.
The age and name variables are inside an object, and every newly created Person object has its own personal copy of age and name. Thus, if you want to access age or name, you must specify what object holds them using dot notation.
You’ll notice that we don’t provide any parameters for Person(), but the __init__(self) function expects an input named self. That’s because in OOP, self is a variable that refers to the object itself (Figure 10.1). This is a simple idea, but one that trips up many beginners.
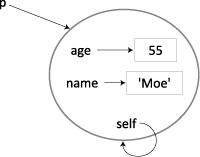
Figure 10.1. In this example, the variable p points to a Person object (represented by the circle). As we know from looking at the Person class, a Person object contains an age and a name. These can be used just like regular variables, with the stipulation that they be accessed using dot notation—that is, p.age and p.name. The special variable self is automatically added by Python to all objects; it points to the object itself and lets functions within the class unambiguously refer to the data and functions within the object.
✓ Tips
All classes should have an
__init__(self)method whose job is to initialize the object—for example, initializing an object’s variables. The__init__method is only called once when the object is created. As we will see, you can provide extra parameters to__init__if needed.We have followed standard Python terminology and given the first parameter of
__init__the nameself. This name is not required: You can use any variable name you like instead ofself. However, the use ofselfis a universal convention in Python, and using any other name would likely just cause confusion for any programmer trying to read your code. Some other languages, such as Java and C++, use—and require—the namethis.Objects can be used like any other data type in Python: You can pass them to functions, store them in lists and dictionaries, pickle them in files, and so on.
As mentioned, a method is simply a function defined within an object. Let’s add a method to the Person class that prints the contents of a Person object:
# person.py
class Person:
    """ Class to represent a person
    """
    def __init__(self):
        self.name = ''
        self.age = 0

    def display(self):

        print("Person('%s', age)" % (self.name, self.age))
The display method prints the contents of a Person object to the screen in a format useful to a programmer:
>>> p = Person()
>>> p.display()
Person('', 0)
>>> p.name = 'Bob'
>>> p.age = 25
>>> p.display()
Person('Bob', 25)
The display method works fine, but we can do better: Python provides some special functions that let you customize objects for seamless printing. For instance, the special __str__ method is used to generate a string representation of an object:
# person.py
class Person:
    # __init__ method removed for space
    def display(self):
        print("Person('%s', age)" % (self.name, self.age))

    def __str__(self):
        return "Person('%s', age)" % (self.name, self.age)
Now we can write code like this:
>>> p = Person()
>>> str(p)
"Person('', 0)"
We can use str to simplify the display method:
# person.py

class Person:

    # __init__ method removed for space
    def display(self):
        print(str(self))

    def __str__(self):
        return "Person('%s', age)" % (self.name, self.age)
You can also define a special method named __repr__ that returns the “official” representation of an object. For example, the default representation of a Person is not very helpful:
>>> p = Person()
>>> p
<__main__.Person object at 0x012C3170>
By adding a __repr__ method, we can control the string that is printed here. In most objects, it is the same as the __str__ method:
# person.py
class Person:
    # __init__ method removed for space
    def display(self):
        print(str(self))

    def __str__(self):
        return "Person('%s', age)" % (self.name, self.age)

    def __repr__(self):
       return str(self)
Now Person objects are easier to work with:
>>> p = Person()
>>> p
Person('', 0)
>>> str(p)
"Person('', 0)"
✓ Tips
When creating your own classes and objects, it is almost always worthwhile to write
__str__and__repr__functions. They are extremely useful for displaying the contents of your objects, which is helpful when debugging your programs.If you define a
__repr__method but not a__str__method, then when you callstr()on the object, it will run__repr__.Once you’ve added the
__repr__method, the display method forPersoncan be further simplified:def display(self): print(self)
In practice, it’s often not necessary to write a
displaymethod.The Python documentation recommends that the string representation of an object be the same as the code you would write to create that object. This is a very useful convention: It lets you easily re-create objects by cutting and pasting the string representation into the command line.
If you want to create a Person object with a particular name and age, you must currently do this:
>>> p = Person()
>>> p.name = 'Moe'
>>> p.age = 55
>>> p
Person('Moe', 55)A more convenient approach is to pass the name and age to __init__ when the object is constructed. So let’s rewrite __init__ to allow for this:
# person.py
class Person:
def __init__(self, name = '',
age = 0):
self.name = name
self.age = ageNow initializing a Person is much simpler:
>>> p = Person('Moe', 55)
>>> p
Person('Moe', 55)Since the parameters to __init__ have default values, you can even create an “empty” Person:
>>> p = Person()
>>> p
Person('', 0)Notice inside the __init__ method that we use self.name and name (and also self.age and age). The variable name refers to the value passed into __init__, while self.name refers to the value stored in the object. The use of self helps make clear which is which.
✓ Tip
While it is easy to create default values for
__init__parameters and thus allow the creation of empty (or null)Personobjects, it is not so clear if this is a good idea from a design point of view. An emptyPersondoes not have a real name or age, so you will need to check for that in code that processesPersonobjects. Constantly checking for special cases can soon become a real burden, and forgetting to do it is easy . Thus, many programmers prefer not to give the__init__parameters default values in this case, and to avoid empty objects altogether.
As it stands now, we can both read and write the name and age values of a Person object using dot notation:
>>> p = Person('Moe', 55)
>>> p.age
55
>>> p.name
'Moe'
>>> p.name = 'Joe'
>>> p.name
'Joe'
>>> p
Person('Joe', 55)A problem with this is that we could, accidentally, set the age to be a nonsensical value, such as −45 or 509. With regular Python variables there is no way to restrict what values they can be assigned. However, within an object, we can write special setter and getter methods that give us control over how values are accessed.
First, let’s add a setter method that changes age only if a sensible value is given:
def set_age(self, age):
if 0 < age <= 150:
self.age = ageNow we can write code like this:
>>> p = Person('Jen', 25)
>>> p
Person('Jen', 25)
>>> p.set_age(30)
>>> p
Person('Jen', 30)
>>> p.set_age(-6)
>>> p
Person('Jen', 30)One common complaint about this kind of setter is that typing p.set_age(30) is more cumbersome than p.age = 30.
Property decorators combine the brevity of variable assignment with the flexibility of setter and getter functions. Decorators indicate that a function or method is special in some way, and here we use them to indicate which methods are setters and getters.
A getter returns the value of a variable, and we indicate this using the @property decorator:
@property
def age(self):
""" Returns this person's age.
"""
return self._ageYou can see here that we’ve created a method called age that takes no parameters (other than the required self). We’ve put @property before it to indicate that it’s a getter; the name of the method is age, and that’s the name we will use to set the variable.
We have also renamed the underlying self.age variable to self._age. Putting an underscore in front of an object variable is a common convention, and we use it here to distinguish it from the age method we just created. You need to replace every occurrence of self.age in Person with self._age.
For consistency, it is also a good idea to everywhere replace self.name with self._name. The modified Person class should look like this:
# person.py
class Person:
def __init__(self, name = '',
age = 0):
self._name = name
self._age = age
@property
def age(self):
return self._age
def set_age(self, age):
if 0 < age <= 150:
self._age = age
def display(self):
   print(self)
def __str__(self):
return "Person('%s', %s)" % (self._name, self._age)
def __repr__(self):
return str(self)To create an age setter, we rename the set_age method to age and decorate it with @age.setter:
    @age.setter
    def age(self, age):
        if 0 < age <= 150:
            self._age = age
With these changes, we can now write code like this:
>>> p = Person('Lia', 33)
>>> p
Person('Lia', 33)
>>> p.age = 55
>>> p.age
55
>>> p.age = -4
>>> p.age
55
The setter and getters for age work just as if we were using the variable age directly. The difference is that now when you call, say, p.age = -4, Python is really calling the age(self, age) method. Similarly, when you write p.age, the age(self) method is called. Thus we get the advantage of the simple assignment syntax combined with the flexibility of controlling how variables are set and get.
You can sneak in illegal changes by accessing self._age directly:
>>> p._age = -44
>>> p
Person('Lia', -44)
One way to decrease the chance of this kind of problem is to rename self._age to self.__age—that is to say, to put two underscores in front of the variable name. The two underscores declare that age is a private variable that is not meant to be accessed by any code outside of Person. To access self.__age directly, you now have to put _Person on the front like this:
>>> p._Person__age = -44
>>> p
Person('Lia', -44)
While this does not prevent you from modifying internal variables, it does make it almost impossible to do so accidentally.
✓ Tips
When writing large programs, a useful rule of thumb is to always make object variables private (that is, starting with two underscores) by default, and then change them to be public if you have a good reason to do so. This way, you will prevent errors caused by unintended meddling with the internals of an object.
The syntax for creating setters and getters is strange at first, but once you get used to it, it is fairly clear. Keep in mind that you don’t always need to create special setters and getters; for simple objects, like the original
Person, regular variables may be fine.Some programmers prefer to avoid setters whenever possible, thus making the object immutable (just like numbers, strings, and tuples). In an object with no setters, after you create the object, there is no “official” way to change anything within it. As with other immutable objects, this can prevent many subtle errors and allow different variables to share the same object (thus saving memory). The downside is, of course, that if you do need to modify the object, your only option is to create a new object that incorporates the change.
If the programmer tries to set the
ageto be something out of range, thenage(self, age)doesn’t make any change. An alternative approach is to purposely raise an exception, thus requiring any code that calls it to handle the exception. The advantage of raising an exception is that it might help you find more errors: Trying to set theageto be a nonsensical value is likely a sign of a problem elsewhere in your program.
Inheritance is a mechanism for reusing classes. Essentially, inheritance allows you to create a brand new class by adding extra variables and methods to a copy of an existing class.
Suppose we are creating a game that has human players and computer players. Let’s create a Player class that contains things common to all players, such as the score and a name:
# players.py
class Player:
    def __init__(self, name):
        self._name = name
        self._score = 0

    def reset_score(self):
        self._score = 0

    def incr_score(self):
        self._score = self._score + 1

    def get_name(self):
        return self._name

    def __str__(self):
        return "name = '%s', score = %s" % (self._name, self._score)

    def __repr__(self):
        return 'Player(%s)' % str(self)
We can create and use Player objects this way:
>>> p = Player('Moe')
>>> p
Player(name = 'Moe', score = 0)
>>> p.incr_score()
>>> p
Player(name = 'Moe', score = 1)
>>> p.reset_score()
>>> p
Player(name = 'Moe', score = 0)
Let’s assume there are two kinds of players: humans and computers. The main difference is that humans enter their moves from the keyboard, while computers generate their moves from functions. Otherwise they are the same, each having a name and a score as in the Player class.
So let’s write a Human class that represents a Human player. The simplest way to do that would be to cut and paste a new copy of the Player class, and then add a make_move(self) method that asks the player to make a move. While that approach certainly would work, a much better way is to use inheritance. We can define the Human class to inherit all the variables and methods from the Player class so that we don’t have to rewrite them:
class Human(Player):
    pass
In Python, the pass statement means “Do nothing.” This is a complete—and useful!—definition for the Human class. It simply inherits the code from Player, which lets us do the following:
>>> h = Human('Jerry')
>>> h
Player(name = 'Jerry', score = 0)
>>> h.incr_score()
>>> h
Player(name = 'Jerry', score = 1)
>>> h.reset_score()
>>> h
Player(name = 'Jerry', score = 0)
This is pretty impressive given that we wrote only two lines of code for the Human class!
One small wart is that the string representation of h says Player when it would be more accurate for it to say Human. We can fix that by giving Human its own __repr__ method:
class Human(Player):
    def __repr__(self):
        return 'Human(%s)' % str(self)
Now we get this:
>>> h = Human('Jerry')
>>> h
Human(name = 'Jerry', score = 0)
This is an example of method overriding: The __repr__ method in Human overrides the __repr__ method inherited from Player. This is a common way to customize inherited classes.
Now it’s easy to write a similar Computer class to represent computer moves:
class Computer(Player):
    def __repr__(self):
        return Computer(%s)' % str(self)
These three classes form a small class hierarchy, as shown in the class diagram of Figure 10.2. The Player class is called the base class, and the other two classes are derived, or extended, classes.
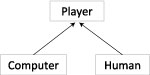
Figure 10.2. A class diagram showing how the Player, Human, and Computer classes relate. The arrows indicate inheritance, and the entire diagram is a hierarchy of classes. The more abstract (that is, general) classes appear near the top, and the more concrete (that is, specific) ones nearer the bottom.
Essentially, an extended class inherits the variables and methods from the base class. Any code you want to be shared by all the derived classes should be placed inside the base class.
To demonstrate the power of OOP, let’s implement a simple game called Undercut. In Undercut, two players simultaneously pick an integer from 1 to 10 (inclusive). If a player picks a number one less than the other player—if he undercuts the other player by 1—then he wins. Otherwise, the game is a draw. For example, if Thomas and Bonnie are playing Undercut, and they pick the numbers 9 and 10, respectively, then Thomas wins. If, instead, they choose 4 and 7, the game is a draw.
Here’s a function for playing one game of Undercut:
def play_undercut(p1, p2):
    p1.reset_score()
    p2.reset_score()
    m1 = p1.get_move()
    m2 = p2.get_move()
    print("%s move: %s" % (p1.get_name(),
                           m1))
    print("%s move: %s" % (p2.get_name(),
                           m2))
    if m1 == m2 - 1:
        p1.incr_score()
        return p1, p2,
               '%s wins!' % p1.get_name()
    elif m2 == m1 - 1:
        p2.incr_score()
        return p1, p2,
               '%s wins!' % p2.get_name()
    else:
        return p1, p2, 'draw: no winner'
If you read this function carefully, you will note that p1.get_move() and p2.get_move() are called. We haven’t yet implemented these functions because they are game-dependent. So let’s do that now.
Even though moves in Undercut are just numbers from 1 to 10, humans and computers determine their moves in very different ways. Human players enter a number from 1 to 10 at the keyboard, while computer players use a function to generate their moves. Thus the Human and Computer classes need their own special-purpose get_move(self) methods.
Here is a get_move method for the human (the error messages have been shortened to save space; fuller and more user-friendly messages are given in the accompanying source code on the Web site):
class Human(Player):
    def __repr__(self):
        return 'Human(%s)' % str(self)

    def get_move(self):
        while True:
            try:
                n = int(input('%s move (1 - 10): ' % self.get_name()))
                if 1 <= n <= 10:
                    return n
                else:
                    print('Oops!')
            except:
                print(Oops!')
This code asks the user to enter an integer from 1 to 10 and doesn’t quit until the user does so. The try/except structure is used to catch the exception that the int function will throw if the user enters a non-integer (like “two”).
For the computer’s move, we will simply have it always return a random number from 1 to 10 (we can improve the computer strategy later if we want):
class Computer(Player):
    import random
    def __repr__(self):
        return 'Computer(%s)' % str(self)

    def get_move(self):
        return random.randint(1, 10)
Notice that we put import random inside the class definition. It is usually a good idea to put everything a class needs to work properly within the class itself.
With all the pieces in place, we can now start playing Undercut. Let’s try a game between a human and a computer:
>>> c = Computer('Hal Bot')
>>> h = Human('Lia')
>>> play_undercut(c, h)
Lia move (1 - 10): 7
Hal Bot move: 10
Lia move: 7
(Computer(name = 'Hal Bot', score = 0), Human(name = 'Lia', score = 0), 'draw: no winner')
It’s important to realize that the player objects must be created outside of the play_undercut function. That’s good design: The play_undercut function worries only about playing the game, and not about how to initialize the player objects.
The play_undercut function returns a 3-tuple of the form (p1, p2, message). The p1 and p2 values are the player objects that were initially passed in; if one player happens to win the game, then her score will have been incremented. The message is a string indicating who won the game or if it was a draw.
Now we will do something that is pretty remarkable when you think about it. Let’s pass two computer players to play_undercut:
>>> c1 = Computer('Hal Bot')
>>> c2 = Computer('MCP Bot')
>>> play_undercut(c1, c2)
Hal Bot move: 8
MCP Bot move: 7
(Computer(name = 'Hal Bot', score = 0), Computer(name = 'MCP Bot', score = 1), 'MCP Bot wins!')
There’s no human player in this game, so the user is not asked to enter a number.
We can also pass in two human players:
>>> h1 = Human('Bea')
>>> h2 = Human('Dee')
>>> play_undercut(h1, h2)
Bea move (1 - 10): 5
Dee move (1 - 10): 4
Bea move: 5
Dee move: 4
(Human(name = 'Bea', score = 0), Human(name = 'Dee', score = 1), 'Dee wins!')This chapter introduced a few of the essentials of OOP. Python has many more OOP features you can learn about by reading the online documentation or by searching the Web for tutorials.
Creating good object-oriented designs is a major topic: Using objects well is much harder than merely using them. One popular methodology is object-oriented design patterns, which are proven recipes for using objects to solve common programming problems.
The most influential book on this topic is Design Patterns: Elements of Reusable Object-Oriented Software, by Erich Gamma, Richard Helm, Ralph Johnson, and John Vlissides. Once you’ve learned all the technical details of OOP, reading this book would be an excellent next step to learning about larger design issues.