
Jenkins CI: Automating Your Automated Tests
Continuous integration (CI) systems such as Jenkins[28] are frequently used to launch test suites after each code commit. pytest includes options to generate junit.xml-formatted files required by Jenkins and other CI systems to display test results.
Jenkins is an open source automation server that is frequently used for continuous integration. Even though Python doesn’t need to be compiled, it’s fairly common practice to use Jenkins or other CI systems to automate the running and reporting of Python projects. In this section, you’ll take a look at how the Tasks project might be set up in Jenkins. I’m not going to walk through the Jenkins installation. It’s different for every operating system, and instructions are available on the Jenkins website.
When using Jenkins for running pytest suites, there are a few Jenkins plugins that you may find useful. These have been installed for the example:
-
build-name-setter: This plugin sets the display name of a build to something other than #1, #2, #3, and so on.
-
Test Results Analyzer plugin: This plugin shows the history of test execution results in a tabular or graphical format.
You can install plugins by going to the top-level Jenkins page, which is localhost:8080/manage for me as I’m running it locally, then clicking Manage Jenkins -> Manage Plugins -> Available. Search for the plugin you want with the filter box. Check the box for the plugin you want. I usually select “Install without Restart,” and then on the Installing Plugins/Upgrades page, I select the box that says, “Restart Jenkins when installation is complete and no jobs are running.”
We’ll look at a complete configuration in case you’d like to follow along for the Tasks project. The Jenkins project/item is a “Freestyle Project” named “tasks,” as shown in the following screen.

The configuration is a little odd since we’re using versions of the Tasks project that look like tasks_proj, tasks_proj_v2, and so on, instead of version control. Therefore, we need to parametrize the project to tell each test session where to install the Tasks project and where to find the tests. We’ll use a couple of string parameters, as shown in the next screen, to specify those directories. (Click “This project is parametrized” to get these options available.)

Next, scroll down to Build Environment, and select “Delete workspace before build starts” and Set Build Name. Set the name to ${start_tests_dir} #${BUILD_NUMBER}, as shown in the next screen.

Next are the Build steps. On a Mac or Unix-like systems, select Add build step-> Execute shell. On Windows, select Add build step->Execute Windows batch command. Since I’m on a Mac, I used an Execute shell block to call a script, as shown here:
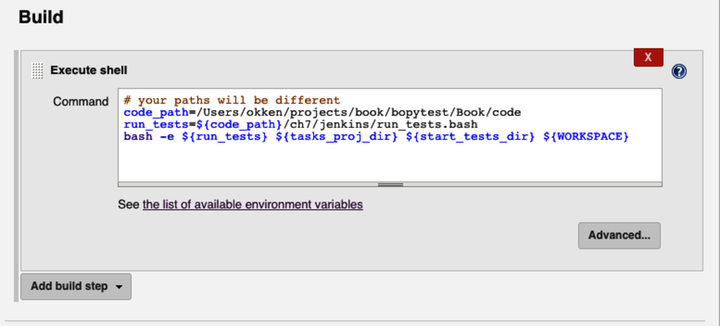
The content of the text box is:
| | # your paths will be different |
| | code_path=/Users/okken/projects/book/bopytest/Book/code |
| | run_tests=${code_path}/ch7/jenkins/run_tests.bash |
| | bash -e ${run_tests} ${tasks_proj_dir} ${start_tests_dir} ${WORKSPACE} |
We use a script instead of putting all of this code into the execute block in Jenkins so that any changes can be tracked with revision control. Here’s the script:
| | #!/bin/bash |
| | |
| | # your paths will be different |
| | top_path=/Users/okken/projects/book/bopytest/Book |
| | code_path=${top_path}/code |
| | venv_path=${top_path}/venv |
| | tasks_proj_dir=${code_path}/$1 |
| | start_tests_dir=${code_path}/$2 |
| | results_dir=$3 |
| | |
| | # click and Python 3, |
| | # from http://click.pocoo.org/5/python3/ |
| | export LC_ALL=en_US.utf-8 |
| | export LANG=en_US.utf-8 |
| | |
| | # virtual environment |
| | source ${venv_path}/bin/activate |
| | |
| | # install project |
| | pip install -e ${tasks_proj_dir} |
| | |
| | # run tests |
| | cd ${start_tests_dir} |
| | pytest --junit-xml=${results_dir}/results.xml |
The bottom line has pytest --junit-xml=${results_dir}/results.xml. The --junit-xml flag is the only thing needed to produce the junit.xml format results file Jenkins needs.
There are other options:
| | $ pytest --help | grep junit |
| | --junit-xml=path create junit-xml style report file at given path. |
| | --junit-prefix=str prepend prefix to classnames in junit-xml output |
| | junit_suite_name (string) Test suite name for JUnit report |
The --junit-prefix can be used as a prefix for every test. This is useful when using tox and you want to separate the different environment results. junit_suite_name is a config file option that you can set in the [pytest] section of pytest.ini or tox.ini. Later we’ll see that the results will have from (pytest) in them. To change pytest to something else, use junit_suite_name.
Next, we’ll add a post-build action: Add post-build action->Publish Junit test result report. Fill in the Test report XMLs with results.xml, as shown in the next screen.

That’s it! Now we can run tests through Jenkins. Here are the steps:
- Click Save.
- Go to the top project.
- Click “Build with Parameters.”
- Select your directories and click Build.
- When it’s done, hover over the title next to the ball in Build History and select Console Output from the drop-down menu that appears. (Or click the build name and select Console Output.)
- Look at the output and try to figure out what went wrong.
You may be able to skip steps 5 and 6, but I never do. I’ve never set up a Jenkins job and had it work the first time. There are usually directory permission problems or path issues or typos in my script, and so on.
Before we look at the results, let’s run one more version to make it interesting. Click “Build with Parameters” again. This time, keep the same project directory, but set ch2 as the start_tests_dir, and click Build. After a refresh of the project top view, you should see the following screen:

Click inside the graph or on the “Latest Test Result” link to see an overview of the test session, with “+” icons to expand for test failures.
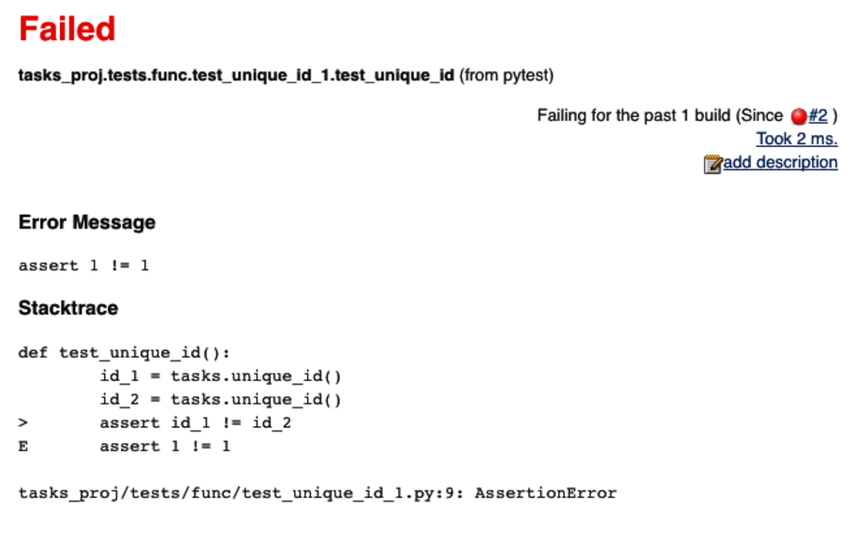
Clicking on any of the failing test names shows you the individual test failure information, as shown in the next screen. This is where you see the “(from pytest)” as part of the test name. This is what’s controlled by the junit_suite_name in a config file.
Going back to Jenkins > tasks, you can click on Test Results Analyzer to see a view that lists which tests haven’t been run for different sessions, along with the pass/fail status (see the following screen):

You’ve seen how to run pytest suites with virtual environments from Jenkins, but there are quite a few other topics to explore around using pytest and Jenkins together. You can test multiple environments with Jenkins by either setting up separate Jenkins tasks for each environment, or by having Jenkins call tox directly. There’s also a nice plugin called Cobertura that is able to display coverage data from coverage.py. Check out the Jenkins documentation[29] for more information.