
Hour 22. Saving Your Code Properly Through Versioning
What You’ll Learn in This Hour:
![]() What versioning does for your code
What versioning does for your code
![]() How to acquire Git and GitHub for versioning
How to acquire Git and GitHub for versioning
![]() How to create and use a repository
How to create and use a repository
![]() How to use branches to experiment with code
How to use branches to experiment with code
![]() How to determine what should go into a repository
How to determine what should go into a repository
So far, we’ve been saving all our programs on our computer just like we would any other file: Open it, make some changes, and save those changes. There’s a far better way, however. Nearly all developers today use some sort of versioning software that helps them keep track of what they changed and when, and helps them work with other people. This hour, you’ll be learning about versioning and a type of versioning called Git, which will allow us to save our work more easily as well as share it with others.
What Is Versioning?
With versioning, not only do you save all of your files, but you also save every change you made to those files since you created them. You can even comment on your changes, and it’s possible to go back to a previous change if you find you’ve made a mistake.
Also, the changes are generally saved not only on your computer, but also on a remote server. This not only gives you an instant backup of your code, but also allows other people to work with you on your projects.
Why Versioning Is Important
Many people resist versioning when they first hear about it. It seems like an extraneous step. Why not just copy all of the files to a backup drive or a server somewhere? Why learn something new just so you can see what changes you’ve made?
If you program, it is guaranteed that you will eventually do something dire to your code. Many a developer has lost a weekend, trying to undo something they had written but realized too late that what they were doing was a bad idea. Had the code been under a versioning system, they could have rolled back to an earlier version with one command.
Also, if you program and you don’t use a versioning system, it can become very difficult to remember to push your code to another server. Many projects have been destroyed by an ill-timed hard drive crash. Had the programmers been using versioning software, getting their code back onto their computer would have been a simple matter of downloading the code again.
Finally, why not just email code back and forth when you want to work with someone? That would be nearly impossible to do. You would have to make sure that only one person was working on the code at a time, because merging your changes together would be extremely time consuming, and likely to introduce bugs into your code.
How Versioning Works
Every time you save a file using versioning software, you don’t save the entire file. Instead, you save something called a delta, which is just what has changed between the previous version and the current version. For example, let’s say we have this script:
from random import randint
def main():
print "Welcome to the number guessing game!"
number = randint(1, 10)
while True:
guess = raw_input("Guess a number between one and ten: ")
if int(guess) == number:
print "That's right!"
break
else:
print "That's not right. Sorry! Guess again."
if __name__ == '__main__':
main()
It’s a pretty simple guessing game. We save it using a versioning system. Later, say we make a small change. Instead of an else statement, we add two elif statements:
from random import randint
def main():
print "Welcome to the number guessing game!"
number = randint(1, 10)
while True:
guess = raw_input("Guess a number between one and ten: ")
if int(guess) == number:
print "That's right!"
break
elif int(guess) > number:
print "Sorry, that's too high. Guess again please!"
elif int(guess) < number:
print "Sorry, that's too low. Guess again please!"
if __name__ == '__main__':
main()
We save this version with versioning software as well. The whole file isn’t really saved, though! The software only saves the fact that we removed two lines and added four lines. The save file might look something like this:
- else:
- print "That's not right. Sorry! Guess again."
+ elif int(guess) > number:
+ print "Sorry, that's too high. Guess again please!"
+ elif int(guess) < number:
+ print "Sorry, that's too low. Guess again please!"
Aside from a comment and some notes about lines, this would be all that the software would save. This would be enough for it to construct the latest version of the script at any time, as long as it knows what the original file looked like and knows about all the other changes.
Versioning with Git and GitHub
More than a few types of versioning software are popular these days. For example, there’s Subversion (also known as SVN), Mercurial (known as hg), and CVS (which stands for Concurrent Versioning System). Today, though, we’ll only be covering one: Git.
Git is one of the latest options in versioning software. It allows you to easily save your code locally and remotely, and to share with others. A website has even been created that allows you to save and share your code for free, so you don’t have to worry about setting up your own server or paying a monthly fee to someone.
Joining GitHub
The first thing you’ll need to do is join GitHub. Though you can use Git without joining this site, you’ll miss out on many of the features of using Git. First, go to github.com. The sign-up form is usually on the front page. You’ll need to create a username, enter your email, and create a password.
There are several membership tiers. The one you’ll automatically be signed up for is the free tier. You’ll be able to make an unlimited number of repositories, but you won’t be able to make them private. This means that everyone will be able to see your code, your changes, and your commit messages.
Because everyone can see your work, you should be careful about what you commit. Never commit anything that needs to be secure, such as a password. Be careful about vulgarity in your commit messages, if that’s something that concerns you. Don’t commit access codes for third-party apps, and don’t commit your database.
Later this hour, we’ll go over what you should commit, and how you can easily ignore certain items.
A Quick Tour of GitHub
GitHub is often referred to as a social network for developers. Like Facebook or Google+ (or any other social network you prefer), you can friend people, “like” items, or follow certain projects or pages. There’s even a timeline that shows everything your friends or favorite projects have been doing recently.
You can search for users, or, if you know their usernames, you can go to https://github.com/USERNAME. There, you can follow or unfollow a user (this is like friending). For example, I know that the original author of Python has the username gvanrossum. His user page is https://github.com/gvanrossum.
Projects are kept under the user who created them. The format for the URL is usually https://github.com/USERNAME/PROJECT. For example, Armin Ronacher (mitsuhiko) is the original author of Flask. The code for the Flask project is hosted at https://github.com/mitsuhiko/flask.
On a project page, you can choose to watch or “star” a repository. If you watch a repository, updates about that repository will show in your timeline. If you star it, updates won’t show up in your timeline, but it makes the repository easy to find again. You can go to https://github.com/stars to see all the applications you’ve starred.
Installing Git
Now that you’ve signed up for GitHub, let’s install Git. Go to http://git-scm.com/downloads and then download the correct installer for your system. Once it’s downloaded, run the installer, sticking to the default options as you go.
Once you’re done, bring up a terminal window and type git. If you installed Git correctly, you should get a help message!
Managing Code in a Repository
A repository is a place where you save code. You might be saving the code for a project, a library, or a module. All the code in a repository should be related, though. You don’t want to throw all the code for all your projects into one repository. It would get hard to use fast!
Creating a Repository
The first step to creating a repository is to make it on GitHub. Log on to GitHub and then click New Repository. You’ll be taken to a page where you’ll have to fill in a few details:
![]() Repository name— This will be part of the URL to get to your project. You can have letters, numbers, dashes, and underscores.
Repository name— This will be part of the URL to get to your project. You can have letters, numbers, dashes, and underscores.
![]() Description— This is optional. It’s a place where you can briefly describe your project.
Description— This is optional. It’s a place where you can briefly describe your project.
![]() Public/Private— This determines if your repository will be available to the public or kept private. Public should be selected.
Public/Private— This determines if your repository will be available to the public or kept private. Public should be selected.
![]() Initialize this repository with a README— Check this. GitHub will automatically create a README, which we know we’ll need anyway.
Initialize this repository with a README— Check this. GitHub will automatically create a README, which we know we’ll need anyway.
![]() Add .gitignore: None— Select Python. This will add a .gitignore file that works especially well for Python. We’ll go over what a .gitignore file is later this hour.
Add .gitignore: None— Select Python. This will add a .gitignore file that works especially well for Python. We’ll go over what a .gitignore file is later this hour.
Once these are filled out, click Create Repository. You’ll be taken to your new repository!
Checking Out the Repository
When you get the code out of a repository, it’s referred to as “checking out” the code. This puts a copy of the code onto your local machine. Checking out projects requires a link. You’ll find it on your project page (see Figure 22.1). Either select the link text and copy, or click the Copy to Clipboard icon.

On your computer, open a terminal window. You’ll want to type the following (with your copied URL instead of the fake one used for this example):
$ git clone https://github.com/kcunning/teach-yourself-python-in-24-hours.git
Cloning into teach-yourself-python-in-24-hours...
remote: Counting objects: 4, done.
remote: Compressing objects: 100% (4/4), done.
remote: Total 4 (delta 0), reused 0 (delta 0)
Unpacking objects: 100% (4/4), done.
Also, a new folder will be created. It will have the same name as your repository. Let’s go into the folder and get some information about the repository:
$ cd teach-yourself-python-in-24-hours/
$ git status
# On branch master
nothing to commit (working directory clean)
Git status tells us what has changed in the repository.
Adding Items to the Repository
Let’s next add something to the repository. In your project directory, create a new Python file called zen.py. Here’s what should be in it:
import this
Yes, it’s a one-line script. We’ll be adding to it. For now, save it and go back to your command line. Let’s see what git status tells us now:
$ git status
# On branch master
# Untracked files:
# (use "git add <file>..." to include in what will be committed)
#
# zen.py
nothing added to commit but untracked files present (use "git add" to track)
Git tells us that we have “untracked” files, which are files we haven’t added to the repository. If we want to add files to our project, we need to add them. Let’s do that with git add:
$ git add zen.py
$ git status
# On branch master
# Changes to be committed:
# (use "git reset HEAD <file>..." to unstage)
#
# new file: zen.py
#
Now, Git tells us that we have a new file to add to our repository. Let’s see what the message looks like when we change a file. In a text editor, open README.md and add a line to it (anything will do). Save it and then run git status again:
$ git status
# On branch master
# Changes to be committed:
# (use "git reset HEAD <file>..." to unstage)
#
# new file: zen.py
#
# Changes not staged for commit:
# (use "git add <file>..." to update what will be committed)
# (use "git checkout -- <file>..." to discard changes in working directory)
#
# modified: README.md
#
If you read the text, you’ll see that our changes to README.md won’t be committed. That’s because we need to tell Git that we want to push our changes to the repository. We do that through git commit:
$ git commit README.md -m "Made some changes to the README"
[master 531811f] Made some changes to the README
Committer: Katie Cunningham <kcunningham@local>
1 files changed, 2 insertions(+), 0 deletions(-)
With git commit, you have to tell what file you want to commit, followed by -m, and then you have to give it a comment for your commit. Git then tells you how much changed in your file.
What if you want to save the changes to many files? In that case, use the command git commit -a -m "Message". This saves the changes to all the files you’ve added to your repository under one commit.
Warning: Adding Files
Using commit -a doesn’t automatically add untracked files! Don’t forget to add any files that you want to commit.
Pushing to the Remote Repository
So far, we’ve only been saving our changes locally. This is fine, but we really want to save all our changes to our repository on GitHub. Let’s do that, using git push. You’ll need to enter the username and password for your GitHub account. If you see a message like the following, you successfully pushed all your files to your repository:
$ git push
Username:
Password:
Counting objects: 5, done.
Delta compression using up to 8 threads.
Compressing objects: 100% (3/3), done.
Writing objects: 100% (3/3), 455 bytes, done.
Total 3 (delta 0), reused 0 (delta 0)
To https://github.com/kcunning/teach-yourself-python-in-24-hours.git
63cd459..531811f master -> master
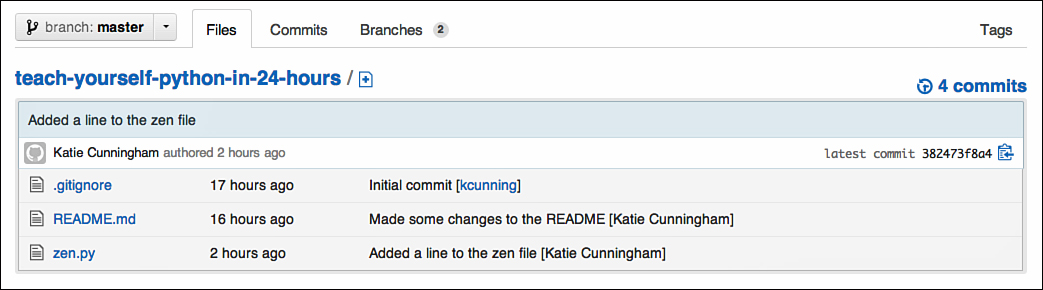
If you go to your repository on GitHub, you’ll see all your files, plus the last comment you made about them (see Figure 22.2).

Getting Updates
Let’s say someone else has made a change to your repository, or you’ve checked out a repository that many people are working on. How do you get their changes? You use git pull.
Say we’ve made some changes on another computer. We want to grab those changes, so we use git pull:
$ git pull
remote: Counting objects: 5, done.
remote: Compressing objects: 100% (2/2), done.
remote: Total 3 (delta 1), reused 3 (delta 1)
Unpacking objects: 100% (3/3), done.
From https://github.com/kcunning/teach-yourself-python-in-24-hours
a0eefc4..382473f master -> origin/master
Updating a0eefc4..382473f
Fast-forward
zen.py | 2 ++
1 files changed, 2 insertions(+), 0 deletions(-)
git pull checks the remote repository on GitHub and sees that there were some changes. It then adds the new lines to zen.py, which now looks like this:
import this
print "Print this out and tape it to your wall."
We can also see exactly what was changed, as well as what commit messages were saved, by using git log. Let’s see what the commit message is:
$ git log
commit 382473f8a4381a25c89dd5f0bb9d71980e9280c2
Author: Katie Cunningham <[email protected]>
Date: Tue Jun 18 08:58:22 2013 -0400
Added a line to the zen file
...
Note that this is cut off, because git log will show every change made in the repository since it was created. If there’s more text to show, the bottom line will be a colon (:). Move down by using the down arrow, move up by pressing the up arrow, and quit by pressing q.
Experimental Changes with Branches
Sometimes, you’ll want to experiment on your code. Maybe you want to try out a new library or you want to add a new feature that you’re not 100% sure will work. This is when it can be useful to create a branch.
A branch is a copy of your code at a certain point in time. Sometimes, people use branches to add a new feature, or to try something experimental. Branches can also be useful when more than one person is working on the same project: Each person has his own branch, and merges back to a main branch when he’s done with his work.
Creating Branches
When you create a repository, you’re already working on a branch. This branch is called the master. To create a new branch off your master branch, you have to create that branch and then check it out:
$ git branch round_one
$ git checkout round_one
Switched to branch 'round_one'
If you want this branch saved to the GitHub repository, you have to let Git know. Let’s add a text file called round_one.txt and commit it:
$ git push -u origin round_one
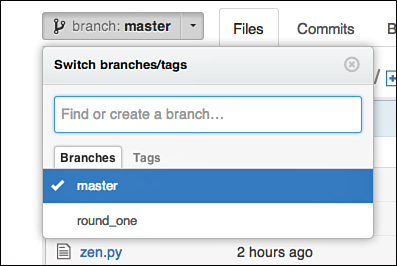
If we look at the repository (see Figure 22.3), it appears that nothing has changed. But note the branch drop-down.
The branch pull-down menu currently has us on “master.” Let’s switch to the new branch (see Figure 22.4).
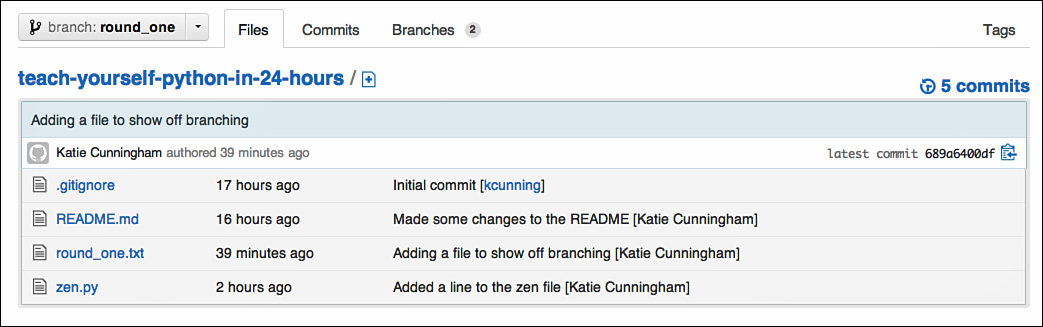
If we select round_one, we can see the changes for that branch (see Figure 22.5).
Let’s say we want to move back to the original branch, master. We can check out that branch, and we will only have the changes that have been made to that branch:
$ git checkout master
Switched to branch 'master'
Now, if we look at the files, we’ll see that the new file is gone and that all the changes made in round_one are gone.
Merging Branches
Chances are, once you’ve decided that you like all your changes, you’ll want to merge these changes back to your master branch. Otherwise, your codebase would be branches based off branches based off branches. Obviously, this can lead to a huge mess.
To merge a branch back down to master, you first need to check out master:
$ git checkout master
Switched to branch 'master'
Then, you need to use the git merge command to merge a specific branch with master. Merge requires you to say which branch you want to merge with, and it merges with your current branch, as in the following example:
$ git merge round_one
Updating 382473f..689a640
Fast-forward
round_one.txt | 1 +
1 files changed, 1 insertions(+), 0 deletions(-)
create mode 100644 round_one.txt
Now that our branches have been merged together, we need to do a push so that the changes are saved on the GitHub repository:
$ git push
Username:
Password:
Total 0 (delta 0), reused 0 (delta 0)
To https://github.com/kcunning/teach-yourself-python-in-24-hours.git
382473f..689a640 master -> master
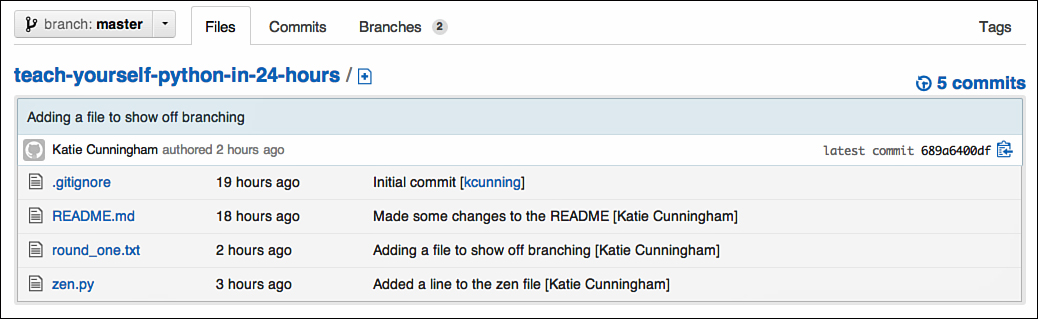
Now, if we look at the files under master, we’ll see that the file we originally created on the round_one branch now exists on the master branch as well (see Figure 22.6).
Determining What Not to Push
Just because a file is in your project doesn’t mean you want to push it to your repository. What do you want to avoid pushing to the repository?
First, and most important, you want to avoid any file that contains information you want kept secure. This includes password files, API keys, and private information. If you wouldn’t want that information pasted on a billboard with instructions on how to exploit it, you should keep it out of your repository.
Second, you should keep compiled files out of your repository. That includes .pyc files you may have noticed popping up here and there. Those files have been compiled by Python so that the next time you go to run the script, it can run faster. You don’t need to include these. They just clutter up your repository.
Finally, you shouldn’t check in databases. The person using the database should create it. They may have a different database or a slightly different setup than you.
The best way to exclude certain types of files is to use .gitignore. The .gitignore file automatically excludes files with certain extensions, such as .pyc. If there’s another extension you want to ignore, just open your .gitignore file and add it. For example, let’s say we have some other language files in our project that we want to exclude. We could add this to the .gitignore file:
*.js
Now, all JavaScript files will be ignored. If we just wanted to ignore one of them, we could add this:
jquery.js
Now, only a file called jquery.js will be ignored.
Another way to avoid accidentally checking in sensitive or unnecessary files is simply to be careful what you add. Sure, you can use git add *, but you shouldn’t do this unless you’re certain there’s nothing sensitive in any of the files of your project, including directories.
Summary
During this hour, you signed up for GitHub and installed Git on your computer. You learned how to create a repository. You added files to your repository and pushed them to GitHub. You also created a branch and then merged it with master. You also learned what you should not save in your repository.
Q&A
Q. GitHub added README.md to my repository. What is an .md file?
A. .md is the extension for a Markdown file. Markdown is a markup language that is easy to read in both its rendered and plaintext forms. Because of this, documentation is often written in Markdown. To learn more about Markdown, go to http://daringfireball.net/projects/markdown/.
Q. How do I make changes to someone else’s code?
A. You can make branches of your own off of other people’s code! On the GitHub page for a project, click Fork. This creates a branch of this code that you can change all you want. Note that you still won’t be changing their code, however. You just have a copy of their code from that point in time.
Workshop
The Workshop contains quiz questions and exercises to help you solidify your understanding of the material covered. Try to answer all questions before looking at the answers that follow.
Quiz
1. Why would you want to use a versioning system when saving your code?
2. What is the command for adding a file to your repository?
3. What files should you not save in your repository?
Answers
1. Versioning allows you to keep track of what you changed, when you changed it, and why you changed it, as well as makes it easier to share your code with others.
2. git add filename adds a file to your repository. git add * adds all unadded files to your repository.
3. You should never save sensitive files, compiled files, and databases to your repository.
Exercise
Create a new repository called guessing-game. Check it out onto your computer. In the master branch, create a file called guess.py. Create a simple guessing game with these (and only these!) features:
![]() The script should generate a number between one and ten.
The script should generate a number between one and ten.
![]() The user should be prompted to guess until getting the answer right.
The user should be prompted to guess until getting the answer right.
![]() The program should exit after the user guesses correctly.
The program should exit after the user guesses correctly.
Save the program and then push it to the repository. Now, create a branch. Here are the features to add:
![]() The user has five chances to guess the correct answer.
The user has five chances to guess the correct answer.
![]() The game ends when the user guesses correctly or runs out of chances.
The game ends when the user guesses correctly or runs out of chances.
![]() The program exits after the end of the game.
The program exits after the end of the game.
Push this branch to the repository and then merge it down to master.