
In the previous example, we have learned how to call C++ functions from JavaScript through Qt's Web Channel system. In this example, we will try to do the reverse: call JavaScript functions from C++ code.
We can call JavaScript functions from C++ through the following steps:
- As usual, create a new Qt Widgets Application project and add the
webengineandwebenginewidgetsmodules to your project. - Then, open up
mainwindow.uiand remove the tool bar, menu bar, and status bar. - After that, add a vertical layout and a horizontal layout to the canvas. Then, select the canvas and click Lay Out Vertically. Make sure the horizontal layout is located at the bottom of the vertical layout.
- Add two push buttons to the horizontal layout; one is called Change HTML Text and the other one is called Play UI Animation. Right-click on one of the buttons and click Go to slot…. A window will now pop up and ask you to pick a signal. Select the clicked() option and click OK. Qt will automatically add a slot function to your source code. Repeat this step for the other button as well:

- Now, open up
mainwindow.hand add the following headers to it:#include <QtWebEngineWidgets/QWebEngineView> #include <QtWebChannel/QWebChannel> #include <QMessageBox>
- Then, declare the class pointer of a
QWebEngineViewobject calledwebview:public: explicit MainWindow(QWidget *parent = 0); ~MainWindow(); QWebEngineView* webview; - After that, open up
mainwindow.cppand add the following code to theMainWindowconstructor:MainWindow::MainWindow(QWidget *parent) : QMainWindow(parent), ui(new Ui::MainWindow) { //qputenv("QTWEBENGINE_REMOTE_DEBUGGING", "1234"); ui->setupUi(this); webview = new QWebEngineView(); ui->verticalLayout->addWidget(webview); QWebChannel* webChannel = new QWebChannel(); webChannel->registerObject("mainWindow", this); webview->page()->setWebChannel(webChannel); webview->page()->load(QUrl("qrc:///html/test.html")); } - Then, define what will happen when the
changeHtmlTextbutton and theplayUIAnimationbutton are clicked:void MainWindow::on_changeHtmlTextButton_clicked() { webview->page()->runJavaScript("changeHtmlText('Text has been replaced by C++!');"); } void MainWindow::on_playUIAnimationButton_clicked() { webview->page()->runJavaScript("startAnim();"); } - Once you're done with that, let's create a resource file for our project by going to File | New File or Project. Then, select Qt Resource File under the Qt category and click Choose. Then, insert your desired file name and click Next, followed by Finish.
- Then, add an empty HTML file and all the required add-ons (jQuery, Bootstrap, and Font Awesome) to our project resources. Also, add the
tux.pngimage file to the resources file as well, as we'll be using it in a short while. - After that, open up the HTML file we just created and add it to the project resources, in our case, it's called
test.html. Then, add the following HTML code to the file:<!DOCTYPE html> <html> <head> <script src="qrc:///qtwebchannel/qwebchannel.js"></script> <script src="js/jquery.min.js"></script> <script src="js/bootstrap.js"></script> <link rel="stylesheet" type="text/css" href="css/bootstrap.css"> <link rel="stylesheet" type="text/css" href="css/font-awesome.css"> </head> <body> </body> </html> - Add the following JavaScript code, which is wrapped within the
<script>tags, to the<head>element of our HTML file:<script> $(document).ready(function() { $("#tux").css({ opacity:0, width:"0%", height:"0%" }); $("#listgroup").hide(); $("#listgroup2").hide(); new QWebChannel(qt.webChannelTransport, function(channel) { mainWindow = channel.objects.mainWindow; }); }); function changeHtmlText(newText) { $("#infotext").html(newText); } function startAnim() { // Reset $("#tux").css({ opacity:0, width:"0%", height:"0%" }); $("#listgroup").hide(); $("#listgroup2").hide(); $("#tux").animate({ opacity:1.0, width:"100%", height:"100%" }, 1000, function() { // tux animation complete $("#listgroup").slideDown(1000, function() { // listgroup animation complete $("#listgroup2").fadeIn(1500); }); }); } </script> - Lastly, add the following code to the
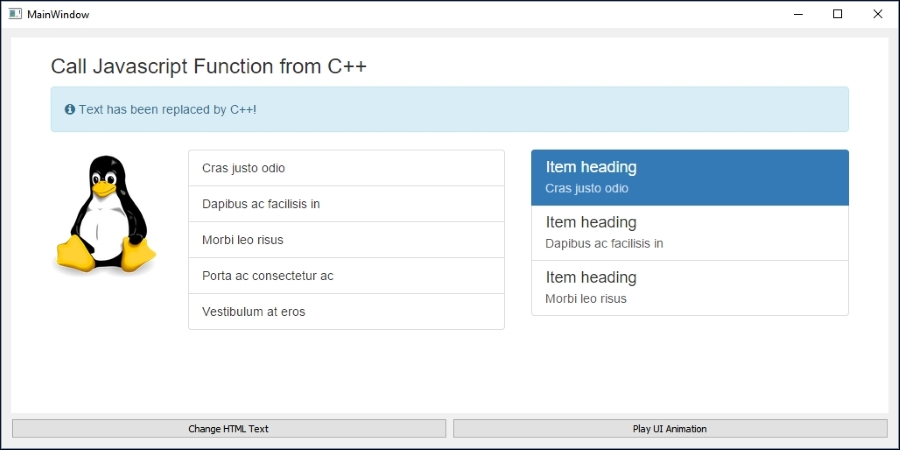
<body>element of our HTML file:<div class="container-fluid"> <form id="example-form" action="#" class="container-fluid"> <div class="form-group"> <div class="col-md-12"><h3>Call Javascript Function from C++</h3></div> <div class="col-md-12"><div class="alert alert-info" role="alert"><i class="fa fa-info-circle"></i> <span id="infotext">Change this text using C++.</span></div></div> <div class="col-md-2"> <img id="tux" src="tux.png"></img> </div> <div class="col-md-5"> <ul id="listgroup" class="list-group"> <li class="list-group-item">Cras justo odio</li> <li class="list-group-item">Dapibus ac facilisis in</li> <li class="list-group-item">Morbi leo risus</li> <li class="list-group-item">Porta ac consectetur ac</li> <li class="list-group-item">Vestibulum at eros</li> </ul> </div> <div id="listgroup2" class="col-md-5"> <a href="#" class="list-group-item active"> <h4 class="list-group-item-heading">Item heading</h4> <p class="list-group-item-text">Cras justo odio</p> </a> <a href="#" class="list-group-item"> <h4 class="list-group-item-heading">Item heading</h4> <p class="list-group-item-text">Dapibus ac facilisis in</p> </a> <a href="#" class="list-group-item"> <h4 class="list-group-item-heading">Item heading</h4> <p class="list-group-item-text">Morbi leo risus</p> </a> </div> </div> </form> </div> - Build and run the program now; you should get a similar result to that shown in the following screenshot. When you click on the Change HTML Text button, the information text is located within the top panel. If you click on the Play UI Animation button, the penguin image alongside the two sets of widgets will appear one after the other, with different animations:
This example is similar to the previous one. Once we have included the Web Channel JavaScript library and initiated the QWebChannel class, we can call any of the JavaScript functions from C++ by calling webview->page()->runJavascript("jsFunctionNameHere();"). Don't forget to apply the web channel created in C++ to the WebView's page as well; otherwise, it will not be able to communicate with the QWebChannel class in your HTML file.
By default, we change the CSS properties of the penguin image and set its opacity to 0, width to 0%, and height to 0%. We also hide the two list groups by calling the jQuery function hide(). When the Play UI Animation button is clicked, we repeat the same steps again just in case the animations have been played before (the same button has been clicked before), then we hide them again in order for the animations to be replayed.
One powerful feature of jQuery is that you can define what happens after an animation is done, which allows us to play the animations in sequence. In this example, we started with the penguin image and interpolated its CSS properties to a targeted setting within a second (1000 milliseconds). Once that's done, we start another animation, which makes the first list group slide from top to bottom in 1 second. After that, we run the third animation, which makes the second list group fade in from nowhere within 1.5 seconds.
To replace the information text located in the top panel, we created a JavaScript function called changeHtmlText() and within the function itself, we got the HTML element by referring to its ID and calling html() to change its contents.