Vulnerability assessment and penetration testing have gained high importance especially in the last couple of years. Organizations often have a complex network of assets storing sensitive data. Such assets are exposed to potential threats from inside as well as from outside the organization. To get an overview of the security posture of the organization, conducting a vulnerability assessment is essential.
It is important to understand the clear difference between vulnerability assessments and penetration testing. To understand this difference, let’s consider a real-world scenario. You notice that your neighbor’s door isn’t locked properly, and the neighbor is not at home. This is a vulnerability assessment. Now if you actually open the neighbor’s door and enter the house, then that is a penetration test. In an information security context, you may notice that the SSH service is running with weak credentials; this is part of a vulnerability assessment. If you actually use those credentials to gain access, then it is a penetration test. Vulnerability assessments are often safe to perform, while penetration tests, if not performed in a controlled way, can cause serious damage on the target systems.
Thus, a vulnerability assessment is one of the essential prerequisites for conducting a penetration test. Unless you know what vulnerabilities exist on the target system, you won’t be able to exploit them.
Performing penetration tests requires a well-planned and methodological approach. It is a multistep process. The following are some of the phases of penetration testing:
Information gathering: Information gathering is the most important phase of the penetration testing lifecycle. This phase is also referred to as reconnaissance. It involves the use of various passive and active techniques to gather as much information as possible about the target system. Detailed information gathering lays a solid foundation for further phases in the penetration testing lifecycle.
Enumeration: Once you have basic information about the target, the enumeration phase uses various tools and techniques to probe the target in detail. It involves finding out the exact service versions running on the target system.
Vulnerability assessment: The vulnerability assessment phase involves the use of various tools and methodologies to affirm the existence of known vulnerabilities in the target system.
Gaining access: From the previous phase, you have a list of probable vulnerabilities for your target. You can now attempt to exploit these vulnerabilities to gain access to the target system.
Escalating privileges: You may get access to your target system by exploiting a particular vulnerability; however, the access may be restricted. To infiltrate deeper, you need to use various techniques and escalate the privileges to that of highest level such as administrator, root, and so on.
Maintaining access: Now that you have worked hard gaining access to the target system, you will certainly want it to persist. This phase involves using various techniques to make the access to the target system persistent.
Covering tracks: The penetration process may create garbage files, modify configuration files, change registry entries, create audit logs, and so on. Covering your tracks involves cleaning up all the traces left during the previous phases.
To perform various tasks in these phases, there are hundreds of tools, scripts, and utilities available. Linux distributions such as Kali Linux even provide bundled tools to perform these tasks.
It is natural to get overwhelmed with the number of tools available. However, there are a few tools that are so powerful and flexible that they alone can perform most of the tasks in all of these phases.
This book is about three such tools: NMAP, OpenVAS, and Metasploit. Just having these three tools in your arsenal can provide extensive penetration testing capabilities.
Table 1-1 describes how these tools could be used in various phases of the penetration testing lifecycle.
Table 1-1
Tools for Pen Testing Phases
Penetration Testing Phase
Tool
Information gathering
NMAP, Metasploit
Enumeration
NMAP, Metasploit
Vulnerability assessment
OpenVAS
Gaining access
Metasploit
Escalating privileges
Metasploit
Maintaining access
Metasploit
Covering tracks
Metasploit
From this table, it is evident that the three tools are capable of performing the tasks across all the phases of the penetration testing lifecycle.
This book focuses on these three tools and helps you get started with fundamentals of each of these tools. This chapter will cover NMAP.
NMAP
Now that you have a fair idea of the different phases in the penetration testing lifecycle and what tools are required, let’s move on to our first tool, NMAP. You’ll learn about various features of NMAP including the following:
Installing NMAP
Using NMAP with ZENMAP
Understanding the NMAP port states
Conducting basic scanning with NMAP
Understanding TCP scans versus UDP scans
Enumerating target operating systems and services
Fine-tuning the scans
Using NMAP scripts
Invoking NMAP from Python
NMAP Installation
NMAP can be installed on both Windows and Unix-based systems. To install NMAP on Windows, simply go to https://nmap.org/download.html, download the executable, and install it.
For Unix-based systems, you can install NMAP from the command line. Security distributions like Kali Linux have NMAP installed by default. However, for other regular distributions, it needs to be installed separately.
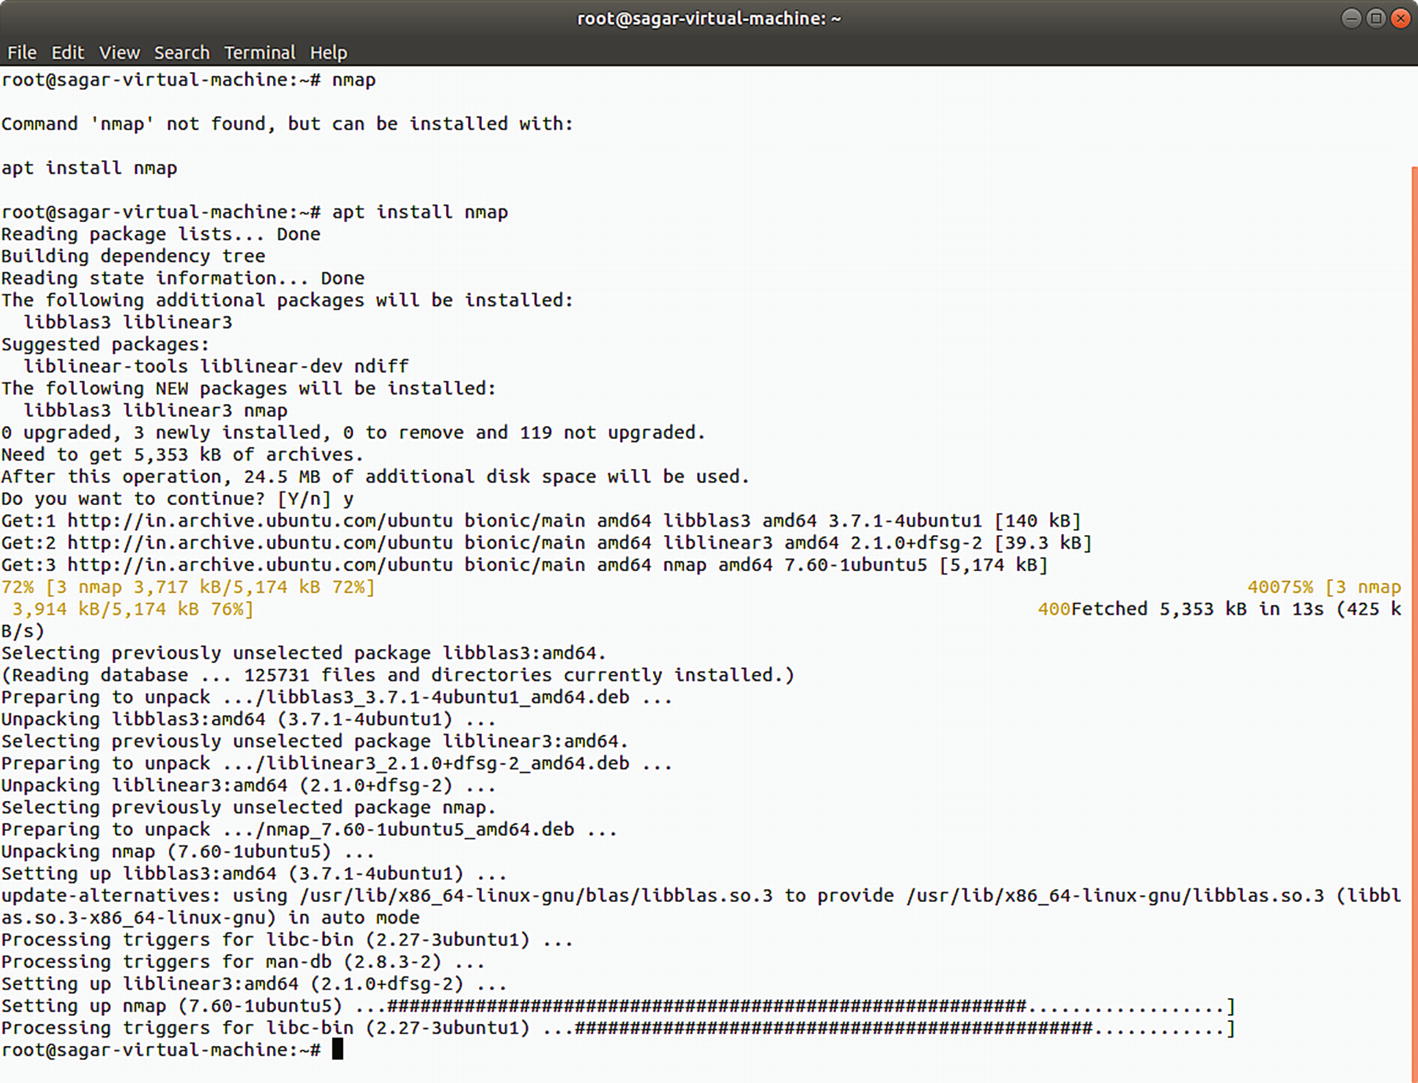
You can simply use the command apt install nmap for Debian-based systems, as shown in Figure 1-1. This command will install NMAP along with all the required dependencies.
Figure 1-1
Installing NMAP on a Debian-based system
Introduction to NMAP and ZENMAP
NMAP was initially a command-line utility. On a Linux terminal, you can simply type the command nmap to get started. Figure 1-2 shows the output of the nmap command. It displays the various parameters and switches that need to be configured to scan a target.
Figure 1-2
Output of the nmap command on the terminal
ZENMAP is a graphical front end to NMAP. It offers the same functionality in a more user-friendly way. ZENMAP is part of the default Kali Linux installation and can be accessed at Applications ➤ Information Gathering ➤ ZENMAP. Figure 1-3 shows the initial ZENMAP screen. The ZENMAP interface has three main configurable settings.
Target: This can be a single IP address, list of multiple IPs, or an entire subnet.
Profile: ZENMAP has set of several predefined scan profiles. The profiles are classified based on the types of scans available in NMAP. Either you can choose among the available profiles or you can have a custom scan as per your requirements.
Command: Once you enter a target and select a predefined profile, ZENMAP will autopopulate the Command field. You can also use this field if you want to execute a customized scan against the predefined profile.
Figure 1-3
Initial screen/interface of ZENMAP
NMAP Port States
Though the current version of NMAP is capable of performing many tasks, it initially started out as a port scanner. NMAP has certain ways to detect whether the port on the target system is open or closed. NMAP detects the status of the target port using predefined states as follows:
Open: The Open state indicates that an application on the target system is actively listening for connections/packets on that port.
Closed: The Closed state indicates there isn’t any application listening on that port. However, the port state could change to Open in the future.
Filtered: The Filtered state indicates that either a firewall, a filter, or some kind of network hurdle is blocking the port and hence NMAP isn’t able to determine whether it is open or closed.
Unfiltered: The Unfiltered state indicates that ports are responding to NMAP probes; however, it isn’t possible to determine whether they are open or closed.
Open/Filtered: The Open/Filtered state indicates that the port is either filtered or open; however, NMAP isn’t precisely able to determine the state.
Closed/Filtered: The Closed/Filtered state indicates that the port is either filtered or closed; however, NMAP isn’t precisely able to determine the state.
Basic Scanning with NMAP
NMAP is a complex tool with numerous options and switches available. In this section, you’ll see various NMAP usage scenarios starting with the most basic scans.
Before you get into the actual scanning, it is important to note that NMAP is a noisy tool. It creates a lot of network traffic and at times can consume much bandwidth. Many of the intrusion detection systems and intrusion prevention systems may detect and block NMAP traffic. It is said that a basic default NMAP scan on one single host can generate more than 4MB of network traffic. So, even if you do a basic scan on an entire subnet, it will create around 1GB of traffic. Hence, it is essential to perform NMAP scans with complete knowledge of the switches being used.
Basic Scan on a Single IP
Here’s the command:
nmap -sn <target IP address>
Let’s start with a basic ping scan on a single target. A ping scan will not check for any open ports; however, it will tell you whether the target is alive. Figure 1-4 shows the output of a ping scan done on a single target IP address.
Figure 1-4
Output of basic NMAP scan done on single IP address
Basic Scan on an Entire Subnet
Here’s the command:
nmap -sn <target IP subnet>
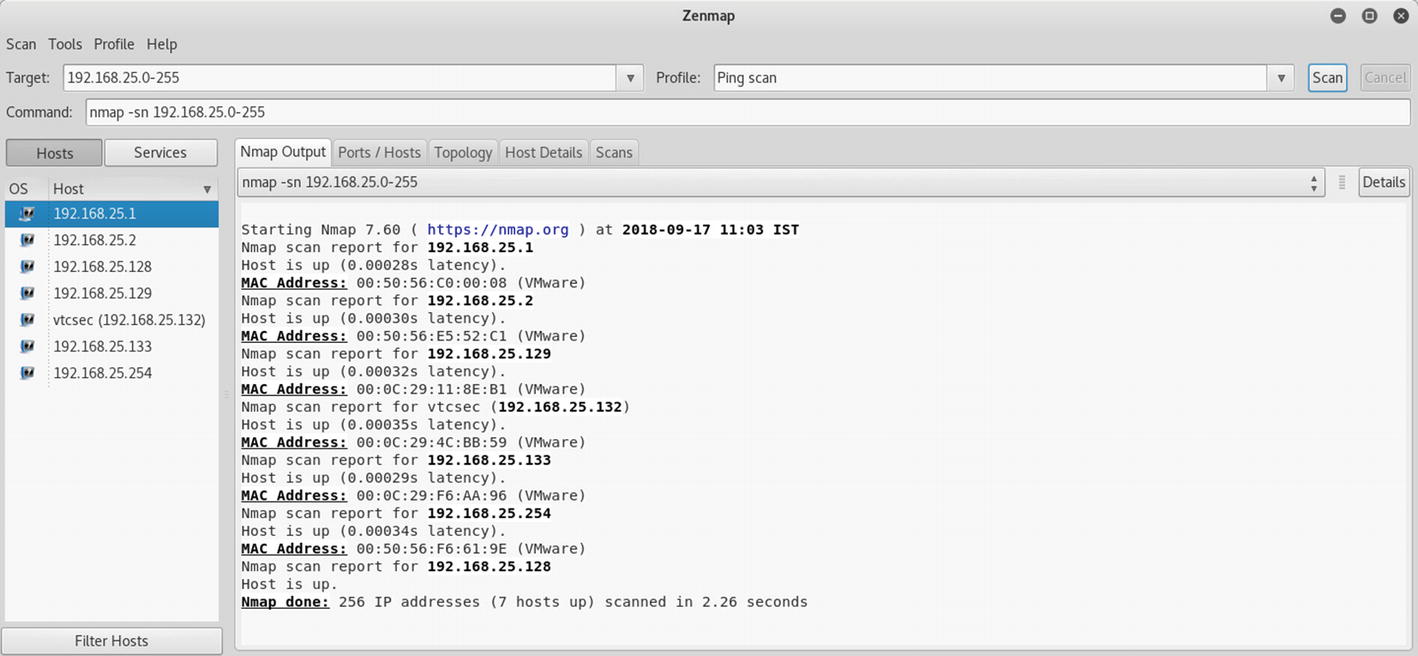
In a practical scenario, you may have multiple IP addresses that you need to check. To get a quick overview of which hosts in a given subnet are alive, you can do an NMAP ping scan on the entire subnet. A subnet is just a logical division of the network. Scanning the entire subnet will give you an overview of what systems are present in the network. Figure 1-5 shows the output of a ping scan done on subnet 192.168.25.0-255. You can see that out of 255 hosts, only seven hosts are up and running. Now you can further probe these seven hosts and get more detailed information.
Figure 1-5
Output of basic NMAP scan done on a subnet
Scan Using an Input File
Here’s the command:
nmap -sn -iL <file path>
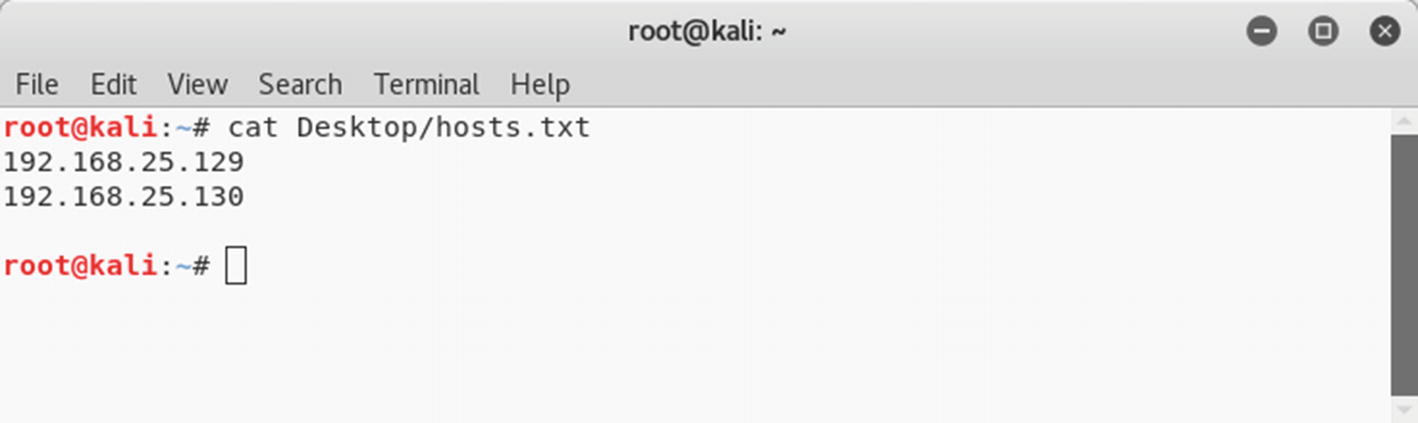
There might be a scenario where you need to scan a wide range of IP addresses. Instead of entering them in a comma-separated format to NMAP, you can put them all in a file and feed that file to the NMAP engine. Figure 1-6 shows the content of the hosts.txt file that contains a list of IP addresses.
Figure 1-6
Hosts file containing a list of IP addresses to be scanned
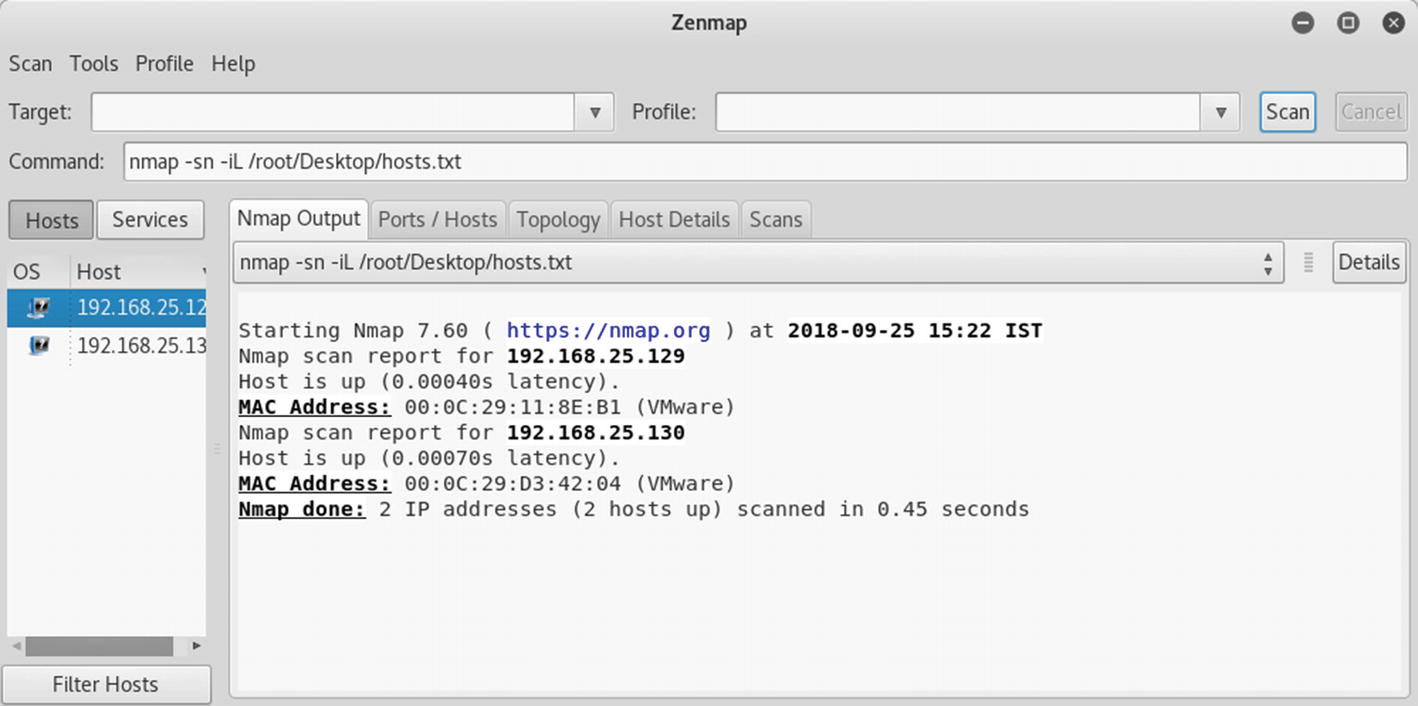
Now you can simply feed the hosts.txt file to NMAP and perform the scan, as shown in Figure 1-7.
Figure 1-7
Output of basic NMAP scan done on multiple IP addresses listed in hosts.txt file
Reason Scan
Here’s the command:
nmap --reason<target IP address>
In a normal NMAP scan, you might get a list of open ports; however, you will not know the reason why NMAP reported a particular port as open. The NMAP reason scan is an interesting option where NMAP provides a reason for every port reported as open, as shown in Figure 1-8. NMAP scans are based on the TCP flags that are set in the request and response. In this case, the open ports were detected based on the SYN and ACK flags set in TCP packets.
Figure 1-8
Output of reason NMAP scan done on a single IP address
Supported Protocols
Here’s the command:
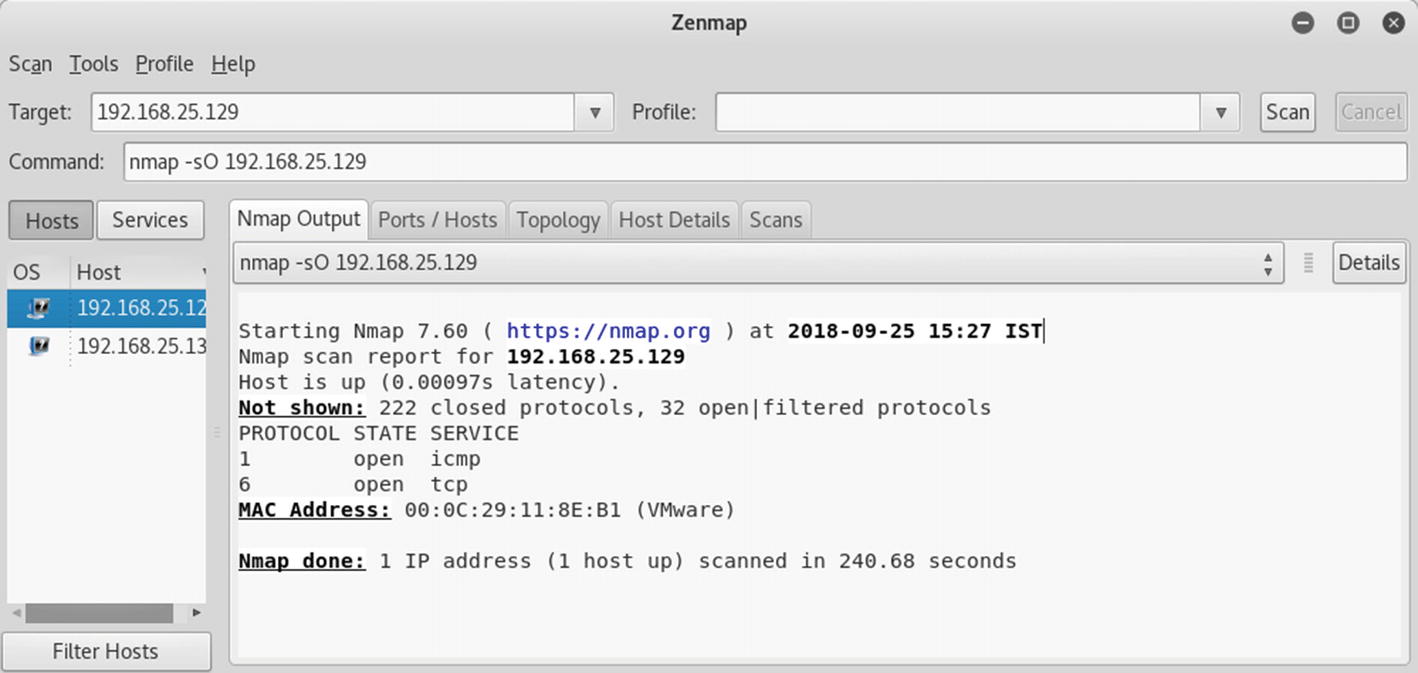
nmap -sO<target IP address>
As part of information gathering and reconnaissance, it may be worthwhile to know what IP protocols are supported by the target. Figure 1-9 shows that this target is supporting two protocols: TCP and ICMP.
Figure 1-9
Output of NMAP protocol scan done on a single IP address
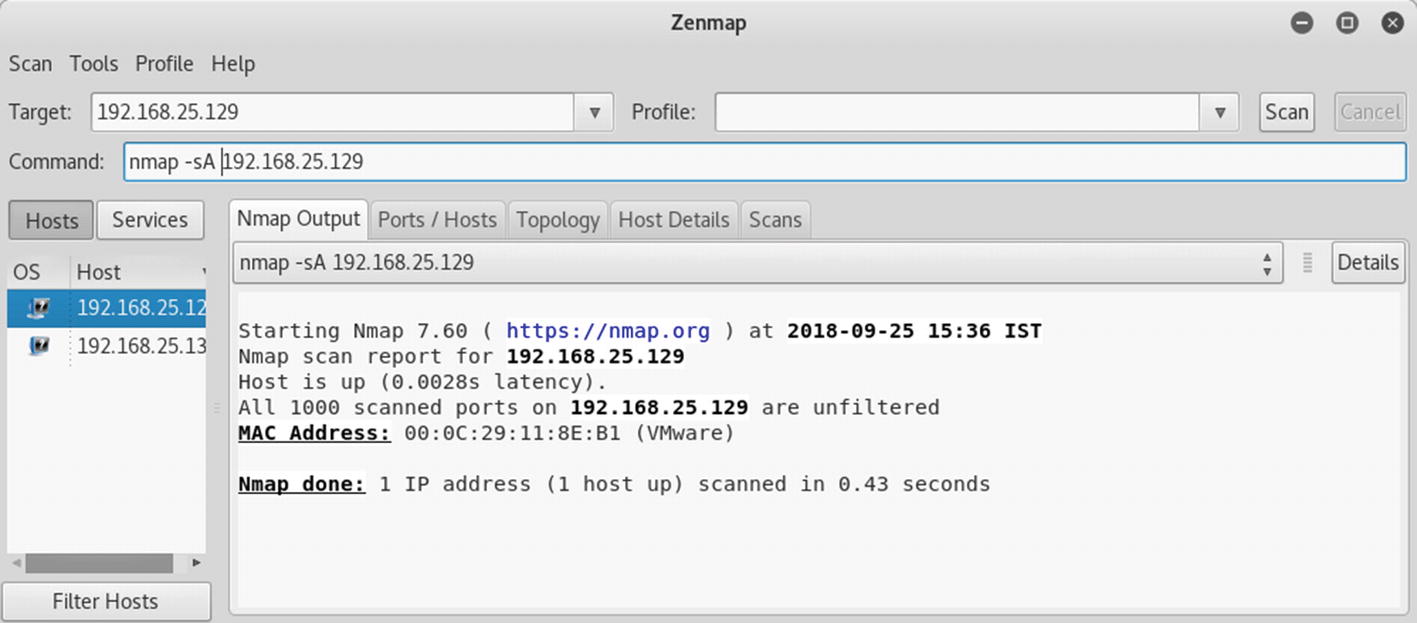
Firewall Probe
In an enterprise network full of firewalls, intrusion detection systems, and intrusion prevention systems, it is quite possible that your NMAP scans will not only be detected but also be blocked. NMAP offers a way to probe whether its scans are getting filtered by any intermediate device like a firewall. Figure 1-10 shows that all 1,000 ports that NMAP scanned were unfiltered; hence, there wasn’t the presence of any filtering device.
Figure 1-10
Output of NMAP firewall probe done against a single IP address
Topology
ZENMAP has an interesting feature that helps you visualize the network topology. Say you did a ping scan on the subnet and found a few hosts alive. Figure 1-11 shows the network topology diagram for the hosts that you found alive. The diagram can be accessed using the Topology tab within the ZENMAP interface.
Figure 1-11
Host topology diagram in ZENMAP
Quick TCP Scan
Here’s the command:
nmap -T4 -F<target IP address>
Now that you have list of hosts that are alive within the subnet, you can perform some detailed scans to find out the ports and services running on them. You can set the target IP address, select Quick Scan as the profile, and then execute the scan. Figure 1-12 shows the output of a scan highlighting several ports open on the target.
Figure 1-12
Output of quick TCP NMAP scan done on a single IP address
Service Enumeration
Here’s the command:
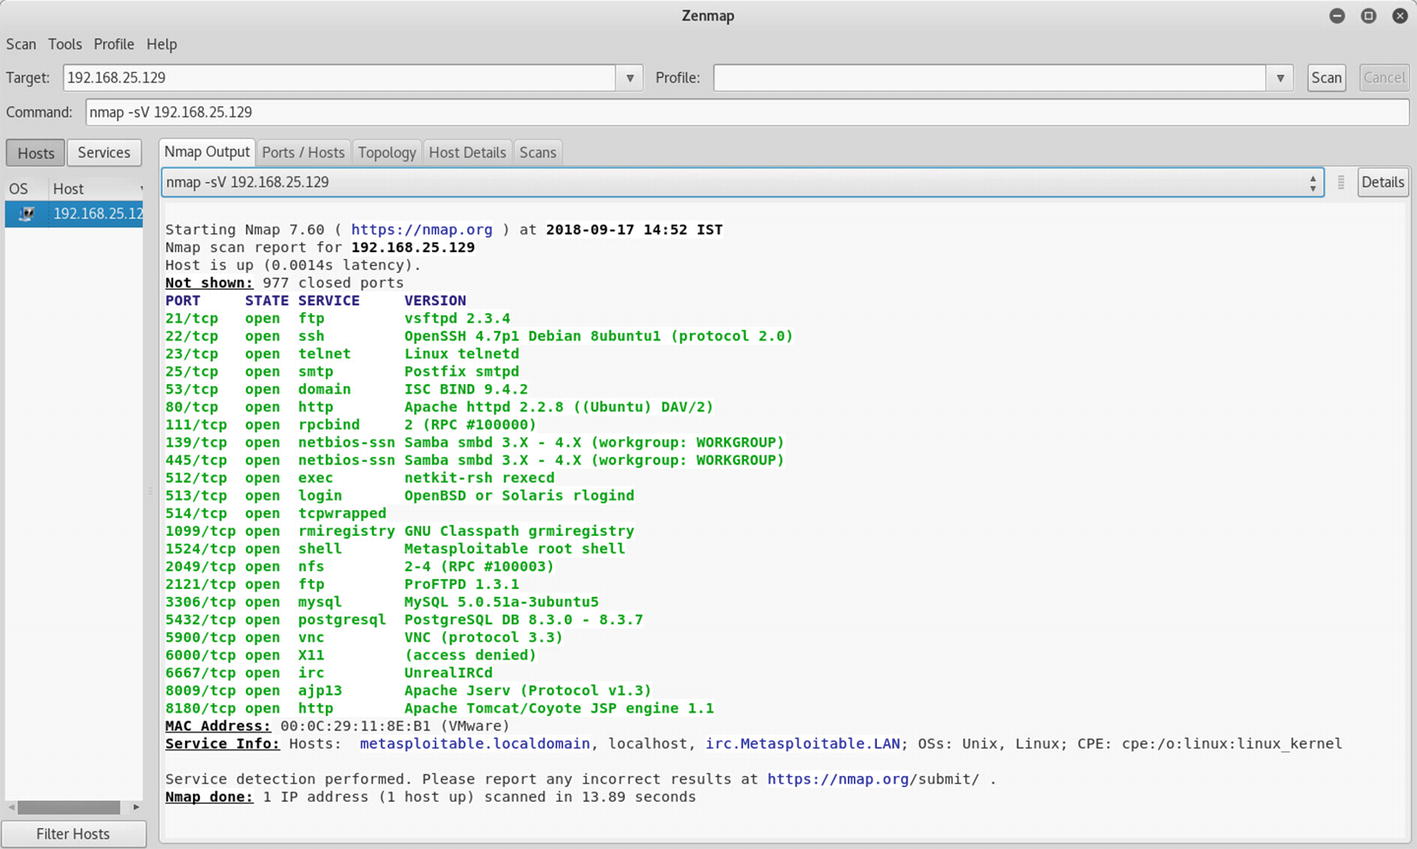
nmap -sV<target IP address>
Now that you have a live host and you also know which ports are open, it’s time to enumerate the services associated with those ports. For example, you can see that port 21 is open. Now you need to know which service is associated with it and what is the exact version of the server catering the service. You can use the command nmap -sV <target IP address>, as shown in Figure 1-13. The -sV switch stands for the service version. Enumerating services and their versions provides a wealth of information that can be used to build further attacks.
Figure 1-13
Output of NMAP service scan done on a single IP address
UDP Port Scan
Here’s the command:
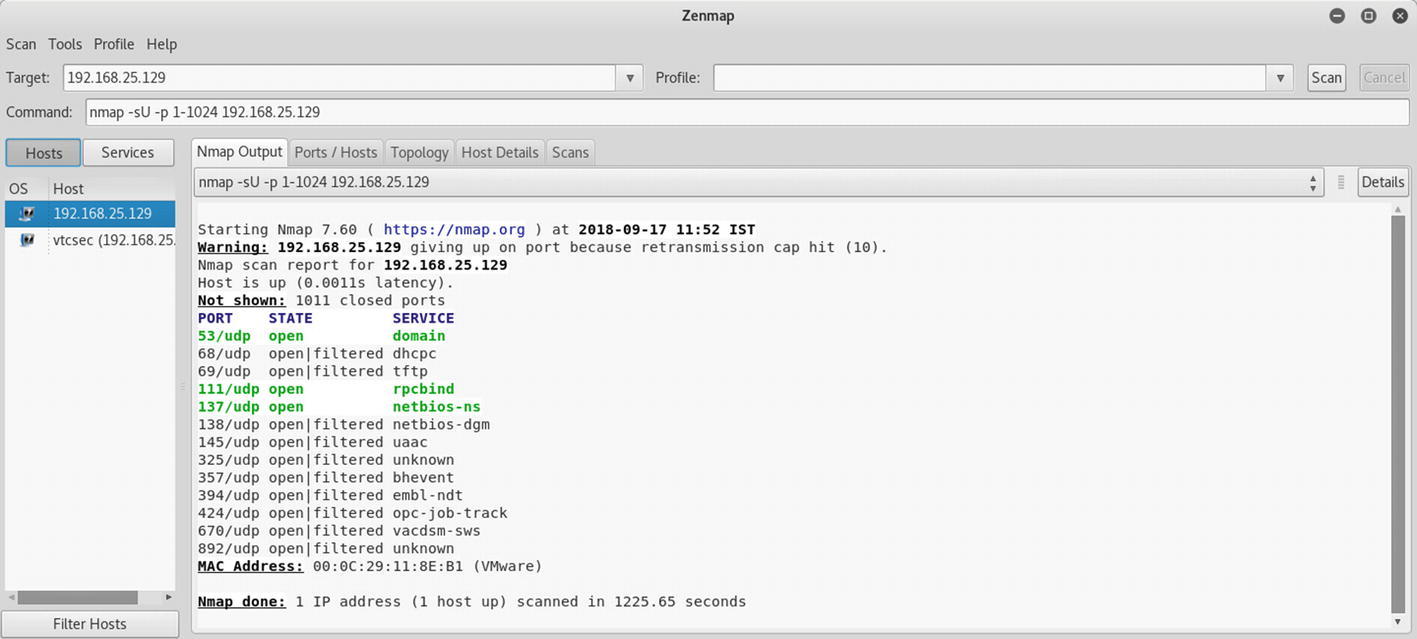
nmap -sU -p 1-1024<target IP address>
All the scans that you did so far gave you information only about TCP ports. However, the target may also have services running on UDP ports. A default NMAP scan probes only TCP ports. You need to exclusively scan for UDP ports and services. To scan common UDP ports, you can use the command nmap -sU -p 1-1024 <target IP address>. The -sU parameter will tell the NMAP engine to specifically scan UDP ports, while the -p 1-1024 parameter will limit the NMAP to scan only ports in the range 1 to 1024. It is also important to note that the UDP port scan takes a significantly longer time than a normal TCP scan. Figure 1-14 shows the output of a sample UDP scan.
Figure 1-14
Output of basic NMAP UDP scan done on a single IP address
OS Detection
Here’s the command:
nmap -O<target IP address>
Now that you know how to probe for open ports and enumerate services, you can go further and use NMAP to detect the operating system version that the target is running on. You can use the command nmap -O <target IP address>. Figure 1-15 shows the output of an NMAP operating system detection probe. You can see that the target is running Linux based on kernel 2.6.X.
Figure 1-15
Output of NMAP OS detection scan done on a single IP address
Intense Scan
Here’s the command:
nmap -T4 -A -v <target IP address>
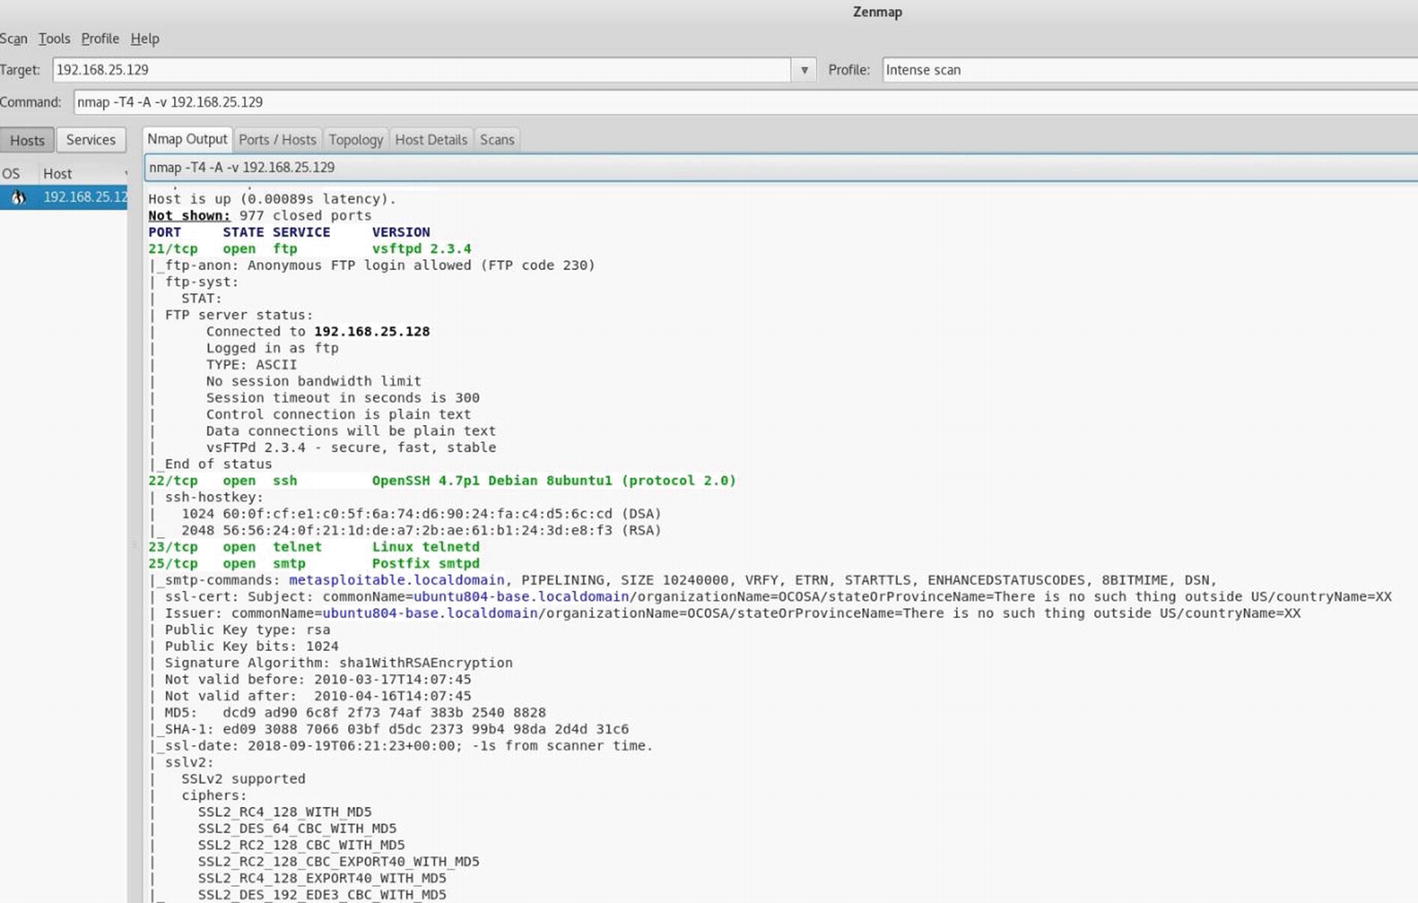
So far, you have used NMAP for performing individual tasks such as port scanning, service enumeration, and OS detection. However, it is possible to perform all these tasks with a single command. You can simply set your target IP address and select the intense scan profile. NMAP will do a TCP port scan, enumerate services, and in addition run some advanced scripts to give more useful results. For example, Figure 1-16 shows the output of an NMAP intense scan that not only enumerated an FTP server but also highlighted that it has Anonymous FTP access enabled.
Figure 1-16
Output of intense NMAP scan done on a single IP address
NMAP Scripts
NMAP has long evolved from a basic port scanner. It is way more powerful and flexible than just a port scanner. NMAP’s functionality can be extended using NMAP scripts. The NMAP scripting engine is capable of executing scripts allowing in-depth target enumeration and information gathering. NMAP has about 600 scripts serving different purposes. In Kali Linux, the scripts can be found at /usr/share/nmap/scripts. The next section will discuss how you can use NMAP scripts for enumerating various TCP services.
HTTP Enumeration
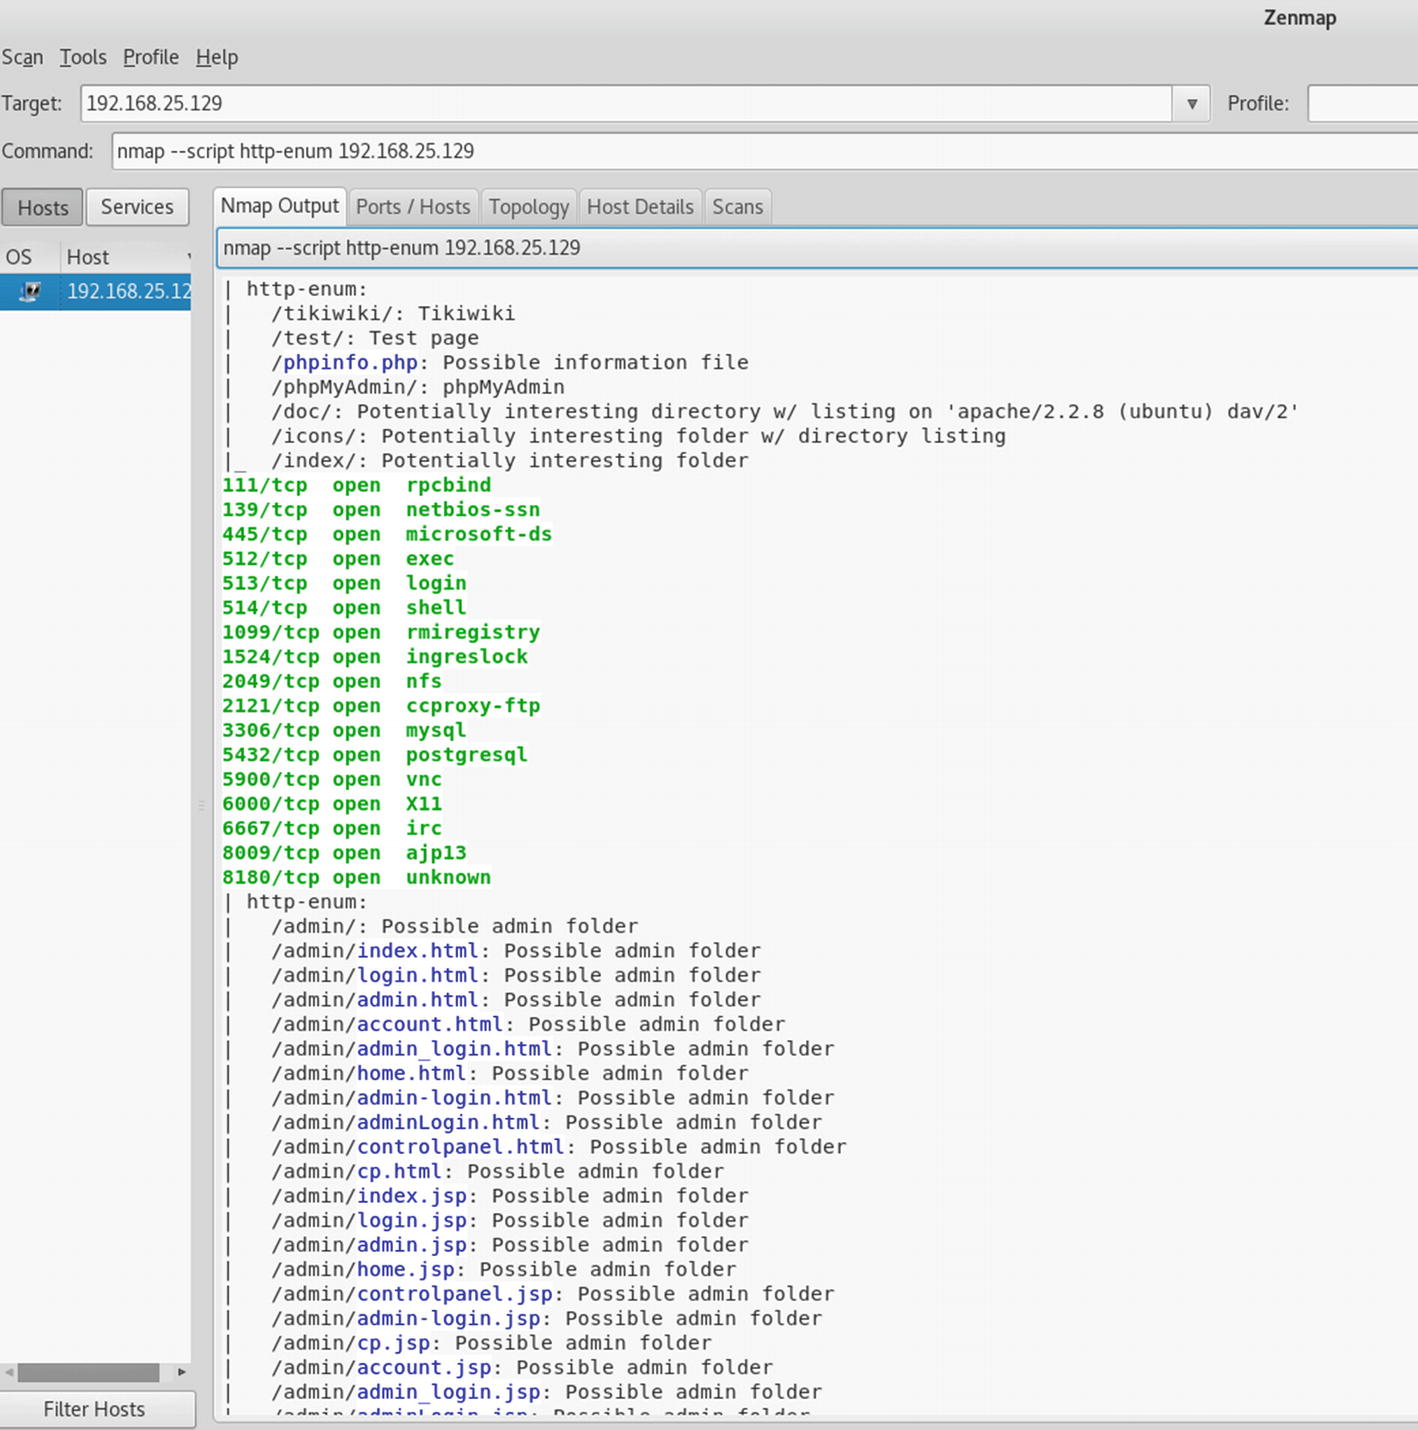
HTTP is a common service found on many hosts. It runs on port 80 by default. NMAP has a script for enumerating HTTP services. It can be invoked using the command nmap –script http-enum <target IP address>. Figure 1-17 shows the output of the http-enum script. It shows various interesting directories hosted on the web server that may be useful in building further attacks.
Figure 1-17
Output of NMAP script http-enum executed against target IP address
HTTP Methods
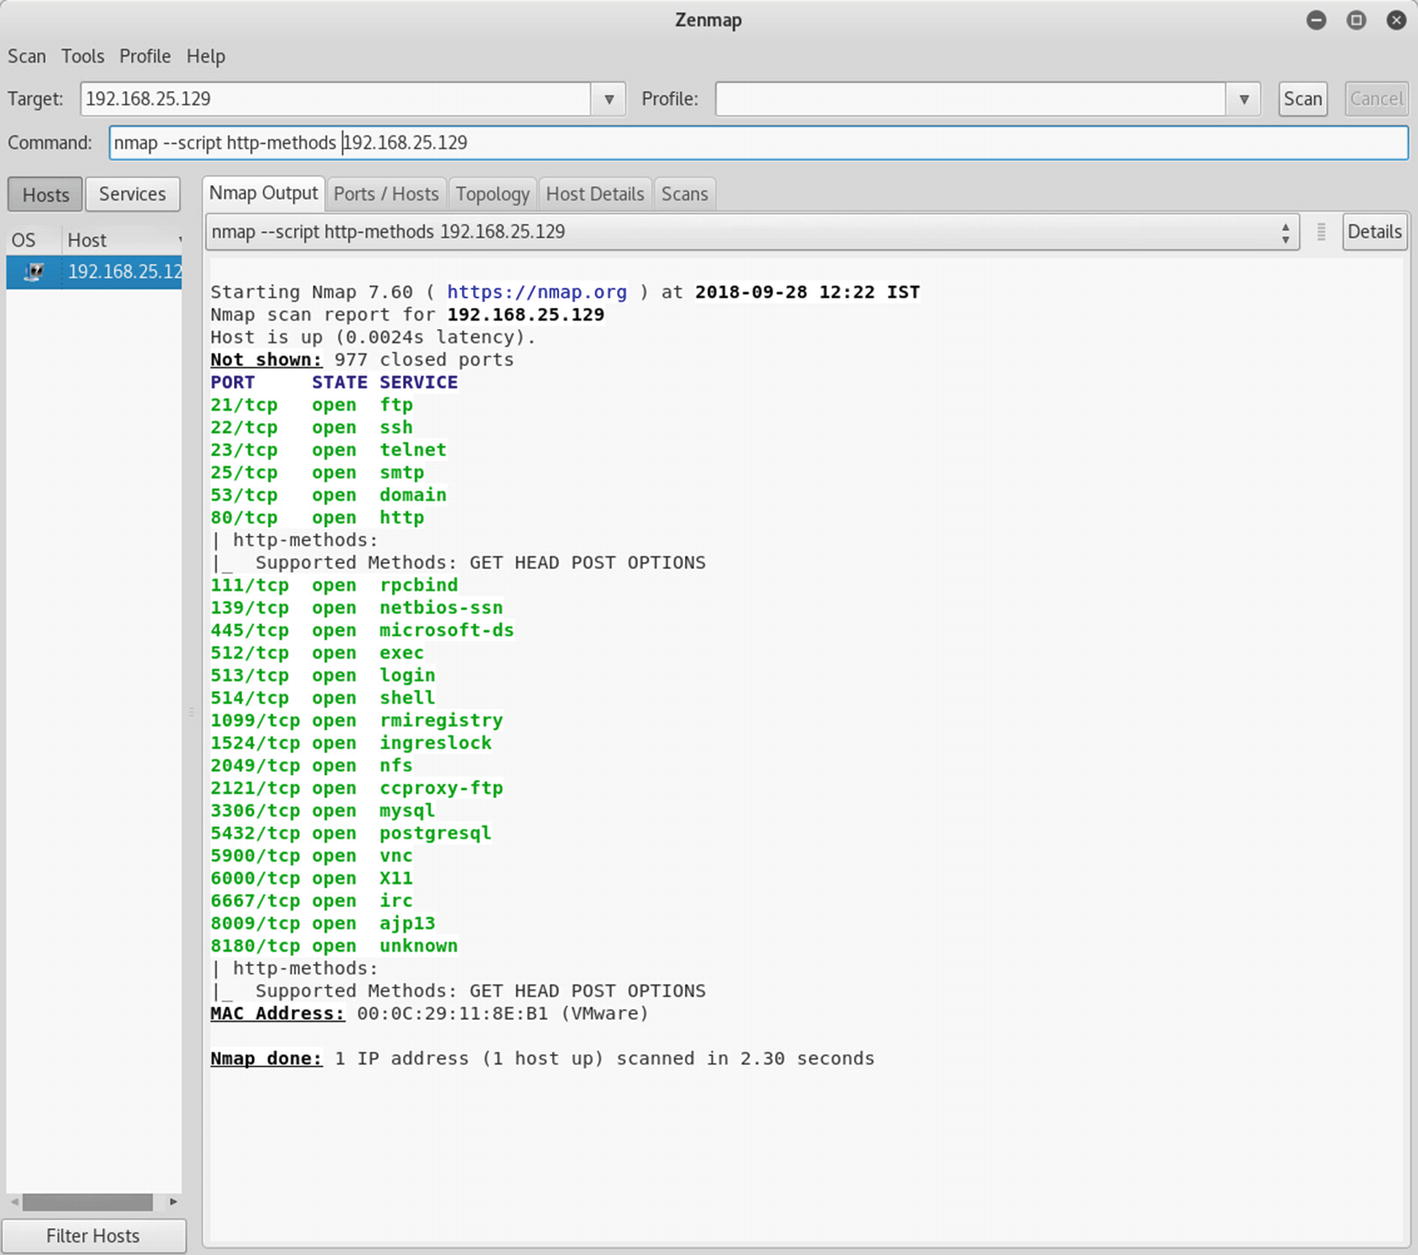
HTTP supports the use of various methods such as GET, POST, DELETE, and so on. Sometimes these methods are left open on the web server unnecessarily. you can use the NMAP script http-methods, as shown in Figure 1-18, to enumerate HTTP methods allowed on the target system.
Figure 1-18
Output of NMAP script http-methods executed against a target IP address
The following are some additional NMAP scripts for HTTP enumeration:
http-title
http-method-tamper
http-trace
http-fetch
http-wordpress-enum
http-devframework
http NSE Library
SMB Enumeration
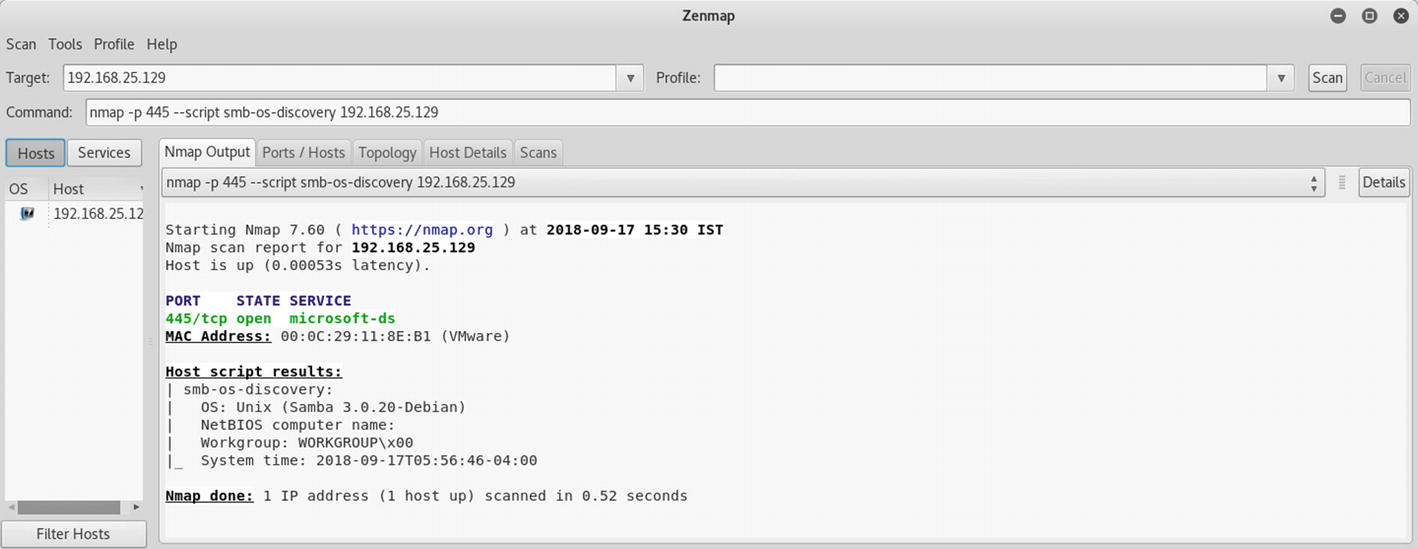
Server Message Block (SMB) is a protocol extensively used for network file sharing. SMB commonly runs on port 445. So, if you find a target with port 445 open, you further enumerate it using NMAP scripts. you can invoke the SMB enumeration by using the command nmap -p 445 –script-smb-os-discovery <target IP address>. The -p 445 parameter triggers the script to run against port 445 on the target. The script output shown in Figure 1-19 will give you the exact SMB version, the OS used, and the NetBIOS name.
Figure 1-19
Output of NMAP script smb-os-discovery executed against a target IP address
Another useful NMAP script is smb-enum-shares, as shown in Figure 1-20. It lists all the SMB shares on the target system.
Figure 1-20
Output of NMAP script smb-enum-shares executed against target IP address
The following are some additional NMAP scripts for SMB enumeration:
smb-vuln-ms17-010
smb-protocols
smb-mbenum
smb-enum-users
smb-enum-processes
smb-enum-services
DNS Enumeration
The Domain Name System is indeed the backbone of the Internet as it does the crucial job of translating host names to IP addresses and vice versa. It runs on port 53 by default. Enumerating a DNS server can give a lot of interesting and useful information. NMAP has several scripts for enumerating a DNS service. Figure 1-21 shows a DNS server enumeration revealing its version details.
Figure 1-21
Output of DNS enumeration executed against a target IP address
The following are some additional NMAP scripts for DNS enumeration:
dns-cache-snoop
dns-service-discovery
dns-recursion
dns-brute
dns-zone-transfer
dns-nsid
dns-nsec-enum
dns-fuzz
dns-srv-enum
FTP Enumeration
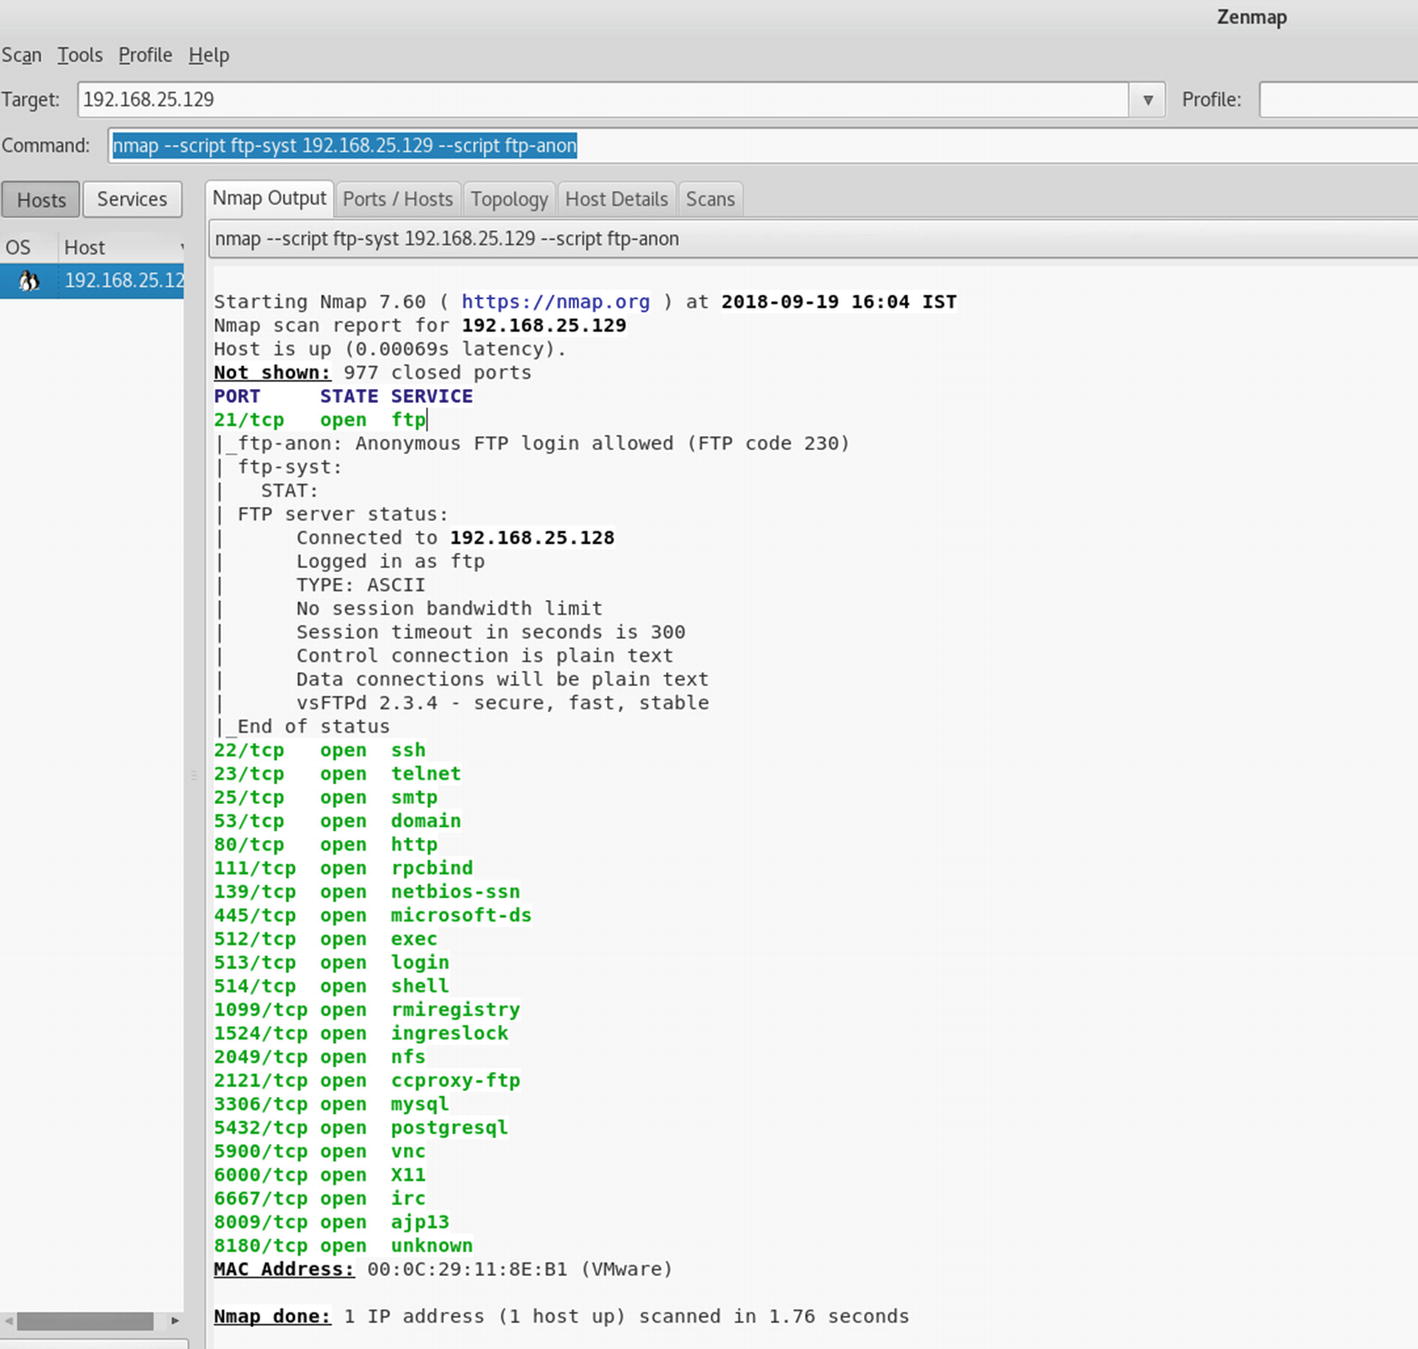
File Transfer Protocol (FTP) is the most commonly used protocol for transferring files between systems. It runs on port 21 by default. NMAP has multiple scripts for enumerating FTP service. Figure 1-22 shows the output of two scripts.
ftp-syst
ftp-anon
The output shows the FTP server version details and reveals that the server is accepting anonymous connections.
Figure 1-22
Output of NMAP scripts ftp-syst and ftp-anon executed against a target IP address
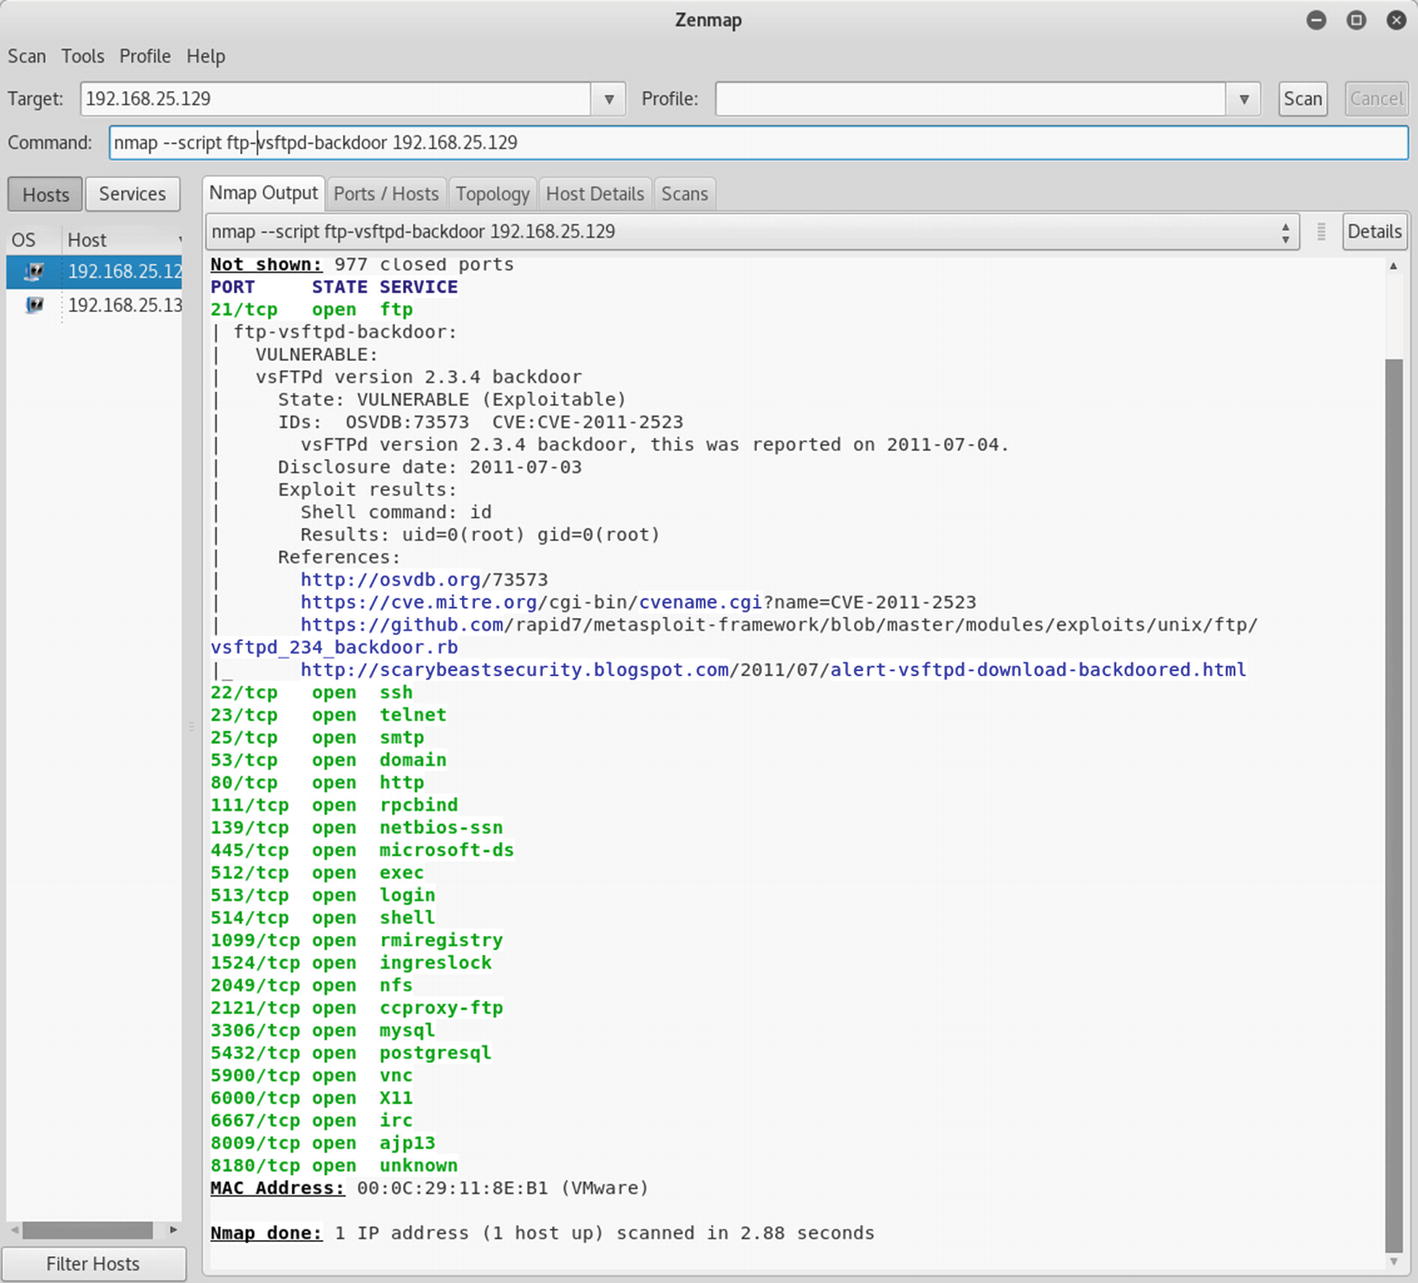
Since the target is running the vsftpd server, you can try another NMAP script, which will check whether the FTP server is vulnerable. The script ftp-vsftpd-backdoor can be used, as shown in Figure 1-23.
Figure 1-23
Output of NMAP script ftp-vsftpd-backdoor executed against a target IP address
The result shows that the FTP server is vulnerable; you’ll learn how to exploit it later in this book.
The following are some additional NMAP scripts for FTP enumeration:
ftp-brute
ftp NSE
ftp-bounce
ftp-vuln-cve2010-4221
ftp-libopie
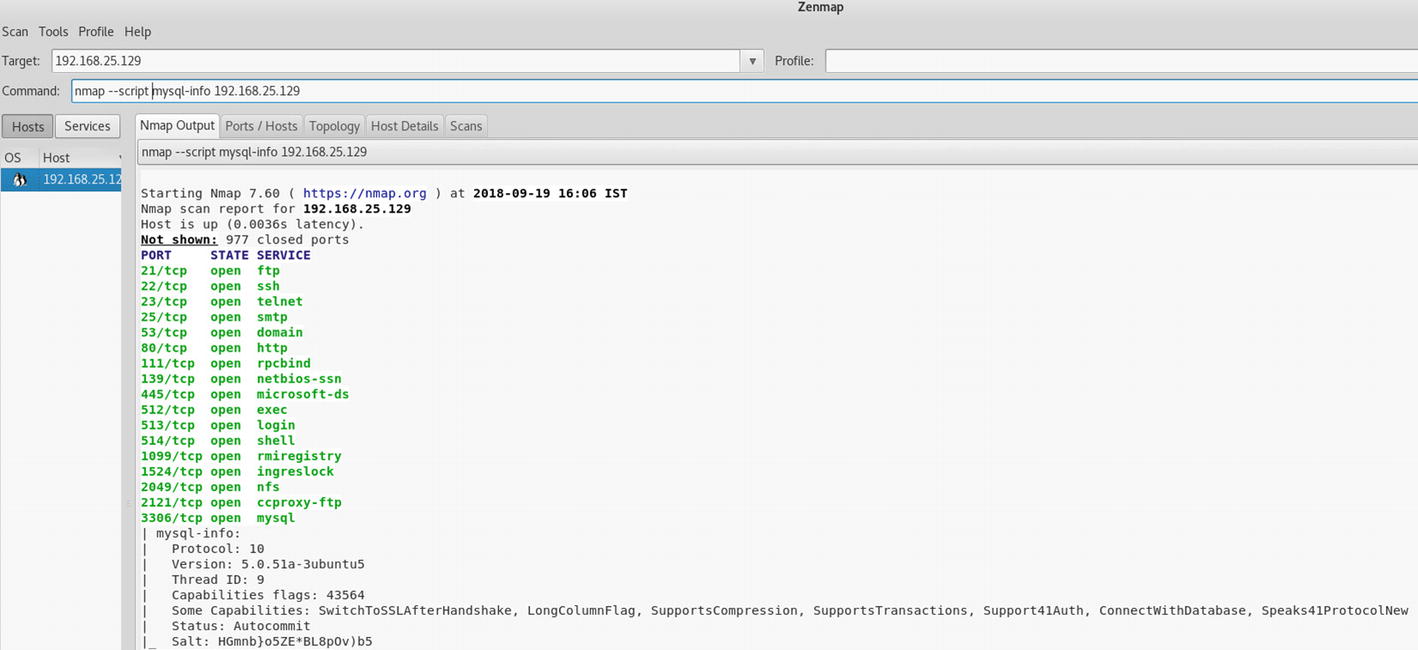
MySQL Enumeration
MySQL is one of the most popular open source relational database management systems. It runs on port 3306 by default. NMAP has scripts for enumerating the MySQL service. Enumerating a MySQL service can reveal a lot of potential information that could be further used to attack the target database. Figure 1-24 shows the output of the mysql-info script. It shows the protocol version details, server capabilities, and the salt value in use.
Figure 1-24
Output of NMAP script mysql-info executed against a target IP address
The following are some additional NMAP scripts for MySQL enumeration:
mysql-databases
mysql-enum
mysql-brute
mysql-query
mysql-empty-password
mysql-vuln-cve2012-2122
mysql-users
mysql-variables
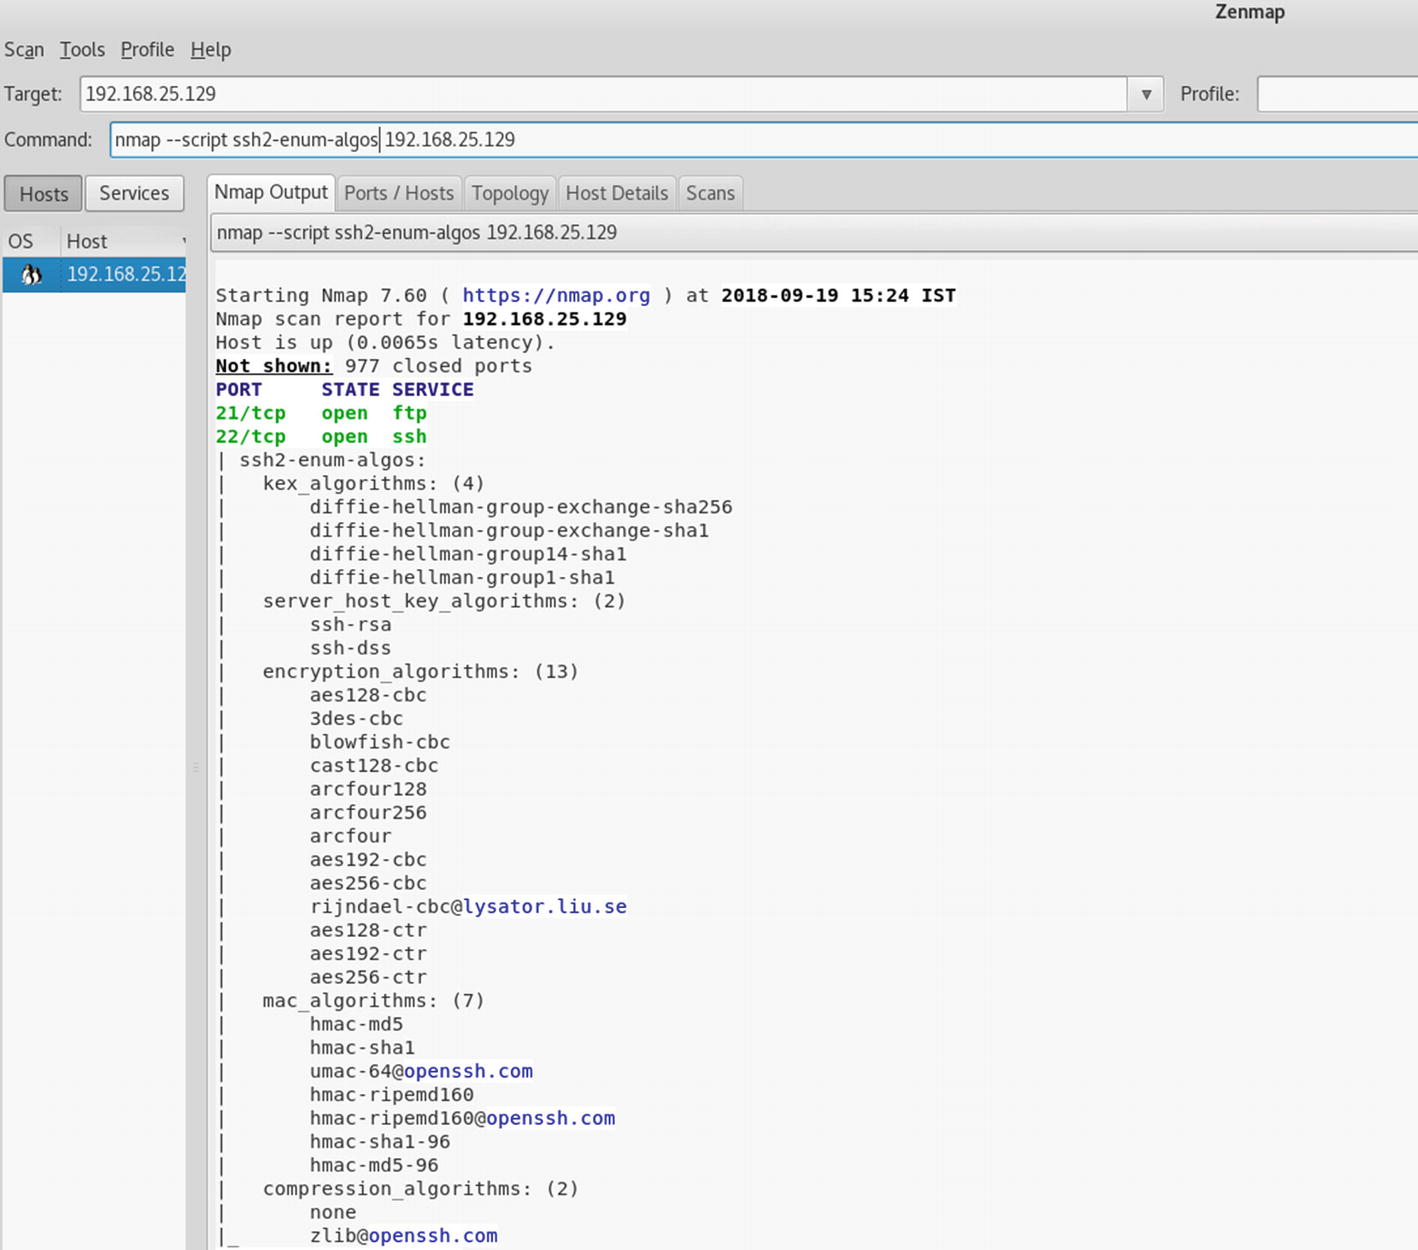
SSH Enumeration
The Secure Shell (SSH) protocol is widely used for secure remote logins and administration. Unlike Telnet, SSH encrypts the traffic, making the communication secure. It runs on port 22 by default. NMAP has scripts for enumerating the SSH service. Figure 1-25 shows output of the ssh2-enum-algos script. It lists the different encryption algorithms supported by the target SSH server.
Figure 1-25
Output of NMAP script ssh2-enum-algos executed against a target IP address
The following are some additional NMAP scripts for SSH enumeration:
ssh-brute
ssh-auth-methods
ssh-run
ssh-hostkey
sshv1
ssh-publickey-acceptance
SMTP Enumeration
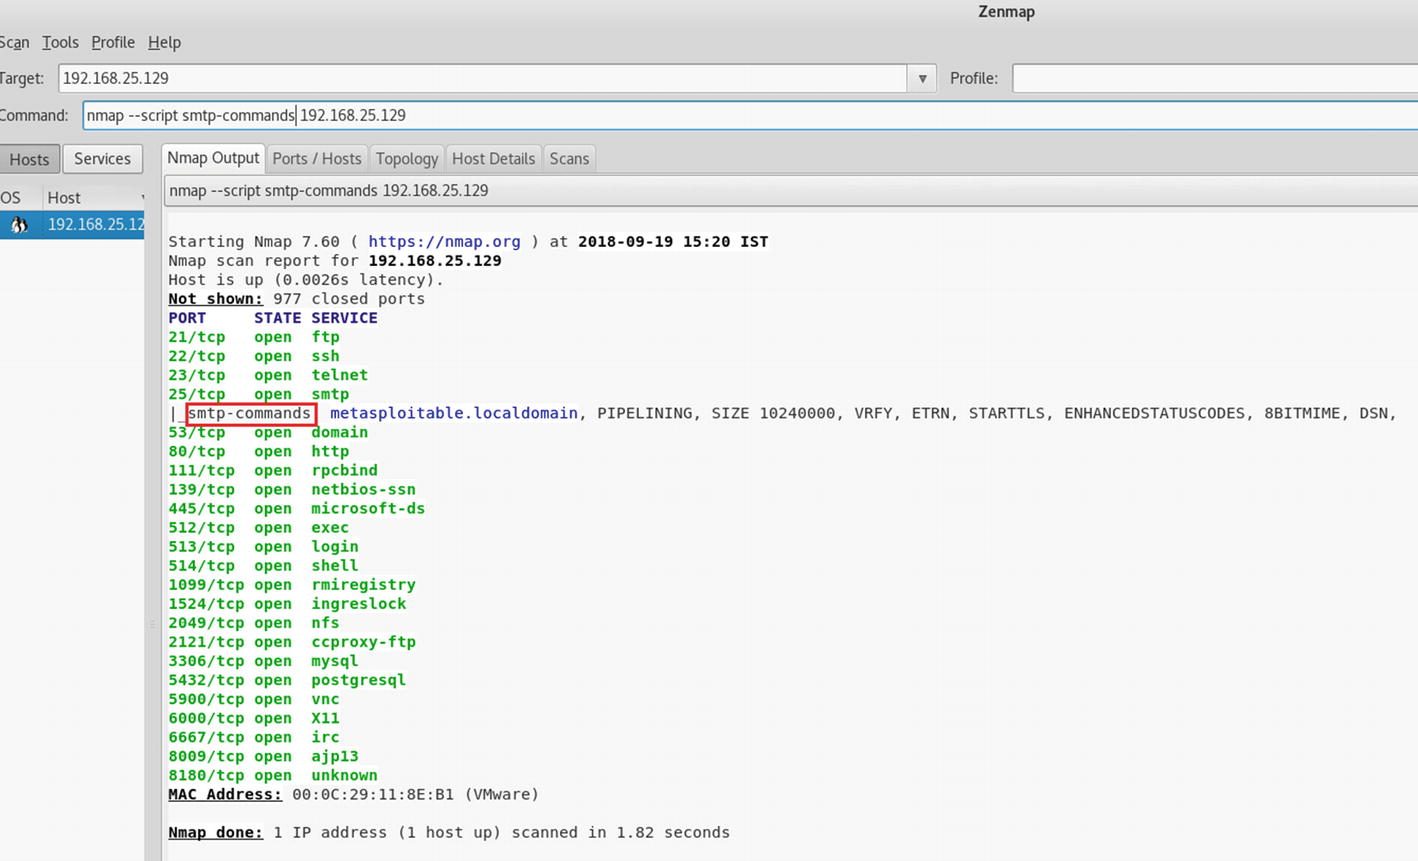
Simple Mail Transfer Protocol (SMTP) is used for the transmission of electronic mail. It runs on port 25 by default. NMAP has several scripts for enumerating the SMTP service. These NMAP scripts could reveal several weaknesses in the SMTP server such as open relays, acceptance of arbitrary commands, and so on. Figure 1-26 shows output of the smtp-commands script. It lists various commands that the target SMTP server is accepting.
Figure 1-26
Output of NMAP script smtp-commands executed against a target IP address
Many SMTP servers mistakenly enable open relay. This allows anyone to connect to the SMTP server without authentication and to send mails. This is indeed a critical flaw. NMAP has a script called smtp-open-relay that checks whether the target SMTP server allows for open relays, as shown in Figure 1-27.
Figure 1-27
Output of NMAP script smtp-open-relay executed against a target IP address
The following are some additional NMAP scripts for SMTP enumeration:
smtp-enum-users
smtp-commands
smtp-brute
smtp-ntlm-info
smtp-strangeport
smtp-vuln-cve2011-1764
VNC Enumeration
The Virtual Network Computing (VNC) protocol is commonly used for remote graphical desktop sharing. It runs on port 5900 by default. NMAP has several scripts for enumerating the VNC service. Figure 1-28 shows the output of the vnc-info script. It shows the protocol version details along with the authentication type.
Figure 1-28
Output of NMAP script vnc-info executed against a target IP address
The following are some additional NMAP scripts for VNC enumeration:
vnc-brute
realvnc-auth-bypass
vnc-title
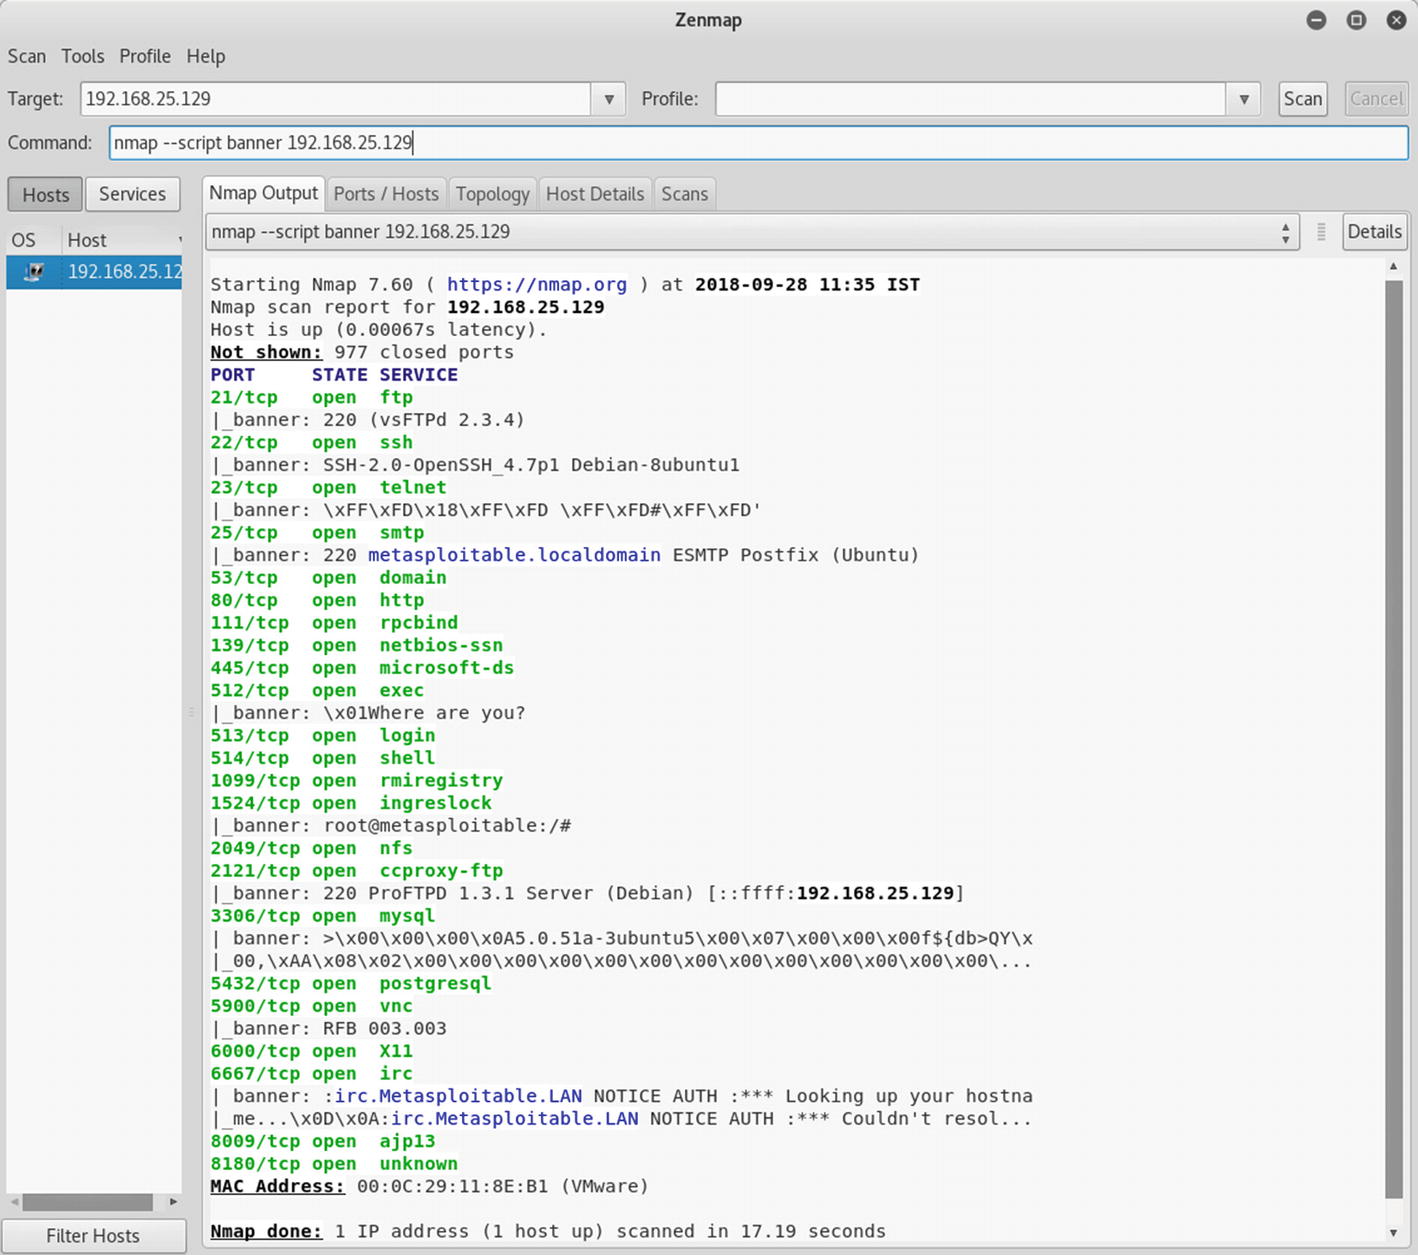
Service Banner Grabbing
Any service running on a system usually has a banner associated with it. A banner normally contains server version information and may even contain organization-specific information such as disclaimers, warnings, or some corporate e-mail addresses. It is certainly worthwhile to grab service banners to get more information about the target. The NMAP script banner probes all services running on the target and grabs their banners, as shown in Figure 1-29.
Figure 1-29
Output of NMAP script banner executed against a target IP address
Detecting Vulnerabilities
So far, you have seen the NMAP capabilities of port scanning and enumeration. Now you’ll see how NMAP can be used for conducting vulnerability assessments. Though not as comprehensive as vulnerability scanners like Nessus and OpenVAS, NMAP can certainly do basic vulnerability detection. NMAP does this with the help of Common Vulnerabilities and Exposure (CVE) IDs. It searches for matching CVEs against the services running on the target. To turn NMAP into a vulnerability scanner, you first need to download and install some additional scripts. Figure 1-30 shows the installation of required scripts. You first navigate to directory /usr/share/nmap/scripts and then clone two git directories, as shown here:
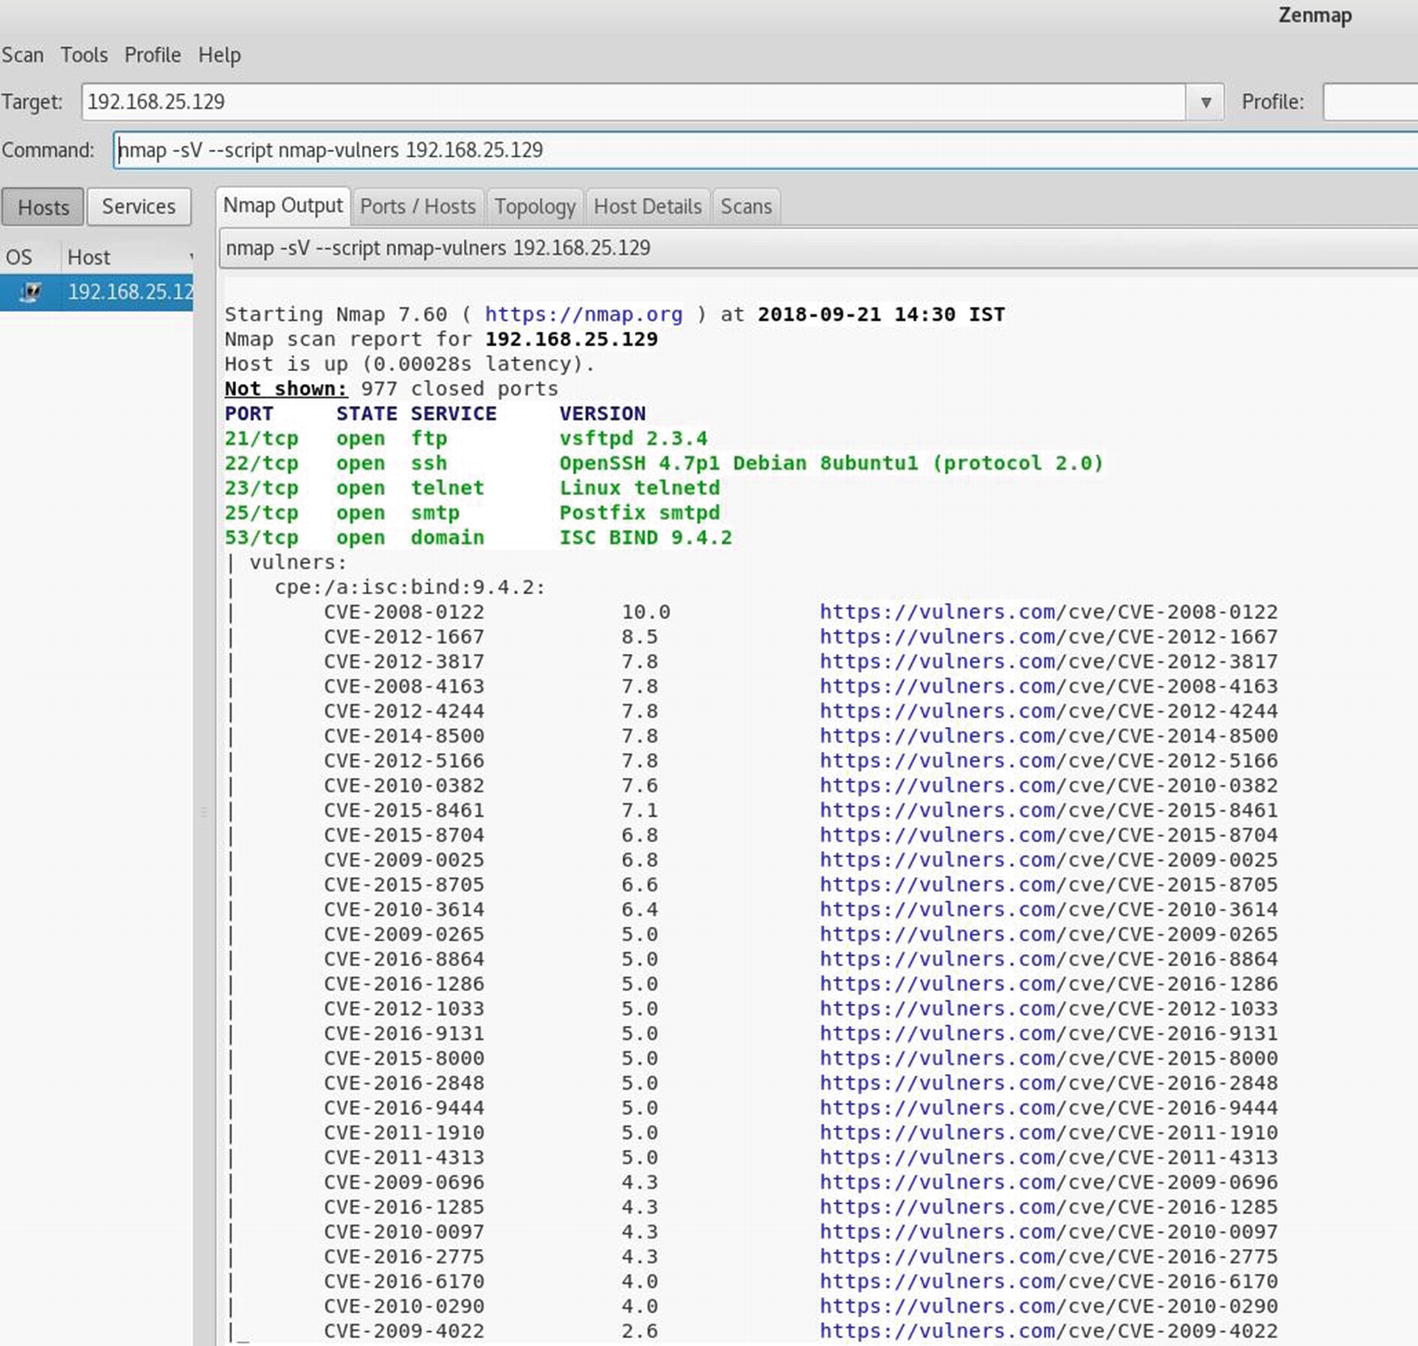
Once you have downloaded the required scripts, you are all set to execute them against the target. You can use the command nmap -sV –script nmap-vulners <target IP address>, as shown in Figure 1-31.
Figure 1-31
Output of NMAP script nmap-vulners executed against a target IP address
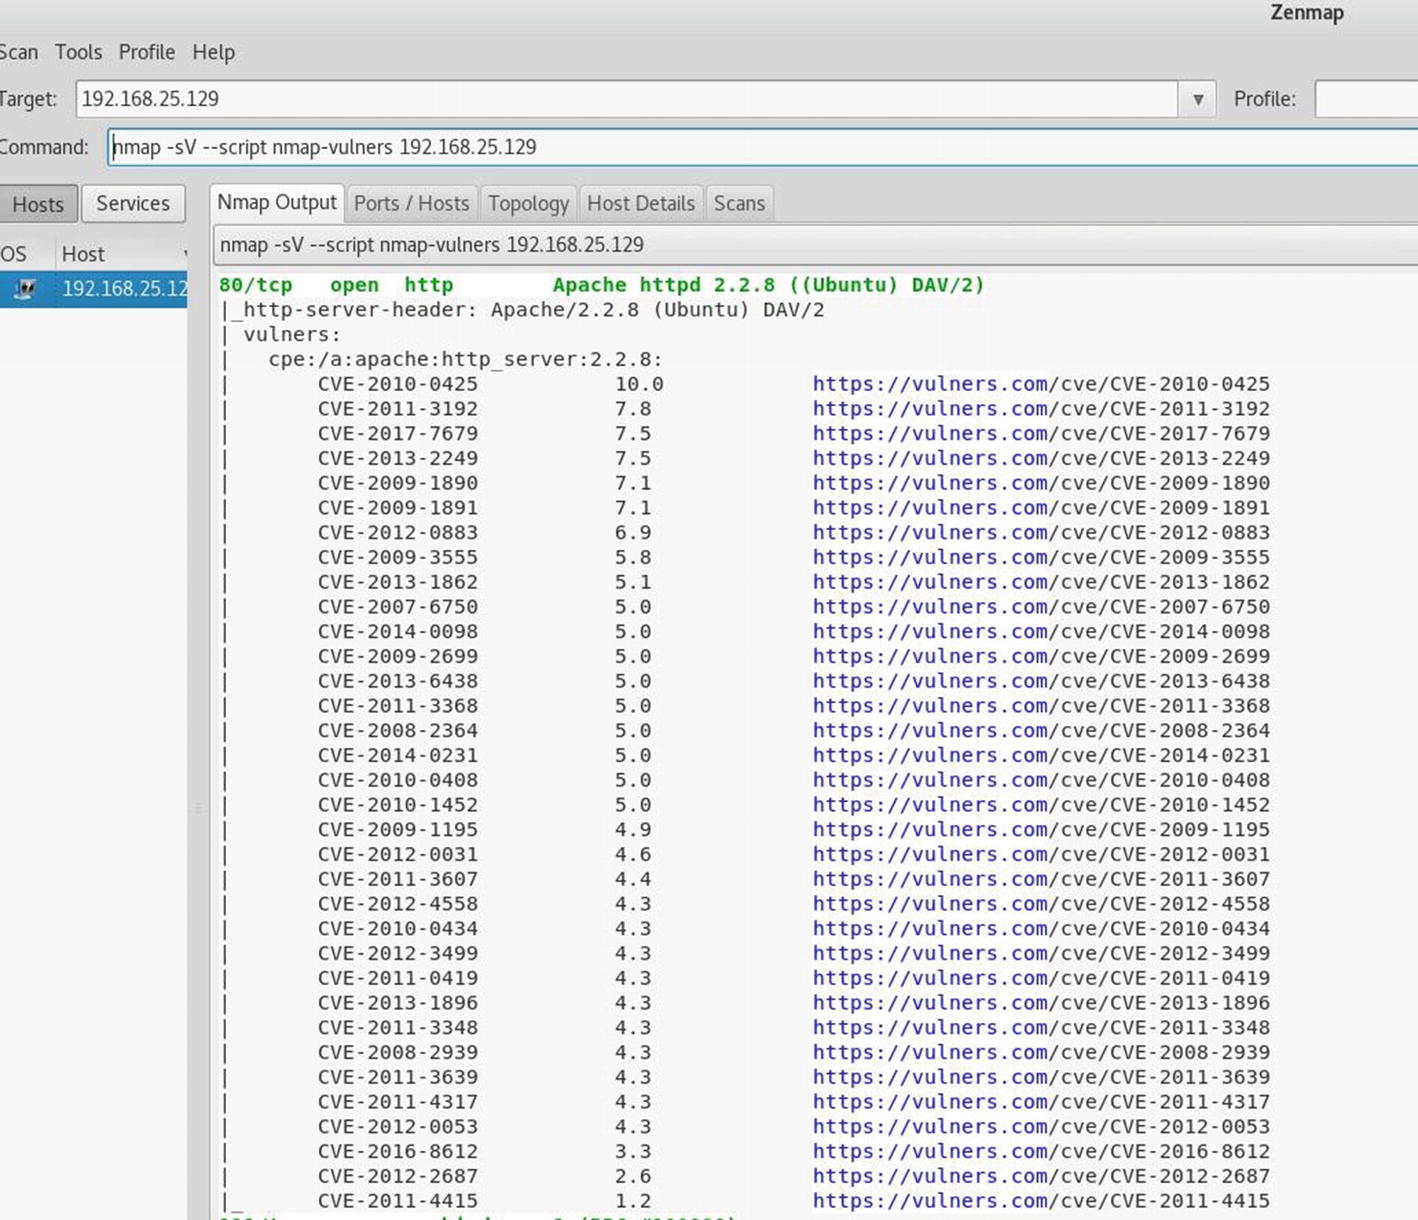
Interestingly, you can see many CVEs are available against the ISC BIND 9.4.2 running on TCP port 53. This CVE information can be used to further exploit the target. You can also see several CVEs for TCP port 80 running the Apache httpd 2.2.8 server, as shown in Figure 1-32.
Figure 1-32
Output of NMAP script nmap-vulners executed against a target IP address
NMAP Output
So far, you have scanned various useful NMAP features. It is important to note that the output produced by NMAP can be fed to many other security tools and products. Hence, you must be aware of different output formats that NMAP is capable of producing, shown here:
Switch
Example
Description
-oN
nmap 192.168.25.129 -oN output.txt
Performs a scan on a target IP address and then writes normal output to the file output.txt
-oX
nmap 192.168.25.129 -oX output.xml
Performs a scan on a target IP address and then writes normal output to the XML file output.xml
-oG
nmap 192.168.25.129 -oG output.grep
Performs a scan on a target IP address and then writes greppable output to the file output.grep
--append-output
nmap 192.168.25.129 -oN file.file --append-output
Performs a scan on a target IP address and then appends the scan output to a previous scan file
NMAP and Python
Throughout this chapter you have seen numerous capabilities of NMAP and how NMAP can be used effectively for information gathering, enumeration, and active scanning. NMAP can also be invoked and executed from various programming languages, making it even more powerful. Python is an interpreted high-level programming language for general-purpose programming. Python is indeed user-friendly and extremely flexible. It has a rich set of ready-to-use libraries for performing various tasks. Getting into the details of Python language basics and syntax is beyond the scope for this book. Assuming you have some basic knowledge about Python, this section will discuss how you can use Python to invoke and automate NMAP scans.
Python is installed by default on most Unix-based systems. However, you need to install the NMAP library separately. On Debian-based systems, you can simply use the command pip install python-nmap, as shown in Figure 1-33. The command will install the required NMAP library.
Figure 1-33
Installing the python-nmap library on a Debian-based system
Now that you have installed the required NMAP library, start the Python interpreter from the terminal by typing the python command, and import the NMAP library, as shown here:
root@kali:~# python
Python 2.7.14+ (default, Dec 5 2017, 15:17:02)
[GCC 7.2.0] on linux2
Type "help", "copyright", "credits" or "license" for more information.
>>> import nmap
>>>
You can now create a new object named nmp to invoke the PortScanner function. Then initiate a new scan for the target IP address 127.0.0.1 and the ports from 1 to 50, as shown here:
>>> nmp = nmap.PortScanner()
>>> nmp.scan('127.0.0.1', '1-50')
The scan completes and gives you the following output:
Though the previous output is raw, it can certainly be formatted using many of the Python functions. Once you have run the initial scan, you can explore different functions to retrieve specific scan details.
scaninfo()
The scaninfo() function returns scan details such as the method used and the port range probed.
>>> nmp.scaninfo()
{'tcp': {'services': '1-1024', 'method': 'syn'}}
all_hosts()
The all_hosts() function returns the list of all IP addresses scanned.
>>> nmp.all_hosts()
['192.168.25.129']
state()
The state() function returns the state of the IP/host scanned, such as whether it’s up or down.
>>> nmp['192.168.25.129'].state()
'up'
keys()
The keys() function returns a list of all open ports found during the scan.
The has_tcp() function checks whether a particular port was found open during the scan on the target IP address.
>>> nmp['192.168.25.129'].has_tcp(22)
True
command_line()
The command_line() function returns the exact NMAP command that ran in the background to produce the output.
>>> nmp.command_line()
'nmap -oX - -p 1-50 -sV 127.0.0.1'
hostname()
The hostname() function returns the host name of the IP address that you pass as an argument.
>>> nmp['127.0.0.1'].hostname()
'localhost'
all_protocols()
The all_protocols function returns the list of protocols supported by the target IP address.
>>> nmp['127.0.0.1'].all_protocols()
['tcp']
Now that you know the basic functions to invoke NMAP from Python, you can write some simple Python code that uses a loop to scan multiple IP addresses. Then you can use various text processing functions to clean and format the output.
Summary
In this chapter, you learned about the concepts of vulnerability assessment and penetration testing. You now understand the different phases of the penetration testing lifecycle and the importance of NMAP, OpenVAS, and Metasploit, which are capable of performing most of the tasks across all phases of the penetration testing lifecycle.
This chapter briefed you on the absolute basics and essentials about the NMAP tool and gave insights into how the NMAP capabilities can be extended using scripts. The chapter also touch on integrating NMAP with Python scripting.
Do-It-Yourself (DIY) Exercises
Install NMAP on Windows and Ubuntu.
Perform a UDP scan on a target system using the NMAP command line.
Use NMAP to detect the operating system on the target system.
Use an NMAP intense scan on a target system.
Use various NMAP scripts for enumerating services on a target system.
Write some Python code that scans 1 to 500 ports on a target system.